


You can’t describe the mixed experience of seeing chicks grow into a full-sized hen. They are quick learners, and easily understands their boundaries.
But first few weeks are critical and chicks can’t regulate their own body temperature. As they are vulnerable to drafts and predators, you as a chicken grower need to provide a safe and controlled environment with a brooder box.
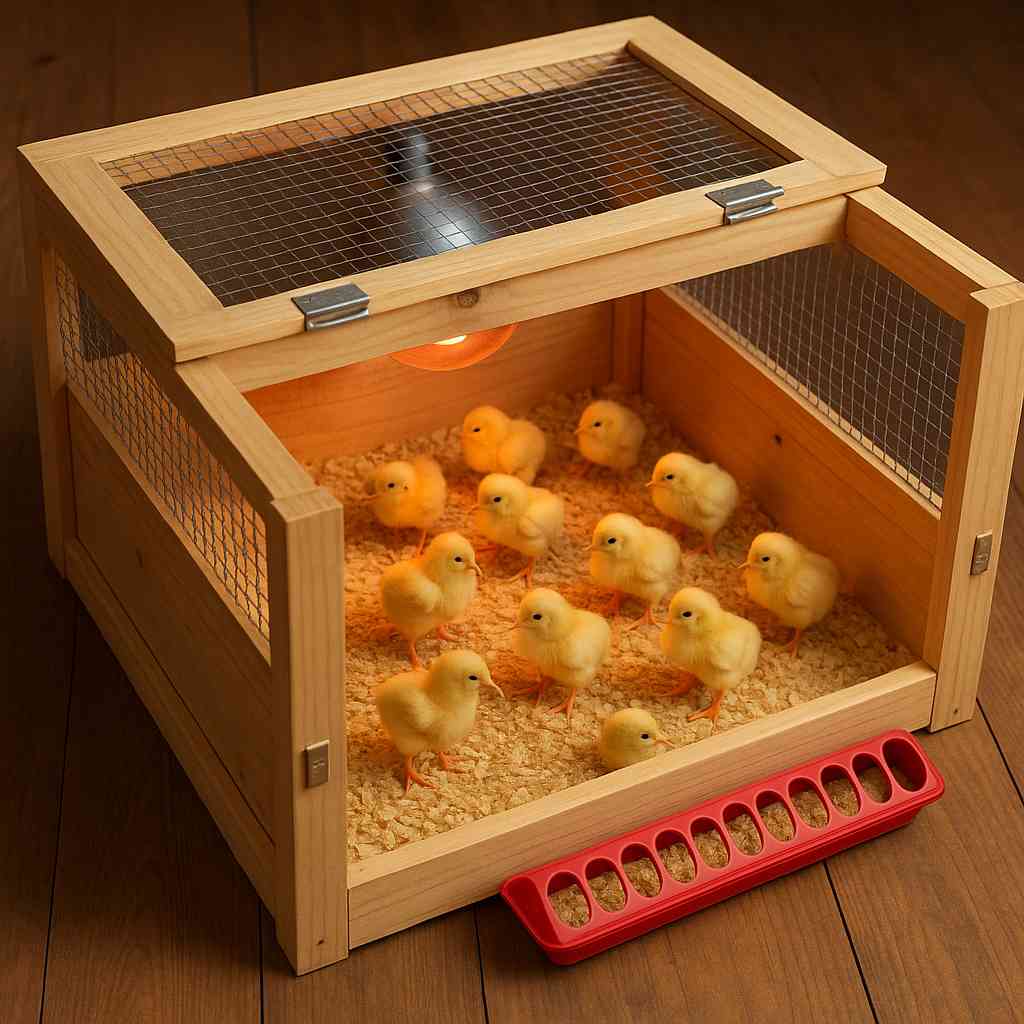
A brooder box is essentially a nursery for chicks. It keeps them warm, dry, and secure until they’re feathered out and ready to move into the coop.
You don’t need to spend hundreds of dollars on a pre-made brooder—building one yourself is simple, cost-effective, and customizable.
In this guide, we’ll cover everything you need to know: why brooders matter, what materials to use, step-by-step instructions for building one, and how to set it up for happy, healthy chicks.
Why Do You Need a Brooder Box?

A brooder box is the perfect setup for chicks because it gives them the right temperature they need to survive and thrive. Since young chicks can’t regulate their own body heat, the box provides consistent warmth, helping them grow strong during those critical early weeks.
It also shields them from drafts, which can be dangerous for little birds. Even a slight chill can make them weak or sick, so having an enclosed, draft-free space is essential.
Safety is another big reason. A brooder keeps chicks protected from curious pets, pests, and other dangers that could harm them when they’re most vulnerable.
Cleanliness is easier to maintain too. With controlled bedding, food, and water areas, you can manage hygiene better, reducing the risk of disease and keeping the environment fresh.
How to Build a Wooden Brooder Box for Chicks?

Building a wooden brooder box for chicks is an essential project for anyone raising poultry, providing a safe, warm environment where day-old chicks can grow and develop during their most vulnerable first weeks of life.
A well-constructed brooder box serves as a protective nursery that maintains proper temperature, ventilation, and security while being accessible for daily care and cleaning.
What Size Brooder for 20 Chicks?
For 20 chicks, you’ll need enough room for them to move freely without overcrowding. A good rule is ½ square foot per chick for the first couple of weeks. That means around 10 square feet of floor space for 20 chicks.
As they grow, they’ll need more room, so plan to upgrade or expand after 4–6 weeks.
A box around 4 feet by 2.5 feet works well in the beginning, with tall enough sides (at least 18 inches) to keep them from jumping out.
Check this: How to Build a Chicken Coop for 20 Chickens?
Materials Needed:
Wood and Framework:
- One sheet of 3/4-inch plywood or OSB board (4×8 feet)
- Several pieces of 2×2 inch or 2×3 inch lumber for framing
- Wood screws (1¼ to 2½ inches long)
- Wood glue (optional for added strength)
Hardware and Ventilation:
- 1/2-inch hardware cloth for ventilation panels
- Hinges and latches for the lid
- Staple gun and heavy-duty staples
- Small handle for easy lid access
Tools Required:
- Circular saw or hand saw
- Drill with bits
- Screwdriver
- Measuring tape
- Pencil for marking
- Sandpaper for smoothing edges
Optional Additions:
- Small furniture wheels/casters for mobility
- Chain or rope for securing the lid
- Corner brackets for extra reinforcement
How to Set Up and Build the Brooder Box?
Step 1: Plan and Cut Your Materials
Start by measuring and marking all your cuts on the plywood. You’ll need:
- Floor: 36″ x 24″
- Two long sides: 36″ x 24″ (height)
- Two short ends: 24″ x 24″ (height)
- Lid: 36″ x 24″
Next, cut your 2×2 lumber. Make four posts (24″ each) for the corners, plus two 36″ and two 24″ pieces for the base frame. Having everything cut and ready before you start makes assembly much easier.
Step 2: Build the Base Frame
Use the 2×2 pieces to build a simple rectangular frame. Connect the corners with screws and double-check that the frame is square by measuring diagonally—both sides should be the same. This base keeps the box sturdy and lifts it slightly off the ground, which helps with insulation.
Step 3: Construct the Box
Attach the plywood floor to the base frame with screws spaced about 6–8 inches apart. Then, stand the four corner posts upright and secure them. These posts will hold the walls and lid in place.
Once they’re solid, screw on the side panels—first the short ends, then the long sides. Make sure everything is lined up square and tight. A bit of wood glue at the joints can add extra strength.
Step 4: Add Ventilation
Chicks need fresh air, so cut hardware cloth to cover part of the lid and a section near the top of one long side. Aim for about 25–30% of wall space as ventilation.
Staple the mesh securely, and cover the sharp edges with thin wood strips so the chicks don’t get hurt. This setup allows airflow but still keeps the brooder safe from drafts and predators.
Step 5: Install the Lid
Attach the lid with 2–3 hinges along one long side. You can keep it as a single piece or split it into two sections for easier access.
Add a latch or lock so the lid stays shut, and a handle for quick opening. If you want to prevent strain on the hinges, attach a small chain or rope so the lid doesn’t swing open too far.
Step 6: Interior Setup and Safety
Line the floor with 2–3 inches of bedding such as pine shavings, straw, or wood chips. Avoid cedar—it’s harmful to chicks.
The bedding should be soft, absorbent, and easy to replace. It also gives the chicks good footing to prevent leg issues. Once the bedding is in, place your feeder, waterer, and heating source, and your brooder is ready to go.
Alternative Brooder Options
While a wooden brooder box is a sturdy and long-lasting choice, you don’t always have to build one from scratch. There are plenty of other options that can work just as well, depending on your budget, space, and how long you plan to keep chicks inside.
One simple option is a large plastic storage bin. These are lightweight, easy to clean, and affordable. Just make sure to drill some ventilation holes near the top or replace part of the lid with wire mesh for airflow.
Another popular choice is a cardboard box. It’s cheap, disposable, and works well for the first couple of weeks. However, it won’t last long—chicks grow fast, and cardboard can get soggy and unhygienic, so it’s best as a short-term solution.
For bigger flocks, some people use kiddie pools or livestock water troughs. These give chicks lots of space to move around, and with a wire cover on top, they’re very secure.
If you prefer something quick and reusable, a dog crate or rabbit hutch lined with bedding also works. Just cover any wide gaps with mesh so chicks can’t slip through.
The key is to choose something safe, warm, and easy to clean. No matter what you use, always make sure it offers enough space, good ventilation, and protection from drafts and predators.
How Big Should Brooder be for 20 chicks?
For 20 chicks, the brooder should give them enough room to move comfortably without being overcrowded. A good rule of thumb is:
- First 1–2 weeks: About ½ square foot per chick → around 10 square feet total. A box that’s roughly 4 feet by 2.5 feet will work well at this stage.
- By 3–6 weeks: They’ll need closer to 1 square foot per chick → at least 20 square feet total. Something like 5 feet by 4 feet will give them the space they need as they grow.
Also, make sure the sides are at least 18–24 inches tall, since chicks get more adventurous as they age and may try to hop out.
A good plan is to start with a manageable size and then either expand the brooder or transfer them to a larger pen once they feather out.
Conclusion
A good brooder box can mean the difference between thriving chicks and heartbreak. Luckily, you don’t need an expensive setup—just some plywood, hardware cloth, and basic tools.
With warmth, space, safety, and cleanliness in place, raising chicks becomes a joy, and your future hens will have started in the brooder you built yourself.

Khaja Moinuddin, a computer science graduate, finds joy in gardening and homesteading. Join him on this blog as he shares his experiences in homesteading, gardening, and composting