


After looking at the benefits of having a greenhouse, I honestly feel every gardener should have at least a small one set-up somewhere in the backyard.
Beyond simply stretching the growing season, a greenhouse opens the door to plants you’d normally only admire in catalogs. Warm-loving or exotic varieties suddenly become possible, even if your local weather isn’t exactly friendly.
With a controlled environment and protection from harsh winds, heavy rain, and many common pests, your plants get the comfort they need to thrive.
Growth tends to be faster, problems are easier to manage, and you spend more time enjoying your garden instead of fighting it.
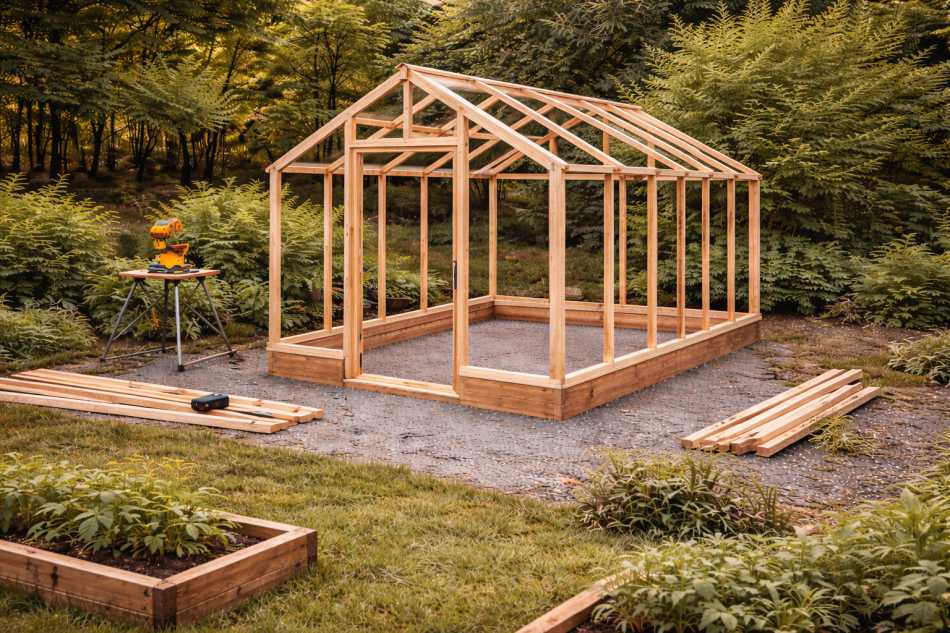
Why Choose Wood to Build a Greenhouse?
I’ll be honest — wood just feels right in a garden. It looks warm, natural, and fits in with raised beds, fences, and all the other backyard projects most of us already have going on. Nothing fancy or industrial, just simple and inviting.
What I really love is how forgiving it is to work with. Measure, cut, screw it together, step back, adjust… no drama. And if you change your mind later (because we gardeners always do), modifying a wooden frame is way easier than reworking metal.
Wood is also plenty strong for a backyard greenhouse. Brace it well, anchor it properly, and it’ll stand up to wind and weather just fine. If a board ever rots or cracks years down the line, you replace that one piece and move on.
Best part? You don’t need pro-level skills or expensive tools. If you can handle basic DIY jobs, you can build this. That makes the whole greenhouse dream feel a lot more doable.
Also Read: 9 Tips for Growing Vegetables in a Greenhouse
Importance of Choosing the Right Spot
Here’s something many first-time builders (me included) tend to underestimate — location can make or break your greenhouse.
Light is usually the biggest factor. During cooler months especially, every extra hour of sunshine helps warm the space naturally and keeps seedlings happy.
You must spend a day noticing where shadows fall before you commit.
Convenience matters too. A greenhouse you can reach easily is one you’ll actually enjoy using. When it’s nearby, watering, venting, and quick check-ins become part of your routine instead of another task on the list.
Keep these key points in mind when picking your spot:
- Choose the sunniest area available, particularly for winter light.
- Avoid shade from trees, buildings, or tall fences.
- Look for well-drained ground so water doesn’t pool around the base.
- Try to place it near a water source (and electricity if you plan upgrades).
- Consider protection from strong winds if your yard is exposed.
A little extra thought here pays off for years. Once the greenhouse is up, moving it is a whole different story.
Plan Your Wood Frame Greenhouse Size and Layout
Before you start cutting lumber, take a moment to picture how you’ll use the space. A little planning now prevents big regrets later.
- Overall footprint: Work with the yard space you have. Remember, bigger also means more watering, heating, and upkeep.
- Height of the structure: More headroom improves airflow and lets you grow taller plants comfortably.
- Bed vs. walkway space: Don’t forget room for yourself. You should be able to move around without squeezing past everything.
- Door placement and width: Wider is better when you’re hauling trays, tools, or soil.
- Roof style: A sloped or peaked roof handles rain well and allows space for vents.
- Future expansion: If you think you’ll outgrow it, plan a side that can extend later.
Smart layout choices make daily greenhouse life much easier.
Materials & Tools You’ll Need
Before the build begins, gather everything in one place. Having supplies ready keeps the project moving and saves endless trips to the hardware store.
Materials
- Pressure-treated lumber for the base
- Framing lumber for walls and roof
- Greenhouse covering (poly film or panels)
- Exterior screws or nails
- Door hinges and latch
- Vent hardware
- Weatherproof sealant or tape
Tools
- Tape measure
- Saw (circular or hand saw)
- Drill/driver
- Level
- Hammer
- Ladder
Step-by-Step Wood Frame Greenhouse Build Guide
This is where the fun really begins. Don’t rush it. Take each step one at a time and focus on getting things square and solid — the rest comes together much easier that way.
Step 1 – Prepare and Level the Ground

Start by marking the footprint using stakes and string. This gives you a clear visual of the size and helps you spot problems before building.
Remove grass and roots, then level the area. If your soil is soft or stays wet, add a few inches of gravel. A firm, level base is critical — if this is off, everything above it will be harder.
Take your time here and double-check your work. Walk the area, tamp it down, and recheck with a level. An extra half hour spent now can save hours of frustration later when walls refuse to line up.
Step 2 – Build the Base Frame
Think of this as the foundation your entire greenhouse will sit on. Use pressure-treated lumber since it touches the ground and deals with moisture.
Screw the boards together into a rectangle and check that it’s square by measuring diagonally from corner to corner. Anchor it with stakes or rebar so wind can’t shift it later.
Before moving on, step back and make sure the base sits flat everywhere. If you notice gaps or rocking, fix them now — the rest of the structure depends on this being stable.
Step 3 – Construct the Wall Frames
Build the walls on the ground first — it’s faster and easier. Frame them much like a simple shed wall, adding vertical studs for strength and places to attach the covering.
Once built, lift each wall into position and secure it to the base. A helper makes this part smoother, but temporary braces can hold things steady if you’re solo.
As you raise them, keep checking for plumb (perfectly vertical). Small adjustments are easy now, but once the roof goes on, they become much harder.
Step 4 – Add the Roof Structure
The roof brings everything together and adds rigidity. Install rafters or trusses depending on your design, keeping spacing consistent.
Make sure the peak is straight and the frame feels sturdy before moving on. A solid roof structure means fewer headaches once the covering goes up.
This is also a good moment to think ahead about hanging baskets or shade cloth. Adding a little extra support now is far easier than retrofitting later.
Step 5 – Install the Door and Vents
Fresh air is just as important as sunlight. Frame your door opening, then build or hang the door so it swings freely without rubbing.
Add at least one vent — roof vents release heat best. Even a simple hinged panel can dramatically improve temperature control.
Open and close everything a few times to test the movement. You want smooth operation, because you’ll be using these daily once plants are inside.
Check this: 12 DIY Greenhouse PVC Plans to Build on a Budget
Step 6 – Attach the Greenhouse Covering
Choose your material: poly film for budget builds or rigid panels for durability. Pull coverings tight to prevent flapping and wear.
Staples, battens, or manufacturer fasteners will hold everything in place. Take your time here — neat work pays off in longevity.
Work on a calm day if possible. Wind can turn a simple job into a wrestling match faster than you’d expect.
Step 7 – Seal, Secure, and Weatherproof
Walk around the structure and look for gaps, loose edges, or weak spots. Seal where needed to keep heat in and drafts out.
Give the frame a final shake test. If it feels solid, you’re ready to move plants in and start growing.
It’s also worth protecting the wood with paint or sealant if you haven’t already. A little protection can add years to the life of your greenhouse.
Building a greenhouse might look intimidating at first, but when you break it into clear steps like this, it becomes totally manageable. One board at a time — and suddenly you’ve built something amazing.
Also Read: How to Grow Strawberries in Greenhouse?
Mistakes to Avoid While Building a Wood Frame Greenhouse
No matter how excited you are to start, a few small missteps can turn into big headaches later.
Most greenhouse regrets come from rushing or skipping the boring prep work.
- Ignoring sunlight patterns: It’s easy to pick a convenient spot and forget about shadows. Limited light will affect plant growth every single day.
- Skipping proper leveling: If the base isn’t level, walls won’t sit right and doors may never close properly.
- Using the wrong lumber: Regular wood in contact with soil can rot faster than you think. Pressure-treated boards for the base are worth it.
- Forgetting ventilation: A sealed greenhouse heats up fast. Without vents, plants can suffer within hours on sunny days.
- Making paths too narrow: You need room to carry pots, trays, and tools. Tight walkways get frustrating very quickly.
- Not anchoring against wind: Even small structures can shift or lift in storms. Secure it well from the start.
- Rushing the covering installation: Loose plastic flaps, wears, and tears. Taking extra time here saves repairs later.
Conclusion
Building a wood frame greenhouse might seem like a big project at first, but once you break it into steps, it becomes completely manageable. One task at a time, one wall at a time — and progress happens fast.
The real reward comes after it’s finished. Stronger seedlings, longer seasons, and the joy of growing plants you never thought possible in your climate.
Start simple, build it sturdy, and improve it as you go. Before long, you’ll wonder how you ever gardened without it.

Khaja Moinuddin, a computer science graduate, finds joy in gardening and homesteading. Join him on this blog as he shares his experiences in homesteading, gardening, and composting