Price: $22.99 - $19.99 (as of Nov 05, 2025 15:29:08 UTC – Details)
From the brand
YOVKOK Resistance Bands
Fed up with clunky fitness gear? YOVKOK Resistance Bands are your game – changer! Compact yet powerful, they fit in your bag, letting you work out at home, during travel, or on a lunch break.Engineered with top – tier, eco – safe materials, our bands feature multiple resistance levels for all fitness levels. Whether toning, strengthening, or rehabbing, YOVKOK adapts instantly.
resistance bands
【DURABLE & HIGH-QUALITY】This Heavy Resistance Bands is Thickened to Prevent Breakage, Healthy and Odorless, High Elastic,Anti-Slip, You Can Train without Any Worries of Wear,Enhancing Your Workout Effectiveness 【BOOST YOUR STRENGTH】This Resistance Bands is Perfect for Men and Women Tone their Arms, Back, Legs, And Butt, Chest, Core. And,Offer Targeted Support for Enhancing Flexibility, Recovering from Injuries, And Therapeutic Exercises 【PORTABLE AND VERSATILE】This Resistance Bands is your Movable Gym.The Compact Size allow for Easy to Carry to the Gym, Park, or Traveling,You can Work Out Anytime, Anywhere.These Training Bands are Your Good Partner in Pilates, Mobility, Powerlifting, Chin Ups, Yoga, Stretching and Calisthenics 【WHAT IS IN THE PACKAGE】1*Door Anchor,1*Drawstring Bag,1*Instruction Manual,1*Exquisite Box Which can be Given to Friends, Family, and Colleagues;4*Elastic Bands with Different Strength Leve,Includes:Yellow Resistance Band (5 – 15 lbs) Orange Resistance Band (15 – 35 lbs) Red Resistance Band (30 – 60 lbs) Green Resistance Band (40-90lbs) 【Suitable for all fitness levels】Resistance bands with varying tension levels help you progress from beginner to advanced. These bands can be used individually or combined for increased intensity. Ideal for post-surgery recovery, home workouts, and sculpting your ideal physique.
Customers say
Customers find these exercise bands durable and of great quality, with one mentioning they offer several strength levels. They are easy to use and provide good value for money, with one customer noting they work well for resistance band exercises. Customers appreciate the portability, with one mentioning they can take them anywhere, and another highlighting the carrying case as an added bonus. The build quality receives mixed feedback.
Price: $34.19 - $29.99 (as of Nov 05, 2025 03:12:49 UTC – Details)
Reasons for Choosing Our Extra Heavy Duty Resistance Bands with Handles for Working Out? Unprecedented 300lbs Heavy Duty Exercise bands– If you have high requirements for muscle and strength, we think you will like heavy duty workout bands, it will give you a different fitness experience and help you get more of what you want! The muscle will receive greater resistance at its strongest point in the range of motion to better stimulate the growth of muscle strength. Helping you increase coordination, and boost stamina and flexibility. Increase strength in all body parts and improve core strength and explosive power!
6 Different Resistance Levels– (25lbs, 35lbs, 45lbs, 55lbs, 65lbs 75lbs), You can freely combine our elastic exercise bands according to your strength! It contains a variety of workout bands weights ranges for both men and women. Whether you are a novice or a sportsman, you can use it very well for sports. Anyone can use elastic workout bands to reach their fitness goals. they will become your usual fitness equipment, gym resistance band set can meet all your exercise needs.
Commitment to Quality– We optimized all of the selective gym accessories, all our heavy duty attachment adopt high-strength material, They can withstand over 300 pounds easily. So that you can get a better experience and a sense of security during exercise. Buying our exercise bands resistance bands set is a perfect investment, one that we will make sure lasts you for years to come! The rubber handles are widened for a better grip, and the heavy duty metal steel carabiners are very firm for strenuous exercise.
Complete & Valuable Work Out Bands Set– Perfect Fitness Band Set of 14PCS: 6 x tube Resistance bands + 1x Door anchor + 1x Wall /Ceiling Anchor +2 x Padded Ankle straps + 2 x Soft rubber handles +1x Carrying bag + 1 Exercise poster Portable Mobile Gym– Elastic exercise bands are easy to transport and store. Door Resistance bands with handles offer a great alternative to bulky weights machines and traditional home or travel workout equipment, providing an excellent option for your home gym and traveling needs. One major difference between free weights and resistance band is the variable resistance applied through the full range of motion of an exercise. And this heavy workout bands allows you to change your positioning in multiple ways. This changes how your body works and how an exercise feels.
Warm Hint– Please note that the resistance bands can only reach their maximum weight when pulled more than 3 times their length, which is 141 inches. The limit length is 5 times their own length, which is 235 inches. To avoid injury, do not exceed the limit length, and contact us immediately for a free replacement if the bands break. 300LBS HEAVY DUTY RESISTANCE BANDS: If you have high requirements for muscle and strength, you will like heavy duty exercise bands, it will help you get more of what you want! The workout bands can be used alone or stacked in any combination to a maximum equivalent of 300 lbs with 6 different resistance levels: 25lbs, 35lbs, 45lbs, 55lbs, 65lbs 75lbs. Whether you are an experienced fitness enthusiast, Professional athlete, or a beginner. they’re the perfect workout equipment for men and women SUPERIOR QUALITY EXERCISE BANDS: For maximum longevity and safety during use, the 47″ long resistance bands are made of high-grade natural latex with high-density nylon webbing and sturdy heavy metal climbing carabiners that won’t break or deform. Each tube fitness band is double-layered and carefully constructed to provide maximum resistance. making it more elastic and durable, safe, and reliable. Which can withstand intense daily exercise sessions and ensure your training goes perfectly. SUPER STRONG LOAD-BEARING, HEAVY ATTACHMENT: Heavy duty exercise handles made of industrial strength ABS Core and covered with Soft Rubber material, sturdy nylon strap, and double steel D-rings, it is durable, comfortable, and anti-slip, sweat-proof. Max Load up to 1200 LBS. Ankle Straps have soft neoprene padding, and double D ring, making them the most comfortable and safety ankle cuff on the market.You can get a better experience and security during exercise COMPLETE and VALUABLE EXERCISE BANDS RESISTANCE BANDS SET: Weight bands for exercise including 6 heavy duty workout bands + 1 door anchor + 2 anti-slip rubber handles+ 2 adjustable neoprene padded ankle straps+ 1 carrying bag. Our exercise bands set also comes with a training poster for exercising different muscle groups. We are quite sure that you will be super-impressed with the durability, portability, versatility, and high quality of our resistance band set PORTABLE PRIVATE GYM: Elastic workout bands with handles save space and easy to carry. That is a great alternative to bulky traditional strength training equipment or fitness equipment, like dumbbells, kettlebells, and barbells. Whether at home, gym, office, hotel, park, traveling, or business trip, you can do exercise anytime and anywhere to burn fat and increase muscle strength. The heavy resistance band set can be great with any popular workout like yoga, pilates, power weight programs etc. Versatility and High Efficiency: The stretch resistance bands are ideal for body Building,physical therapy, stretching, resistance training, strength training, weight loss. The elastic exercise bands are effective for practicing squats, push-ups, leg lifts, planks, and biceps triceps strengthening. Helping you increase coordination, boost stamina, flexibility, range of motion. Building your core strength through a variety of exercises.Good for toning your arms, shoulders, chest, glutes, legs. Brand Support: Each exercise bands resistance bands set is inspected with the highest quality standards. We are very confident that you will like our work out bands. If any problems with the heavy duty fitness bands , you can contact us through the order information to send an e-mail. We will solve it within 24 hours.
Customers say
Customers find these resistance bands to be of high quality, with individual handles and sturdy construction that should last a long time. They appreciate the variety of resistance levels and versatility of the bands, with one customer noting they can target multiple muscle groups. Customers find them effective and good value for money, with one mentioning they’re ideal for home gym use.
Cream of mushroom soup is an ingredient staple this time of year. From my favorite green bean casserole with cream of mushroom soup to smothered pork chops and even baked chicken. This mushroom soup is so good though, you’ll just want a warm bowl by itself.
How to Make Cream of Mushroom Soup
Unlike some soups and stews, this isn’t a chop and throw everything in the pot and leave it situation. While I love the dump and go soup recipes, this soup starts with sauteing the veggies. Next you’ll thicken it up with some arrowroot powder to make a roux, then add all the creamy ingredients.
It’s still super easy though and comes together in just minutes. I love smelling the mushrooms, garlic, and onion as they cook down together. Finish it off with some chicken broth for healthy collagen, minerals, and even more flavor.
Cream of Mushroom Soup Ingredients
I’ve already mentioned a few of the ingredients above, but cream of mushroom soup is a surprising nutritional powerhouse. Chicken broth is one of my favorite superfoods because it’s nutrient dense and simple to make. You can even make it ahead of time and freeze for later.
Don’t have healthy bone broth on hand? This brand is a favorite of mine and just as good as homemade broth.
You might be wondering: Is cream of mushroom soup gluten free? This mushroom soup is since we’re using arrowroot powder to thicken. Other recipes often use wheat flour or even cornstarch. And of course, the conventional mushroom soup on store shelves has gluten, dairy, and other thickeners and fillers. While our family is no longer dairy free, the dairy in this soup is optional.
Condensed Cream of Mushroom Soup
We love this soup as a side dish to hamburgers, chicken, and more. If you need condensed cream of mushroom soup though for recipes, there’s an easy way to do it. You’ll just reduce the amount of chicken broth to two cups while cooking (details in the recipe below).
Where to Buy Healthy Creamy Mushroom Soup
Thankfully, more brands are putting healthier items onto store shelves for those of us with busy lives. If you don’t have time to make your own soup or want some on hand for busy days, you’ve got options! This Mushroom Bisque from Kettle and Fire tastes amazing and is made with real food ingredients.
A Better Cream of Mushroom Soup (& It’s Easy!)
Like most foods, homemade not only tastes better, but it’s typically healthier too. Cream of mushroom soup is no exception! This simple DIY version works as a substitute in recipes or is delicious on its own.
I typically make several batches of this and keep them in the refrigerator. I also freeze it for easy meal prep at Thanksgiving. If you use cream of mushroom (or cream of anything) soup in recipes for your family, consider taking 20 extra minutes to make your own. I promise you will be hooked!
Homemade Cream of Mushroom Soup
Delicious creamy soup made with real food ingredients.
In a large pot, melt butter or coconut oil over medium heat.
Add chopped mushrooms and onion; sauté until soft and translucent, about 8–10 minutes.
Stir in minced garlic and cook for another 1–2 minutes, until fragrant.
Sprinkle in salt, pepper, and arrowroot powder. Stir to coat the vegetables evenly.
Slowly add the chicken broth, stirring as you pour to prevent clumping.
Bring to a gentle simmer and cook for about 10 minutes, until slightly thickened.
Stir in the cream and sour cream (if using) and heat just until smooth and warmed through.
Nutrition Facts
Homemade Cream of Mushroom Soup
Amount Per Serving (1 cup)
Calories 234 Calories from Fat 180
% Daily Value*
Fat 20g31%
Saturated Fat 12g75%
Trans Fat 0.3g
Polyunsaturated Fat 1g
Monounsaturated Fat 5g
Cholesterol 54mg18%
Sodium 512mg22%
Potassium 454mg13%
Carbohydrates 10g3%
Fiber 1g4%
Sugar 4g4%
Protein 7g14%
Vitamin A 649IU13%
Vitamin C 4mg5%
Calcium 51mg5%
Iron 1mg6%
* Percent Daily Values are based on a 2000 calorie diet.
Serve warm as a comforting soup, or use as a homemade substitute for cream of mushroom soup in recipes.
Mushroom Soup Tips
For extra flavor: Add ½ teaspoon dried thyme or a splash of tamari or coconut aminos for a deeper, umami taste.
Creamier: Use an immersion blender to partially or fully puree the soup.
Condensed version: Reduce the broth to 2 cups for a thicker consistency. This makes about 2 cups of condensed soup, he same as roughly 2 standard 10.5 oz cans of store-bought condensed cream of mushroom soup.
Storage: Keeps up to 4 days in the fridge or 2–3 months in the freezer. Freeze in 1-cup portions for easy recipe use.
Recipes With Cream of Mushroom Soup
Here are some ideas for ways to use your mushroom soup.
I recently watched a Zoom presentation from a local gardener and author who said the way to grow roses in the Pacific Northwest was to only choose shrub roses and carpet roses. Don’t even try to grow old-fashioned, moss roses, David Austins, hybrid teas, and so on. Well, this is just wrong. Our climate is very similar to the UK, and they grow wonderful roses.
Thankfully, I met Andrea Lantin, who lives on Bainbridge Island, Washington, and has cracked the code for growing strong and healthy roses in our region. She has over 300 roses on her property of all species, but she did not have this outrageous success from the start. After some initial failures, Andrea connected with rose gardeners in the UK and has cultivated a time-tested method for growing amazing roses that doesn’t require endless hours of maintenance.
In this video, I get a late-season look at her garden as roses continue to bloom. Andrea explains the rose-care routine that has helped her create her flourishing space, as well as the top varieties she recommends to gardeners just getting started with growing roses in the Pacific Northwest.
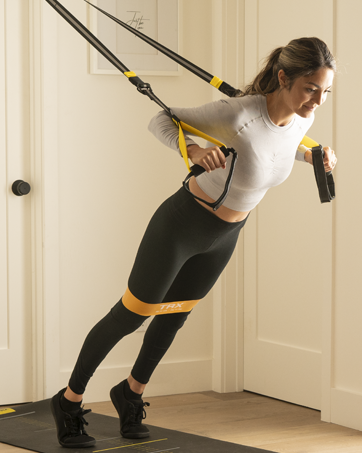
Price: $22.95 (as of Nov 04, 2025 14:53:02 UTC – Details)
From the brand
Make your body your machine!! TRX is made for you, to create the best version of you ever. Our gear and training programs meet you where you are, and enables you to achieve and exceed your goals.
Whether you are looking to burn fat, build muscle, improve stability, increase your range of motion or alleviate pain, TRX will help you change the way you LOOK, FEEL & THINK.
Suspension Trainers
Our Suspension Trainers are the all-in-one fitness method powered by your body weight to sweat, sculpt, and strengthen.
Suspension Trainers
Anytime, Anywhere
Founded by Randy Hetrick, a US Navy SEAL, TRX helps your workouts become adaptable and accessible, wherever you are.
Dynamic Resistance Tools
Functional and Portable
From warm-up to workout to recovery, these training essentials are easy to use at home or in the gym to help you achieve your goals.
Training Tools
How did we get started?
Randy Hetrick built the original Suspension Trainer to maintain peak physical condition while deployed as a US Navy SEAL. The design has evolved to provide you with the ultimate workout tool to use anywhere.
What is the TRX App?
The TRX App is our exclusive streaming platform that lets you work out with world-class trainers. Choose from hundreds of strength, cardio, and recovery workouts that fit any fitness goal.
Why choose TRX?
We believe that fitness can be achieved by anyone, and our equipment will endure the toughest workouts to help you make fit happen.
WHAT’S IN THE BOX: The TRX exercise-band set includes 4 bands of different weight ranges to help gauge your lifting progress: yellow (2–8 lbs.), orange (5–12 lbs.), gray (6–17 lbs.), and black (10–25 lbs.). Each band measures 12″. TRX WORKOUT BANDS: This resistance-band set is perfect for low-impact training, rehabilitation, stretching, and mobility. These lightweight and portable stretch bands will help you push and pull your way through anything. FOR ALL FITNESS LEVELS: This workout equipment is perfect for all levels. Whether you’re a pro or just starting out, you’ll get the stretch and resistance you need. Pull the bands out for physical resistance during strengthening or core workouts. TRAVEL TRX BANDS: Now your strength-training equipment and routine can go anywhere. Pair these bands with a yoga mat for an exceptional at-home workout, bring them to the gym or pilates classes to increase intensity, and even take them on vacation. YOUR TRIAL TO THE TRX TRAINING CLUB APP: Experience unlimited access to 500+ on-demand workouts: weight training, cardio, cross-training, sport athleticism, resistance and mobility training, and prehab and rehab. Find 100s of workouts for every goal! All workouts guided by world-class certified TRX trainers.
Customers say
Customers find the exercise bands provide good resistance, with one noting a nice progressive increase in tension. The durability receives mixed feedback, with some finding them strong while others report them breaking at first stretch or snapping after months of use. The quality, functionality, and ease of use also get mixed reviews, with some finding them great while others consider them poor quality and unusable. Customers report issues with the bands rolling up and sticking to themselves. The thickness receives mixed feedback, with some describing them as thick while others find them thin.
Scott Adams, creator of Dilbert, the office humor comic strip, is pictured at work in 2006. Adams has metastatic prostate cancer and he appealed to President Trump to help save his life by solving a bureaucratic problem with his health insurance. It worked: His appointment is Tuesday.
Marcio Jose Sanchez/AP
hide caption
toggle caption
Marcio Jose Sanchez/AP
Like many, many Americans, Scott Adams had health insurance problems.
But Adams — made famous first by his long-running Dilbert cartoon, and later for a racist rant on YouTube — counts some powerful people in his social media circle: President Trump, his son Donald Trump Jr. and Health and Human Services Secretary Robert F. Kennedy Jr.
So Adams posted his complaint on X, saying Kaiser of Northern California, his health insurer and care provider, had “dropped the ball” in scheduling a procedure needed to treat his metastatic prostate cancer. Adams wrote he was going to ask Trump to help save his life, and he added: “I am declining fast. I will ask President Trump if he can get Kaiser of Northern California to respond and schedule it for Monday.”
And on Monday, Adams posted that he had an appointment to receive the infusion he needed of the cancer drug, Pluvicto, on Tuesday.
“For context, I waited months for the drug, like everyone else,” Adams wrote. “But I think my files got misplaced or something and that glitch just got corrected. Not sure.”
The U.S. health care system is notoriously complex, confusing and expensive, and many Americans have had similarly frustrating experiences as Adams did. Few, though, have the social media reach to enlist such powerful helping hands.
“Our health system shouldn’t be one where we need the intervention of the president or the HHS secretary to weigh in on behalf of a high-profile political backer,” said Anthony Wright, the executive director of Families USA, a health care advocacy organization.
Wright added that he is gratified Adams got the help he needed and said it should be available to all. “Glad the President is offering to do casework,” Wright said, noting that federal workers who do similar problem solving have been fired and navigators who help people sign up for Affordable Care Act health insurance have been cut by 90%. Wright also called out the” “current shutdown over the issue of tax credits that help millions access and afford health care.”
NPR reached out to Kaiser for comment and they e-mailed this statement: “Mr. Adams’ oncology team is working closely with him on the next steps in his cancer care, which are already underway. Since it was approved by the FDA three years ago, Kaiser Permanente’s nuclear medicine and medical oncology experts have treated more than 150 patients with Lu-177 PSMA (Pluvicto) in Northern California alone. We know this drug and this disease.”
Adams’ experience drummed up a chorus of well-wishes online, as well as those who called out the preferential treatment he apparently got.
“There are Americans all over America who are currently going through similar circumstances,” wrote one X poster, responding to Kennedy’s offer to help Adams.
Another responded: “How about promoting UNIVERSAL HEALTHCARE, like the rest of the Industrialized 1st World Nations, so EVERYONE can be treated, not just Celebrity & the Wealthy?”
In the shutdown health care fight that started Oct. 1, about 24 million Americans who buy their insurance on the ACA marketplaces will see their premiums skyrocket — the average plan will double in price — if Congress doesn’t act. Democrats say they will not reopen the government unless the tax subsidies that bring down the cost are renewed. Republicans say they will not discuss renewing the subsidies until the government is reopened.
Growing fresh herbs doesn’t have to stop when winter arrives! With the right setup, you can create a thriving indoor herb garden that keeps your kitchen full of fresh flavor and greenery through the colder months.
Many popular herbs actually adapt well to indoor conditions, and some even develop richer aromas in the cozy warmth of your home. Imagine brushing your hand across a pot of rosemary or snipping fresh basil for a steaming soup when everything outside is frozen.
Whether you’re a seasoned gardener or just exploring indoor growing, keeping herbs thriving inside is simple and rewarding. All you need is a sunny windowsill or a small grow-light setup to enjoy harvests throughout winter.
So, let’s explore how to plan your indoor herb garden and which herbs grow best inside during the chilly season.
How to Plan an Indoor Winter Herb Garden?
Creating an indoor herb garden for winter is easier than it looks but requires a little planning. With the right environment and thoughtful care, you can have productive, attractive pots of herbs growing all season long.
1. Select Ideal Herbs for Indoor Growth
Choose herbs that adapt well to indoor conditions such as basil, parsley, chives, mint, oregano, and thyme. Many of these herbs prefer steady temperatures and bright light, making them perfect for windowsills or shelves under grow lights.
2. Find the Perfect Location
Natural Light: Place herbs near a south or west-facing window that gets at least 4–6 hours of light daily.
Artificial Light: If sunlight is scarce, use LED grow lights positioned 6–12 inches above the plants for 12–14 hours a day.
Avoid Drafts: Keep plants away from cold windows and heating vents to prevent stress.
3. Choose the Right Containers
Opt for pots with good drainage holes to prevent waterlogging. Terracotta or ceramic pots work beautifully for most herbs, though lightweight plastic is great for shelves or hanging setups. Always use saucers to catch excess water.
4. Use High-Quality Potting Mix
Regular garden soil is too heavy for indoor herbs. Choose a well-draining potting mix with added perlite or coco coir for airflow. Mix in compost or organic fertilizer before planting for nutrient support.
5. Maintain Warm, Stable Conditions
Indoor herbs thrive at temperatures between 60–70°F. Avoid sudden temperature drops and water with room-temperature water to prevent root shock.
6. Water Properly
Only water when the top inch of soil feels dry. Overwatering is one of the main reasons herbs fail indoors. During darker days, reduce frequency since growth slows slightly.
7. Fertilize Lightly
Since indoor herbs grow slower in winter, fertilize once every 3–4 weeks using diluted liquid organic fertilizer. Avoid heavy feeding, which can lead to weak, leggy growth.
8. Harvest Regularly
Frequent trimming encourages bushier growth. Snip the upper leaves with scissors rather than pulling to keep plants looking full and healthy.
Difference Between Perennial, Biennial, and Annual Indoor Herbs
Perennial Herbs
Perennial herbs, such as thyme, mint, oregano, and rosemary, can live for several years indoors with proper care. They flourish in bright, sunny spots and benefit from regular pruning to stay compact. Move larger perennials like rosemary outdoors in warmer months if space allows.
Biennial Herbs
Biennial herbs, including parsley and caraway, grow leafy in their first year and produce seeds in the second. Indoors, these are best restarted from seed each winter for steady supply and tender growth.
Annual Herbs
Annual herbs like basil, dill, and cilantro grow quickly under warm indoor conditions and provide flavor-filled harvests within weeks. Start new seeds every two months for continuous production through winter.
19 Herbs That Grow Well Indoors in Winter
1. Basil
Basil loves warmth and bright light, making it perfect near a sunny kitchen window. Keep soil lightly moist and pinch back flower buds to encourage fresh leaf growth. Sweet basil, Thai basil, and lemon basil all thrive indoors with at least 6 hours of sunlight daily or under grow lights.
This tender annual grows quickly and rewards you with aromatic leaves for pesto, pasta, and salads. Harvest regularly from the top to promote bushier growth, and watch for yellowing leaves, which usually signal overwatering or insufficient light.
2. Parsley
Parsley adapts well indoors with moderate watering and bright indirect light. It takes a few weeks to establish but produces lush, fragrant leaves through most of winter. Both curly and flat-leaf varieties grow successfully in containers, reaching about 12-18 inches tall.
This biennial herb grows best in consistently moist soil with good drainage. Snip outer stems first to encourage new growth from the center. Parsley’s fresh, slightly peppery flavor enhances soups, salads, and garnishes throughout the cold months.
3. Chives
Chives grow beautifully in pots with shallow roots and thrive even under lower light conditions. Trim frequently to keep new shoots coming. These hardy perennials form neat clumps and produce delicate purple flowers if allowed to bloom indoors.
Place chives in a bright spot and water when the top inch of soil feels dry. Their mild onion flavor adds brightness to omelets, baked potatoes, and cream cheese spreads. Snip leaves about an inch from the base for continuous harvests all winter long.
4. Mint
Mint grows vigorously indoors, especially in containers where its roots can’t spread. It enjoys moderate light and slightly damp soil. Regular trimming helps maintain dense foliage. Popular varieties like spearmint, peppermint, and chocolate mint all adapt well to indoor conditions.
Keep mint in individual pots to prevent it from overtaking other herbs. Pinch back stems regularly to encourage bushy growth and prevent legginess. Fresh mint leaves brighten teas, cocktails, desserts, and savory dishes with their refreshing, cool flavor.
5. Thyme
Thyme’s low, spreading growth makes it ideal for windowsills. It needs direct sunlight and minimal water, making it one of the easiest herbs to maintain indoors. Common thyme, lemon thyme, and creeping thyme all flourish in bright, warm spots.
Allow soil to dry slightly between waterings to prevent root rot. This woody perennial develops stronger flavor when slightly stressed by dryness. Harvest sprigs as needed for roasted vegetables, meats, and soups, leaving at least one-third of the plant intact.
Rosemary prefers full light and well-drained soil. Mist occasionally to prevent dryness and rotate the pot to ensure even growth. This Mediterranean herb thrives in temperatures between 60-70°F and needs good air circulation to stay healthy.
Water only when the top two inches of soil feel dry, as rosemary dislikes soggy roots. Its needle-like leaves release a piney, aromatic scent perfect for breads, roasted potatoes, and grilled meats. Prune regularly to maintain shape and encourage fresh growth.
7. Oregano
Oregano thrives indoors with strong light and slightly dry conditions between waterings. It’s great for constant cooking use, as frequent trimming enhances its flavor. Greek oregano and Italian oregano both grow well in pots, spreading into attractive, bushy plants.
This hardy perennial prefers temperatures around 65-75°F and benefits from occasional feeding with diluted liquid fertilizer. Harvest leaves before the plant flowers for the most intense flavor. Fresh oregano elevates pizzas, pasta sauces, and Mediterranean dishes.
8. Sage
Sage does best in bright light and cooler indoor temperatures. Allow soil to dry between waterings, and prune occasionally to prevent legginess. Common sage and purple sage both adapt well to container growing, developing attractive, textured foliage.
This woody perennial grows slowly but steadily through winter. Pinch growing tips to encourage branching and fuller growth. Sage’s earthy, slightly peppery flavor complements poultry, stuffing, and brown butter sauces beautifully.
Cilantro grows rapidly indoors but prefers cooler conditions and filtered light. Start new batches from seed every six weeks for continuous harvests. This fast-growing annual thrives in temperatures between 50-70°F, making it perfect for cooler rooms.
Water consistently to keep soil evenly moist, as dryness causes bolting. Harvest outer leaves first, working your way toward the center. Fresh cilantro adds bright, citrusy notes to salsas, curries, and Asian-inspired dishes.
10. Lemon Balm
This fragrant herb enjoys partial light and moderate moisture. Its fresh, citrus scent adds brightness to rooms and makes a soothing tea during chilly nights. Lemon balm grows vigorously indoors, reaching 12-18 inches in containers.
Pinch back stems regularly to prevent flowering and maintain compact growth. The lemony leaves have calming properties and work wonderfully in herbal teas, fruit salads, and fish dishes. This hardy perennial tolerates various light conditions better than many herbs.
11. Chervil
Chervil prefers cool indoor air and indirect light. Keep soil moist, but not soggy, for delicate, feathery leaves with a subtle anise flavor. This delicate annual grows best in temperatures between 60-65°F.
Harvest outer leaves regularly to promote new growth. Chervil’s mild, slightly sweet flavor resembles a combination of parsley and tarragon. Use fresh leaves in French-inspired dishes, egg preparations, and spring salads for an elegant touch.
12. Dill
Dill grows well indoors with bright light and good air circulation. Plant seeds directly in deep containers, as dill develops a long taproot and dislikes transplanting. This annual herb reaches 12-24 inches tall and produces feathery, aromatic foliage.
Water when the top inch of soil dries out, maintaining consistent moisture for best growth. Fresh dill adds distinctive flavor to pickles, fish dishes, potato salads, and yogurt-based sauces. Start new seeds every month for a steady winter supply.
13. Bay Laurel
Bay laurel thrives indoors as a slow-growing potted tree. It needs bright, direct light and well-draining soil. Water sparingly, allowing soil to dry between waterings. This evergreen perennial can live for years indoors with proper care.
Glossy bay leaves develop full flavor when dried or used fresh in long-simmered dishes. Place pots near south-facing windows and rotate regularly for even growth. Bay leaves enhance soups, stews, sauces, and braised meats with their subtle, aromatic qualities.
14. Tarragon
French tarragon grows successfully indoors with bright light and warm temperatures. This perennial herb prefers slightly dry conditions between waterings and benefits from good drainage. It grows 18-24 inches tall in containers.
Tarragon’s distinctive anise-like flavor pairs beautifully with chicken, fish, and egg dishes. Pinch back growing tips to encourage bushy growth and prevent flowering. Harvest leaves regularly for béarnaise sauce, vinaigrettes, and French-inspired cuisine.
15. Marjoram
Marjoram adapts well to indoor growing with full sun and moderate watering. This tender perennial resembles oregano but offers a sweeter, milder flavor. It grows compactly in pots, reaching about 12 inches tall.
Keep soil evenly moist but not waterlogged, and provide temperatures around 65-70°F. Fresh marjoram enhances Mediterranean dishes, soups, and marinades. Harvest sprigs regularly to maintain compact growth and encourage fresh foliage throughout winter.
16. Stevia
Stevia grows indoors as a natural sweetener source with bright light and warm conditions. This tropical perennial prefers temperatures above 60°F and consistent moisture. It reaches 12-18 inches in containers.
The sweet leaves can be used fresh or dried to sweeten teas and beverages naturally. Pinch back stems to prevent flowering and maintain bushy growth. Stevia requires more humidity than most herbs, so mist occasionally or use a pebble tray.
17. Chamomile
German chamomile grows easily indoors from seed with bright light. This annual herb produces delicate, daisy-like flowers perfect for soothing herbal tea. It grows 12-18 inches tall and prefers moderate temperatures around 60-68°F.
Keep soil consistently moist and harvest flowers when fully open. The apple-scented blooms have calming properties and make excellent evening tea. Chamomile also attracts beneficial insects if you eventually move it outdoors in spring.
18. Lavender
Lavender can grow indoors with full sun exposure and excellent drainage. Choose compact varieties like ‘Munstead’ or ‘Hidcote’ for container growing. This Mediterranean herb needs at least 6-8 hours of bright light daily.
Water sparingly, allowing soil to dry completely between waterings. Lavender prefers cooler indoor temperatures and low humidity. While challenging indoors, successful growth rewards you with fragrant flowers for teas, baking, and aromatherapy.
19. Sorrel
Sorrel adapts surprisingly well to indoor growing with bright, indirect light. This lemony herb thrives in consistently moist soil and cooler temperatures around 60-65°F. It grows 12-18 inches tall in containers.
Harvest outer leaves regularly, leaving the center intact for continuous growth. Sorrel’s tart, citrusy flavor brightens salads, soups, and sauces. This hardy perennial tolerates lower light better than many herbs, making it perfect for north-facing windows.
Conclusion
Bringing herbs indoors during winter is a simple, rewarding way to keep your garden alive all year round. With just a few pots, good light, and proper watering, you can enjoy fresh, aromatic herbs even when it’s snowing outside.
Basil, thyme, rosemary, and mint thrive indoors and bring both fragrance and flavor to your home.
Whether on a bright windowsill or under a grow light, these resilient herbs offer a touch of green comfort throughout the cold season, keeping your cooking fresh and your indoor spaces naturally alive.
Khaja Moinuddin, a computer science graduate, finds joy in gardening and homesteading. Join him on this blog as he shares his experiences in homesteading, gardening, and composting
Price: $39.99 - $33.99 (as of Nov 04, 2025 02:43:52 UTC – Details)
MUCH HEAVIER RESISTANCE & IMPROVED TEN – Resistance from 20 LBs to 40 LBs, heavier bands with max tension compared with similar resistance workout bands. The metal carabiners on the resistance strap enable the user to add or remove resistance to create the perfect challenge for every muscle group. Challenge your limit. ANTI-SNAP DOUBLE PROTECTION – Build with high quality protective Nylon sleeve and premium natural latex which prevents the resistance tube from being damaged, and provide you double protection in case the band were to snap, our elastic exercise bands serve long time and provide the maximum resistance. FITTNESS ANYWHERE – Lots of potential for different workouts with these fitness and they are easy to use at home or throw in the backpack to get in a quick stretch or exercise when needed. These exercise cords are perfect for exercise, fitness, pilates, strength training. Comes with❤ 4 improved bigger handles❤ allow you share bands with your workout pals and don’t have to switch handles between bands. 15 IN 1 RESISTANCE BANDS WITH HANDLES – 5 Resistance Bands: 1 x Red (20 lbs), 1 x Gray (25 lbs), 1 x Blue (30 lbs), 1 x Yellow (35 lbs) and 1 x Black (40 lbs). Accessories: 4 x Cushioned Foam Handles, 2 x Door Anchors, 2 x Ankle Straps, 1 x Carrying Bag, 1 x Workout Book. Exercise tubes with handles and heavier tension allows you more different training methods for building strength. This resistance bands set is definitely the best gift for your workout fellows, allows exercise everywhere; As a carry-on gym system, it is absolutely the best fitness gift for the most active guys you know, gym junkies, runners, and more will go nuts for this gift. We stand up for our product, 7/24 supportive customer service. Love it, or pay nothing.
Customers say
Customers find these resistance bands provide a gym-like workout experience with good quality and value for money. The bands are easy to use and versatile, offering a wide range of strength training movements, and customers appreciate the different resistance levels. However, durability receives mixed feedback – while some say they last a long time, others report them breaking easily.
Tall, flaky sweet potato biscuits are easy to make from scratch using pantry and fridge staples and this easy pat, roll and cut method. They’re perfect for pairing with a bowl of soup and serving at your next holiday meal.
Price: $39.97 (as of Nov 03, 2025 14:15:53 UTC – Details)
Introducing the Tribe Lifting workout bands for men and women, perfect for anyone looking to take their exercise routine to the next level. These exercise bands with handles will provide you with a complete range of resistance levels to challenge your body. Our pull up bands assistance bands come in a variety of strengths. With the variety of resistance bands for working out with handles, you can easily adjust the intensity of your workout. The exercise resistance bands can be used as resistance loop bands or resistance bands for pull up assist. These weight bands are designed to be durable, made from high-quality materials. Loop bands for exercise offer a wide range of benefits, from increasing muscle strength to improving flexibility. With these workout resistance bands, you can choose the level of resistance, whether you need heavy resistance bands, thick resistance bands or easier mobility bands, stretch bands for flexibility or pt bands. The Tribe Lifting loop resistance bands are perfect for pull up assistance, helping you build strength and endurance to achieve your fitness goals. With excercise bands and resistance bands for stretching, you can create a customized workout routine that targets all areas of your body. This resistance band with handle set can also be used as tension bands for exercise. Our body resistance bands can also be used as stretching bands for flexibility, as well as workout bands with handles that will be perfect for upper body strength training. These exercise bands for physical therapy are the perfect tool to help you regain your strength and mobility. With this versatile set of workout bands, you’ll have everything you need to create a customized workout routine that targets all areas of your body and helps you achieve your fitness goals. [Durable and Eco-Friendly] – Natural latex rubber pull up bands with layered construction = 3x more durable than other elastic bands for exercise. [Any Level] – Our resistance band set has 5 resistance levels for each pullup assistant band and are suitable for beginners as stretch bands for physical therapy, as pull up resistance bands for an intermediate or even as squat bands for an athlete [Multifunctional] – These excersing bands are great for a variety of uses, as pullup assistant, stretching bands or as resistance bands for physical therapy bands. Resistance bands are suitable to be used as arm bands for workout bicep bands [Versatile] – This work out bands set for men and women works as travel fitness equipment or exercise equipment for home gym so that you can always get a strong resistant band workout or as pull up assist bands when you need a bit of assistance [Guarantee] – Tribe Lifting workout equipment is designed in North America and manufactured with a great attention to detail. If you are unhappy with your strength bands resistance set, we will replace the gym bands for pull ups or issue you a refund
Customers say
Customers find these resistance bands well-made, versatile, and effective for home workouts, with good value for money. The bands provide even resistance across different levels, and customers appreciate their portability, with one mentioning they can be used literally anywhere. They are comfortable to use, with one customer noting the extra grip on the handles, and another mentioning reduced joint stress. Durability receives mixed feedback – while some find them durable, others report them breaking during use.