Price: $89.99 - $71.99
(as of Jan 11, 2026 17:51:13 UTC – Details)
Easy to move and perfect for small spaces—enjoy cardio anytime, anywhere.
【FREE SUNNYFIT APP CONNECTIVITY】 Connect seamlessly via Bluetooth to the SunnyFit App to access real-time performance tracking, personalized fitness goals, 1,000+ expert-led workouts, and 10,000+ scenic global routes.
【SPACE-SAVING, LIGHTWEIGHT DESIGN】 Compact and easy to move, this stepper fits into any room. Ideal for small spaces and quick storage, it offers convenient cardio anywhere, anytime.
【EFFECTIVE TWISTING MOTION】 Sculpt and tone your glutes, thighs, and core with an innovative side-to-side stepping motion that also enhances balance, flexibility, and coordination.
【SMOOTH & QUIET HYDRAULIC RESISTANCE】 Dual hydraulic cylinders ensure smooth, stable, and nearly silent step motion—perfect for use in apartments or shared spaces.
【STRONG FRAME, HIGH CAPACITY】 Built with durable steel, this twist stepper supports users up to 300 lbs, offering stability and long-lasting performance.
【ADJUSTABLE STEP HEIGHT】Customize your workout intensity with adjustable step height to match your fitness level and training goals.
【INTEGRATED RESISTANCE BANDS】 Target your upper body with included resistance bands—perfect for toning arms, shoulders, back, and chest during cardio sessions.
【QUICK & SIMPLE ASSEMBLY】 Get started in minutes with minimal setup required. Includes easy-to-follow instructions for a fast and stress-free assembly
【TEXTURED, MASSAGE PEDALS】 Stay secure with oversized, non-slip pedals that include a textured surface to stimulate foot acupressure points for added comfort and circulation.
【TRUSTED BRAND EXCELLENCE】 Backed by over 20 years of experience, Sunny Health & Fitness offers premium-quality equipment, expert support, and a community focused on wellness for everyone.
Sunny Health & Fitness Mini Stepper for Exercise at Home, Stair Step Workout Machine with Resistance Band and Over 300lb Weight Capacity, Optional Twist Motion and Free SunnyFit App Connection

Brain Health Challenge: Try the MIND Diet

Welcome to Day 2 of the Brain Health Challenge. Today, we’re talking about food.
Your brain is an energy hog. Despite comprising about 2 percent of the average person’s body mass, it consumes roughly 20 percent of the body’s energy. In other words, what you use to fuel yourself matters for brain health.
So what foods are best for your brain?
In a nine-year study of nearly 1,000 older adults, researchers at Rush University in Chicago found that people who ate more of nine particular types of food — berries, leafy greens, other vegetables, whole grains, beans, nuts, fish, poultry and olive oil — and who ate less red meat, butter and margarine, cheese, sweet treats and fried food had slower cognitive decline.
Based on these findings, the researchers developed the MIND diet.
Large studies encompassing thousands of people have since shown that following the MIND diet corresponds with better cognitive functioning, a lower risk of dementia and slower disease progression in people with Alzheimer’s. People benefit from the diet regardless of whether they start it in midlife or late life.
Experts think the foods included in the MIND diet are especially good for the brain because they contain certain macro and micronutrients.
Berries and leafy greens, for example, are rich in polyphenols and other antioxidants, said Jennifer Ventrelle, a dietitian at Rush and a co-author of “The Official Mind Diet.” Many of these compounds can cross the blood-brain barrier and help to fight inflammation and oxidative stress, both of which can damage cells and are linked to dementia.
Nuts and fatty fishes, like salmon and sardines, contain omega-3 fatty acids, which are important for building the insulating sheaths that surround the nerve fibers that carry information from one brain cell to another.
Whole grains and beans both contain a hefty dose of fiber, which feeds the good microbes in the gut. Those microbes produce byproducts called short-chain fatty acids that experts think can influence brain health via the gut-brain axis.
You don’t have to revamp your whole diet to get these nutrients. Instead, think about “MIND-ifying” whatever you already tend to eat, said Dr. Joel Salinas, a neurologist at NYU Langone Health and the founder and chief medical officer of the telehealth platform Isaac Health. For instance, add a handful of nuts or berries to your breakfast.
Today’s activity will help you MIND-ify your own meals. Share your choices with your accountability partner and in the comments, and I’ll discuss the ways I’m adjusting my diet, too. For added inspiration, check out these MIND-approved recipes from New York Times Cooking.
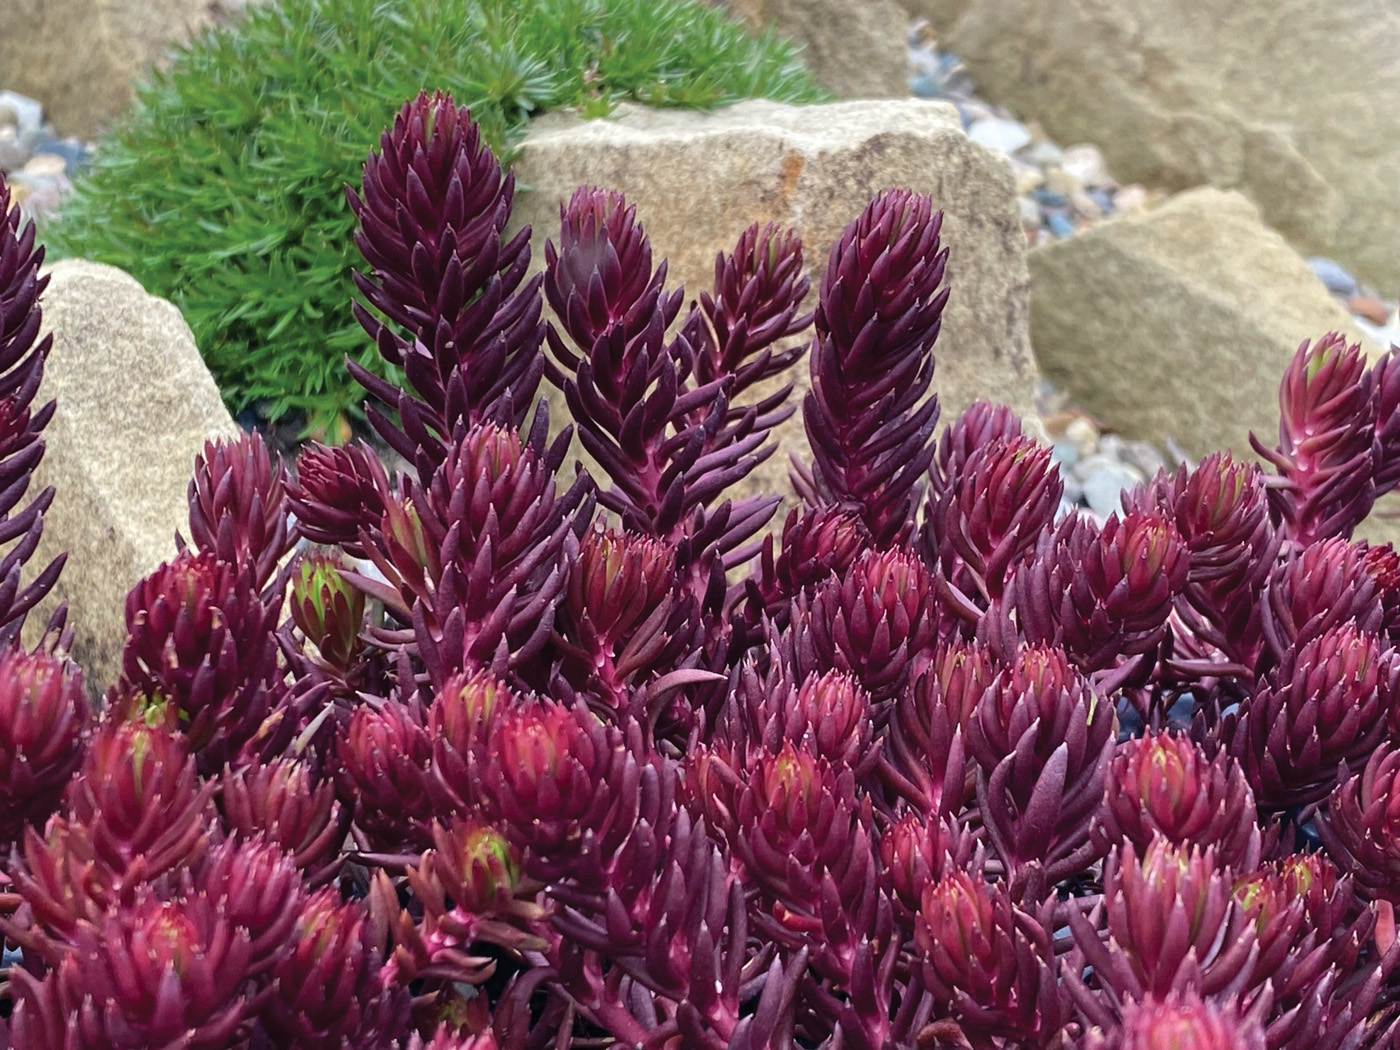
Add Succulent Color and Architectural Intrigue with ‘Gold Nugget’ Hens and Chicks

Try ‘Gold Nugget’ hens and chicks in your garden and containers
I try not to get swept up in new plant fads, but every once in a while something is introduced that just cannot be ignored. ‘Gold Nugget’ hens and chicks is one of these plants. As soon as I saw it, I knew that I must have it. My first few plants came from a friend’s display at a garden show in late winter. I was mesmerized by the deep golden hues accented with contrasting shades of maroon and vibrant orange-red on artfully arranged rosettes of thick succulent leaves. This hardy horticultural star was meant to sparkle, and I could not wait to try it at the Miller Garden.
Knowing that rainy Pacific Northwest winters are tough on hardy succulents, we put ‘Gold Nugget’ in frost-proof terra-cotta pots with very well-drained potting mix. A light top layer of fine gravel kept weeds out and prevented soil from splashing onto the leaves. The plants thrived and displayed brilliant color through winter. As the days lengthened and the weather warmed in spring, the colors softened to chartreuse with hints of red, a palette that persisted through the growing season. With the arrival of cool autumn weather, the intensely vivid hues returned.
Tips for growing ‘Gold Nugget’ hens and chicks
Even though hens and chicks can tolerate some dry weather, keeping the plants regularly watered and fertilized during the growing season ensures vigorous growth and multiple “chicks.” ‘Gold Nugget’ is a relatively robust cultivar, but it does not like competition. It is best used alone in a container or combined with smaller, less vigorous succulents or alpine plants. Excellent drainage is a must in the Pacific Northwest, but in other regions, where winter rain is less frequent and the summer temperatures are hotter, average coarse potting soil should suffice, or plant it in the ground in a well-drained spot.
Learn more: Plants for Nooks and Crannies
‘Gold Nugget’ will have the best color when it is grown in a bright, open location. Full sun is difficult for gardeners in my region to provide during our gray winters, but a minimum of four to six hours of sunlight during fall and winter has proven to be enough for our plants to put on a colorful show. This year, we are experimenting with growing hens and chicks on vertical surfaces with other succulents, making a colorful mosaic. The amazing cold hardiness and ease of cultivation make this selection a choice garden plant for almost anyone.
‘Gold Nugget’ hens and chicks
Sempervivum ‘Gold Nugget’
Zones: 3–8
Conditions: Full sun to partial shade; moderately moist to dry, well-drained soil
Native Range: Africa and Eurasia
Yes—this low-growing sedum now comes in red!
New Plant for 2026: Red Angelina™ sedum
If you love the spiky yellow leaves and creeping form of ‘Angelina’ sedum (S. rupestre ‘Angelina’, Zones 5–9), just wait until you take Red Angelina™ sedum for a spin. This exciting new introduction has the same great form but in cherry red. A stunner trailing over the edge of containers and hugging the ground along a bed edge, Red Angelina™ struts its spectacular color for 10 months of the year, turning a bit green during the heat of summer. Give it a sunny location, sit back, and watch the show.
Red Angelina™ sedum
Sedum ‘GarSol2’
Zones: 3–9
Size: 4 to 6 inches tall and 12 to 24 inches wide
Conditions: Full sun; average to dry, sharply drained soil
Native Range: Europe and Turkey
Plant Sources:
Richie Steffen is a contributing editor and the executive director of the Miller Garden in Seattle.
‘Gold Nugget’ hens and chicks photo courtesy of Richie Steffen; Red Angelina™ sedum courtesy of Chris Hansen; Illustration by Elara Tanguy
Learn More:
See More Super Cool Plants
Growing Succulents for Color
Episode 139 Let’s Argue About Plants: Favorite Succulents
Fine Gardening Recommended Products

Dramm Revolution Adjustable 9-Pattern Metal Hose Nozzle
Fine Gardening receives a commission for items purchased through links on this site, including Amazon Associates and other affiliate advertising programs.
– 15 x 10 x 7 inches
– Ergonomic insulated grip
– Maximum pressure of 90 PSI
– Fully adjustable spray pattern
– No trigger lock

Nesco Snackmaster Express Food Dehydrator
Fine Gardening receives a commission for items purchased through links on this site, including Amazon Associates and other affiliate advertising programs.
500-watt 4-tray food dehydrator dries in hours with adjustable thermostat that allows you to dry different foods at proper temperatures (95°F – 155°F). Four 13.5-inch BPA-free trays allow you to dry large quantities at once with no tray rotation needed. Includes 1 fruit roll sheet and 2 original-flavor jerky spice and cure packets.
Lee Valley Large Gardener’s Wash Basket
Fine Gardening receives a commission for items purchased through links on this site, including Amazon Associates and other affiliate advertising programs.
This basket was designed to be used by gardeners to wash freshly harvested vegetables before taking them inside. You can gather your vegetables and then hose them off right in the same basket. However, you can also use it for fruit or add a cloth liner for serving bread or other baked goods. Measuring 16″ long, 11″ wide and 4″ deep, it is made of chrome-plated steel to resist rust.
Watch Bands Replacement for ID115plus HR, Very Fit Pro Activity Fitness Tracker Wrist Bands Set, Multicolor Veryfitpro Smart Watch Strap Replacements

Price: $11.99 - $9.99
(as of Jan 11, 2026 05:48:37 UTC – Details)
Product description


Department : unisex-adult
Date First Available : January 15, 2025
ASIN : B0DT396PMZ
Product Warranty: For warranty information about this product, please click here
Best Sellers Rank: #16,165 in Cell Phones & Accessories (See Top 100 in Cell Phones & Accessories) #1,625 in Smartwatch Bands
Customer Reviews: 4.1 4.1 out of 5 stars (343) var dpAcrHasRegisteredArcLinkClickAction; P.when(‘A’, ‘ready’).execute(function(A) { if (dpAcrHasRegisteredArcLinkClickAction !== true) { dpAcrHasRegisteredArcLinkClickAction = true; A.declarative( ‘acrLink-click-metrics’, ‘click’, { “allowLinkDefault”: true }, function (event) { if (window.ue) { ue.count(“acrLinkClickCount”, (ue.count(“acrLinkClickCount”) || 0) + 1); } } ); } }); P.when(‘A’, ‘cf’).execute(function(A) { A.declarative(‘acrStarsLink-click-metrics’, ‘click’, { “allowLinkDefault” : true }, function(event){ if(window.ue) { ue.count(“acrStarsLinkWithPopoverClickCount”, (ue.count(“acrStarsLinkWithPopoverClickCount”) || 0) + 1); } }); });
The CDC Just Sidelined These Childhood Vaccines. Here’s What They Prevent : Shots

A bandage is seen on a child’s arm after she received a COVID vaccine on November 3, 2021 in Shoreline, Washington.
David Ryder/Getty Images
hide caption
toggle caption
David Ryder/Getty Images
The federal government has drastically scaled back the number of recommended childhood immunizations, sidelining six routine vaccines that have safeguarded millions from serious diseases, long-term disability, and death.
Just three of the six immunizations the Centers for Disease Control and Prevention says it will no longer routinely recommend — against hepatitis A, hepatitis B, and rotavirus — have prevented nearly 2 million hospitalizations and more than 90,000 deaths in the past 30 years, according to the CDC’s own publications.
Vaccines against the three diseases, as well as those against respiratory syncytial virus, meningococcal disease, flu, and COVID, are now recommended only for children at high risk of serious illness or after “shared clinical decision-making,” or consultation between doctors and parents.
The CDC maintained its recommendations for 11 childhood vaccines: measles, mumps, and rubella; whooping cough, tetanus, and diphtheria; the bacterial disease known as Hib; pneumonia; polio; chickenpox; and human papillomavirus, or HPV.
Federal and private insurance will still cover vaccines for the diseases the CDC no longer recommends universally, according to a Department of Health and Human Services fact sheet; parents who want to vaccinate their children against those diseases will not have to pay out-of-pocket.
Experts on childhood disease were baffled by the change in guidance. HHS said the changes followed “a scientific review of the underlying science” and were in line with vaccination programs in other developed nations.
HHS Secretary Robert F. Kennedy Jr., an anti-vaccine activist, pointed to Denmark as a model. But the schedules of most European countries are closer to the U.S. standard upended by the new guidance.
For example, Denmark, which does not vaccinate against rotavirus, registers around 1,200 infant and toddler rotavirus hospitalizations a year. That rate, in a country of 6 million, is about the same as it was in the United States before vaccination.
“They’re OK with having 1,200 or 1,300 hospitalized kids, which is the tip of the iceberg in terms of childhood suffering,” said Paul Offit, the director of the Vaccine Education Center at the Children’s Hospital of Philadelphia and a co-inventor of a licensed rotavirus vaccine. “We weren’t. They should be trying to emulate us, not the other way around.”
Public health officials say the new guidance puts the onus on parents to research and understand each childhood vaccine and why it is important.
Here’s a rundown of the diseases the sidelined vaccines prevent:
RSV. Respiratory syncytial virus is the most common cause of hospitalization for infants in the U.S.
The respiratory virus usually spreads in fall and winter and produces cold-like symptoms, though it can be deadly for young children, causing tens of thousands of hospitalizations and hundreds of deaths a year. According to the National Foundation for Infectious Diseases, roughly 80% of children younger than 2 who are hospitalized with RSV have no identifiable risk factors. Long-awaited vaccines against the disease were introduced in 2023.
Hepatitis A. Hepatitis A vaccination, which was phased in beginning in the late 1990s and recommended for all toddlers starting in 2006, has led to a more than 90% drop in the disease since 1996. The foodborne virus, which causes a wretched illness, continues to plague adults, particularly people who are homeless or who abuse drugs or alcohol, with a total of 1,648 cases and 85 deaths reported in 2023.
Hepatitis B. The disease causes liver cancer, cirrhosis, and other serious illnesses and is particularly dangerous when contracted by babies and young children. The hepatitis B virus is transmitted through blood and other bodily fluids, even in microscopic amounts, and can survive on surfaces for a week. From 1990 to 2019, vaccination resulted in a 99% decline in reported cases of acute hepatitis B among children and teens. Liver cancer among American children has also plummeted as a result of universal childhood vaccination. But the hepatitis B virus is still around, with 2,000-3,000 acute cases reported annually among unvaccinated adults. More than 17,000 chronic hepatitis B diagnoses were reported in 2023. The CDC estimates about half of people infected don’t know they have it.
Rotavirus. Before routine administration of the current rotavirus vaccines began in 2006, about 70,000 young children were hospitalized and 50 died every year from the virus. It was known as “winter vomiting syndrome,” said Sean O’Leary, a pediatrician at the University of Colorado. “It was a miserable disease that we hardly see anymore.”
The virus is still common on surfaces that babies touch, however, and “if you lower immunization rates it will once again hospitalize children,” Offit said.
Meningococcal vaccines. These have been required mainly for teenagers and college students, who are notably vulnerable to critical illness caused by the bacteria. About 600 to 1,000 cases of meningococcal disease are reported in the U.S. each year, but it kills more than 10% of those it sickens, and 1 in 5 survivors have permanent disabilities.
Flu and covid. The two respiratory viruses have each killed hundreds of children in recent years — though both tend to be much more severe in older adults. Flu is currently on the upswing in the United States, and last flu season the virus killed 289 children.
What is shared clinical decision-making?
Under the changes, decisions about vaccinating children against influenza, covid, rotavirus, meningococcal disease, and hepatitis A and B will now rely on what officials call “shared clinical decision-making,” meaning families will have to consult with a health care provider to determine whether a vaccine is appropriate.
“It means a provider should have a conversation with the patient to lay out the risks and the benefits and make a decision for that individual person,” said Lori Handy, a pediatric infectious disease specialist at the Children’s Hospital of Philadelphia.
In the past, the CDC used that term only in reference to narrow circumstances, like whether a person in a monogamous relationship needed the HPV vaccine, which prevents a sexually transmitted infection and certain cancers.
The CDC’s new approach doesn’t line up with the science because of the proven protective benefit the vaccines have for the vast majority of the population, Handy said.
In their report justifying the changes, HHS officials Tracy Beth Høeg and Martin Kulldorff said the U.S. vaccination system requires more safety research and more parental choice. Eroding trust in public health caused in part by an overly large vaccine schedule had led more parents to shun vaccination against major threats like measles, they said.
The vaccines on the schedule that the CDC has altered were backed up by extensive safety research when they were evaluated and approved by the FDA.
“They’re held to a safety standard higher than any other medical intervention that we have,” Handy said. “The value of routine recommendations is that it really helps the public understand that this has been vetted upside down and backwards in every which way.”
Eric Ball, a pediatrician in Orange County, Calif., said the change in guidance will cause more confusion among parents who think it means a vaccine’s safety is in question.
“It is critical for public health that recommendations for vaccines are very clear and concise,” Ball said. “Anything to muddy the water is just going to lead to more children getting sick.”
Ball said that instead of focusing on a child’s individual health needs, he often has to spend limited clinic time reassuring parents that vaccines are safe. A “shared clinical decision-making” status for a vaccine has no relationship to safety concerns, but parents may think it does.
HHS’ changes do not affect state vaccination laws and therefore should allow prudent medical practitioners to carry on as before, said Richard Hughes IV, an attorney and a George Washington University lecturer who is leading litigation against Kennedy over vaccine changes.
“You could expect that any pediatrician is going to follow sound evidence and recommend that their patients be vaccinated,” he said. The law protects providers who follow professional care guidelines, he said, and “RSV, meningococcal, and hepatitis remain serious health threats for children in this country.”
This story comes from NPR’s health reporting partnership with KFF Health News, a national newsroom that produces in-depth journalism about health issues. KFF Health News is one of the core operating programs at KFF, the independent source for health policy research, polling, and journalism.
60 Popular Cut Flower Garden Ideas to Transform Your Backyard

Unlike just growing flowering plants in your backyard, cut flower garden involves designing that escort beauty and fragance to your gardening space.
You must be creative to arrange seasonal blooms to experiment with different colors, shapes and texture.
Whether you’re an experienced gardener or a complete beginner, growing flowers specifically for cutting lets you enjoy fresh arrangements indoors all season long.
From cottage-style plantings to structured raised beds, there are endless ways to design a space that keeps your vases full and your garden buzzing with life.
Before starting it is important that you plant your cut flower garden. Requiremens like soil, sunlight and watering needs are to be considered in planning phase.
60 Popular Cut Flower Garden Ideas
Start your cut flower garden with long lasting flowering plants like roses, lilies and zinnias. Combining a mix of perennials and annuals guarantee year long floral display.
Create pathways between the garden layout for easy walkthrough.
1. Classic Cottage-Style Cut Flower Garden
A cottage-style garden is perfect for anyone who loves an overflowing, storybook-like look. Packed with nostalgic blooms like foxgloves, hollyhocks, delphiniums, and old roses, it creates a soft, enchanting feel in your backyard.
The mix of heights and textures adds depth, while the natural, slightly messy layout ensures something is always blooming. You’ll enjoy constant color and plenty of stems snipped straight from that romantic, old-world charm.
2. Raised Bed Cut Flower Garden

Raised beds give your cut flower garden a neat, structured appearance while improving soil drainage and warmth. They are especially helpful if you’re working with rocky, clay-heavy, or poor soil.
You can assign each raised bed to specific flower families—filler flowers in one, focal blooms in another—making planting and harvesting incredibly easy. Plus, the elevated height keeps maintenance comfortable.
3. All-Annual Cutting Garden

Annuals like zinnias, cosmos, marigolds, and sunflowers provide nonstop blooms from early summer to frost. They grow fast, produce abundantly, and are perfect for gardeners who want weekly bouquets.
Since annuals bloom their hearts out in a single season, you’ll enjoy vibrant, vase-ready stems with minimal waiting time. Succession planting every few weeks keeps the display fresh and continuously productive.
4. Drought-Tolerant Cut Flower Garden

If you live in a hot or dry region, consider drought-tolerant favorites like lavender, yarrow, strawflower, and rudbeckia. These flowers stay healthy even through long dry spells, requiring far less watering.
They also offer excellent vase life, with many varieties retaining their shape and color even when dried. This makes them perfect for both fresh and everlasting bouquets.
5. Wildflower-Themed Cutting Patch

A wildflower garden brings natural beauty with little effort, using varieties like gaillardia, bachelor’s buttons, coreopsis, and poppies. The mix creates a breezy, meadow-like feel filled with butterflies and bees.
Their more relaxed and whimsical look gives bouquets an airy, natural vibe. It’s the perfect choice for gardeners who love a free-flowing, low-maintenance cutting space.
6. Rose-Dominant Cutting Garden

Roses bring unbeatable fragrance and elegance to any bouquet, making them a must-have for passionate cut-flower gardeners. Hybrid teas, David Austin varieties, and long-stemmed floribundas all work beautifully.
Planting roses in rows improves airflow, which keeps them healthier and produces stronger stems. Pair them with filler plants and greenery for fuller, richer flower arrangements.
7. Fragrance-Focused Cut Flower Garden

If scent is your priority, mix fragrant beauties like sweet peas, stock, lilacs, lilies, and gardenias. These flowers bring a delightful aroma indoors, filling rooms with natural perfume.
Combining early-, mid-, and late-season scented flowers ensures your bouquets always smell lovely. It’s an excellent way to make your floral arrangements feel luxurious and memorable.
8. Vertical Trellis Cutting Garden

Adding trellises helps climbing flowers like sweet peas, clematis, morning glories, and climbing roses grow upward. This maximizes your space while adding height and structure to your garden.
Vertical gardening also improves airflow, producing longer, straighter stems perfect for cutting. It’s ideal for small backyards or gardeners wanting dramatic, towering blooms.
9. Perennial-Only Cutting Garden

Perennials offer dependable blooms year after year, making them a long-term investment. Flowers like peonies, phlox, daisies, and echinacea provide strong stems and reliable blooming cycles.
Though perennials don’t bloom as continuously as annuals, they bring structure, longevity, and seasonal beauty. Over time, they fill out beautifully and require far less replanting.
10. Color-Themed Cutting Garden

A color-themed garden—like all whites, warm sunset tones, or cool pastel palettes—creates a visually stunning and intentional design. It helps your bouquets always feel cohesive and artistic.
Working within a color scheme simplifies plant selection and ensures your garden looks harmonious even from a distance. It’s a fun way to add personality while keeping things coordinated.
11. Butterfly-Friendly Cut Flower Garden

Butterflies flock to nectar-rich flowers like zinnias, lantana, verbena, and coneflowers. These blooms not only look gorgeous but also help support local pollinator populations.
A garden fluttering with butterflies feels lively and enchanting while giving you stems bursting with color. It’s a stunning combination of beauty and ecological benefit.
12. Bee-Friendly Cutting Patch

Bees love flowers like cosmos, lavender, borage, sunflowers, and oregano blooms. Planting these boosts pollination in your garden while supplying vibrant stems for your home.
This type of garden is especially helpful if you grow vegetables nearby, as bees improve yields. Plus, the flowers themselves offer wonderful movement and charm in bouquets.
13. Shade-Tolerant Cut Flower Garden

If your yard gets only partial sun, opt for shade-friendly florals like foxglove, hydrangea, astilbe, and columbine. These plants thrive in dappled or filtered light.
Their softer, woodland-style blooms create delicate, romantic arrangements. Shade gardens also tend to stay lush and cool throughout summer, making maintenance easier.
14. Farm-Style Row Garden

A traditional farm-style layout features long, straight rows packed with productive bloomers like snapdragons, lisianthus, celosia, and dahlias. This structure maximizes efficiency and yield.
Row planting makes watering, weeding, fertilizing, and harvesting a breeze. It’s especially helpful if you plan to grow cut flowers in larger quantities or sell bouquets.
15. Small Backyard Cutting Garden

Even a tiny space can become a productive cutting garden with clever planning. Narrow beds, vertical supports, tiered planters, and compact varieties make the most of limited room.
Choose smaller plants like dwarf zinnias, mini dahlias, and shorter sunflowers to avoid overcrowding. With the right layout, you can still enjoy a steady supply of homegrown bouquets.
16. Herb-and-Flower Mixed Cutting Garden

Mixing herbs like basil, rosemary, dill, and mint with blooms such as marigolds, cosmos, and calendula adds fragrance and texture to your garden and arrangements.
Herbal foliage makes bouquets smell amazing, and many herbs repel pests naturally. This creates a functional space that serves both your kitchen and your vase.
17. Container Cut Flower Garden

Growing cut flowers in containers is perfect for patios, terraces, and small gardens. You can experiment with dahlias, ranunculus, snapdragons, and cosmos in large pots or buckets.
Containers let you control soil quality, rearrange your garden easily, and grow flowers even if you’re renting. Just ensure they get enough sun and consistent watering.
18. Dahlia-Heavy Cutting Garden

Dahlias are beloved for their huge variety of colors, patterns, and styles—from dinnerplate blooms to pompons. They provide endless drama and beauty in bouquets.
Planting lots of dahlias ensures a summer-to-frost display that grows more impressive each week. Support their stems well, and you’ll harvest bucketloads of stunning blooms.
19. Foliage-Focused Cut Garden

A garden dedicated to foliage plants like eucalyptus, dusty miller, coleus, and ornamental grasses ensures your bouquets always look full and structured. Greens are the secret to professional-looking arrangements.
These plants grow vigorously and provide texture, contrast, and a cooling balance to bright blooms. Having dedicated foliage on hand elevates your floral designs effortlessly.
20. Succession-Planting Cut Flower Garden

Succession planting means sowing new seeds every two to three weeks, especially for fast growers like zinnias, cosmos, calendula, and sunflowers. This keeps the flower supply steady all season long.
By staggering your plantings, you prevent gaps in blooming cycles and always have fresh stems ready for cutting. It’s the perfect strategy for consistent bouquets from spring to fall.
21. Pollinator Pathway Cutting Garden

A pollinator pathway uses connected plantings of nectar-rich flowers to attract bees, butterflies, and hummingbirds. Blooms like salvia, echinacea, and cosmos keep the garden buzzing with life.
This type of garden not only helps local wildlife but also boosts flower production. More pollinators mean healthier plants and more stems for cutting throughout the season.
22. Sunflower-Focused Cutting Patch

Sunflowers are unbeatable for cheerful, bold arrangements, offering varieties from classic yellows to deep reds and bi-colors. They grow quickly and produce long, sturdy stems.
Mix branching sunflowers with single-stem varieties to get continuous blooms. Their vibrant appearance makes every bouquet instantly uplifting.
23. Peony Border Garden

Peonies are beloved for their lush, ruffled blooms and incredible fragrance. They bloom for a short but spectacular period in late spring to early summer.
Planting a peony border ensures big, luxurious stems for arrangements each year with minimal maintenance. Once established, they come back stronger and fuller.
24. Seasonal Color Block Cutting Garden

Instead of mixing everything together, plant your flowers in color blocks—one bed for reds, one for pinks, one for whites, and so on. This creates a striking visual impact.
Color blocking simplifies harvesting for themed bouquets while giving your garden a bold painterly look. It’s also great for photographers and content creators.
25. Aromatic Herb & Bloom Pairing Garden

Pair aromatic herbs like lemon balm, lavender, and sage with flowers such as zinnias and cosmos. These combinations create beautiful arrangements with soft scents.
Herbs also help repel pests and improve airflow around your blooms. The result is a healthier, more fragrant cutting garden that’s both useful and beautiful.
26. Edible-and-Flower Mixed Cutting Patch

Mix edible flowers like calendula, nasturtium, borage, and violas with traditional cutting blooms. You’ll have decorative edible garnishes and bouquet fillers in one space.
This garden is especially fun for food lovers who enjoy plating meals beautifully. It also brings double the color and function to your backyard.
27. Vintage-Style Cutting Garden

Use nostalgic flowers like sweet peas, old garden roses, carnations, and scabiosa for a vintage-style garden. These blooms bring soft, romantic charm with a timeless feel.
The delicate petals and pastel tones look perfect in dainty, old-fashioned arrangements. It’s ideal for anyone who loves retro aesthetics or Victorian garden vibes.
28. Modern Minimalist Flower Garden

A minimalist garden features clean lines, lots of negative space, and select plant varieties. Choose flowers like calla lilies, alliums, and white dahlias for a modern look.
The simplicity highlights each flower’s form and makes harvesting easy. It’s perfect for those who prefer streamlined design over big, busy borders.
29. Moon Garden for Night-Blooming Cuts

Moon gardens use white or pale flowers like moonflower, white cosmos, nicotiana, and evening primrose that glow under moonlight. These blooms look magical at dusk.
They provide unique, ethereal stems for evening arrangements or nighttime entertaining. Plus, their fragrance is often strongest after sunset.
30. Beginner-Friendly Cutting Garden

A beginner garden focuses on easy, forgiving varieties like zinnias, marigolds, sunflowers, and snapdragons. These plants thrive even with minimal care.
This type of garden helps new gardeners build confidence while still producing tons of flowers. It’s the simplest path to weekly fresh bouquets.
31. Children’s Cut Flower Garden

Create a fun, simple garden with fast-growing flowers like sunflowers, cosmos, strawflowers, and zinnias. Kids love watching these colorful blooms pop up quickly.
Add stepping stones and small labels for an interactive experience. This garden encourages creativity and makes harvesting flowers a shared family activity.
32. Mini Greenhouse Cut Flower Setup

Using a small greenhouse lets you start seeds early and extend your growing season. Flowers like ranunculus, anemones, and snapdragons thrive in cooler temps.
This setup gives you earlier blooms and longer-lasting stems. It’s perfect for gardeners who want spring bouquets before the outdoor beds wake up.
33. Long-Stem Specialty Garden

Focus on varieties known for extra-long stems such as delphinium, snapdragons, lisianthus, and tall cosmos. These are ideal for dramatic, tall arrangements.
Growing these specialty blooms gives your bouquets a professional look. Support and trellising keep the stems straight and cut-ready.
34. Rainbow-Themed Cutting Garden

Plant flowers in a rainbow order—red, orange, yellow, green, blue, purple, pink. This makes your garden look like a vibrant, living spectrum.
It creates visually stunning beds and helps you harvest matching colors for coordinated bouquets. It’s a playful and cheerful garden style.
35. Spring-Only Cutting Garden

A spring garden focuses on bulbs and early bloomers like tulips, daffodils, ranunculus, and anemones. These flowers bring soft, fresh colors after long winters.
Spring cutting gardens look spectacular with little effort and provide the season’s first harvests. They pair beautifully in gentle, pastel bouquets.
36. Summer Explosion Cutting Garden

This garden emphasizes peak-summer blooms like zinnias, sunflowers, dahlias, marigolds, and celosia—plants that love heat and produce continuously.
A summer-heavy cutting garden ensures you’ll have bright, bold bouquets every week. It’s the perfect choice for gardeners who enjoy vibrant, energetic color palettes.
37. Fall-Themed Cut Flower Garden

Grow late-season flowers like chrysanthemums, asters, rudbeckia, and ornamental grasses. These plants keep the garden alive when most others start fading.
The autumn color palette—rust, gold, burgundy, and deep orange—creates warm, cozy fall bouquets. It’s an excellent way to extend your cutting season.
38. Cut Flower Garden with Decorative Paths

Design paths using mulch, gravel, bricks, or stepping stones to create structure around your flower beds. It makes the garden feel more intentional and easier to access.
Pretty pathways elevate the overall look, making harvesting smoother and enjoyable. They also keep your shoes clean even after watering or rain.
39. Mixed Height Layered Cutting Garden

Use tall flowers like sunflowers and hollyhocks in the back, medium plants like cosmos in the middle, and low growers like alyssum or marigolds in the front.
This layered approach creates depth and keeps all plants visible. The structure also makes harvesting simple since everything has its own place.
40. Backyard Flower Farm Style Garden

Transform your backyard into a mini flower farm with rows of productive varieties like lisianthus, zinnias, dahlias, and snapdragons. It mimics professional grower layouts.
With efficient spacing, irrigation, and succession planting, you’ll have enough blooms to fill your home—and share with neighbors or sell at local markets.
41. Xeriscape Cut Flower Garden

A xeriscape flower garden focuses on water-wise plants like lavender, coneflowers, yarrow, and globe thistle. These blooms thrive even in hot, dry climates with minimal irrigation.
This garden style reduces maintenance while still delivering gorgeous, long-lasting stems for arrangements. It’s perfect for gardeners dealing with water restrictions or naturally dry soil conditions.
42. Rustic Farmhouse Cutting Garden
Rustic farmhouse gardens mix sunflowers, black-eyed Susans, asters, and wild grasses for a warm, country feel. The look is relaxed, abundant, and charming.
Paired with wooden raised beds, galvanized buckets, or old crates, the space becomes decorative as well as productive. The harvested bouquets reflect that homey, cozy farmhouse vibe.
43. Bohemian-Style Cut Flower Garden
A boho garden uses free-flowing, textural flowers like amaranthus, cosmos, celosia, and ornamental grasses. Nothing is overly structured—everything feels whimsical and natural.
Bouquets from this garden look airy and artistic, often featuring trailing blooms and unique shapes. It’s perfect for gardeners who love relaxed, creative designs.
44. Tropical Cut Flower Garden
Grow dramatic tropical blooms like cannas, ginger lilies, hibiscus, and bird of paradise for bold, exotic arrangements. These plants bring vibrant color and lush foliage.
Tropical flowers create eye-catching bouquets that feel like vacation vibes in a vase. They thrive in warm, humid climates or can be grown in containers in cooler regions.
45. Patio Cut Flower Garden
If you’re gardening on a patio, use large containers, tiered stands, and railing planters filled with dahlias, zinnias, cosmos, and mini sunflowers. This keeps everything close and accessible.
Patio cutting gardens look beautiful and allow you to harvest flowers right outside your seating area. They’re perfect for renters and small-space gardeners.
46. Front-Yard Cut Flower Border
Make your front yard work double duty by planting a long border of daisies, phlox, roses, asters, and lilies. It adds curb appeal while supplying endless stems.
Visitors enjoy the display, and you get a garden that’s both ornamental and useful. It’s a smart way to blend beauty with practicality.
47. Backyard Archway Flower Garden
Install a metal or wooden arch covered with climbing flowers like roses, clematis, or sweet peas. This creates a beautiful entry point to your cutting garden.
The arch adds height, romance, and structural interest while offering long stems for harvesting. It instantly elevates the garden’s overall aesthetic.
48. Shady Woodland-Inspired Cut Garden
For gardens with dappled light, grow shade-loving flowers like astilbe, Japanese anemones, columbine, and ferns. These plants thrive under tall trees or along fences.
Their soft colors and delicate textures create dreamy, natural-looking arrangements. This style makes the most of spaces many gardeners ignore.
49. Raised Border Cutting Garden
A raised border uses slightly elevated mounds or built-up edges filled with perennials and annuals. It provides excellent drainage and adds visual shape to your yard.
These borders make flowers easier to harvest and help define pathways or garden zones. They look especially beautiful with layered height plantings.
50. Mixed Bulb Cut Flower Garden
Plant a variety of bulbs—tulips, alliums, lilies, gladiolus, and dahlias—for blooms from early spring to fall. Bulbs offer strong stems and striking shapes.
This garden gives you waves of color throughout the year. With careful planning, something is always popping up for your vases.
51. Japanese-Inspired Flower Garden
Use simple, elegant flowers like irises, peonies, camellias, and flowering branches to create a peaceful, Zen-like atmosphere. Less is more here.
These flowers make arrangements that feel serene and artistic. Paired with stones and water features, the garden becomes a tranquil retreat.
52. Fairy Garden-Themed Cut Flower Bed
Soft, whimsical flowers like violas, alyssum, foxgloves, and baby’s breath make your garden feel magical. Add tiny decorative elements for charm.
The harvested blooms are delicate and sweet, perfect for small table arrangements. Kids especially love this enchanting garden theme.
53. Evergreen Foliage & Bloom Combo Garden
Mix evergreen shrubs like boxwood or rosemary with seasonal blooms. This ensures your cutting garden looks good even in winter.
The evergreens provide structure while the flowers add seasonal color. Together, they create balanced bouquets and year-round visual interest.
54. White Garden (All-White Blooms)
A white garden uses flowers like white roses, daisies, phlox, snapdragons, and hydrangeas. It creates a clean, elegant, moonlit effect.
These monochromatic bouquets feel fresh and timeless. White gardens also look stunning in the evening when the blooms reflect ambient light.
55. Colorful Cottage Strip Garden
If you have a narrow area, plant a strip of mixed cottage blooms like delphiniums, daisies, poppies, and scabiosa. It turns unused edges into mini flower farms.
Strip gardens produce surprising amounts of stems while requiring very little space. They’re perfect for walkways, fences, or property edges.
56. Salvaged & Recycled Container Garden
Use old buckets, wooden crates, tin cans, and unused pots to create a charming recycled cutting garden. Fill them with easy growers like marigolds, cosmos, and zinnias.
This eco-friendly approach saves money while adding personality to your space. It’s creative, sustainable, and perfect for rustic or farmhouse decor lovers.
57. Mediterranean Cut Flower Garden
Mediterranean flowers like lavender, rosemary blooms, sage flowers, snapdragons, and rock roses thrive in warm, dry climates. Their silvery foliage adds extra beauty.
This garden style looks timeless and sun-kissed, offering herbs and blooms with great vase life. It’s ideal for low-maintenance gardeners.
58. Cottage Meadow Mix Garden
Combine meadow-style blooms like asters, cosmos, rudbeckia, and Queen Anne’s lace for a loose, natural look. These plants blend beautifully and grow with little fuss.
You’ll get airy, textured bouquets that feel like they came straight from the countryside. It’s perfect for a relaxed, wandering garden style.
59. Circular Cut Flower Garden Layout
Arrange your flower beds in circular patterns with a center focal point like a birdbath or statue. It creates symmetry and visual flow.
A circular layout is easy to walk around and makes harvesting simple from all sides. It also adds elegance to the space without needing much room.
60. High-Volume Flower Production Garden
Designed for gardeners who want LOTS of blooms, this garden uses intensive planting, spacing, and succession techniques. Rows of zinnias, dahlias, snapdragons, and strawflowers keep production high.
With proper planning, you can harvest buckets of flowers every week. It’s perfect for gifting, events, or starting a small home flower business.
Conclusion
By mixing seasonal favorites, experimenting with textures, and growing varieties you truly love, you’ll always have fresh flowers ready for your home.
From spring bulbs to fall classics, your garden can keep your vases full nearly all year long.
No matter which ideas you choose, the joy of stepping outside and gathering a handful of fresh, homegrown flowers never gets old—and that’s the magic of a blooming backyard.

Khaja Moinuddin, a computer science graduate, finds joy in gardening and homesteading. Join him on this blog as he shares his experiences in homesteading, gardening, and composting
BIGGERFIVE Smart Watch for Kids, 1.8″ Fitness Tracker Watch Pedometer, Heart Rate, IP68 Waterproof, Sleep Monitor, Calorie Step Counter, 5 Puzzle Games with/Without APP for Girls Teens 5-16, Nylon

Price: $39.99 - $29.99
(as of Jan 10, 2026 17:43:44 UTC – Details)
From the brand


With children’s health as our top priority, Biggerfive is committed to creating the best wearable technology products for children.
Encouragement is at the core of our philosophy, and we believe in the fierce power of familial encouragement to shape our kids for a healthier and happier tomorrow.
Biggerfive,happy to thrive!
Kids Fitness Watch without APP
Kids Multi-functional Watch
Kids Fitness Tracker
Brave Kids Smartwatch
10+ Sports Mode
All-Day Activity Tracking: BIGGERFIVE BRAVE 2 Smart Watch for Kids Teens Automatically counts steps, distance, calories burned, and active minutes. Supports 80 sports modes like walking, running, cycling, basketball, and more.
Without/With APP: BIGGERFIVE kids fitness tracker watch can be used seperately without APP and phone. But with APP, you could explore more functions. Compatible with Android 6.0+ and iOS 9.0+ smartphones.
Comprehensive Health Monitoring: Monitors real-time heart rate and tracks sleep patterns to promote your child’s well-being.
Customizable Watch Face &1.8″ HD Touch Screen:Our kids smartwatch boasts a 1.8″ HD touch screen and offers 100+ exquisite cloud dials in APP BIGGERFIVE. Elevate personal style with custom dials using your kids’ own photos and ignite their creativity!
Puzzle Games under Parents’ Control: 5 built-in puzzle games can help train your child’s reaction ability and calculation ability. You could restrict your child from playing games at school in the BIGGERFIVE APP (supports also lock game all the time).
Encourages Healthy Habits & Perfect Gift Idea: BIGGERFIVE kids smart watch motivates children to develop good exercise habits and stay healthier. Ideal gift for birthdays, Christmas, and other special occasions.
2026 Upgrade Foot Pedal Resistance Band, Adjustable 4-Tube Pedal Ankle Puller Resistance Band with Handle, Multifunction Home Gym Equipment, Stirrup Puller for Men Women for Full Body Exercise

Price: $27.99
(as of Jan 10, 2026 05:41:58 UTC – Details)
To calculate the overall star rating and percentage breakdown by star, we don’t use a simple average. Instead, our system considers things like how recent a review is and if the reviewer bought the item on Amazon. It also analyzed reviews to verify trustworthiness.Learn more how customers reviews work on Amazon