Price: $164.67 - $135.00 (as of May 21, 2026 13:12:49 UTC – Details)
Product description
Product Dimensions : 1.97 x 1.18 x 3.94 inches; 3.2 ounces Item model number : SCAOD0350 Manufacturer : The Organic Pharmacy ASIN : B07XD5BWTW Best Sellers Rank: #360,438 in Beauty & Personal Care (See Top 100 in Beauty & Personal Care) #6,818 in Facial Serums Customer Reviews: 4.0 4.0 out of 5 stars (18) var dpAcrHasRegisteredArcLinkClickAction; P.when(‘A’, ‘ready’).execute(function(A) { if (dpAcrHasRegisteredArcLinkClickAction !== true) { dpAcrHasRegisteredArcLinkClickAction = true; A.declarative( ‘acrLink-click-metrics’, ‘click’, { “allowLinkDefault”: true }, function (event) { if (window.ue) { ue.count(“acrLinkClickCount”, (ue.count(“acrLinkClickCount”) || 0) + 1); } } ); } }); P.when(‘A’, ‘cf’).execute(function(A) { A.declarative(‘acrStarsLink-click-metrics’, ‘click’, { “allowLinkDefault” : true }, function(event){ if(window.ue) { ue.count(“acrStarsLinkWithPopoverClickCount”, (ue.count(“acrStarsLinkWithPopoverClickCount”) || 0) + 1); } }); }); THE ORGANIC PHARMACY ANTI-AGING DUO: The Organic Pharmacy Antioxidant Face Serum 35ml & The Organic Pharmacy Antioxidant Face Gel 35ml. An answer to everyday skin damage from toxins and environmental aggressors. Infuse your skin with antioxidants, essential fatty acids, and cell regenerating plant extracts to actively protect and repair your skin on a daily basis. ANTIOXIDANT AND VITAMIN-RICH: Ultra-light Antioxidant Face Gel is packed with antioxidants, vitamins and herbal extracts. Antioxidant Face Serum is packed with potent, skin-loving ingredients for a radiant, healthy glow. Gel is 90% organic; Serum is 98% organic. SKIN BARRIER PROTECTION: Formulated with antioxidant-rich botanical extracts including Aloe Vera, Oat, and Centella Asiatica to strengthen and repair the skin barrier. Boosts Collagen to minimizes appearance of wrinkles. Revitalizes skin for ‘’instant face lift’’ HOW TO USE: Morning and night, apply 1-2 pumps to face, neck and decollete after cleansing and toning. For best results apply before Antioxidant Face Gel and after Antioxidant Face Serum. Customize the amounts based on your skin’s needs. MADE IN UK: All The Organic Pharmacy products are developed and manufactured with care in London, England. None of our products are tested on animals.
Price: $15.99 - $4.99 (as of May 21, 2026 01:10:13 UTC – Details)
You don’t have to be an expert to heal naturally. If you’ve felt overwhelmed by herbal books packed with info but no heart, Nature’s Pharmacy is a breath of fresh air. With warmth, clarity, and a practical, holistic approach, it helps you care for yourself and your family using simple, time-tested remedies that really work.
This book is different from all the others—it teaches you how to identify and grow herbs, cook with purpose for healing, and use natural remedies for everything from colds, headaches, and menstrual cramps to anxiety, insomnia, as well as remedies and holistic approaches like red light therapy and grounding to manage pain.
You’ll learn how to manage weight naturally and holistically, using herbal appetite suppressants and metabolism boosters—along with gut health and a balanced microbiome information.
Here is more of what you’ll discover in this empowering guide:
🌿 Identify herbs with confidence – Simple tips and vivid illustrations make it easy to recognize.
👶 Gentle remedies for kids – Soothe colic, constipation, and more with safe, effective herbal support.
⚖️ Natural weight loss support – Practical insights and strategies to help transform your weight loss journey.
🍲 Cook with purpose – Discover how herbs in the kitchen can double as powerful healing tools.
🦠 Boost digestion & gut health – Strengthen your microbiome and feel your best from the inside out.
🩹 Everyday first aid – Ease sore throats, earaches, bug bites, and burns with simple, natural solutions.
🔬 Science-backed confidence – Lean on trusted studies while using herbs with clarity and assurance.
✨ Healthy skin, naturally – Herbal help for acne, wrinkles, and glowing skin at any age.
😌 Stress & anxiety relief – Calm your mind and body with holistic remedies that support emotional wellness.
🌱 Lifestyle that heals – A practical roadmap to daily habits that work with your herbal journey, not against it.
📚 Global wisdom & tradition – Cultural stories behind popular herbs connect you to centuries of healing.
🌼 Start your herbal garden – Learn the easiest beginner herbs to grow—even with limited space or experience.
You might be thinking, “This feels like too much to learn with everything I’ve got going on,” or, “Herbs haven’t really worked for me before.”
But don’t worry—this guide keeps things simple, clear, and doable. Start small and continue to build as your confidence grows. Learn how to bring herbal healing into your everyday life!
Ready to take charge of your health the natural way? Scroll up and hit “Add to Cart.” You’ve got this!
From the Publisher
ASIN : B0F3KMLYJH Accessibility : Learn more Publication date : April 2, 2025 Language : English File size : 6.5 MB Enhanced typesetting : Enabled X-Ray : Not Enabled Word Wise : Enabled Print length : 143 pages Page Flip : Enabled Best Sellers Rank: #1,536,208 in Kindle Store (See Top 100 in Kindle Store) #1,027 in Alternative Holistic Medicine #1,304 in Herbal Remedies (Kindle Store) #2,800 in Nutrition (Kindle Store) Customer Reviews: 4.8 4.8 out of 5 stars (34) var dpAcrHasRegisteredArcLinkClickAction; P.when(‘A’, ‘ready’).execute(function(A) { if (dpAcrHasRegisteredArcLinkClickAction !== true) { dpAcrHasRegisteredArcLinkClickAction = true; A.declarative( ‘acrLink-click-metrics’, ‘click’, { “allowLinkDefault”: true }, function (event) { if (window.ue) { ue.count(“acrLinkClickCount”, (ue.count(“acrLinkClickCount”) || 0) + 1); } } ); } }); P.when(‘A’, ‘cf’).execute(function(A) { A.declarative(‘acrStarsLink-click-metrics’, ‘click’, { “allowLinkDefault” : true }, function(event){ if(window.ue) { ue.count(“acrStarsLinkWithPopoverClickCount”, (ue.count(“acrStarsLinkWithPopoverClickCount”) || 0) + 1); } }); });
Tomatoes may start small in spring, but by midsummer they often turn into sprawling, tangled vines that quickly take over the garden.
Without support, branches flop onto the soil, fruits become harder to harvest, and plants are more vulnerable to pests and disease.
A sturdy tomato trellis keeps plants upright, improves airflow, and makes pruning, watering, and picking tomatoes much easier. The best part is that you do not need expensive materials to build one.
Simple supplies like bamboo poles, wooden stakes, cattle panels, PVC pipe, and even recycled items can create reliable supports for healthy plants.
Whether you grow tomatoes in raised beds, containers, or backyard rows, these DIY tomato trellis ideas will help save space, keep plants organized, and make summer harvesting far more enjoyable.
28 DIY Tomato Trellis Ideas
A reliable tomato trellis can completely change the way your garden grows, making plants easier to manage while keeping fruits cleaner and healthier.
From rustic wooden supports to space-saving vertical designs, these DIY ideas combine practicality with creativity for every type of home garden.
1. Simple Wooden Stake Trellis
A simple wooden stake trellis is an easy, budget-friendly way to support tomato plants. It works best for determinate varieties that stay compact and manageable during the season.
Sturdy wooden stakes keep branches upright, improve airflow, and make harvesting easier while preventing fruits from touching the soil.
Install the stakes early and tie plants loosely as they grow for reliable support throughout summer.
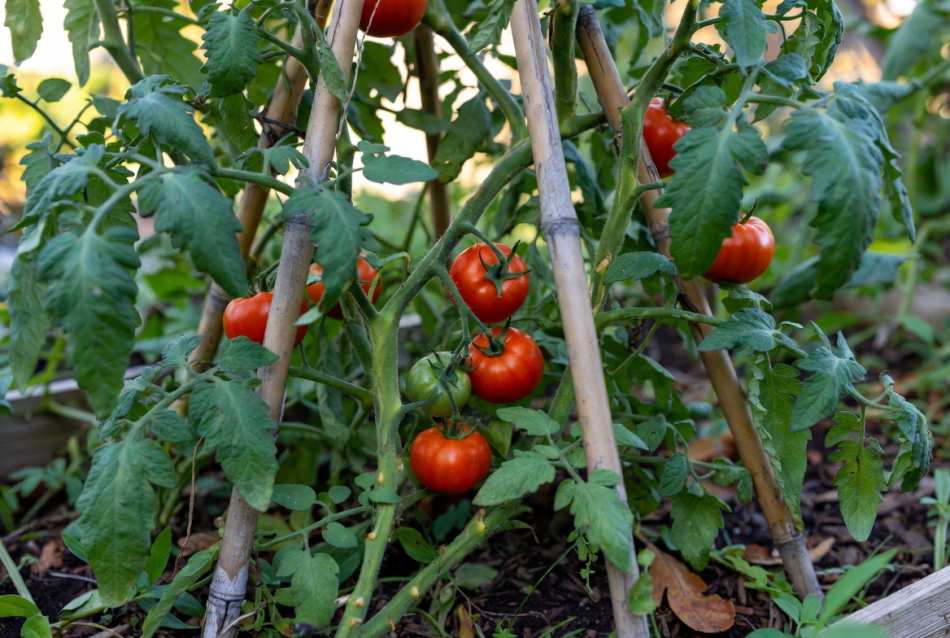
A bamboo teepee trellis adds a simple rustic look while giving tomato plants reliable vertical support.
Several bamboo poles are tied together at the top to form a sturdy cone-shaped structure that works well in raised beds, containers, and small backyard gardens.
The open design improves airflow and allows vines to climb naturally, making harvesting and pruning much easier during the growing season.
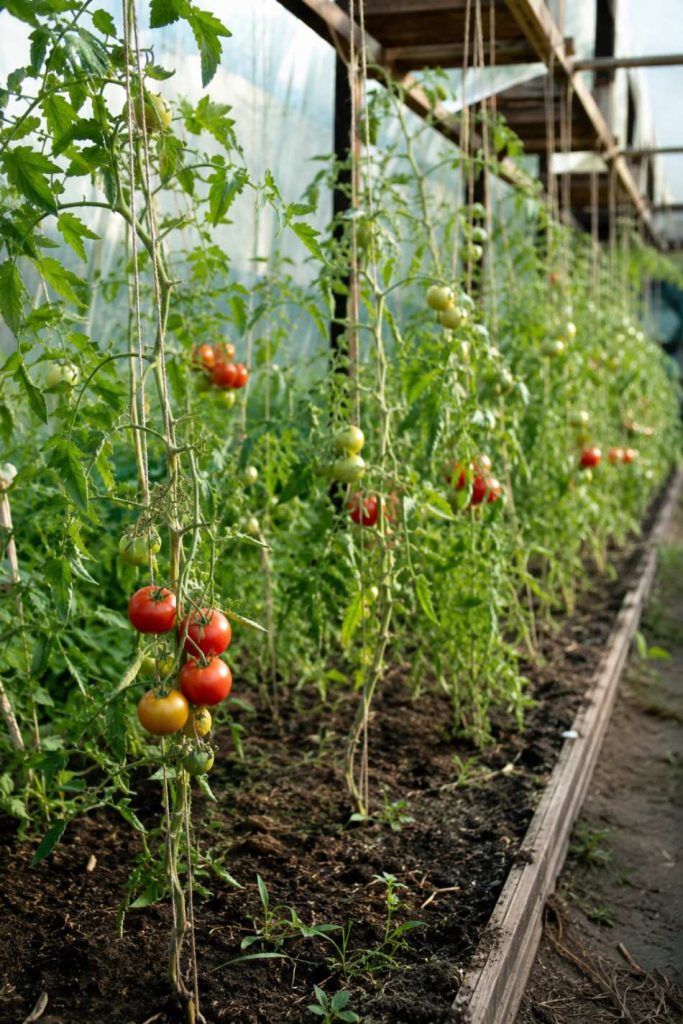
A string trellis system is a great option for gardeners who want to grow tomatoes vertically without using bulky cages or panels.
Strong twine is attached overhead and secured near the base of each plant, allowing vines to be trained upward as they grow. This setup saves space, improves airflow, and works especially well for indeterminate tomato varieties in greenhouses or narrow garden rows.
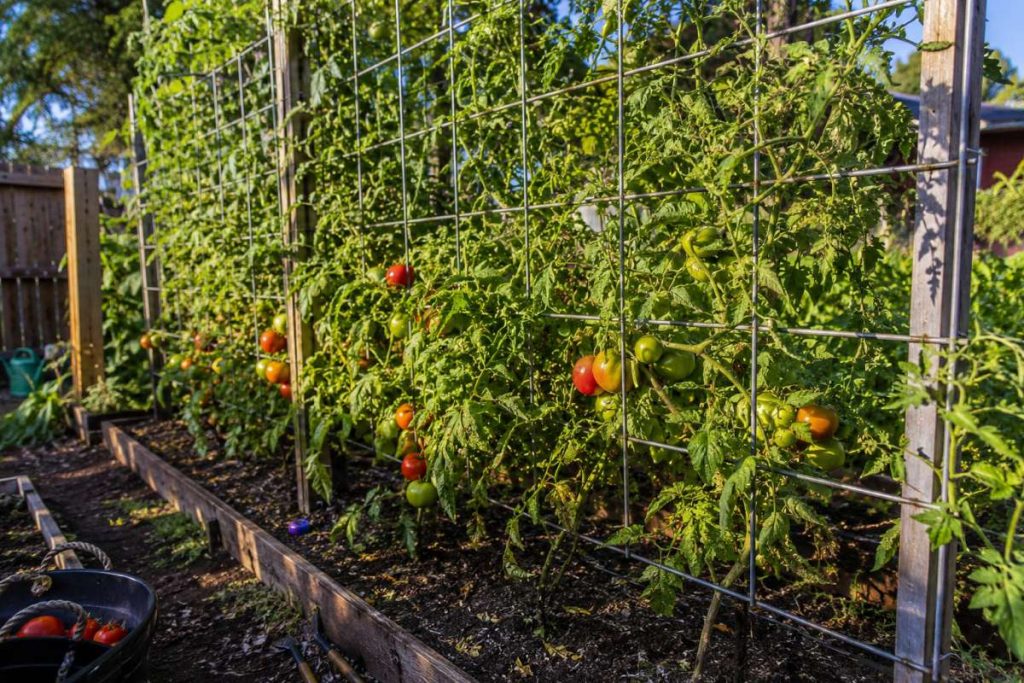
A cattle panel trellis provides strong support for large tomato plants loaded with heavy fruit.
The sturdy metal panels can be secured between wooden or metal posts to create a long-lasting vertical growing system. This setup improves airflow, keeps vines organized, and makes harvesting easier throughout the season.
It works especially well in raised beds and larger backyard vegetable gardens.
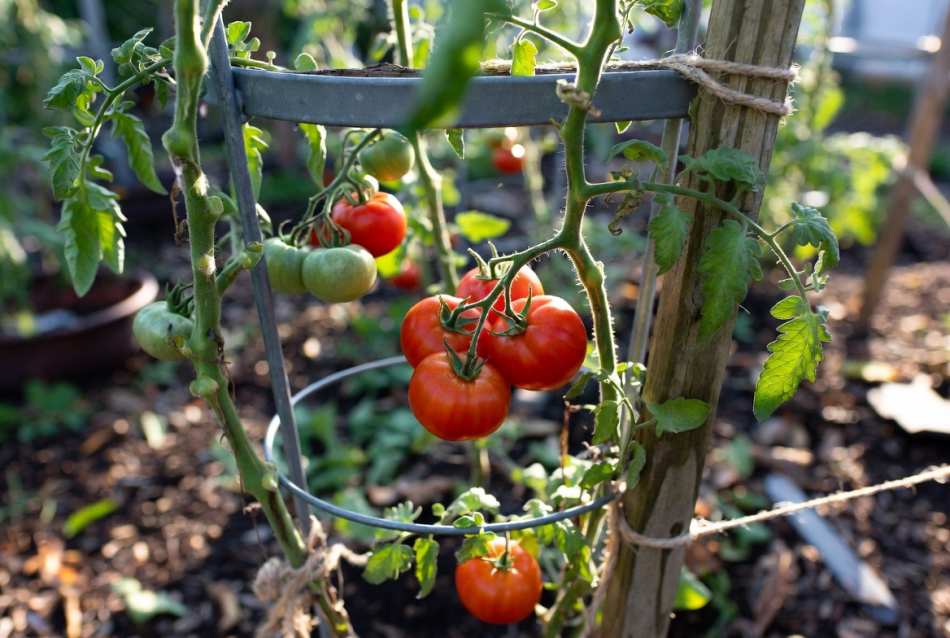
5. Tomato Cage Upgrade
Basic tomato cages often become weak once plants start producing heavy branches and fruit.
Reinforcing them with wooden stakes or metal rods creates a much sturdier support system that lasts longer through summer storms and rapid growth. This simple DIY upgrade helps keep plants upright without replacing existing cages, making it an easy and affordable option for beginner gardeners.
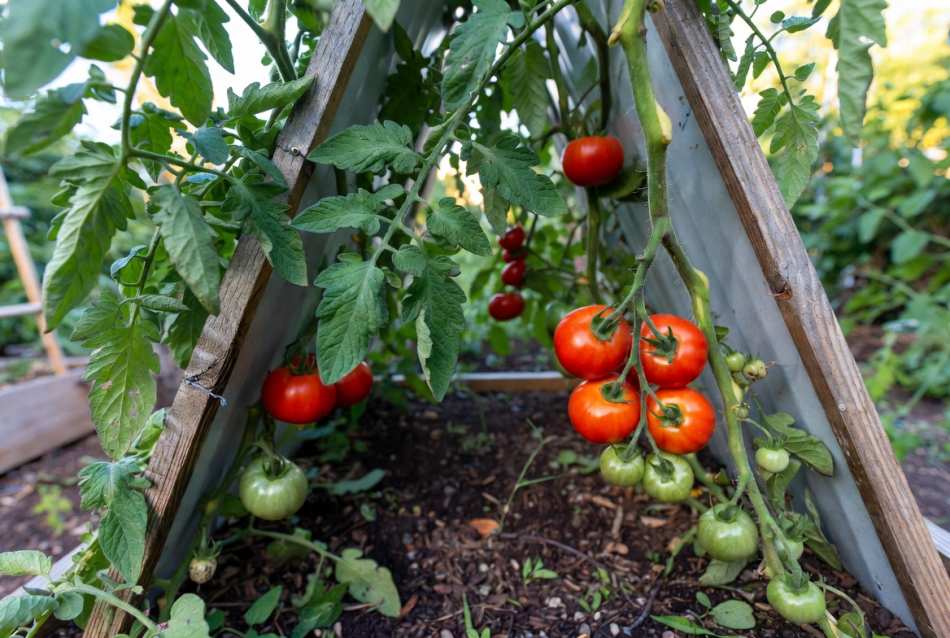
6. A-Frame Tomato Trellis
An A-frame tomato trellis creates a stable structure that supports plants on both sides while saving valuable garden space.
Built from wood, bamboo, or metal panels, the angled design allows tomatoes to climb upward with good airflow and sunlight exposure.
The open center also makes harvesting easier and keeps pathways clear, making this style ideal for raised beds and larger garden rows.
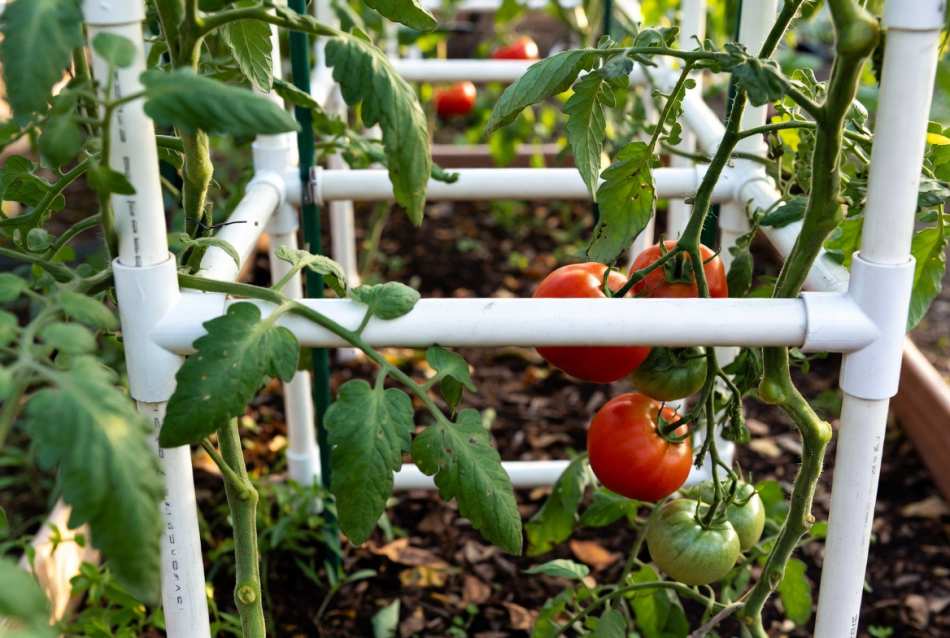
7. PVC Pipe Trellis
A PVC pipe trellis is lightweight, affordable, and easy to customize for different garden sizes. The pipes can be connected into simple frames, arches, or vertical supports that hold tomato plants securely throughout the season.
PVC also resists moisture and weather damage better than untreated wood, making it a long-lasting option for backyard gardens, raised beds, and container tomato setups.
8. Florida Weave Trellis
The Florida weave trellis is a popular method for supporting multiple tomato plants in long garden rows.
Strong twine is woven between sturdy stakes, creating a flexible support system that keeps vines upright as they grow. This setup improves airflow, reduces sprawling, and makes harvesting easier without using bulky cages.
It works especially well for gardeners growing several tomato plants together.
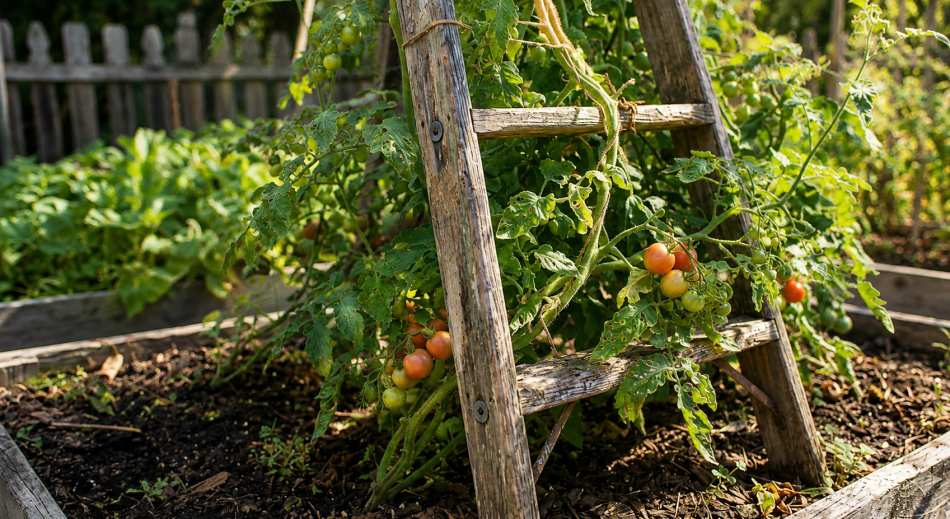
9. Recycled Ladder Trellis
An old wooden ladder can become a creative and functional tomato trellis with very little effort. Tomato vines naturally climb along the rungs, while the vertical design saves space in smaller gardens and patios.
Recycled ladder trellises also add rustic charm to vegetable beds and work well for gardeners who enjoy repurposing materials instead of buying new garden structures.
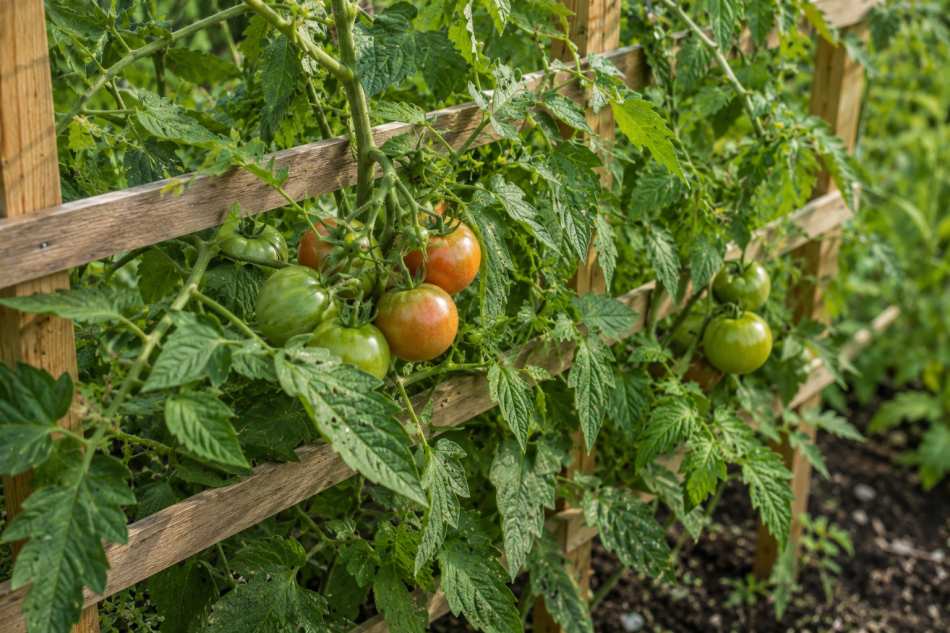
10. Wooden Grid Trellis
A wooden grid trellis gives tomato plants plenty of support while adding a neat, decorative look to the garden. The crisscross design creates multiple tie points that help guide vines upward as they grow.
This style works well in raised beds, along fences, or against garden walls. It also improves airflow around the plants, helping reduce moisture buildup and common tomato diseases.
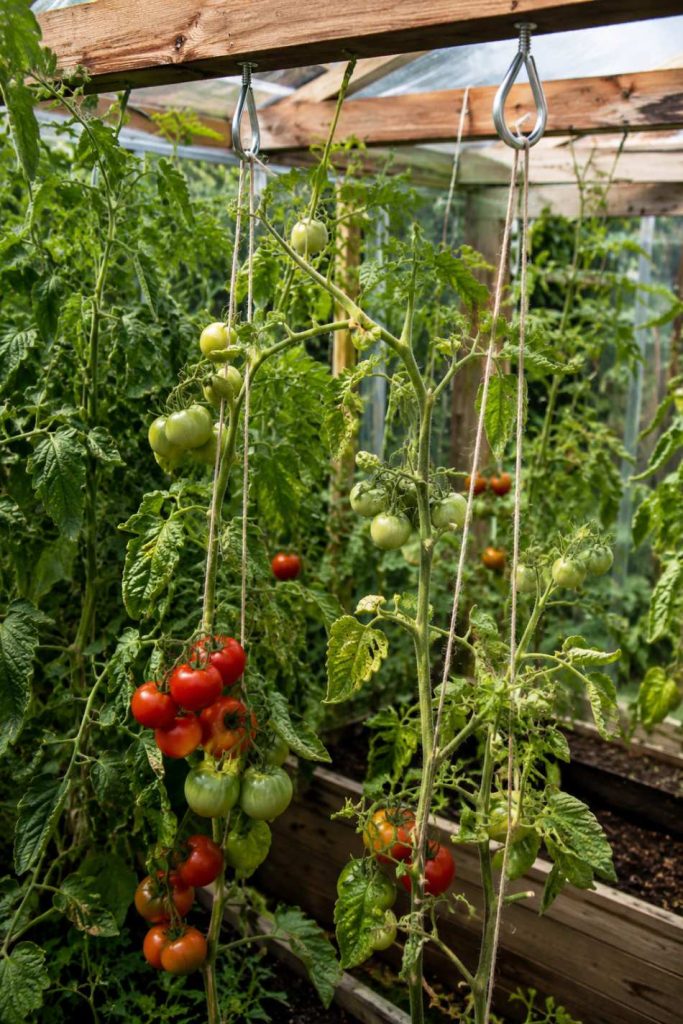
11. Hanging String and Hook Trellis
A hanging string and hook trellis is a simple vertical growing system often used in greenhouses and compact gardens. Strong hooks support hanging twine that guides tomato vines upward throughout the season. This setup keeps plants organized, saves ground space, and allows easy pruning and harvesting.
It works especially well for tall indeterminate tomato varieties that continue growing all summer long.
Using an existing fence panel as a tomato trellis is an easy way to save both money and garden space.
Tomato vines can be tied directly to the fence as they grow, creating a tidy vertical growing system with excellent airflow and sunlight exposure. This method works especially well in small backyards where every bit of planting space matters during the busy summer season.
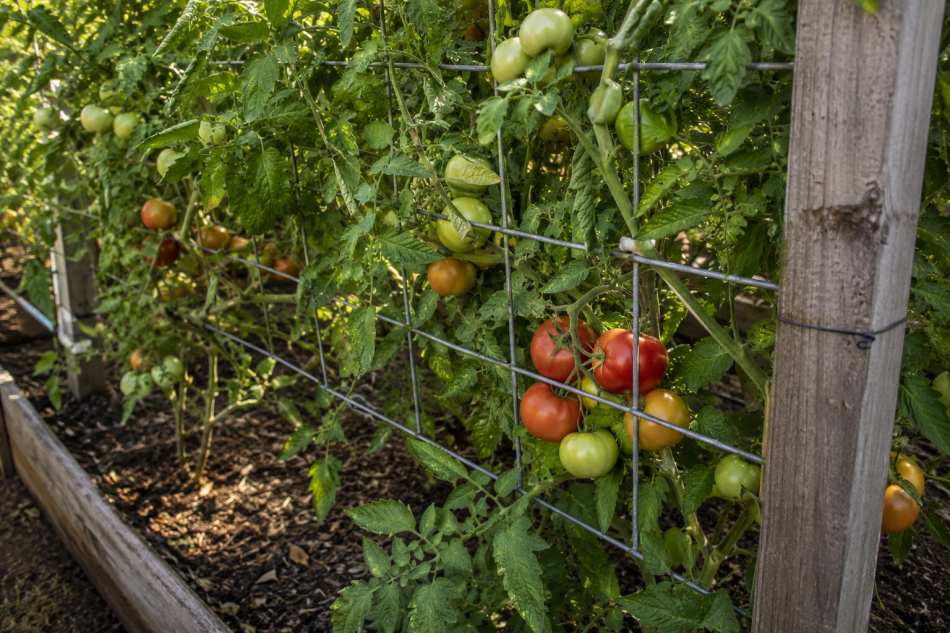
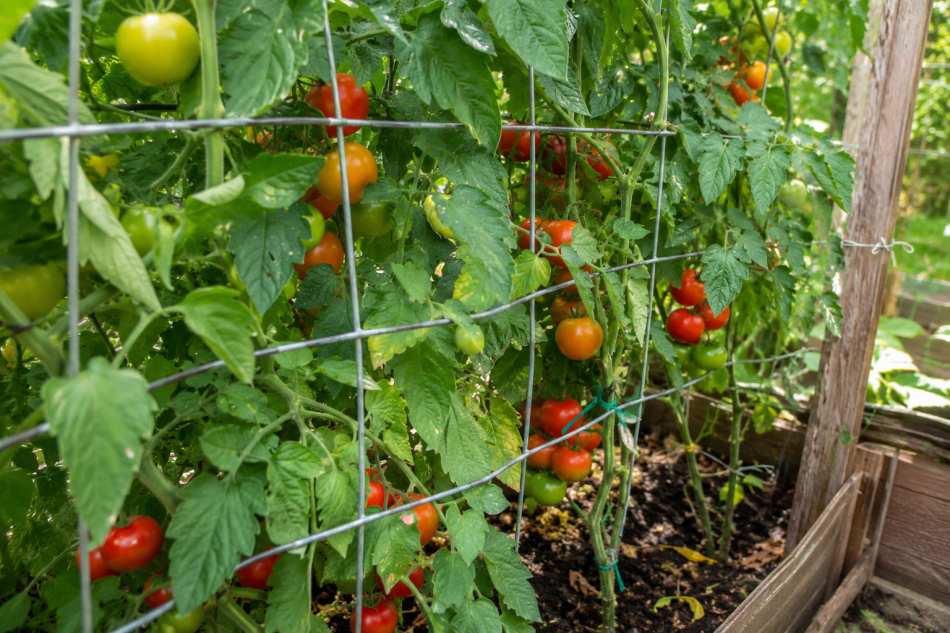
13. DIY Wire Mesh Trellis
A wire mesh trellis offers sturdy support for fast-growing tomato plants while keeping vines neatly contained. The open mesh design allows good airflow and gives gardeners plenty of places to tie stems as the plants grow taller.
Wire mesh panels are also easy to install against posts or raised beds, making them a durable and practical option for larger tomato varieties.
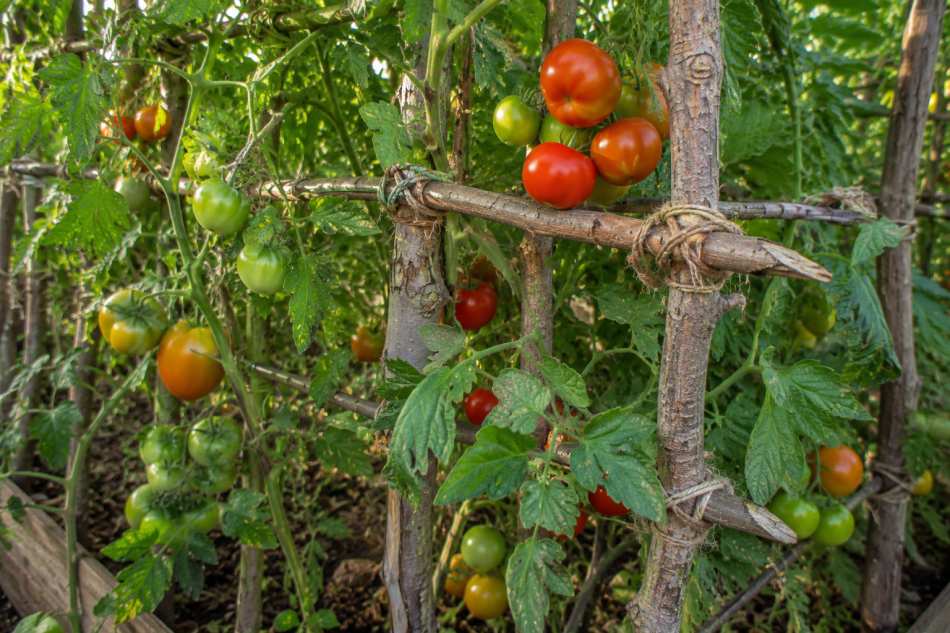
14. Rustic Branch Trellis
A rustic branch trellis brings a natural woodland look to the vegetable garden using sticks, pruned branches, or fallen limbs. The uneven shapes create a charming handmade appearance while still providing reliable support for climbing tomato vines.
This eco-friendly option works well for gardeners who enjoy using natural materials and want a simple trellis without spending much money.
15. Raised Bed Corner Trellis
A corner trellis helps maximize growing space inside raised beds by using vertical support without crowding the center of the garden.
Installed along the edges or corners, the structure keeps tomato vines upright while leaving more room for companion plants nearby. This setup improves airflow, simplifies harvesting, and works especially well in compact backyard gardens with limited planting space.
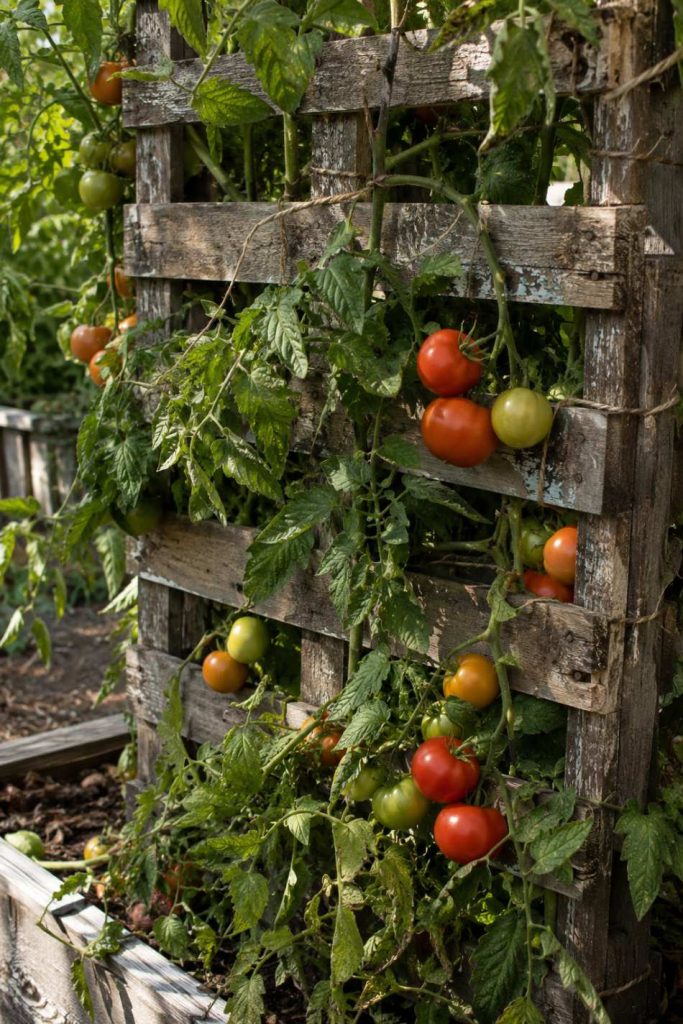
16. Pallet Tomato Trellis
A wooden pallet can be turned into a simple tomato trellis with very little effort or expense. The slats provide natural support points for tying tomato vines as they grow taller through the season.
Leaned against a fence or secured upright in the garden, pallets create a rustic vertical growing system that works well for raised beds and small backyard spaces.
17. Arched Tomato Tunnel Trellis
An arched tomato tunnel creates both a functional support system and an eye-catching garden feature. Built from cattle panels, PVC, or flexible metal fencing, the curved structure allows tomato vines to climb overhead while keeping pathways open underneath.
The design improves airflow and sunlight exposure while making harvesting easier. It works especially well in larger vegetable gardens with multiple tomato plants.
18. Heavy-Duty Metal Conduit Trellis
A metal conduit trellis provides extremely strong support for large indeterminate tomato plants that produce heavy fruit all summer. The durable metal frame withstands wind, rain, and long growing seasons without bending or collapsing.
Although it takes more effort to build, this sturdy structure can last for years and works well for gardeners who grow tomatoes regularly every season.
19. Balcony Tomato String Trellis
A balcony string trellis is perfect for growing tomatoes in containers when garden space is limited. Strings attached to railings, hooks, or overhead supports guide the vines upward instead of allowing them to spread outward.
This vertical setup keeps balconies tidy, improves airflow around plants, and makes it easier to grow healthy tomatoes even in compact urban spaces.
20. Spiral Stake Tomato Support
Spiral stakes offer a compact and simple way to support tomato plants without bulky cages or large trellises. The metal spiral allows vines to naturally twist upward as they grow, reducing the need for constant tying.
This method works especially well for smaller garden spaces and container tomatoes while keeping plants upright, organized, and easier to harvest throughout the season.
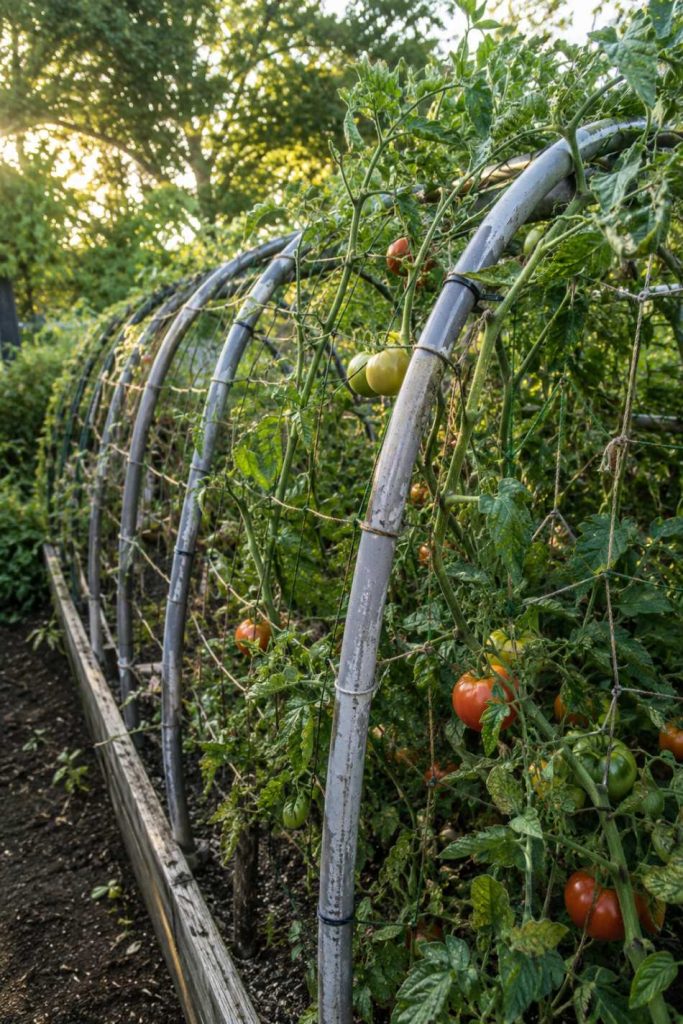
21. Livestock Panel Arch Trellis
A livestock panel arch creates a sturdy overhead support system that can handle heavy tomato vines with ease. The curved metal panels form a tunnel-like structure where plants can climb naturally while improving airflow and sunlight exposure.
Besides being highly functional, this trellis also adds a dramatic focal point to backyard gardens and works well for larger growing spaces.
22. Tripod Tomato Trellis
A tripod trellis uses three sturdy poles tied together at the top to create a stable support structure for tomato plants. This beginner-friendly design is easy to build using bamboo, branches, or wooden stakes.
The angled shape helps improve balance and wind resistance while giving tomato vines plenty of room to grow upward throughout the summer season.
23. Concrete Reinforcement Mesh Trellis
Concrete reinforcement mesh makes a durable tomato trellis capable of supporting large indeterminate plants loaded with fruit. The sturdy metal grid provides plenty of attachment points for tying vines and keeping growth organized.
Although the material is heavier than other options, it lasts for years and works especially well in raised beds or permanent vegetable garden setups.
24. Wall-Mounted Tomato Trellis
A wall-mounted trellis is a smart way to grow tomatoes vertically while making use of empty fence or patio wall space. Wooden slats, wire grids, or metal frames can be secured directly against the surface to support climbing vines.
This setup keeps plants organized, improves airflow, and works especially well in small gardens where ground space is limited.
25. Rope and Pole Trellis
A rope and pole trellis creates a simple farmhouse-style support system using sturdy posts and strong garden rope or twine. Tomato vines can be tied and trained upward as they grow, keeping plants upright and easier to manage.
This flexible design works well for raised beds and garden rows while remaining inexpensive and easy to remove after the season ends.
26. Foldable Tomato Trellis
A foldable tomato trellis offers sturdy plant support while making off-season storage much easier. Hinged wooden frames or lightweight metal panels can be collapsed when not in use, saving valuable shed or garage space.
This practical design works well for gardeners who want reusable supports without leaving large trellises standing in the garden throughout the year.
27. Hoop Trellis for Tomatoes
A hoop trellis uses curved metal or PVC hoops to support tomato plants while creating a clean, organized growing space.
Tomato vines can be tied along the arches as they grow, improving airflow and keeping fruits off the ground. This setup also doubles as a frame for shade cloth or protective covers, making it useful during intense summer weather.
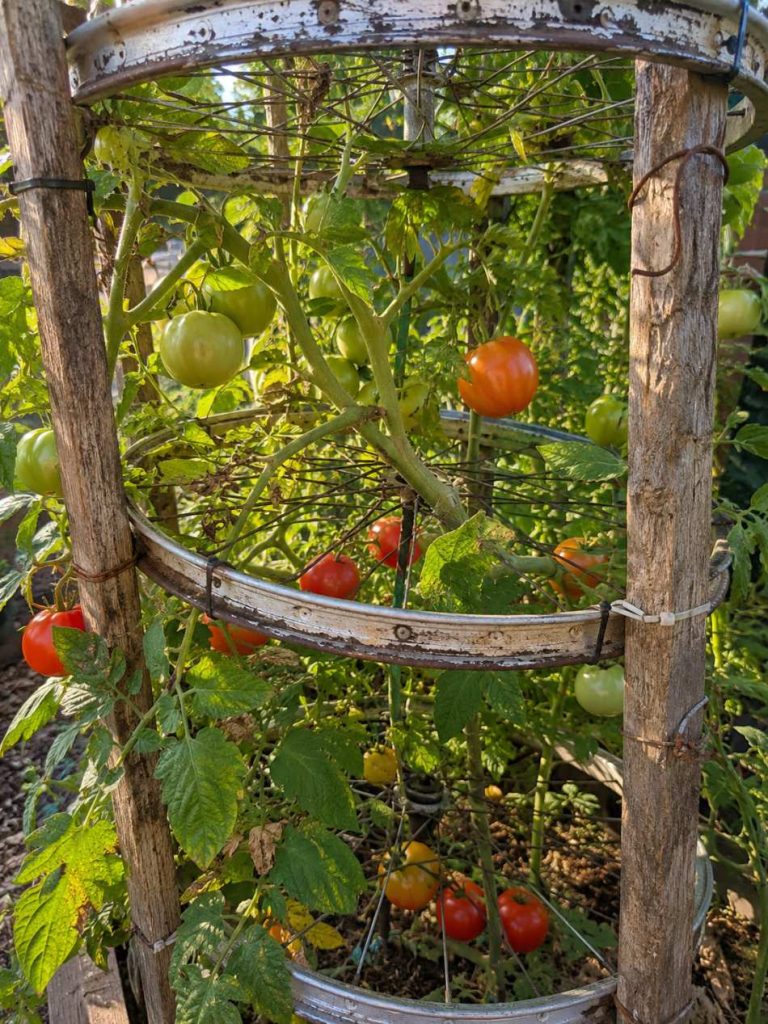
28. Upcycled Bicycle Rim Trellis
Old bicycle rims can be transformed into a creative tomato trellis that adds personality to the garden while supporting climbing vines.
The circular metal frames provide multiple attachment points for twine or plant ties, helping tomatoes grow upward in a compact space. This recycled design works especially well for gardeners who enjoy unique DIY projects with repurposed materials.
Tips for Building DIY Tomato Trellises
Install tomato trellises early so plants can grow naturally into the support system and roots are not disturbed later.
Choose strong materials like bamboo, wood, metal panels, or sturdy PVC pipe to handle the weight of mature tomato plants.
Match the trellis design to the tomato variety, since determinate tomatoes need smaller supports while indeterminate types require taller, stronger structures.
Tie tomato vines loosely using soft garden ties, cloth strips, or twine to avoid damaging growing stems.
Leave enough space between plants and use open trellis designs to improve airflow and reduce fungal disease problems.
Anchor trellises securely into the ground to prevent leaning or collapsing during storms and windy weather.
Conclusion
A good tomato trellis does far more than keep plants upright. It helps improve airflow, saves garden space, keeps fruits cleaner, and makes harvesting much easier throughout the growing season.
Whether you prefer a simple wooden stake setup or a large arched trellis, the right support system can make tomato plants healthier and more productive.
One of the best things about DIY tomato trellises is the flexibility they offer. Many designs can be built using affordable materials, recycled items, or supplies already available around the home and garden.
With a little creativity and planning, you can create a trellis that fits both your growing space and gardening style while helping your tomato plants thrive all summer long.
Khaja Moinuddin, a computer science graduate, finds joy in gardening and homesteading. Join him on this blog as he shares his experiences in homesteading, gardening, and composting
Price: $5.23 (as of May 20, 2026 13:08:52 UTC – Details)
Collaborative & Pharmacy Care Clinics have been created to provide care for minor illnesses or issues. It’s a new way to help primary care providers to give proper care to patients and improve health care in many provinces.
This medical record keeping will help you keep all your health care information in one convenient place when visiting any of these clinics. It is simple and easy to use. You’ll be able to keep a record of each appointment and which medical provider you visited, this will allow an easy access of passed information and referrals.
This is what you’ll find inside:
General Information, including the collaborative & Pharmacy care clinics information.Insurance & Pharmacy information (prescriptions).Other Medical Providers, such as your family doctor & dentists, etc.Yearly calendar to write your next appointment.Allergies & Vaccinations.Medication list to keep track of what you are taking.Symptoms, to help you keep track of what you are feeling before you head to the clinics.Appointments page.
When doctors, nurses, nurse practitioners, and other health professionals work closely together, it’s called collaborative care. It’s effective primary care that’s centred around the patient. Which is why you’re seeing more collaborative family practice teams.
Pharmacy care clinics provide services that include assessment and prescribing for Strep Throat, Pink Eye, UTIs, Chronic Disease Management (Diabetes, Asthma, COPD), prescription renewals for all medications and more.
Stay safe and healthy! Thank you for your interest.
From the Publisher
TAKE A PEEK
BOOK COVER
This is how the book looks like.
GENERAL INFORMATION
In the general information, you’ll keep the details that need to be accessible quick and easily. Collective & Pharmacy Care clinic info, other physicians information, health information, such as allergies, surgeries and more.
INSRUANCE & OTHER MEDICAL PROVIDERS
Keep track of the information that might be required at the main office when checking-in.
Have all your medical providers information handy to provide to the collaborative clinic.
NEXT APPOINTMENT PAGE
In this section, you’ll be able to keep track of all your incoming appointments.
ALLERGIES, VACCINATIONS & MEDICATION LIST
This section will help you pen down your vaccinations and allergies if any.
Also, Keep track of the medications you are currently on, so you can easily pass the information to the physicians.
SYMPTOMS
Pain, headaches, stomachache, keep track of the ailments that you might have, so when heading the clinic, you can easily remember all of them. Once the appointment is done, you can checkmark them as clear.
APPOINTMENT PAGE
The appointment page, here you’ll be able to write down your appointment information, notes, questions before and after (if you are like me, questions pop before the appointment, so write it down here). Is is a virtual or in person appointment? Do you need a follow up? being referred to another medical specialist? other concerns, and notes. You’ll be able to access the information for your next visit.
ASIN : B0CF4BFCHB Publisher : Independently published Publication date : August 7, 2023 Language : English Print length : 101 pages Item Weight : 7.4 ounces Dimensions : 6 x 0.23 x 9 inches
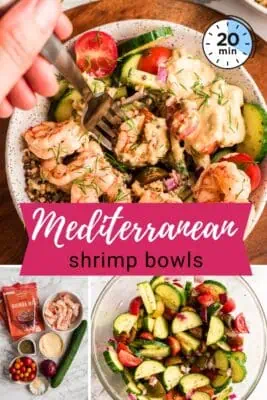
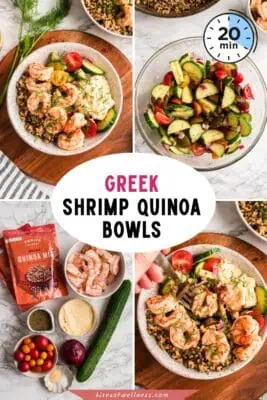
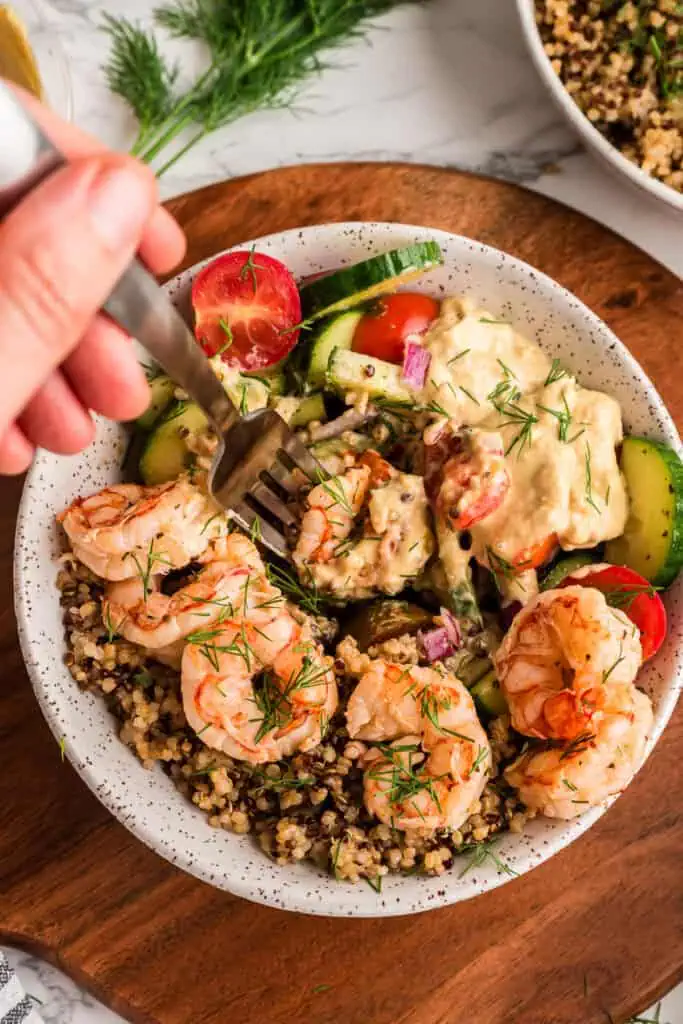
These Greek shrimp bowls are one of my favorite easy meals when the weather starts getting warmer. The shrimp cooks quickly, the veggies keep everything feeling fresh, and the whole meal comes together with simple ingredients like quinoa, hummus, cucumber, tomatoes, and store-bought Greek dressing. If you already have quinoa cooked, this can easily be a 10-minute dinner. It’s light without feeling unsatisfying and has become one of those recipes I come back to over and over again during the summer.
I spend a lot of time creating recipes that are quick, realistic, and easy to fit into everyday life, especially during seasons when cooking feels harder than usual. Meals like this are exactly what helped me through cooking burnout because they rely on simple ingredients, minimal cooking, and flavors that still feel fresh and exciting. Even when I don’t feel like chopping vegetables, this recipe still works. You can use a veggie chopper to make prep easier or simplify it even more with easy vegetables like broccoli and extra dressing. The goal is always to make dinner feel manageable, not complicated.
This post contains affiliate links. As an amazon associate I earn from qualifying purchases. Click here to read my policy and more about affiliate links.
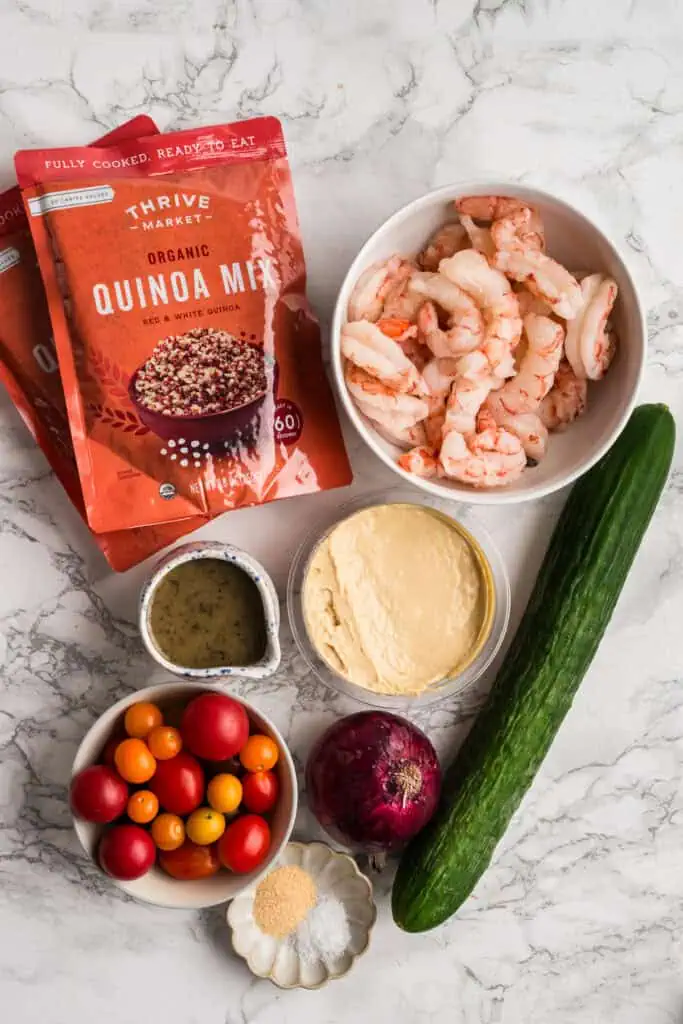
Ingredient Spotlight
Frozen Peeled & Deveined Shrimp – I always use frozen shrimp that’s already peeled, deveined, and tail-off. It keeps this recipe quick and low effort since all you have to do is thaw and cook the shrimp.
Store-Bought Greek Dressing – Using a store-bought Greek dressing keeps this recipe incredibly simple. If you don’t have Greek dressing, Italian dressing works too. You can also make a quick homemade version with olive oil, lemon juice, red wine vinegar, garlic powder, salt, and Italian seasoning.
Step by step instructions
Tips for success
Quick shrimp thawing method – Forgot to thaw the shrimp overnight? Place the sealed bag in a bowl of cold water and swap the water every 15–20 minutes. It should thaw in under an hour.
Meal prep quinoa ahead of time – I like to cook large batches of quinoa and freeze it in portions so meals like this come together even faster.
Use rice or cauliflower rice instead – Not feeling quinoa? Rice or cauliflower rice both work great here.
Instant Pot quinoa is the easiest option – Quinoa cooks in under 15 minutes in the Instant Pot, which keeps this recipe quick and low effort.
★ Did you make this recipe? Please give it a star rating below!
When skillet is preheated, add shrimp in a single layer and cook 2 minutes.
Flip shrimp and cook 1-2 more minutes.
Chop the tomato, thinly slice the cucumber into half moon circles and chop the red onion. Add the veggies to a clean bowl with 1/4 teaspoon salt, 1/4 teaspoon garlic powder and 2-3 tablespoons greek dressing. Stir well.
0.25 teaspoon sea salt, 0.25 teaspoon garlic powder, 1 cup tomatoes, 1 medium english cucumber, 1/2 medium red onion, 3 tablespoons greek dressing
Reheat quinoa in a skillet or in the microwave. If you need to cook quinoa, add 1 cup dry quinoa and 1.5 cups water to instant pot and cook for 1 minute high pressure. Let pressure naturally release for 10 minutes than manually release.
3 cups cooked quinoa
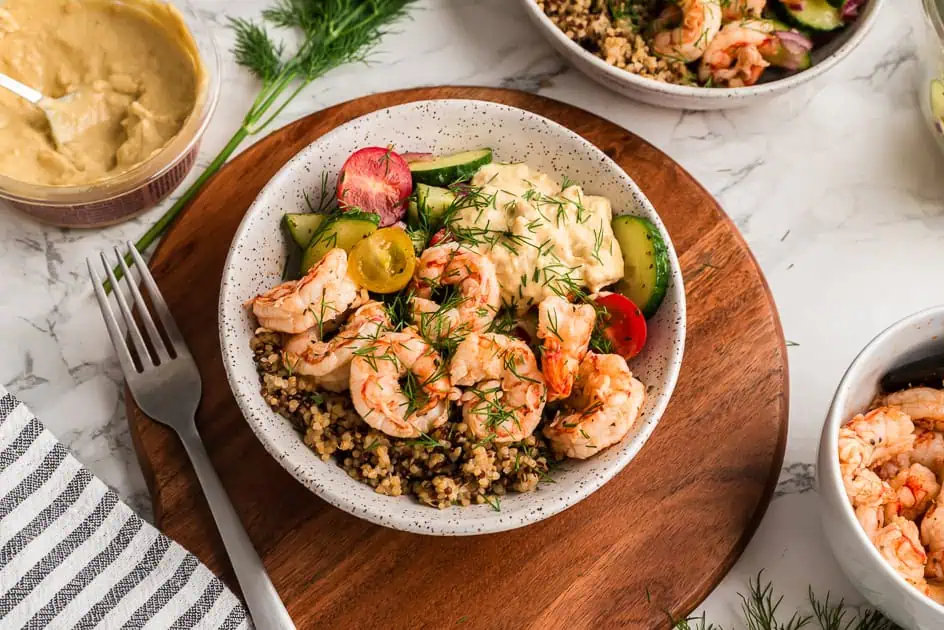
Serve the bowls by adding quinoa to the bowl and topping it with the cucumber tomato salad, shrimp, hummus and a sprinkle of fresh dill.
1/2 cup hummus, 2-3 tablespoons fresh dill
Make sure the shrimp is fully thawed – Drain off any excess liquid before cooking so the shrimp can brown properly instead of steaming.
Cook shrimp in a hot skillet – Shrimp cooks very quickly. Cook for about 2–3 minutes on the first side, then about 1 minute after flipping.
Watch for the “C” shape – The shrimp is done when it turns opaque and curls into a tight “C” shape.
Storing leftovers – Store the shrimp, quinoa, and vegetables separately for the best texture. These bowls are great for meal prep and keep well for about 3 days in the fridge.
Nutrition Information
Nutrition Facts
Amount per Serving
Where does nutrition info come from? Nutrition facts are provided as a courtesy, sourced from the USDA Food Database.
SHARE THIS POST!
If you liked this post, share it with your friends and family!
Living in the south I have plenty of access to fresh citrus fruits, like lemon. That means plenty of lemon poppyseed muffins and healthy, gluten-free lemon bars. They’re a bright and tart way to wrap up a meal in the summer months.
There are several ways to make this recipe. If you want a gluten-free lemon bars recipe, then make the lemon bars with almond flour crust. Need a dairy-free version? I’ve included an option for vegan lemon bars too.
Lemon bars have a bright yellow color, an intense lemon flavor, and a buttery crust.
How to Elevate Lemon Bars
I’ve seen plenty of easy lemon bar recipes that call for a box of cake mix and a can of lemon pie filling. While I’m a big fan of easy, I’m not willing to sacrifice quality ingredients (or taste!). To me, the best lemon bars recipe has old fashioned taste, is thick and chewy with intense lemon flavor, and still on the healthy side.
Using quality, real food ingredients is the best way to really have the best taste and texture.
Lemon Bar Ingredients
Like I said, we’re skipping the boxed cake mix and lemon pie filling with processed sugar and added food dye here. The ingredients are still simple though and the recipe isn’t difficult to pull together.
For the crust you can use organic, unbleached wheat flour, coconut sugar for a caramel like sweetness, and melted butter for richness. If you want a gluten-free version, then an almond flour crust gives it the perfect subtle nuttiness. And if you need dairy-free, coconut oil works well instead of butter.
The filling uses lemon juice for tartness and lemon zest for tons of natural flavor. Whole eggs and arrowroot powder (or more organic flour) provide thickness. And I use raw honey or maple syrup to naturally sweeten.
Here’s how to make the best regular or gluten-free lemon bars!
The Best Healthy Lemon Bars (With Gluten-Free Option)
These tart, lemon bars make the perfect, gooey dessert.
Preheat the oven to 350°F. Line an 8×8 baking dish with parchment paper.
In a bowl, mix together the flour, coconut sugar, and salt. Add melted butter and vanilla, stirring until a soft dough forms.
Press dough evenly into the bottom of the pan. Bake for 10–12 minutes, until lightly golden.
In a bowl, whisk eggs, honey (or maple syrup), lemon juice, lemon zest, and salt until smooth.
Whisk in the flour (or arrowroot) until fully combined.
Pour the filling over the warm crust. Bake for 20–25 minutes, until the center is just set (it shouldn’t jiggle much).
Let cool completely at room temperature, then refrigerate for at least 1 hour before slicing. This helps them set cleanly and improves the texture.
Nutrition Facts
The Best Healthy Lemon Bars (With Gluten-Free Option)
Amount Per Serving (1 bar)
Calories 136 Calories from Fat 63
% Daily Value*
Fat 7g11%
Saturated Fat 4g25%
Trans Fat 0.2g
Polyunsaturated Fat 0.4g
Monounsaturated Fat 2g
Cholesterol 46mg15%
Sodium 136mg6%
Potassium 33mg1%
Carbohydrates 18g6%
Fiber 0.3g1%
Sugar 11g12%
Protein 2g4%
Vitamin A 222IU4%
Vitamin C 2mg2%
Calcium 9mg1%
Iron 1mg6%
* Percent Daily Values are based on a 2000 calorie diet.
For clean slices: Use a sharp knife and wipe between cuts
Like them sweeter or more tart? Add another tablespoon of lemon juice or a few more tablespoons of honey to taste.
Tips For Making the Best Lemon Bars
Also known as lemon squares, lemon bars are pretty easy to make. You simply make and pre-bake the crust, pour in the mixed filling, bake, cool, and slice.
Should I use parchment paper for lemon bars? – I do because they’re much easier to remove from the pan and slice. You don’t want to leave any of that delicious crust stuck to the bottom of the pan!
Why can’t you use a metal pan for lemon bars? – The acid from the lemon can leach some metal from the pan, giving the lemon bars a metallic taste. There’s less of a risk using parchment paper, but many use non-reactive glass to be safe.
Shelf Life and Storage – These gluten-free lemon bars will keep fresh in the fridge for up to 5 days. Be sure to cover them in the fridge to preserve their custard-like texture.
Looking For Lemon
Need some more lemon recipes? Or just in the mood for some lemon flavor? Here are some of our favorites!
What are some of your favorite desserts to have on hand? Leave a comment and let us know!
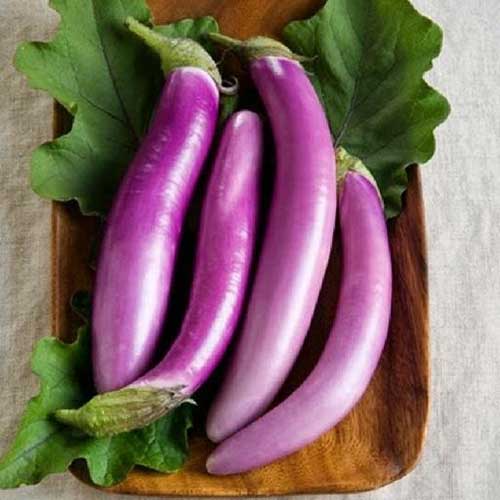
Japanese eggplants have long, slender fruit, with thin skins and few seeds.
The mild, delicately flavored flesh is less bitter than some of the varieties you would typically find in the grocery store.
Some like to distinguish “Japanese eggplant” as a separate category of “Asian eggplant,” but quite often the two terms are used interchangeably to refer to the long, slender, thin-skinned varieties.
We link to vendors to help you find relevant products. If you buy from one of our links, we may earn a commission.
Many growers refer simply to “Asian type” eggplants when describing these – and I’m going to follow their example throughout this article.
In this article I’ll be looking at 21 different Asian eggplant varieties – some of which are Japanese, some of which are Chinese, some Indian, and some bred in the US.
Before we get started on our world tour, here’s an overview of what I’ll cover:
21 of the Best Asian Eggplant Varieties
Asian eggplant with dark purple to black skin colors tend to originate primarily in Japan.
Typically from China, the bright purple varieties are just as tender and tasty as the dark purple ones.
The pastel, pink and lavender cultivars of Asian-type eggplants are worth trying – if for nothing other than their enchanting colors.
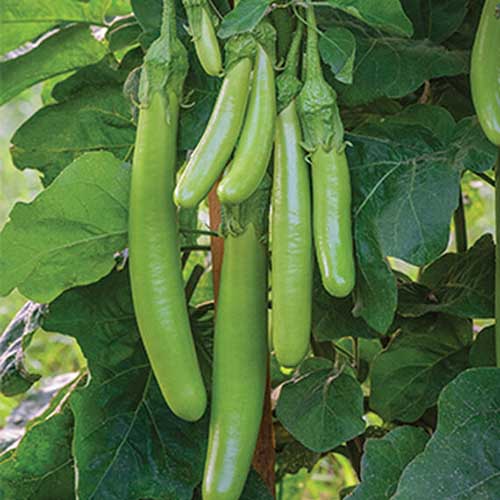
Green eggplants are popular throughout Asia, where they seem to be just as widespread as purple varieties.
1. Bangladeshi Long
‘Bangladeshi Long’ is a prolific heirloom that is native to Bangladesh.
Its eight-inch-long, slightly curved fruits are striking – they have a grayish green color with purple streaks.
Photo by Felicia Lim.
These thin-skinned veggies are never bitter and have a delicious, mild flavor.
They are perfect for use in Indian-inspired cuisine, such as this spicy eggplant curry recipe that you can find on our sister site, Foodal.
The large, sturdy plants of ‘Bangladeshi Long’ reach 48 inches tall, and bear fruit 75 to 80 days after transplanting.
2. Black Egg
This Japanese heirloom variety produces round, egg-shaped fruits that are dark purple, almost black in color, with a black calyx.
Tender, four- to five-inch-long fruit with a mild, sweet flavor grow on compact, vigorous plants that mature to just three feet tall.
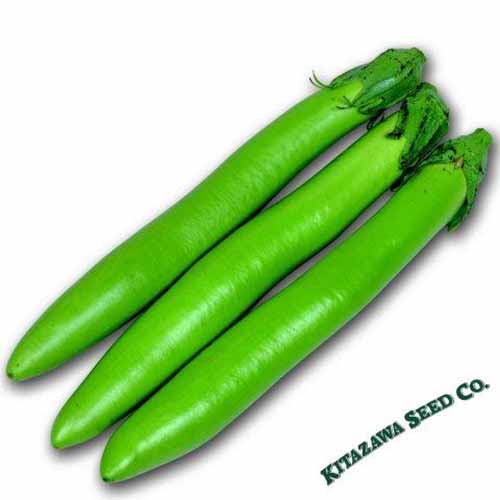
A hybrid variety, ‘Green Knight’ bears green-skinned fruit that reach seven to 10 inches long. They are mild in flavor, with few seeds and a meaty texture.
An early-maturing variety, you’ll be harvesting the succulent fruit from these 34- to 36-inch plants in just 55 to 60 days.
You can find packets of 30 seeds, or bundles of three ‘Green Knight’ plants, available at Burpee.
7. Hari
An Indian hybrid, ‘Hari’ has waxy green, thin skin and grows from green stems.
Fruits reach seven to 10 inches long, and have tender flesh with a mild flavor and no hint of bitterness.
An ultra-early maturing variety, ‘Hari’ will be ready to harvest in just 50 days.
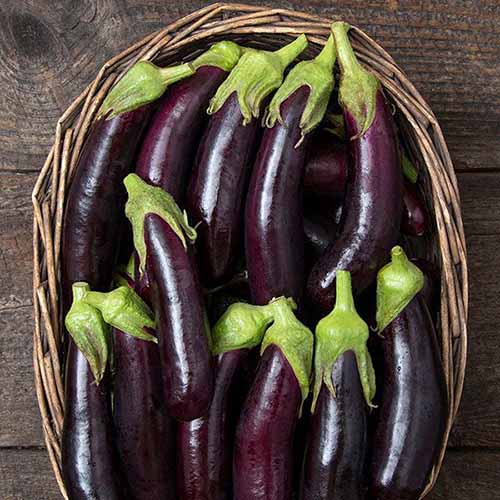
8. Ichiban
‘Ichiban’ is a Japanese hybrid that loves hot weather, but will also thrive in cooler climates – and it bears fruit all the way through to the first autumn frost.
Its name means “best” in Japanese, and many gardeners agree that this is at the top of their Asian eggplant list!
‘Ichiban’ produces slim, purplish-black, 10-inch-long fruits on purple stems.
The fruits have thin skins with a delicate, sweet, and mild flavor, and a succulent texture.
Plants grow in an upright form, reaching three to four feet tall, and two to three feet wide at maturity.
They perform well in containers, and they are prolific and very early, bearing fruit just 50 to 60 days after transplanting – with 12 fruits per plant, on average.
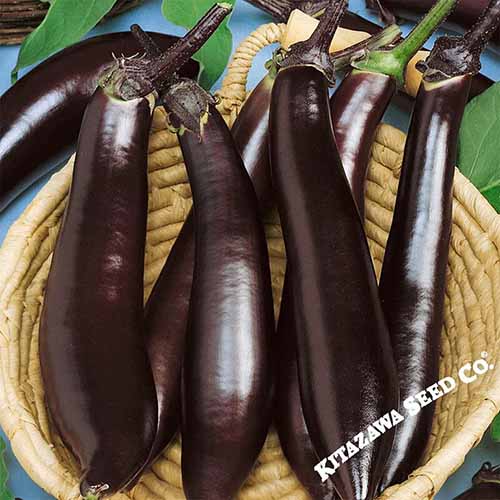
The longest Asian eggplant among my selection, the fruits of ‘Japanese Pickling’ can reach an astonishing 22 to 26 inches in length!
Bright to dark purple in color, these are long, thin, and slightly curved – measuring just 2 inches in diameter.
‘Japanese Pickling’ eggplant are sweet and mellow tasting with creamy, meaty flesh – and as their name suggests, they lend themselves perfectly to pickling.
Hailing from the city of Kurume in Japan’s Fukuoka Prefecture, ‘Kurume Long’ is an open-pollinated cultivar that bears shiny, nine- to 10-inch-long black fruit on black stems.
The mild, delicate fruits of ‘Kurume Long’ are excellent for making tempura or for pickling.
Price: $76.99 (as of May 20, 2026 01:05:20 UTC – Details)
The healthcare field is rapidly evolving, compelled by technological strides, pressure to increase efficiency, and demand to contain costs. Pharmacy and the U.S. Health Care System, Third Edition is the classic text used to prepare pharmacists for independent practice in today’s unpredictable environment since the first edition was published in 1991. This new edition is now streamlined and tailored for a one-semester course, completely updated with the most recent data, statistics, and emerging issues relevant to today’s pharmacy professional, with new chapters devoted to the political realities of the industry and the future of pharmacy. Publisher : Routledge Publication date : August 4, 2005 Edition : 3rd Language : English Print length : 500 pages ISBN-10 : 0789018756 ISBN-13 : 978-0789018755 Item Weight : 2.02 pounds Dimensions : 6.5 x 1.5 x 8.75 inches Best Sellers Rank: #10,972,112 in Books (See Top 100 in Books) #1,137 in Health Care Administration #2,650 in Pharmacy (Books) #4,402 in Pharmacies


")


")


")
 Eggplant Varieties")