


Tuber Tutorial
A dahlia tuber is the below-ground portion of the plant.
It’s a starchy storage organ that holds the food, nutrients, and water needed for growth as the plant establishes feeder roots.
They come in a variety of shapes. Some look distinctly yam-like, others can be long and thin, plump and rounded, or elongated teardrops, depending on the variety.
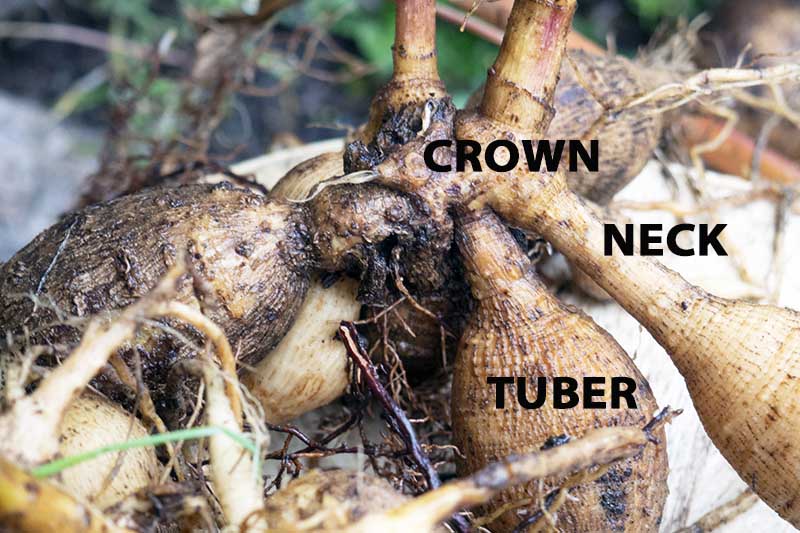
For the purposes of storage and division, there are three sections to be aware of:
- The fleshy crown located at the base of the stem.
- The thin neck that attaches the tuber to the crown.
- The large tuber that’s attached to the crown by the neck.
The crown is only the only part of the plant that develops growth eyes.
But for successful propagation, all three sections are required to remain intact.
For this reason, don’t try to propagate new plants using tubers that have grown from others – without a piece of crown, new plants won’t develop.
Also, should you inadvertently break off actively growing eyes, it’s not a problem. New ones will push up from the crown at the same location.
Dig and Lift
When first lifted, dahlia tubers can have fragile necks.
If possible, dig them out in the morning and allow them to sit on the ground for a few hours before cleaning and dividing – the necks will be less brittle and easier to handle.

To remove a clump, cut down stems to approximately 12 inches from the ground, if you haven’t done this in advance.
Mark a radius of approximately 12 inches around the clump and use a garden shovel or fork to dig down six to eight inches to loosen the soil.
When the soil is loose, insert your fork under the clump and lift it carefully. Grasp the flower stems to help you lift it if needed.
Gently knock off any large lumps of soil from the clump and rinse with a garden hose to remove any remaining dirt.
With a sharp, clean knife, cut away any pieces that are damaged, discolored, soft, or rotting.

Invert the clump and set it upside down in a dry location for a few days. This allows any stem water to drain away and helps to remove excess moisture from the tubers.
This time spent drying, or curing, is important to prevent contamination from bacteria, fungus, mildew, and winter rot which can damage or destroy your tubers.
After the skin starts to wrinkle slightly, the tubers are dry enough for storage.
Winter Storage
Storing tubers is straightforward and a wide variety of containers can be used including cardboard or wooden boxes, paper bags, or styrofoam ice chests.
Your dahlia tubers should not be stored in plastic bins, containers, or bags as these tend to trap too much moisture which can easily lead to mildew and rot.

They will require a dry to lightly moist packing medium. Coconut coir, peat moss, perlite, sand, sawdust, or vermiculite all work well for packing tubers.
For storage, line the box bottom with several layers of newsprint then add a generous layer of your chosen packing medium – two to three inches deep.
With clean, sharp garden shears, remove any long feeder roots growing from the tuber and any remaining pieces of stem.
Dust the tubers with a fungicide powder such as garden sulphur before storing, and ensure you apply it to any cut surfaces as well.
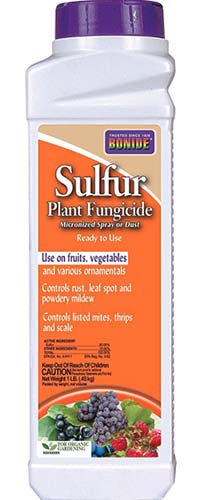
Garden sulphur can be purchased online at Arbico Organics.
Place clumps of tubers inside the box on top of the packing medium ensuring that they’re not touching. Add more packing material on top until they are completely covered.
Close the box and store it in a cool, dark location such as a basement, cellar, garage, or shed.
To ensure viability, temperatures need to remain above freezing and below 50°F, with an ideal temperature range of 40 to 45°F.
Every month, inspect the tubers carefully and discard any that show signs of softness or rot.
In late winter or early spring, move your containers to a warm (60 to 70°F), dark location.
Every week, sprinkle a tablespoon of water on top of the packing medium until you are ready to plant them out.
The warmth and added moisture help the growth eyes to develop, which makes division easier.
Divide and Plant
After all risk of frost has passed, when you are ready to plant, remove the clumps from storage and gently shake off the storage medium.
Inspect the clump and discard any tubers that are moldy, soft, or rotten as well as those with broken or damaged necks.