I’ve always thought about redoing the lyrics of “Santa Baby” by Eartha Kitt to make it more gardener-friendly. Not that there’s anything wrong with wanting a ’54 convertible in light blue, but I’d rather have an Ariens mechanical edger in bright orange. And I have no use for a ring under the tree. I’ve already got one of those, and for most of the gardening season it sits in a jewelry box because compost and diamonds don’t mix well. Speaking of compost, I wouldn’t mind finding a couple yards of that dumped under my redbud tree instead.
This might all sound a bit silly, but I think it makes the point that gardeners can be notoriously hard to buy gifts for (or at least that’s what my husband tells me). We generally value practicality over prettiness. So in an effort to help out those of you who have been tasked with purchasing a present for that favorite plantsperson in your life, we have collected a lengthy list of items that any gardener would be delighted to receive.
On this list you’ll find suggestions from Fine Gardening staffers like Don Burgard, our talented copy editor. The thing Don wants most this year is a pole saw, but not just any pole saw—the saw he wants has features that make it especially useful.
You’ll also find suggestions from our cadre of regional reporters. These are folks from all corners of the U.S., who bring their expertise and extensive experience in gardening to inform their choices. No matter where you, your regional reporter has you covered.
The most important bit of advice I have for those of you looking for that perfect gardening gift is that it is sometimes the smallest things can make us the happiest. Years ago my spouse stuck a small bag of bare-root peonies in my stocking, and I almost cried. To the rest of the family it appeared like I had received a weird pile of brown tentacles. But to me, it was the best gift ever.
FG Staff Picks
The only “shovel” you’ll ever need
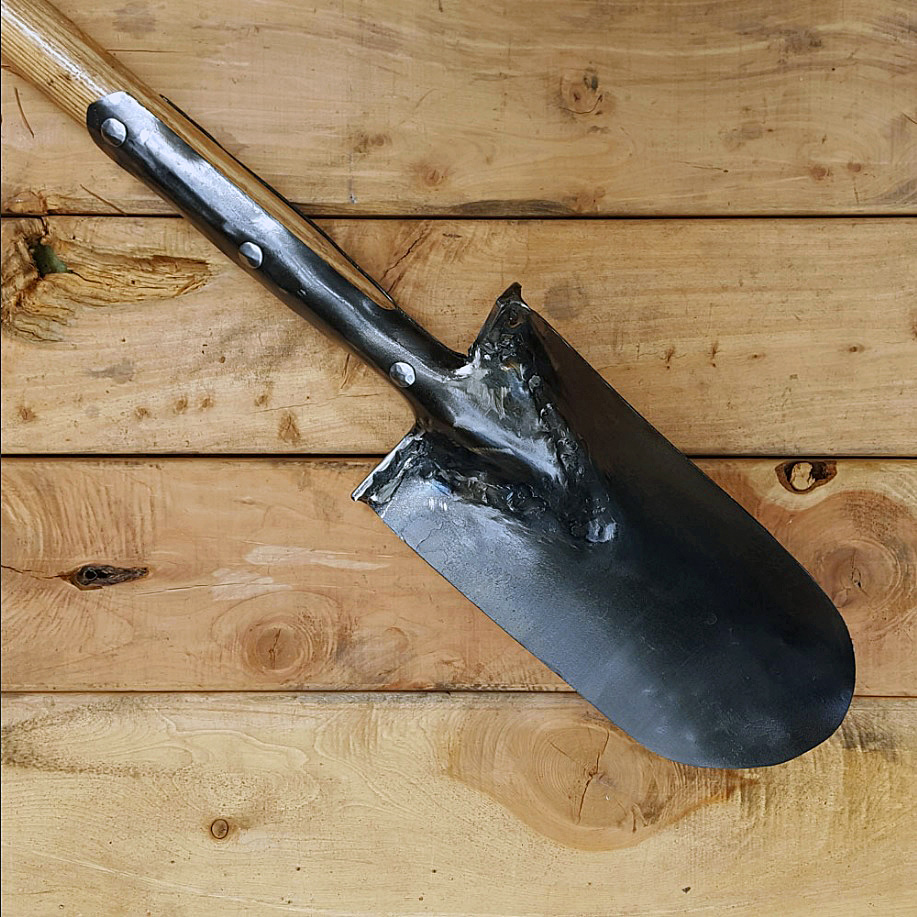
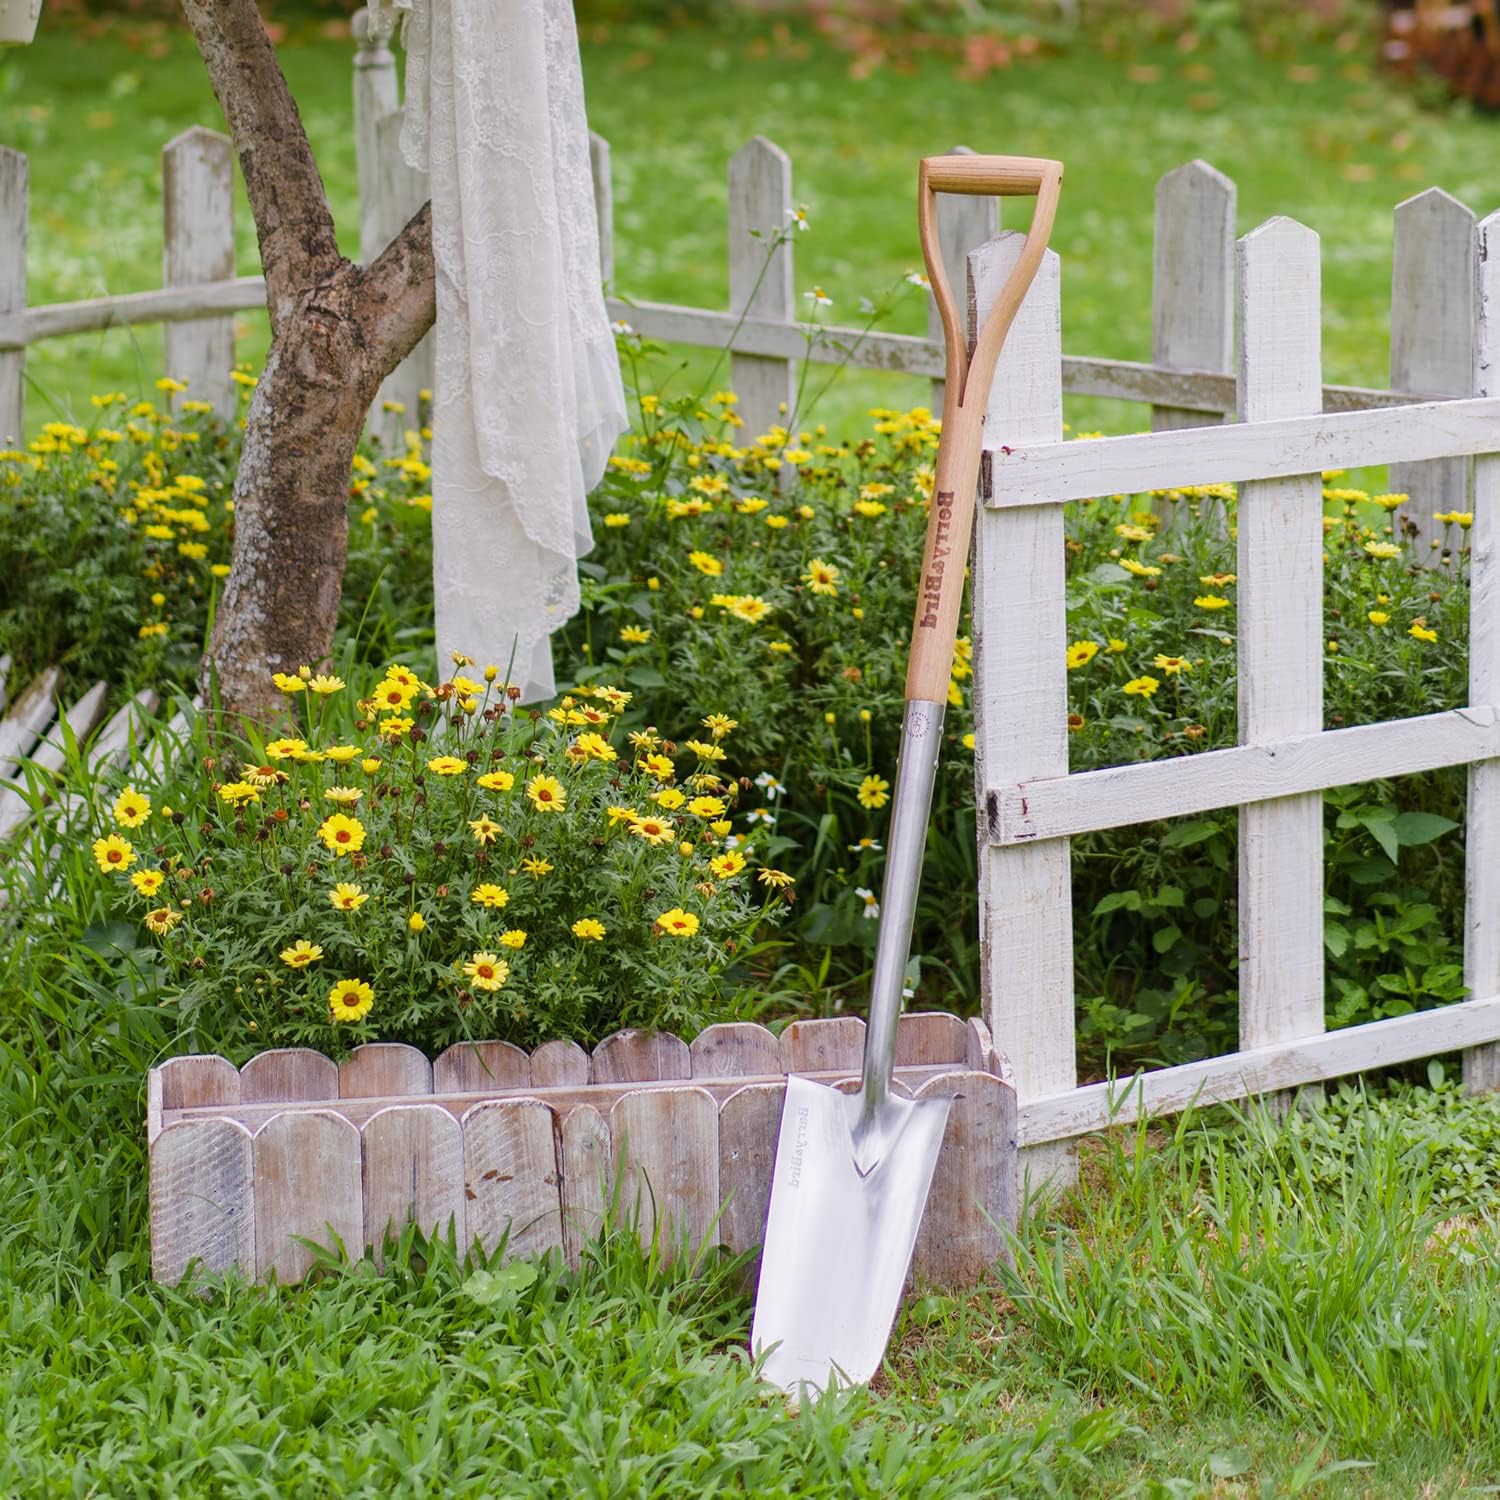
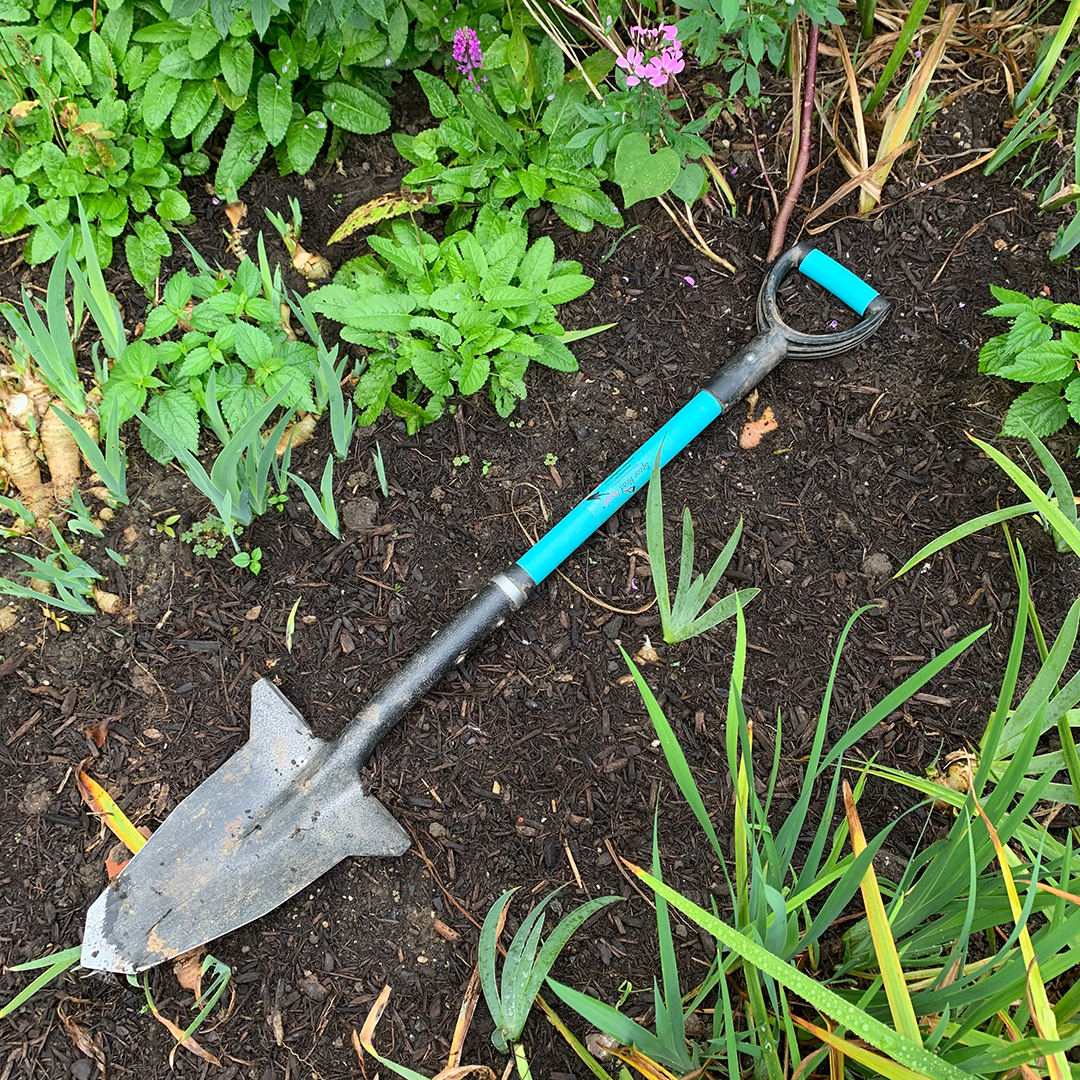
Many years ago I inherited my grandfather’s rabbiting spade. At the time I wasn’t quite sure what good a small-headed shovel would do in my garden. But I quickly came to consider it THE most invaluable tool I own. The folklore goes that poor tenant farmers in the 19th century would file down a traditional-size shovel to a rounded point so it could be used to easily dig up rabbits for supper. This narrow-handled tool is often called a “poacher’s spade” because this action would all take place illegally on the rich estate owner’s land. In modern times, this sharp shovel is ideal for edging a bed, transplanting in tight quarters, or even slicing through thick roots for easy division. The closest version to my heirloom that I can find is the rabbiting spade from Red Pig Garden Tools. Known for custom-built, blacksmith-forged tools, this company has thought of every detail. The handle length is 48 inches, but if you’re on the shorter side, you can request one that is only 44 inches long. The blade has a tapered, rounded cutting edge that is about 9 to 11 inches long, and two straps with rivets secure the head to the handle, ensuring strength and stability. The only bad thing I can say about this beautiful rabbiting spade is that it makes my older version look sad in comparison.
Source: redpigtools.com
Price: $125.00
—Danielle Sherry, executive editor
Berry & Bird Rabbiting Spade, Trenching Shovel
Ideal Tool for All Gardeners Use: Our heavy duty trenching shovel is designed by a professional gardening tool designer. Lifetime Durability: This heavy duty drain spade is made of high-quality stainless steel, it is very strong and durable, even if it is used for high-strength work, it will not bend. Ergonomic Wood Handle: The handle of this planting spade is made of ash hardwood harvested from FSC-certified forests and has an ergonomically streamlined design, making it very suitable for everyone’s hands. Multi-Use: This digging shovel is generally used for digging trenches, digging holes, transplanting, edging, moving compost, cutting thick turf and furrowing. The sharp blade allows you to cut, scoop, dig, lift and dice in hard soil.
Price: $65.99 at the time of writing
A useful tool for many tasks
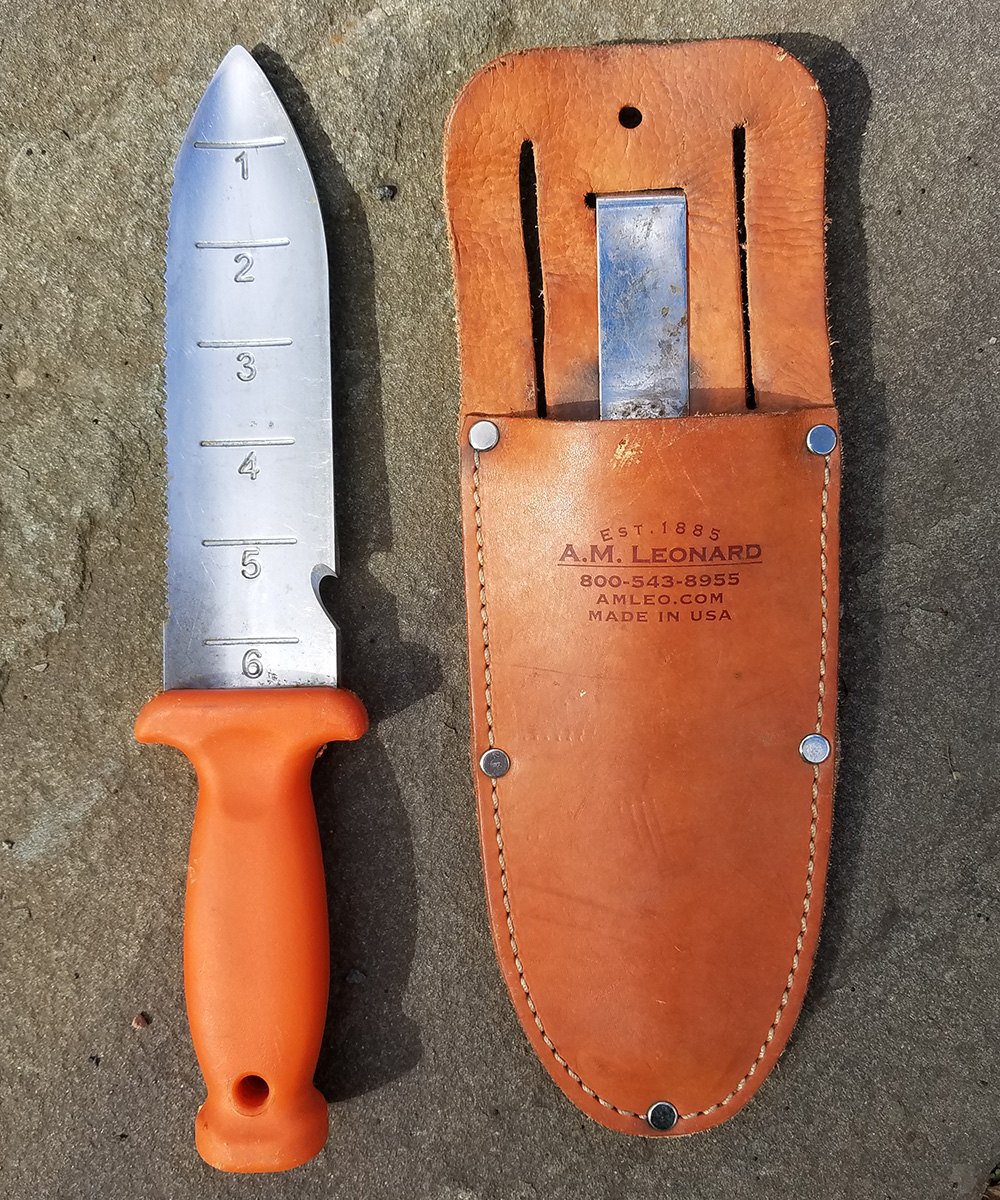
This high-quality garden knife from A. M. Leonard is the tool you will want to have at your side whenever you are in the garden. The 6-inch stainless steel blade has a wonderfully sharp serrated edge that will cut through roots and stems quickly and cleanly. The blade also has a notch for cutting twine and is marked in 1-inch increments that are useful for measuring planting depth or for lending scale to reference photos. The knife’s comfortable molded handle has a wide guard, and its bright orange color makes it hard to misplace. You can safely keep the tool close at hand using the durable leather sheath, which can be threaded onto a belt or clipped to your waistband or pants pocket. This knife is perfect for planting, dividing, weeding, digging, and prying, and you will keep finding new uses for it all the time.
Source: amleo.com
Price: $34.83
—Carol Collins, associate editor
Pruning snips for delicate jobs
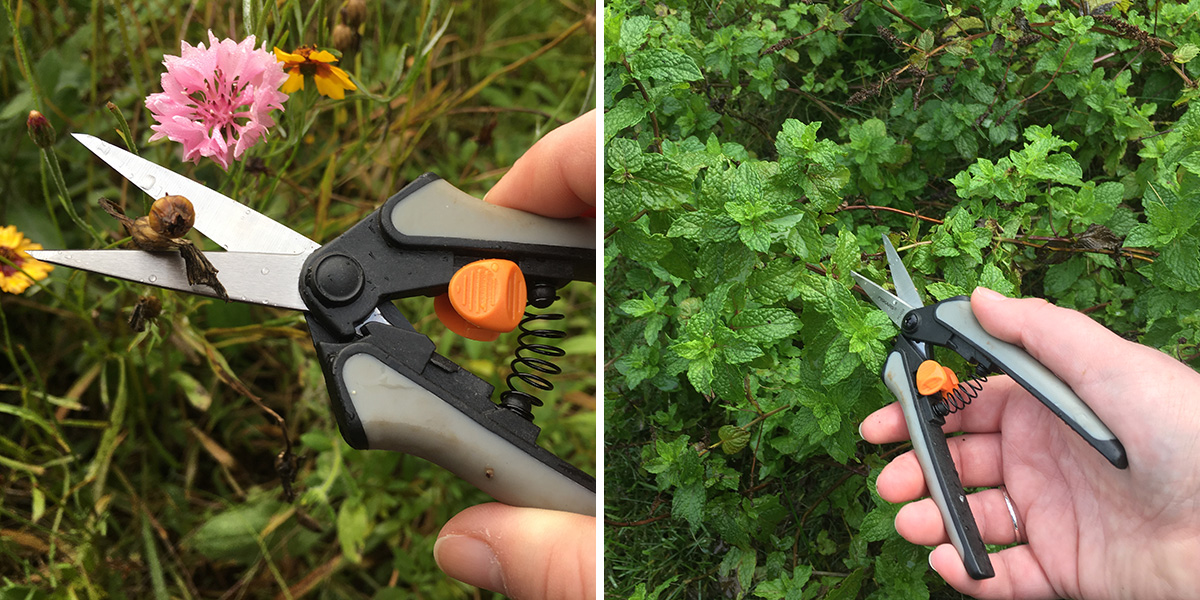
For delicate pruning jobs, you can’t do better than these pruning snips from Fiskars Non-stick Micro-Tip Pruning Snips. They are a great supplement to your regular pruners. Like scalpels with handles, they will cut even the smallest and thinnest of shoots with sharp precision. They’re great for cut-flower gardens, bonsai pruning, and herb gardening. Just 6 inches long with 1.75-inch blades, they’re lightweight and nimble. The blades spring back open after cuts and are also covered with a nonstick coating to reduce jamming. This means that less pressure is required, making it much easier on your hands. Be sure to keep the sheath on the end of the snips, as the blades are very sharp. Best of all, this tool is sold in a two-pack, so you’ll have a backup if you misplace it.
Source: fiskars.com
Price: $14.99
—Diana Koehm, assistant editor
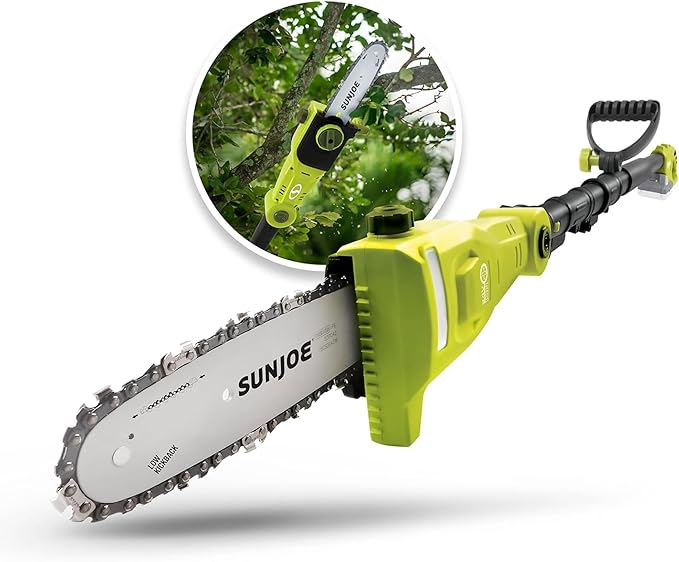
A battery-powered and heavy-duty chain saw
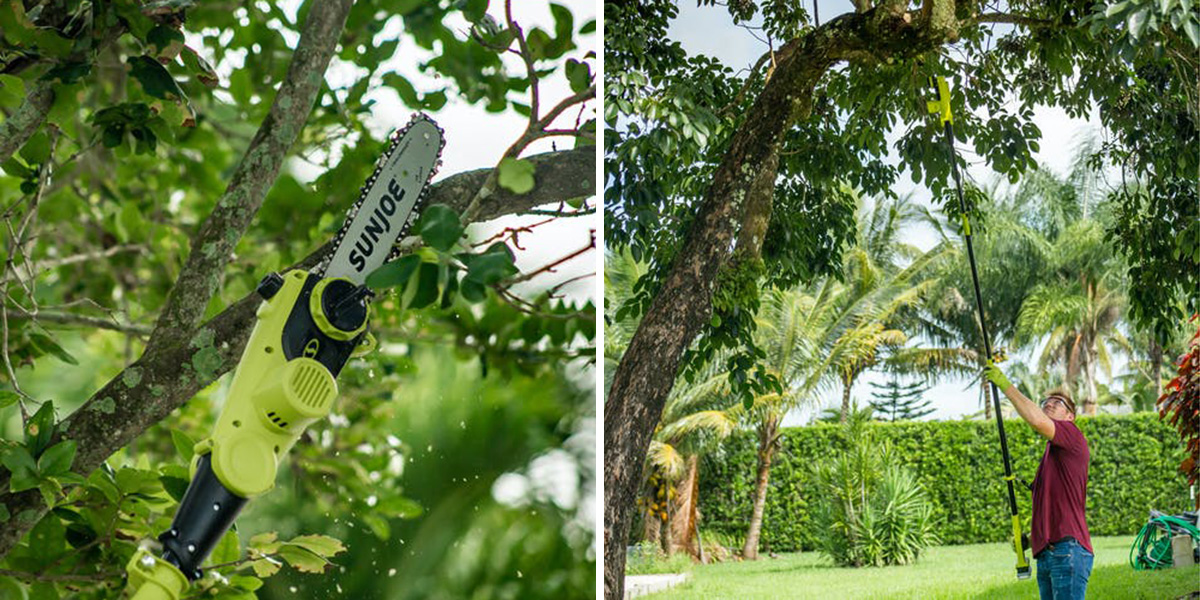
Living in a house surrounded by trees is wonderful, but a downside is the ongoing need for maintenance. As a younger man, I proudly tackled the job of tree trimming with a bow saw, which not only required some muscle but also a ladder. I later added a pole saw to my tool arsenal, which meant that I could leave the ladder in the garage—but handling the pole saw still demanded a lot from me. Upon seeing how hard I was working to trim a tree one afternoon, my neighbor introduced me to his latest gadget—a pole chain saw. It’s just what it sounds like—a chain saw at the end of a pole. With one of those, I could do my tree trimming and still have enough upper-body strength left for lugging around my regular chain saw to cut up the branches into more-manageable pieces.
Although the tool that my neighbor let me borrow is powered by gasoline, I’ve got my eye on this battery-powered version by SunJoe, with an advertised runtime of up to 15 minutes. That doesn’t sound like a lot, but a chainsaw is going to move through a tree branch a lot faster than a saw that’s powered by me. This saw has a telescoping pole that extends almost to 7 feet, and the company claims that it can saw through branches 9.5 inches thick. If Santa is on board with the idea, I hope next spring to be chain-sawing my way to healthier and more shapely trees.
Source: snowjoe.com
Price: $124.00
—Don Burgard, copy/production editor
Sun Joe Cordless Telescoping Pole Chain Saw
BAR + CHAIN: 8 in. auto-lubricating bar + chain with 2.7 fl oz oil tank capacity and oil level window. TELESCOPIC: Telescoping pole extends from 3.7 ft to 7.2 ft, providing up to 14 ft of overhead reach. ADJUSTABLE HEAD: Multi-angle head adjusts from 0º to 30º
24-VOLT SYSTEM: 24V 2.0 Ah IONMAX lithium-ion battery allows for up to 32 cuts of 4″ x 4″ pine on a single charge.
Price: $110.49 at the time of writing
Garden snips for the cut-flower gardener
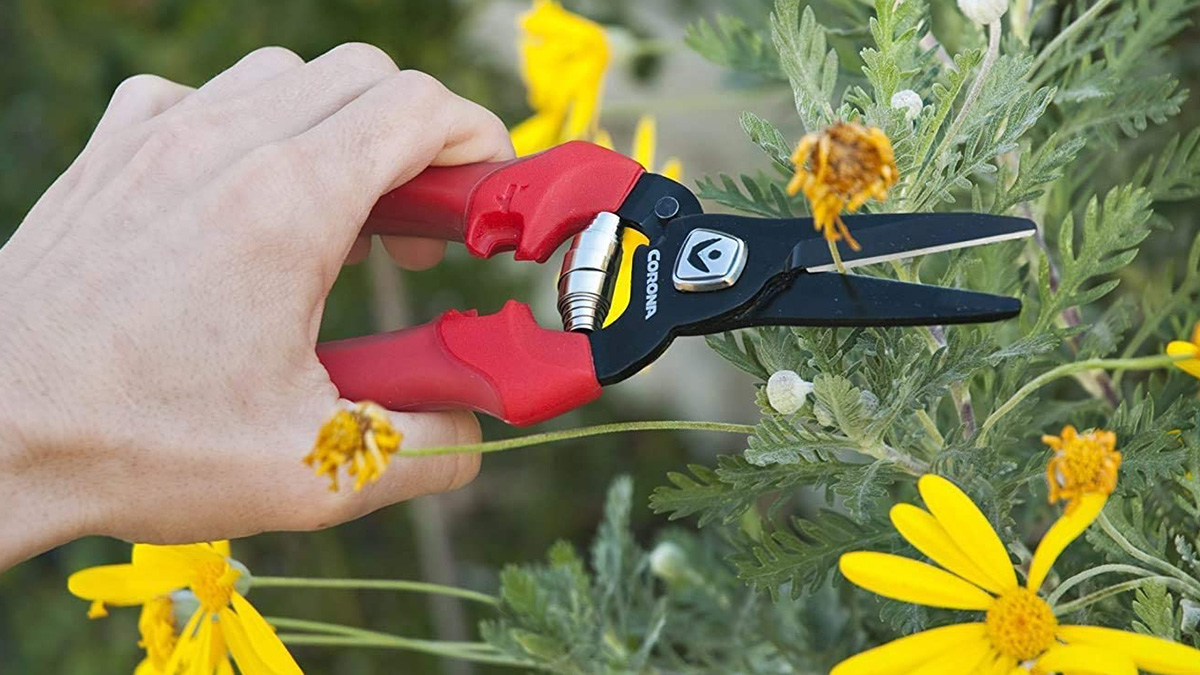
A good pair of garden snips is essential if you’re growing a cut-flower garden. This year, I went against everybody’s advice and decided to grow my own wedding flowers. I knew that to do it right I would need the correct tools, and one of the most essential ended up being these snips. Though my wedding was postponed due to the pandemic, I was still able to enjoy the flowers throughout the growing season. I loved grabbing these snips and heading into my garden beds to see what flowers were ready to harvest, and then playing with the design of the bouquets. These snips have a comfort-gel ergonomic grip that makes them very easy on the hands during repeated use—as when one is harvesting stems and branches for bouquets. They are sharp and cut precisely, even on thicker-stemmed plants and woodies like hydrangeas, viburnums, and beautyberries. They also feature a thorn stripper and a floral wire cutter right on the snips, making these a great choice for the professional florist too.
Source: shop.coronatoolsusa.com
Price: $20.20
—Christine Alexander, digital content manager
Water your plant with a friendly face
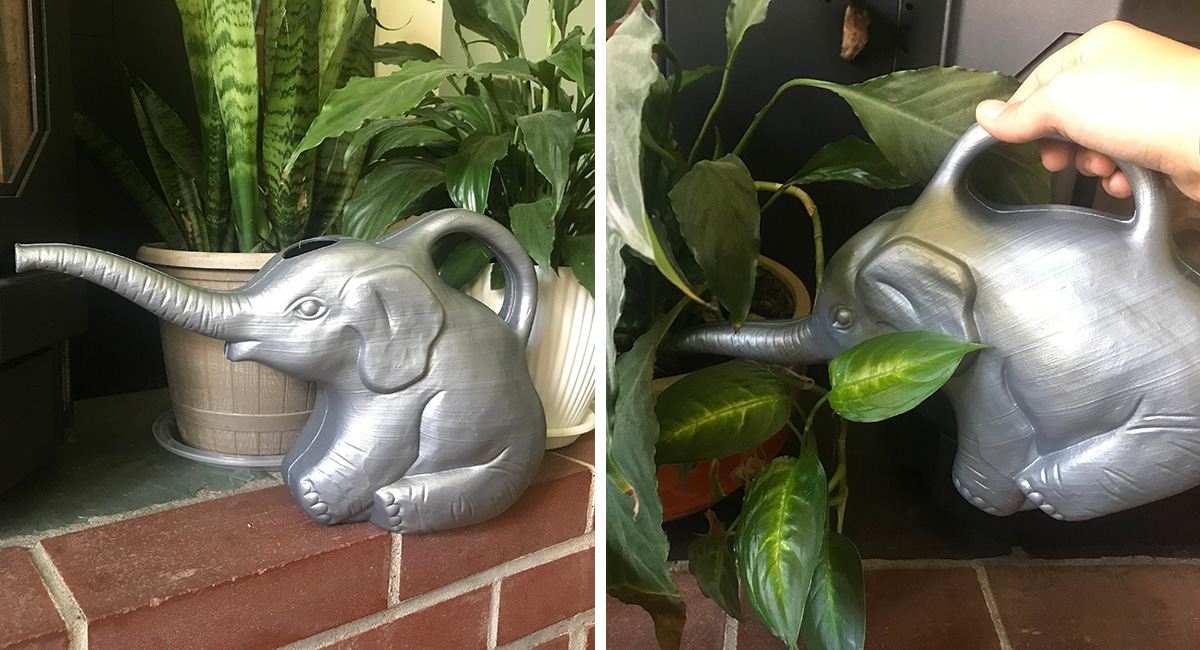
I have a confession to make—I’m a serial plant killer. I’ve always loved and appreciated plants, but watering and I have never gotten along. I can find a million other things to do in a day rather than spend a little bit of time tending to my plants. But that all changed when I got this simple, small, but absolutely adorable watering can. It’s pretty enough to leave on your plant stand so that it’s always handy, and its friendly face will encourage you to check on your thirsty plants even when you’re feeling too tired or busy. With a half-gallon capacity, it’s perfect for a small patio garden or collection of indoor plants. It’s never too heavy to carry around my house, yet it still holds enough water so that I’m not constantly running back to the kitchen sink for refills. Do your part to reform a serial plant killer in your life with this cheery gardening gift.
Source: amazon.com
Price: $8.89
—Kaitlyn Hayes, digital content production specialist
Let your houseplants water themselves
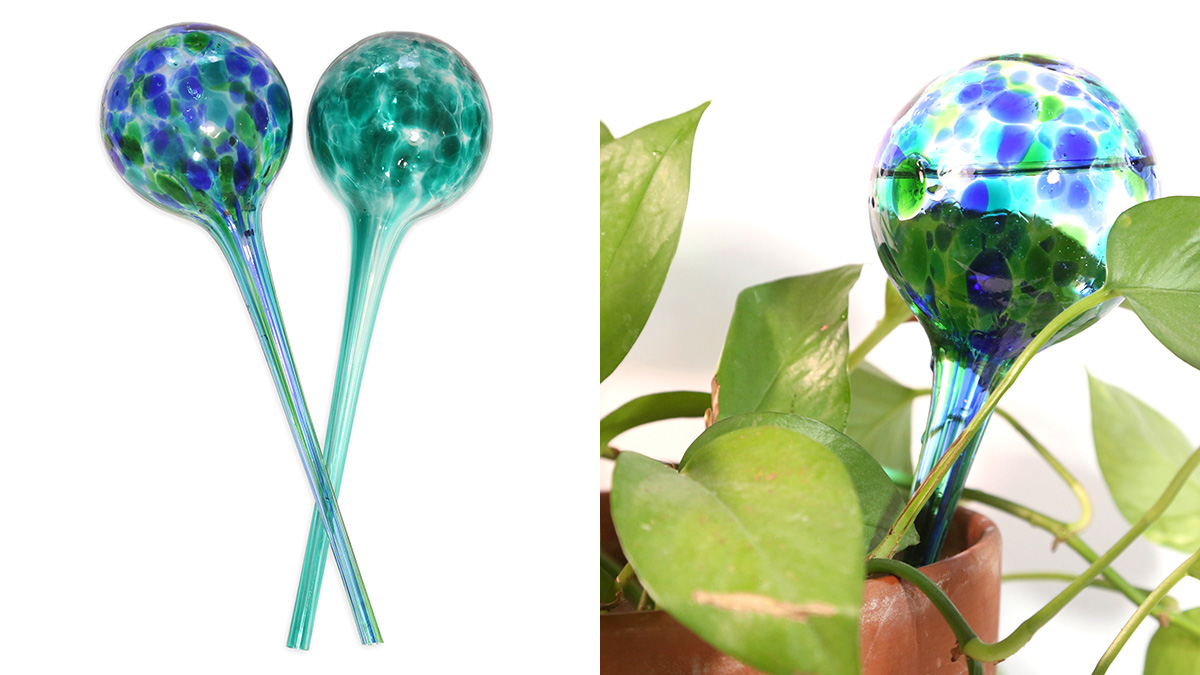
I love houseplants and have acquired many beautiful varieties in my home. As much as I love my houseplants, however, I find it quite a task to water them all. Then I discovered these fiberglass globes. They look beautiful and can water your plants slowly for up to two weeks. With these tools, I am hoping to cut back on the amount of time it takes to water my plants while adding a beautiful decorative touch to them. I am putting these beautiful glass globes on my wishlist this year!
Source: lowes.com
Price: $8.98
—Kara Demos, digital content production specialist
Mid-Atlantic Regional Reporter—Michele Christiano
Amp up your container game with this guide
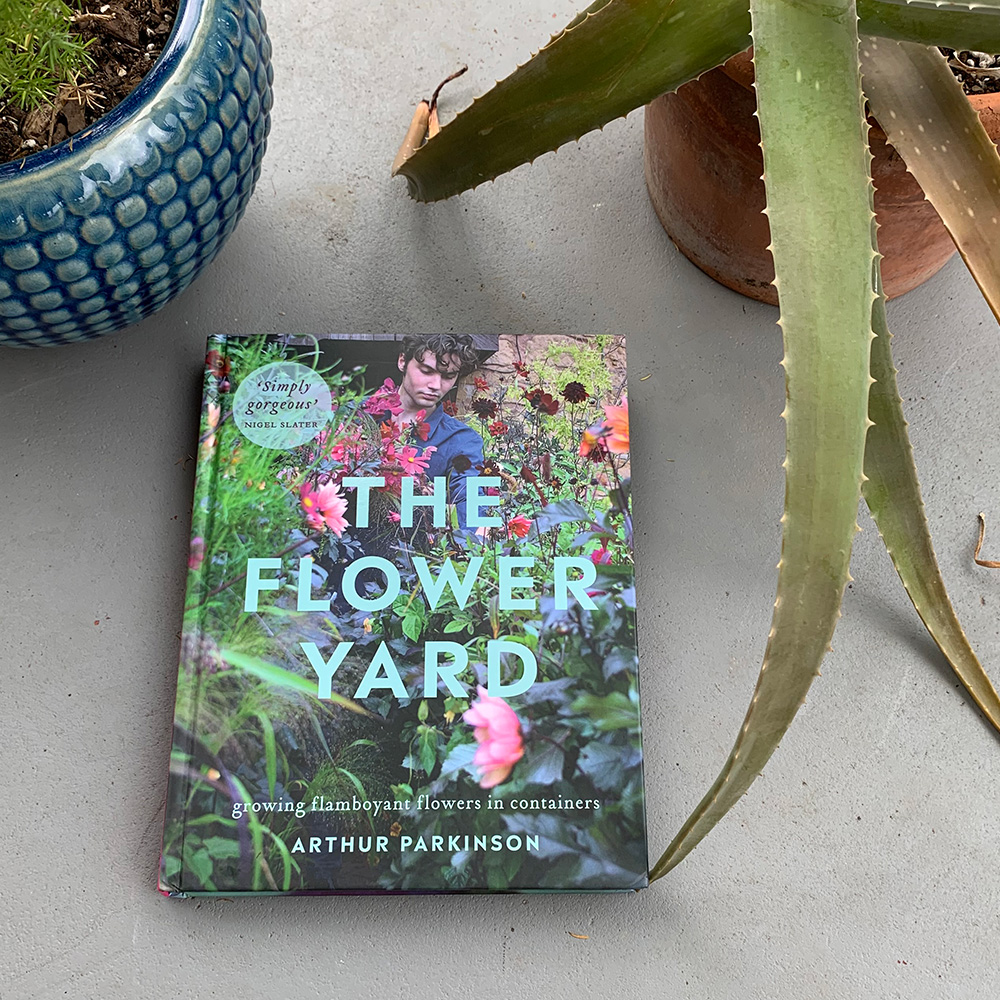
A must-have book for anyone passionate about container gardening, The Flower Yard: Growing Flamboyant Flowers in Containers by Arthur Parkinson is packed from cover to cover with design ideas and practical tips on topics such as composting, planting, staking, and organic pest control. This charming book provides an intimate look into Parkinson’s garden, which consists solely of containers spilling over with the likes of tulips, cosmos, and dahlias throughout the year. He shares his design methods for choosing colors and textures for his containers with easy-to-replicate visuals like a mood board to envision plant combinations. This book not only keeps the reader visually entranced with the whimsy of his plant combinations, but it also offers an abundance of solid advice on container gardening for the novice and advanced gardener alike.
Source: barnesandnoble.com
Price: $26.99
A deft spade for tight spots
The SpearHead Spade is the only shovel the garden-tool enthusiast will ever need. Made with carbon manganese steel, the spade boasts a thicker and stronger blade than the typical shovel. Due to its narrow, pointed shape, the SpearHead Spade pierces any soil type, making planting and transplanting a breeze. Need to dig in a very small space? No problem! It maneuvers beautifully in fully planted beds where room is limited. Three different models are available for that special gardener in your life: long-handled, short D-handled, and a mini spade, which is perfect for very tight spots or container gardening. As a bonus, the short D-handled model comes in five bright colors.
Source: spearheadspade.com
Price: $35.00 to $54.00
—Michele Christiano has worked in public gardens for most of her career. She lives and gardens in southern Pennsylvania.
Midwest Regional Reporter—Mark Dwyer
Keep yourself organized with this bucket caddy

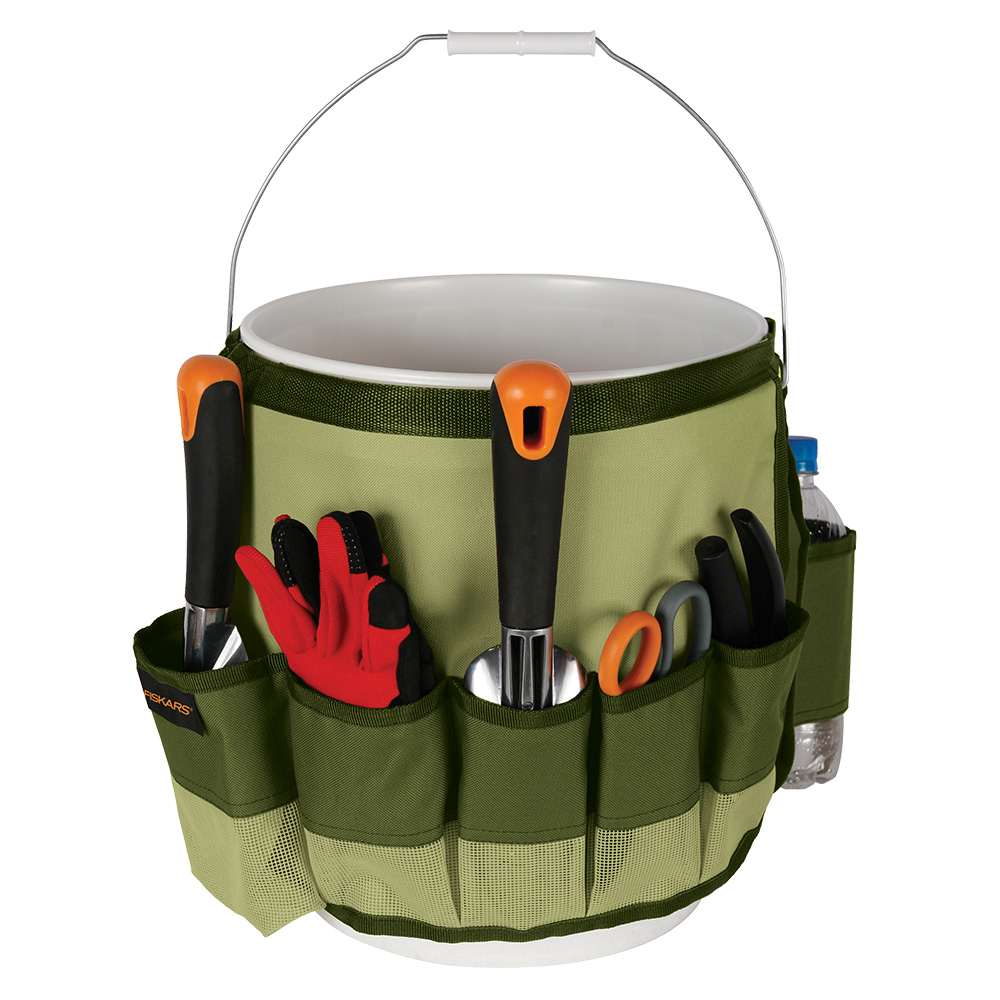
Fitting snuggly on a standard 5-gallon bucket, this amazing garden bucket caddy from Fiskars will free up the internal space of the bucket while keeping tools and supplies accessible and organized on the exterior of the bucket. Weatherproof and durable, this accessory is constructed of easy-to-clean canvas and includes nine deep pockets and two “pencil pockets.” The larger pockets can accommodate a wide range of hand tools such as a trowel, weeding tool, and hand pruners, as well as items such as a cell phone, sunscreen bottle, insect repellant, or a notepad. Customize your caddy as you see fit! Backed by a lifetime warranty, this bucket caddy is a welcome and appreciated product that sees increasing popularity with the efficient and organized gardener (and those who are still striving for efficiency).
Source: homedepot.com
Price: $12.11
Get incredibly clean cuts with this folding saw
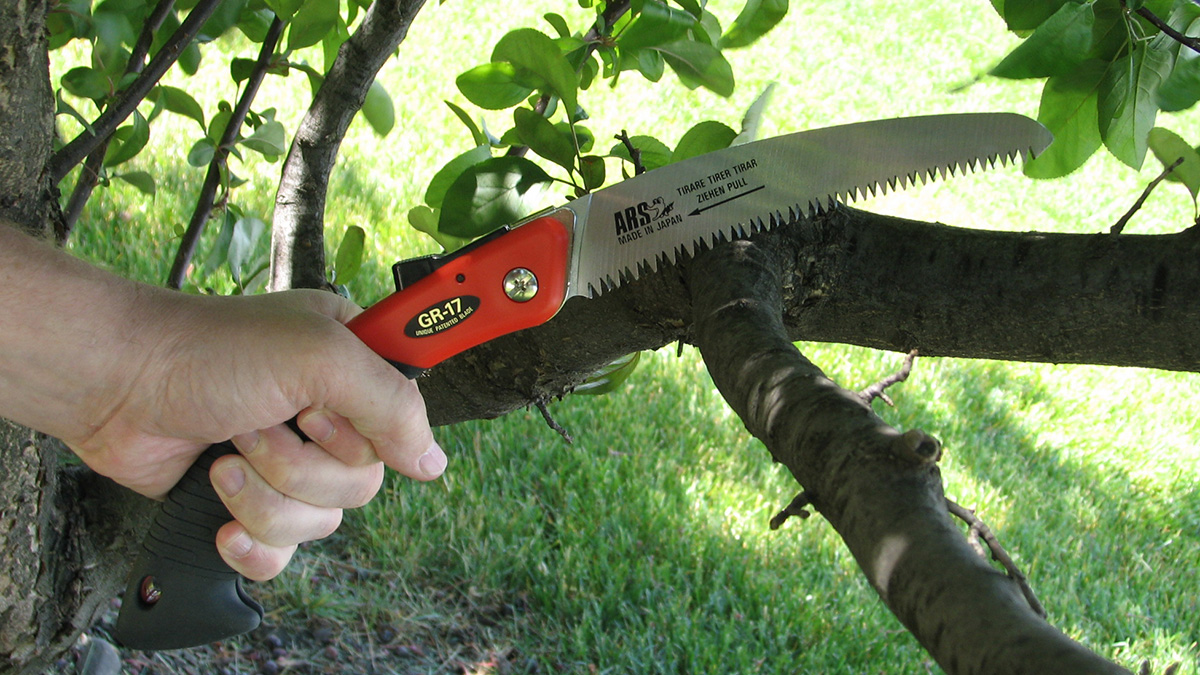
This small, lightweight saw from ARS has limitless potential with a myriad of garden applications. The 6.5-inch curved blade has tri-edge serrated teeth that cut on both the push and pull motions. The incredibly sharp blade (made of high-carbon steel) is chrome-plated for rust and sap resistance and offers a very clean and efficient cut. A rubber-coated grip provides additional stability to any cut. When opened, the entire saw is 15 inches in length but folds and stores safely. Despite the blade length on this saw, it has few equals and is not only suitable for most garden uses but is popular in heavy-duty situations and orchard applications. I would not be without this saw, which also has a replaceable blade.
Source: amazon.com
Price: $42.90
—Mark Dwyer, former director of horticulture at Rotary Botanical Gardens in Janesville, Wisconsin, operates Landscape Prescriptions by MD.
Mountain West Regional Reporter—Michelle Provaznik
Membership to your local public garden is a gift that keeps on giving
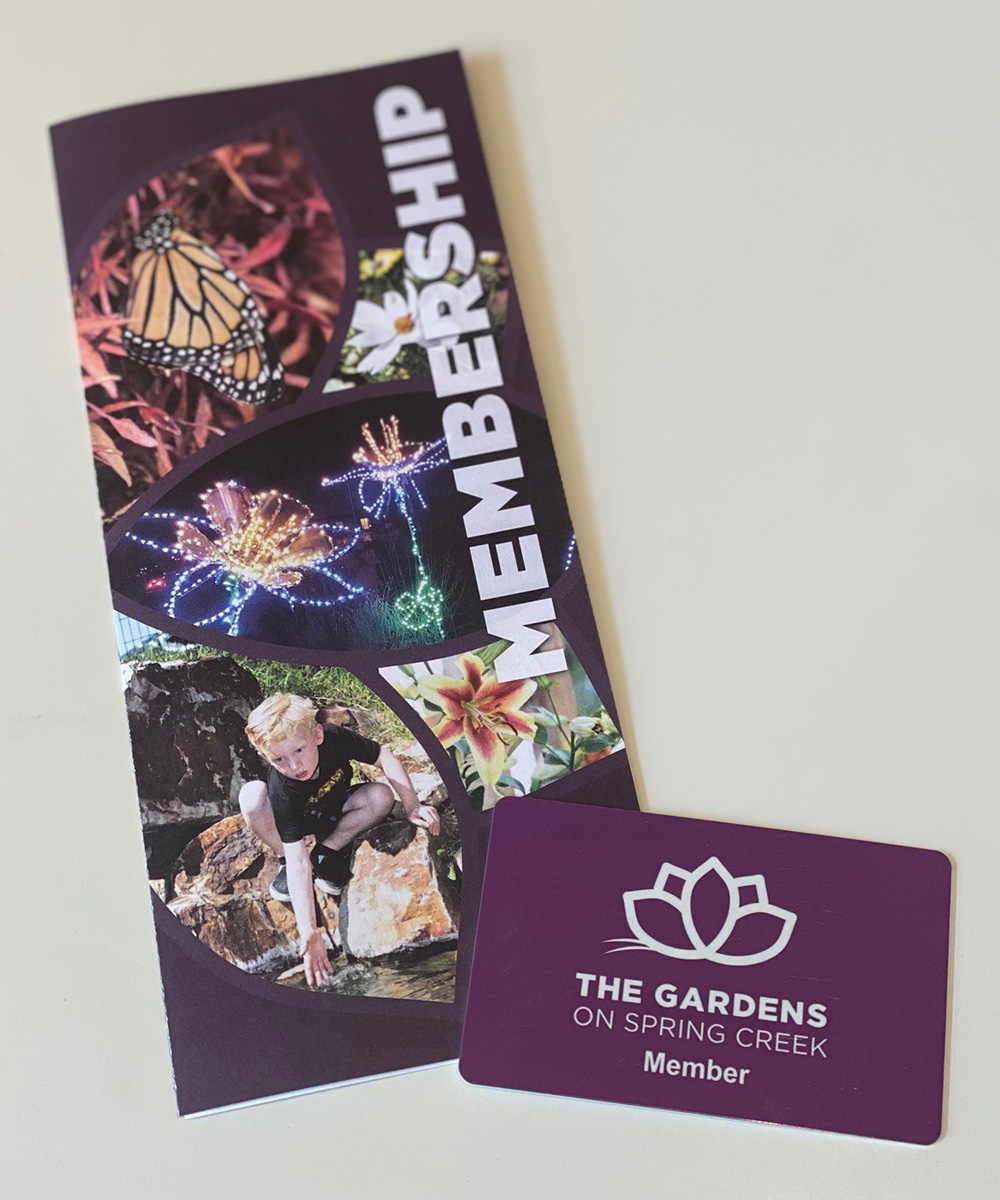
A membership to your local public garden is a gift that gives year-round. Memberships allow free admission to the garden and/or free parking. Discounts on classes, events, gift shop purchases, and so forth are often included as well. Be sure to check out your local garden’s website for specific details about its membership program. In addition, most garden memberships can be used for free or discounted admission to over 300 public gardens nationwide—a terrific perk for the gardener who also loves to travel. It’s also nice to know that your purchase provides much-needed funding for your local garden’s operations and programs—a true win-win.
This rolling garden seat saves your back and knees
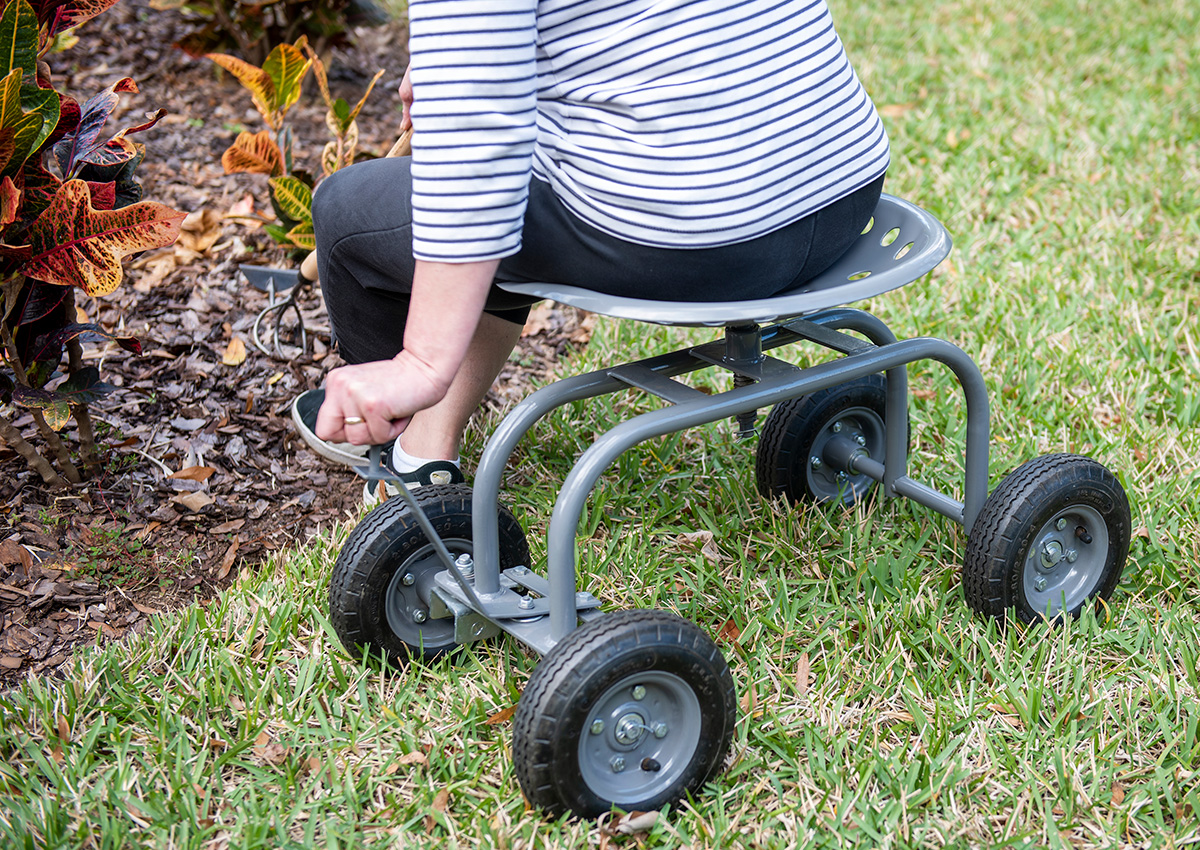
If you have a loved one with a back that’s sore from hours working in the garden, this is a terrific gift that will ensure many more pain-free hours to tend their passion. The Rolling Garden Seat from Gardener’s Supply allows easy access to raised beds; imagine never having to hunch over to harvest green beans! It also eliminates stooping or bending to weed and deadhead flower gardens. The seat rotates 360 degrees and can be raised or lowered for the perfect height. The heavy-duty wheels can be used on a variety of surfaces, and a turnbar gives you front wheel control to easily meander your way through planting beds.
Source: gardeners.com
Price: $79.95
—Michelle Provaznik is executive director of the Gardens on Spring Creek in Fort Collins, Colorado.
Northeast Regional Reporter—Matt Mattus
A watering can as beautiful as your houseplants
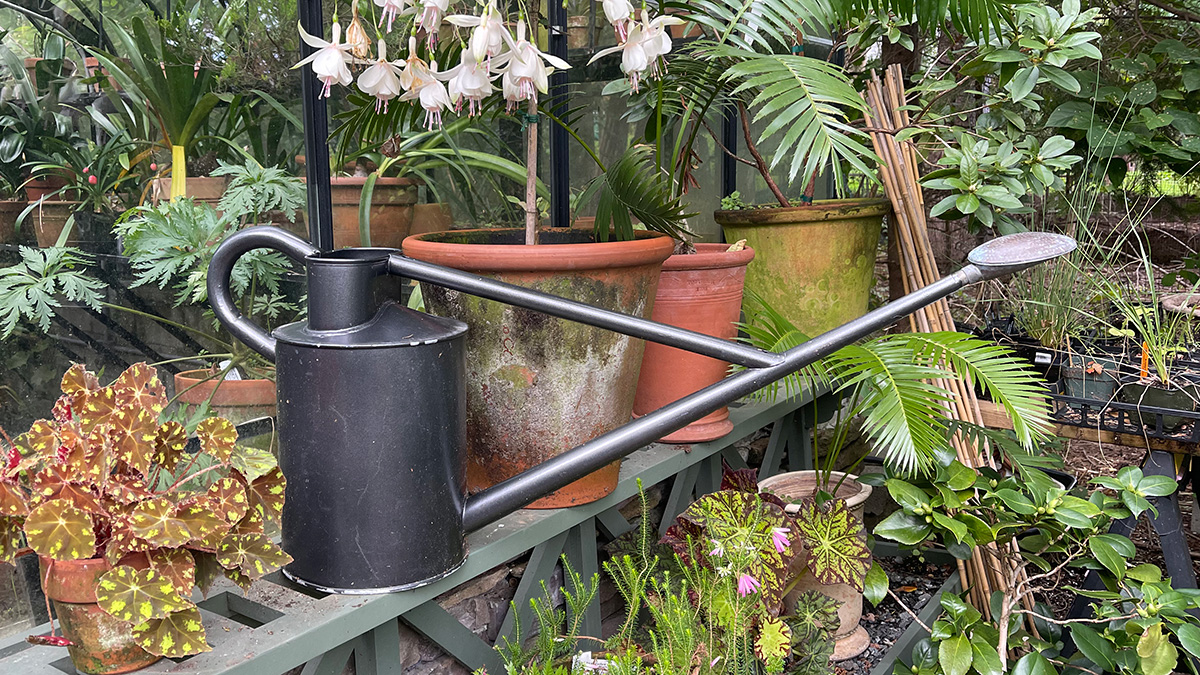
After 30 years of practicing as a product designer, I can appreciate designs that are ergonomic, timeless, and practical. But it’s pure kismet when you discover a product that is also stunningly beautiful—even just as an object. The classic Haws watering can is all that and more. As with so many crafts, it all comes down to having the finest-crafted tools to work with. Chefs geek out over pricey knives and obscure kitchen paraphernalia, but we serious gardeners dream about things like hand-thrown pottery and, yes, authentic Haws watering cans.
Source: haws1886.com
Price: £7.99 to £59.99 (about $11 to $82)
Keep critters away from your veggies
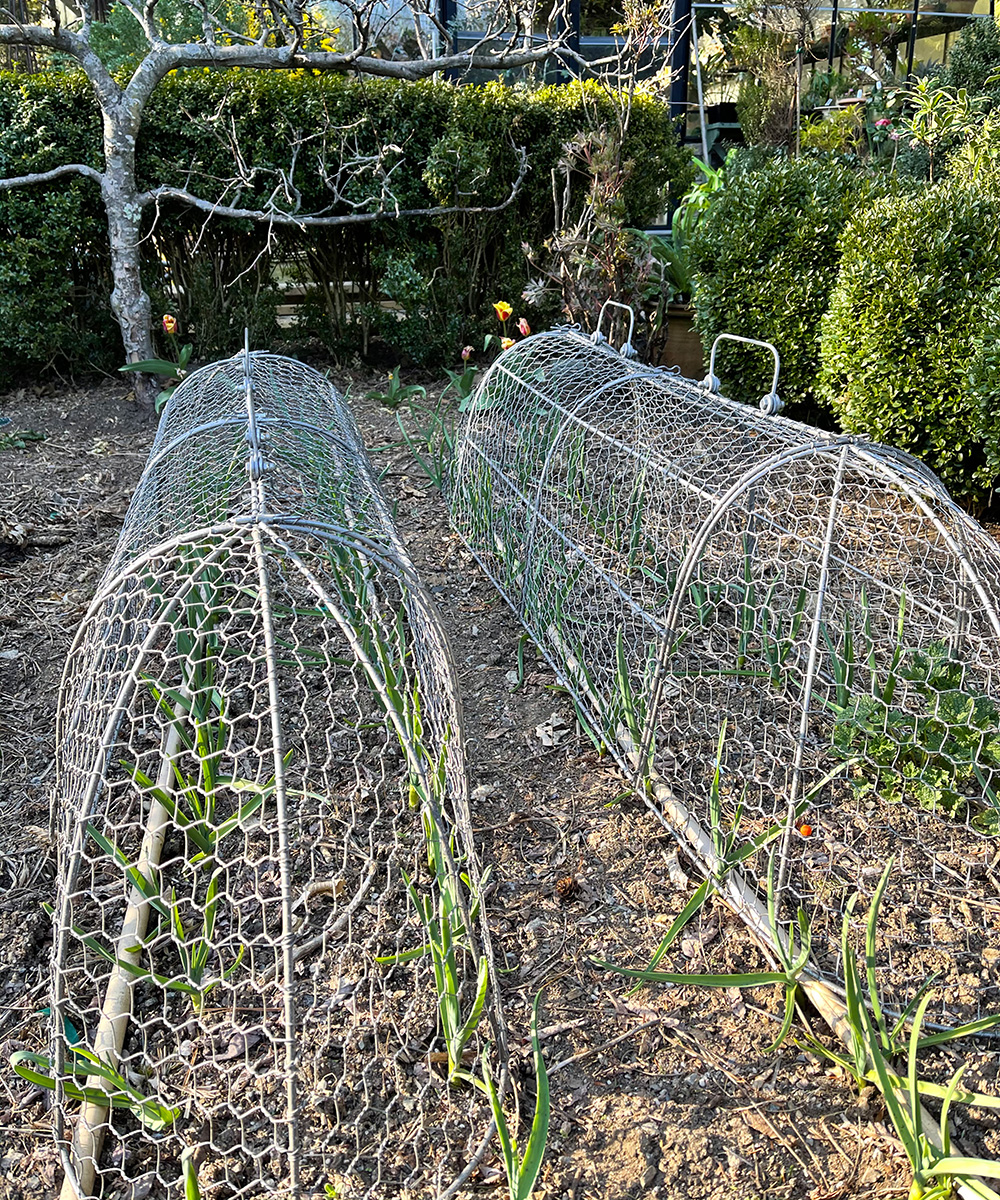
My garden struggles include having too many wild rabbits who like to munch on my plants and three curious terriers who like to dig wherever I have dug. So when I saw these wire-covered cloches from Gardener’s Supply, I knew that I had to have them. Not only do they keep the bunnies, dogs, and deer from destroying a crop, but they look as if they came right out of a Beatrix Potter illustration. Now I can say goodbye to those rusty tomato cages that I would lay over the garden. These cloches stay out year-round—and they’re gorgeous. Shhh—no one needs to know that they are functional.
Source: gardeners.com
Price: $39.95 (3 or more, $36.50 each)
—Matt Mattus is the author of two books: Mastering the Art of Flower Gardening and Mastering the Art of Vegetable Gardening. He gardens in Worcester, Massachusetts.
Northern California Regional Reporter—Fionuala Campion
Protect your face and neck with this stylish hat

Every gardener in your life would appreciate at least one of these comfortable and colorful hats this holiday season! Though I normally am extremely ambivalent about hats, I absolutely LOVE this lightweight, washable, breathable, and very flattering cotton hat from Foxgloves. Whether I’m gardening, traveling (this hat can be squeezed into the tiniest available luggage space), going to an outdoor event, or hiking, it has become my go-to head covering for every outdoor occasion—miraculously staying put even on the windiest of days! And it provides SPF50+ sun protection. Not only is this hat pretty, but it is available in an array of colors. You’re bound to find at least one that you or your gardening buddies will fall in love with (I have four at last count). I promise you’ll find yourself buying multiples to make sure you’ve got one to match every outfit! So put a Cotton Crochet Hat from Foxgloves on your own wishlist, or start shopping for your gardening friends and family.
Source: foxglovesinc.com
Price: $35.00
Gorgeous garden art that gives back
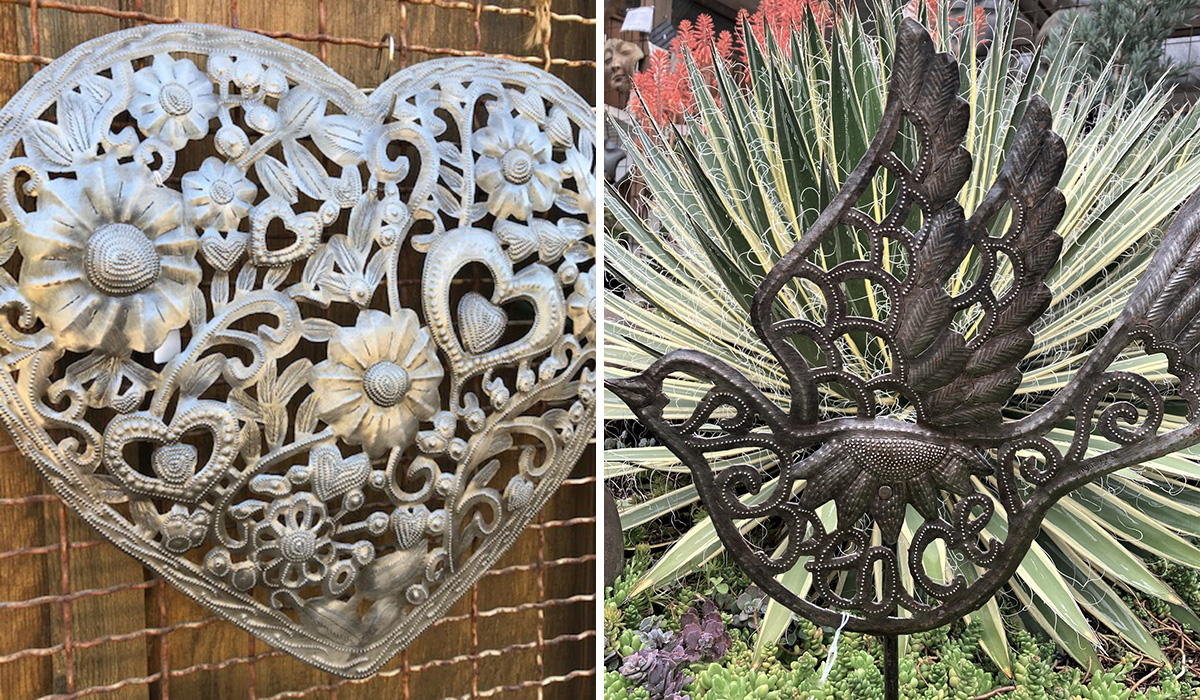
Beyond Borders Fair Trade helps the talented metal artists it works with in the town of Croix des Bouquets, Haiti, to better their lives, alleviate poverty, and improve the Haitian economy—all through sharing their beautiful metal artwork with appreciative homeowners and gardeners all over the world. Using discarded oil barrels, hammers, chisels, and nails, each artist puts their gifts to work and creates gorgeous pieces ranging from small garden stakes for a flower border to large, collectible wall or fence pieces perfect for either indoors or out. There are styles, sizes, and price points to suit every friend or family member this holiday season. The hardest part is choosing which beautiful piece to give or to put on your own wishlist!
Source: beyondbordershome.com
Price: $39.99 to $123.99
—Fionuala Campion is the owner and manager of Cottage Gardens of Petaluma in Petaluma, California.
Northern Plains Regional Reporter—Marti Neely, FAPLD
Make a stylish statement with these plush plant pillows
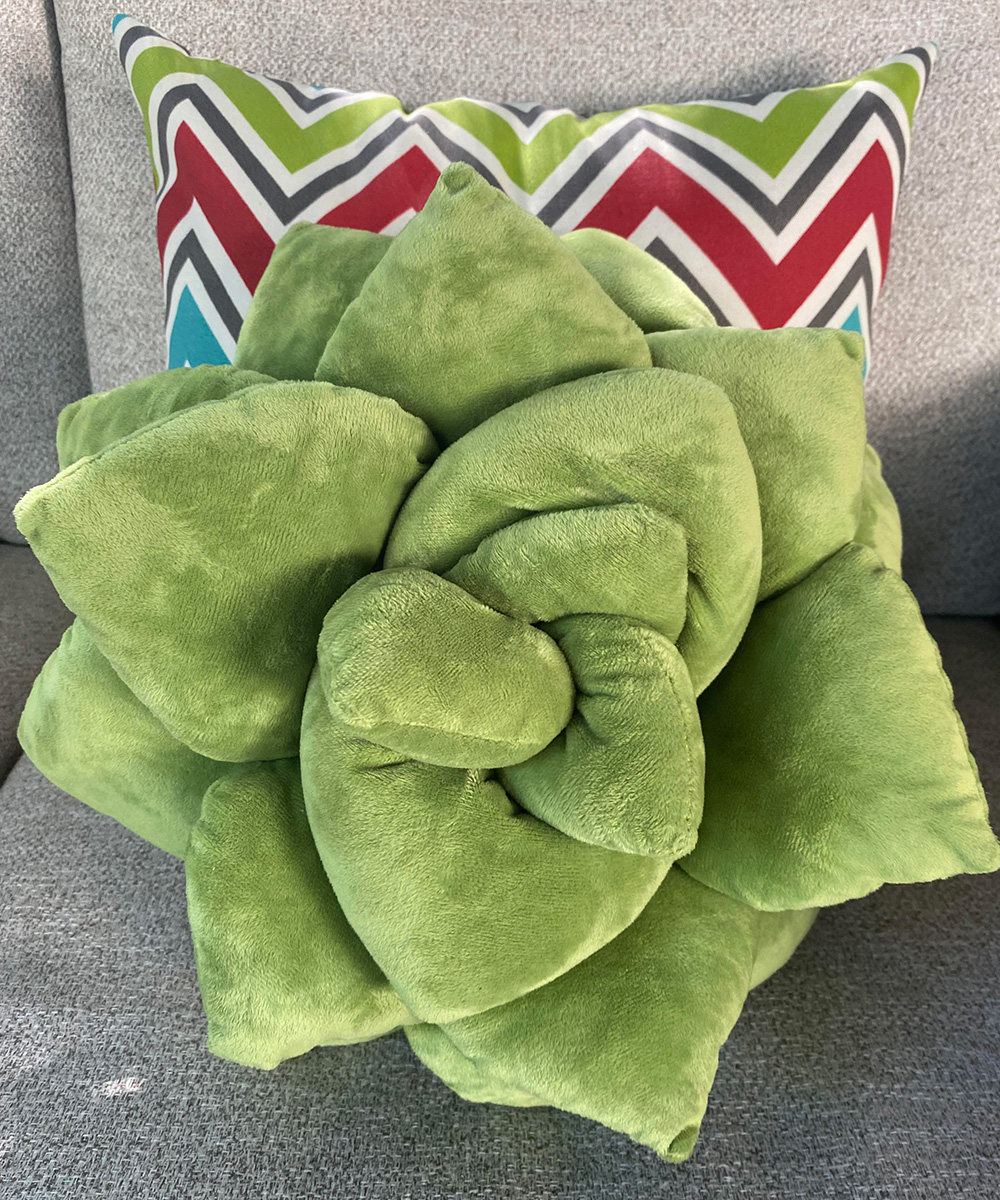
Whether you have fallen in love with monsteras, anthuriums, alocasias, or any other wildly wonderful tropical plants, there is now a new way to bring their boldness into your living spaces with creative flourish. Give the gift of gardening with unique pillows inspired by nature from the Green Philosophy Co. The Succulent Plush Pillow is available in three colors and two sizes, with each easy-care micro plush cover created individually by hand. Additional styles of plant species are available. Partnering with Trees for the Future, this woman-owned company pledges to plant trees in developing countries for every purchase, with over 137,700 planted to date.
Source: greenphilosophy.co
Price: $35.00 to $149.00
This book will help you make your garden more sustainable
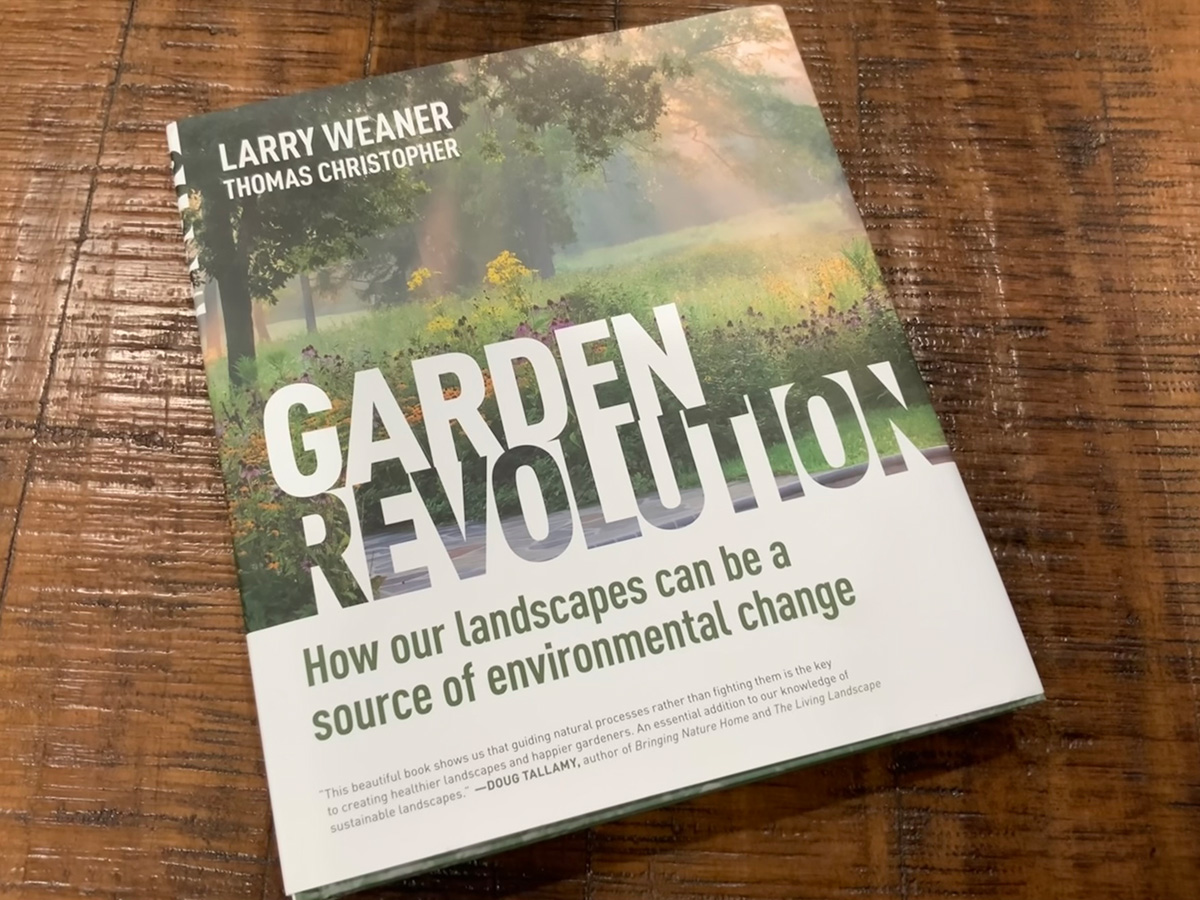
For anyone interested in learning how to create landscapes based on ecosystems and plant communities, there is no better place to start than Garden Revolution: How Our Landscapes Can Be a Source of Environmental Change by Larry Weaner and Thomas Christopher, (Timber Press, 2016). This book is thoughtfully organized and written to be not only educational but also to tell the story of discovering nature’s seasonal surprises. It documents Weaner’s and Christopher’s personal journeys through horticulture, explored through lessons learned and used to inform you of best practices for developing more ecologically responsible gardens. Whether you are a novice gardener or a practicing professional, this is a must-have addition to your library.
Source: amazon.com
Price: $32.31
—Marti Neely, FAPLD, owns and operates Marti Neely Design and Associates in Omaha, Nebraska.
Northwest Regional Reporter—Susan Calhoun
Help a novice become a practiced gardener
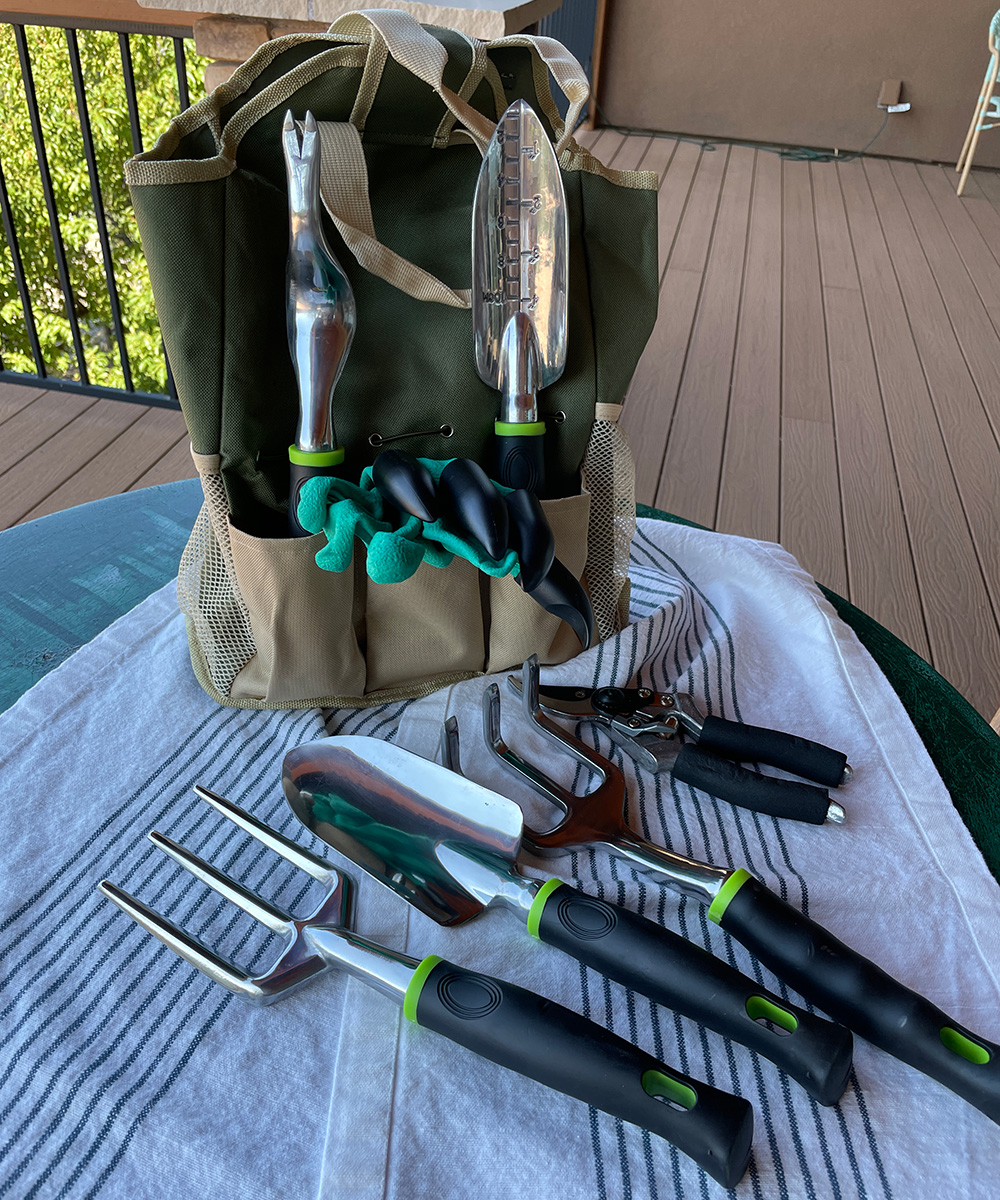
This beginning gardener’s kit from California Picnic is good fun and a great gift for young gardeners, with its Wolverine-type claw gloves. Waterproof with plastic claw fingertips on one glove, the pair helps with digging out planting holes. Many gardeners wear out the fingers on gardening gloves, so this would also be perfect for any plantsperson on your list. The bright purple color could even help with finding the glove that always goes missing while working. Tools—including claw, rake, trowel, weeder, and even pruners—are all included in a tote that can carry other gardening bits and bobs.
Source: amazon.com
Price: $25.97
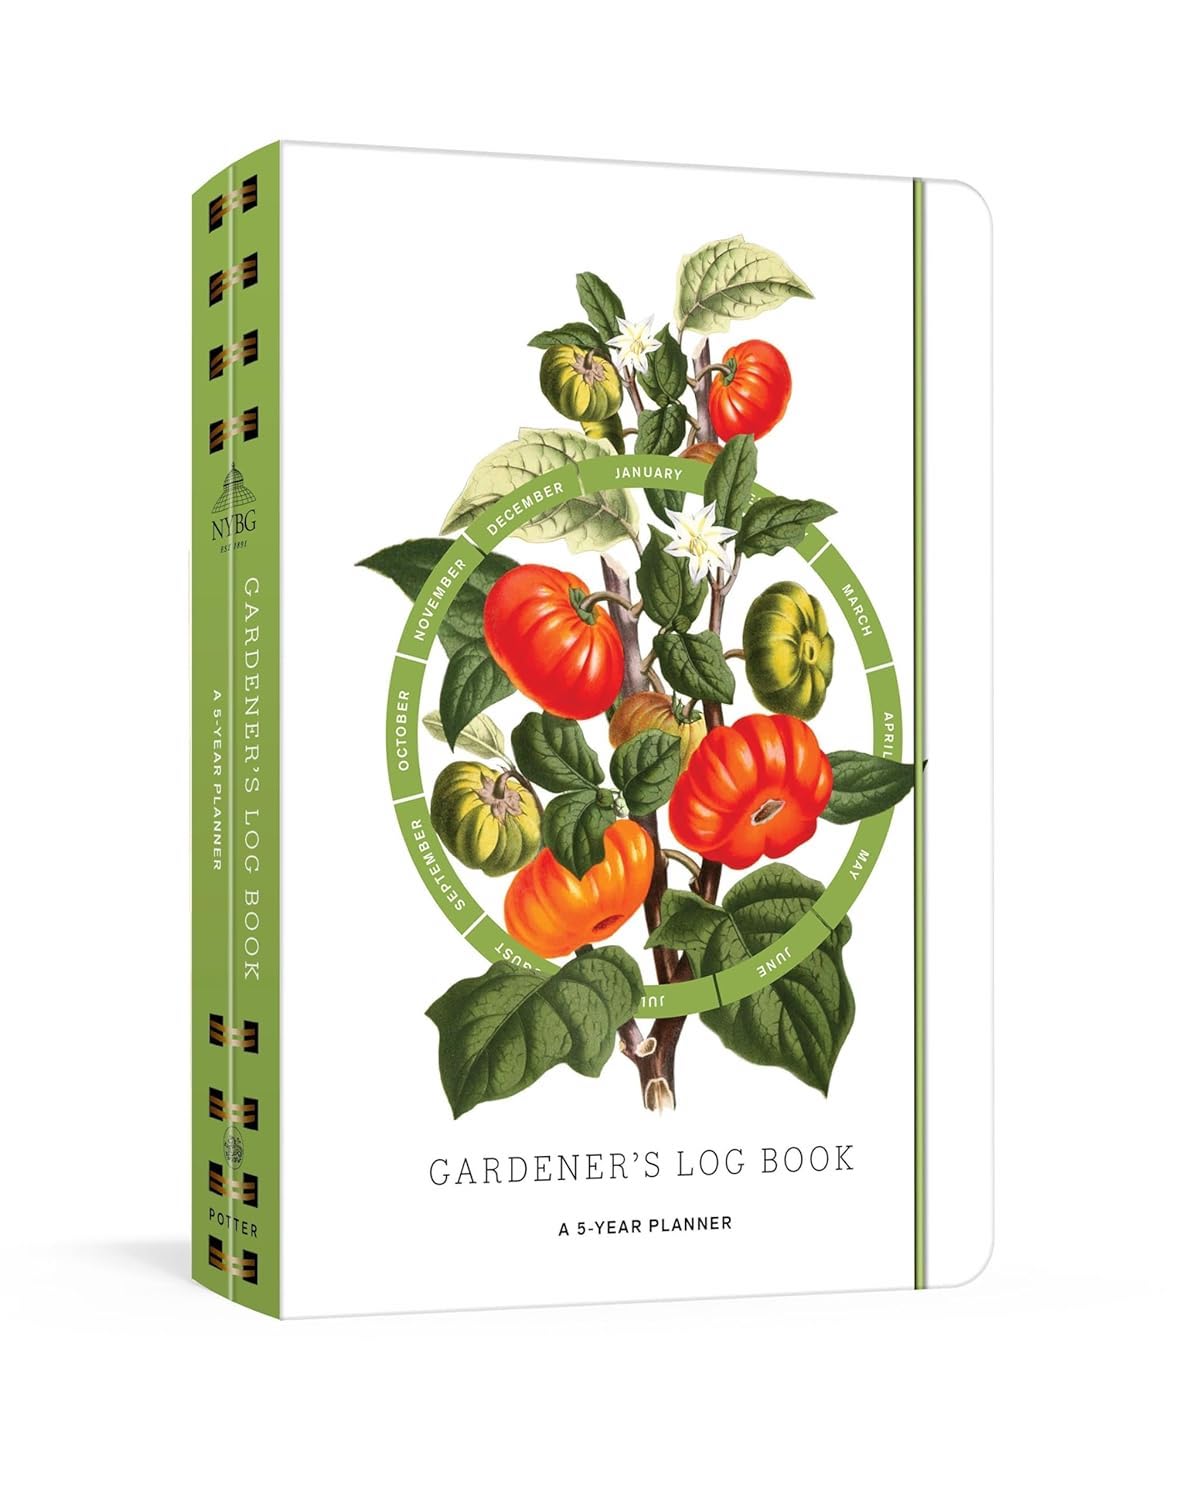
Plan and document your gardening season with this journal
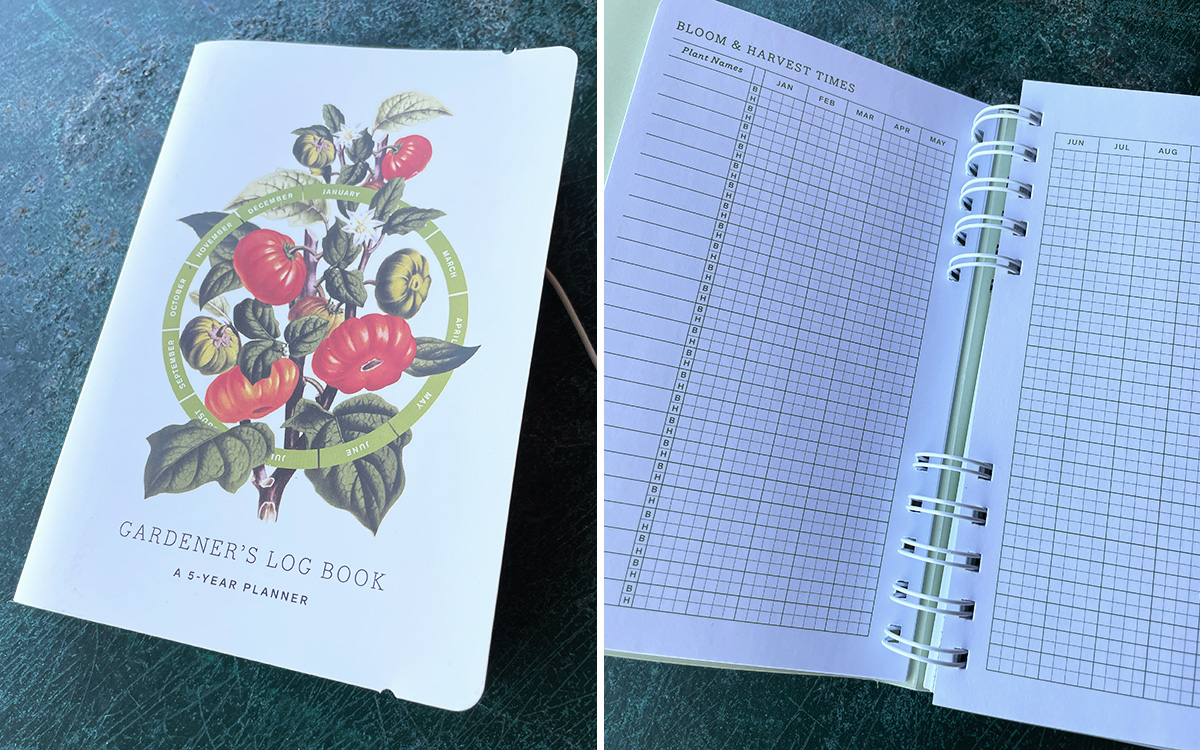
Many gardeners keep records of plant purchases, save tags, and have loose notes about plants in a box. A gardener’s journal is a great way to organize all these bits and pieces. This waterproof log book has specific sections for design notes, plant pages, and memos, as well as a seasonal calendar to help with tasks. It is based on a five-year plan, so it has plenty of room to really track the garden. That New Year’s resolution to be more organized will be easier this year. It is available on many online sources, including the New York Botanical Garden website. This gift gives two ways by also helping to support the botanical garden.
Source: amazon.com
Price: $16.99
—Susan Calhoun is the owner of Plantswoman Design in Bainbridge Island, Washington.
Gardener’s Log Book from NYBG
This weatherproof five-year log book includes the following features:
· Sturdy waterproof cover to protect pages from rain and muddy soil
· Lined pages and gridded paper for plotting beds
· Five years of 12-month bloom and harvest grids for recording what you planted and when
· Authoritative appendices on composting, pruning, pest and disease control, and container gardening
· Useful reminders by season on fertilizing, mulching, and transplanting
· Space for listing your favorite sources and suppliers.
Price: $ at the time of writing
South Regional Reporters—Jason and Shelley Powell
Weed more easily with this long-handled swoe
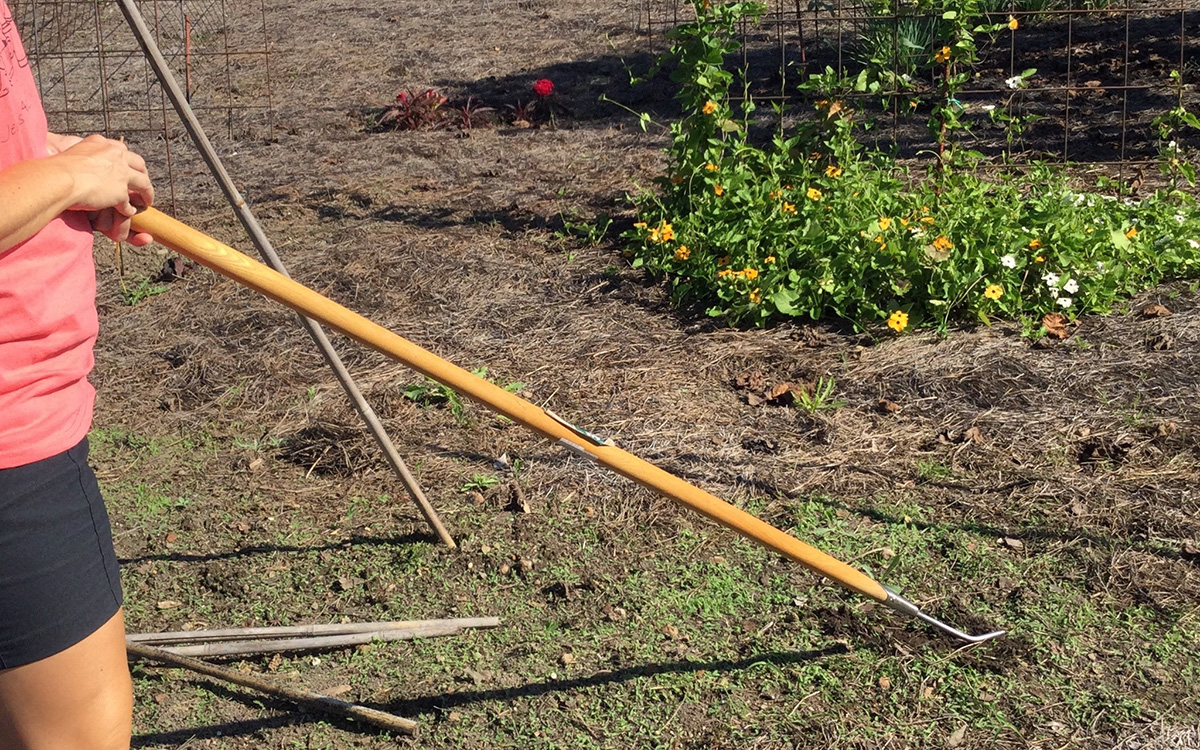
Long-handled tools are incredibly useful for many reasons. At the top of the list is the fact that they allow us to weed while saving our backs. Of all the long-handled tools we have used, none are easier and more effective than this swoe. With a 6-foot lightweight handle, we can reach to the back of our flower beds with ease. And with the narrow head that has cutting edges on three sides, we can weed between vegetable plants without uprooting them. If you want to make the gardeners on your gift list happy campers, put a bow on a swoe for them.
Source: leevalley.com
Price: $53.95
Move heavy pots with ease with this plant caddy
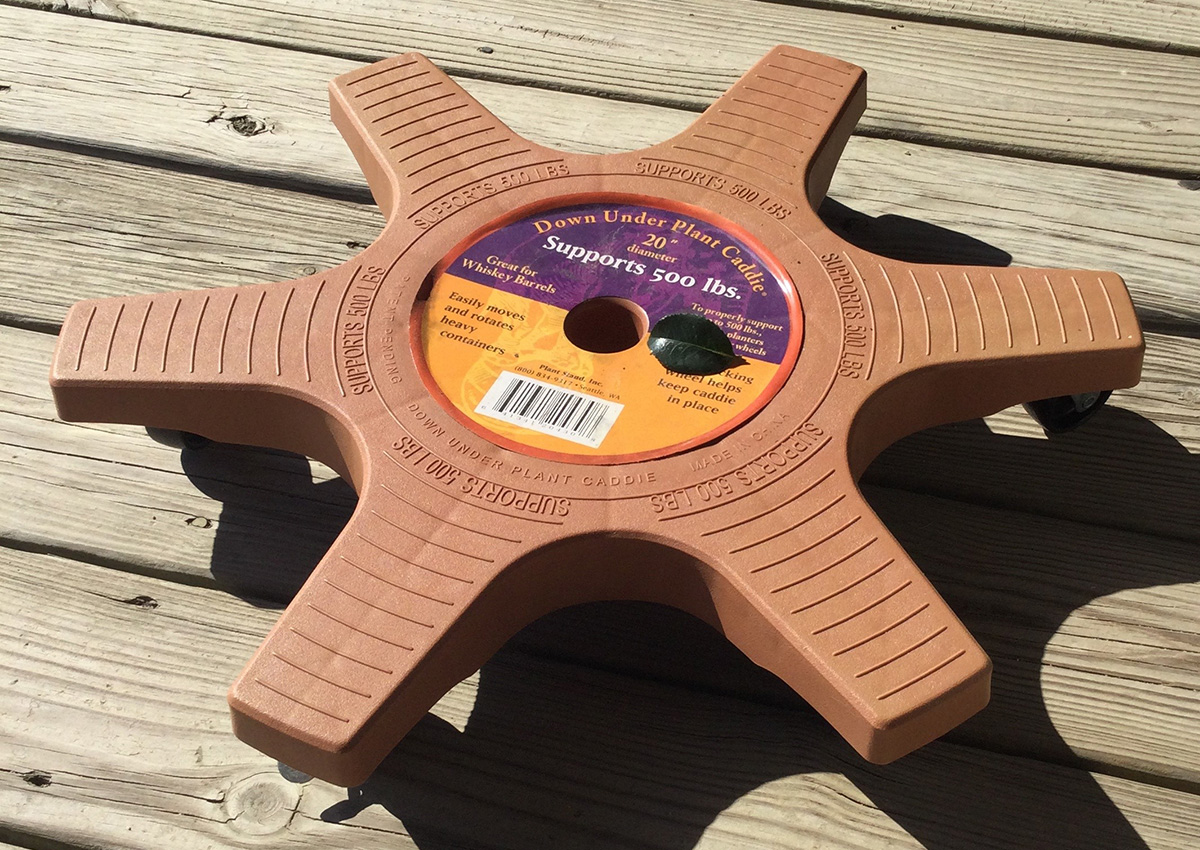
We love big pots, especially ones that we’ve planted with hard-to-replace frost-tender plants. There are few things more attractive than a nice lemon tree in a 20-inch glazed pot. Unfortunately, finding help to wrestle those big pots inside the night before that first hard frost can be difficult. Now there are these Down Under Plant Caddies, which can carry up to 500 pounds and still roll. A couple of different sizes are available for all kinds of pots. They make the prospect of moving that giant pot with the beautiful lemon tree into the garage a reality.
Every gardener likes big pots and moving them around. An empty pot isn’t terrible to move; however, once you fill it and plant it, putting it in the other corner of the patio is more challenging. Once you put the empty pot on wheels and get it planted, the fact that it may or may not look better in the far left corner or a couple of feet to the right is much easier to discover.
Source: bosmereusa.com
Price: $30.95 to $49.64
—Jason and Shelley Powell own and manage Petals from the Past, a garden center in Jemison, Alabama.
Southeast Regional Reporter—Dr. Andy Pulte
Heavy-duty gardening gloves that will last for years
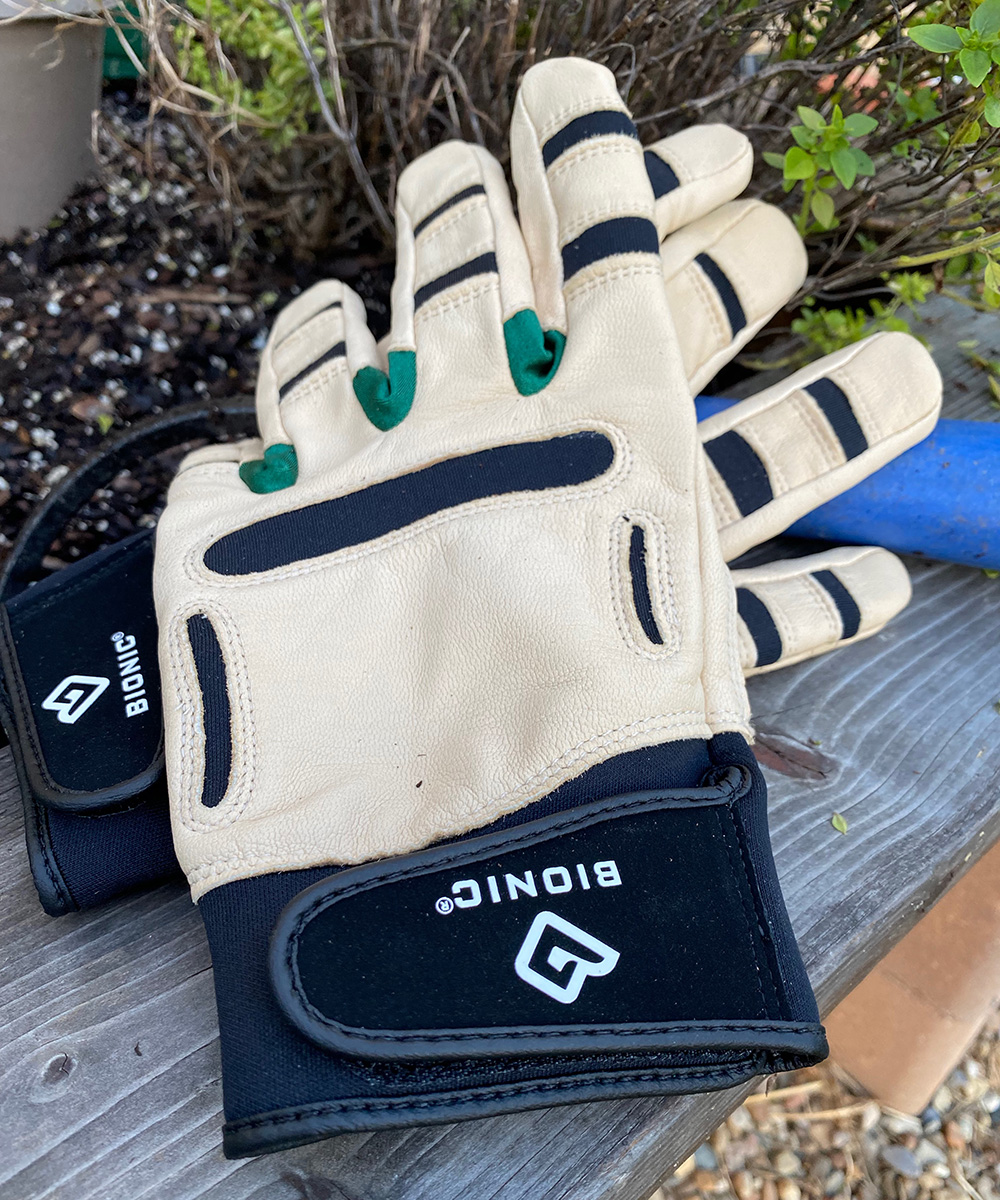
Life is too short, and I garden too much to waste my time on cheapo gloves. They need to be comfortable, fit well, and last a season or more. Bionic is my go-to glove. Coming in at about $40 a pair, they might seem like a luxury item to most gardeners. However, over the last six years I have only worn out three pairs. Trust me, I put them to the test. I wear them when I am running a chain saw and when I’m pulling weeds. I tend to wear the fingertips of gloves out quickly. These have silicone finger pads for added fingertip longevity. Between each finger is flexible fabric that makes hand movement natural. A flexible Velcro wrist closure keeps dirt out of the gloves while you’re working.
Source: bionicgloves.com
Price: $39.99 to $56.99
A nifty tool that for many garden tasks
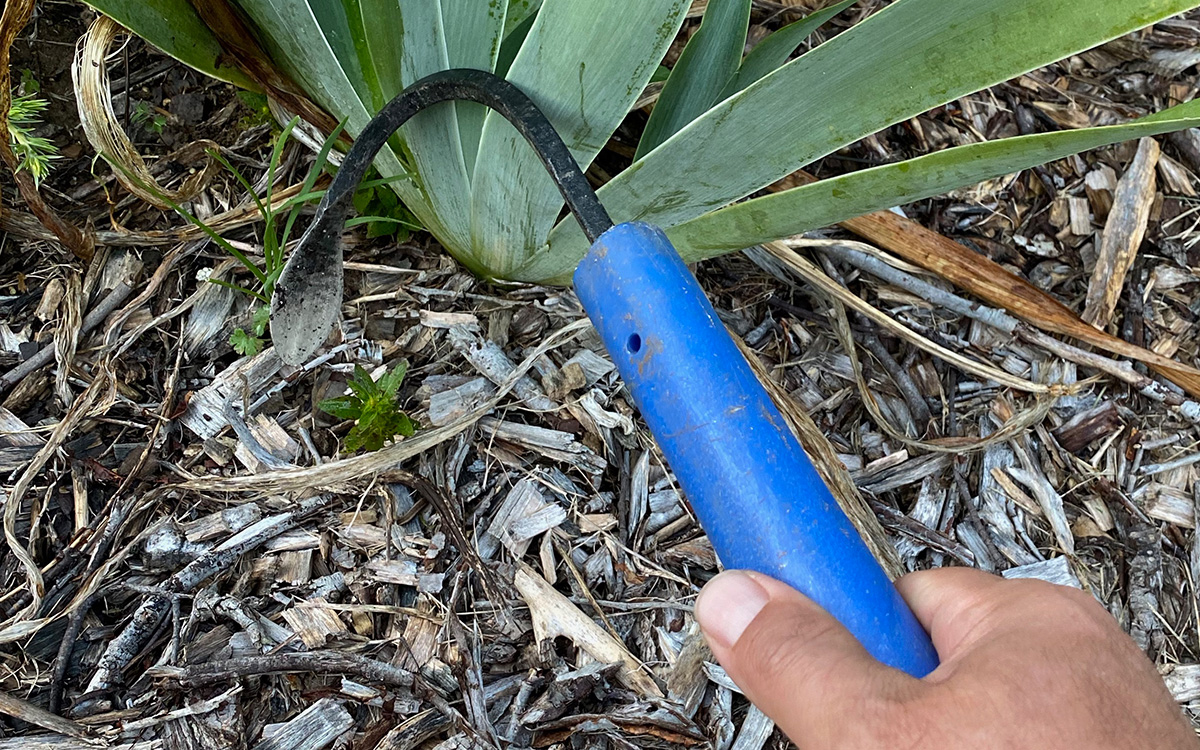
Made in Wisconsin, the Original CobraHead Weeder and Cultivator is one of the garden items I always keep nearby. Around 10 years ago the developer of this unique gardening tool, Noel Valdes, handed me the first one I had ever seen. I suppose you can do almost anything with it in the garden. My preferred use is ripping dandelions out of the ground. When I’m not weeding, I use it to plant small transplants. I have also been known to trench shallow rows for seeding in my vegetable patch with its unique hood-shaped blade. What I like about it is its ability to transition between the indiscriminately forceful and the precise but delicate in the garden.
Source: cobrahead.com
Price: $24.95 to $112.95
—Andy Pulte is a faculty member in the plant sciences department at the University of Tennessee.
Southern California Regional Reporter— Jane Gates
Waterproof work pants that can take abuse
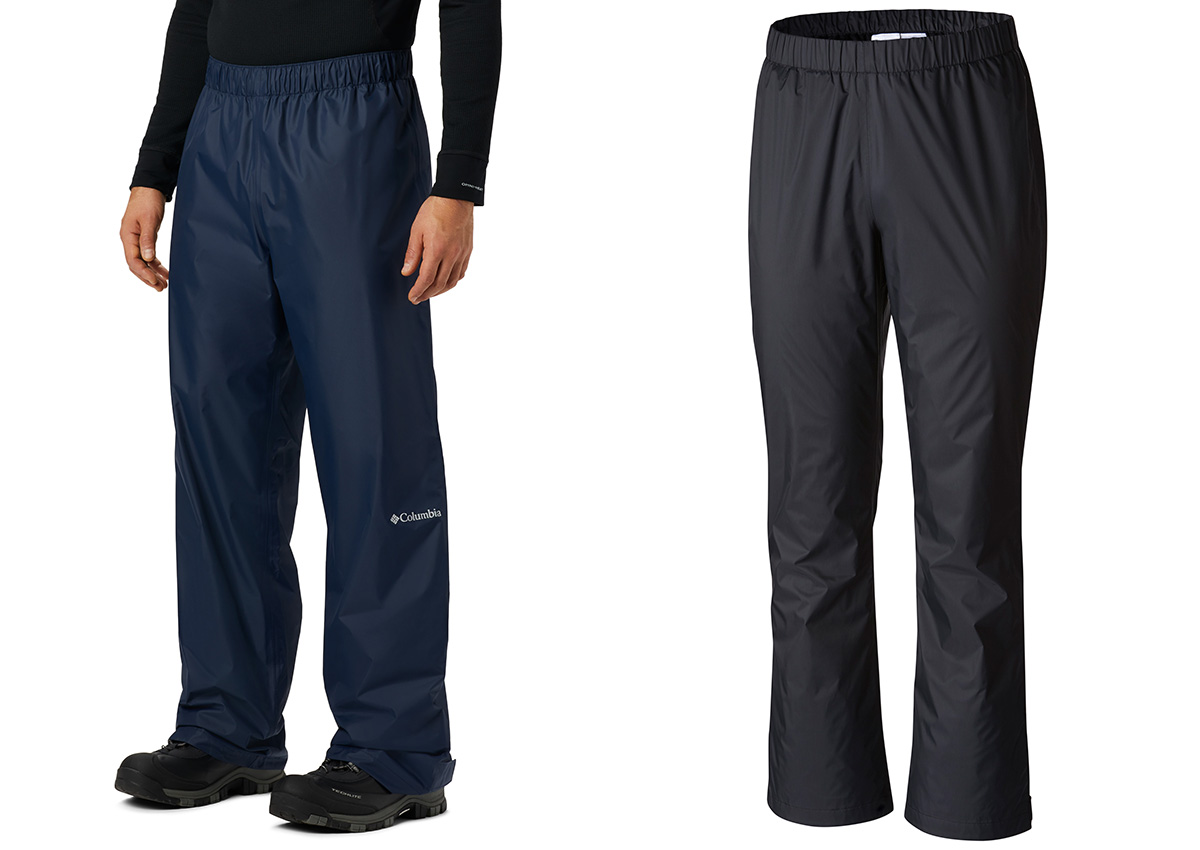
Probably one of the best gifts I ever gave myself was an inexpensive pair of plastic-fabric pants. I bought them long ago, and they will likely remain in my wardrobe for a long to come. Whenever I have a messy project to do in the garden, I slip them on. Mine are now a piece of art displaying splattered paint from fences, oils, drips, and various other pieces of gardening history. They have rescued my legs from scratches, tears, thorns, and LOTS of bug bites. They are good for when I’m spraying, washing, pruning, turning creepy-crawly compost heaps, and cleaning messy, muddy areas. This may not be a very romantic gift, but it’s one that will surely keep on giving!
Hint 1: Buy at least one or two sizes bigger than normally worn so the plastic pants will slip easily over heavy jeans or anything else.
Hint 2: The thicker the better for durability.
The pair I still have was made by Columbia Outdoor Sportswear, and you can currently find styles of that company’s waterproof pants in retail stores and online. They come in assorted sizes and colors for men, women, and children.
Sources: columbia.com (women’s pants); columbia.com (men’s pants)
Price: $50.00 to $60.00
Herb garden kits for indoors, outdoors, and spaces in between
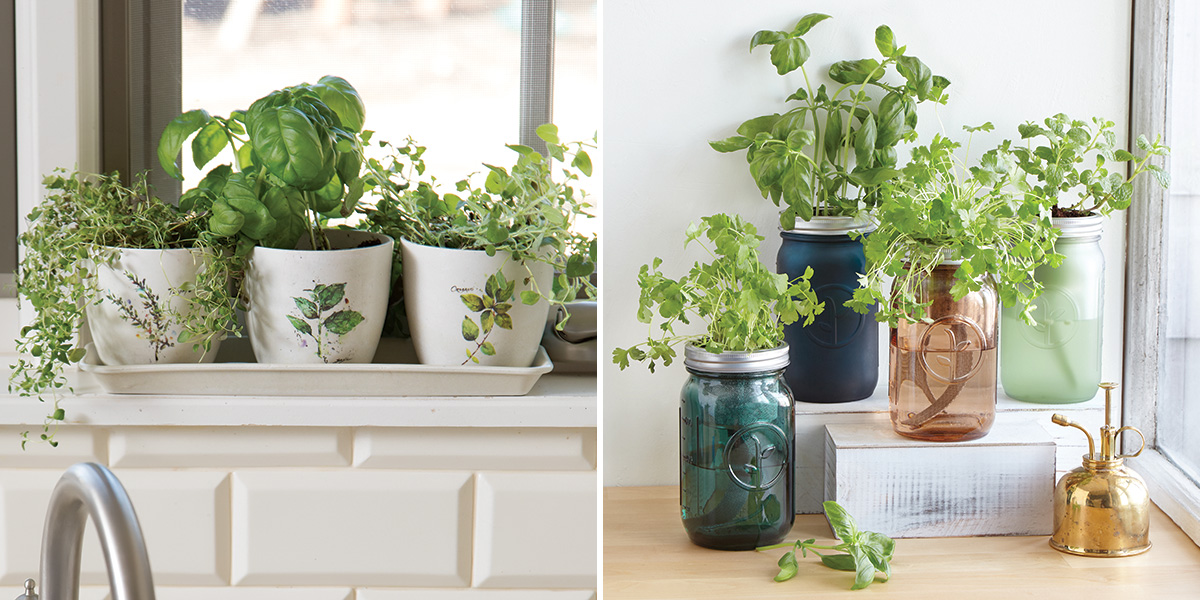
What do you give someone who loves gardening and good food—especially when you can’t depend on the weather these days? How about an herb garden kit?
If you choose a good enough design, your garden kit can be grown indoors in a sunny window, be ported outdoors onto a balcony or patio, or be perched outside in the landscape as a point of interest. Snuggle it near the kitchen where the resident herbs will be fresh and convenient to snip just in time to complete that perfect meal!
All kinds of herb garden kits are available in garden centers, home stores, nurseries, and online. But I suggest gifting kits with mix-and-match, reusable pieces. These kits not only offer longer-lasting, eco-friendly service, but also opportunities to replant seeds for different seasonal favorites. Consider growing all kinds of herbs, spices, and maybe even a pot of small-growing vegetables (like radishes), fruits (think strawberries!), or decorative colorful flowers.
And if all of this is not enough to convince you, remember that an herb garden kit can bring delight to a child, adult, or even senior citizen. This is the kind of gift anyone can grow with.
Sources: harryanddavid.com, demdaco.com, uncommongoods.com
Price: $22.00 to $59.99
—Jane Gates is a landscape designer based in Los Angeles.
Southern Plains Regional Reporter—Kim Toscano
Make your veggie garden work for you with this book
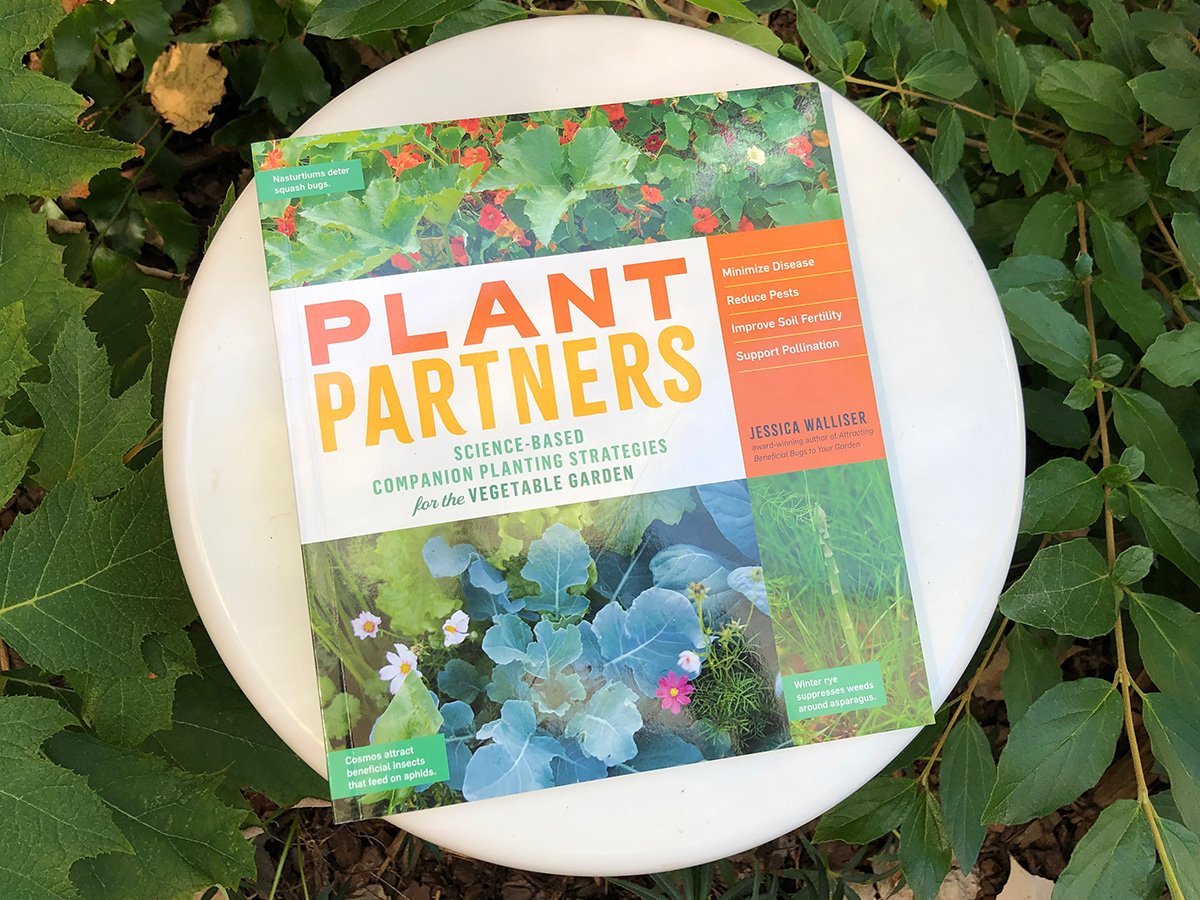
There’s a lot of information out there about companion planting, but little of it has stood up to rigorous scientific testing. That’s where Plant Partners: Science-Based Companion Planting Strategies for the Vegetable Garden differs from other companion planting books. Author and horticulturalist Jessica Walliser examined nearly 200 scholarly research articles to find what methods produce scientifically significant results—and which ones do not. The product is a remarkably thorough presentation of how companion planting works and why, along with strategies gardeners can use to achieve a diversity of goals, from pest management to soil conditioning. Along the way, readers will gain valuable insights into the myriad ecosystem interactions that affect plant growth and productivity. This is a resource you’ll turn to for years to come. As a scientist, I am both incredibly impressed with and greatly appreciative of the research that went into writing Plant Partners.
Source: amazon.com
Price: $24.95
This feeder protects small birds while they eat
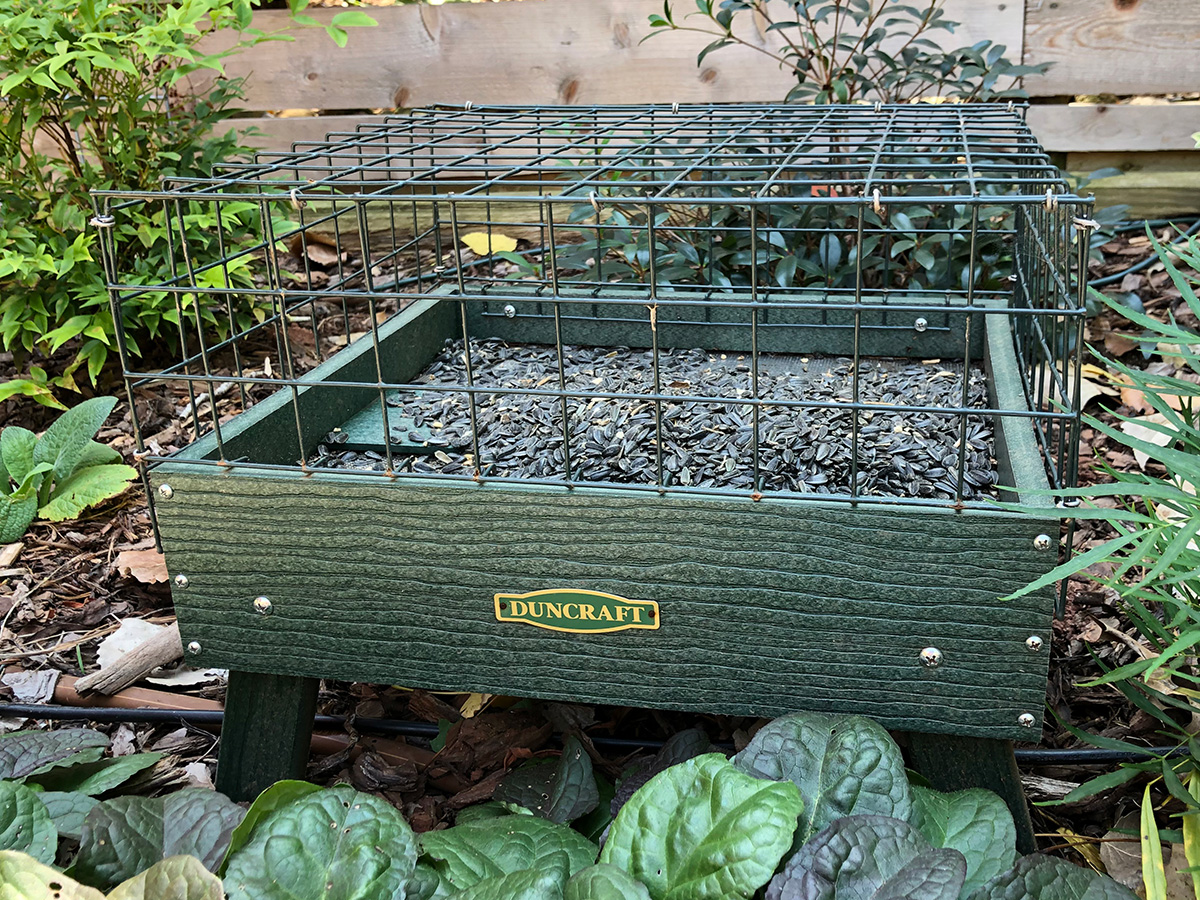
I’ve been gifting bird feeders since grade school, when I brought home my first peanut butter–covered pinecone feeder. This protective ground feeder from Duncraft takes my gift-giving to a whole new level. The Duncraft Ground Platform Haven Feeder features a wire cover to protect small birds from raptors and other predators as they feed. Sitting just 6 inches above the ground, the low platform is perfect for juncos, finches, and sparrows. Doves like to gather around and feed on any seeds the smaller birds kick out onto the ground. The feeder is built from weather-resistant recycled plastic and has a woodlike finish. The wire cover is easy to remove for cleaning, and a mesh floor allows water to drain. Birding brings great joy to people of all ages, and I love to share my love of bird watching with others when it comes to gift giving.
Source: duncraft.com
Price: $119.95
—Kim Toscano is a horticulturalist, entomologist, garden designer, writer, and graphic designer. She previously hosted Oklahoma Gardening, a weekly PBS television program produced by the Oklahoma Cooperative Extension Service.
Southwest Regional Reporter—Mark Brotton
The toughest, most durable boots you’ll ever own
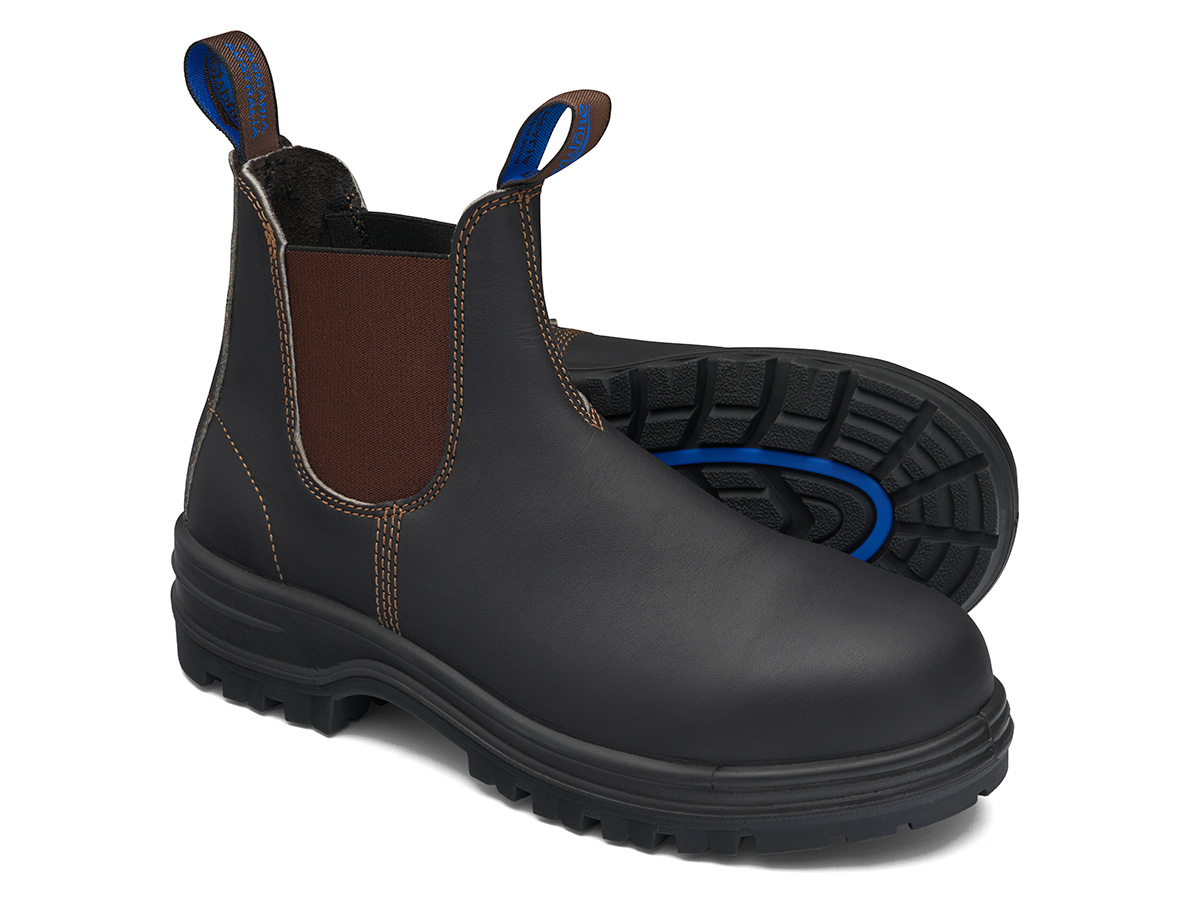
Slip-on boots and shoes are my favorites when working in a yard or garden. I prefer to steer away from laces at all costs just for the ease of not worrying about muddy shoes in the house. These Blundstone boots are extremely durable and practical for working outside, especially in the garden. These unisex boots are qualified to take great care of your feet whether you’re a man or woman. This brand also has specially made waterproof pairs for those of you who prefer to keep their feet toasty and unfrozen by the effects of water. These boots are tough and durable and have been perfected since 1870. If the specific boots pictured here don’t catch your eye, there are plenty of other styles you can check out.
Source: blundstone.com
Price: $204.95
Heavy-duty gloves with stylish prints and patterns
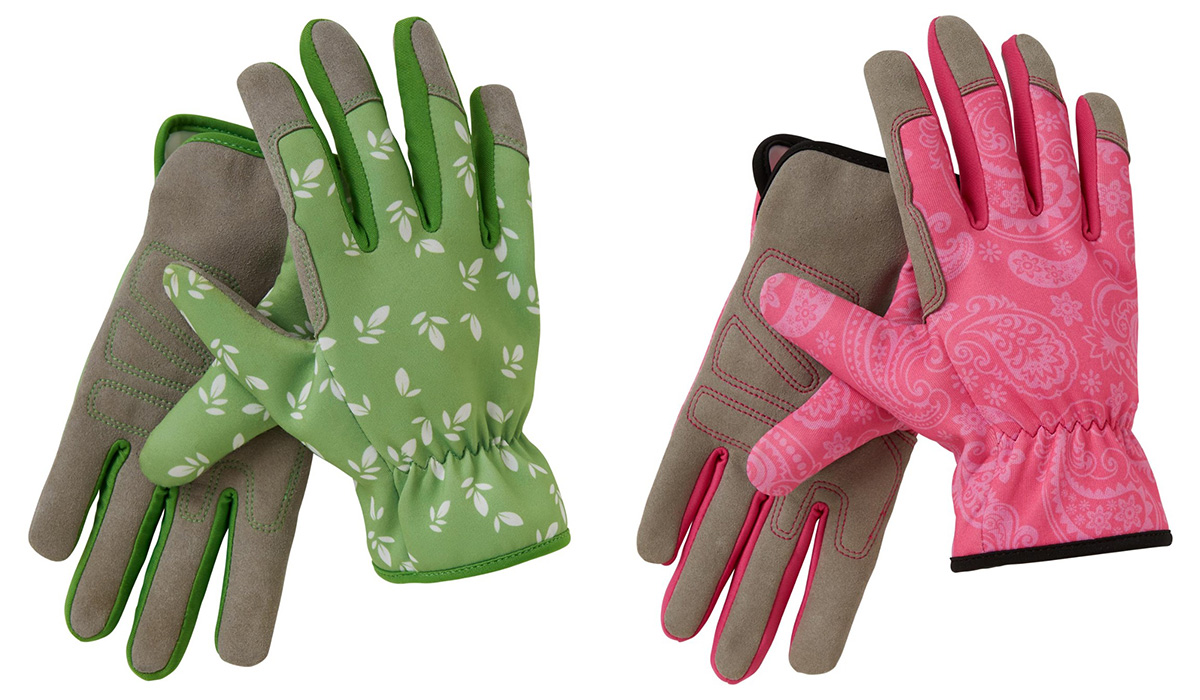
These gloves are a woman’s necessity when working in the garden. Some of us like getting dirt under our nails, but I am not one of those people. In my work as a contractor and designer for more than 20 years, I have always needed to protect my hands from nasty splinters or other sharp, pokey things, and I don’t enjoy spending lots of time cleaning my hands after work. These gloves will last for more than one season. They are available in green, pink, or purple with different design options for the woman or friend you love. I originally found these on Duluth Trading Co. but they don’t seem to carry them anymore, but Amazon does. If you’re looking for gloves for the man in your life, then you will most likely find the perfect pair from Duluth Trading Co. as well.
Source: amazon.com
Price: $17.95
—Mark Brotton, APLD, owns and operates Living Water, Irrigation, and Landscape based in Santa Fe, New Mexico.
See more gift ideas from our sponsors!


")


 1.62″ Amoled Display | 233 mAh Battery | up to 21 Days of Battery Life | Over 150 Workout Modes | BT 5.4 | 50M Water Resistant -Arctic Blue")