Green goddess grain bowls are easy to make, packed with flavor, satisfying and ready in just 20 minutes from start to finish. This green goddess bowl recipe is perfect for lunch or dinner and can even be made for meal prep.
This post contains affiliate links. As an amazon associate I earn from qualifying purchases. Click here to read my policy and more about affiliate links.
Green Goddess Bowl Highlights
Easy to make
Ready in 20 minutes
Packed with flavor
Great for meal prep
Versatile
Ingredient spotlight
Roasted red pepper – this is one of my go-to ingredients for quick cooking meals, it adds so much flavor and doesn’t require any cooking! If you have a lot of bell peppers on hand, I recommend using your air fryer to make roasted peppers at home.
Green goddess dressing – to make this recipe as easy as possible, I’m using a jarred green goddess dressing. If you have a favorite recipe, you could also make this from scratch.
How to make green goddess grain bowls
Make the grains: Rinse the quinoa then add it to the instant pot with water. Cook for 1 minute high pressure, let pressure naturally release for 5-10 minutes then manually release. When quinoa is done cooking, fluff with fork.
Cook the zucchini: Slice zucchini, cook in a hot pan over medium heat, adding salt, garlic powder and italian seasoning. Cook 5-7 minutes until start to brown.
Prep the chickpeas: Drain and rinse the chickpeas.
Assemble the bowls: Add quinoa, zucchini, chickpeas roasted red peppers, avocado and top with green goddess dressing.
Other veggies: Add broccoli, peas (fresh or frozen), bell peppers, onion, yellow squash, mushrooms to saute with zucchini
Swap chickpeas for white beans (to keep it vegan) or add shredded chicken, air fryer salmon bites or cooked shrimp
Herby addition: add fresh herbs like basil, parsley or dill for even more fresh flavor
Potatoes: Add roasted potatoes or sweet potatoes to make this even more filling
Hummus: you can add some hummus to make this even more filling and to add a creamy texture (if making these for meal prep, wait to add the hummus until after reheating).
Yes! This green goddess bowl is perfect for meal prep. You can prep the quinoa, cook the zucchini and assemble the bowls (minus the avocado and green goddess dressing). When you are ready to eat, you can eat cold, at room temperature or warmed up. Add chopped avocado and pour dressing over top before enjoying.
Substitutions
Quinoa – swap for rice, cauliflower rice, or orzo
Zucchini – swap for your favorite vegetable
Chickpeas – swap for white beans or your favorite protein
Fridge: Store leftovers in the fridge for up to 4 days in an airtight container. I recommend waiting to cut the avocado until right before serving and wait to add dressing until right before serving if you plan on heating this up when eating leftovers.
If you love quinoa bowls, you should try
★ Did you make this recipe? Please give it a star rating below!
inse the quinoa then add it to the instant pot with water. Cook for 1 minute high pressure, let pressure naturally release for 5-10 minutes then manually release. When quinoa is done cooking, fluff with fork.
Slice zucchini, cook in a hot pan over medium heat, adding salt, garlic powder and italian seasoning. Cook 5-7 minutes until start to brown.
Drain and rinse the chickpeas., chop the roasted red peppers.
Assemble the bowls by adding quinoa, zucchini, chickpeas roasted red peppers, avocado and top with green goddess dressing.
Top tips
Don’t have an instant pot? You can cook quinoa on the stove (same measurements). Bring quinoa to a boil, then cover and let cook 15 minutes on low heat.
You can use pre-cooked quinoa or rice (you can usually find it frozen or you can freeze it yourself in advance). There are also some great shelf stable quinoa packs (I love the quinoa mix blend from Thrive Market) that is ready in 60 seconds.
Nutrition Information
Nutrition Facts
Amount per Serving
Where does nutrition info come from? Nutrition facts are provided as a courtesy, sourced from the USDA Food Database.
SHARE THIS POST!
If you liked this post, share it with your friends and family!
Let others know by rating and leaving a comment below!
The Trump administration asked a federal judge on Monday to dismiss a lawsuit that seeks to sharply restrict access to the abortion pill mifepristone — taking the same position as the Biden administration in a closely watched case that has major implications for abortion access.
The court filing by the Justice Department is striking, given that President Trump and a number of officials in his administration have forcefully opposed abortion rights. Mr. Trump often boasts that he appointed three of the Supreme Court justices who voted in 2022 to overturn Roe v. Wade, which had guaranteed the national right to abortion. And so far in his second term, his administration has taken steps to curtail programs that support reproductive health.
The filing is the first time the Trump administration has weighed in on the lawsuit, which seeks to reverse numerous regulatory changes that the Food and Drug Administration made over the past decade that greatly expanded access to mifepristone.
The Trump administration’s request makes no mention of the merits of the case, which have not yet been considered by the courts. Rather, echoing the argument that the Biden administration made shortly before Mr. Trump took office, the court filing asserts that the case does not meet the legal standard to be heard in the federal district court in which it was filed.
The case was filed by the conservative attorneys general of three states — Missouri, Idaho, and Kansas — before Judge Matthew J. Kacsmaryk of the U.S. District Court for the Northern District of Texas, a Trump appointee who strongly opposes abortion.
“The states do not dispute that their claims have no connection to the Northern District of Texas,” the Justice Department lawyers wrote in the filing.
“Regardless of the merits of the states’ claims, the states cannot proceed in this court,” they concluded, adding that the complaint “should be dismissed or transferred for lack of venue.”
Mary Ziegler, a law professor and abortion law expert at the University of California, Davis, said that the Trump administration’s support of the Biden administration’s earlier request to dismiss the case “is surprising, but I think the best way to read it is that they’re just buying time to figure out what to do about mifepristone.”
She said the filing “avoids saying anything on the substance at all,” which, she suggested, allows the Trump administration to delay telegraphing its views on mifepristone and to control whether and when it takes action to restrict the drug.
Mr. Trump’s political calculus on abortion has changed since his first term. Although Republicans prevailed in the 2024 elections, so did abortion rights, with ballot measures to protect abortion access winning in several conservative states, including Missouri. Voters in Kansas, one of the other plaintiffs in the case, endorsed abortion rights in 2022, a year when Democrats made strong gains in Congress partly because of a backlash against Republicans over abortion. During the presidential campaign, Mr. Trump tried to adjust to the changing political winds on the issue, sometimes taking positions that frustrated social conservatives.
Ms. Ziegler said Monday’s court filing might reflect a desire to be politically cautious on abortion, possibly until the 2026 midterm elections.
“I think he thinks that doing anything bold on mifepristone could backfire politically,” she said. “But he has a lot of anti-abortion voters who are not only hoping that he will do something on mifepristone but are still expecting that he will.”
“There hasn’t been a merits ruling in this case yet,” she added, “so I think the strategy of sort of avoiding the merits and kicking the can down the road is working well for Trump at the moment, but it’s sort of unclear whether it’s sustainable.”
The next step in the case will be for Judge Kacsmaryk to decide whether to dismiss it or allow it to proceed.
If the lawsuit succeeded, it could have wide-ranging impact on access to abortion in the United States, where abortion pills now account for nearly two-thirds of pregnancy terminations.
Among the F.D.A. measures the lawsuit seeks to reverse is a provision that removed the requirement that patients visit prescribers in person to obtain mifepristone. Reinstating the in-person requirement would halt the fast-growing practice of prescribing abortion pills through telemedicine and mailing them to patients, including those in states with abortion bans.
“Removing the in-person dispensing protections enabled a 50-state mail-order abortion drug economy,” the attorneys general wrote in their complaint. The lawsuit also seeks to reverse the agency’s approval of generic mifepristone, now the most widely used form of the drug; the ability for nurse practitioners and other health providers who are not doctors to prescribe mifepristone; and the ability for retail pharmacies, like CVS and Walgreens, to dispense the medication.
And it asks for new F.D.A. restrictions on mifepristone, including to outlaw the medication for anyone under 18.
The lawsuit argues that actions by the F.D.A. that expanded access to mifepristone have allowed women to obtain abortion pills despite state abortion bans or restrictions. Because of this, it says, health systems in states where abortion is limited or outlawed are required to treat patients who visit emergency rooms for follow-up care or abortion complications, costing the states money. It also claims that such states have been harmed because the “loss of fetal life and potential births” reduces the “potential population of each state.”
The lawsuit also contends that the F.D.A. violated the Comstock Act, a rarely enforced anti-vice law from 1873 that prohibits mailing items “intended for the prevention of conception or procuring of abortion.” A 2022 opinion by the Justice Department said that the law should not be interpreted to criminalize the mailing of abortion pills in most cases. Mr. Trump’s Justice Department has not rescinded or changed that opinion.
The case was initially filed in November 2022 by a consortium of anti-abortion doctors and groups and made its way to the Supreme Court. But in a unanimous ruling in June, the justices threw out the case, saying that the plaintiffs did not have standing to sue because they couldn’t show they had been harmed by the F.D.A.’s decisions on mifepristone.
A few months later, the three attorneys general revived the lawsuit and filed an amended complaint in the same court in Texas before Judge Kacsmaryk. In the first iteration of the case, Judge Kacsmaryk issued rulings that stridently criticized the F.D.A. and adopted much of the terminology used by anti-abortion activists.
Abortion pills are prescribed up to 12 weeks into pregnancy in the United States. Women in states with abortion bans have increasingly sought abortion pills through telemedicine providers.
Currently, 19 states have bans or restrictions stricter than the standard set by Roe v. Wade. In states that support abortion rights, telemedicine abortion providers have expanded, and a number of states have passed shield laws that protect doctors and other health providers who prescribe and send abortion pills to patients in states with bans or restrictions.
The typical medication abortion regimen involves mifepristone, which blocks a hormone needed for pregnancy development, followed 24 to 48 hours later by misoprostol, which causes contractions similar to those during a miscarriage.
Mifepristone was approved for abortion 25 years ago. Misoprostol, which has long been widely available for several medical conditions, can terminate a pregnancy on its own, but the lawsuit does not seek any restrictions on misoprostol. Decades of research has found the pills to be safe, and serious complications rare.
In January, shortly before Mr. Trump took office, the Biden Justice Department filed a motion to dismiss the lawsuit, citing several reasons, including that the Texas court was the wrong venue. The motion also said that the three states had not shown that they had been concretely harmed by the F.D.A.’s mifepristone regulations and that the states had not taken required steps to first seek the regulatory rollback through F.D.A.’s administrative channels.
The Trump administration’s court filing cites the same reasons. “The states also contend that F.D.A.’s actions have made it easier for individuals ‘to evade state laws,’” the brief said.
“But even assuming that were true,” it said, “the mere fact that someone might violate state law” does not on its own injure a state government in a way that meets the legal standard to sue.
Trump administration officials have previously said little about whether they intend to roll back access to mifepristone. Last month, the F.D.A. commissioner, Dr. Martin A. Makary, said during an interview at a journalism conference that he had “no plans to take action on mifepristone.” But he also said that “there is an ongoing set of data that is coming into F.D.A. on mifepristone.”
“So if the data suggests something or tells us that there’s a real signal, then I — we can’t promise we’re not going to act on that data that we have not yet seen,” he added.
In addition to the F.D.A., the two manufacturers of mifepristone are defendants in the case. Danco Laboratories, which makes Mifeprex, the branded version of the drug, requested to be added to the case soon after the original filing in 2022. GenBioPro, which makes generic mifepristone, became a party last month after it requested to be added in anticipation that the Trump administration might not fully support the F.D.A.’s actions regarding the medication.
In a perfect world, all of the plants in my garden would be easy to care for, fragrant, colorful, attractive to wildlife, and edible.
I realize that’s a tall order and that most plants will fall short on one or more of those criteria. Not agastache (Agastache spp.), though. It fits all my requirements and more.
On top of all that, the blooms last for months, and the plant returns year after year in Zones 4 to 10.
We link to vendors to help you find relevant products. If you buy from one of our links, we may earn a commission.
When you’re convinced you need to grow agastache in your garden, the hard part begins: deciding which type to settle on.
Whether you want a tall plant with sunset-like hues, a short cutie with vibrant purple flowers, or a plant to make tea and use to season dishes, you have many options.
We’re going to talk about 19 superb agastache varieties, from modern hybrids to classic native species. Here’s the list:
19 of the Best Agastache Varieties
1. Anise Hyssop
Anise hyssop (Agastache foeniculum) is perhaps the most well-known species in the genus.
It’s a popular herb that is used medicinally and appreciated for its licorice-anise flavor. But the plants are highly ornamental and attract pollinators from far and wide.
Since it is native to parts of North America, it can also be a beneficial plant to support local native insect populations.
It’s a short-lived perennial that is hardy in Zones 3 to 8 and grows up to four feet tall and three feet wide with stalks of white to blue-purple flowers.
‘Arizona Sun’ is a glorious Agastache hybrid that features stellar yellow blossoms on a petite little plant that only grows to about 10 inches tall and wide in Zones 6 to 9.
It starts shining in early summer and the blooms last until late fall.
In warmer climates, like Zones 8 and up, it might even stay evergreen, adding its gray-green foliage to the winter landscape.
For a cheerful plant as warming to the soul as a bright Arizona day, purchase 25, 100, or 500 seeds at True Leaf Market.
3. Blue Boa
This gorgeous hybrid has violet-blue blossoms held by burgundy calyxes on tall plants that grow up to 40 inches tall and 24 inches wide.
It grows happily in Zones 5b to 8, a somewhat more limited range than many others on this list, but if you’re one of the lucky people in the right climate, consider ‘Blue Boa.’
Part of what makes it so special are the huge flowers, which can be up to an inch in diameter.
It was rated as one of the top plants in the Colorado State University Perennial Trials in 2014 and I can see why.
‘Blue Fortune’ nabbed the 2004 Great Plant Picks award from the Elisabeth Miller Botanical Garden. You can find plants available at Burpee.
5. Giant Mexican
Giant mexican agastache (A. mexicana) is not the easiest to grow, nor is it the showiest if you’re in the market for a bold ornamental.
This species produces highly fragrant, lemon-scented foliage. The large leaves are popularly made into tea or used to flavor foods.
The plant quickly grows to about three or four feet tall and one to two feet wide, and is topped with petite purple spikes. It’s hardy in Zones 6 to 10.
There are a handful of cultivars out there, and many are quite glorious.
If you have your heart set on having Mexican agastache in the garden but you also really want an ornamental, look for cultivars in the Summerlong™ series, which are more compact and floriferous than the species.
Breakfast for the week is prepped in just 10 minutes! This vegan baked oatmeal is super easy to make and baked in just 35 minutes. Made with rolled oats, chia seeds, cinnamon, peanut butter, and maple syrup, this oatmeal is packed with flavor. Easily customizable to add in your fruit or topping of choice (chocolate chips, anyone?)
Why I like this recipe!
A week’s worth of breakfast prepped in just in 10 minutes! Need I say more?!
That’s right – this healthy baked oatmeal comes together in just 10 minutes. Prep it on a Sunday, pop it in the oven on a Monday morning, and you’ve got 6 servings breakfast for the week ahead!
I also love this recipe because it’s so easily customizable. This make ahead vegan oatmeal is the base recipe that is delicious on its own but then you can get creative with the mix-ins and toppings based on what you’ve got in your fridge and pantry (keep scrolling for more ideas!)
As a registered dietitian, I choose breakfasts that are going to make me feel full and satisfied – this dairy free baked oatmeal with peanut butter will do just that, especially if you add some fruit for extra fiber and extra nuts / nut butter for more fat and protein.
The perfect vegan make-ahead breakfast! Baked in just 35 minutes.
Ingredients You’ll Need
Notes on ingredients:
cinnamon: adds warmth and depth to flavors.
vanilla: enhances the sweetness of existing sugars.
peanut butter: A pantry staple! It adds a creaminess and nuttiness that will have your tastebuds wanting more.
almond milk: A dairy free alternative that gives this dish a mild nutty flavor and adds moisture. This can be swapped for cow’s milk or a different dairy-free alternative.
salt: enhances the flavors.
chia seeds: acts as a vegan binding agent in lieu of eggs.
maple syrup – Adds a sweet richness.
baking powder – helps the oatmeal rise in the oven and contributes to the light, fluffy texture.
rolled oats – I like using rolled oats in baked oatmeal since they retain their texture well with baking. If you want to make a gluten-free version, be sure to grab certified gluten-free rolled oats.
Oats are nutritious!
As a registered dietitian, I LOVE oats! Not only are they filling and satisfying, these tiny little grains are a nutrition powerhouse!
Prepare baking dish. Grease a 11×7 baking dish and preheat oven to 350 degrees F.
Make chia egg replacement: In a large bowl, whisk 1 tablespoon of chia seeds with 2 1/2 tablespoons water and let rest for 5 minutes.
Combine wet ingredients. Whisk in peanut butter, egg, maple syrup, vanilla, and almond milk until combined.
Stir in dry ingredients. Add rolled oats, cinnamon, baking powder and salt, and stir until combined.
Fold in any fruit: Fold in any add ins you may be using.
Add to baking dish. Pour mixture into prepared baking dish.
Bake and serve. Bake until center of oatmeal is just set, about 35-40 minutes. Allow oatmeal to cool for at least 10-15 minutes on a wire rack before serving.
Equipment You’ll Need
(affiliate links – if you make a purchase I receive a small commission)
Customize by adding toppings of choice like more peanut butter, coconut flakes, fresh fruit, chocolate chips, etc. You can add these on top or fold into the mixture before baking.
Here are some ideas for mix-ins:
Apple Cinnamon – add 1 cup chopped apples and increase cinnamon to 1 tablespoon.
Banana Bread – add 1 cup sliced or mashed banana and 1/2 cup toasted walnuts
Almond Joy – add 1/4 cup coconut flakes and 1/4 cup chocolate chips. Substitute peanut butter for almond butter.
Strawberries and cream – add 1 cup sliced strawberries and dollop of yogurt, nondairy yogurt alternative, or coconut whipped cream on top.
Storage and Preparation
Leftovers can be stored in an airtight container in the refrigerator for up to 4 days. Reheat in microwave for 1-2 minutes with a little splash of almond milk or milk of choice.
Baked oatmeal is also freezer-friendly. To store in the freezer, bake as directed and let cool completely. I recommend cutting it into squares and placing the portions in an airtight container. If you want to take an extra step, you could wrap each portion in plastic wrap before putting it in the container.
Store in the freezer for up to 3 months. Let defrost in the refrigerator overnight and you can pop it right on a microwave safe dish, add a splash of almond milk, and microwave for about 1-2 minutes.
If you like this recipe, please be sure to comment and give it a 5 star rating below. If you make it, share it on Instagram and tag me @karalydonrd and I’ll re-share it with my followers! If you want to save this recipe for later, be sure to pin it on Pinterest!
Breakfast for the week is prepped in just 10 minutes! This vegan baked oatmeal is super easy to make and is ready to come out of the oven in just 35 minutes. Made with rolled oats, chia seeds, cinnamon, peanut butter, and maple syrup, this oatmeal is packed with flavor. Easily customizable to add in your fruit or topping of choice (chocolate chips, anyone?)
Vegan butter or coconut oil for greasing pan
1 tablespoon chia seeds
1/3 cup maple syrup
2 teaspoons vanilla
2 tablespoons peanut butter
2 cups unsweetened almond milk (or nondairy milk alternative of choice)
2 cups rolled oats
1 teaspoon baking powder
2 teaspoons cinnamon
1/2 teaspoon salt
Optional: 1 cup fruit of choice (raspberries, blueberries, sliced strawberries, chopped apples, etc.)
Preheat oven to 350 degrees F. Grease a 11×7 baking dish with vegan butter or coconut oil.
To make a chia egg replacement, add chia to a small bowl and add 2 1/2 tablespoons water. Mix until incorporated and let sit until gels and thickens, about 5 minutes.
In a large bowl, add maple syrup, vanilla, peanut butter, almond milk and chia egg, and whisk until combined.
Add rolled oats, baking powder, cinnamon and salt and stir until combined.
Fold in any fruit, if using.
Transfer mixture to greased baking dish and bake until set, about 35-40 minutes.
Let cool on a wire rack for at least 10 minutes before serving.
Notes
Add toppings of choice like more peanut butter, coconut flakes, fresh fruit, chocolate chips, etc.
This vegan Wellington is filled with braised lentils, finely chopped walnuts, and a beautiful orange center of tender, oven-roasted carrots. It’s a show-stopping centerpiece for holiday meals, gatherings, and special occasions—and it’s incredibly wholesome, also.
The vegan Wellington that I’m sharing today is a true centerpiece for your celebratory table.
Yes, we all have festive sides that are plant-based already, or they easily could be. And I know that a lot of people feel as though side dishes are the real highlight of holiday meals.
But I also like being able to serve a main dish that feels undoubtedly like the star of the show.
Vegan Wellington is such a dish. It’s also delicious, full of nutrient-rich ingredients, and fun to assemble.
How this recipe came to be
Years ago, I ate at a restaurant in New York City that had a (non-vegan) carrot Wellington on the menu. I thought to myself that it was a great idea for a “fancy” plant-based entrée, and I made a note to myself to try a homemade version sometime.
Years went by, and I conquered a lot of other elaborate or complex recipes. I baked bread, pie, and even puff pastry.
Yet I remained a little intimidated by the idea of a Wellington, until I finally gave it a try this fall. I realized that I’d been silly to avoid it for so long!
First, there’s no requirement to use homemade puff pastry when making a Wellington at home. The frozen puff pastry from Pepperidge Farm, Pillsbury, Sweet Loren’s, and Dufour Plant-Based are all vegan and can be used for the outer shell.
Constructing the Wellington is a little involved, as you’ll see. But if you approach it patiently and treat it as a (delicious) project, it’s also really rewarding.
I learned one critical thing in my homemade vegan Wellington experiments: overnight chilling time is essential.
If you put freshly roasted vegetables and hot lentils into a sheet of puff pastry, it’ll soften or melt on the spot. Puff pastry should be cold when it goes into the oven.
So, be sure to account for an overnight chill as you plan this meal.
A wholesome and beautiful cross-section
My carrot Wellington isn’t only filled with carrots. There are also braised lentils and walnuts involved.
These ingredients give the Wellington its structure and shape, and they lend plant-protein and healthful fats to the recipe. They increase its nutritional balance and help to make it a more filling vegan main dish.
You’ll braise, or simmer the lentils in liquid, in order to cook them. After they’re cooked, you’ll pulse them in a food processor with toasted lentils.
Some lentils will remain whole, others will be broken down. The processed mixture will hold the carrots in the center of the Wellington.
Speaking of that, you’ll roast the carrots in two parts. First transfer them to the oven with a foil or parchment cover, to steam-cook and tenderize them. Then, roast the carrots uncovered, so that they start to brown and become glazed in appearance.
The two-step roasting process helps to ensure that the carrots don’t start burning before they’re fully tender.
Let’s go through the steps, one by one.
How to make vegan Wellington
Before you start cooking the Wellington ingredients or thinking about assembly, devote a moment or two to planning.
You’ll need to give the lentil filling and the roasted carrots an overnight chill, so that they’re nice and cold when you construct the Wellington. It’s also important to thaw the puff pastry sheet about one hour before you use it (follow the manufacturer’s instructions).
When I make the recipe, I generally prepare the carrots and lentil filling on one day, then assemble and bake the following day. Splitting the process into steps makes the whole thing feel doable.
Step 1: Preheat the oven and toast your walnuts
Begin by preheating your oven and oven-toasting the walnuts that go into the Wellington filling. Toasting the nuts this way deepens their flavor.
Step 2: Roast your carrots
Once you’ve toasted and removed the walnuts, turn to roasting your whole carrots.
It’s not hard to roast whole carrots if they’re small. The problem with bigger ones is that it takes them quite a while to become fully tender. Often their exteriors start to burn before the interiors are cooked through.
In order to avoid this, I use a two-step roasting method for the Wellington.
First, you’ll wrap the carrots tightly in foil or parchment paper, like a sealed little package. It’s the same method that I use for my oven roasted beets, and it’s a form of par-cooking.
Unlike the beets, the carrots will get unwrapped and seasoned midway through cooking, and you’ll finish roasting them uncovered. They should be very tender and have an almost glazed appearance when you’re finished.
The whole roasted carrots will be very tender after they come out of the oven. Thanks to seasonings and a touch of maple syrup, they’ll have a mildly glazed appearance.
Step 3: Cook the lentils
You’ll braise, or simmer-cook, the lentils with broth and a mixture of carrots, onion, celery, and herbs. This seasons them nicely.
Simmering the lentils with onions, carrots, and celery, along with herbs and broth, ensures that they’re well-seasoned before they go into the Wellington.
However, it’s fine to substitute black lentils, pardina (Spanish) lentils, or regular brown or green lentils in the recipe. If you use brown or green, they’ll need less cooking time than French (20-25 minutes rather than 35).
Step 4: Overnight chill
Once the lentils and carrots are cooked, transfer them to airtight storage containers and give them an overnight chill.
If you’d like to make the entire recipe in a single day, you can start early and chill both components for a minimum of four hours, or until cold.
Step 5: Pulse the lentils and walnuts together
On the following day (or at least four hours later), you can pull the lentils from the fridge. Transfer them to a food processor fitted with the S blade and pulse them together with the toasted walnuts.
You’ll end up with a somewhat crumbly mixture; the lentils will be partially broken down, and the walnuts will help with binding.
Step 6: Assemble your vegan Wellington
The fun of assembly begins!
Note that you’ll need to defrost your puff pastry about one hour before you assemble the Wellington, so plan accordingly. You should also preheat your oven to 400°F / 200°C.
Store-bought puff pastry is usually sold in either a single 14- or 15-ounce (400-425g) sheet or a package of two 8.5 ounce / 240g sheets.
The recipe card, below, will give instructions for both options. Essentially, if you have two sheets at home, you’ll roll them out together so that they merge into a bigger sheet.
Either way, you’ll roll the puff pastry out and arrange a layer of the lentil/walnut mixture along the long side.
Top this layer with a nice, stacked layer of carrots. I do two layers and alternate their direction, so that they can be as evenly arranged as possible.
Alternating the direction of the carrots as you arrange them will help you to keep them in a roughly rectangular shape.
Once you’ve got a nice stack of carrots, you can cover them with the remaining half of the lentil mixture. Try to pat it down around the sides of the carrots, too, so that they’re fully enveloped.
Next, you’ll wrap one side of the puff pastry around your filling ingredients. It should impartially cover the top layer of lentils.
Wrap one long side of the puff pastry over the top of the lentils, then roll everything sideways to wrap the Wellington up.After rolling the Wellington up, you’ll seal the long side and trim and tuck in the short sides.
Roll the whole Wellington up sideways, so that you surround the column of fillings with puff pastry. When you finish, trim any excess pastry and seal the long edge.
Finish by trimming and tucking the pastry on the short ends of the Wellington. Finally, cut a few diagonal lines on the top of the Wellington to vent as it cooks, and brush the top with aquafaba.
Step 7: Bake
Transfer the vegan Wellington to your oven and bake it for 40-45 minutes.
Brush the Wellington once halfway through baking with additional aquafaba. It will be a deep golden shade of brown and nicely puffed after baking.
I like to brush the top of the Wellington once again with aquafaba halfway through it’s baking time. This gives it a nice, subtle glaze.
After baking, the Wellington will be a beautiful golden brown and the pastry will have puffed up.
I recommend waiting at least twenty minutes before slicing and serving your Wellington. Alternatively, you can transfer it to the fridge and store it for up to five days, or you can freeze it for up to six weeks.
What to pair with your vegan Wellington
The Wellington will play nicely with so many veggie side dishes. Its earthy flavors and hearty consistency work well with a fresh green salad.
If you’d like to add a leafy green component, but you’re not in the mood for salad, it would be really pretty to serve the vegan Wellington slices over a bed of steamed kale or lightly sautéed spinach.
No matter how you present the dish, it’s sure to impress!
Vegan Wellington with Oven-Roasted Carrots, Lentils, and Walnuts
2 1/4cupsvegan chicken-style or vegetable broth (530ml)
Wellington assembly:
114- or 15-ouncesheet vegan puff pastry, or two 8.5-ounce sheets, thawed for 40-60 minutes prior to assembly (according to package instructions)(One 400-425g sheet or two 240g sheets)
3tablespoonsaquafaba(drained liquid from a can of chickpeas)
Toast the walnuts and roast the carrots:
Preheat the oven to 400°F/200°C.
Line a baking sheet with parchment. Place the walnuts onto the sheet and transfer them to the oven for 5 minutes, to toast them. Immediately remove the walnuts from the sheet and set them aside to cool; allow the baking sheet to cool enough to be touched again.
Line the baking sheet with foil. Place the carrots onto the sheet and place another sheet of foil on top of them. Wrap the carrots up with the foil, creating a tight envelope for them. Transfer them to the oven and roast for 20 minutes (for thinner carrots) or 25 minutes (for thicker carrots). Remove the top layer of foil. The carrots will be tender already.
Drizzle the carrots with the avocado oil and maple syrup, then season them well with salt and pepper. Return them to the oven for 10 minutes, or until they’re browning gently and have a glazed appearance. They will be tender all the way through. Remove the carrots from the oven and set them aside.
Cook the lentils
Heat the olive oil in a large, deep, lidded skillet or heavy-bottomed pot over medium heat. Add the onion, carrots, and celery. Sauté these vegetables for 5-6 minutes, stirring often, until the onion is translucent and the carrots are just tender. Add the lentils, bay leaf, herbs, and broth to the skillet or pot. Bring the mixture to a simmer, then cover and turn the heat to low. Simmer the lentils for 35 minutes, or until all the broth has been absorbed and the lentils are fully tender.
Overnight chill
Transfer both the carrots and the lentils to airtight storage containers with lids and refrigerate them overnight. Transfer the toasted walnuts to a mason jar (or another small container) and store them at room temperature overnight, or for a minimum of four hours.
Prepare the braised lentil walnut crumble
On the following day: place the walnuts into a food processor fitted with the S blade. Pulse them a few times to break them down. Then, add the lentil mixture to the processor. Continue pulsing for about 20 seconds. You should have a lentil and walnut mixture that’s a bit crumbly and the lentils should be partially broken down, though many whole lentils should remain. The mixture will hold together relatively well if you apply pressure to it.
Assemble and bake the Wellington
Preheat the oven to 400°/200°C once again. Be sure to thaw your pastry as directed.
If using a 14- or 15-ounce / 400-425g sheet of pastry: lay the pastry onto a large sheet of parchment and dust the top with flour. Use a floured rolling pin to roll the pastry sheet out so that it’s about 13-inches by 15-inches / 36cm by 38cm, or as close to this as possible. If using two 8.5-ounce / 240g sheets, place them side-by-side with the long edges joining. Roll the sheet gently, helping to seal the two sheets together and creating one larger rectangle that’s about 18” by 12”; you’ll end up trimming away some extra pastry at the end, which you can freeze for future use or reserve for a homemade dessert.
Arrange half of the lentil mixture along the long side of the sheet, about 6 inches / 15cm away from the long edge of the sheet. The lentil mixture should be arranged in a layer that’s about 10-inches by 3 ½ inches (25cm by 9cm) and about ¾-inch / 2cm high.
Arrange the carrots on top of this bed of lentils, alternating the direction that the carrots face, so that they end up in two even (or even-ish) layers. It doesn’t have to be perfect, but you want the carrots to stay in place; you may not use every single carrot. Gently arrange the remaining lentils on top of them, patting the lentil mixture down so that it stays put as a top layer.
Brush the long edge of the sheet (next to the lentils) with the aquafaba. Tuck this edge up over the top of the lentil mixture. Holding it firmly in place, roll the whole log of lentils and carrots over, to wrap up your Wellington. When you finish rolling, the lentil layer that was on bottom of the carrots will now be on top, and the puff pastry will surround the whole Wellington. Trim away excess pastry on the long side of the Wellington, then be sure to seal the long edge by pinching and pressing it together.
Next, fold the middle of the short sides into the center of the Wellington. Trim away the bottom flap and tuck the top flap over the side of the Wellington, pinching as you go to help secure it. Repeat on the other side. Brush the entire Wellington with aquafaba. Cut a few diagonal slits along the top, which will allow steam to escape and create a nice visual effect.
Transfer the Wellington to the oven. Bake for40-45 minutes, or until it’s a deep golden brown and nicely puffed all over. Midway through baking, brush more aquafaba all over the Wellington.
Wait 20 minutes before storing the Wellington or slicing and serving. Enjoy! Leftover slices can be stored for up to five days in the fridge or frozen for up to six weeks.
Yes, it’s a long one, but I hope that the length of the recipe won’t scare you off.
We have the whole year round for 30-minute recipes and easy weeknight meals. Special occasions are exactly that, and it’s a real pleasure when food on the table is as unique and special as the day itself.
I hope that the vegan Wellington will bring festivity to your table at a moment worth celebrating!
It’s like my thoughts were under a pile of garbage.
On a Friday night, as my husband and I tried to figure out where to eat, a typical conversation would go like this:
Me: Do you want to go to that restaurant?
Him: What restaurant?
Me: I can’t think of the name. We’ve eaten there before. It’s that place with the peanut shells on the floor? It’s next to… You know… It’s on that road where we used to take the dog to the vet. Do you know the one I’m talking about??
It was as if certain details got lost in a pile of sludge in the deep recesses of my brain. Then, hours later, the details would escape, and I’d shout into an empty room…
“Texas Roadhouse!”
Sludginess with proper nouns is typical for people who are middle-aged and beyond.
However, what seemed to be happening to me, increasingly in my late 40s and early 50s, felt far from typical.
Not only could I never seem to spit out the names of various restaurants or people or books or movies or so many other things, but my brain was also pooping out during the workday.
I’d sit in front of my computer screen, stare at a document, and will myself to do something constructive with my fingertips. Everything seemed hazy, like those first few moments in the morning when you’re awake enough to turn off the alarm but too sleepy to do basic math.
I had my good moments, usually in the morning, when I attempted to pack eight hours of writing into the two or three hours I possessed mental clarity.
On my worst days, however, I awoke with a haze I never managed to shake. Work was a non-starter. Nor did I have enough bandwidth to read, or do much of anything, really.
I sought medical advice.
Three healthcare professionals recommended antidepressants. I tried one, and felt even worse. I tried another. I tried yet another at a higher dose. Still, I felt like a zombie. Another professional gave me a sleeping pill. It left me feeling even more drugged.
Someone tested my thyroid. There was nothing wrong with it. Nor was I anemic. I tried supplements, mushroom coffee, and just about any product with the word “think” somewhere on its label.
Finally, after nearly two years of seeing a revolving door of doctors, I made an appointment with a gynecologist for my yearly exam. I mentioned vaginal dryness. That information triggered her to ask a string of questions that had nothing to do with my undercarriage. How was my sleep? Mood? Energy levels? Was I experiencing hot flashes? How about brain fog?
“Funny you should mention brain fog,” I said in my usual hazy monotone. “I feel like I’m barely alive.”
By the end of the visit, I understood that I’d likely never had depression.
What I “had” was menopause.
My gynecologist sent me home with prescriptions for estradiol and progesterone.
Within days, it was as if someone had flipped a switch.
I could think again. I could type words again. I could follow conversations. I could work past noon.
And, for the first time in years, I could sleep more than two hours without waking.
Over 150,000 health & fitness professionals certified
Save $200 on the industry’s top nutrition certification
Help people improve their health and fitness—while making a great full-time or part-time living doing what you love.
Now, menopause isn’t a medical condition.
Nor is it a disease.
Instead, like puberty, it’s a life stage—a transitional moment to be precise.
Once you’ve gone 12 consecutive months without a period, you’ve reached menopause. And from that moment onwards, you’re officially “postmenopausal.”
As women approach this transitional moment, hormone levels fluctuate and fall, triggering dozens of symptoms. Weight gain and reduced sex drive get a lot of attention.
However, during and after menopause, roughly 40 percent of women report increased irritability, mood swings, anxiety, fatigue, and trouble concentrating, according to the American College of Obstetricians and Gynecologists.1 2 As the following image shows, it’s also one of the most vulnerable times in a woman’s life to develop depression,3 particularly if they’ve struggled in the past with it before.
Before starting hormones, I often found myself sobbing for no reason. Other times, the world’s stimuli felt too… stimulating.
Normal everyday sounds—like the buzz of traffic or people at the mall—literally hurt. I was jumpy and irritable and felt anxious about situations that had never bothered me in the past, such as driving over bridges or through construction.
It’s not completely clear what drives these cognitive and emotional symptoms.
Fluctuating hormone levels likely play a role, as do typical age-related changes in the brain.
In addition, during this stage of life, women often deal with several issues that siphon cognitive capacity faster than a thirsty vampire drains a carotid.
During their 40s and 50s, for example, many women have reached the peak of their careers, with responsibilities that follow them home and keep them up at night. They may also be parenting angst-filled teens, caring for aging parents, adjusting to an empty nest, questioning their marriage, or trying to wrap their bank account around the latest statement from the college bursar or hospital billing department.
However, one of the lesser-known and talked about triggers for cognitive discontent has nothing to do with aging or life stress and everything to do with that hallmark menopausal symptom: the hot flash.
Anatomy of a hot flash
Hot flashes, which happen during the day, and night sweats, which occur at night, fall under the category of vasomotor symptoms. (The word “vasomotor” refers to the constriction or dilation of blood vessels which, in turn, can influence everything from blood pressure to sweating.)
During a hot flash or night sweat, norepinephrine and cortisol levels rise. Blood vessels dilate in an attempt to shed heat. Blood pressure and heart rate increase.
Depending on the severity of the hot flash, your skin might redden as sensations of warmth spread through your face, neck, and chest.
You might sweat, experience heart palpitations, or feel anxious, tired, or faint.4
It’s not entirely clear why hot flashes crop up around menopause.
According to one theory, falling estrogen levels affect the hypothalamus, the area of the brain involved in temperature regulation. The brain’s internal thermostat gets wonky and occasionally thinks your body is too hot or cold (when it’s not).
How vasomotor symptoms change the brain
For many years, experts thought of vasomotor symptoms as mere inconveniences or sources of embarrassment.
(To be honest, so did I. During all of those fruitless visits to various healthcare professionals, it never occurred to me to mention them.)
However, an increasing body of research has revealed that hot flashes may do more than make us uncomfortable or force us to change our sheets in the middle of the night.
They may also affect our blood vessels and brains—and not for the better.5 For this reason, an increasing number of experts now consider vasomotor symptoms to be a treatable medical condition.6 7 8
Hot flashes and brain lesions
In one study, researchers asked 226 women to wear monitors that tracked when they were experiencing a hot flash. The women also underwent magnetic resonance imaging (MRI), filled out sleep diaries, and wore smartwatches that recorded how often they woke at night.9
As researchers looked at the brain images obtained from women who experienced the most hot flashes, they noticed an abundance of patchy areas called whole-brain white matter intensities.
These lesions were once thought of as a typical consequence of aging. However, neuroscientists now believe that the presence of whole-brain white matter intensities is predictive of future cognitive decline.
People with an abundance of these brain lesions are twice as likely to get diagnosed with dementia and three times as likely to have a future stroke.10
The blood vessel connection
It’s thought that the increased presence of whole-brain white matter intensities may stem, in part, from changes taking place in the blood vessels that feed the brain.
A three-year study of 492 women supports that theory. It determined that women who experienced frequent hot flashes also tended to experience unhealthy changes in their blood vessels, such as an inability to dilate to accommodate increased blood flow.11
Other research has linked frequent hot flashes with increases in the following:
Thickening in the carotid arteries that supply blood to the brain, face, and neck12
Body fat
Total and LDL cholesterol
Insulin resistance13 14 15 16
The sleep connection
In addition to directly affecting the blood vessels, frequent hot flashes may also affect the brain by disturbing sleep.17
Interestingly, many women don’t necessarily know that hot flashes are disturbing their sleep.
They may instead—as I did—assume they have insomnia or sleep apnea.
That’s because night sweats aren’t always sweaty.
By the time a surge in cortisol and norepinephrine jolts a woman awake, the hotness of the flash may have dissipated. So, it can feel as if she’s repeatedly waking, over and over and over again, for no discernable reason.
These frequent awakenings may interfere with the brain’s ability to consolidate memories, metabolize toxins, and store all the names, dates, and facts one encounters daily.
It can also lead to lost connectivity in the hippocampus, a part of the brain that’s important for learning and memory.
Sleep loss also means the amygdala, a part of the brain involved in emotion, becomes more reactive, causing people to feel more easily stressed, anxious, irritable, frustrated, or enraged.18 19
All of these brain changes can set in after just days to a week of lost sleep. So, imagine what happens when you’ve been waking over and over again—for years.
Why it can be hard to get help
To diagnose depression, healthcare professionals use a tool called the Patient Health Questionnaire (PHQ-9) depression scale. If you check off four of the nine symptoms on the scale, you’re considered depressed.
However, four of the symptoms on the checklist also overlap with the symptoms of menopause-related sleep deprivation:
Little interest or pleasure in doing things
Trouble falling or staying asleep
Feeling tired or having little energy
Trouble concentrating on things, such as reading the newspaper or watching television
Check off those four items, and you might be diagnosed with depression, even if what’s really ailing you is the battle with sleep you’ve been waging since you turned 47.
A lack of menopause-specific training
Another problem: On surveys, 80 percent of medical residents admit they feel “barely comfortable” talking about menopause.20 In addition, few residency programs—including ob-gyn residency programs—offer training in it.21
Given the above, it’s no wonder so many healthcare professionals never think to ask about hot flashes or sleep disturbances when people like me show up complaining of fatigue, lack of gumption, and an inability to focus.
In addition, even when it’s clear that vasomotor symptoms are leading to cognitive and emotional symptoms, many healthcare professionals still shy away from prescribing menopausal hormone therapy (also called hormone replacement therapy, or HRT), often telling women that supplemental hormones are “not safe” or “too risky.”
These professionals are practicing what Michigan-based menopause-trained gynecologist Jerrold H. Weinberg, MD, calls “defensive medicine.”
“It’s one of the first reflexes doctors have when they recommend a treatment,” says Dr. Weinberg. “They worry they’re going to get sued.”
What the research actually says about hormone therapy
These worries are based on research done several decades ago that linked the use of certain types of hormones with a slightly increased risk of developing breast cancer or stroke.22
However, according to more recent research, that small increased risk seems to depend on several other factors, such as age, dose, the type of hormonal preparation, and the duration of hormone use.23 24
As long as you’re younger than 60 and have been postmenopausal for fewer than 10 years, many experts now say the benefits outweigh the risks for women with moderate to severe menopausal symptoms.25
It’s also counterbalanced by health benefits such as reduced risk of developing Alzheimer’s disease or osteoporosis, says Dr. Weinberg, who confirms the health benefits of menopause hormone therapy far outweigh the risks for most women.
Because some antidepressants can lift mood, improve sleep, and reduce hot flashes, some healthcare professionals turn to them instead of menopause hormone therapy. As with any medicine, antidepressants have their own list of side effects. However, for someone practicing defensive medicine, they often seem like a safer bet, says Dr. Weinberg.26 27 28
How to advocate for your health
If you or your client are on what seems like a never-ending quest to find a healthcare professional who understands menopause, use the following advice from Dr. Weinberg and Helen Kollias, PhD, an expert on physiology and molecular biology and science advisor at Precision Nutrition and Girls Gone Strong.
▶ Seek care from a menopause-trained health professional.
Usually, these professionals list this training and interest in their bio. For example, they might list “menopause” as an area of focus.
You can also search this database for practitioners who have earned a certification from the Menopause Society.
▶ Document your symptoms.
Write them down. That way, if you feel foggy or nervous during your appointment, you can lean on your notes.
This information can also help you judge whether MHT or another medicine is working. Based on your symptom data, you and your healthcare professional may decide to switch to a different medicine or change your dose.
Consider tracking:
How often you get hot flashes
The number of hours in a typical day you find yourself battling brain fog
How often you experience fatigue, anxiety, rage, or some other symptom
How often you wake up at night
▶ Be as specific as you can during your appointment.
Saying something like “I don’t sleep well,” is less likely to get you the right kind of help than saying, “During the past seven days, I’ve only gotten four uninterrupted hours once. I wake, on average, five times a night. On a typical night, my longest stretch of sleep is three hours.”
If you use a smartwatch, come ready to fire up your health app, so your healthcare professional can see the data.
▶ Talk about the pros and cons of treatment.
There’s a concept in medicine known as “shared decision-making.” Part of that process involves frank discussions about the benefits and risks of a given treatment. Then, patients and clinicians work together to make decisions based on those benefits and risks.
Many healthcare networks encourage clinicians to use shared decision-making, as it seems to reduce patient complaints as well as malpractice lawsuits.29 30
For this reason, shared decision-making can help shift a healthcare professional out of the “defensive medicine” mindset.
You might ask questions like:
“I’m interested in seeing if menopausal hormone therapy might be helpful. Could we discuss if I’m a good candidate?”
“I’ve read that menopausal hormone therapy could slightly increase my risk of breast cancer. Could you help me understand my personal breast cancer risk based on my family history, age, body weight, and lifestyle?”
“Osteoporosis runs in my family, as does dementia. I’ve heard that menopausal hormone therapy might help to reduce the risk for both, in addition to helping me sleep. Could you help me weigh the pros and cons?”
How to improve mental and emotional health during menopause: 9 lifestyle strategies
The lifestyle habits that improve mental and emotional health during menopause aren’t terribly different from the lifestyle habits that improve overall health—for any person, at any stage of life.
Other than avoiding caffeine, alcohol, and spicy or hot foods, there’s no special diet for people with vasomotor symptoms. (And by the way, tofu and other soy products don’t seem to help with vasomotor symptoms as much as once thought30—though they’re still nutritious.)
Strategy #1: Lean into fundamental health strategies.
Healthy behaviors don’t necessarily change during middle age.
Nutrition, physical activity, stress management, sleep, social connectedness, and a sense of purpose matter just as much during the menopausal transition as they do when we’re younger. However, these fundamentals are even more important to dial in as life progresses.
So consider:
Are you setting aside enough time for sleep and rest?
Are you physically active?
Are you eating a diet that’s mostly minimally processed and full of brightly colored produce, healthy fats, lean protein, fibrous vegetables, and legumes?
Do you regularly connect with other humans in ways that help you buffer stress and feel supported?
Do you find ways to experience awe, joy, curiosity, peace, and purpose?
If you answered “no” to some or all of those questions, consider why that is. What’s stopping you? How might you remove barriers or shore up support to make those fundamentals easier?
Strategy #2: Experiment with creatine.
In addition to helping to blunt age- and hormone-related losses in muscle and bone mass, creatine may also help bolster mood and brain function while reducing mental fatigue.
It also seems to counter some of the negative effects of sleep deprivation. 32 33 Research shows a daily dose of 5 to 7 grams of creatine monohydrate is effective.
Strategy #3: Get regular about light exposure.
In addition to helping you feel alert, sunlight helps to set the internal clock in your brain that makes you sleepy at night and spunky in the morning. Morning and late afternoon light exposure seem particularly potent.
In a study of 103 people, exposure to morning sunlight predicted better sleep quality the following night. When people spent time outdoors in the mornings, they fell asleep more quickly, slept longer, and experienced fewer awakenings the following evening.34
Sunlight may also improve mood and concentration.35
Strategy #4: Go easier at the gym.
If you’re already worn out, long, intense exercise sessions will likely make you feel worse.
For one, injuries crop up much more easily at middle age than during our 20s and 30s. In addition, it takes longer to recover between sessions.36
String too many overly zealous workouts too close together, and you’ll not only likely start to feel achy but also more irritable, tense, and tired.
However, much like a cold shower, short bursts of exercise may help you to feel alert during the day.
If you’re falling asleep at your desk, encourage yourself to take short movement breaks such as a 5- or 10-minute walk outdoors or a quick set of pushups or squats.
In addition, you may find gentle exercise—such as yoga or stretching—helps you relax before bed. Just don’t make it too intense, or you’ll trigger a release of adrenaline.
Whenever you exercise, tune into how your body feels, especially after a particularly bad night of sleep.
We’re not saying you should never exercise vigorously or try to beat your lifting PRs. However, depending on your sleep and recovery, you might want to pare things back, especially if you’ve traditionally hit the gym hard.
You can still do intense sessions—just balance them out with more moderate sessions, as well as proportionate recovery.
Depending on how you feel, you might decide to go all out, as usual.
However, you might also decide to do a zone 2 training session instead of an intense run. Or, if you’re resistance training, you might still do your planned session, but reduce the number of sets, reps, or volume lifted.
Strategy #5: Investigate Cognitive Behavior Therapy for Insomnia (CBT-I).
This research-based therapy for insomnia can help you develop skills and mental reframes that encourage sound sleep.
For example, a CBT-I therapist will help you develop the skill of getting up at the same time every day, regardless of how badly you slept (or didn’t sleep) the night before.
You may not have the energy (or desire) to do everything you did when you were younger. (When you were 36, your daily checklist defied time and space.)
As a result, you might benefit from looking critically at your current responsibilities to see which ones you can shrink or downsize. For several days, track how you spend your time and bandwidth. Then, analyze your data.
Ask yourself:
Is this how you truly want to spend your time and energy?
Does your current schedule allow you to rest, recover, and tend to your own needs? Or, do you spend nearly all of your time and energy caring for and providing for others?
What changes could you make to prioritize rest and recovery?
If you’re a coach, use the Wheel of Stress Assessment to help clients identify different dimensions of their life that might be draining their mental and emotional capacity. (When you know specifically where your stress is coming from, you have a better chance of resolving it.)
You might find you sleep better and experience fewer night sweats if you sleep in a cooler environment.
Try turning down the thermostat a couple of degrees, using a fan, or investing in an electric cooling mattress pad.
Strategy #8: Take frequent breaks.
When you feel the fog take over your brain, it’s not likely you’ll be doing “your best work” anyway.
So, for a block of time—say, 20 minutes—permit yourself to do nothing. You might:
Relax with a cold beverage
Cuddle with a pet
Gaze out a window
Sit outdoors while listening to the birds
Call a friend
If you need a quick “refresh,” you can also try a 5-minute mind-body scan.
Get your body into a comfortable position. For example, you might use the yoga “legs up the wall” pose or lie down and place a pillow under your knees.
Then, close your eyes and bring your attention to physical sensations in your body. Start at your head, and work your way down to your toes.
Don’t judge or rush to change anything. Just observe, like a scientist. You can also scan your mind, for example, by noticing thoughts.
When you’ve completed the scan, consider:
What are you feeling physically?
What are you feeling emotionally?
What are you thinking?
You don’t have to “do” anything with the information you uncover, just notice.
Strategy #9: Follow a diet that promotes healthy circulation.
The foods that protect the blood vessels around your heart can also protect the blood vessels in your brain.
For example, both the MIND and Mediterranean diets are associated with a reduced risk of Alzheimer’s disease and depression.37 38 These eating patterns are rich in vegetables, fruit, whole grains, olives, beans, fish, and other minimally-processed whole foods.
In addition, nitrate-rich foods like beets and dark, leafy greens may help to dilate blood vessels, temporarily improving memory by helping more blood to reach the brain.39 40
It’s frustrating when you feel like you can’t do it all.
Believe me. I know.
However, this stage of life presents a hidden opportunity, forcing you to re-evaluate what’s most important.
Before going on hormones, as my ability to type coherent words and phrases diminished, I was forced to ask an important question:
Do I really need to be doing this?
It was more of an existential question than a career-related one, and it allowed me to reassess how I wanted to spend my limited mental resources.
Given that I was self-employed, I didn’t actually need to be working eight hours a day. That was a gift, wasn’t it?
Maybe I also didn’t need to cook dinner six nights out of seven. Maybe the recipes I chose could be simplified, too.
Finally, maybe saying “no” a lot more often and without regret would allow me to continue to say yes to the things that mattered most.
Things like visiting my aging parents.
And picking up the phone whenever my kid called from college.
Or meeting a friend for a meandering walk around town.
Thanks to the hormones and life tweaks, I now have energy again. I’m also clear-headed most of the time. However, I still tend to end my work day around 3 p.m.
Thurston RC, Chang Y, Buysse DJ, Hall MH, Matthews KA. Hot flashes and awakenings among midlife women. Sleep [Internet]. 2019 Sep 6 [cited 2024 Oct 31];42(9). Available from: https://pubmed.ncbi.nlm.nih.gov/31152182/
There are many gardens we’ve been enjoying on the blog for years now, and it’s always incredible to see the transformations that occur from season to season and year to year. Some of these gardens are relatively new, like this colorful paradise Lizzi Gualtieri has created in Walla Walla, Washington, which can make the transformations even more evident and exciting. Lizzi first shared her garden in 2022 after only being at the property for two and a half years (Lizzi’s Walla Walla Garden). Since then, we’ve gotten a two-year update and were treated to a tour of the front yard vegetable garden built in 2020 (Walla Walla Backyard Two Years Later, and Lizzi’s Front Yard Veggie Garden in Washington). Today she is back to share her vibrant garden in spring as it continues to grow and evolve.
After a very mild winter, we’ve had a beautiful spring show this year in Walla Walla, Washington (zone 7a). I wish I could attach fragrances to the photos because stepping out my back door I smell the wistaria, laurel, lilac and daphne in one glorious scent! The garden is only 4 years old but some of the flowering trees and shrubs were here when we moved in. There’s always something new going in and grass going away! I’m hoping this year that the backyard will feel more established and a little more like a green sanctuary.
The bright orangey-pink azalea was one of the existing shrubs so I don’t know its variety.
The ‘Alexandria’ brunnera(Brunnera‘Alexandria’, Zones 4–9) is new this year with a hosta and ostrich fern (Matteuccia struthiopteris,Zones 3–7) behind it.
Northern Exposure™ Purple heuchera(Heuchera x ‘TNHEUNEP’, Zones 3–10)and lamium line the edge of a created dry stream bed that is currently full of crabapple blossoms.
‘Quicksilver’ hebe (Hebe pimeleoides ‘Quicksilver’, Zones 7–9)is marginal here but I have it planted in a relatively protected area with the ‘Golden Mop’ cypress(Chamaecyparis pisifera ‘Golden Mop’, Zones 4–8). Black mondo grass(Ophiopogon planiscapus ‘Nigrescens’, Zones 5–10) and giant ‘Ambassador’ alliums (Allium‘Ambassador’, Zones 4–8)are also in the photo.
Another view of the backyard with a dwarf blue spruce in the foreground. I love the variegated iris(Iris pallida ‘Variegata’, Zones 3–9)for their foliage and the amazing scent of their flowers. Behind them is a quince tree that despite its small size is covered in blossoms and will hopefully produce about a half a dozen large quince in the fall. The weeping white pine(Pinus strobus ‘Pendula’, Zones 3–8)in the back is an investment for the future.
The Schipka cherry laurel (Prunus laurocerasus ‘Schipkaensis’, Zones 6–9) is another plant that can be marginal if not planted in a protected spot but it’s great for screening between houses. It’s planted in front of an ancient white lilac (Syringa vulgaris var. alba, Zones 3–7).
This photo doesn’t really do justice to the brilliant color of our giant red beech tree. The leaves emerge in spring an intense flaming orange and darken to burgundy by summertime. There is a weeping cherry and another ancient purple lilac in the foreground.
The wistaria draping over the back gate was here when we moved in so I don’t know its variety. It puts on its big show in spring before leafing out, but blooms continually until fall with shorter blossom clusters.
The labrador violets(Viola labradorica, Zones 3–8)and the creeping jenny (Lysimachia nummularia, Zones 4–8)were travelers in a potted Japanese maple that we brought with us when we moved here a little over 5 years ago. They’ve since naturalized all over the shady portion of the yard and I just love the color combination.
Thank you so much for sharing another incredible garden update, Lizzi! It has been amazing to witness the evolution of your space in the few short years you’ve been contributing. I hope we get to enjoy your beautiful garden as it continues to transform!
How is your garden transforming this year? Are you enjoying the normal growth that occurs during this season of change, or has your landscape been completely reshaped by fall planting? Let us know in the comments below, or consider sharing your spring photos with the Garden Photo of the Day. Follow the directions below to submit photos via email, or send me a DM on Instagram: @agirlherdogandtheroad.
We want to see YOUR garden!
Have photos to share? We’d love to see your garden, a particular collection of plants you love, or a wonderful garden you had the chance to visit!
To submit, send 5–10 photos to [email protected] along with some information about the plants in the pictures and where you took the photos. We’d love to hear where you are located, how long you’ve been gardening, successes you are proud of, failures you learned from, hopes for the future, favorite plants, or funny stories from your garden.
Do you receive the GPOD by email yet? Sign up here
Fine Gardening Recommended Products
Lee Valley Mini Garden Shear Set
Fine Gardening receives a commission for items purchased through links on this site, including Amazon Associates and other affiliate advertising programs.
These shears have a distinctive finger rest that not only aids grip but allows greater freedom of movement than a conventional handle design. They have a durable powder-coat finish to resist rust and wear, and a simple clasp that locks the spring-action stainless-steel blades closed. The set includes one pair of round-nose shears measuring 5 1/2″ overall with 1″ blades for cutting stems up to 3/8″ in diameter, and one pair of 6 1/2″ needle-nose shears with 2″ fine-tip blades for precise work.
Razor-Back Potato/Refuse Hook
Fine Gardening receives a commission for items purchased through links on this site, including Amazon Associates and other affiliate advertising programs.
Berry & Bird Rabbiting Spade, Trenching Shovel
Fine Gardening receives a commission for items purchased through links on this site, including Amazon Associates and other affiliate advertising programs.
Ideal Tool for All Gardeners Use: Our heavy duty trenching shovel is designed by a professional gardening tool designer. Lifetime Durability: This heavy duty drain spade is made of high-quality stainless steel, it is very strong and durable, even if it is used for high-strength work, it will not bend. Ergonomic Wood Handle: The handle of this planting spade is made of ash hardwood harvested from FSC-certified forests and has an ergonomically streamlined design, making it very suitable for everyone’s hands. Multi-Use: This digging shovel is generally used for digging trenches, digging holes, transplanting, edging, moving compost, cutting thick turf and furrowing. The sharp blade allows you to cut, scoop, dig, lift and dice in hard soil.
Italian chicken and vegetables is easy to make, packed with flavor and ready in just 20 minutes. This easy italian chicken bowl is perfect for busy weeknight meals and is very versatile, use whatever veggies you have on hand! Made with just 8 ingredients, this is a recipe the whole family will love and can even be made for meal prep.
This post contains affiliate links. As an amazon associate I earn from qualifying purchases. Click here to read my policy and more about affiliate links.
Italian Chicken Bowl Highlights
Ready in 20 minutes – the veggies cook up in the air fryer while the quinoa cooks in the instant pot. This allows you to focus on the chicken without having to manage a ton of pots and pans on the stove.
Easy to make – every component of this recipe is easy to make and doesn’t require a ton of prep.
Versatile – use whatever veggies you have on hand
Ingredient spotlight
Italian dressing – I use my favorite bottled italian dressing to make this recipe super easy to pull together (and keeps the ingredient count down)
How to make italian chicken and vegetables
Cook the squash: Slice the squash into 1/4 inch thick pieces. Coat the squash in dressing and spices and stir well. Cook squash in air fryer at 400F for 12-16 minutes, shaking the basket occasionally. Be sure to check out all my tips on how to make zucchini and squash in the air fryer.
Make the quinoa: Rinse quinoa well. Add quinoa, water and salt to instant pot. Cook on high pressure 1 minute, allow to naturally release. Manually release when the rest of the food is done.
Prep the chicken: Preheat a large skillet over medium to medium high heat. Cut chicken into cubes. Add chicken, italian dressing and salt to a bowl. Stir well.
Cook the chicken: Add chicken to hot skillet. Spread into a single layer. Cook 5 minutes without touching the chicken. After 5 minutes, stir the pan and cook 3-5 additional minutes.
Assemble the bowls: Add quinoa, chicken and veggies to a bowl and enjoy.
Variations
Add more spice: add a drizzle of sriracha or chili onion crunch
Change up the veggies:: you can make this with bell peppers, mushrooms, onions (red or white), green beans, broccoli. All will cook in the air fryer in the same time.
Use a different grain: if you don’t have quinoa, you could also use rice or even cauliflower rice to keep this low carb friendly.
Different flavor: Use greek dressing or even add a dollop or two of pesto to the chicken or veggies (or both)
Serve over pasta instead of grains
Common questions
What is the best chicken to use
Any kind of boneless, skinless chicken will work for this recipe. I recommend chicken thighs for the most flavor, or chicken tenders if you are short on time. As long as you cut the chicken down into cubes, it will cook quickly.
What is the best way to cut chicken into cubes
I personally like to use kitchen shears but you could also use a sharp knife (and a plastic cutting board that you can put in the dishwasher when you are done).
Storing leftovers
Fridge: Store leftover chicken quinoa veggie bowls in the fridge in airtight containers for up to 3 days.
Freezer: you can freeze the chicken and quinoa (for up to 3 months) but I do not recommend freezing the leftover squash, as the texture will be off when you defrost it.
If you love this quick chicken recipe, you should try
★ Did you make this recipe? Please give it a star rating below!
Add squash, italian dressing, salt, garlic powder and red pepper flakes to a bowl and stir well until all the squash is well coated.
Cook squash in air fryer at 400F for 12-16 minutes, shaking the basket occasionally.
Instant Pot Quinoa
Rinse quinoa well. Add quinoa, water and salt to instant pot. Cook on high pressure 1 minute, allow to naturally release. Manually release when the rest of the food is done. (see tips below if cooking on the stove)
Italian Chicken
Preheat a large skillet over medium to medium high heat.
Cut chicken into cubes. Add chicken, italian dressing and salt to a bowl. Stir well.
Add chicken to hot skillet. Spread into a single layer. Cook 5 minutes without touching the chicken. After 5 minutes, stir the pan and cook 3-5 additional minutes.
Assemble the bowls, add quinoa, chicken and veggies
Tips:
No air fryer? Cook the squash on the stove in a large skillet over medium heat for 7-9 minutes until softened.
No instant pot? Cook quinoa on the stove (same measurements). Bring quinoa to a boil, then cover and let cook 15 minutes on low heat.
Save time: use pre-cooked quinoa or rice (you can usually find it frozen or you can freeze it yourself in advance). There are also some great shelf stable quinoa packs (I love the quinoa mix blend from Thrive Market) that is ready in 60 seconds.
Use chicken tenders to make prep easier. Since the chicken tenders are already so thin, they only take a minute to cut down into cubes.
Use your favorite italian dressing or make your own.
Nutrition Information
Nutrition Facts
Amount per Serving
Where does nutrition info come from? Nutrition facts are provided as a courtesy, sourced from the USDA Food Database.
SHARE THIS POST!
If you liked this post, share it with your friends and family!
Let others know by rating and leaving a comment below!
As Mother’s Day approaches, I’ve gotten several requests for gift ideas for Mom. Sometimes regular chocolate doesn’t cut it anymore!
I’ve compiled a list of some things I’d want to get myself or gift my own mom. These are items I’ve personally tried and love using. Feel free to add your favorites in the comments! Some of these definitely aren’t your typical gifts but will help Mom be healthy and happy.
Gifts for Mother’s Day (She Won’t Just Pretend She Loves)
How do you get a gift for the person that gave birth to you, cooked food for your entire childhood, and stayed by your side through teething/tantrums/friend drama/dating and all the other challenges of childhood?
It likely isn’t possible to find one gift that says, “thanks for everything you’ve done for me.” However, I’ve compiled a list of gifts Mom will be able to use and enjoy. These are gifts I’d give to my own mom or that I’d be thrilled to receive from my kids.
Of course, nothing beats a heartfelt letter or handmade gift, but if you’ve already got those covered, here’s a list of some other ideas she’ll love! Some of these brands are offering sales for Mother’s Day, so be sure to check out their sites for any deals.
Natural Skincare
Annmarie Gianni Skincare – I love Annmarie skincare products and how clean and effective they are! Their clean beauty trial includes a cleanser and anti-aging serum that leaves your skin feeling refreshed and toned! Treat the special Mom in your life to an amazing experience (and price!).
Alitura – Along with the above I’ve found myself using Alitura’s face mask regularly. I definitely have noticed improvements in my skin since adopting it into my regular routine. The founder, Andy, was on the podcast and shares his inspirational story of how and why he created this clean line of skin products.
Wellnesse Personal Care Products – I helped co-formulate this line of oral and skincare to make Mom feel super pampered (and it’s safe for the whole family!). Better yet, these formulas nourish hair and remineralize teeth with beneficial and science-backed natural ingredients.
Toups & Co. – This all natural skincare line features nourishing tallow. They’re perfect for skin of any age to help give you more of that youthful glow.
MadeOn – I discovered this small family company years ago and I still love their hard lotion bars. Made with simple ingredients, it’s like a DIY lotion bar without the work!
Food and Kitchen
Solo Smokeless Outdoor Fire Pit – This stand-alone, sleek-looking fire pit is a Wellness Mama team favorite this year. It burns natural wood, gives off the perfect amount of heat, and keeps irritating smoke away! Ideal for outdoor entertaining.
Daily Harvest Smoothie Box – These real-food smoothies are super nourishing and delicious. They’re my quick-fix snack or treat just for me. All you need is a freezer and a blender. The gift box option also lets the recipient pick the varieties, so you don’t have to guess what they would like.
New Cookware – If mom’s going to cook dinner it may as well be in style. I know using my beautiful set of non-toxic cookware from Our Place brings me joy every day! Plus their Wonder Oven (a non-toxic air fryer combo) is a family favorite. I also love this cookware from Caraway. Use the code WELLNESSMAMA for $10 off. (Can’t decide? See my full cookware review here.)
Real Plans Membership – I love this meal planning service that lets me plan my meals each week in just minutes and shop in half the time. Give Mom some time off by saving her time on meal planning and prep (and even better, plan and shop for her for a few weeks!).
Thrive Market Membership – Thrive Market membership gives Mom access to the best quality organic groceries and beauty products at the best prices.
Anything Le Creuset – Incredible (but pricey) dishes. I’ve been collecting a few pieces over the years and am resisting the urge to buy them all!
Instant Pot – Revolutionize dinner! This electric pressure cooker makes roasts in about an hour and turns tough cuts of meat into deliciously tender meals. You can even cook frozen meat in it on busy days when you forgot to defrost the meat that morning.
Cheesecake – To go with a cup of tea or simply for a healthier version of this delicious dessert, try a Wonder Monday Cheesecake. Save $5 off your order with the code WELLNESSMAMA5.
Clean Water and Drinks
Hydroflask Water Bottle – These steel bottles are cute and really functional. They keep liquids cold for up to 24 hours and hot for up to twelve. Clearly Filtered also makes similar bottles but with a filter built-in. It’s an easy way to always have clean, filtered water on the go.
RTIC Tumbler – This one performs as well as the high-priced Yeti, and I use mine all the time. Great for coffee, smoothies, and water.
Clean Water and more – Our friends at Radiant Life carry so many high-quality products that I couldn’t live without. Moms often worry about the health of their families. Our Radiant Life water filter was one of my favorite gifts ever.
French Press Coffee Maker – Coffee is my sanity some days. If the mom in your life is the same way, help her ditch the toxic plastic coffee maker with a glass French press or any of these non-toxic coffee makers.
Four Sigmatic Coffee – I guarantee she’s been wanting to try it, and Mother’s Day is the perfect excuse to splurge. It also makes a great “Happy Mother’s Day to me” gift! If she’s not into mushroom coffee, try a bag of smooth, amazing Purity Coffee. I often blend the two.
Wine Subscription – The secret to a happy mom? Wine showing up at the door! Just joking, of course (kind of), but if Mom is a wine lover, this is the gift that keeps on giving. I especially like this one from Dry Farms because I never get headaches from it like I used to from even just one glass of regular wine. It’s organic, low-sugar, and free of unhealthy additives.
Pique Tea – For the Mom who begins (or ends!) her day with a cup of tea. Pique uses incredibly fresh and pure ingredients and triple screens for toxins.
Kombucha Brewing – Give mom everything she needs to brew her own kombucha (including classes!).
Relaxation and Pampering
Myobuddy Massager – An amazing handheld massager that rivals what chiropractors use in-office. And some of them do use Myobuddy. This percussive massager heats up, vibrates, and feels like a real massage. This is an especially great gift for a nursing mom to give her some love on her neck, shoulders, and back. Use the code WELLNESSMAMA for special discounts!
Shiatsu Massage Pillow – I received this as a gift and absolutely love it! It rivals an actual massage, and I use it all the time after long days of cooking and running around with the kids.
100% Silk Sleep Mask – A sleep mask that’s actually comfortable. This mulberry silk sleep mask feels lightweight and is great for travel or home. I often use mine!
Dry Brush Set – Brushing isn’t just for hair and teeth. Brushing skin can help it stay smooth and supple, move lymph, and may improve collagen. It also feels great and is super-relaxing.
Plant Therapy essential oils come in beautiful boxed gift sets for Mother’s Day (choose from several). I also can’t get enough of their natural Himalayan salt scrubs, body cremes, and body butter and balm boxes.
Fontana candles – I finally found a non-toxic candle that I love. Their candles are made with beeswax and coconut and scented with essential oils. They even use wooden wicks. They have some great scents, including spiced latte.
Healthy Lifestyle
Wake-up Light Gentle Alarm Clock – Make waking up less of a chore with this natural alarm clock. Mom can gently wake up to gradual light and sound with this wake-up light.
Himalayan Salt Lamp – Mom can enjoy the soothing warm orange glow at night from these beautiful lamps. Doesn’t disrupt circadian rhythms with blue light!
10,000 Lux Happy Light – I use this super-bright light in the morning on winter days to keep my cortisol levels healthy.
Sauna – While we’re dreaming, how about a sauna? A sound-proof house of her own away from everything that will also improve her health!? She’ll be thanking you for years! I also love this personal sauna and used it for years in my bedroom.
Sauna Blanket – Sauna has tons of health benefits, but not everyone has the space for one. This sauna blanket is a great alternative for those who are short on space and/or need to find a budget-friendly sauna. Simply unfold it, plug it in, and relax in the blanket while you watch tv or listen to music or a podcast. Use code WELLNESSMAMA20 for a discount.
Apollo Neuro – Unlike other wearable devices, this doesn’t track your stress or sleep, it helps fix them. It releases soothing vibrations that can help mom feel calmer, get better sleep, and be more focused. Use code wellnessmama15 for a discount.
Miscellaneous
Amazon Gift Cards– Give mom the gift of a gift card. Amazon has tons of items available and this way she can choose exactly what she wants.
Beekeeping Course – If mom already has everything, why not try an intro to beekeeping course?
If timely shipping is a concern, no worries. Slip a picture of the gift in a box or a card and Mom will have something to look forward to.
Bottom Line: Show Mom Lots of Love!
I’m not always a fan of Hallmark holidays, but moms give so much day in and day out (pregnancy and childbirth, just for starters!) and certainly deserve to be celebrated. Show Mom a little (or a lot) of extra love and care this Mother’s Day and every day… hopefully, some of these ideas help!
What have been your favorite Mother’s Day gifts to get or give? Please share below!


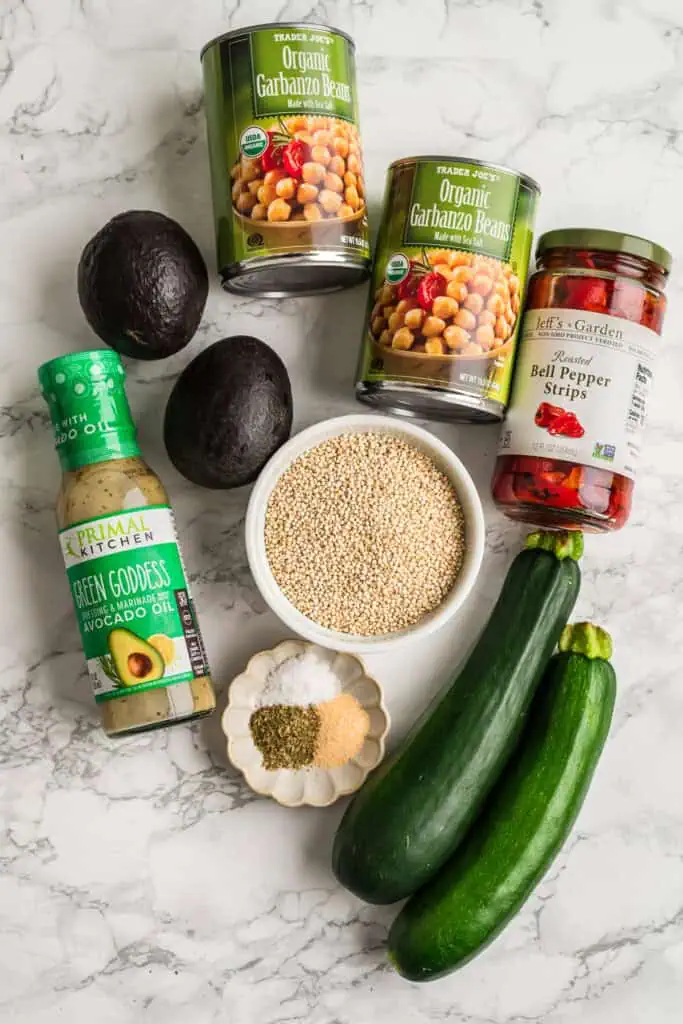
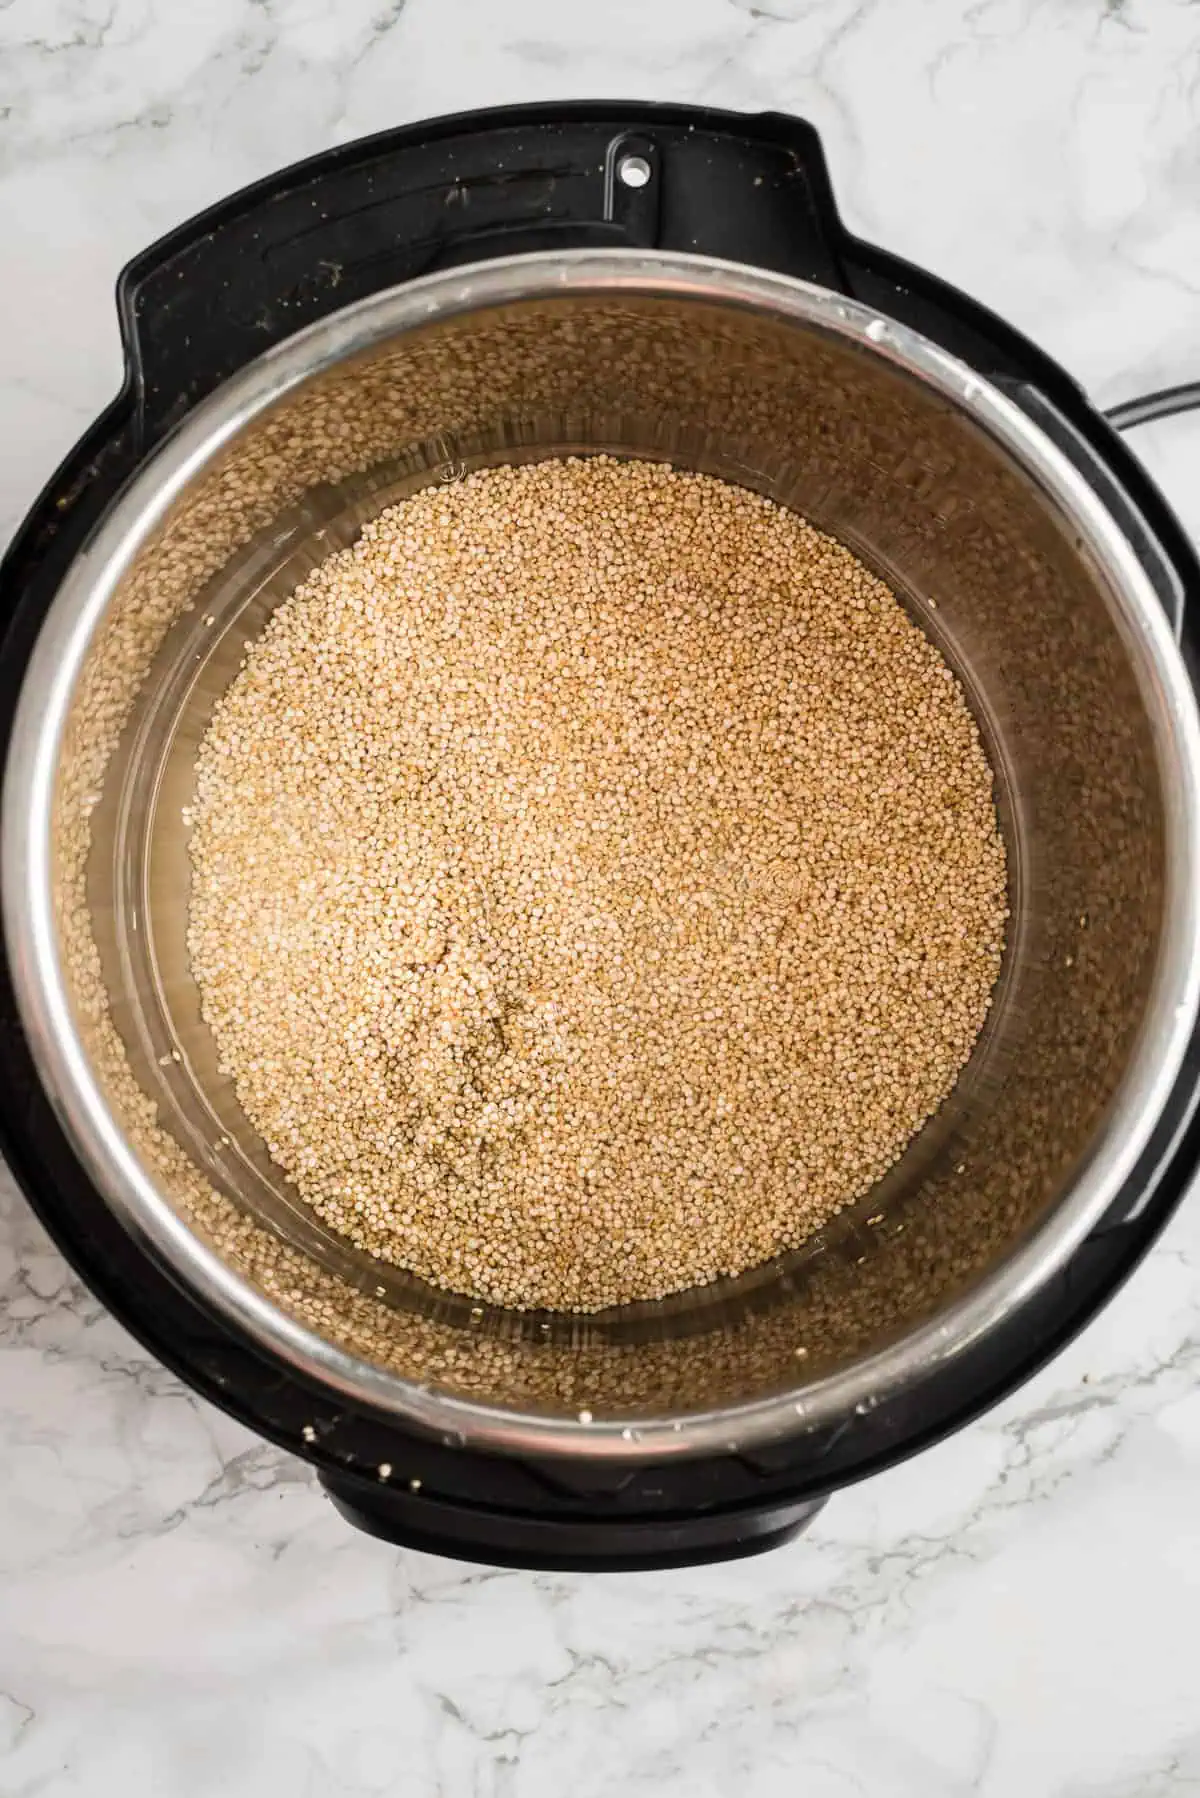
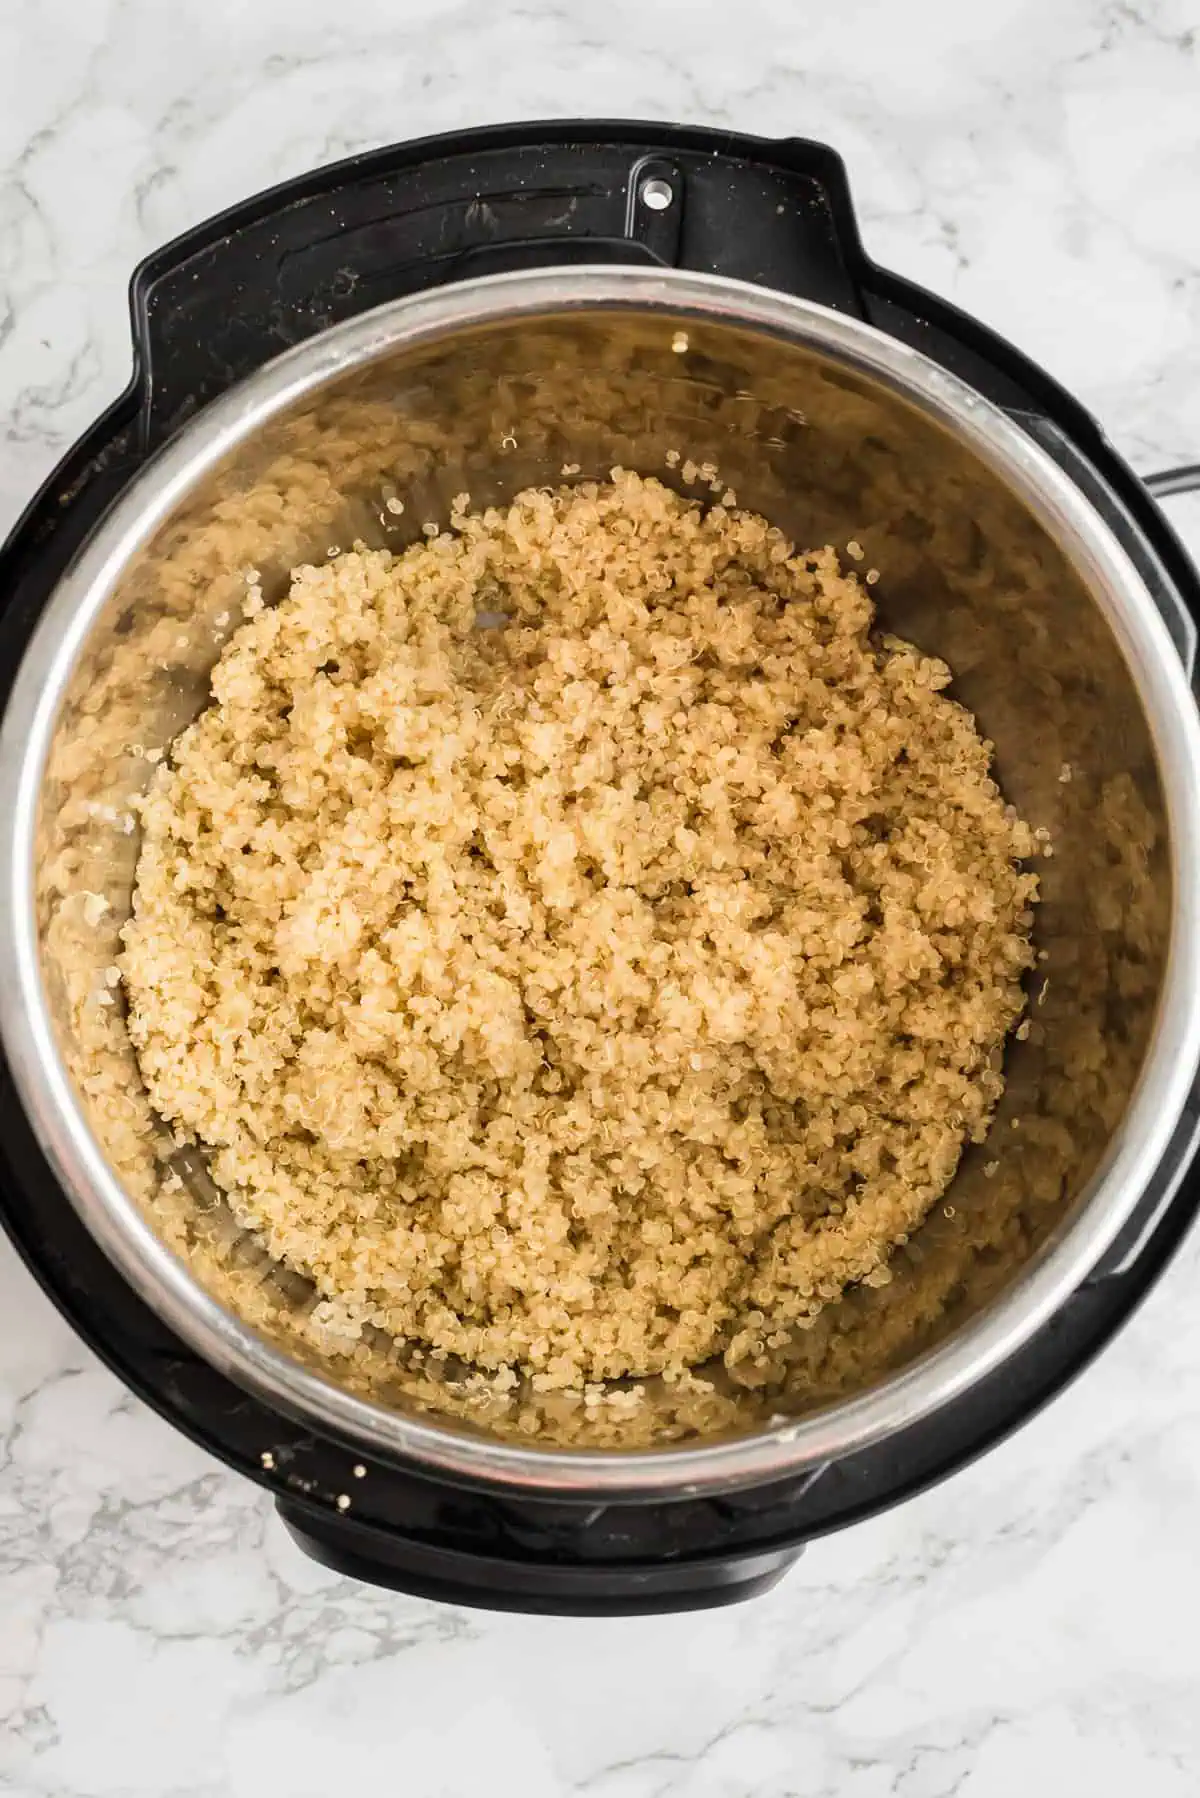


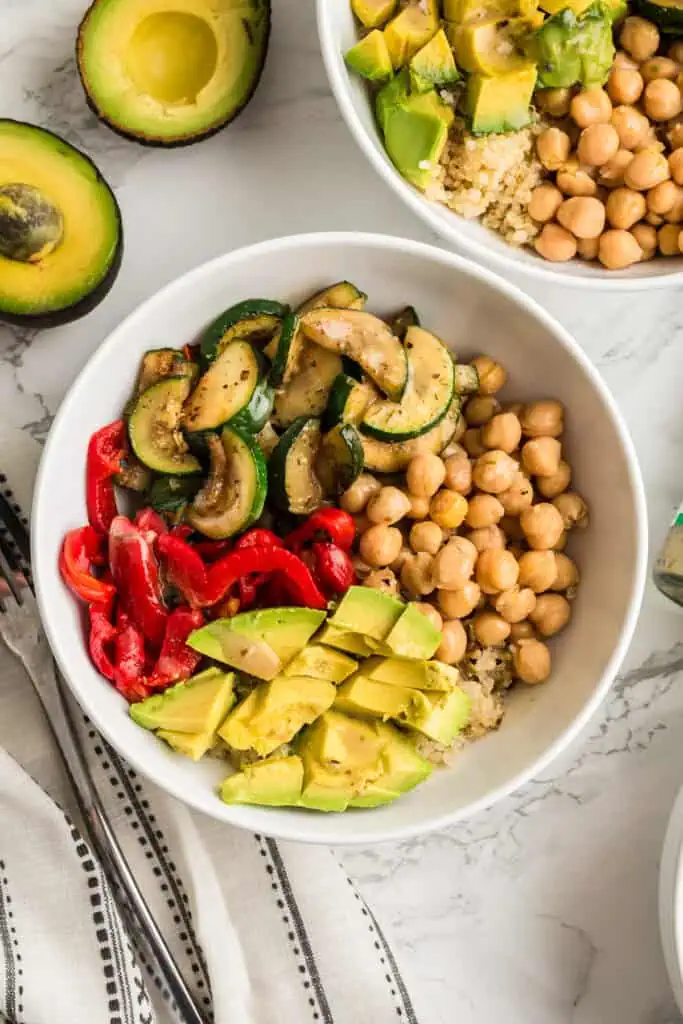
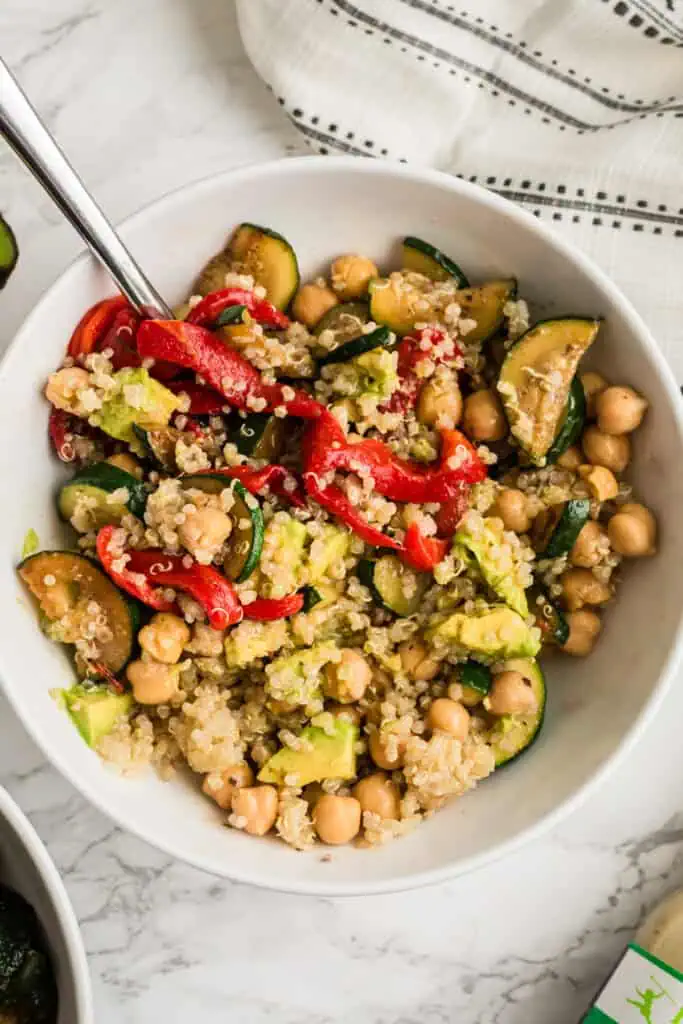
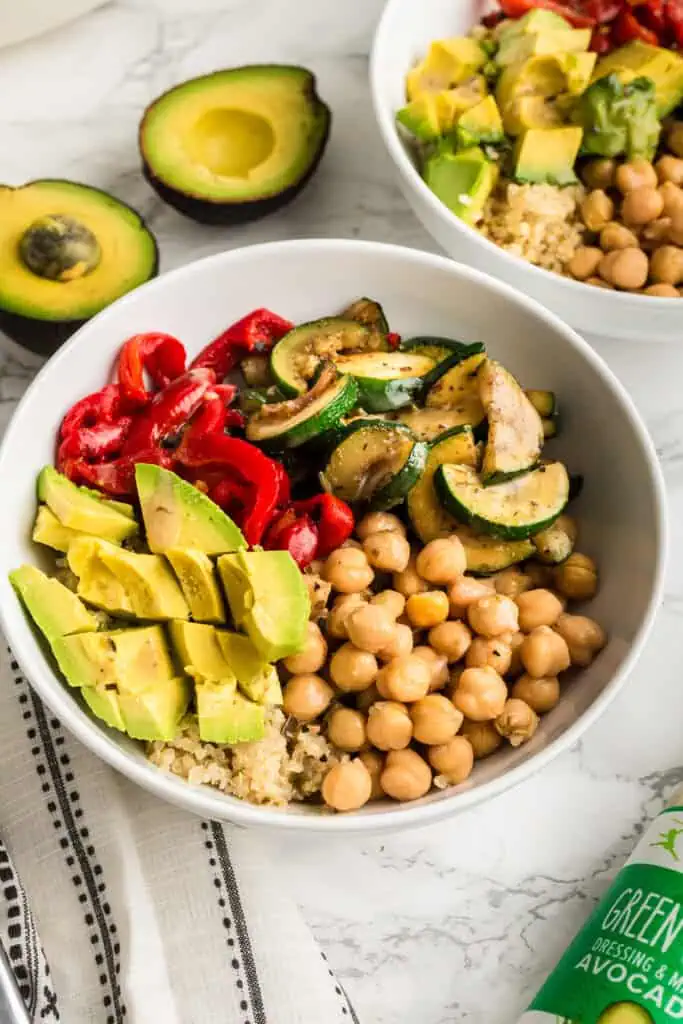


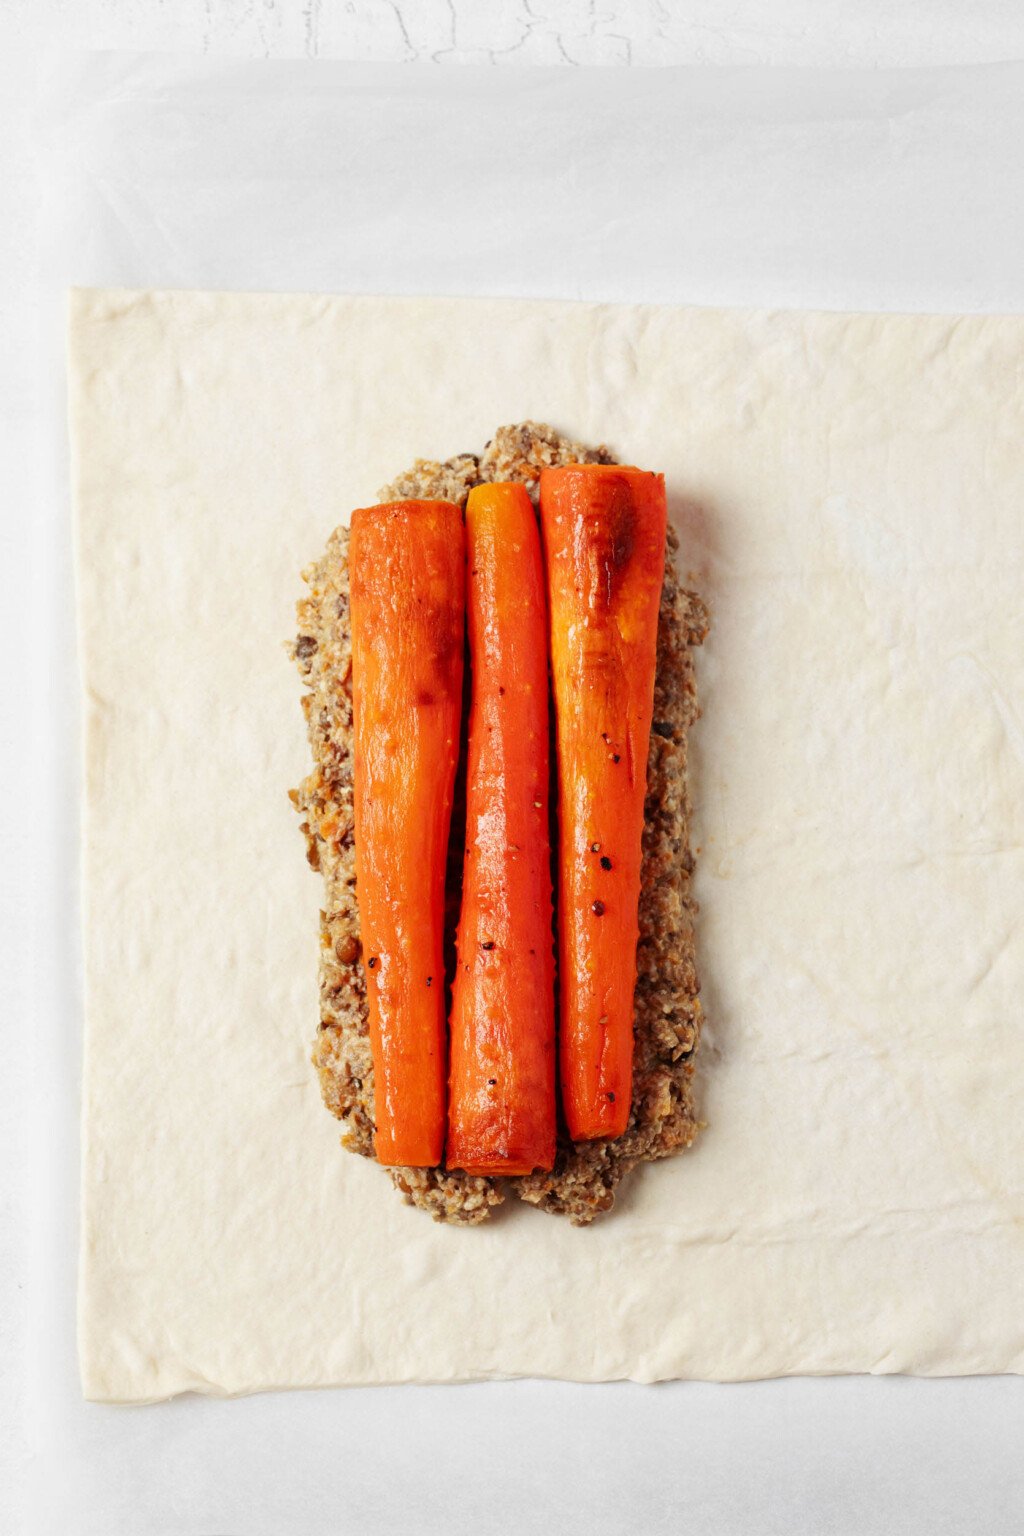
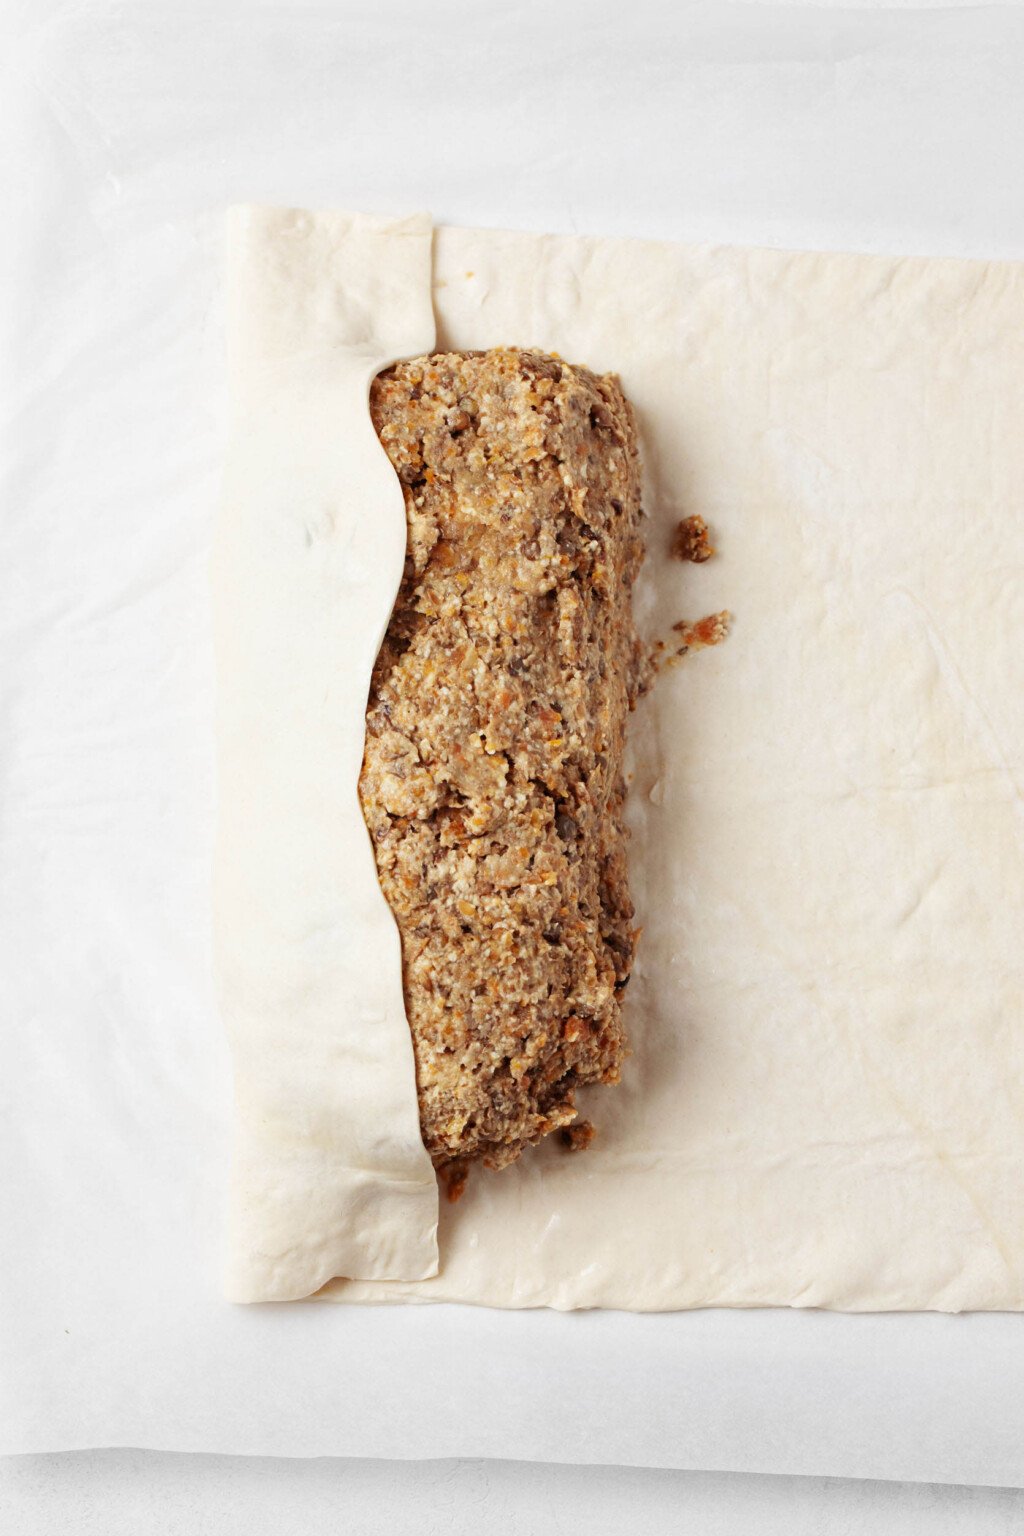


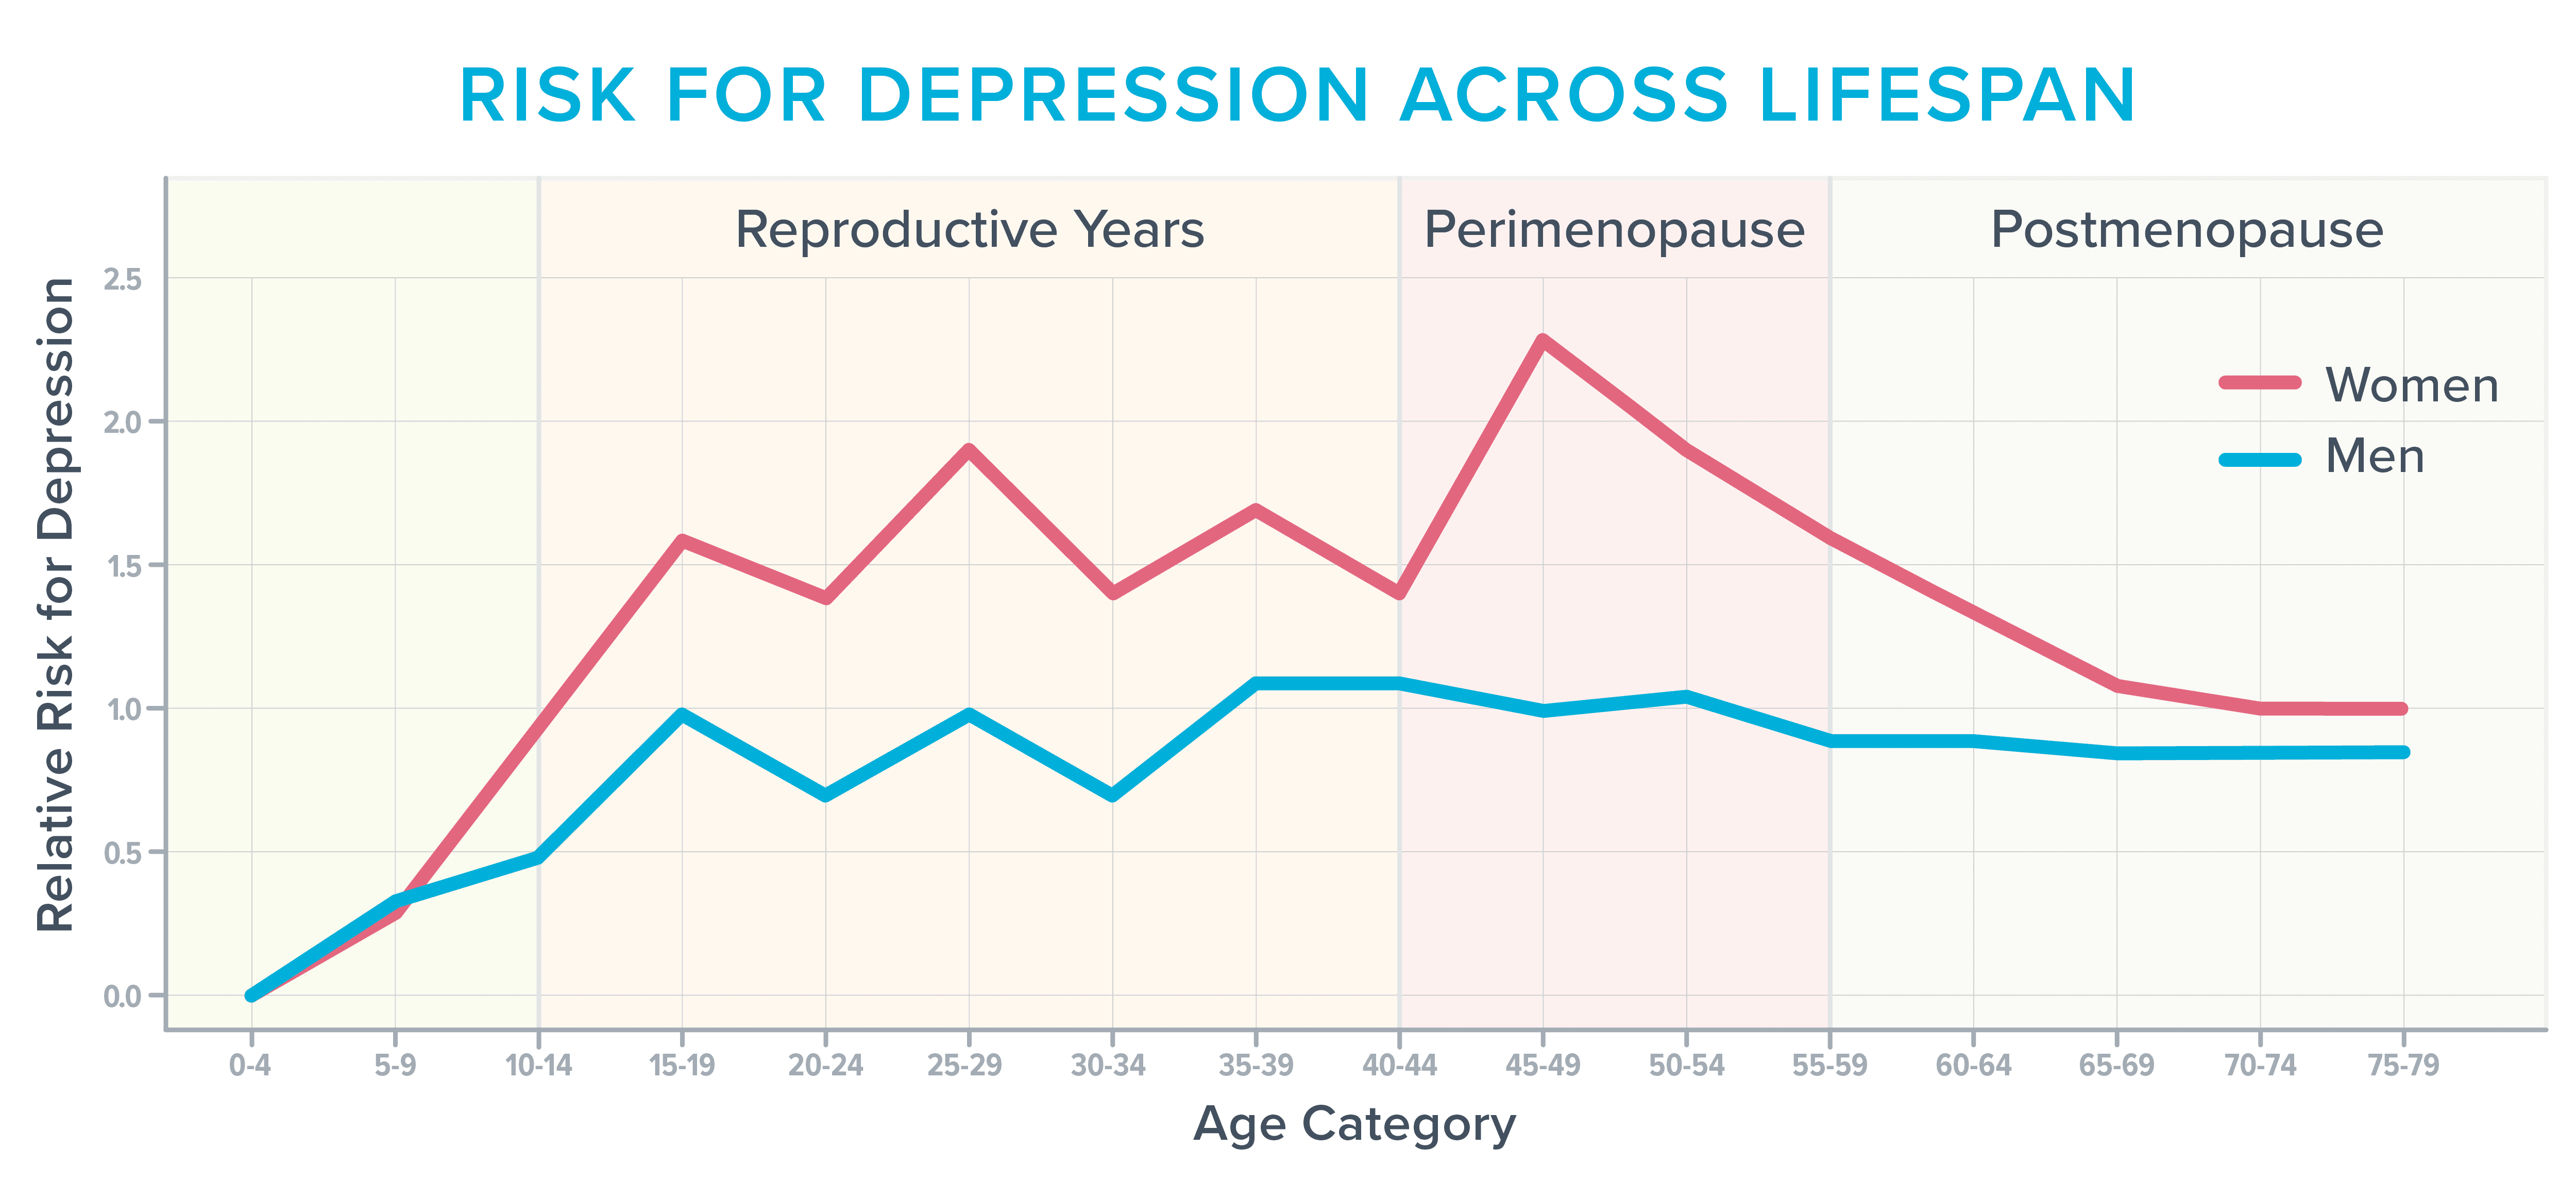


 ‘Quicksilver’ hebe (Hebe pimeleoides ‘Quicksilver’, Zones 7–9) is marginal here but I have it planted in a relatively protected area with the ‘Golden Mop’ cypress (


