Price: $39.99 - $29.99 (as of Oct 15, 2025 11:02:36 UTC – Details)
Stacks up to 310lbs: These heavy duty resistance bands can handle workouts up to 310 pounds with multiple tension levels (with the number of progressively larger bands from 40 to 90 lbs, you can go from a light workout to unbelievably tough) for all fitness abilities Versatile Workouts: Loop the bands around doors, poles, or yourself to perform hundreds of exercises like rows, chest presses, squats, lunges, bicep curls and more anywhere comfortably Sturdy Consruction: Made of heavy duty latex (has a nice consistent stretch to it), these bands can withstand extended use and maintain their shape stretch for long lasting quality workout after workout Comfortable Handles: The handles are larger than the traditional handles and are very comfortable Carry Anywhere: These resistance bands (lightweight and compact) comes in a very useful bag for storage and can be taken for traveling or portability when storage space is scarce Smooth and Comfortable: The latex material contours comfortably to the body without pulling or pinching skin during intense resistance workouts
Customers say
Customers find these resistance bands well-constructed and durable, with up to 310 lbs of resistance. They are perfect for intense workouts and easy to use, making them very useful for home workouts. Customers consider them good value for money and appreciate their versatility, with one customer noting they can be combined for significant weight resistance.
Price: $58.97 (as of Oct 14, 2025 23:02:00 UTC – Details)
Product description
The video showcases the product in use.The video guides you through product setup.The video compares multiple products.The video shows the product being unpacked.
*Comes with a Midnight Black, Glacier Silver, Mystic Rose or Arctic Blue TPU strap as standard. Other straps must be purchased separately.
Xiaomi Smart Band 9
1 Glacier Silver
2 Midnight Black
3 Mystic Rose
4 Arctic Blue
IMPROVED DISPLAY BRIGHTNESS: With an AMOLED peak display brightness of 1200 nits, view data with ease even under direct sunlight. Equipped with a light sensor module, it accurately detects ambient light to automatically adjust screen brightness for more comfortable viewing ELEGANT DESIGN: For the first time, the Xiaomi Smart Band utilises aluminium alloy frames in different colours such as Midnight Black, Glacier Silver, Mystic Rose and Arctic Blue. Pair it with a range of stylish straps, allowing you to show off your individuality with every flick of your wrist HIGH-PRECISION SENSORS: The monitoring module has been significantly improved for more precise monitoring of workouts and overall health. Specifically, the latest generation sensors for: heart rate monitoring, Continuous blood oxygen saturation monitoring, Continuous stress monitoring, Breathing training, Female health management OVER 150 SPORTS MODES: Stay motivated with advanced algorithms covering metrics such as maximum oxygen consumption, recovery time, training results, load and more. Accurate tracking, no matter whether you’re cycling outdoors or sweating it out indoors LONG-LASTING BATTERY AND WATER RESISTANCE: Thanks to professional low-power consumption sensors and smart power consumption algorithms, Xiaomi Smart Band 9 has an extraordinary battery life of 21 days with regular use. In addition, it is water resistant and you can wear it while swimming: it withstands pressure equal to a depth of 50 meters
Customers say
Customers find the smart band to be a fantastic fitness watch with amazing battery life, taking only 20 minutes to charge back, and consider it perfect for the money. The device is extremely accurate and has all the necessary functions, though some report issues with sensors stopping working. Customers disagree on the ease of use, with some finding it simple while others say the software is too complicated. The heart rate tracking receives mixed feedback, with some finding it useful while others say it’s not very helpful, and connectivity is also mixed, with some finding it easy to connect while others report difficulties syncing with phones.
Years ago when I had little ones who liked going to the pumpkin patch, we’d always come home with a few pumpkins. While I don’t always have time to make homemade pumpkin puree anymore, our family still loves pumpkin bread during the fall. It’s naturally sweetened with maple syrup and features all the warming spices you love about the season.
This pumpkin bread is still grain free but features nutty almond flour instead of my other coconut flour version. I also included a delicious maple glaze that sinks into the bread while it’s still warm. A slice of this with some grass-fed butter and a cup of tea tastes amazing on a chilly (or not so chilly!) morning.
Almond Flour Pumpkin Bread
While our family does eat some grains now that my Hashimoto’s is gone, I still like the taste of almond flour in baked goods. Along with the pumpkin puree it helps keep the bread moist and tastes really filling. You can also add some coconut flour into the mix if you don’t want to only use almond flour.
Thanks to the almonds and eggs each serving has a decent amount of protein. And the pumpkin is a great source of vitamin A and fiber.
I’ll also stir in some chopped walnuts for extra crunch. English walnuts work well, or try black walnuts for a more unique flavor. Not a fan of walnuts? Pecans, dried fruit, or even chocolate chips also taste delicious!
Keep Some For Later (Maybe)
Almond flour pumpkin bread is great along with some protein for breakfast, as an easy dessert, or a snack. It stores well in the fridge and you can even freeze individual slices for later. Just wrap them in parchment paper and place in a bag in the freezer. Although I will admit my kids inhale this as soon as it’s out of the oven so ours never lasts that long!
Here’s how to make delicious, grain-free and dairy-free pumpkin bread.
Maple-Glazed Almond Flour Pumpkin Bread
This delicious almond flour pumpkin bread is high in protein, vitamins, and fiber for a nutritious and yummy dessert or snack.
Preheat the oven to 350°F. Grease a loaf pan or line with parchment paper
In a bowl, mix almond/coconut flour, baking soda, baking powder, salt, and spices.
In a separate bowl, whisk pumpkin, maple syrup, eggs, oil, and vanilla.
Combine wet and dry ingredients just until mixed. Fold in nuts or chocolate if using.
Pour into the loaf pan and bake for 50–60 minutes or until a toothpick comes out clean.
Brush the top with maple glaze while warm. Let cool before slicing.
Nutrition Facts
Maple-Glazed Almond Flour Pumpkin Bread
Amount Per Serving (1 slice)
Calories 244 Calories from Fat 171
% Daily Value*
Fat 19g29%
Saturated Fat 6g38%
Trans Fat 0.003g
Polyunsaturated Fat 3g
Monounsaturated Fat 1g
Cholesterol 33mg11%
Sodium 241mg10%
Potassium 143mg4%
Carbohydrates 17g6%
Fiber 3g13%
Sugar 10g11%
Protein 6g12%
Vitamin A 3862IU77%
Vitamin C 1mg1%
Calcium 79mg8%
Iron 1mg6%
* Percent Daily Values are based on a 2000 calorie diet.
Not a fan of walnuts? Try stirring in some chopped pecans or dark chocolate chips instead.
More Pumpkin Recipes
Have some more pumpkin that needs used up? Here are some of our favorite pumpkin recipes for the season, including some surprising ways to use pumpkin!
What are some of your favorite pumpkin flavored treats? Leave a comment and let us know!
Winter doesn’t provide ideal growing requirements of a plant. Though few cold-hardy plants can thrive, most plants struggle to survive due to limited sunlight, freezing temperature and reduced enzyme activity.
However, if you’re looking to keep yourself busy throughout the winter, then growing veggies indoors is an optimal solution.
Growing indoors vegetable garden can be intimating for novice gardeners, but with proper care and correct guidance it can turn out to be a gratifying achievement.
Before diving to the list of veggies that you can grow indoors in the winter, lets first understand fundamentals of indoor gardening.
How to Grow Vegetables Indoors in Winter?
If you can’t afford a greenhouse, you can still grow vegetables indoors with enough light and the right temperature. Choosing the right plants is key to success. The second most important step is providing extra care so your plants stay strong even when days are short. With proper light, warmth, and watering, your indoor garden can thrive all winter.
Choosing the Right Plants
Pick vegetables that grow well in low light, like spinach, lettuce, kale, and arugula. These greens love cool air and need little sun. Herbs such as basil, parsley, chives, cilantro, and thyme also grow well indoors. With enough light, you can even grow dwarf tomatoes and peppers.
Provide Enough Light
Winter days are short, so give plants 10–12 hours of extra light daily. LED grow lights work best because they mimic sunlight. Place plants near a south-facing window and turn them daily for even growth.
Maintain Ideal Conditions
Keep temperatures between 65°F and 75°F during the day. Avoid placing plants near cold drafts or hot vents. Maintain 40–60% humidity using water trays, a humidifier, or by grouping plants together.
Water and Feed Properly
Check soil often and water only when the top inch feels dry. Use well-draining pots and add mulch to retain moisture. Mix compost or use liquid fertilizer every few weeks during active growth.
Maximize Space and Care
Rotate crops for continuous harvests. Watch for pests and wipe dust off leaves. Stack pots or use shelves to grow more in less space.
27 Vegetables to Grow Indoors in the Winter
Winter doesn’t mean giving up fresh vegetables. With a sunny windowsill or grow lights, you can harvest greens, herbs, and fruiting vegetables throughout winter.
Last year, I started with three lettuce pots on my kitchen counter. Within weeks, my skepticism vanished as I snipped fresh salad leaves for dinner.
1. Lettuce
Lettuce tops the list for indoor winter growing because it genuinely doesn’t mind cooler temperatures and lower light. Loose-leaf varieties like buttercrunch, red leaf, and oakleaf work best since you can harvest outer leaves while the plant keeps producing. Seeds sprout in just 7-10 days, and you’ll be eating salads within a month.
Plant lettuce seeds a quarter-inch deep in 6-inch containers with drainage. Keep soil moist but not soggy. Provide south-facing light or 10–12 hours under grow lights. Harvest outer leaves regularly to encourage continuous growth throughout winter.
2. Spinach
Spinach actually prefers the cooler conditions you’ll find indoors during winter. It’s packed with nutrients and grows relatively quickly—most varieties are ready to harvest in 4-6 weeks. Baby spinach varieties work particularly well for indoor containers since they don’t need as much root space as full-sized plants.
Sow spinach seeds half an inch deep, two inches apart in 6–8 inch containers. Keep soil moist and water when the top inch is dry. It tolerates partial shade. Harvest outer leaves at 4–6 inches. Plants will continue producing new growth for several months.
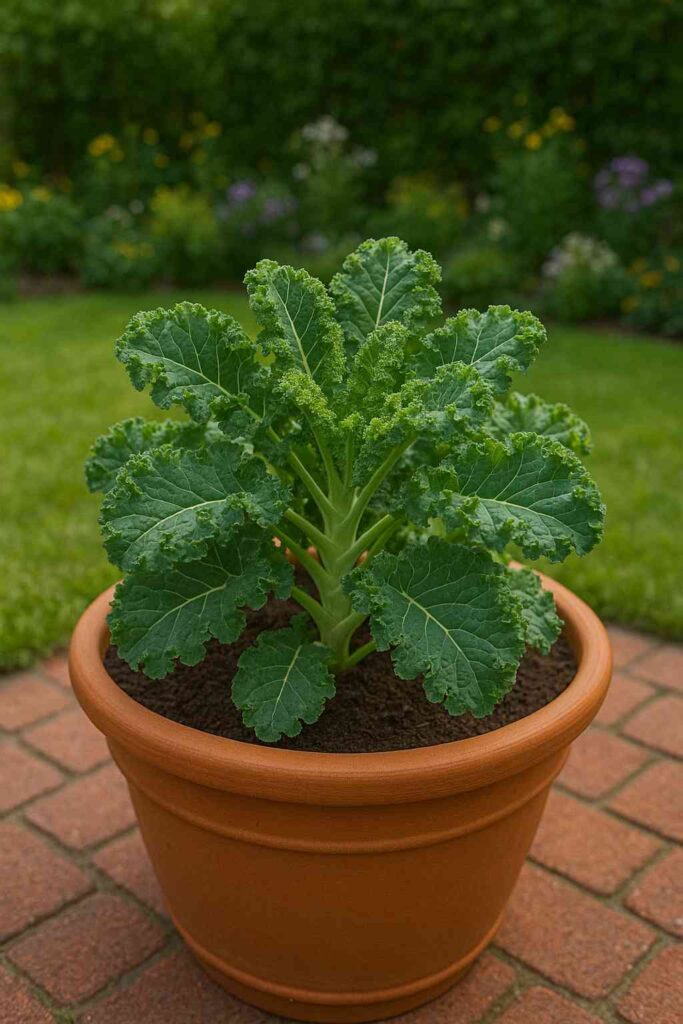
3. Kale
Kale has become incredibly popular, and for good reason—it’s ridiculously hardy and actually tastes sweeter in cooler temperatures. Dwarf varieties like Dwarf Blue Curled or Winterbor fit better in indoor spaces than those massive outdoor plants. One container can feed you for months if you harvest correctly.
Use 8–10 inch deep containers for kale. Sow seeds half an inch deep and thin to 6–8 inches apart. Provide 6–8 hours of sunlight or 12–14 hours under grow lights. Keep soil moist and feed every 3–4 weeks. Harvest lower leaves first, leaving the crown intact.
4. Arugula
Here’s something most people don’t know: arugula grows faster than almost any other green, often ready to harvest in just three weeks! It has that distinctive peppery bite that makes salads interesting. Plus, it doesn’t complain about the shorter winter days.
Scatter arugula seeds thinly in shallow containers and cover lightly. Water gently. Provide moderate light and keep soil moist at 60–70°F. Harvest leaves at 2–4 inches; older leaves become bitter and tough.
Microgreens are basically vegetable seedlings harvested when they’re tiny, but don’t let that fool you—they pack intense flavor and nutrition. You can grow radish, broccoli, mustard, beet, and dozens of other microgreens in just 7-14 days. They need minimal space, making them perfect for small apartments.
Use shallow trays with 2 inches of soil. Scatter seeds densely and mist daily. Place in bright light once sprouts appear. Harvest with scissors when first true leaves develop, usually in two weeks. Rinse the tray and start a new batch.
6. Swiss Chard
Swiss chard is gorgeous—those bright red, yellow, and orange stems look like they belong in a flower arrangement. But it’s also incredibly productive and tolerates the imperfect conditions of indoor growing better than many vegetables. Rainbow chard varieties offer the prettiest stems.
Plant chard seeds an inch deep in 8-inch containers. Thin seedlings to 4–6 inches. Keep soil moist and provide bright light. Feed monthly. Harvest outer leaves at 6–8 inches. Chard is forgiving and will produce for months.
7. Cilantro
Cilantro divides people—you either love it or think it tastes like soap (blame your genes for that). If you’re in the love-it camp, growing cilantro indoors means fresh herbs for tacos, curries, and salads all winter. It does bolt quickly in warm conditions, but indoor temperatures usually keep it producing longer.
Use 8-inch deep containers for cilantro. Sow seeds half an inch deep and keep soil moist until germination. Then water when the top inch is dry. Provide at least 6 hours of bright light. Harvest outer leaves at 4–6 inches. Flowering seeds can be used as coriander.
8. Parsley
Parsley is one of those herbs you always need just a little bit of, making it perfect for indoor growing. Both flat-leaf (Italian) and curly varieties grow well inside, though flat-leaf has more flavor. Fair warning: parsley seeds are notoriously slow to germinate—sometimes taking 3 weeks.
Soak parsley seeds overnight, then plant half an inch deep in 6–8 inch containers with good drainage. Keep soil moist and provide bright light. Parsley tolerates occasional misting. Harvest outer stems at the base to encourage bushy growth. Plants will produce for months once established.
9. Basil
Basil loves warmth, so winter indoors suits it better than cold outdoor temperatures. The smell alone makes it worth growing—nothing beats fresh basil for pasta, pizza, or caprese salad. Genovese is the classic variety, but try Thai basil or purple basil for something different.
Basil needs 65–75°F and 10–12 hours of light. Sow seeds a quarter-inch deep in well-draining soil and keep moist. Ensure containers drain well and provide humidity. Pinch growing tips to encourage bushy growth. Remove flower buds to keep leaves producing.
10. Chives
Chives are practically indestructible, making them ideal for beginners or anyone who occasionally forgets to water. They’re perennials that grow in clumps, and you can harvest them repeatedly by cutting leaves to about 2 inches above the soil. The mild onion flavor works in everything from eggs to soups.
Start chives from seeds or a small store pot. Use 6-inch containers and allow slight crowding. They grow in lower light but thrive with 6–8 hours of bright light. Water when soil is dry an inch down. Cut leaves regularly to keep plants healthy and prevent flowering.
11. Thyme
Thyme is tough as nails and doesn’t mind the drier air in heated homes during winter. This Mediterranean herb prefers life on the dry side, so it’s perfect if you’re not great at remembering to water. A little thyme goes a long way in cooking—those tiny leaves pack serious flavor.
Plant thyme in well-draining soil with sand or perlite. Keep in bright light and water only when dry. Grow slowly but steadily. Harvest sprigs as needed, cutting a third of the stem. Regular pruning keeps plants compact and bushy.
12. Oregano
Oregano and pizza are best friends, but this herb also enhances countless other dishes. It’s another Mediterranean herb that prefers drier conditions, making it low-maintenance for indoor growing. Greek oregano has the strongest flavor, while Italian oregano is slightly milder.
Oregano needs well-draining soil with perlite or sand. Provide bright light and water only when soil is dry. Harvest stems regularly to keep it bushy. Leaves taste stronger when dried.
Mint is aggressive—in outdoor gardens, it takes over everything. Indoors, that aggressive nature becomes an advantage because it grows enthusiastically in containers. Spearmint and peppermint are classic choices, but chocolate mint, apple mint, and other varieties offer fun flavor variations.
Grow mint from cuttings or starter plants in 8-inch containers. Keep soil damp and provide bright or partial light. Harvest stems often to control growth and encourage new shoots. Homegrown mint adds fresh flavor to tea, cocktails, and dishes.
14. Scallions (Green Onions)
Here’s the easiest indoor vegetable trick ever: buy scallions from the grocery store, use the green tops, and replant the white root ends. They’ll regrow in your windowsill. You can also grow scallions from seeds, but the regrowth method gives instant gratification.
Place scallion roots in a small container with an inch of water, changing it often, or plant directly an inch deep. Keep soil moist with moderate light. Snip green tops when needed, leaving 2 inches. They regrow for several months before replacement is needed.
15. Radishes
Most people don’t think of radishes as indoor plants, but small varieties grow surprisingly well in containers. They’re one of the fastest vegetables you can grow—some varieties mature in just 25 days. Easter Egg radishes offer pretty colors, while French Breakfast radishes have a mild, sweet flavor.
Radishes need 6-inch containers. Plant seeds half an inch deep, an inch apart. Keep soil moist and provide 6–8 hours of light. Thin seedlings to 2 inches. Harvest when roots reach recommended size; waiting too long makes them woody. They germinate quickly, usually in 3–5 days.
16. Carrots
Growing full-sized carrots indoors is challenging, but small varieties like Paris Market, Thumbelina, or Little Finger work beautifully. There’s something magical about pulling your own carrots, even if they’re miniature. Kids especially love this.
Carrots need 12-inch deep containers and loose, rock-free soil. Sow seeds thinly and cover lightly. Keep soil moist; seeds take 2–3 weeks to germinate. Thin seedlings to 2 inches apart. Grow in bright light at 60–70°F. Harvest when roots reach the soil surface.
17. Cherry Tomatoes
Tomatoes are ambitious for indoor growing, but dwarf or micro varieties like Tiny Tim, Red Robin, or Micro Tom can produce real tomatoes indoors. Don’t expect huge harvests like outdoor gardens, but even a handful of fresh tomatoes in February feels like a miracle.
Tomatoes need 12–14 hours of bright light and warm temperatures (70–80°F). Use 8–10 inch containers with good drainage. Start with seedlings. Keep soil moist and feed weekly after flowering. Shake flowers to aid pollination. Support plants with stakes, even small varieties.
18. Bell Peppers
Peppers handle indoor conditions better than tomatoes and can produce fruit for months with proper care. Dwarf varieties or ornamental peppers work best. Even if you don’t get huge harvests, watching peppers grow and change color brightens dreary winter days.
Peppers need bright light (12–14 hours) and warm temperatures (75–80°F). Use 8-inch containers with loose, well-draining soil. Keep soil moist, not wet. Feed every two weeks after flowering. Shake flowers to help pollination. Harvest at full size, even if still green.
19. Hot Peppers
Hot peppers actually grow more successfully indoors than bell peppers because they tolerate slightly lower light and set fruit more reliably. Varieties like jalapeño, cayenne, Thai chilies, or habanero can produce impressive harvests. Fresh hot peppers have completely different flavor than dried ones.
Hot peppers need bright light, warmth, and consistent moisture. Use 6–8 inch containers. They can produce fruit for several years. Harvest when fully grown and colored. Wear gloves with very hot peppers and avoid touching your face.
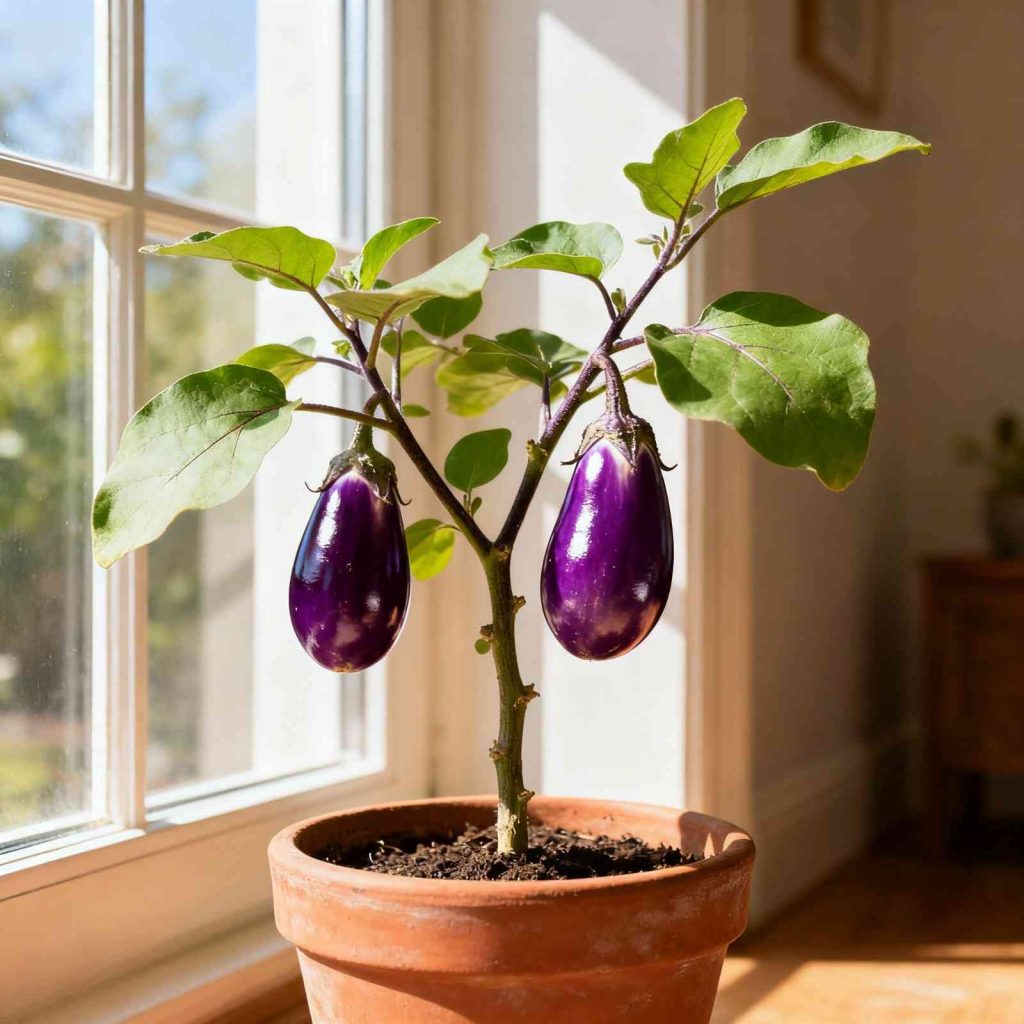
20. Dwarf Eggplant
Eggplant might seem impossible for indoor growing, but mini varieties like Fairy Tale or Little Finger produce small fruits in containers. They’re beautiful plants too, with purple flowers and glossy fruits. Eggplants need commitment—they take longer than quick-growing greens.
Eggplants need bright light and warm temperatures (75–85°F). Use 10–12 inch containers and start from seedlings. Keep soil moist and feed weekly after flowering. Tap flowers to help pollination. Harvest fruits at 3–4 inches when skin is glossy; dull skin means overripe.
21. Peas
Dwarf pea varieties like Tom Thumb or Little Marvel can grow in containers and produce sweet pods. Both snow peas and snap peas work well. Peas actually prefer cooler temperatures, making them ideal for windows in unheated rooms or cooler spots in your home.
Plant peas an inch deep in 8-inch containers. Provide a trellis or stakes to climb. Keep soil moist, especially during flowering. Grow in bright light at 60–70°F. Harvest snow peas when pods are flat, snap peas when pods are full but crisp.
Beet greens are incredibly nutritious, and you get a bonus root vegetable too. Small varieties like Detroit Dark Red or Golden Detroit work best for containers. Some people actually grow beets just for the greens, harvesting leaves continuously without worrying about root development.
Use 8–10 inch containers for beets. Sow seeds, then thin seedlings to 3–4 inches. Beets tolerate partial shade. Keep soil moist to avoid tough roots. Harvest leaves at 4–6 inches, or wait 50–70 days. Pull roots at 1–2 inches for best flavor.
23. Bok Choy
Bok choy grows faster than most vegetables—baby varieties are ready in just 30 days. It has a mild, slightly sweet flavor perfect for stir-fries, soups, or eating raw. Bok choy prefers cooler temperatures, so it’s perfect for winter windowsills.
Plant bok choy seeds half an inch deep in 6–8 inch containers. Space baby plants 4 inches, larger ones 6–8 inches. Keep soil moist and provide bright light. Grow at 60–70°F. Harvest baby bok choy at 4–6 inches or pick outer leaves from larger plants when crisp and full.
Mustard greens offer a spicy kick similar to arugula but with more substance. They grow incredibly fast—often ready to harvest in 3-4 weeks. Red Giant and Green Wave are popular varieties that grow well indoors. These greens are packed with vitamins and add zip to salads or stir-fries.
Sow mustard seeds a quarter-inch deep in 6-inch containers. Thin seedlings to 4–6 inches. Keep soil moist and provide bright light. Cooler temperatures help tender leaves. Harvest outer leaves at 4–6 inches. Young leaves are mild; older ones are spicier. Regular picking keeps plants producing through winter.
25. Celery
Growing full celery stalks indoors is difficult, but you can regrow celery from scraps or grow leaf celery (cutting celery) for fresh greens. Leaf celery has the same flavor as regular celery but grows in bushy clumps like parsley. It’s actually easier and more productive than regular celery.
Cut 2–3 inches from a celery base and place in shallow water. Change water daily. When roots and leaves appear, plant in soil. For leaf celery, sow seeds a quarter-inch deep. Use deep containers, bright light, and keep soil very moist. Harvest outer stalks as needed.
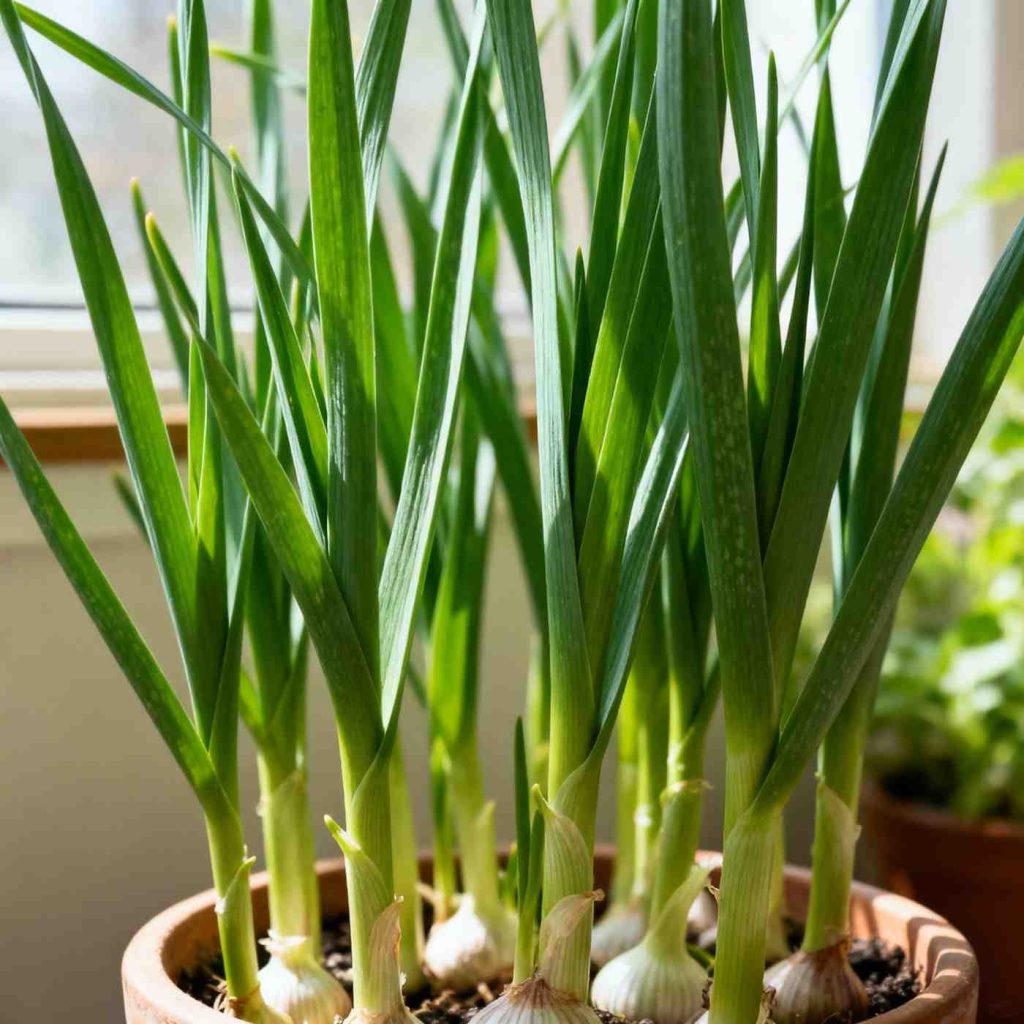
26. Garlic Greens
Growing full garlic bulbs indoors takes too long and too much space, but growing garlic greens is easy and rewarding. Garlic greens taste like mild garlic and work perfectly in any dish where you’d use garlic or chives. Plus, you can use cloves from your kitchen—no special seeds needed.
Separate a garlic bulb and plant cloves pointy-end up, an inch deep. Space 2–3 inches apart. Keep soil moist and place in bright light. Shoots appear in a week. Grow 8–10 inches, then cut, leaving 2 inches. Cloves keep producing shoots for months.
27. Watercress
Watercress has a peppery, slightly bitter taste that livens up salads and sandwiches. Despite the name, you don’t need running water to grow it—just very moist soil and bright light. It’s one of the most nutrient-dense foods you can eat, packed with vitamins and minerals.
Watercress grows best in moist containers with drainage. Sow seeds on the surface and press lightly. Keep soil wet but not flooded. Place in bright light for 6–8 hours. Use shallow trays of water for steady moisture. Harvest stems at 4–6 inches; plants regrow fast.
Growing vegetables indoors in winter lets you enjoy fresh, nutritious greens year-round. With the right containers, light, and consistent care, even cold-season crops thrive inside.
Regular watering, proper spacing, and timely harvesting keep plants healthy and productive. Indoor gardening turns winter into a season of growth and flavor.
Khaja Moinuddin, a computer science graduate, finds joy in gardening and homesteading. Join him on this blog as he shares his experiences in homesteading, gardening, and composting
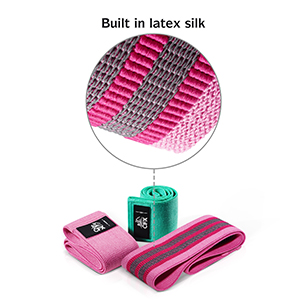
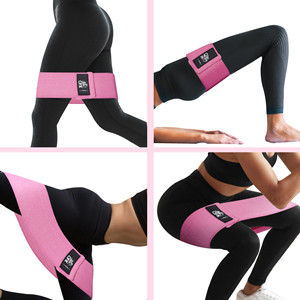
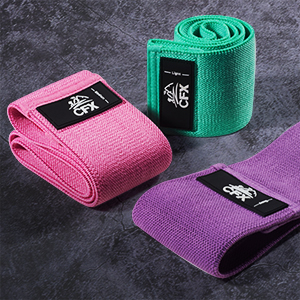
Price: $10.99 (as of Oct 14, 2025 10:59:46 UTC – Details)
Product description
Resistance Band Don’t Slip & Don’t Roll up
CFX resistance bands boast a wider, more comfortable fit , and feature anti-slip rubber layers to stop them sliding or rolling up.Resistance bands are the same size and different strength, suitable for all body shapes and sizes.
Booty Bands High Duality Elastic&Durability Design
Booty Bands built-in elastic natural latex liner increases the elasticity and durability of the tension bands. comfortable, durable, and elasticity and will NEVER BREAK.
Exercise bands Fits A Variety of Exercise
Exercise bands for women or men! You can do Pilates, Squats, Lunges, Glute Bridge, Donkey Kicks, Monster Walk, etc. Exercise band exercise your glutes, thighs, legs, abs, and shape your perfect curvy butt.
Workout bands Portable Compact Carrying Case
Workout bands Portable carry case makes it very easy for you to take it anywhere, help you save time and space,so that you never miss a workout, making them ideal for travelling or a busy life.
Exercise Bands Make a great Gift
Exercise Bands is the fitness gift for best choice. Exercise bands is a great Gift,for yourself and one for your friend, workout partner or spouse.
CFX ORIGINAL Resistance Bands
CFX Resistance bands are made from strongest, highest quality materials to ensure they are built to last. The user experience is always our focus.
Non-Slip, Durable And Comfortable Design: Resistance bands is sewn with high-quality cotton polyester stretch fabric,Resistance band is firm and soft, will not break and is comfortable when used.Resistance bands set built-in elastic natural latex liner increases the elasticity and durability of the tension bands. Non-slip, comfortable, durable, and elasticity are far better than traditional resistance band made of latex or rubber. Multi-Function: Exercise bands can exercise all parts of the buttocks, arm and leg muscles, abdomen, etc.The different training modes of the exercise bands can make your whole body stronger and continuously increase the athletic ability or muscle endurance and strength. Exercise band also suit for restores the body or increases mobility. Three Different Workout Bands Levels: Workout bands sets with 3 colors,same size and different strength.Workout band Provides more flexibility and more options for your exercise at different intensity levels, ensuring that met all your exercise goals and intensity levels. Whether you are a beginner or an experienced user, you can easily customize the training according to your strength,ability and comfort. Booty Bands Suitable for almost everyone: The most suitablee booty band length is 36cm, the most suitable three different tensions, you can do P90x, CrossFit, Yoga, Insanity, Pilates and Hot Yoga. resistance bands for women or men. Resistance Bands Lightweight Portable:CFX fabric resistance bands comes with a storage bag.The fitness bands occupies a small space and it can be easily carried with you.No matter where you are traveling, at home, gym, etc.You can also take resistance band with you on the way in the office, vacation, etc., or squat down anytime while watching TV at home.Also is a great Gift for You and your friend.
Customers say
Customers find these resistance bands well-made and durable, noting they don’t roll up or slip during use. The bands are effective for various workouts, including strength training and Jazzercise classes, and come in three different resistance levels. Customers appreciate their comfort, mentioning they don’t pinch or rub the skin, and consider them good value for money.
Preteens using increasing amounts of social media perform poorer in reading, vocabulary and memory tests in early adolescence compared with those who use no or little social media.
That’s according to a new study that suggests a link between social media use and poorer cognition in teens. The findings are published in JAMA.
“This is a really exciting study,” says psychologist Mitch Prinstein at the University of North Carolina at Chapel Hill, who wasn’t involved in the new research.
“It confirms a lot of what we have been hearing about from schools all across the country, which is that kids are just having a really hard time focusing on being able to learn as well as they used to, because of the ways in which social media has changed their ability to process information, perhaps.”
While most previous research has focused on the impact of social media use on kids’ mental health, “it’s critical to understand how social media use during school hours specifically affects learning, especially as so many schools are considering phone bans right now,” says study author and pediatrician Jason Nagata of the University of California, San Francisco.
A look at reading and memory
To understand that, Nagata and his colleagues used data from one of the largest ongoing studies on adolescents, called the Adolescent Brain Cognitive Development (ABCD) Study. Scientists have been following thousands of preteens as they go through adolescence to understand the development of their brains.
The ongoing study has been surveying kids about their social media use every year and giving them a range of tests for learning and memory every other year. Nagata and his colleagues used data on over 6,000 children, ages 9 to 10, as scientists followed them through early adolescence.
They classified the kids into three groups based on their evolving patterns of social media use. The biggest group, consisting of about 58% of the kids, used little or no social media over the next few years. The second-largest group, about 37% of kids, started out with low-level use of social media, but by the time they turned 13, they were spending about an hour each day on social media.
The remaining 6% of kids — called the “high increasing social media group” — were spending about three or more hours a day by age 13.
“The dosage effect”
All the groups were given a range of tests to measure their cognitive functioning at the start of the study and in early adolescence. For example, the oral reading recognition test examined their reading and vocabulary skills. Another test, called the picture vocabulary test, had them match the right pictures to words they heard.
“What was notable actually to me and perhaps surprising was that even the low [increasing] social media users, so those who had about one hour a day by age 13, did perform on average 1 to 2 points lower on the reading and memory tasks compared to the non-social media users,” says Nagata.
And the high increasing group performed up to 4 to 5 points lower than the non-social media users.
“So those who had the highest social media use have lower scores,” notes Nagata, “but even the low users had smaller differences in their cognitive scores.”
“That really speaks to the dosage effect of these [apps],” says psychologist Sheri Madigan at the University of Calgary, who wrote an accompanying editorial for the study. “It’s problematic at really high uses, but it’s also problematic at even in small doses.”
While a difference of a few points in test scores may seem insignificant, “it’s important to understand that kids are a moving target,” explains Prinstein, who is also chief of psychology strategy and integration at the American Psychological Association.
“Even a slight change in what they look like after a short period of time means that they’re kind of now pointed on a trajectory that is different from others. That means that two, three, five years from now, we might be talking about some very significant gaps between kids who might have been heavy users or not as heavy users.”
And other recent research shows that hours on social media increase later in adolescence, notes Nagata. “We would expect that when they hit age 15, 16, 17, their use will be much higher,” which might lead to even larger gaps in cognition and learning in later years, he adds.
In earlier studies, Nagata’s team has used the same data from the ABCD Study and found other disturbing trends among underage social media users.
They found that a majority of kids — nearly two-thirds — start using social media before they turn 13, with the average user having three social media accounts.
“Half the kids who had smartphones said that they lose track of how much time they’re using their phone,” says Nagata. “A quarter who are using social media say they use social media to forget about their problems. And 11% say that social media use has negatively affected their schoolwork.”
An important time for brain development
Adolescence is a critical period for brain development, notes Prinstein, when the brain is fine-tuning its architecture based on experiences.
“After the first year of life, the adolescent period is the time where we see the most growth and the biggest reorganization of the brain in our lifetimes,” he says.
In a recent study, Prinstein and his colleagues found that teens who are heavy social media users have brains that are more attuned to an existence on social media, with its “rapid, constant feedback,” says Prinstein. “What we’re finding is that kids become hypersensitive to the kinds of likes, comments, feedback and rewards they might get from peers.”
Those findings help explain the results of the new studies, he adds. “It makes perfect sense that if their brain is growing to be optimized for social media activities, it might not be optimized for other things they need to do, like we saw in the [new] study.”
The new study also “gives us good-enough evidence that we really need to create some policies that are really specific around creating age limits, for example, on social media apps,” says Madigan.
Denmark announced last week that it plans to enforce a social media ban for users under age 15, she notes. Australia is requiring social media companies to “take reasonable steps to prevent Australians under the age of 16 from creating or keeping an account” starting December 2025.
Madigan hopes other countries will take note. “I think that we’ll see a trickle effect on that. That’s going to be really beneficial for kids.”
There’s no need to fertilize in-ground plants unless they are growing slowly then you can feed once in spring and once in late summer with a cactus and succulent fertilizer.
Container-grown specimens benefit from an application of fertilizer in spring and late summer.
Species and Cultivars
I can’t even begin to cover all of the incredible hybrids, cultivars, and species that are available.
I highly recommend heading to your local nursery and see if they have any. If they do, it will likely include the first plant on our list:
Arizona
One of the most popular hybrids is the 18-inch-wide ‘Arizona,’ with its dark blue-green leaves dotted with white spikes on the margins.
It’s often the one that stores will carry, and is the parent of so many other fantastic hybrids, including ‘Feather Star’ and ‘White Fang.’
‘Arizona’ was bred by Bill Baker, who was an avid plant hunter and nurseryman. He created numerous hybrids, some of which are the most popular and respected out there.
Dawsonii
The bronze leaves of D. dawsonii are lined with hooked spines on plants that can grow up to a foot wide, producing yellow-orange flowers.
With a little extra sun, the leaves can even turn dark purple. The species is fairly rare in cultivation, but there are several cultivars and hybrids.
‘Brittle Star’ is a Bill Baker hybrid that’s wildly popular and takes after its dawsonii parent with dark purple, nearly black leaves. It also has D. fosteriana and D. platyphylla parentage.
Delicata
My heartfelt thanks goes out to the botanists who found D. delicata species in the high altitudes of southern Brazil in 1996. This is such a cool species.
The foliage forms a compact rosette, with leaves that curl downward into a spiky little orb. The tips of the leaves can even dig into the soil or hang below the rim of a container.
Foliage can be green, red, or gray, all covered in silver flocking. There’s also a striking gold form with yellow-gold foliage.
The long, pointed spines might look intimidating, but they’re surprisingly soft to the touch. Go ahead, this is one dyckia you can safely pet.
Fosteriana
This species has narrow, silvery-white leaves accented by heaps and heaps of spines along the edges. The leaves are exceptionally curvy and can drape below the rim if you grow it in a pot.
The plants stay small, growing to just about eight inches tall and a bit wider when mature. Another check in the “good for container cultivation” column.
They’re quick to mature and send out offsets, so you’ll be enjoying clusters of these plants in no time.
Look for varieties like nivosa, which matures at just about five inches across, or the rubra form, which turns a deep burgundy in bright light.
Goehringii
If you like your plants to be vicious, this species is for you. The margins of the leaves are lined with spines, and those spines are hooked at the ends.
Want to keep kids, pets, or pests out of the garden? Like the look of what one bromeliad forum user called “a bouquet full of razor wire?” Goehringii it is.
This species is also a good option if you want to propagate the pups.
They emerge on short stolons that hold the offsets away from the base of the mother plant, rather than clustered tightly around it.
Pineapple
Pineapple dyckia (D. brevifolia) certainly bears a resemblance to the plant from which it derives its common name. It has the same type of green, strappy leaves that give it a familiar look.
One notable hybrid is ‘Naked Lady,’ a cross between D. brevifolia and D. encholirioides. It features pale green to yellow foliage and grows up to a foot tall and even wider.
Since it lacks spines, this one is a good option for growing as a houseplant or for placing in high-traffic areas.
White
The botanical name D. marnier-lapostollei may be a mouthful, but the plant itself is undeniably stunning.
It has small, claw-like spines along the margins of gray-green leaves that appear nearly white thanks to a heavy coating of trichomes.
The leaves are deeply curved, often curling back beneath themselves or dipping below the rim of a container. They’re lined with spines that are relatively soft.
At maturity, the plant reaches about a foot tall and wide and produces flower spikes up to two feet tall topped with orange blooms. It grows well even in partial shade.
The species was named after Julien Marnier-Lapostolle of Grand Marnier liqueur fame, as the plant was discovered growing on one of his estates.
Wide Leaf
Known as wide-leaf dyckia, D. platyphylla has broader leaves than many other species, though each still tapers to a point.
The foliage is covered in stubby but sharp spines and dotted with silvery scales. In bright sun, the leaves can take on a bronze, red, or purple hue.
At maturity, plants reach about a foot tall and up to two feet wide, sending up tall stalks of yellow flowers.
To be perfectly accurate, it’s not entirely clear whether this plant is a true species or a hybrid. It was first described in 1970 by botanist and bromeliad expert Lyman Bradford Smith, based on a specimen collected by Bateman Foster.
But it has never been rediscovered in the wild, and some experts suspect it may be a hybrid.
The hybrid ‘Cherry Coke’ inherits its glossy leaves from D. platyphylla, while D. fosteriana contributes its tendency to shift color in the sun.
Bake the ultimate fudgy sweet potato brownies! They taste just like regular brownies but get a boost of nutrients and naturally sweet flavor from sweet potatoes. A must-bake recipe for brownie lovers!
Price: $59.99 - $46.80 (as of Oct 13, 2025 22:57:00 UTC – Details)
Product description
The video showcases the product in use.The video guides you through product setup.The video compares multiple products.The video shows the product being unpacked.
*Comes with a Midnight Black, Glacier Silver, Mystic Rose or Arctic Blue TPU strap as standard. Other straps must be purchased separately.
Xiaomi Smart Band 9
1 Glacier Silver
2 Midnight Black
3 Mystic Rose
4 Arctic Blue
IMPROVED DISPLAY BRIGHTNESS: With an AMOLED peak display brightness of 1200 nits, view data with ease even under direct sunlight. Equipped with a light sensor module, it accurately detects ambient light to automatically adjust screen brightness for more comfortable viewing ELEGANT DESIGN: For the first time, the Xiaomi Smart Band utilises aluminium alloy frames in different colours such as Midnight Black, Glacier Silver, Mystic Rose and Arctic Blue. Pair it with a range of stylish straps, allowing you to show off your individuality with every flick of your wrist HIGH-PRECISION SENSORS: The monitoring module has been significantly improved for more precise monitoring of workouts and overall health. Specifically, the latest generation sensors for: heart rate monitoring, Continuous blood oxygen saturation monitoring, Continuous stress monitoring, Breathing training, Female health management OVER 150 SPORTS MODES: Stay motivated with advanced algorithms covering metrics such as maximum oxygen consumption, recovery time, training results, load and more. Accurate tracking, no matter whether you’re cycling outdoors or sweating it out indoors LONG-LASTING BATTERY AND WATER RESISTANCE: Thanks to professional low-power consumption sensors and smart power consumption algorithms, Xiaomi Smart Band 9 has an extraordinary battery life of 21 days with regular use. In addition, it is water resistant and you can wear it while swimming: it withstands pressure equal to a depth of 50 meters
Customers say
Customers find the smart band to be a great cheap fitness watch option with good battery life and better quality than previous models. The display receives positive feedback, with one customer specifically praising the OLED screen. The functionality and step tracking receive mixed reviews, with some saying it does the job while others report poor step tracking. The accuracy of the heart rate monitor is also mixed, with several customers finding it inaccurate.
Price: $20.99 - $11.99 (as of Oct 13, 2025 10:50:52 UTC – Details)
From the brand
Pilates Bar Kits
150lbs Resistance Tube Bands
Elastic Resistance Bands
Ankle Bands with Cuffs
Gym Exercise Handles
How did we start?
The founder of RENRANRING is also a fitness expert who is determined to create a healthy life for users and restore physical vitality, so that you can enjoy health every day.
What makes our products different?
We have professional market research, design and testing personnel. Strictly select materials and pay attention to details and quality. Durable and service.
What makes us love it?
RENRANRING non latex resistance belt can be used at all ages. It is widely loved by users and is the perfect tool for exercising.
THE FIGURE OF 8 PROVIDES EFFECTIVE STRENGTH TRAINING : arms, back, shoulders, legs and hips are exercised at once with an active band, ideal for body stretching, resistance training, yoga and physical therapy, helping to strengthen torn ligaments or muscles RECOMMENDED FOR USE WITH RENRANRING PHYSICAL THERAPY BANDS: Ideal for people with leg, knee and back injuries and to help recover from torn MCL and ACL, knee replacement, patella and meniscus rehabilitation. Also great for women to use during pregnancy and after childbirth to keep their bodies in shape 3 PIECE ICON 8 RESISTANCE BAND SET: Arm bands for workout available in 3 resistance levels: yellow 20 lbs, blue 30 lbs, red 40 lbs. Soft rubber grip for added comfort and secure grip WORKOUT ANYWHERE ANYTIME: Our figure 8 tube comes with a premium packaging bag that makes it easy to take anywhere. Get a great resistance band at home, at the gym or in the office SAFE, DURABLE, PORTABLE: Our figure 8 resistance bands are made from a healthy, strong latex material that is flexible and toughness, with no risk of breaking. Easily correct posture and shape your body
Customers say
Customers find the resistance bands well-made, easy to use, and effective for strength training, particularly for arms and leg stretches. They appreciate the three different resistance levels and consider them good value for money. However, durability is a concern as multiple customers report the bands breaking during use. Comfort is mixed, with some finding them comfortable while others mention they hit their chest and neck.


 1.62″ Amoled Display | 233 mAh Battery | up to 21 Days of Battery Life | Over 150 Workout Modes | BT 5.4 | 50M Water Resistant – Midnight Black")


")


 1.62″ Amoled Display | 233 mAh Battery | up to 21 Days of Battery Life | Over 150 Workout Modes | BT 5.4 | 50M Water Resistant – Glacier Silver")