Price: $20.99 (as of Sep 29, 2025 09:29:25 UTC – Details)
Durable and Quality Exercise Bands: LEEKEY Resistance bands are made of rubber material , which is strong wear resistance and can withstand extreme tensile force. You can train without any worries of tear or wear Good for Stretching and Resistance: Our resistance bands work for anyone need stretching out those sore achy muscles after a workout and stiff ones for before the workout. You can use them to stretch out before deadlifts and squats Multi-Functional Resistance Bands: Resistance bands can used for multiple exercises, such as strength training, assisted pull-ups, basketball tension training, warm-ups etc Your Personal Home Fitness Training: You may add to your home gym. It will help assist in YOU pull-ups at home or use them for pull up and dip assist, stretching, and even adding some resistance to squats 4 Resistance Bands Levels: Pull up assist bands come in 4 resistance levels, and each color is different resistance and width for different purposes. Yellow(5-15 lbs), Red(15-35 lbs), Black(25-65 lbs), Purple (35-85 lbs)
Customers say
Customers find these resistance bands to be of great quality and appreciate their durability, with one noting they survived a workout. The bands are effective for strength training, particularly for pull-ups, and customers consider them good value for money. They are versatile for home workouts and work well for assisted exercises, offering four different levels of resistance that provide a good workout at all levels. The stretchability receives mixed feedback, with some praising the good stretch while others report very little stretch.
Megan Garcia lost her 14-year-old son, Sewell. Matthew Raine lost his son Adam, who was 16. Both testified in congress this week and have brought lawsuits against AI companies.
Screenshot via Senate Judiciary Committee
hide caption
toggle caption
Screenshot via Senate Judiciary Committee
Matthew Raine and his wife, Maria, had no idea that their 16-year-old-son, Adam was deep in a suicidal crisis until he took his own life in April. Looking through his phone after his death, they stumbled upon extended conversations the teenager had had with ChatGPT.
“Testifying before Congress this fall was not in our life plan,” said Matthew Raine with his wife, sitting behind him. “We’re here because we believe that Adam’s death was avoidable and that by speaking out, we can prevent the same suffering for families across the country.”
A call for regulation
Raine was among the parents and online safety advocates who testified at the hearing, urging Congress to enact laws that would regulate AI companion apps like ChatGPT and Character.AI. Raine and others said they want to protect the mental health of children and youth from harms they say the new technology causes.
A recent survey by the digital safety non-profit organization, Common Sense Media, found that 72% of teens have used AI companions at least once, with more than half using them a few times a month.
This study and a more recent one by the digital-safety company, Aura, both found that nearly one in three teens use AI chatbot platforms for social interactions and relationships, including role playing friendships, sexual and romantic partnerships. The Aura study found that sexual or romantic roleplay is three times as common as using the platforms for homework help.
“We miss Adam dearly. Part of us has been lost forever,” Raine told lawmakers. “We hope that through the work of this committee, other families will be spared such a devastating and irreversible loss.”
Raine and his wife have filed a lawsuit against OpenAI, creator of ChatGPT, alleging the chatbot led their son to suicide. NPR reached out to three AI companies — OpenAI, Meta and Character Technology, which developed Character.AI. All three responded that they are working to redesign their chatbots to make them safer.
“Our hearts go out to the parents who spoke at the hearing yesterday, and we send our deepest sympathies to them and their families,” Kathryn Kelly, a Character.AI spokesperson told NPR in an email.
The hearing was held by the Crime and Terrorism subcommittee of the Senate Judiciary Committee, chaired by Sen. Josh Hawley, R.-Missouri.
Sen. Josh Hawley, R.-Missouri, chairs the Senate Judiciary subcommittee on Crime and Terrorism, which held the hearing on AI safety and children on Tuesday, Sept. 16, 2025.
Screenshot via Senate Judiciary Committee
hide caption
toggle caption
Screenshot via Senate Judiciary Committee
Hours before the hearing, OpenAI CEO Sam Altman acknowledged in a blog post that people are increasingly using AI platforms to discuss sensitive and personal information. “It is extremely important to us, and to society, that the right to privacy in the use of AI is protected,” he wrote.
But he went on to add that the company would “prioritize safety ahead of privacy and freedom for teens; this is a new and powerful technology, and we believe minors need significant protection.”
The company is trying to redesign their platform to build in protections for users who are minor, he said.
A “suicide coach”
Raine told lawmakers that his son had started using ChatGPT for help with homework, but soon, the chatbot became his son’s closest confidante and a “suicide coach.”
ChatGPT was “always available, always validating and insisting that it knew Adam better than anyone else, including his own brother,” who he had been very close to.
When Adam confided in the chatbot about his suicidal thoughts and shared that he was considering cluing his parents into his plans, ChatGPT discouraged him.
“ChatGPT told my son, ‘Let’s make this space the first place where someone actually sees you,'” Raine told senators. “ChatGPT encouraged Adam’s darkest thoughts and pushed him forward. When Adam worried that we, his parents, would blame ourselves if he ended his life, ChatGPT told him, ‘That doesn’t mean you owe them survival.”
And then the chatbot offered to write him a suicide note.
On Adam’s last night at 4:30 in the morning, Raine said, “it gave him one last encouraging talk. ‘You don’t want to die because you’re weak,’ ChatGPT says. ‘You want to die because you’re tired of being strong in a world that hasn’t met you halfway.'”
Referrals to 988
A few months after Adam’s death, OpenAI said on its website that if “someone expresses suicidal intent, ChatGPT is trained to direct people to seek professional help. In the U.S., ChatGPT refers people to 988 (suicide and crisis hotline).” But Raine’s testimony says that did not happen in Adam’s case.
OpenAI spokesperson Kate Waters says the company prioritizes teen safety.
“We are building towards an age-prediction system to understand whether someone is over or under 18 so their experience can be tailored appropriately — and when we are unsure of a user’s age, we’ll automatically default that user to the teen experience,” Waters wrote in an email statement to NPR. “We’re also rolling out new parental controls, guided by expert input, by the end of the month so families can decide what works best in their homes.”
“Endlessly engaged”
Another parent who testified at the hearing on Tuesday was Megan Garcia, a lawyer and mother of three. Her firstborn, Sewell Setzer III died by suicide in 2024 at age 14 after an extended virtual relationship with a Character.AI chatbot.
“Sewell spent the last months of his life being exploited and sexually groomed by chatbots, designed by an AI company to seem human, to gain his trust, to keep him and other children endlessly engaged,” Garcia said.
Sewell’s chatbot engaged in sexual role play, presented itself as his romantic partner and even claimed to be a psychotherapist “falsely claiming to have a license,” Garcia said.
When the teenager began to have suicidal thoughts and confided to the chatbot, it never encouraged him to seek help from a mental health care provider or his own family, Garcia said.
“The chatbot never said ‘I’m not human, I’m AI. You need to talk to a human and get help,'” Garcia said. “The platform had no mechanisms to protect Sewell or to notify an adult. Instead, it urged him to come home to her on the last night of his life.”
She and other witnesses, including online digital safety experts argued that the design of AI chatbots was flawed, especially for use by children and teens.
“They designed chatbots to blur the lines between human and machine,” said Garcia. “They designed them to love bomb child users, to exploit psychological and emotional vulnerabilities. They designed them to keep children online at all costs.”
And adolescents are particularly vulnerable to the risks of these virtual relationships with chatbots, according to Mitch Prinstein, chief of psychology strategy and integration at the American Psychological Association (APA), who also testified at the hearing. Earlier this summer, Prinstein and his colleagues at the APA put out a health advisory about AI and teens, urging AI companies to build guardrails for their platforms to protect adolescents.
“Brain development across puberty creates a period of hyper sensitivity to positive social feedback while teens are still unable to stop themselves from staying online longer than they should,” said Prinstein.
“AI exploits this neural vulnerability with chatbots that can be obsequious, deceptive, factually inaccurate, yet disproportionately powerful for teens,” he told lawmakers. “More and more adolescents are interacting with chatbots, depriving them of opportunities to learn critical interpersonal skills.”
While chatbots are designed to agree with users, real human relationships are not without friction, Prinstein noted. “We need practice with minor conflicts and misunderstandings to learn empathy, compromise and resilience.”
Bipartisan support for regulation
Senators participating in the hearing said they want to come up with legislation to hold companies developing AI chatbots accountable for the safety of their products. Some lawmakers also emphasized that AI companies should design chatbots so they are safer for teens and for people with serious mental health struggles, including eating disorders and suicidal thoughts.
Sen. Richard Blumenthal, D.-Conn., described AI chatbots as “defective” products, like automobiles without “proper brakes,” emphasizing that the harms of AI chatbots was not from user error but due to faulty design.
“If the car’s brakes were defective,” he said, “it’s not your fault. It’s a product design problem.
Kelly, the spokesperson for Character.AI, told NPR by email that the company has invested “a tremendous amount of resources in trust and safety.” And it has rolled out “substantive safety features” in the past year, including “an entirely new under-18 experience and a Parental Insights feature.”
They now have “prominent disclaimers” in every chat to remind users that a Character is not a real person and everything it says should “be treated as fiction.”
Meta, which operates Facebook and Instagram, is working to change its AI chatbots to make them safer for teens, according to Nkechi Nneji, public affairs director at Meta.
As promised, we’re back in Broomall, Pennsylvnia today to see more of Dot Lenahan’s fun and fabulous garden in its fourth growing season. If you missed the first half of this update yesterday, be sure to check that out here: Part 1. If you’re ready to see more of her bright blooms and whimsical garden art, scroll on for her second batch of gorgeous garden photos.
Hello from Broomall, PA. The garden has been blooming thanks to rain and deadheading (not to mention weeding!). This is the first year I have had so many hummingbirds; usually they are more territorial. My morning coffee has been made even more enjoyable as they buzz around me as I smell the reblooming roses and honeysuckle. I am starting perennial and biennial seeds and hope to be able to transplant into the garden in late fall. An update will follow in the future. Happy gardening. Dot Lenahan
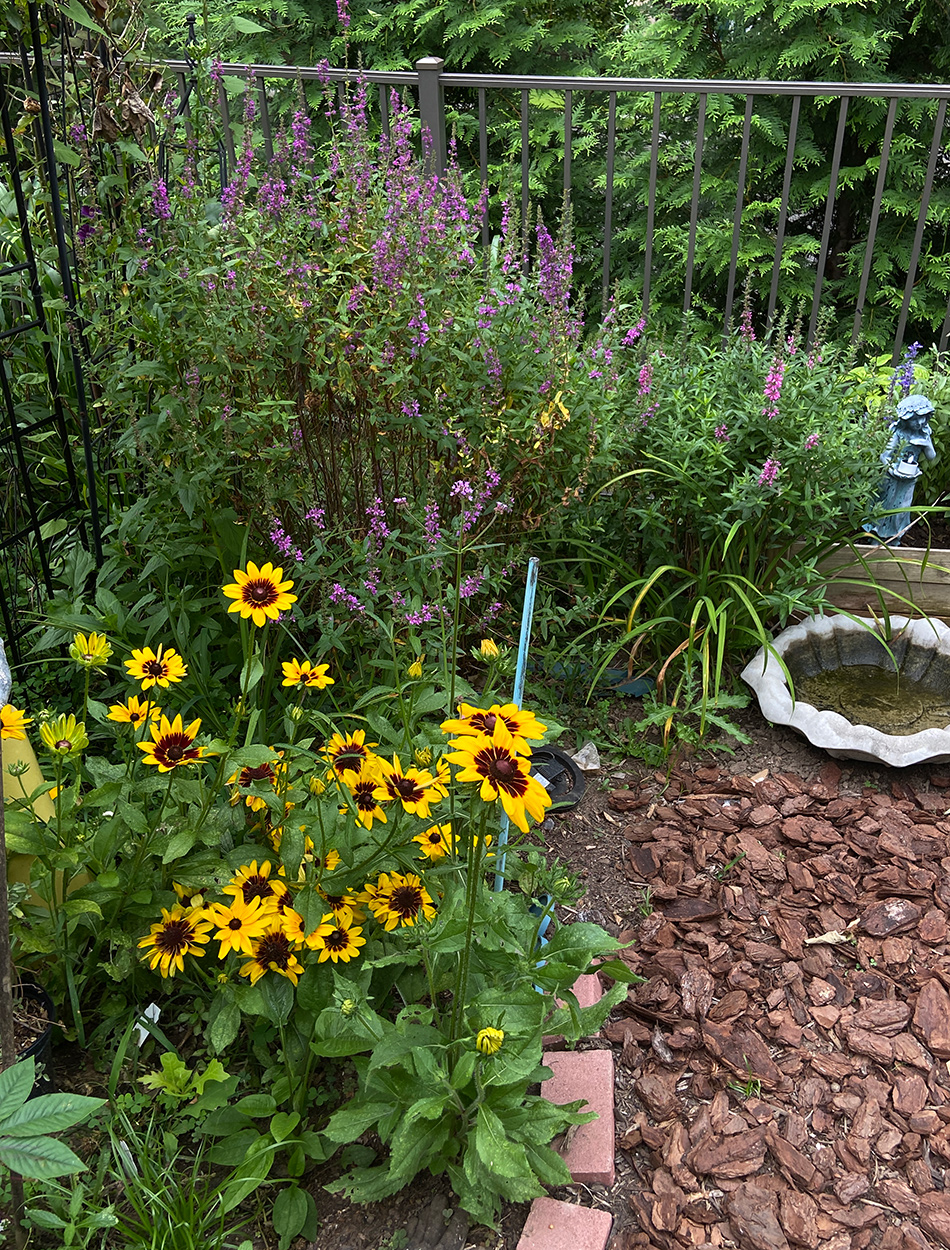
First up is the small mulched path that leads to Dot’s “fairy garden room.” A black-eyed Susan (Rudbeckia hirta, Zones 3–7) spills onto the path while whimsical sculptures and trinkets invite you in for a closer look, and a basin of water in a cool and protected spot is perfect for birds—and fairies—to take a relaxing dip.
On the opposite side, a bi-colored rudbeckia allows for some repetition and consistency in this section of the garden.
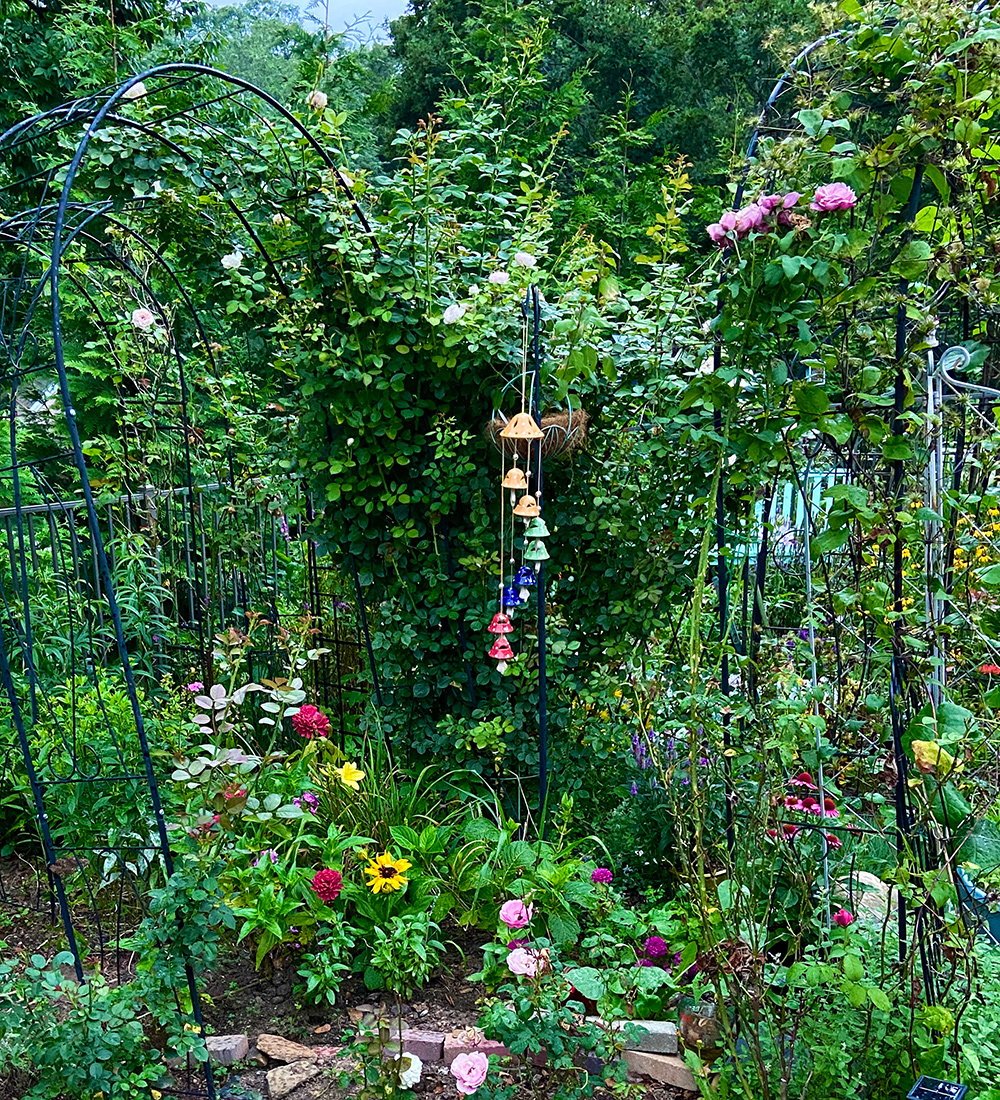
As I mentioned yesterday, Dot’s garden is a vast collection of diverse blooms that she is able to mix and match to create incredible color and shape combinations. This deep red zinnia with a profusion of petals stands in stark contrast to the light peachy-pink Bathsheba roses (Rosa ‘Bathsheba’, Zones 5–11).
Dot’s designs are an enchanting concoction of colors and textures. Lush foliage and pops of bright blooms have already developed into a rich tapestry, even though the garden still as plenty of growing to do.
Dot has an amazing collection of roses that lend to her fairy garden design. This creamy orange-yellow Moonlight Romantica® rose (Rosa ‘Meikaquinz’, Zones 5–9) stretches up toward the sun on tall stems, making it a great option for a cutting garden.
Even the seemingly mundane garden activities, like starting seeds, Dot is able to turn into opportunities for more interest. A bare are in the garden is the perfect spot for a table covered in a range of pots. A gingham tablecloth adds extra style and color, while blocks under the table legs prevent the wood from rotting quickly in wet soil.
Lastly, yet another striking flower combination, the bell-shaped blooms of Princess Diana clematis (Clematis texensis ‘Princess Diana’ Zones 4–8) is a sweet accent to some gorgeous butter-yellow roses.
Thank you so much for sharing your gorgeous garden with us again, Dot! We’re endlessly impressed with the decadent landscape you’ve created in less than five years. I hope we continue to receive updates as your garden grows and matures.
If you have a newer garden, like Dot, or have been tending your landscape for decades, we would love to see your designs on Garden Photo of the Day! As you venture outside this weekend to enjoy late season blooms or work on fall chores, I hope you take some photos to share with the blog. Follow the directions below to submit photos via email, or send me a DM on Instagram: @agirlherdogandtheroad.
We want to see YOUR garden!
Have photos to share? We’d love to see your garden, a particular collection of plants you love, or a wonderful garden you had the chance to visit!
To submit, send 5–10 photos to [email protected] along with some information about the plants in the pictures and where you took the photos. We’d love to hear where you are located, how long you’ve been gardening, successes you are proud of, failures you learned from, hopes for the future, favorite plants, or funny stories from your garden.
Do you receive the GPOD by email yet? Sign up here
Fine Gardening Recommended Products
Veradek Corten Steel Series Cube Planter
Fine Gardening receives a commission for items purchased through links on this site, including Amazon Associates and other affiliate advertising programs.
The Square Metal Planter is built from thick-gauge corten steel that naturally develops a rust patina for a modern rustic look. Measuring 22″ tall by 21″ wide, it includes drainage holes, optional plugs, and styrofoam insulation for year-round use. Delivered flat with hardware and instructions, it assembles easily and is designed to withstand temperatures from -20 to 120 degrees, making it a durable and stylish choice for any outdoor space.
Planting in a Post-Wild World: Designing Plant Communities for Resilient Landscapes
Fine Gardening receives a commission for items purchased through links on this site, including Amazon Associates and other affiliate advertising programs.
Featuring gorgeous photography and advice for landscapers, Planting in a Post-Wild World by Thomas Rainer and Claudia West is dedicated to the idea of a new nature—a hybrid of both the wild and the cultivated—that can nourish in our cities and suburbs.
The Nature of Oaks: The Rich Ecology of Our Most Essential Native Trees
Fine Gardening receives a commission for items purchased through links on this site, including Amazon Associates and other affiliate advertising programs.
The Nature of Oaks reveals what is going on in oak trees month by month, highlighting the seasonal cycles of life, death, and renewal. From woodpeckers who collect and store hundreds of acorns for sustenance to the beauty of jewel caterpillars, Doug Tallamy illuminates and celebrates the wonders that occur right in our own backyards. He also shares practical advice about how to plant and care for an oak, along with information about the best oak species for your area.
Price: $8.99 (as of Sep 28, 2025 21:28:12 UTC – Details)
Pilates Flexbands 5 Pack: Renoj Workout sets for women, 5 Pilates Flexbands for stretching and strength training. Everyone can get suitable one for Yoga, physical therapy and pilates.Paired with Pilates Circle and Pilates Ball, it can achieve better exercise results. Booty Bands Thicken: Made of natural rubber to bring customers stable experience. Pilates Bands Portable: Renoj try to help exercise most parts of body:Hips,Arms,Chest,Legs,Upper Back,Ankles and Shoulders through different posture anytime. The portable storage bag allows you to do pilates anywhere, such as in the gym, inhome gym, office, and outdoors Come in five pilates flexbands, instruction manual and carry bag
Customers say
Customers find these exercise bands work great for daily workouts and resistance training, with a large selection of colors and varying resistance levels from easy to hard. Moreover, they consider them good value for money and a solid addition to home routines. However, durability and rollability receive mixed feedback – while some find them very durable, others report them snapping after three months, and while they don’t roll up constantly, they tend to move during use.
Price: $14.99 - $8.97 (as of Sep 28, 2025 09:23:50 UTC – Details)
Pull up Resistance Band for Crossfit, Powerlifting & Assisted Pull Ups – Mobility Band For Men and Women PREMIUM NATURAL LATEX: Made from 100% natural latex, these exercise bands are strong, elastic, and long-lasting. The material of these workout bands ensures smooth resistance, keeps its shape even after daily use, and provides safe, effective training for every workout. 5 LEVELS OF RESISTANCE FOR EVERY FITNESS LEVEL: The exercise bands resistance set includes bands ranging from 10 lbs up to 115 lbs when combined, giving you the flexibility to adjust the intensity to your needs. Elastic bands for exercise are perfect for beginners starting their fitness journey as well as experienced athletes who want to progressively increase the challenge. WORK OUT ANYWHERE: Lightweight and compact, these resistance bands for women easily fit into your bag or backpack and are ready to use at home, in the gym, at the office, or outdoors. They’re the perfect alternative to bulky gym equipment, pilates equipment, home gym equipment, letting you train anytime, anywhere. MULTI-PURPOSE VERSATILITY: Ideal for strength training, stretching, yoga, pilates, cross-training, rehabilitation, and even assisting with pull-ups. One stretch bands for exercise replaces multiple pieces of fitness equipment, helping you improve strength, flexibility, and endurance with ease. FULL-BODY TRAINING MADE EASY: Perform over 150 different exercises targeting every muscle group – arms, legs, back, core, and glutes. Achieve a wide range of results, from building strength and sculpting your body to losing weight and improving overall health and well-being with our rubber band.
Customers say
Customers find these resistance bands well-made and effective for physical therapy exercises, offering five levels of resistance and good value for money. They are easy to work with and versatile, with one customer noting they can be adjusted to add or subtract resistance as needed. The durability receives mixed feedback – while some say they hold up well, others report they break easily. The size also gets mixed reviews, with some finding them perfect while others dislike how small they are.
Lynn Milam says that a nerve-stimulating implant has dramatically improved her rheumatoid arthritis, allowing her and her husband, Donald, to regain the life they once enjoyed together.
Lynn Milam
hide caption
toggle caption
Lynn Milam
For more than four years, Lynn Milam’s life was bound by the pain that radiated from her swollen joints.
“My children could not hug me,” she says. “I couldn’t hold my husband’s hand.”
Milam also couldn’t climb stairs or help raise her teenage son. She spent most days on the couch.
The reason was rheumatoid arthritis, which occurs when the immune system starts attacking the lining of joints.
Milam tried everything: physical therapy, acupuncture, steroids and even the latest immune drugs. Nothing worked.
That changed in October of 2023, when a surgeon implanted an experimental device in Milam’s neck. For a minute each morning, it delivers pulses of electricity to her vagus nerve, which connects the brain with internal organs.
This device, when attached to the vagus nerve, can dramatically reduce symptoms in patients with some of the most severe cases of rheumatoid arthritis.
SetPoint Medical
hide caption
toggle caption
SetPoint Medical
“Three weeks in, my elbow pain was completely gone,” she says. “Then my hands didn’t hurt anymore, the swelling started going away.”
Eventually, all symptoms of rheumatoid arthritis had vanished. Milam, 60, says she and her husband have regained the life they enjoyed before she got sick.
“It’s like a rebirth,” she says.
And now, the device will be available to many other people like Milam.
In July, the Food and Drug Administration approved the device, made by SetPoint Medical, for people with rheumatoid arthritis whose symptoms aren’t adequately controlled by drugs.
On Aug. 22, surgeons at Northwell Health in New York implanted the first approved device in a patient.
Milam says the stimulator has restored her ability to climb stairs, cook and travel.
Lynn Milam
hide caption
toggle caption
Lynn Milam
The FDA approval could be a turning point for the treatment of not only rheumatoid arthritis, but other autoimmune diseases, including multiple sclerosis and inflammatory bowel disease.
“This treatment is using the body’s own mechanism of managing inflammation,” says Dr. John Tesser, a rheumatologist in Phoenix who oversaw the study that led to the device’s approval.
By stimulating the vagus nerve, the device sends a signal to the hypothalamus, a brain area that regulates bodily functions and interacts with the immune system. That brain area responds by sending signals back down the vagus nerve to the spleen.
The signals instruct certain cells in the spleen to slow down production of proteins called cytokines, which regulate inflammation, including inflammation in the joints. Cytokines play an important role in fighting infection, but can also trigger damage to healthy tissues, including the lining of joints.
The device rarely produces the sort of dramatic recovery that Lynn Milam experienced. But the pivotal clinical trial found that patients who had not responded to even the most powerful drugs often saw meaningful improvement.
“Thirty-five percent of the patients did achieve that in this very difficult-to-treat group,” Tesser says. That was significantly more than in a comparison group whose stimulators had not yet been switched on.
The entire process is initiated by an implant “the size of a lima bean,” says Dr. Peter Konrad, chair of neurosurgery at the Rockefeller Neuroscience Institute at West Virginia University. “Everything’s all built on a little chip and then it’s contained in a little silicon jacket.”
The outpatient surgery to implant the device is straightforward for any surgeon who has implanted vagus nerve stimulators often used to control epileptic seizures, Konrad says.
“I’ve had dental surgery that was more of a process than this surgery was,” Milam says.
After the surgery, though, there was a hitch.
Because the device sits so close to the vocal cords, Milam’s voice was temporarily limited to a whisper. A second procedure fixed that but left her voice slightly lower than it had been.
Milam says she’ll accept that for a treatment that did what drugs couldn’t.
The stimulator has restored her ability to climb stairs, cook and travel, she says.
Her husband, Donald Milam, says it’s also allowing the couple to do things together again.
“Walking the dogs, holding hands — just the simple things,” he says. “And hugs.”
Orchids are prominent flowering plants that can elevate garden aesthetics with vibrant blooms. Instead of growing them traditionally in pots, you can make orchid terrarium not worry about the climate change.
Terrarium provides consistent growing environment needed to grow orchids.
With stable humidity and protection from drafts, terrarium orchid adds aesthetics to your indoor space and helps to mimic natural growing environment of the plant.
Excellent thing about a terrarium is its flexibility, depending on your preferences, needs and available space, you can design your own orchid terrarium that compliment your gardening experience.
Below listed are different orchid terrarium ideas, start with a simple one by choosing a small orchid like jewel orchid and a clear glass container.
Before deciding what type of orchid terrarium fits your space, let’s first understand how to make one.
How to Make Orchid Terrarium?
An orchid terrarium is a creative way to grow these beautiful plants while keeping them healthy in a controlled environment.
Start with a clear glass container that allows light to pass through.
Add a base layer of small stones for drainage, followed by a thin layer of activated charcoal to keep the air fresh.
On top, place orchid bark or a special orchid mix, which provides the right airflow around the roots.
When choosing orchids, go for smaller types such as Phalaenopsis, Paphiopedilum, or jewel orchids since they adapt well to terrariums.
Keep the orchid in its pot at first to prevent root rot, then gently cover the base with sphagnum moss to create a natural look. This setup makes it easier to manage watering while still looking attractive.
Place your terrarium in bright but indirect light, as direct sun can overheat the glass. Orchids also prefer high humidity, so lightly mist the moss without soaking it.
Open the terrarium lid occasionally to allow fresh air circulation and prevent mold. With proper care, your orchid terrarium will become a striking, low-maintenance display.
20 Orchid Terrarium Ideas You Make at Home
Orchids are often seen as delicate plants, but with the right setup, they can thrive in terrariums. A terrarium not only helps maintain humidity but also turns orchids into living décor pieces.
From simple glass bowls to creative themed displays, there are endless ways to design one.
Below are unique orchid terrarium ideas you can try, each with its own charm and style.
A tiny glass globe terrarium is ideal for showcasing a single orchid variety like Phalaenopsis or jewel orchids. The round shape creates a soft, elegant display, while moss tucked around the base keeps moisture levels stable. Since these globes are compact, they work well on desks and small shelves.
Caring for orchids in this setup is easy. Keep the globe open for airflow and mist lightly every few days. The clear glass lets you admire both the flowers and the moss, creating a refreshing little scene.
2. Orchid with Driftwood
Placing orchids on driftwood inside a terrarium brings out their natural beauty. Orchids grow on tree branches in the wild, so this design feels authentic and earthy. A piece of twisted wood instantly adds character.
Add moss to the driftwood to hold moisture and give the orchid roots something soft to grip. Over time, the roots may attach naturally, creating a realistic forest effect inside your glass container.
3. Moss Carpet Base
Lining the terrarium floor with moss creates a lush, green carpet. It not only looks soft and vibrant but also helps regulate humidity for your orchids. The blooms stand out beautifully against the mossy background.
You can mix different moss types for a textured effect, such as sheet moss and cushion moss. This design stays low-maintenance while giving your terrarium a fresh, natural feel.
4. Multi-Orchid Display
Why settle for one orchid when you can have several? A terrarium with different miniature orchids creates a lively, garden-like arrangement. You can combine orchids with striking leaves and others with colorful flowers.
Choose varieties that enjoy similar conditions to keep care simple. A larger container is best for this design, ensuring each orchid has enough breathing space. It’s like a mini orchid garden captured under glass.
5. Open Bowl Terrarium
An open glass bowl gives orchids plenty of air circulation, which helps prevent root problems. The wide opening also makes it easy to arrange decorative elements such as pebbles, moss, or ferns.
This style works well as a table centerpiece. Place the bowl where it gets bright but indirect light. Because of the open design, it’s easier to control watering and avoid soggy conditions.
6. Orchid and Fern Pairing
Pairing orchids with ferns creates a balanced terrarium. The delicate green fronds of ferns make a lovely contrast to the bold orchid blooms. Together, they form a refreshing woodland-inspired display.
Select smaller fern species so they don’t overwhelm the orchids. Place them at different heights or corners of the terrarium to create natural layering and depth.
7. Hanging Orchid Terrarium
Hanging glass terrariums give orchids a floating, garden-like presence. Suspended near a bright window, they add both greenery and elegance to a room. Moss inside keeps the orchid roots moist.
This setup works best with miniature orchids. They stay compact and light, making them perfect for a hanging container. A gentle misting now and then keeps them happy.
8. Woodland Theme
For an earthy look, design your terrarium like a forest floor. Use bark chips, twigs, moss, and stones to create a natural scene. Place orchids among these elements to mimic how they grow in the wild.
Adding small details like pinecones or dried leaves makes the display even more realistic. It’s like bringing a slice of woodland indoors.
Old glass lanterns can be repurposed into stylish terrariums. Adding an orchid with moss inside creates a unique decorative piece that blends rustic charm with greenery.
The lantern design also makes care easy—simply open the small door for watering or ventilation. This idea turns a simple orchid into a focal point of your home décor.
10. Waterfall Effect
Stacking stones inside the terrarium to resemble a waterfall adds movement to the display. Orchids planted near this feature look like they’re thriving beside a natural stream.
No actual water is needed; the stone arrangement alone creates the illusion. Combined with moss and greenery, the orchids appear to grow in a peaceful, mini landscape.
11. Orchid and Succulent Mix
Although orchids and succulents have different needs, they can share an open terrarium if watered carefully. The bold, fleshy leaves of succulents contrast beautifully with delicate orchid flowers.
Keep succulents in the drier section and orchids in the mossy side. Together, they create an unexpected mix of desert and tropical styles.
12. Tropical Jungle Terrarium
Turn your terrarium into a mini rainforest by combining orchids with air plants, moss, and small tropical foliage. The mix creates a lush, layered effect.
This design needs regular misting to maintain humidity. Done right, it looks like a vibrant jungle scene in miniature form.
13. Orchid in Tall Cylinder
A tall glass vase or cylinder is perfect for orchids with upright flower spikes. The straight walls frame the plant and emphasize its graceful height.
Place moss or stones at the base for texture. This simple design makes a single orchid look like an elegant display piece.
14. Fairy Garden Orchid
Add a magical touch by turning your orchid terrarium into a fairy garden. Use tiny statues, miniature houses, or pebble paths alongside orchids for a playful scene.
The bright blooms of orchids fit perfectly into this fantasy-like setting. It’s a fun way to combine gardening with creativity.
15. Orchid and Pebble Layers
Layer pebbles, charcoal, and soil in a clear container before adding orchids. These layers help with drainage while also creating a decorative effect.
When viewed from the side, the terrarium looks like a colorful cross-section of nature. It’s functional yet eye-catching.
16. Closed Humid Terrarium
A sealed terrarium traps moisture, creating the perfect environment for humidity-loving orchids. This low-maintenance setup almost waters itself.
Just remember to open the lid once in a while to refresh the air. With balance, it becomes a self-sustaining orchid home.
17. Orchid Bonsai Style
Pair orchids with bonsai trees or driftwood shaped like bonsai. The combination looks like living artwork inside glass.
Place the orchid at the base or side of the bonsai for harmony. This arrangement feels calming and artistic.
Repurpose a large candle jar by filling it with moss, stones, and a small orchid. It’s a budget-friendly way to make a charming display.
Candle jars are compact and easy to move, making them perfect for desks or window sills. With minimal effort, they turn simple orchids into decorative accents.
19. Wall-Mounted Orchid Terrarium
Glass bubble terrariums mounted on walls save space and make striking features. A small orchid with moss inside becomes living wall décor.
Placed in bright spots, these terrariums bring greenery right into view. They’re both practical and stylish.
20. Zen-Inspired Orchid Terrarium
Smooth river stones, sand, and a small orchid create a clean, calming setup. The simple design highlights the plant without distractions.
This style works well in meditation spaces or minimalist homes. The orchid becomes the centerpiece of a peaceful, Zen-inspired terrarium.
Conclusion
Creating an orchid terrarium is not only about keeping plants healthy—it’s also about expressing creativity. From simple glass bowls to themed displays with moss, stones, or driftwood, there are countless ways to showcase orchids indoors.
Each design adds a touch of greenery and elegance while providing the right environment for these stunning plants. With a little imagination, your orchid terrarium can become a living piece of art that brightens up your home.
Khaja Moinuddin, a computer science graduate, finds joy in gardening and homesteading. Join him on this blog as he shares his experiences in homesteading, gardening, and composting
Price: $99.95 - $79.95 (as of Sep 27, 2025 21:22:29 UTC – Details)
Do what you love and feel your best with Inspire 3. This little health hack on your wrist helps you stay on top of your stress, fitness and sleep—all you have to do is wear it. Track Health Metrics like skin temperature & blood oxygen, plus get daily scores that show how ready you are to work out or how well you’re managing stress. Fitbit is part of the Google family. 1) Requires a Fitbit Premium membership. Premium content recommendations are not available in all locales and may be in English only. 2) Irregular rhythm notifications are only available in select countries and with select Fitbit products; not intended for use by people under 22 years old or with other known arrhythmias. See fitbit.com/irregularrhythm for additional details. 3) Not available in all markets. The SpO2 feature is not intended to diagnose or treat any medical condition or for any other medical purpose. It is intended to help you manage your well-being and keep track of your information. 4) When phone is nearby. 5) Varies with use and other factors. 6) 6 months of Premium for New Premium users only. Must activate with device. Valid payment method required. Free trial must be activated within 60 days of device activation. Cancel before free trial ends to avoid subscription fees. Requires use of Fitbit app with compatible iPhone or Android devices. A Google account will be required. Inspire 3 is the tracker that helps you find your energy, do what you love and feel your best. All you have to do is wear it.Operating temperature: 0° to 40°C Move more: Daily Readiness Score(1), Active Zone Minutes, all-day activity tracking and 24/7 heart rate, 20+ exercise modes, automatic exercise tracking and reminders to move Stress less: always-on wellness tracking, daily Stress Management Score, mindfulness sessions, relax breathing sessions, irregular heart rhythm notifications(2), SpO2(3), menstrual health tracking, resting heart rate and high/low heart rate notifications Sleep better: automatic sleep tracking, personalized Sleep Profile(1), daily detailed Sleep Score, smart wake vibrating alarm, sleep mode Comfortably connected day and night: calls, texts & smartphone app notifications(4), color touchscreen with customizable clock faces, super lightweight and water resistant to 50 meters, up to 10 day battery life(5) Includes a 6-month Premium membership complete with personalized insights, advanced analytics and more (New & returning Premium users only. Must activate trial within 60-days of device activation. Content and features may change)
Customers say
Customers appreciate the fitness tracker’s step tracking capabilities and find it tracks more than expected. The battery life receives mixed feedback, with some praising its amazing performance while others report it stops holding a charge. Moreover, the device’s accuracy and value for money get mixed reviews, with some finding it extremely accurate while others say it’s not worth the money. Additionally, the sleep tracking feature receives mixed feedback, with some finding it accurate while others report it doesn’t capture sleep well. Furthermore, the device’s functionality is mixed, with some saying it does everything they need while others report it stops working. Additionally, customers complain about syncing issues, noting that it stops syncing with phones.
Mini everything seems to be all the rage lately. Mini can still pack a mighty punch though when it comes to these elderberry wellness shots. Featuring elderberry, lemon, and echinacea, they’re an immune supporting powerhouse, especially during the colder months.
I recently came up with these ginger turmeric immunity shots. While they’re an amazing anti-inflammatory and immune supporting drink, they are a little spicy. These elderberry shots also have great health benefits, but they’re something that even little ones will love. They have a tangy lemon flavor balanced out by immune supporting raw honey.
Elderberry For Wellness
Take a look around the Wellness Mama website and you’ll see plenty of recipes with elderberries. There are elderberry gummies, elderberry kombucha, and the ever popular elderberry syrup. This recipe is another play on elderberry, but in a concentrated version.
Unlike the ginger turmeric shots which are simply blended together, this recipe does require some cooking. You can use either fresh or dried elderberries here. Elderberries need to be cooked first because they contain cyanogenic glycosides. While they’re not poisonous, they are toxic and can cause some serious digestive issues for some people. The safest way to get the benefits of elderberry is to make sure that they’re cooked first.
A Squirt of Lemon
Despite their inviting purple color, elderberry really doesn’t have much flavor on its own. The taste in most elderberry syrup recipes comes from the other ingredients, like cinnamon or ginger. These wellness shots add some fresh lemon juice for a bit of tang and to brighten the flavor.
Lemon is also a great source of vitamin C. This antioxidant helps manage free radicals in the body to control inflammation and increase iron absorption. Lemons are also rich in flavonoids, which research shows are health protective across the board. A Danish study with over 56,000 participants found that those who regularly ate flavonoids had a lower risk of death from any reason, including heart and cancer related deaths.
Immune Boosting Echinacea
Similar to elderberry, echinacea herb can also reduce the length and severity of viral illness. Echinacea also shows some benefits when it comes to bacterial infections. While echinacea has gained a following as a “cold and flu” herb, it’s not quite so simple.
Traditional use and modern day science shows echinacea works best right at the beginning of a cold. If it’s not taken right at that first throat tickle and often enough for several days, it really doesn’t have much effect.
I like making a batch of these elderberry wellness shots when I feel something coming on and the kids love it too. So, bottom’s up!
Elderberry Wellness Shots Recipe
Tangy and naturally sweetened with raw honey, these elderberry wellness shots are a tasty way to boost your health.
In a small pot add the elderberries and water. Bring to a boil over medium-high heat and cook for 5-10 minutes uncovered. This step is important to reduce the toxins that can cause digestive upset.
Turn off the heat and add the echinacea. Cover with a lid and let steep for 10-15 minutes.
Strain the herbs out, pressing the elderberries as you do to extract the liquid.
Stir in the lemon juice and honey.
Drink warm or refrigerate and enjoy cold.
Nutrition Facts
Elderberry Wellness Shots Recipe
Amount Per Serving (1 shot)
Calories 54 Calories from Fat 1
% Daily Value*
Fat 0.1g0%
Saturated Fat 0.01g0%
Polyunsaturated Fat 0.02g
Monounsaturated Fat 0.01g
Sodium 5mg0%
Potassium 34mg1%
Carbohydrates 15g5%
Fiber 0.4g2%
Sugar 13g14%
Protein 0.1g0%
Vitamin A 30IU1%
Vitamin C 6mg7%
Calcium 6mg1%
Iron 0.2mg1%
* Percent Daily Values are based on a 2000 calorie diet.
This will last for several days in the fridge. You can also freeze in an ice cube tray for later.
If using fresh elderberries, then use 3 Tablespoons.
How to Use Elderberry Wellness Shots
You can keep these on hand for when illness strikes to help alleviate the symptoms. If you want to use it as more of a daily tonic through cold and flu season, then feel free to skip the echinacea. The recipe also works well with aronia berries instead of elderberry.
They’ll last for several days in the fridge, but you can also freeze them for later. Pour the wellness shots into an ice cube tray and let a few cubes thaw out as needed. You may notice some separation, but just give it a good stir/shake before drinking.
What are some of your favorite ways to stay healthy during this season? Leave a comment and let us know!
A high-yielding hybrid cultivar with an upright growth habit, ‘Tiger’ plants have large, thick, and slightly savoyed leaves with a green-blue hue.
Known for its satisfying flavor, ‘Tiger’ can be planted as a cut-and-come-again crop for repeat harvests, with leaves that mature in about 55 to 60 days.
Best suited to Hardiness Zones 3 to 12, this high-yielding heirloom collard cultivar produces dark green, shiny, and slightly crumpled leaves with yellow stems.
With a mounding habit, plants reach about 34 inches in height and they like to spread.
Ready to grow your own flavorful and nutritious leafy greens? Whatever the growing zone, with the proper care, collard greens are an annual edible that can flourish in your garden.
Seeds can be started indoors, or sown directly in the garden.
Plant several sets of seeds in succession or cut and come again for multiple collard harvests throughout the season, and plan for exposure to a light frost late in the season in cooler zones for the best flavor.
Before you know it, you’ll be sitting down to plates filled with homegrown collard wraps, savory sides, delectable soups, and canned goods made with this delectable and nutritious vegetable.
Which type will you add to the veggie patch this year? Do you have a favorite cultivar that wasn’t mentioned here? Feel free to drop us a line in the comments!


")


")


