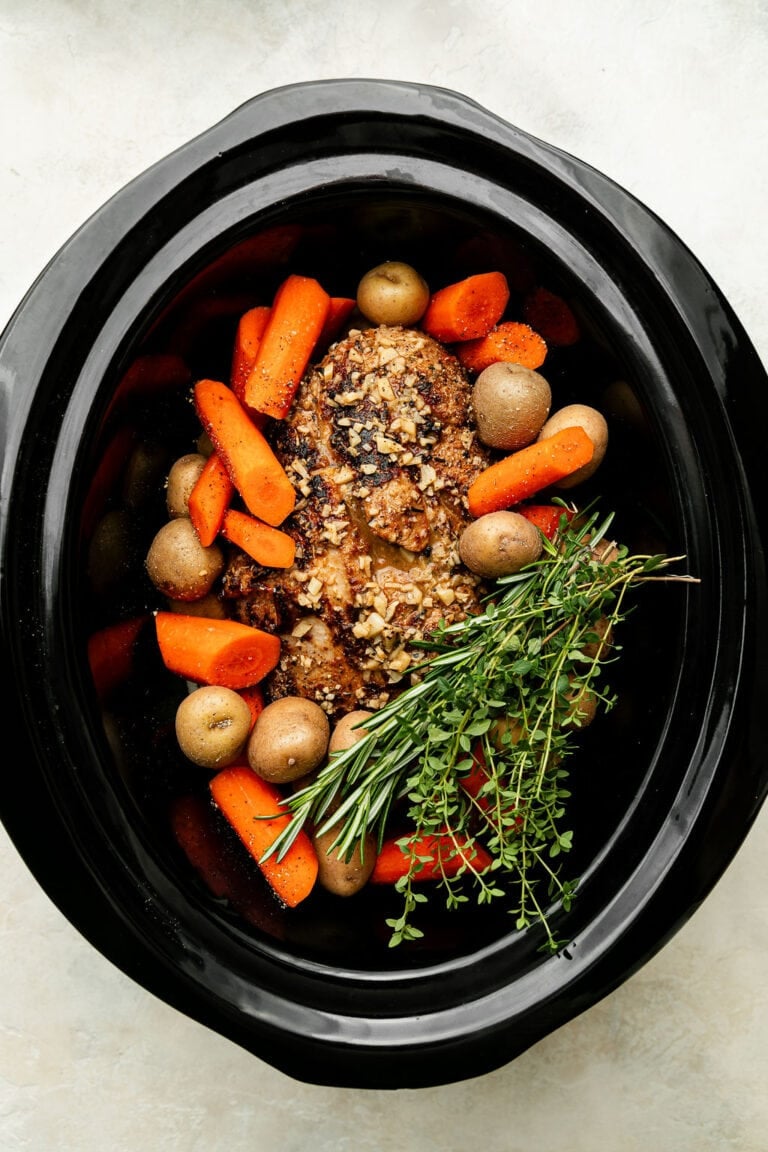
Joe Walsh, who has Alzheimer’s disease, is accompanied by his wife, Karen Walsh, to an appointment at Brigham and Women’s Hospital in Boston. Joe is receiving an experimental therapy to treat Alzheimer’s.
Jodi Hilton/for NPR
hide caption
toggle caption
Jodi Hilton/for NPR
Joe Walsh, 79, is waiting to inhale.
He’s perched on a tan recliner at the Center for Alzheimer Research and Treatment at Brigham and Women’s Hospital in Boston. His wife, Karen Walsh, hovers over him, ready to depress the plunger on a nasal spray applicator.
“One, two, three,” a nurse counts. The plunger plunges, Walsh sniffs, and it’s done.
The nasal spray contains an experimental monoclonal antibody meant to reduce the Alzheimer’s-related inflammation in Walsh’s brain.
He is the first person living with Alzheimer’s to get the treatment, which is also being tested in people with diseases including multiple sclerosis, ALS and COVID-19.
And the drug appears to be reducing the inflammation in Walsh’s brain, researchers report in the journal Clinical Nuclear Medicine.
“I think this is something special,” says Dr. Howard Weiner, a neurologist at Mass General Brigham who helped develop the nasal spray, along with its maker, Tiziana Life Sciences.
Whether a decrease in inflammation will bring improvements in Walsh’s thinking and memory, however, remains unclear.
The experimental treatment is part of a larger effort to find new ways to interrupt the cascade of events in the brain that lead to Alzheimer’s dementia.
Two drugs now on the market clear the brain of sticky amyloid plaques, clumps of toxic protein that accumulate between neurons. Other experimental drugs have targeted the tau tangles, a different protein that builds up inside nerve cells.
But fewer efforts have tried to address inflammation, a sign of Alzheimer’s that becomes more pronounced as the disease progresses.
Dr. Brahyan Galindo-Mendez, right, administers an eye-tracking test to Walsh after his treatment.
Jodi Hilton/for NPR
hide caption
toggle caption
Jodi Hilton/for NPR
A diagnosis and a quest for care
Once Joe Walsh has finished inhaling the experimental medication, he gets a cognitive exam from Dr. Brahyan Galindo-Mendez, a neurology fellow.
“Can you tell me your name please,” Mendez asks. “What’s your name?”
After a pause, Walsh answers: “Joe.”
“And who is with you today?” Mendez says, glancing toward Walsh’s wife, Karen.
“We’ll do that,” Walsh replies.
“What’s her name?” Mendez persists.
“Her name,” Walsh echoes. “That’s her name. That’s my wife.”
Walsh is unable to put a name to the woman he’s been married to for 36 years.
In 2019, a PET scan confirmed that Joe Walsh had Alzheimer’s. It took Karen Walsh years to get her husband into a research study that would offer him an experimental treatment.
Jodi Hilton/for NPR
hide caption
toggle caption
Jodi Hilton/for NPR
Karen Walsh began to notice a change in her husband back in 2017.
“He was struggling to find the right words to complete a thought or a sentence,” she says.
The couple went to a primary care doctor, who said that if Walsh turned out to have Alzheimer’s, he should enter a research study in hopes of getting one of the latest treatments. Then the doctor referred Walsh to a neurologist.
In 2019, a PET scan revealed extensive amyloid plaques in Walsh’s brain, confirming the diagnosis.
“As much as I was in shock,” Karen Walsh says, “the words were ringing in my head: ‘ask for the research.'”
So she began looking for a clinical trial. But in 2020, COVID arrived in the U.S., shuttering hundreds of research studies. By the time the pandemic subsided, Walsh’s Alzheimer’s had progressed to the point where he no longer qualified for most studies.
A novel drug for inflammation
In late 2024, Karen brought Joe to Dr. Seth Gale, a neurologist at Mass General Brigham and Harvard Medical School who promised to look for a research study Walsh could enter.
Before long, Gale received a query from a colleague looking for a patient with moderate Alzheimer’s disease to take part in a trial. He called the Walshes.
The research involved a monoclonal antibody called foralumab that was being tested on people with inflammatory diseases including multiple sclerosis.
Foralumab nasal spray, above, is being tested as a treatment for Alzheimer’s disease by researchers at Mass General Brigham.
Jodi Hilton/for NPR
hide caption
toggle caption
Jodi Hilton/for NPR
MS occurs when the immune system mistakenly attacks the protective covering around nerve fibers, causing inflammation. And foralumab was producing promising results in MS patients.
“It induces regulatory cells that go to the brain and shut down inflammation,” Weiner says.
Those regulatory cells reduce the activity of microglia, the cells that serve as the primary immune system in the brain and spinal cord.
Weiner thought foralumab might help with another condition that causes damaging inflammation in the nervous system.
“I’ve always been interested in Alzheimer’s disease,” Weiner says. “I lost my mother to Alzheimer’s disease.”
Most efforts to treat Alzheimer’s involve clearing the brain of the disease’s hallmarks: sticky amyloid plaques and tangled fibers called tau. But increasingly, researchers are seeking ways to tamp down the inflammation that accompanies those brain changes, especially as the disease progresses.
“Once people have Alzheimer’s, the inflammation is driving the disease more,” Weiner says.
Dr. Howard Weiner, a neurologist at Mass General Brigham, is studying foralumab for treating diseases including multiple sclerosis, COVID, ALS and Alzheimer’s.
Jodi Hilton/for NPR
hide caption
toggle caption
Jodi Hilton/for NPR
The approach worked in mice that develop a form of Alzheimer’s.
But in order to treat Walsh, Weiner’s team had to get special permission from the Food and Drug Administration through a program called expanded access. The program is for patients who can’t get into a clinical trial and have no other treatment options.
When the FDA approved foralumab for Walsh, he became the first Alzheimer’s patient to get the treatment.
Six months later, the drug has dramatically reduced the inflammation in Walsh’s brain. But no drug can restore brain cells that have already been lost.
It will take a battery of cognitive tests to see if Walsh’s memory and thinking have improved with the treatment. Karen Walsh, though, sees some positive signs.
Although her husband still struggles to find words, she says, he appears to be more engaged in social activities.
“A couple of guys come pick him up once a month, you know, and they take him out for lunch,” she says. “They sent me a text after saying, ‘Wow, Joe is really, really laughing, and very involved.'”
After three months of treatment, a PET scan showed that the inflammation in Walsh’s brain had decreased dramatically.
Jodi Hilton/for NPR
hide caption
toggle caption
Jodi Hilton/for NPR
Walsh himself seems happy to stay on the drug. Between non sequiturs, he manages to put together a complete sentence: “It’s easy enough to take it, so I do it, and it feels good.”
A clinical trial of foralumab for Alzheimer’s disease is scheduled to begin later this year.
Penstemons are among the most beloved and widely known Western wildflowers. With around 280 species of the plants recognized, most mesic and dry landscapes across the West are home to at least one type of penstemon, often several. Despite their impressive geographic and genetic spread, they’re also among those that leave gardeners most disappointed. Many penstemon species bloom briefly and spectacularly in cultivation, produce an incredible number of seeds, and disappear after repeating this act for just a few years. In nature, many of these plants grow slowly because of limited water and nutrition, but in gardens, where resources abound, many species exhaust themselves by over-investing in flowering and making seed.
Read on to find three of the most reliable penstemons for regional gardens. All are known for their adaptable dispositions, extended periods of bloom, and, perhaps most notably among this group of plants, their long lifespans. At the end of this piece, you’ll also find tips and tricks to extend the life and maximize the vigor of most penstemon species, including those you may already grow.
Even during the dreaded midsummer floral slump, where so many perennials look tired or quit blooming, Bridges’ penstemon continues to bloom unperturbed.
Bridges’ penstemon
Penstemon rostriflorus
Zones: 4–8
Size: 2 to 3 feet tall and wide
The largest and shrubbiest of penstemon species in this piece, Bridges’ penstemon takes a mounded shape, staying a bit shorter than it is wide. Mature plants will fill a healthy 3 feet, blanketing themselves in orange-red, tubular flowers in midsummer. They will bloom moderately until frost in one of the most persistent floral displays of our region, and the plants themselves are incredibly unfussy. A hot site can help plants grow more vigorously, and it’s worth noting that this species tolerates periodic watering well—as long as they are mulched in gravel and planted in unamended soil. Arguably the longest-lived penstemon in Mountain West gardens, these plants routinely last more than a decade before slowing down. And they’re a hummingbird favorite, thanks to their long, reddish, nectar-rich blooms. Growing as a subshrub, these plants form a small woody frame that sprouts lots of herbaceous growth. Cut this growth back in spring, leaving the firmer woody stalks year to year.
Pineleaf penstemon is well-rounded in all senses, as committed to a mounding profile as it is to an even-keeled disposition in the garden. Photo: High Country Gardens
Pineleaf penstemon
Penstemon pinifolius
Zones: 5–9
Size: 10 to 12 inches tall and 12 to 24 inches wide
Also a member of the hummingbird-pollinated group of penstemons, pineleaf penstemon is equally easygoing in our gardens. Plants are considerably smaller than Bridges’ penstemon, rarely exceeding 1 foot high and 2 feet wide. This species is among the most distinctive of garden penstemons in form, developing into a mounded subshrub covered in ½-inch long, needle-like leaves that give the plant an herb-like look. Beginning in early summer and continuing lightly through most of the growing season, pineleaf penstemon will top this form in 1-inch, brightly colored, tubular flowers ranging from screaming red to warm orange and bright, cheery yellow. Half Pint® offers a red-flowering plant around half the size of typical, while ‘Mersea Yellow’ is larger than average and among the most intensely yellow. Several oranges can be found online, including ‘Orange’, SteppeSuns® Sunset Glow, and ‘Luminous’. The small size and dense growth of this plant make it a superb edger for water-wise beds and a great filler for xeric hellstrips. In the event of winter dieback, cut it back as you would lavender once late-spring growth reveals which stalks are alive and which have died.
An unusually floriferous specimen of Richardson’s penstemon makes a great backing for bright yellow Sand Hills evening primrose (Oenothera rhombipetala, Zones 4–8).
Richardson’s penstemon
Penstemon richardsonii
Zones: 5–9
Size: 1 to 3 feet tall and 1 to 2 feet wide
Of the cool-toned penstemons, typically pollinated by bees, one reigns supreme in terms of longevity in our gardens: Richardson’s penstemon. This species can be harder to find but is a cinch to grow yourself by direct-sowing seed in a sunny spot mid-winter or planted in seedling pots around the same time. It can be mail-ordered if your thumb isn’t quite so green. These plants bear especially attractive, lobed leaves and take a rounded form that reaches about 2 to 3 feet high and half as wide. From summer on, they top their slender stalks in bulbous flowers, usually in pink, though a spectacular true blue form can be found. Richardson’s penstemon is not as dramatic in flower as the above species but has a substantial presence and looks quite handsome out of bloom. Use it in dry beds, hellstrips, and the like; it makes an attractive, long-blooming addition to dry gardens.
Planting and care
Knowing a few tricks to growing penstemon will extend the lifespans of almost all species in addition to selecting longer-lived, more reliable species. Since penstemons tend to “live fast, die young” if given all the resources they desire, keep them resource limited. This is best done by growing them in unamended native soils and by using rock mulch or no mulch at all. Irrigate periodically, especially leading up to bloom and during drought, allowing the soil to dry between waterings. If you have the option, always shop for the starter size at the nursery, not #1s (gallons), or direct sow them yourself. And do not fertilize penstemon. The only exception is transplants that are already visibility nutrient deficient or stressed (witnessed as very limited growth and yellowing lower leaves). A single light fertilization at time of transplant is sufficient.
After bloom, cut off all but a few of the developing seed stalks from the plants. This act will force more energy back into the mother plant, rather than into seed production, and encourages the plant to live another year. Since penstemon seeds are small and numerous, with each stalk producing seed up most of its length, even a couple of stalks will still provide ample seeds for your use and allow plants to self-sow.
By balancing self-seeding opportunities with plant lifespans and selecting species for their longevity, keeping a robust, long-blooming population of vibrant penstemon in your garden can be a breeze instead of a chore.
More about penstemons and other bright blooms for the Mountain West:
Discuss this article or ask gardening questions with a regional gardening expert on the Gardening Answers forum.
And for more Mountain West regional reports, click here.
Bryan Fischer lives and gardens at the intersection of the Great Plains and the Rockies. He is a horticulturist and the curator of plant collections for a local botanic garden.
All photos unless otherwise noted: Bryan Fischer
Fine Gardening Recommended Products
Hunter Industries MP-1000-90 Hunter Nozzle
Fine Gardening receives a commission for items purchased through links on this site, including Amazon Associates and other affiliate advertising programs.
– 8′ to 15′ radius with an adjustable arc of 90° to 210°, radius can be reduced by up to 25% to fit landscape needs
– Double-pop technology flushes the nozzle during start-up and shutdown to prevent clogging
– Wind-resistant, multi-directional streams provide even coverage
Dramm 17050 50′ ColorStorm 1/2″ Standard Soaker Hose
Fine Gardening receives a commission for items purchased through links on this site, including Amazon Associates and other affiliate advertising programs.
– Provides sufficient amounts of water to the garden without the hassle of hand watering
– Conveniently waters garden and beds
– 50 ft. by 1/2 inch diameter made from recycled material; lifetime guarantee
– Made in the USA
Lee Valley Mini Garden Shear Set
Fine Gardening receives a commission for items purchased through links on this site, including Amazon Associates and other affiliate advertising programs.
These shears have a distinctive finger rest that not only aids grip but allows greater freedom of movement than a conventional handle design. They have a durable powder-coat finish to resist rust and wear, and a simple clasp that locks the spring-action stainless-steel blades closed. The set includes one pair of round-nose shears measuring 5 1/2″ overall with 1″ blades for cutting stems up to 3/8″ in diameter, and one pair of 6 1/2″ needle-nose shears with 2″ fine-tip blades for precise work.
If you’ve ever tangled with poison ivy or been the unfortunate dinner guest of summer mosquitos, chances are you’ve been desperate for relief. And while I love the outdoors and try to enjoy the sunshine often, sometimes skin irritation happens. Jewelweed salve is a popular folk remedy to help with poison ivy and other skin issues and it’s easy to make!
Jewelweed is a wild-growing plant that’s been trusted for generations to soothe skin irritations, calm eczema, and keep bug bites at bay. While it’s best fresh, you can also preserve some of the benefits in a DIY salve.
What Is Jewelweed?
Jewelweed, (aka Impatiens capensis or touch-me-not) is a flowering plant. You’ll often find it growing in moist, shaded areas across North America. It prefers growing near water sources, like creeks or forested trails, often right alongside its infamous neighbor, poison ivy. It has distinctive orange flowers and seed pods that “explode,” making it a favorite of kids and foragers alike.
This plant isn’t just fun to find, it’s also packed with powerful natural compounds. Jewelweed has lawsone, a molecule researchers believe competes with urushiol (the rash-inducing oil in poison ivy) for binding sites on the skin. Some research shows that if you rub jewelweed on the skin immediately after a run in with poison ivy it can stop the rash before it starts. Lawsone can effectively blocks urushiol, reducing or preventing a rash altogether. Jewelweed also has saponins, which may act like natural soap and help cleanse the skin.
While there aren’t a ton of studies on using jewelweed, it does have a long history of traditional use.
Traditional and Modern Uses of Jewelweed
Indigenous North American tribes traditionally used mashed jewelweed plants as a poultice for poison ivy rashes, burns, cuts, sprains, and insect bites. And modern research back this up. Freshly mashed jewelweed is a go-to for many when it comes to stopping poison ivy in it’s tracks. Studies show jewelweed soap can also help reduce poison ivy severity if used right away. Soap in general though is good at breaking up the oils in poison ivy that causes rash.
Beyond poison plants, jewelweed helps calm irritated skin, easing eczema, and offering gentle anti-inflammatory support. If you’re planning on going outside this summer, it can be helpful to have on hand!
If you get into poison ivy, the best option is to use fresh jewelweed right away. However, it’s not always apparant that you’ve been in poison ivy until after the fact! In these cases a DIY jewelweed salve can be a great way to soothe or help prevent the rash. It also works well on bites and irritated skin. Here’s how to make jewelweed salve!
DIY Jewelweed Salve Recipe
This diy salve calms skin irritations and is perfect for summer bug season or when poison ivy strikes.
Prep Time5 minutesmins
Active Time15 minutesmins
Infusion Time3 hourshrs
Total Time3 hourshrs20 minutesmins
Yield: 9ounces
Author: Katie Wells
Oil Infusion
Put the jewelweed into the pint size Mason jar. You want enough plant material so that the jar is about half full.
Cover the jewelweed completely with olive oil or coconut oil.
Fill a pot halfway with water and place a cotton cloth (like a washcloth) at the bottom. Put the jar on top of the cloth (this helps keep the jar from breaking).
Turn the heat to medium low and bring the water to a simmer. Reduce the heat if needed so that the water is very hot, but not boiling. Heat the jar in the water bath on low heat for about 3 hours.
Once the jewelweed infused oil is done, strain the mixture through a cheesecloth. Give it a good squeeze to get the most out of it.
Make the Salve
Add 1 cup of the herb infused oil and the beeswax into the top of a double boiler and gently heat until the wax is melted.
Remove from the heat and stir in the essential oils and vitamin E if using.
Pour into small tins or glass jars and allow to cool completely.
Add some plantain herb leaves into the oil too for extra skin soothing properties.
Store in a cool, dark place. This should last for about 6 months if stored properly, but toss it if it starts to look or smell off.
Since dried jewelweed loses some of its beneficial properties, I use it fresh in this salve. However, oil infused with fresh plants is more prone to growing mold. By doing a heated infusion with the jar lid off this allows some of the extra moisture to evaporate.
How to Use Jewelweed Salve
Jewelweed salve works well on the following:
Poison ivy or poison oak rashes (best used right after exposure)
Mosquito bites and bug bites
Eczema and irritated skin
Where to Find Jewelweed?
You can find jewelweed growing in almost every state in the US (except the dessert). It prefers moist or wet soil so look near streams or damp woodland edges. It usually grows conveniently right next to poison ivy! If you decide to go foraging, be sure to positively identify the plant you’re looking for and only forage from uncontaminated areas. Right next to highways and conventional farm fields are not great places to get plants.
The plants start to grow in the late spring and develop colorful flowers in mid to late summer. You can use just the leaves and stems, but the flowers make it easier to identify for beginners. Here’s more on how to identify it.
Foraging fresh jewelweed is simple if you know where to look:
Look for juicy stems and oval, toothed leaves.
The flowers are trumpet-shaped and usually orange with red speckles.
Try touching a seed pod—they’ll spring open (hence the name “touch-me-not”).
And be sure to leave plenty behind for the pollinators and wildlife!
Final Thoughts on Jewelweed Salve
Jewelweed is a really fun and beautiful plant to work with. Whether you’re battling poison ivy, nursing stubborn eczema, or simply want a diy anti-itch balm that actually works, this humble wildflower is a great option. So next time you’re out hiking or rambling in the woods keep an eye out for these bright orange flowers!
Have you ever used jewelweed before? Share your experience in the comments!
Hibiscus plants with their large trumped-shaped liked flowers are easy to grow with the right care and treatment.
This tropical plant grows in full sun but can tolerate some partial shade too. They come in a variety of colours red, pink, and purple, and prefer warm climates to thrive well.
Tropical hibiscus, as their name implies, cannot withstand cold temperatures. They thrive in warmer climates, as anything cooler would be too chilly for them.
However, hardy hibiscus varieties can tolerate colder temperatures and may survive in outdoor conditions. If you reside in a cold climate or lack outdoor space, then you can grow in containers too.
But, Can you propagate hibiscus from cuttings?
Yes, hibiscus can be grown from cuttings. To grow, choose a healthy stem which is free from any pests and diseases for successful growth.
Remove lower leaves, dip in rooting hormone, plant in well-draining soil, and keep moist in a warm, bright spot. With care, the cutting will develop roots and grow into a new hibiscus plant.
The cutting should be taken from a non-flowering stem, preferably in the spring or early summer when the plant is actively growing.
Moreover, you should grow hibiscus cuttings in spring or early summer, when the plant is actively growing and temperatures are warmer.
What is the Laziest Way to Grow Hibiscus from Cuttings?
You can grow hibiscus from cuttings with water or either with soil method. The choice is yours. Both methods are good but growing hibiscus cuttings in water is the best way, as this plant does well with water propagation if done in the right way.
Water propagation
To propagate the hibiscus through water, take a hibiscus cutting off about 6 inches in length.
Gently remove the lower leaves, ensuring a few leaves are left at the top. Place the cutting in a glass or jar filled with water, making sure that at least two nodes are submerged.
Keep the glass in a warm and bright location, away from direct sunlight. Remember to change the water every few days to prevent stagnation and encourage root growth.
After a few weeks, you’ll start to seeing the roots. Once the roots reach a length of about 2 inches, carefully transplant the cutting into a small pot with well-draining soil.
Maintain consistent moisture and provide indirect sunlight to support the growth of the new hibiscus plant.
Soil method
For the soil propagation method, take a healthy hibiscus cutting and clear the lower leaves but leave the top leaves as it is.
Dip the cut end of the cutting into a rooting hormone to stimulate root development.
Select a pot with drainage holes that are large enough to accommodate the hibiscus cuttings. Choose a well-draining soil mix suitable for hibiscus. A combination of potting soil, perlite, and peat moss is ideal.
Make small holes in the soil mix using your finger or a stick. Insert the prepared hibiscus cuttings into the holes, planting at least 1 inch in the soil. Gently press the soil around the base of the cuttings to provide stability.
Give the newly planted cuttings a thorough watering, ensuring the soil is evenly moist.
Both methods offer a simple and low-maintenance way to propagate hibiscus from cuttings. Select the method that you like the most.
How to Propagate Hibiscus from Cutting?
Propagating hibiscus from cuttings is a fantastic way to create new plants that are exact clones of the parent plant. Growing your hibiscus from a cutting allows you to preserve the unique characteristics of your favourite plants while expanding your garden with more beautiful flowers.
Now, let’s get into growing hibiscus from a cutting. It involves carefully selecting a suitable cutting, providing the right conditions for rooting, and taking care of the newly propagated plant.
1. Choose a healthy cutting
You’ll need a healthy cutting from your existing hibiscus plant. Look for a stem with green growth and plenty of leaves. Trim off the top additional leaves, and cut the bottom end of the stem diagonally. This angle will increase the surface area for root development.
2. Encourage root growth
Next, it’s time to encourage root growth. Dip the cut end of the hibiscus stem into a rooting hormone, which is not necessary but can speed up the process.
Then, carefully place the stem into a cup of water or directly into moist soil. If using water, make sure to change it regularly to prevent stagnation. If using soil, keep it moist but not overly wet.
3. Right environment
Provide the cutting with indirect sunlight and maintain a warm environment. Find a bright spot in your home where the cutting can receive ample light without direct sun exposure. A temperature range of 65-75F is ideal for root development.
4. Transfer to a pot or container
For about four weeks, roots will begin to grow, indicating that your hibiscus cutting has successfully rooted. At this point, you can transfer it to a pot or a container, giving it much space to grow and thrive.
Yes, you can grow hibiscus cuttings in water. Water propagation is an easy method to propagate hibiscus plants from cuttings. By following a few simple steps, you can successfully make your own hibiscus plant growing with cuttings in no time.
Selecting the right cuttings
The first step is to select healthy hibiscus cuttings for water propagation that look healthy and clean. Look for stems that are about 6 inches long and have at least three sets of leaves. Choose stems that are free from any damage.
Preparing the cuttings
Once you have selected your cuttings, remove the lower leaves, leaving only a few leaves at the top. This will prevent the leaves from sitting in the water, which can lead to rot. Make a clean, diagonal cut at the bottom of the stem.
Placing cuttings in the water
Take a glass or jar and fill it with room-temperature water. Place the prepared hibiscus cuttings into the water, making sure that the nodes are submerged. Avoid overcrowding the container, as each cutting needs space for root development. If needed, you can use multiple containers.
Providing the Right Environment
Place the glass or jar with the cuttings in a warm and bright location, away from direct sunlight. Indirect sunlight will provide the necessary light for photosynthesis without overheating the cuttings. To prevent the growth of bacteria, change the water in every few days.
Monitoring and Transplanting
Over the next few weeks, roots will start to develop from the nodes of the hibiscus cuttings. Once the roots are about 2 inches long, it’s time to transfer the cuttings into pots filled with well-draining soil. Remove the cuttings from the water, taking care not to damage the roots. Plant them in the soil and lightly press the soil around the base of each cutting.
Rooting hibiscus cuttings is a journey that requires patience and care. Hibiscus cuttings take around eight weeks to develop roots.
Some cuttings may root more quickly, while others may take a bit longer. Several factors such as environmental conditions, cutting preparation and rooting hormones can affect the time it takes for hibiscus cuttings to root.
1. Environmental conditions
Providing the right environment is crucial for successful rooting. The hibiscus cuttings need warmth, indirect sunlight, and a high level of humidity to support root development. Maintaining a temperature range of 65-75°F is ideal for them.
2. Cutting preparation
Properly preparing the hibiscus cuttings before planting can positively impact the rooting time. Make sure to select healthy cuttings and free from any diseases. A clean, diagonal cut just below a node provides the best opportunity for root growth.
3. Rooting Hormones
Using rooting hormones can enhance the rooting process by boosting root growth. These hormones are available in liquid or powder form and can be applied to the cut end of the hibiscus cutting before planting.
Growing hibiscus from cuttings is an exciting way to propagate new plants. With the right techniques and a little care, you can easily create vibrant hibiscus plants that are identical to the parent plant. Here are some steps to follow –
Step 1 – Selecting healthy cuttings
Choose healthy hibiscus cuttings for propagation. Look for stems that are approximately 6 inches long. Ensure the stems are healthy and ready to be used.
Step 2 – Preparing the cuttings
Trim the lower leaves from the selected cuttings but leave some leaves at the top. Make a clean and diagonal cut just below a node. Nodes are the area in the stem where roots will grow.
Step 3 – Potting mix preparation
Prepare a well-draining potting mix suitable for hibiscus cuttings. You can create a mix by combining equal parts of potting soil, perlite, and peat moss. This blend promotes good drainage while retaining moisture for the developing roots.
Make a small hole in the potting mix. Insert the prepared hibiscus cuttings into the hole. Now press the soil around the base of the cuttings to give it steadiness.
Step 5 – Watering
Give the newly planted cuttings a thorough watering, ensuring the soil is evenly moist. Water the cuttings whenever you see them slightly dry or feel them by touching the soil. Avoid overwatering and maintain a consistent level of moisture.
Step 6 – Provide ideal growing conditions
Place the potted cuttings in a warm and bright location, away from direct sunlight. Indirect sunlight provides the necessary light for photosynthesis.
How to Transplant Hibiscus Cuttings?
After about eight weeks, your hibiscus cuttings should develop roots. Once the roots are approximately 2 inches long, it’s time to transplant them into individual pots filled with well-draining soil.
Carefully remove the rooted cuttings from their original pots. Plant them in the new pots and lightly press the soil around the base of each cutting. Water thoroughly after transplanting and continue regular watering as needed.
Can You Root Hibiscus Cuttings in Water?
Yes, you can root hibiscus cuttings in water. Simply select healthy hibiscus stems, remove the lower leaves, and place the cuttings in a glass of water or a jar. Keep the jar or glass in a warm, bright location, and change the water every few days to maintain freshness.
Over time, roots will begin to develop from the nodes, indicating successful rooting. Once the roots are well established, you can transfer the cuttings into pots filled with soil for further growth.
The best time to grow hibiscus from cuttings is during the warm months of spring and summer. These seasons provide the ideal conditions for the cuttings to establish roots and grow into healthy plants. Choose a time when temperatures are 65-75°F to promote successful rooting.
Is hibiscus easy to grow from cuttings?
Yes, hibiscus is easy to grow from cuttings. Simply select healthy stems, trim off lower leaves, make a clean cut below a node, and place the cuttings in soil or water. Keep them moist and provide indirect sunlight. In about eight weeks, roots will develop, and you’ll have new hibiscus plants.
What is the best way to grow hibiscus cuttings?
The best way to grow hibiscus cuttings is by using either water or soil. Both methods can be successful in propagating hibiscus plants from cuttings.
In water propagation, the cuttings are placed in a container of water until roots develop.
In soil propagation, the cuttings are planted in a well-draining soil mix and kept moist until roots form. Both methods have their benefits, so you can choose the one that suits your preferences.
Note: To boost hibiscus plant growth, you can use bone meal powder along with potting soil.
Conclusion
Growing hibiscus from cuttings is an exciting method that allows you to propagate new plants and expand your hibiscus plants.
Whether you choose water or soil as the rooting medium, the key is to select healthy cuttings, provide suitable growing conditions, and be patient as roots develop. Both methods have proven to be successful in producing vibrant hibiscus plants.
Following the best practices and giving proper care, you can enjoy the beauty of hibiscus flowers in your own garden. So, get started with your hibiscus cuttings and turn them into beautiful ones.
Khaja Moinuddin, a computer science graduate, finds joy in gardening and homesteading. Join him on this blog as he shares his experiences in homesteading, gardening, and composting
If you’re looking for a fun fitness form that engages your entire body — and your mind! — look no further than dancing.
Dancing is one of the best heart-pumping ways to torch calories while simultaneously improving muscle tone, strength, balance, core strength, and joint health. Plus, your mind stays engaged and sharp as it learns choreography and keeps pace with the steps.
What’s more: This well-rounded, full-body workout is actually fun! Time flies as you whirl around and step to the beats, ensuring you’re not staring at the clock and watching the minutes tick by until the workout ends.
Ready to give it a shot? We put together a list of seven of the best 20-minute (or less) dance workouts — exciting forms you can try to torch some calories without even thinking about it!
Say what you want about the 80s, but one thing’s certain: they really knew how to get your heart pumping with their music. This fun dance workout plays some of the best songs from that era and leverages light steps and fist pumps to get your heart going (and going strong!) for a 20-minute workout that will fly by.
This one’s for all the Swifties out there. Combine your love of America’s favorite pop star with some beginner-level, full-body cardio dance movements for 15 minutes of smiling and sweating.
Jo knows how to host a cardio dance video, and this proves it. You don’t need any equipment and only 15 minutes to get your groove on. Jo also ensures beginners can modify steps until they learn them — all along the beats of stars like Usher, Sean Paul, Missy Elliot, and Rihanna.
Head back to the 80s by getting your sweat on with this cardio routine featuring music from Madonna, Michael Jackson, Whitney Houston, and more. Reviewers love it, and many have even found themselves adding more minutes of dance because of how much fun it is!
This particular YouTube dance video graces many lists rounding up the best dance workout videos — and for good reason! Reviewers love this video because it’s focused on actual choreography and movement and is led by the engaging personality of Megan Thee Stallion. It’s one most people find themselves returning to again and again.
Bring back your childhood with this dance fitness video from creator Emily Thorne that pumps your heart to some of your favorite Disney classics. One reviewer says she “never smiled or had more fun doing a workout.”
NSync, The Backstreet Boys, One Direction, and The Jonas Brothers all grace this video’s soundtrack — and boy, is it something. Certified PT Emily is committed to making working out less awful and more fun, and her heart-pumping, calorie-torching boy band workout video here proves it!
Caitlin is the Diet-to-Go community manager and an avid runner. She is passionate about engaging with others online and maintaining a healthy, active lifestyle. She believes moderation is key, and people will have the most weight loss success if they engage in common-sense healthy eating and fitness.
Federal agencies identified listeria contamination in some Boar’s Head deli meats last year. Since Trump’s cuts to federal agencies, experts worry inspectors can’t keep up with demand.
Paula Soldner inspected meat and poultry plants around southern Wisconsin for 38 years: “I’m talking brats, hot dogs, summer sausage, pizza.”
Her Department of Agriculture job requireddaily check-ups on factories to ensure slicers were cleaned on schedule, for example. Her signoff allowed plants to put red-white-and-blue “USDA inspected” stickers on grocery-store packages.
Last month, Soldner took the Trump administration up on its offer of early retirement, joining an exodus from the Food Safety and Inspection Service that began under President Biden’s reorganization of the agency last year. Soldner, who also chairs the National Joint Council of Food Inspection Locals, says remaining inspectors must now visit eight facilities — double the usual number — each day.
That’s not possible, she says, so it’s unclear how much food is legitimately earning that stamp of approval.
“Did that plant receive that daily inspection from inspection personnel? In my mind, that’s a huge question mark,” Soldner says.
She says further staff retirements, hostility toward federal workers, and plummeting morale are creating conditions that make consumersmore vulnerable to outbreaks of foodborne illness, like the deadly listeria contamination that hit Boar’s Head deli meats last year, killing 10 people and hospitalizing dozens.
“Do I foresee another Boar’s Head situation? Absolutely,” she says. “I worry about the public.”
Experts who study the nation’s food supply say the safety of everything we eat — from milk and macaroni to meat and lettuce — is called into question because of massive cuts by the Trump administration to the three federal agencies charged with monitoring it: the Food and Drug Administration, the Department of Agriculture, and the Centers for Disease Control and Prevention.
Those three agencies coordinate and fund a lot of the complex work that makes up the country’s food safety surveillance system, while state and local regulators and inspectors conduct a lot of work on the ground.
Most produce is inspected by states, for example, though select samples are sent to one of the FDA’s national labs to test for pathogens like salmonella or E.coli. When a consumer falls ill, it’s often the local health officials who are first to know and then report cases to the CDC, which in turn traces the contamination to its sources and compiles data.
“Our federal food safety system is teetering on the brink of a collapse,” says Sarah Sorscher, a policy expert at the Center for Science in the Public Interest. She’s most concerned about the loss of expertise from recent job cuts.
But she also worries about policy moves like the administration’s rollback of new USDA food-safety rules set last August that would have limited the amount of salmonella in poultry in order for it to be sold. Instead, the agency said it is reevaluating the issue and whether salmonella regulations need updating at all.
In statements emailed to NPR, FDA and USDA said recent streamlining of their operations will not alter their commitment to food safety. USDA announced Tuesday that it boosted funds to reimburse states for food safety inspections by $14.5 million.
In a separate emailed statement, the USDA called its inspectors’ work “critical,” and said therefore inspectors were exempt from its hiring freeze, and its “front-line inspectors and veterinarians were not offered the opportunity to participate” in the agency’s second early retirement offer in April “because of the essential nature of their work.”
However, NPR reviewed emails sent from USDA officials urging inspectors to take the early retirementdeal and confirming their eligibility for it, as well as a document listing eligible job categories, including consumer safety inspector and slaughterhousesinspectors.
Last month, the Trump administration also abruptly shuttered two of the FDA’s seven food testing labs in San Francisco and Chicago, according to several FDA staffers who spoke on condition of anonymity for fear of retaliation.
The ensuing chaos delayed seafood inspections and routine produce testing, the FDA staffers, including microbiologists working in different labs, told NPR. Samples of lettuce or fruit had to be shipped in ice-packed containers to redirect them to other labs, where a shortage of staff and basic lab supplies such asplastic pipettes and other testing supplies, makes it difficult to triage the workload.
This month, the administration reopened the two labs, but Sorscher, who leads regulatory affairs at the Center for Science in the Public Interest, says damage has been done. “It’s as if you took a chainsaw and started cutting holes out of the walls of a house,” she says. “You can’t really point to the fact that the doors or windows are still there and say, ‘Don’t worry, the house is secure.'”
The CDC said in an emailed statement that its lab, surveillance and data collection work continues and that the agency “remains prepared to respond to, and work with states on those outbreaks.”
But many of the state and local food-safety programs historically funded by the CDC are at risk, says Steven Mandernach, executive director of the Association of Food and Drug Officials. Budgets and staffing have been cut at CDC, which affects how it supports local programs. The CDC, for example, typically funded staff to notify the public in the event of outbreaks, or to help remove dangerous products from shelves, as they did with lead-contaminated apple sauce pouches in 2023.
Mandernach says many states can no longer afford staff dedicated to public communications. So he worries about delayed warnings and less robust local tracking of cases that would affect national data.
“It could artificially make it look like, ‘Hey, food safety is great here,’ when the reality is we’re not looking for it as much,” he says.
The most popular choices for the home gardener are hybrids typically classified as G. × hortulanus.
These are divided into three main groups, all with an extensive range of flower colors.
Grandiflora hybrids, G. grandiflora, produce large, funnel-shaped and ruffled blooms four to six inches wide on tall spikes three to six feet tall with up to 30 flowers per scape.
Nanus hybrids are miniature varieties with small, trumpet-like blooms three inches wide on scapes that grow up to two feet tall.
Primulinus hybrids, G. dalenii, have loose, hooded flowers two to three inches wide on scapes up to three feet tall and often feature contrasting throat blotches.
Dwarf varieties typically grow in the range of 12 to 36 inches tall and make a handsome, upright choice for containers.
Nanus types are popular miniature varieties with soft, pastel colors on scapes that grow up to 24 inches tall.
They also have better cold hardiness than standard varieties and are suitable for cultivation in Zones 5 to 10.
Here are some varieties to consider:
Charming Lady
‘Charming Lady’ is a nanus type with beautiful, bubblegum pink blooms.
If you opt to grow dwarf varieties that top out in the range of 12 to 36 inches tall, pots with a minimum of 12 inches in diameter and height are suitable.
Standard varieties grow much taller, and these need taller pots for a couple of reasons.
The first is that shallow pots make it too easy to overwater the corms, which can lead to root rot and bulb collapse.
Another reason is that taller pots are needed to balance the impressive height, which can look top-heavy in small vessels.
For a visually pleasing look, aim to use containers that are roughly one-and-a-half to two-and-a-half times shorter than the mature plants.
For example, if your plants grow five to six feet tall, choose a pot that’s in the range of 18 to 30 inches in height.
This size helps to anchor the overall appearance and provides a satisfying, harmonious sightline.
Containers can be made of any type of material such as ceramic, fiberglass, hypertufa, terra cotta, or wood.
However, if you plan to overwinter bulbs in their pots, ensure the material can withstand the low temperatures your region experiences.
A fast, furious, embodied and empowering birth – sharing River’s birth story in its entirety!
Let me start off with a little back story for context. On Friday, December 27th, at 30 weeks pregnant, I found out I had gestational diabetes. I was shocked, confused, angry, sad, in denial, scared…As someone who has worked really hard to find peace with food, I was upset about having to be more rigid with what I was eating.
ESPECIALLY because Steve and I had our baby moon to the Bahamas planned that following week. A baby moon spent pricking my fingers 4x/day, stressing over blood sugar levels, and skipping the virgin pina coladas?! I didn’t skip the coladas but I also stressed way too much about food and my sugars and it put a big damper on our getaway. Needless to say, I want a redo someday on the carefree Bahamas vacay.
Once we got back home and into our routine, I was able to manage my post meal sugars well but my fasting sugars always hovered around 93-100 (they wanted them below 95). We took a wait-and-see approach for needing to start nighttime insulin.
I really didn’t want to start insulin because then I would’ve been induced at 39 weeks and I’d have to switch my care from my certified nurse midwife who I had a relationship with to an OB who I never met before. This was the practice’s standard protocol.
As we approached 37/38 weeks, my fasting sugars started to creep up a little more. I’d have 3 days of slightly elevated fasting levels and then 4 days of normal levels. My endocrinologist and later a MFM doctor told me I was very borderline for starting insulin and my endocrinologist didn’t really seem to know what to recommend “well, what did MFM say?” “She said to refer to you!” Gotta love too many cooks in the healthcare kitchen.
At 38 weeks and 4 days I was STRESSIN. I had my midwife appointment the next day and I didn’t have a clear picture of what was going to happen (I mean when it comes to childbirth do we really ever? no). But I wanted to know was I going to get induced in 3 days? Would I start on insulin for a few days before getting induced?
My anxiety started to get the best of me – I wanted to make “THE RIGHT” decision that would be the least risk to me and my baby. Between the gestational diabetes and testing positive for Group B Strep, I was worried that something was going to go wrong.
So I sent long winded messages to my endocrinologist and MFM doctor (who I previously met with because of a growth ultrasound that was concerning) trying to get more information so I could make an informed decision. I was also aggravated that my care couldn’t be more coordinated. Why cant ya’ll collaborate on my case and tell me your team recommendation?
38 weeks and 4 days was a Thursday. My last day of seeing my private practice clients and my second to last day of work. I had planned to do a bunch of admin / tying up loose ends work on Friday. And then the hope was I would have a week off before baby came. I scheduled some self care for that weekend and upcoming week.
JOKE’S ON ME.
I swear it’s as if River knew I was stressing and was like girl I got you. Let me make this decision for you.
That night I went to bed like any other night, uncomfortable with pubic symphysis pain, but nothing felt different (side note: Steve claims he had a sense that I was going to go into labor that night when I went up to bed).
At 3:40 AM, I woke up and felt a little crampy. I was like hmmm this feels a little different and also vaguely familiar (to 4 years ago when I woke up at 2am feeling crampy the night I went into labor with Luca). So I stood up to use the bathroom (as one does in the middle of the night when they are 38 weeks preggo).
And when I stood up, water leaked out. I’m like oh shit. But this time it wasn’t an obvious gush of water (like I had with Luca) but it was more than a trickle. And as someone with good bladder control, I’m like that didn’t feel like me peeing myself lol.
So I went to the bathroom, actually peed, checked my undies and I was like hmmm that looks clear but a little too shiny to be pee.
I walked out of the bedroom calling for Steve (he was in Luca’s room because we have a toddler that doesn’t like to sleep through the night alone). “Can you come here?” He knew. He said he knew as soon as he saw I turned on the light in our bedroom lol.
Now if you’ve never heard or read Luca’s birth story, you have to know this. Luca came unexpectedly fast. My entire labor was 4.5 hours start to finish. And they say your second comes even faster. Logistically, this time around was more complicated too. We needed someone to stay with Luca and we moved to the burbs last fall so we were about 30 minutes from friends and 30 minutes from the hospital (with little to no traffic).
Because of my fast labor with Luca, I was told to pretty much go right to the hospital at a first sign of labor. I told Steve to call our friends Lauren and Brent who were the first on our “on call” list of generous friends who volunteered to help out with Luca if I went “early”. Meanwhile, I called my midwife practice.
The midwife who called me back clearly didn’t read my chart before she called. She asked questions about my water breaking. “Usually it’s a gush”. I know, I know. But I told her it wasn’t a trickle and I was pretty certain it wasn’t pee. She told me I could put on a pad and if it was my water breaking, I would see more coming out onto the pad. She said I could wait an hour and see if I start having regular contractions (I was only having mild cramping at that time).
I told her that I had a really fast labor with my first and she paused and she’s like “oh, oh okay. I’m just reading your chart and yes I see that now. There’s a note that says tell her to come to the hospital when she calls” (LOL). She’s like “okay actually I think you should just come right in then.”
As we waited for our friend to arrive to our house while Luca slept, we gathered our (packed, thankfully) hospital bags and last minute things like my bed pillow. I changed out of my PJs and into comfy clothes. Steve and I shared words about how we “weren’t ready” and had work to do that day. I told him I had to transfer my website management to a different agency today.
I started getting contractions and opened up a contraction timer app to see if they were happening regularly, and sure enough they were, every ~ 3 minutes. Yes, within ~10 minutes I went from mild cramping to regular contractions every 3 minutes. Told ya I labor fast.
Our friend, Brent, made it to us in record time – 20 minutes! Thank goodness for going into labor in the middle of the night and there being no cars on the road.
We told him what time Luca might wake up, told him to make himself at home, he wished us good luck, and we were on our way.
As soon as we got into the car, I texted my Mom and Dad (who were also on call) at 4:12AM and said “Heading into the hospital. Think it’s happening. Will keep you posted.” Also while in the car, I busted out my business credit card and purchased the plan for my new website management agency (because my other agency was scheduled to exit the site that day). Nothing like a little last minute work while speeding to the hospital to give birth!
We arrive at Newton Wellesley Hospital, also in record time, thanks to Steve speeding and it being 4 in the morning. We park in the ER parking lot because the entrance to Labor & Delivery (L&D) ward is locked after hours. It feels a little like deja vu honestly. We arrived to the same lot around the same time in the middle of the night as my first labor.
We get out of the car, Steve grabs our bags, and we walk toward the ER entrance, stopping a couple times on the way for me to work through contractions.
The staff member at the entrance just stares at us as we walk in. Steve says “labor and delivery?” And he points down the hall and gives us directions on how to get to the L&D ward. I’m like that’s weird I remember being wheeled in a wheelchair to L&D last time. But we start walking down the hall, me crouching over in pain, until a woman calls after us. “Excuse me, are you IN labor?”
UH YAH.
“Sorry, come this way, we need to check you into triage.”
They check me in. We do some admin paperwork. They page L&D. Check my vitals. Then the L&D nurse comes to get me with a wheelchair (THERE SHE IS – the wheelchair, not the RN). Actually I don’t even know if she’s a nurse or who she is because I’m pretty sure she doesn’t introduce herself or maybe she does and I’m starting to be in my labor third dimension. But I honestly thought she was an aid until she started poking my veins in antenatal.
They wheel me to the antenatal room and they’re asking me medical questions and about my birth plan and trying to put an IV in in-between contractions. They stick me with the needle. Blow my vein. Oh I’m sorry we’re going to have to do that again. Contraction. Stick me again. Blow another vein. I’m so sorry. This went on two more times before they finally called in a senior nurse to give me an IV. The nurses in recovery saw my bruised arms and said “honey, what happened to you?!” But seriously, blown veins make some gnarly looking bruises.
At this point I know I’m in labor for real so I tell Steve to text my parents at 5:23AM. “It’s happening Kara requests booking the flight”.
Now the midwife on call, Nicole (goes by Nicki), comes into the room. She’s really bubbly and friendly and positive but not in an annoying way, in a reassuring way. I also can’t stop staring at her sweet sleeve tats. The nurses are asking again about my birth plan (I never gave my midwife my birth plan because she told us we would review it at my 38 week visit – which was scheduled in like 6 hours). They ask me if I want an epidural (which my birth plan says don’t ask me if I want one – I will tell you if I want one). I must have been asked at least 3 separate times if I wanted an epidural.
Nicki, who must have seen my birth plan for Luca in my chart, said “she wants to start with nitrous (oxide gas) first. She had a ‘natural’ birth, no epidural, with her first.” By this time my contractions are pretty intense. The midwife is going to do a cervical check but she’s coaching me through the contractions right now. “Relax your shoulders, relax your jaw…” “You’re doing great, mama.”
Checks my cervix. “You’re 7 centimeters dilated. Fully effaced. You definitely came in at the right time.” She also said she could feel my water bag but wasn’t sure what was going on – that maybe it was partially blocked and that’s why I didn’t experience that full gush.
Nicki tells me we’re ready to go to the L&D room and she’ll see me in there. She tells the nurses she’ll put in the order for antibiotics for my group B strep.
Steve is now trying to coach me through contractions. “Relax,” he keeps saying. Relax. Poor Steve. He’s only trying to replicate what he heard Nicki saying minutes before. But this general statement to “relax” repeated again and again sends me over. I’m like “You gotta stop telling me to relax.” Like I understand the intention but I’m not at the spa babe, I’m in the worst pain of my LIFE. Relaxing? Not in the cards for me right now.
As they push my hospital bed into the L&D room, I start to feel like I could cry. Because I know this is the room where I will meet my son so so soon. It feels oddly nostalgic too – I’ve been here before. This is where the magic happened.
Magic is going to happen again here.
They try to get the nitrous machine. They hook me up to the monitors. Contractions are so painful now. I begin to doubt myself. How much longer is this going to be until I’m fully dilated? I don’t know if I can make it (without an epidural). They wheel the nitrous machine in and hook it up. Then the most piercing annoying loud alarm starts going off on the machine. And I’m trying to relax between contractions. “What is that noise?! Can someone make it stop?!”
The nurse tells another nurse to get the machine out of the room. And to find a different one.
I ask Steve to put on my labor playlist. I need music to help ground me after that alarm shook me.
They bring back another machine. They try to coach me on how to use it. Breathe in and breathe out with your contractions. I breathe in but it’s hard to take a long, full breath. Even harder to breathe out into this mask because my exhale is basically a loud moan / growl / scream? at this point. It’s not helping the pain. I give up on it after a couple attempts.
“Can someone dim the lights?” The nurses look to Nicki, now in the room, for her approval. She nods her head yes.
“I don’t see the order in here,” the nurse says (she’s referring to the antibiotic order). “I put it in.” “It’s not in here.” Nicki leaves to go put in the order again. I was supposed to get this antibiotic asap so it had time to get into my system before I delivered.
When Nicki comes back in, I tell her I think I’m ready to start pushing. My contractions feel different. Way more intense. I feel like I want to bear down. I remember this feeling with Luca. When I was in transition.
She nonchalantly says “I can do another cervical check if you want.” Um YES. She asks if I’m okay if she does it after the next contraction is over. I’m like GIRL LET’S GO.
Around 5:50AM, she checks my cervix. “Yup, you’re fully dilated. Do you feel like you want to start pushing?” Most definitely.
I start bearing down with contractions. I am lying on my left side. The nurse is to the left of me with her medical charting stand so Steve is to my right. Because of this I’m squeezing the heck out of the bed rail, not Steve’s hand this time (lucky Steve’s hand). But he’s coaching me through every contraction. And by coaching I just mean encouraging me I guess? Saying things like “you’re doing great hunny, you got this.”
It feels chaotic around me. The nurses seemed very green and everyone seemed like they were rushing around and confused about this antibiotic order. No one was helping me or asking if I needed anything.
I had to ask myself.
“Can I get some water?”
“Can I get a cold towel for my forehead?” (I be sweatin’)
“Can I get another cold towel for my neck?”
“Can you put on my playlist?”
“Can you dim the lights?”
With Luca, the L&D nurses were way more on top of it. Offering all those things without me asking. Applying counter pressure on my back with contractions.
This time, there was just frantic energy around me. But I was like only half there. I was aware of the chaos around me but also in my own little world too.
“You need to relax your hand,” the nurse says. Then she starts tampering with the IV in my arm. Apparently when squeezing the bed rail, I messed with it and the antibiotic couldn’t be administered. The chaos, I found out later from Steve, was them not being able to figure out why they kept getting an error message for pushing the antibiotic.
One of the nurses asked me if she could lift my upper leg – yes that’s fine. And she started to coach me through pushing. When to breathe in and when to bear down and when to breathe out.
With each contraction, Nicki would say “so intense” “you’re doing awesome.” I appreciated the comment of “so intense”. It was simple but felt like a validation. Yes this is intense. I see you doing the intense thing.
A gush of water. There’s the rest of that bag.
I started to feel a burning sensation but it wasn’t a searing burn like I experienced with Luca crowning. It was a less intense burn.
Nicki said “I see hair!” “Do you want to feel his head?” I reached down and touched the top of his soft head. A internal sigh of relief. A confirmation that we were close to the finish line.
“Okay he’s going to be here with this last push. I need you to give me one more really strong push.”
ARGHHHHHHHHHH I yelled. I pushed hard. I opened. I felt River emerge. But really it kind of feels like an alien is emerging.
At 6:09 AM, I took a breath. River took a breath (he cried).
The cry that floods you with relief. He’s here. He’s okay.
The midwife hands him to me and he lays on my chest. I cry. Sobs of happiness. Sobs of relief.
I did it. I fucking did it.
In that moment, all the hardships of my pregnancy – the intense anxiety, the pain, the nausea, the vomiting, the gestational diabetes, the depression, it all felt worth it. THIS. It was for HIM. And he’s here. On my chest. He is perfection.
I that moment, I fell in love all over again.
I kept saying to River, “You’re here! You’re finally here.” “We did it.”
For nine months my mental health was shit. And now, pure joy and happiness and purpose. The shift in my energy was palpable. Later that day Steve said “it’s nice to see you smile again.” Not that I hadn’t smiled in nine months lol but this smile was different. I couldn’t stop smiling. I was so happy.
Nicki congratulated me on the birth – she was in awe of my fast labor (2.5 hours from start to finish!) and kept saying wow your body really knows how to labor. “You’re a rockstar.” “That was incredible.”
I felt strong. I felt capable. I felt so much gratitude for my body. I also felt in awe of my body and what she was capable of.
With Luca’s birth, I felt scared. I felt disconnected. I felt traumatized afterward.
This labor was even faster and more furious and yet, I felt more empowered and embodied. I felt like a badass. I just had another unmedicated birth where I got to feel everything and be in my body (not that there is anything wrong with a medicated labor).
I rode that high for the rest of my hospital stay.
My umbilical cord was still pulsating for a bit so they delayed cord clamping until it was done and then Steve helped cut the cord. Nicki told me I didn’t have any tearing this time (I had three tears with Luca). “Seriously?!”, I said. “That’s amazing.” She said Luca helped pave the way for River.
They gave me a shot of Pitocin to help stop the bleeding.
One of the nurses asked me if I wanted to see my placenta. Normally I’m not into this sort of thing. Blood skeeves me out. But I had just finished reading a chapter all about the placenta in Like a Mother: A Feminist’s Journey through the Science and Culture of Pregnancy by Angela Garbes so was intrigued to see it. It was huge. She showed me the side that faced me and the side that faced baby. She showed me what they refer to as ‘the tree of life”, a branch of blood vessels on the fetal side of the placenta.
Birthing bodies are incredible.
I’m so grateful that River’s birth unfolded the way it did. That labor started in the middle of the night so we could get the care we needed and to the hospital quickly and safely (if this happened during rush hour traffic, I would’ve had him in the car!). That my body and River made the decision for when labor would start and that it happened spontaneously.
I’m grateful for my birth with Luca so that I felt more mentally prepared for a fast and furious labor this time. Grateful for my body, for my physical and mental strength, for Steve and my midwife. Grateful for our friends and family who were on call to help us.
I’m grateful to have had an empowering and embodied birthing experience.
On February 28th, at 6:09AM, River Avery was born. And my heart forever expanded.
For more pregnancy-related content check out my posts below:
Who doesn’t love ice cream on a hot summer day? Even if you’re avoiding dairy, there’s no reason to miss out! I first learned to make homemade ice cream when we were avoiding dairy for my son years ago. Even though I’ve added some dairy back into my diet, this dairy-free mint chocolate chip ice cream recipe is still a family favorite.
This mint chocolate ice cream gets its creaminess from coconut milk and avocado. Since making ice cream is on our summer bucket list, I’m glad to have an ice cream recipe full of nutrients and healthy fats for the kids to enjoy.
I Scream, You Scream, We All Scream For… Avocado Ice Cream?
Instead of whipping cream or heavy cream, this mint chip ice cream gets its creaminess from avocadoes.
Avocados have such a mild taste and creamy texture that they’re perfect for desserts. I’ve used them before in cucumber lime veggie smoothies and real food shamrock shakes. Whenever I find a good deal on avocados, I know it’s time to stock up and make chocolate mint ice cream (and maybe some avocado brownies too).
Another reason avocados work so well for mint chocolate chip ice cream is the light green color they naturally add. It’s not bright like the green food coloring found in store bought versions though (which is probably a good thing!).
Homemade Mint Chocolate Chip Ice Cream With Coconut Milk
To make the ice cream, I simply puree everything except the chocolate chips together in a blender and then pour it into the ice cream maker. I add the chocolate chips once it starts to thicken. If you don’t have an ice cream maker you can freeze it without one, just stir it occasionally until it thickens.
You can use either semi-sweet chocolate chips or dark chocolate for this. You can even use a chopped chocolate bar. The little bits of chocolate add a nice crunchy texture the the smooth ice cream. I always opt for a darker chocolate since it has more health benefits and less additives.
This homemade version skips the granulated sugar and instead uses a touch of raw honey to sweeten. You can even make your own mint extract with fresh mint to add to this.
Here’s how to make your own (healthy!) mint chocolate chip ice cream the whole family will love!
Homemade Mint Chocolate Chip Ice Cream Recipe
Make dairy-free mint chocolate chip ice cream at home with coconut milk, avocado, and honey.
Place all the ingredients except the chocolate chips in a blender and puree until smooth.
Pour the mixture into an ice cream maker and churn until thickened.
Add the chocolate chips and churn 2 minutes more.
The ice cream will be a very soft texture at this point. You can either serve immediately as soft-serve or pour into a freezer safe bowl and freeze until ready to use.
Allow to thaw at room temperature for 10-15 minutes before serving.
Enjoy!
Nutrition Facts
Homemade Mint Chocolate Chip Ice Cream Recipe
Amount Per Serving (0.5 cups)
Calories 305 Calories from Fat 189
% Daily Value*
Fat 21g32%
Saturated Fat 13g81%
Cholesterol 3mg1%
Sodium 27mg1%
Potassium 356mg10%
Carbohydrates 29g10%
Fiber 4g17%
Sugar 23g26%
Protein 3g6%
Vitamin A 110IU2%
Vitamin C 5.5mg7%
Calcium 34mg3%
Iron 2.1mg12%
* Percent Daily Values are based on a 2000 calorie diet.
Taste after step 1 and add more peppermint extract if desired.
If you do not have an ice cream maker, add the chocolate chips and put into a freezer safe bowl and into the freezer. Stir every 30 minutes until thickened.
More Homemade Ice Cream Recipes
If you’re in the mood for some more ice cream, homemade versions beat the ones from the grocery store hands down. You might even like them more than your favorite ice cream from the local ice cream shop! Here are a few recipes to try.
What are your favorite ice cream flavors? Tell me about it below!