Price: $29.99 (as of Jun 02, 2026 13:50:39 UTC – Details)
You are looking for an awesome pharmacy technician design? Then is this funny health care, pharmacy tech or technician design the right one. It’s a great idea for pharmacist moms who love their job. Wear it proudly to work or in your free time. Get this. This funny pharmacy technician design for women and men who love their health care or pharmacy tech job. Show that you are a proud pharmacist mom. On the pharmacy technician motive is the quote Pharmacy Technician Mom The Idol The Myth The Legend. You are looking for an awesome pharmacy technician design? Then is this funny health care, pharmacy tech or technician design the right one. It’s a great idea for pharmacist moms who love their job. Wear it proudly to work or in your free time. Get this. This funny pharmacy technician design for women and men who love their health care or pharmacy tech job. Show that you are a proud pharmacist mom. On the pharmacy technician motive is the quote Pharmacy Technician Mom The Idol The Myth The Legend. Dual-wall insulated stainless steel construction keeps beverages hot or cold, dishwasher safe and BPA free Leak-proof flip lid includes BPA free plastic drinking straw
Price: $29.99 (as of Jun 02, 2026 01:50:03 UTC – Details)
You are looking for an awesome pharmacy technician design? Then is this funny health care, pharmacy tech or technician design the right one. It’s a great idea for pharmacists who love their job. Wear it proudly to work or in your free time. Get this now. This funny pharmacy technician design for women and men who love their technician or pharmacy tech job. Show that you are a proud pharmacist. On the pharmacy technician motive is the quote A Short Story I Am A Proud Pharmacy Technician End. You are looking for an awesome pharmacy technician design? Then is this funny health care, pharmacy tech or technician design the right one. It’s a great idea for pharmacists who love their job. Wear it proudly to work or in your free time. Get this now. This funny pharmacy technician design for women and men who love their technician or pharmacy tech job. Show that you are a proud pharmacist. On the pharmacy technician motive is the quote A Short Story I Am A Proud Pharmacy Technician End. Dual-wall insulated stainless steel construction keeps beverages hot or cold, dishwasher safe and BPA free Leak-proof flip lid includes BPA free plastic drinking straw
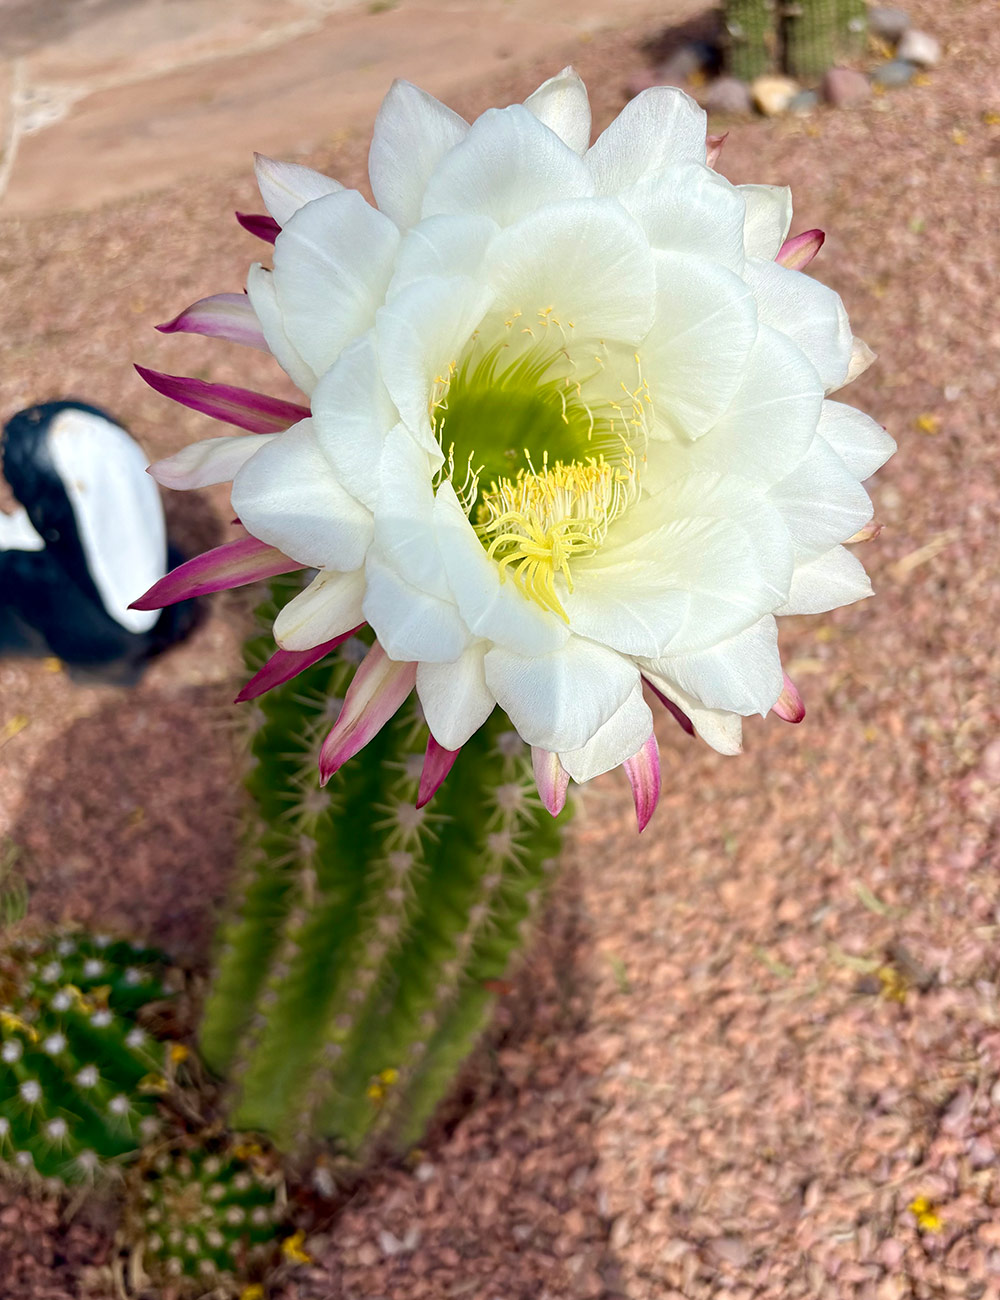
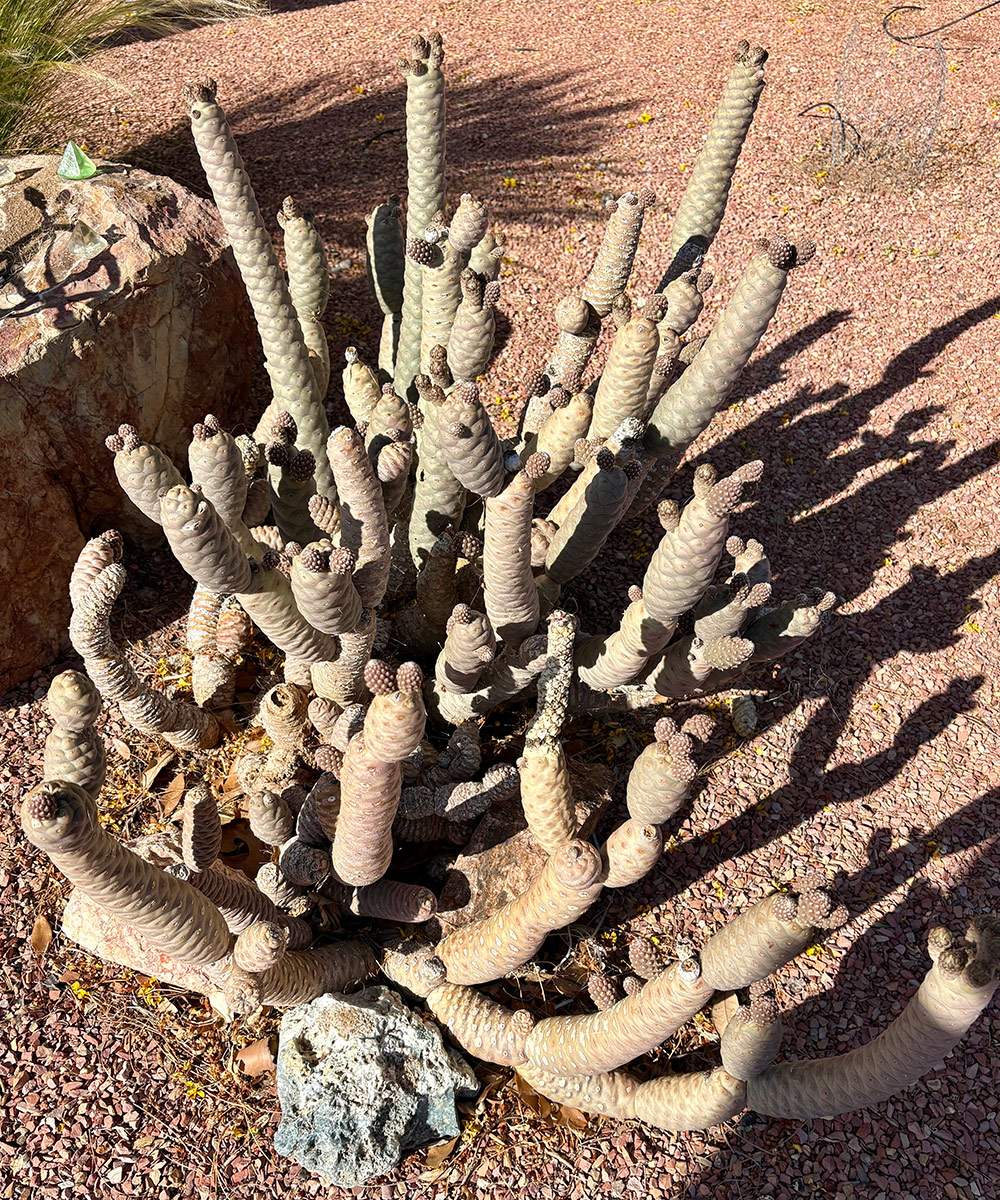
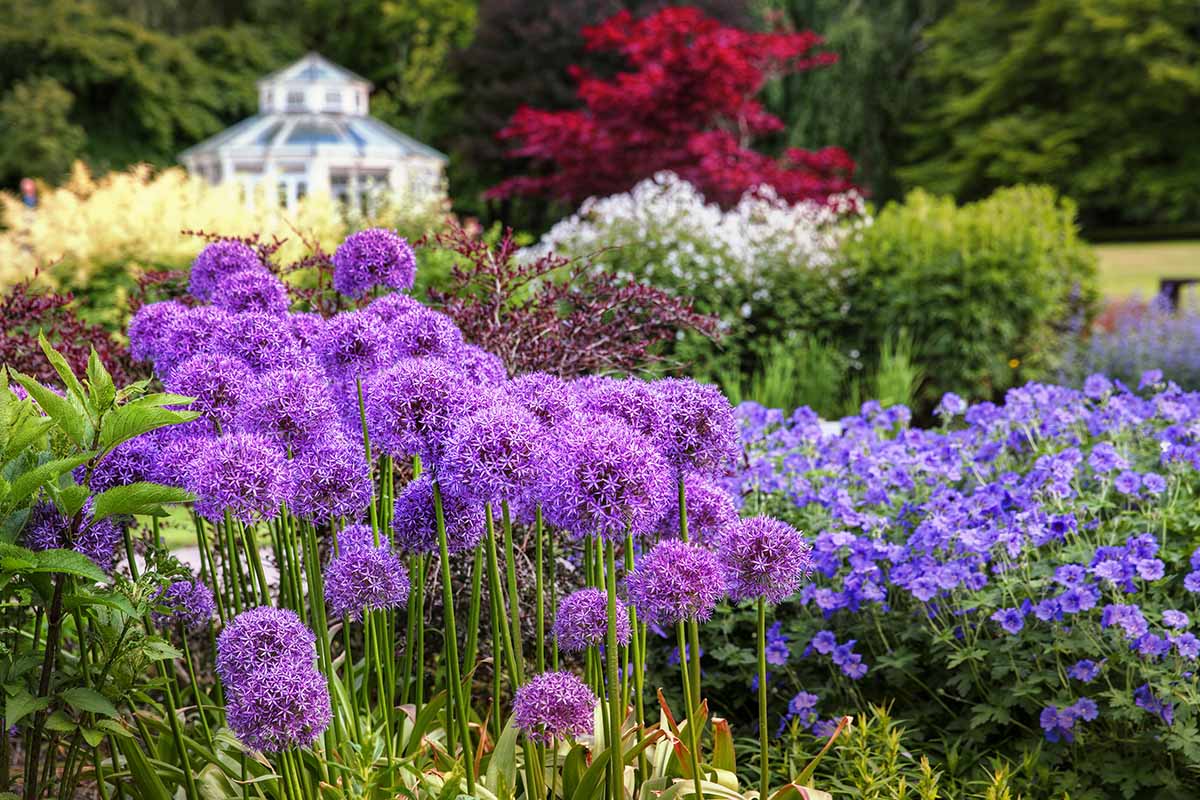
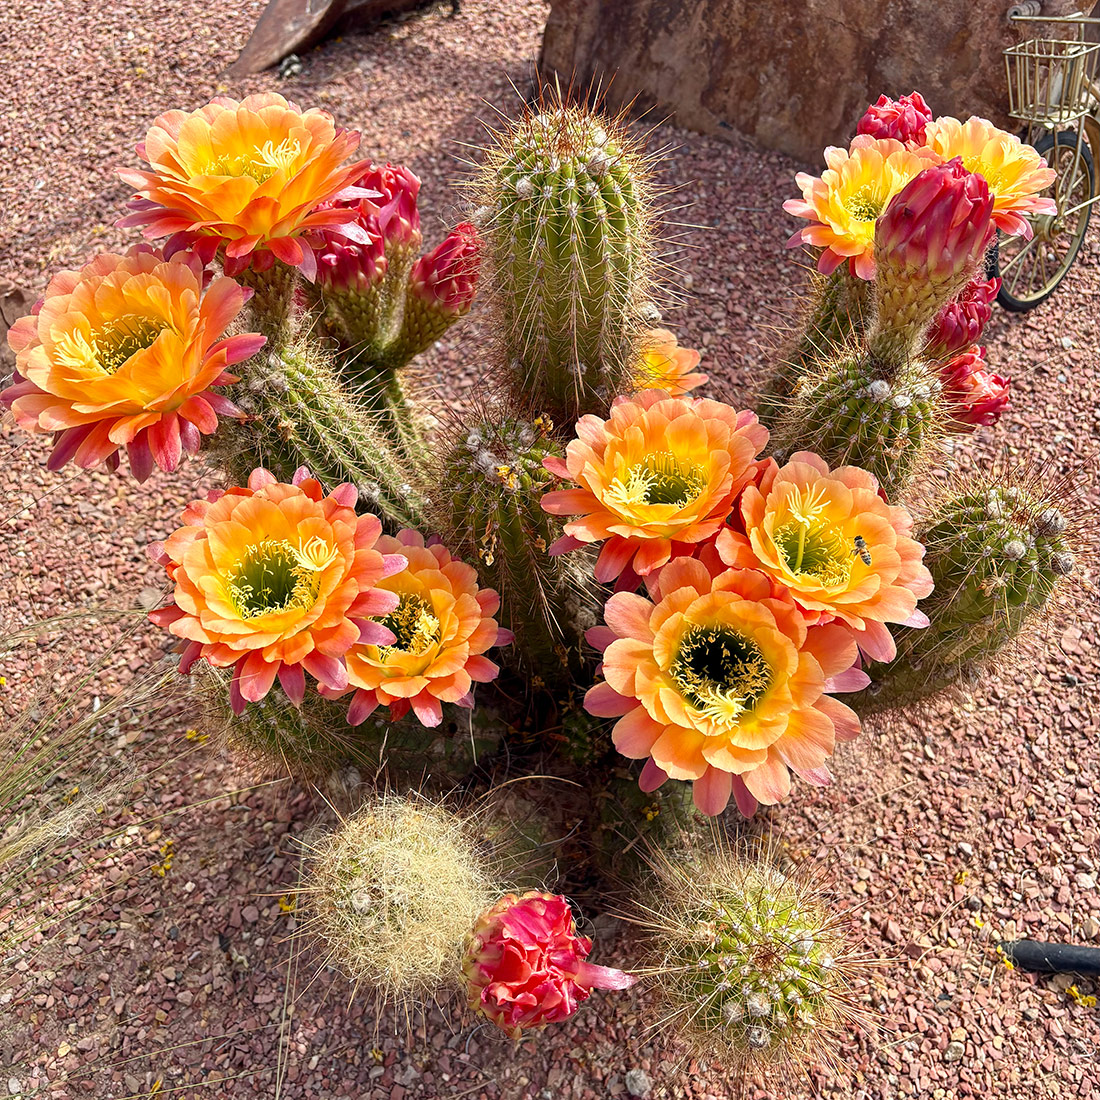
Spring brings a wonderful array of color to our gardens. Trees, shrubs, bulbs, annuals and perennials all have something spectacular to offer our early-season landscapes. In some parts of North America, however, a different set of plants puts on the most colorful performance this season: cacti. We don’t often receive submissions from the southwest, but when we do I’m always dazzled by the desert-dwelling plants that gardeners in this warm climate grow. Karen in Las Cruces, New Mexico (Zone 8) is not able to grow the perennials she dreamed of around her home, but the collection of cacti she has acquired bloom with such sensational color that she is not missing out on any spring interest.
We moved into a senior mobile home community about ten years ago. Although we don’t own the lot, just the house, I had a vision of lots of flowering perennials in our yard. We soon realized our front yard is very hot and sunny with a lot of wind in spring. A few weeks ago many of our cacti were in bloom. Most of them are trichocereus or torch cacti. We have a few prickly pear and some smaller ones but I especially like the torch cacti because they will bloom off and on all summer.
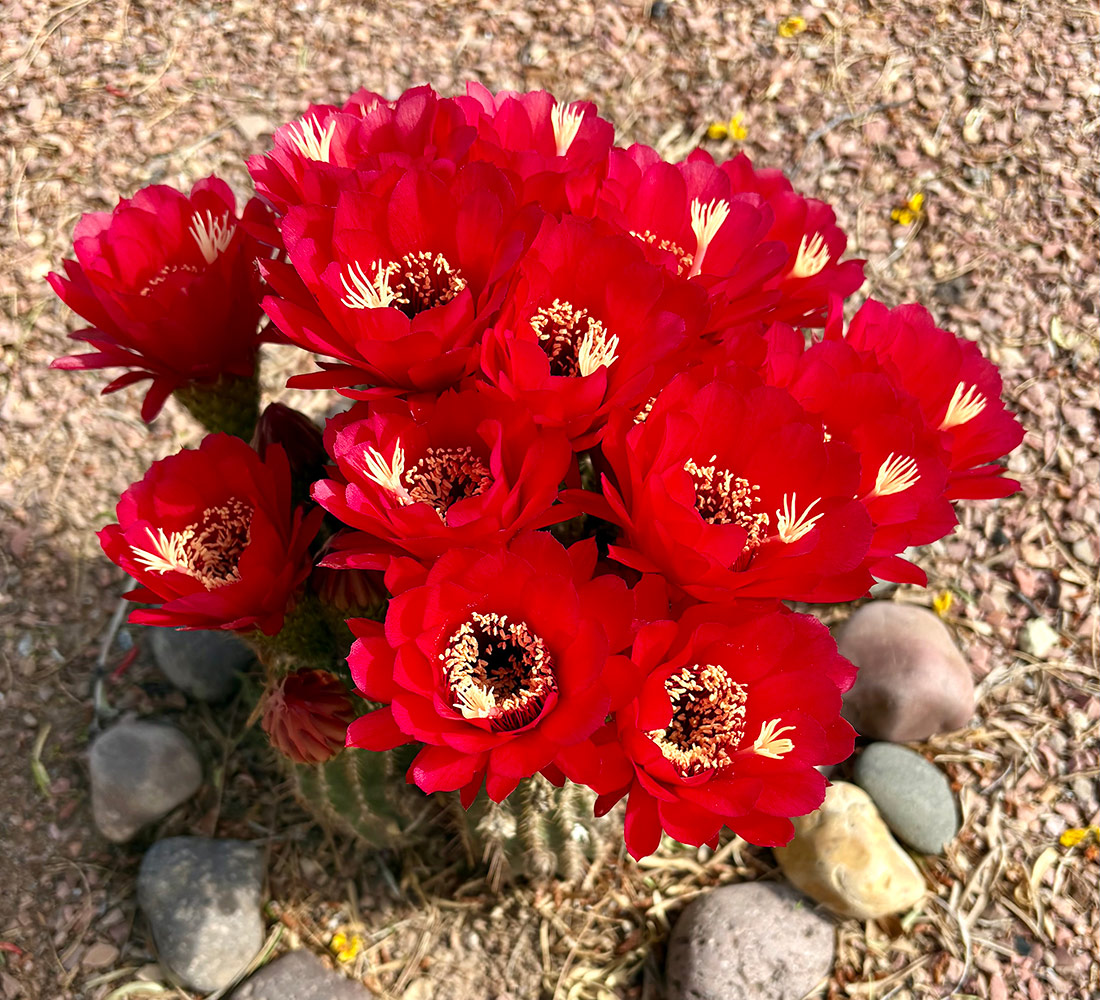
I believe this one is called Volcanic Sunset(Trichocereus ‘Volcanic Sunset’, Zones 8–11)
I got this from a neighbor and I’m not sure what it is. The flowers are open at night.
From a local nursery
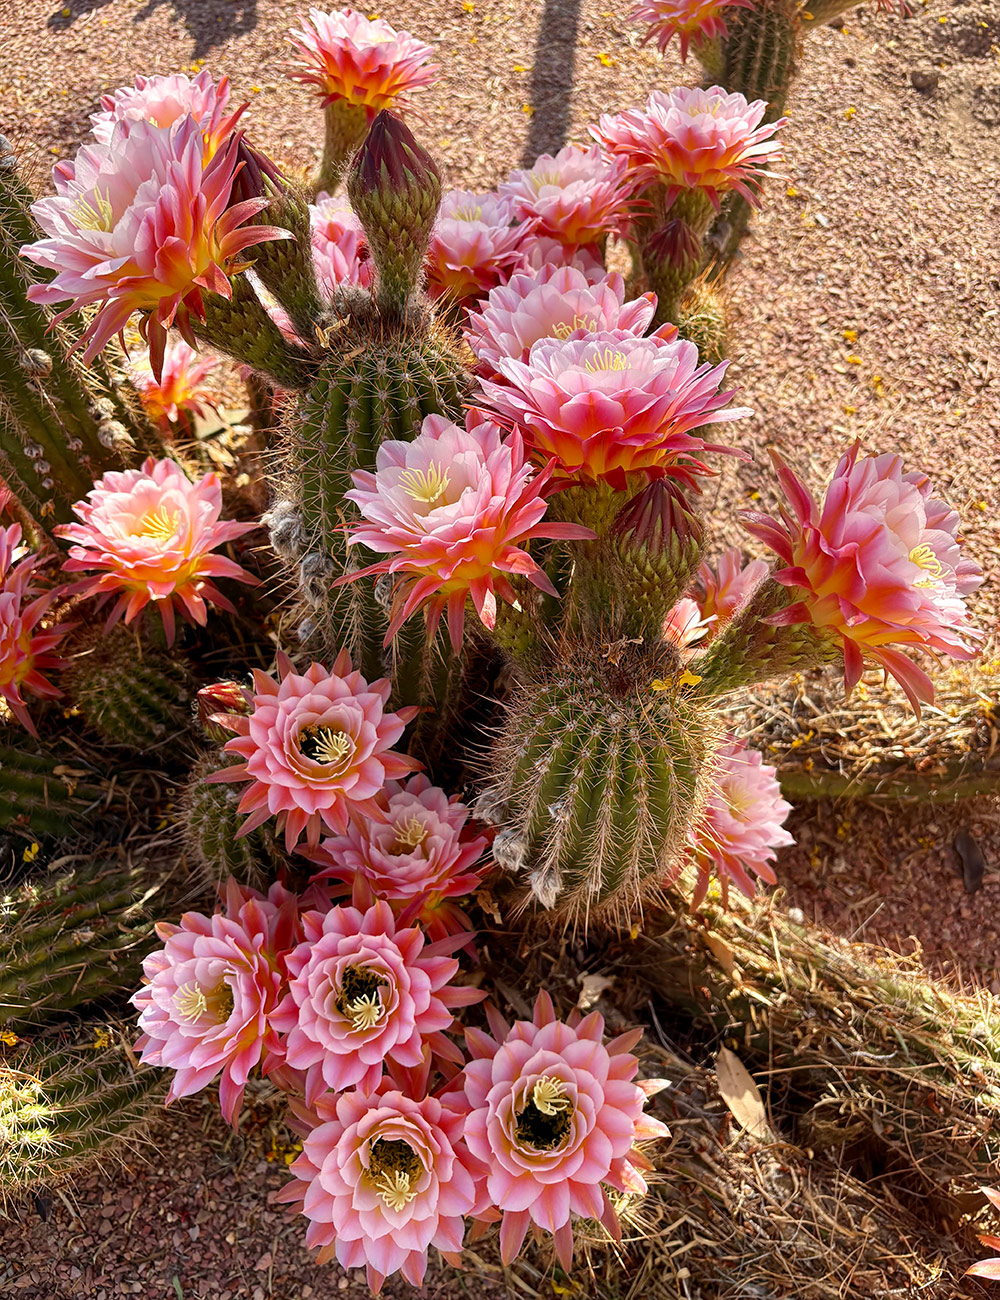
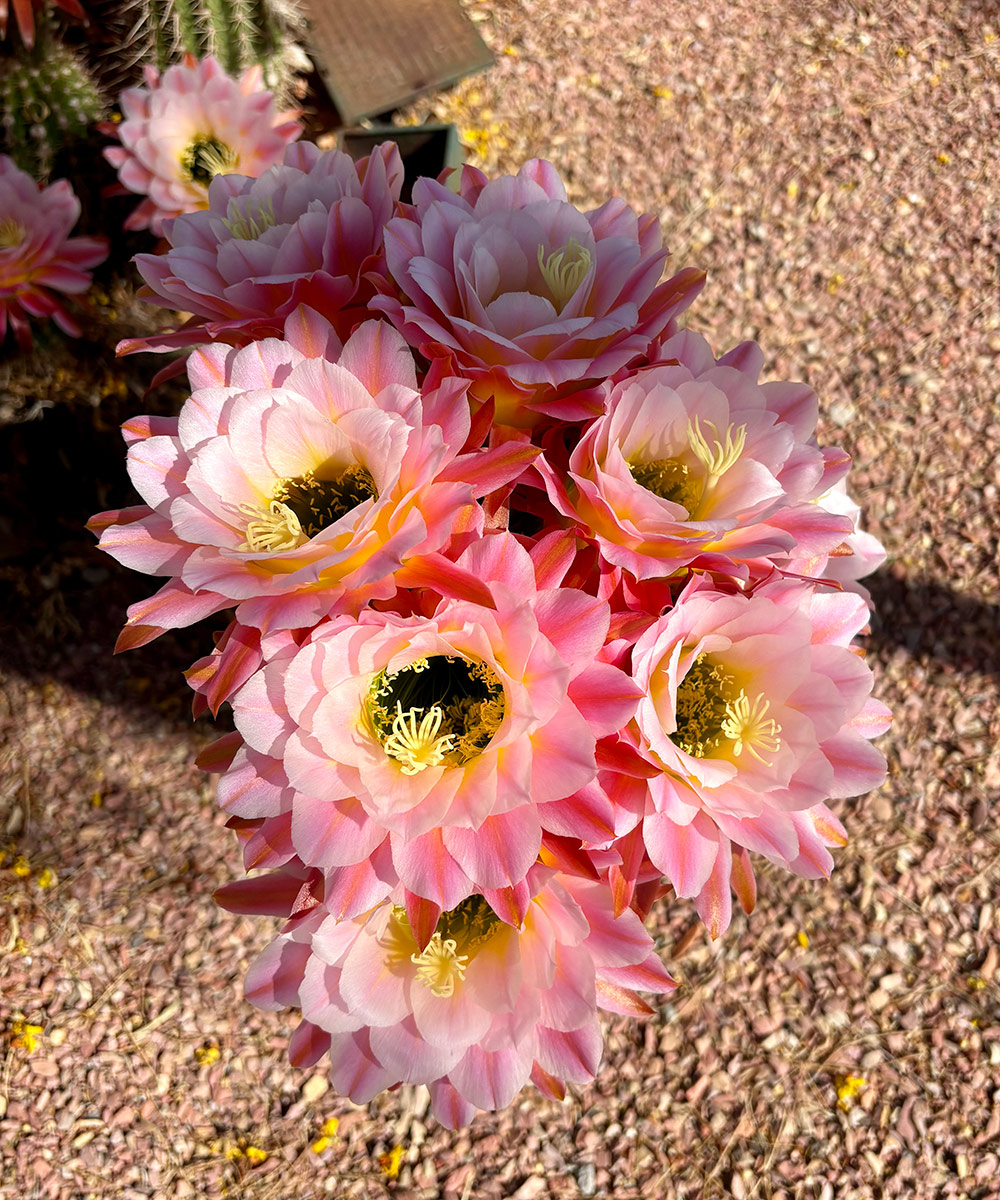
My favorite…from a cactus nursery that went out of business and it didn’t have a label. It’s pretty large now and in a good year it will have around 50 blossoms when it first blooms.
A closer look at my favorite
A cone cactus(Tephrocactus articulatus, Zones 8–11), it has frilly white flowers.
Thank you so much for sharing a very different side of spring with us, Karen! As someone who adores growing cacti in the northeast, it will always amaze me seeing these gorgeous plants growing to mature size and with spectacular flowers.
What plants put on a dazzling spring display in your garden? Are you a bulb connoisseur, do flowering shrubs and trees tickle your fancy, are ephemerals the stars your early-season landscape, or do cacti and succulents pack the most colorful punch? Let us know in the comments below, or consider sharing photos of your favorite spring bloomers with the blog. Follow the directions below to submit your photos to Garden Photo of the Day!
We want to see YOUR garden!
Have photos to share? We’d love to see your garden, a particular collection of plants you love, or a wonderful garden you had the chance to visit!
You can also send 5–10 photos to [email protected] along with some information about the plants in the pictures and where you took the photos. We’d love to hear where you are located, how long you’ve been gardening, successes you are proud of, failures you learned from, hopes for the future, favorite plants, or funny stories from your garden.
Do you receive the GPOD by email yet? Sign up here
Fine Gardening Recommended Products
SHOWA Atlas 370B Nitrile Palm Coating Gloves, Black, Medium (Pack of 12 Pairs)
Fine Gardening receives a commission for items purchased through links on this site, including Amazon Associates and other affiliate advertising programs.
Lightweight and close-fitting for excellent dexterity. Machine washable. Breathable back of hand to reduce perspiration. Designed for easy movement and continuous wear. Ideal for aerospace, assembly, automotive, construction, final fix, gardening, manufacturing, operating machinery, packaging, precision handling, tiling, warehousing.
Channel Link Rain Chain, 8.5 Feet, Pure Solid Copper
Fine Gardening receives a commission for items purchased through links on this site, including Amazon Associates and other affiliate advertising programs.
Elevate Your Exterior: Replace unsightly gutter downspouts with this stunning rain chain. Enjoy the mesmerizing sights and soothing sounds of rain cascading gracefully down, adding beauty to any outdoor space. Exceptional Durability: Crafted from pure copper, our rain chains for gutters are meticulously hand-assembled, promising a lifetime of classic beauty and resilience. Install in a Snap: No need to be an expert. Easily swap your rain chains for downspouts using the supplied hanging hook. Our rain chains for outside are compatible with any standard gutter hole. Optional gutter installer sold separately. Unrestricted Water Flow: The open-flow design of the gutter chain downspout allows water to effortlessly cascade down the chain without fear of backing up, even by heavy rain. Dimensions: Cup: 1.25 inches wide, 2 inches tall, 8.5 feet long, Cup count: 25
Price: $9.98 (as of Jun 01, 2026 13:49:35 UTC – Details)
Product description
Various Pill Counting Tray
Add to Cart
Add to Cart
Add to Cart
Add to Cart
Add to Cart
Add to Cart
Add to Cart
Customer Reviews
4.7 out of 5 stars 2,528
4.6 out of 5 stars 484
4.8 out of 5 stars 755
4.8 out of 5 stars 358
4.6 out of 5 stars 473
4.6 out of 5 stars 1,258
4.7 out of 5 stars 192
Price
$8.95$8.95
$9.98$9.98
$8.98$8.98
$8.95$8.95
$8.95$8.95
$8.98$8.98
$6.99$6.99
Color
Blue
Clear
Purple
Light Green
Clear
Purple
Purple
Pill Separator Material
L Shape
Wood Handle
L Shape
L Shape
L Shape
Multifunctional
L Shape
Left and Right Hands
Right Hands
Right Hands
Right Hands
Right Hands
Right Hands
Right Hands
Left Hand
Portable
✔
✔
✔
✔
✔
✔
✔
Quality
✔
✔
✔
✔
✔
✔
✔
Is Discontinued By Manufacturer : No Package Dimensions : 8.58 x 6.22 x 1.77 inches; 4.76 ounces Date First Available : May 24, 2018 Manufacturer : Medarchitect ASIN : B07CZ1BP9X Best Sellers Rank: #69,980 in Health & Household (See Top 100 in Health & Household) #487 in Personal Pill Organizers Customer Reviews: 4.6 4.6 out of 5 stars (484) var dpAcrHasRegisteredArcLinkClickAction; P.when(‘A’, ‘ready’).execute(function(A) { if (dpAcrHasRegisteredArcLinkClickAction !== true) { dpAcrHasRegisteredArcLinkClickAction = true; A.declarative( ‘acrLink-click-metrics’, ‘click’, { “allowLinkDefault”: true }, function (event) { if (window.ue) { ue.count(“acrLinkClickCount”, (ue.count(“acrLinkClickCount”) || 0) + 1); } } ); } }); P.when(‘A’, ‘cf’).execute(function(A) { A.declarative(‘acrStarsLink-click-metrics’, ‘click’, { “allowLinkDefault” : true }, function(event){ if(window.ue) { ue.count(“acrStarsLinkWithPopoverClickCount”, (ue.count(“acrStarsLinkWithPopoverClickCount”) || 0) + 1); } }); }); Dual Channel Design: Channel in lower left corner is for pouring the pills/tablets into daily pill box. Channel in top right corner is for pouring the rest pill back into original pill vial. Hands will not touch pills in whole counting process, making pill counting work more sanitary & efficient Hygienic Pill Sorting – Easily count and organize your medications without direct contact, preventing spills, drops, or chasing loose pills across surfaces Wood Handle Spatula: Help counting pills more comfortable Food Grade & BPA Free Plastic: Non-smell, Non-toxic, robust, heavy-duty hinges with metal pins for durability, long life Various Color Options: Classical Blue, Clear, Green, Light Green, Purple, White, and Black. Different color counting tray will be applied on different color pills counting
A sunny patio is great for relaxing outdoors, but too much direct sun can quickly make the space uncomfortable. The good news is that creating shade doesn’t have to mean spending a fortune on a custom pergola or expensive outdoor structure.
With a little creativity, you can make your patio cooler, more inviting, and easier to enjoy throughout the warmer months.
Whether you have a small backyard patio, a country porch, or a spacious outdoor sitting area, there are plenty of budget-friendly ways to block harsh sunlight while adding charm and personality.
Many of these ideas can even be completed as simple weekend DIY projects using affordable materials.
From fabric canopies and shade sails to climbing plants and repurposed outdoor features, these inexpensive patio shade ideas will help you stay comfortable outdoors without stretching your budget.
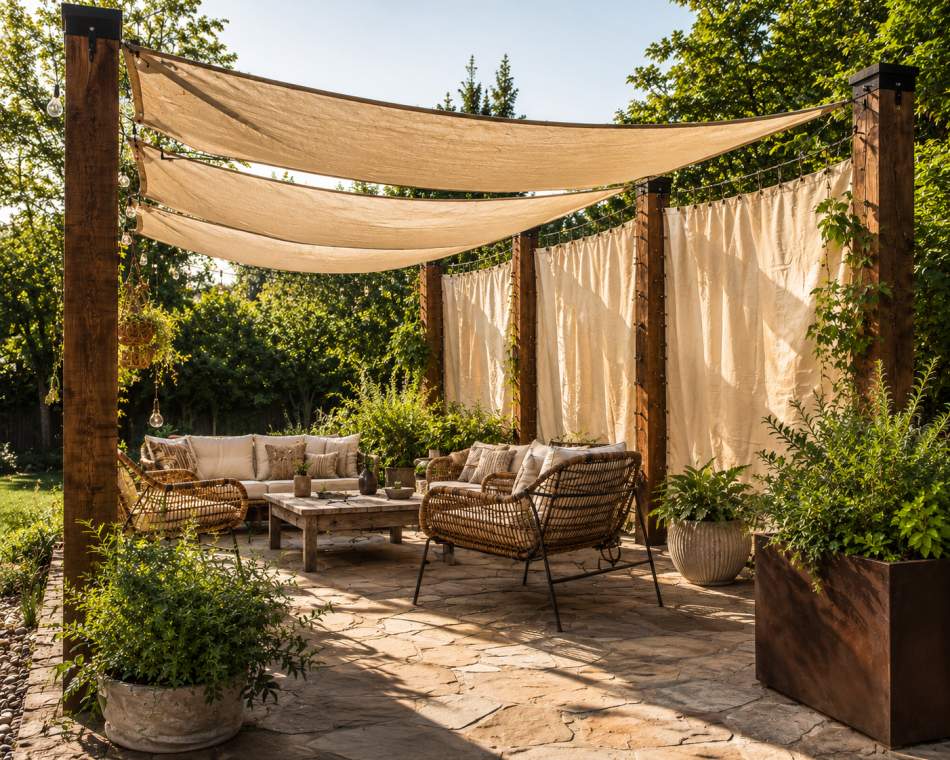
1. Install a Simple Shade Sail
A shade sail is one of the most affordable ways to add shade to a sunny patio. These fabric panels stretch between posts, walls, or trees to block harsh sunlight and create a cooler outdoor space.
They’re easy to install, available in many sizes and colors, and work well for both small and large patios. For extra coverage, try overlapping two sails. It’s a simple upgrade that offers plenty of shade without a big price tag.
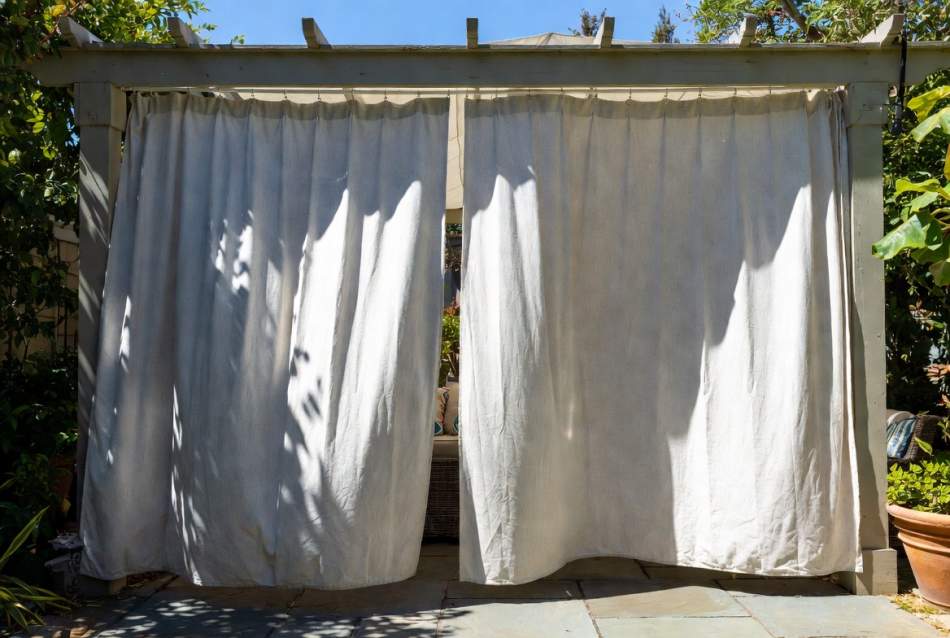
Outdoor curtains are a simple way to add shade while making a patio feel more private and cozy. They can be hung from a pergola, porch roof, or a basic wire system and drawn closed when the sun gets too intense.
Weather-resistant curtains are widely available, but you can also use affordable outdoor fabric to save money. Besides blocking sunlight, they add softness and style to your outdoor living space.
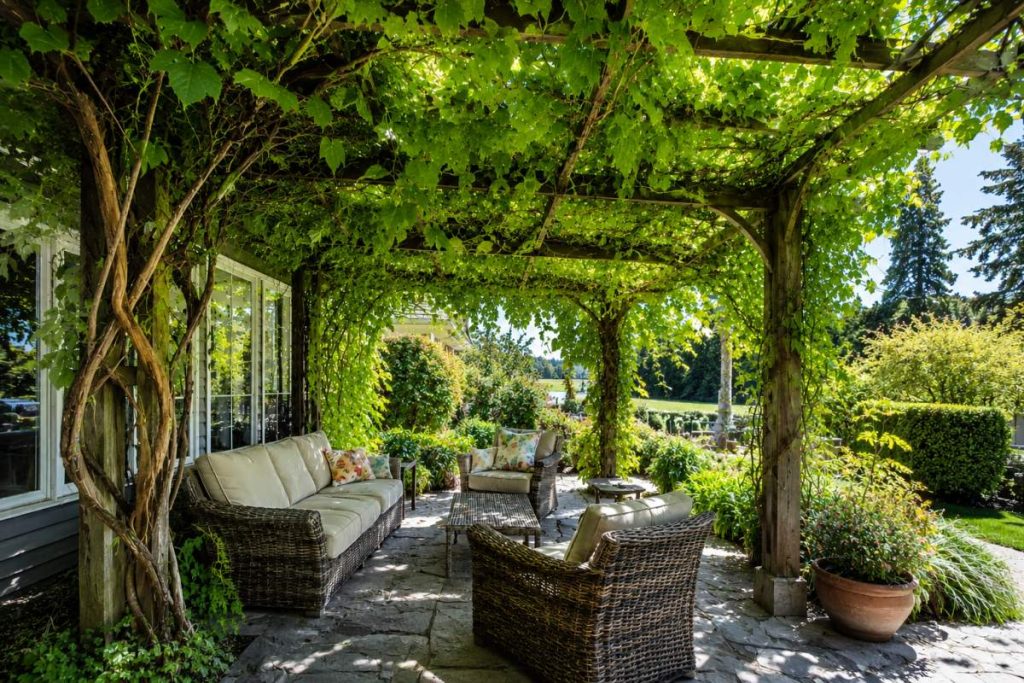
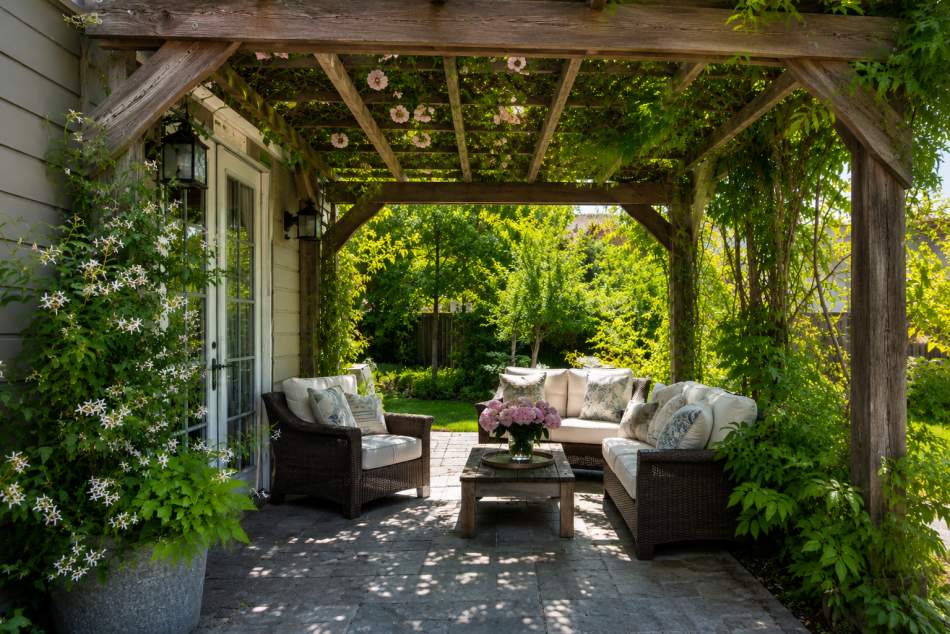
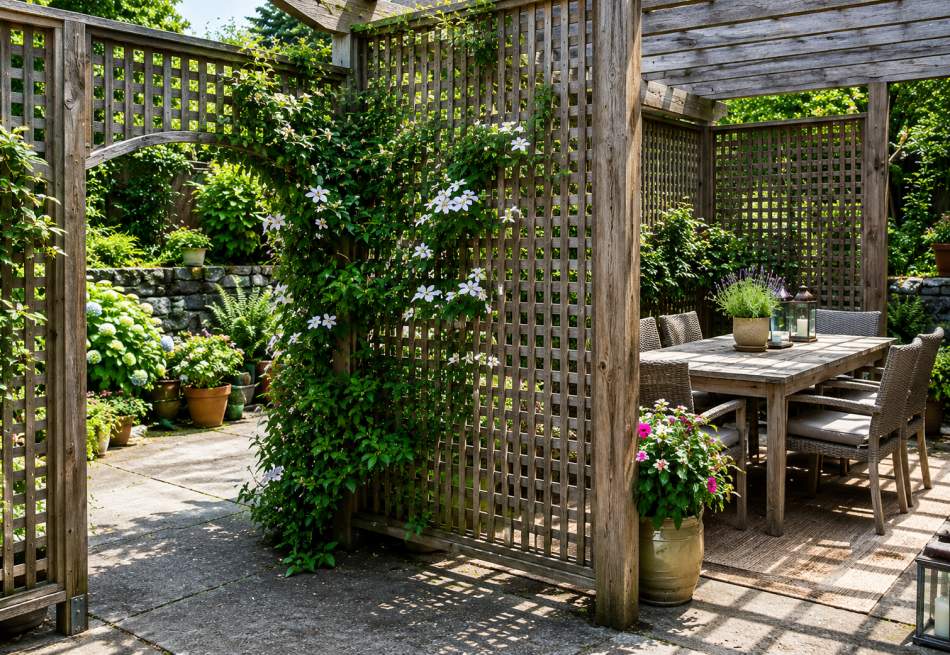
3. Grow Fast-Climbing Vines
Climbing vines offer a natural and budget-friendly way to create patio shade. Plants like morning glory, jasmine, or trumpet vine can quickly cover a trellis, arbor, or pergola, helping filter sunlight while adding greenery.
Although they take time to establish, vines provide long-lasting shade and can make your patio feel cooler and more inviting throughout the growing season.
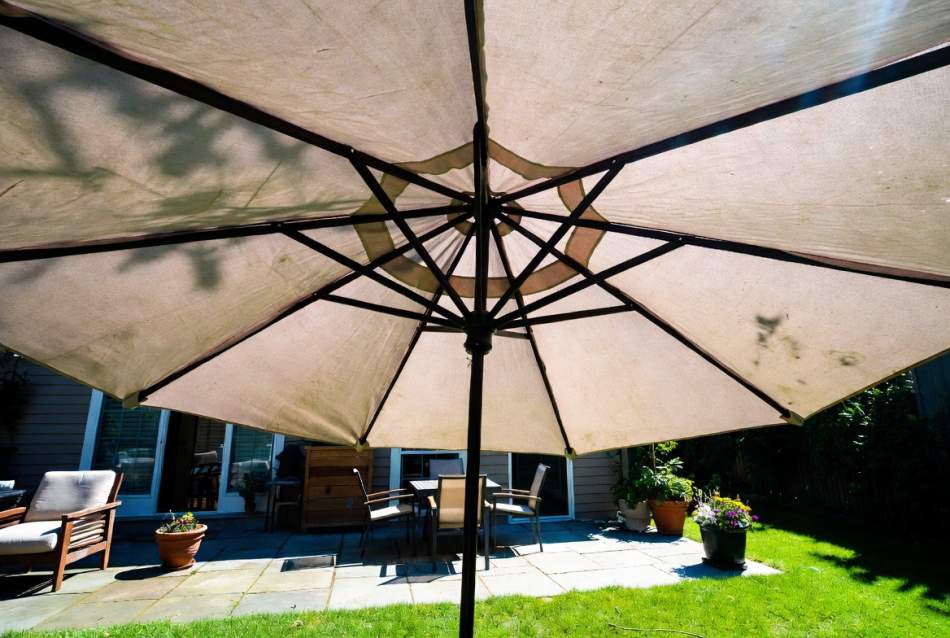
4. Use a Large Market Umbrella
A large market umbrella is an easy solution for patios that need flexible shade. Unlike permanent structures, umbrellas can be opened, closed, or moved as the sun shifts during the day.
They’re available in a wide range of sizes and price points, making them suitable for almost any budget. Place one over a dining table or seating area for instant protection from the sun.
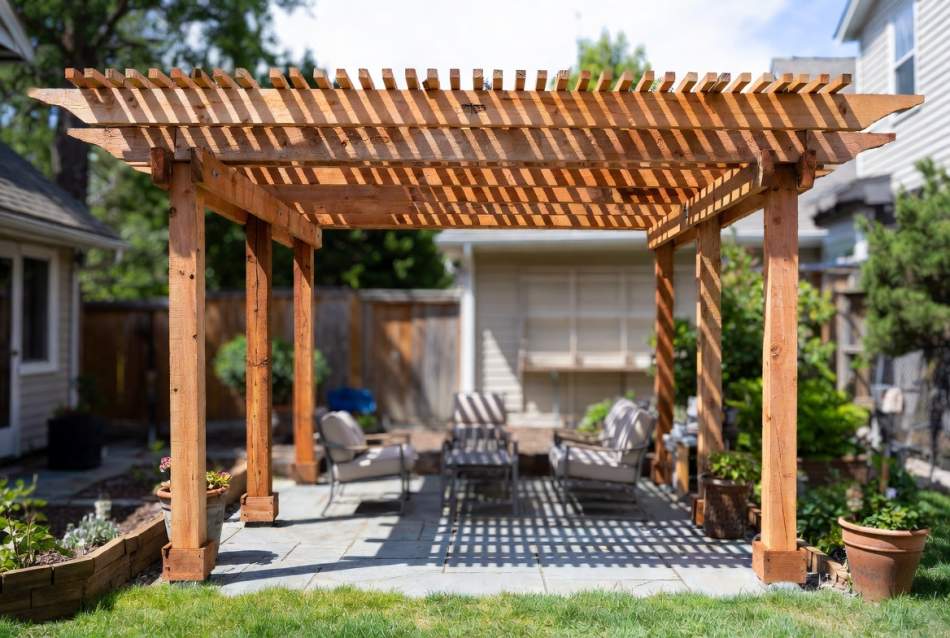
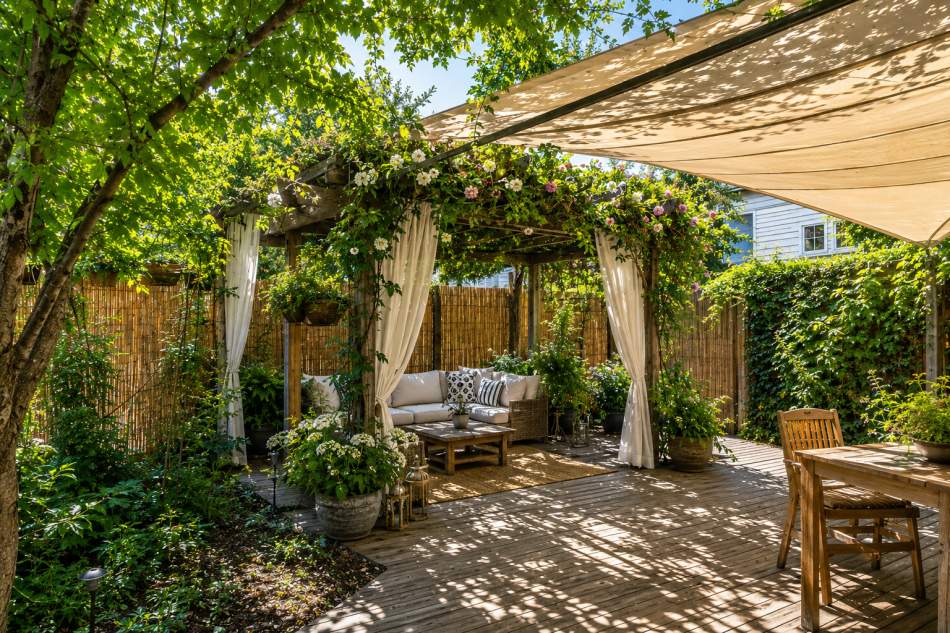
5. Build a DIY Pergola
A simple DIY pergola can provide partial shade while giving your patio a more finished look. Basic designs can be built with affordable lumber and customized over time with fabric, lights, or climbing plants.
Even a small pergola creates a defined outdoor space and offers a sturdy framework for additional shade solutions.
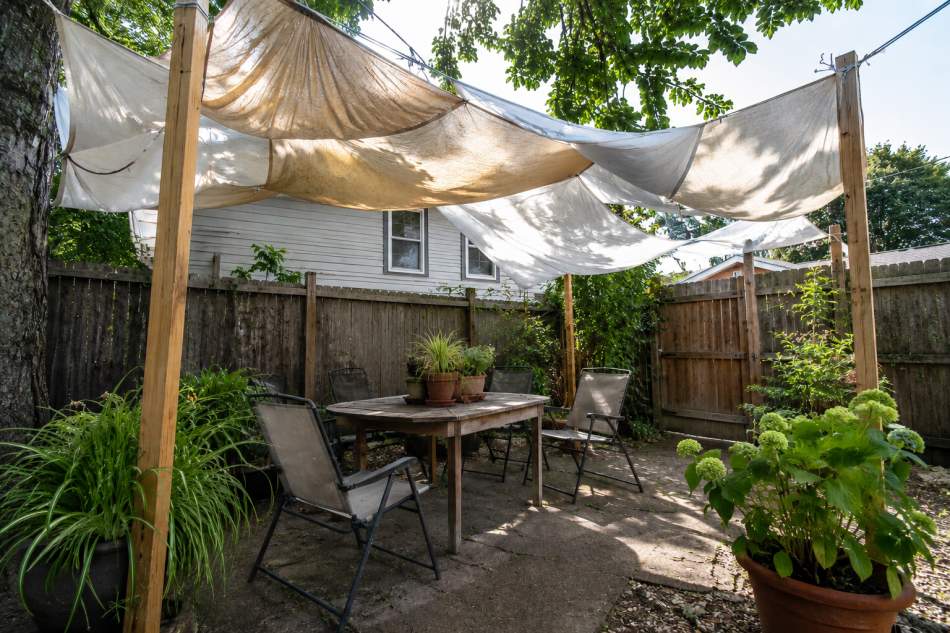
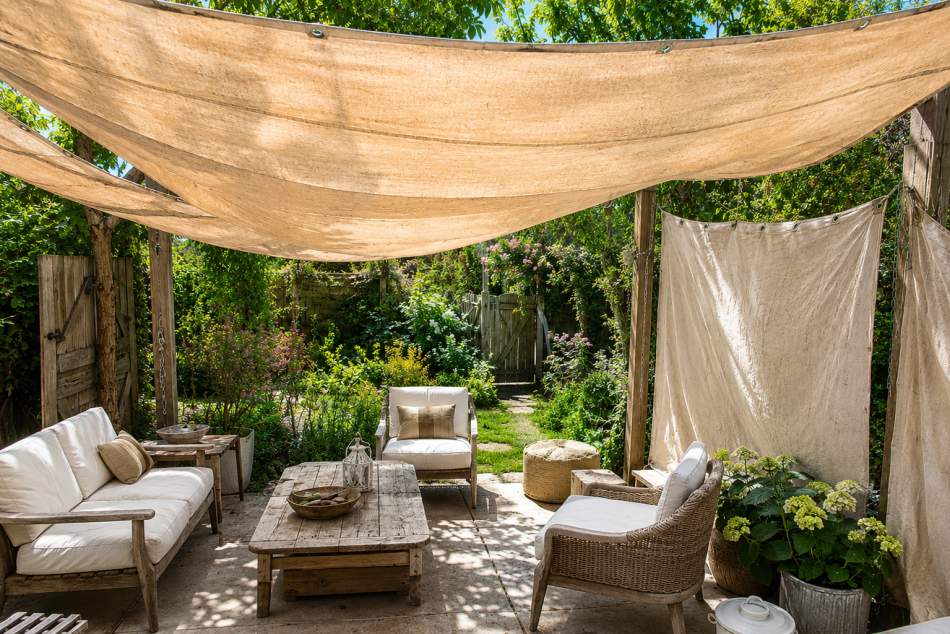
For a temporary and ultra-budget-friendly option, use old sheets to create a patio canopy. Secure them between posts, fences, or nearby structures to block direct sunlight during the hottest parts of the day.
While not as durable as commercial shade products, this quick DIY solution works well for summer gatherings and costs little to nothing if you already have spare sheets at home.
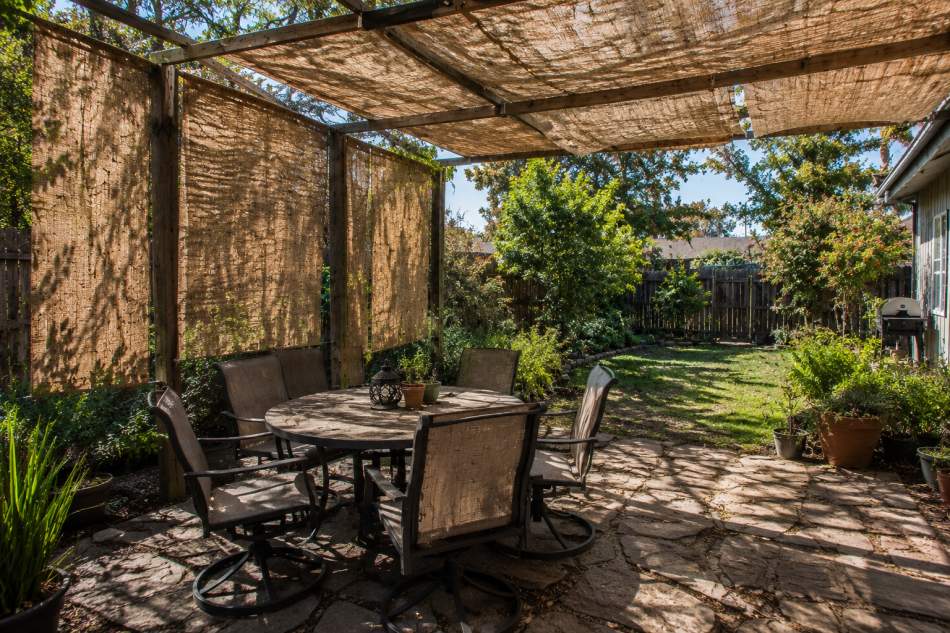
7. Use Bamboo Screens
Bamboo screens provide shade while adding a natural, rustic look to your patio. They can be attached to the sides of a patio or porch to block low-angle morning and afternoon sun without completely closing off the space.
Lightweight and affordable, bamboo screens also help create a more private outdoor retreat.
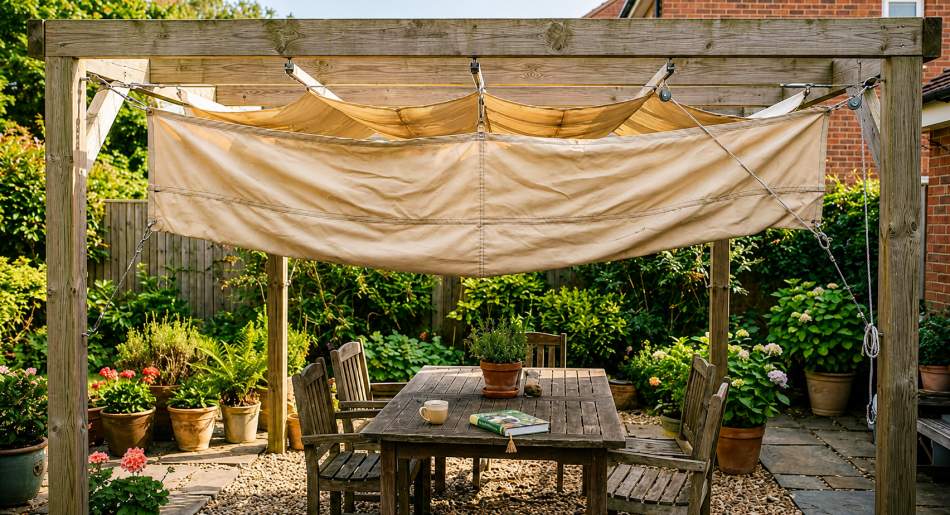
8. Add a Retractable Fabric Canopy
A retractable fabric canopy gives you shade when you need it and sunshine when you don’t. The fabric can be pulled open during hot afternoons and retracted on cooler days.
Many DIY versions can be made using outdoor fabric and a simple cable system, making this a practical budget-friendly option.
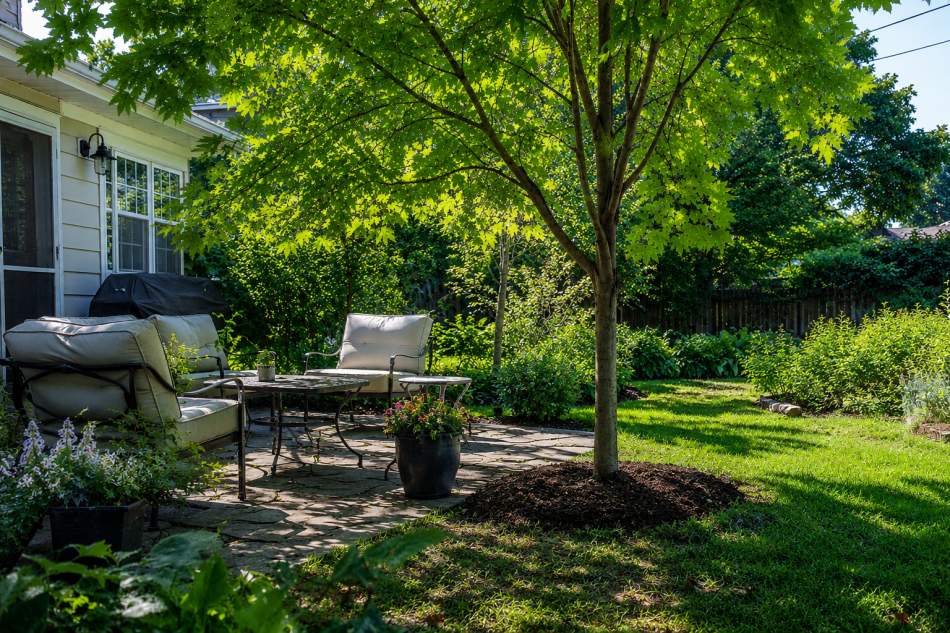
9. Plant a Shade Tree Nearby
Planting a shade tree is one of the best long-term solutions for a sunny patio. As the tree grows, it provides natural cooling, reduces glare, and creates a more comfortable outdoor environment.
Fast-growing varieties can begin offering noticeable shade within just a few years, making them a worthwhile investment for the future.
Reed fencing panels are an inexpensive way to block sunlight from the sides of a patio. Made from natural materials, they filter harsh rays while still allowing airflow.
They’re easy to install on fences, railings, or existing structures and can instantly make an outdoor space feel cooler and more private.
11. Build a Pallet Patio Cover
Wood pallets can be repurposed into a simple patio cover for very little cost. Arrange them above a seating area to create partial shade while maintaining an open, airy feel.
This DIY project is perfect for homeowners who enjoy upcycling materials and adding rustic charm to their backyard.
12. Hang Fabric Panels Between Posts
Stretching fabric panels between patio posts is a simple way to create shade without building a permanent structure. Outdoor fabric, canvas, or drop cloths can all work well for this project.
The flowing fabric softens the space, blocks direct sunlight, and gives the patio a relaxed, resort-inspired look.
13. Install a Roll-Up Bamboo Blind
A roll-up bamboo blind is an affordable way to block intense afternoon sun. Mounted to a porch, pergola, or patio cover, it can be lowered when needed and rolled up when you want more light.
The natural texture also adds warmth and character to outdoor spaces.
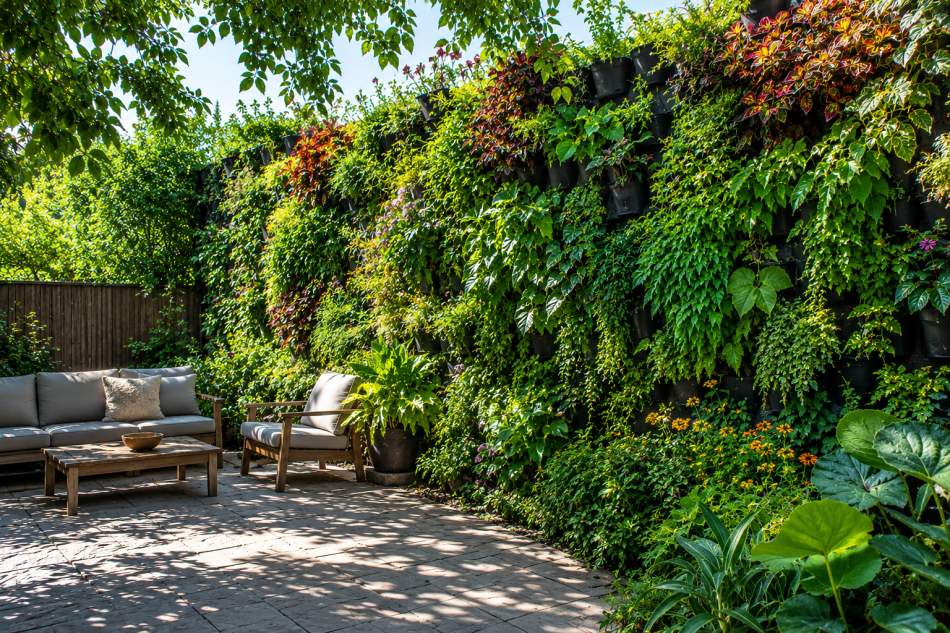
14. Create a Living Wall of Plants
A living wall can provide both shade and beauty to a patio. By growing plants on vertical supports, you can soften harsh sunlight while adding color and greenery.
It’s a great solution for small patios where space is limited but extra shade is needed.
15. Use Shade Cloth
Shade cloth is designed specifically to reduce sun exposure while still allowing air to circulate. It’s commonly used in gardens but works just as well over patios and seating areas.
Available in different shade levels and sizes, it’s one of the most cost-effective ways to create a cooler outdoor space.
16. Build an Arbor Over a Seating Area
An arbor can add charm and light shade to a patio seating area without taking up much space. It’s often less expensive than a full pergola and provides support for climbing plants that increase shade over time.
With a little DIY effort, an arbor can become an attractive focal point in your backyard.
17. Repurpose an Old Gazebo Frame
If you have an old gazebo frame sitting unused, give it new life by adding an inexpensive fabric cover. The frame already provides the structure, making this a budget-friendly way to create a shaded retreat.
Add outdoor curtains or climbing plants for even more shade and privacy.
18. Install Lattice Panels
Lattice panels provide partial shade while maintaining good airflow. They can be attached to the sides of a patio or used overhead to filter sunlight and create a more comfortable outdoor space.
For even more coverage, grow climbing vines through the lattice to create natural shade over time.
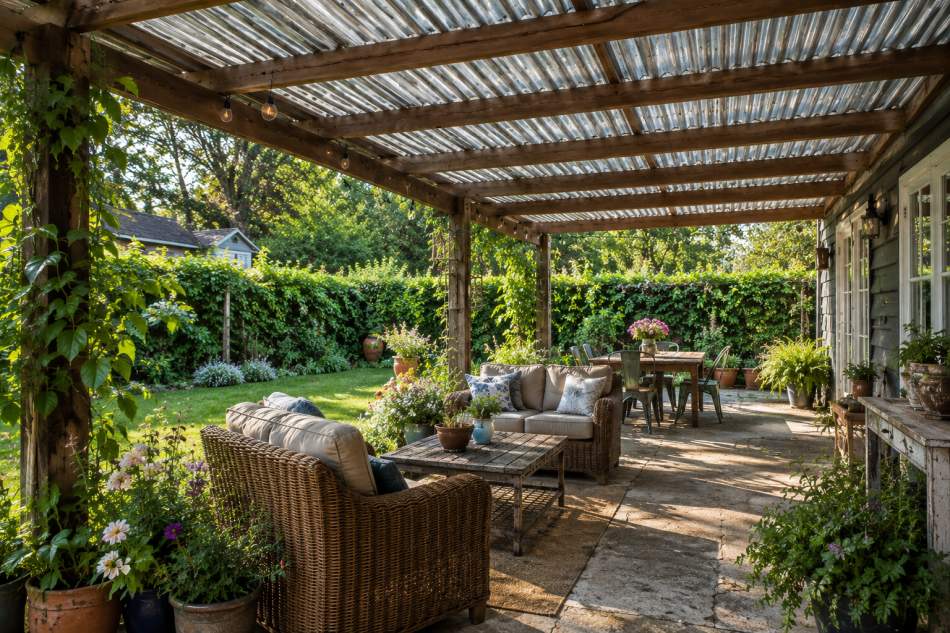
19. Use Corrugated Roofing Panels
Corrugated roofing panels are an affordable option for creating a permanent patio cover. Available in metal or plastic, they block direct sunlight and offer protection from light rain as well.
When installed over a simple frame, they provide reliable shade and can significantly extend the time you spend outdoors.
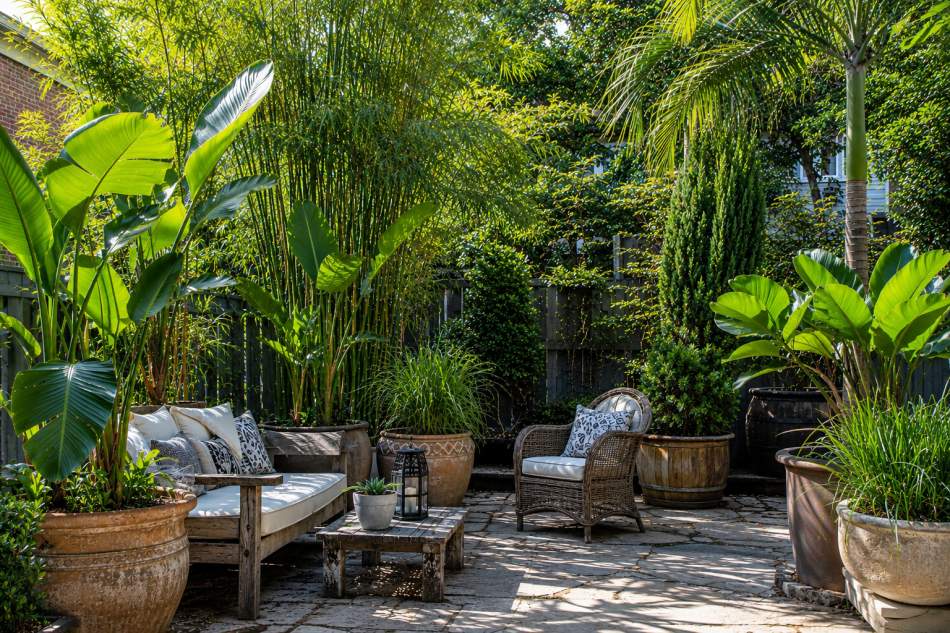
Tall potted plants can provide shade while adding beauty and greenery to your patio. Place large containers around seating areas to help block direct sunlight and create a more secluded feel.
Plants such as bamboo, ornamental grasses, or small trees work especially well for creating natural shade.
21. Hang Canvas Drop Cloths
Canvas drop cloths are a budget-friendly alternative to custom outdoor curtains or canopies. Hung between posts or along the side of a patio, they help block the sun while giving the space a relaxed, rustic look.
They’re durable, easy to install, and often cost much less than specialty outdoor fabrics.
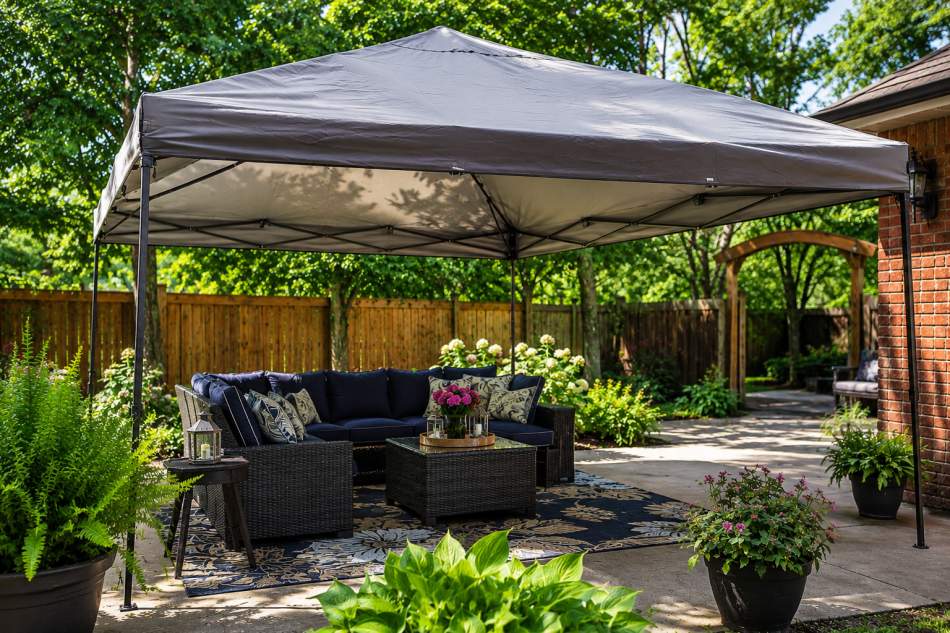
22. Add a Pop-Up Canopy
A pop-up canopy offers instant shade without any permanent installation. It’s an excellent option for renters, outdoor gatherings, or homeowners who want a flexible solution.
Most models are easy to set up, take down, and store when not in use, making them a practical and affordable choice.
23. Combine Multiple Shade Solutions
Sometimes the best shade comes from using more than one method. Pair an umbrella with potted plants, or add outdoor curtains to a pergola for greater sun protection.
Layering different shade solutions can make your patio cooler, more comfortable, and visually appealing without spending a lot of money.
The best patio shade solution depends on your budget, available space, and how much sun your patio receives. If you’re looking for a quick and inexpensive fix, options like umbrellas, shade sails, and outdoor curtains can provide immediate relief from the sun.
For homeowners seeking a long-term solution, pergolas, shade trees, and climbing vines are often worth the extra time and investment. You’ll also want to consider whether you prefer a permanent structure or a flexible option that can be moved or removed as needed.
Before making a decision, evaluate your patio’s size, local weather conditions, and DIY skill level. Choosing a shade solution that fits your needs will help you create a more comfortable and enjoyable outdoor space for years to come.
What is the cheapest way to shade a patio?
Old sheets, shade cloth, and DIY fabric canopies are among the cheapest patio shade options. They require minimal materials and can often be installed in a single afternoon.
Do shade sails hold up in strong winds?
Yes, high-quality shade sails can withstand moderate winds when installed correctly. However, they should be taken down during severe storms to prevent damage.
What plants provide the fastest patio shade?
Fast-growing vines like morning glory, trumpet vine, and jasmine can quickly cover trellises and pergolas. They provide natural shade while adding beauty to the patio.
Can renters create patio shade without permanent structures?
Absolutely. Umbrellas, pop-up canopies, outdoor curtains, and freestanding shade sails are great renter-friendly options that don’t require permanent installation.
Is a pergola cheaper than a gazebo?
In most cases, a basic pergola costs less than a gazebo because it uses fewer materials and has a simpler design. DIY pergolas can be especially budget-friendly.
Conclusion
Creating a comfortable, shaded patio doesn’t have to cost a fortune. From simple shade sails and umbrellas to DIY pergolas and climbing plants, there are plenty of affordable ways to escape the sun and enjoy your outdoor space.
Whether you’re looking for a quick weekend project or a long-term solution, these inexpensive patio shade ideas can help transform a hot, exposed patio into a cool and inviting retreat. Start with the option that best fits your budget and space, and you’ll be spending more time outdoors in comfort.
Khaja Moinuddin, a computer science graduate, finds joy in gardening and homesteading. Join him on this blog as he shares his experiences in homesteading, gardening, and composting
Price: $6.99 (as of Jun 01, 2026 01:48:49 UTC – Details)
Product description
Various Pill Counting Tray
Add to Cart
Add to Cart
Add to Cart
Add to Cart
Add to Cart
Add to Cart
Add to Cart
Customer Reviews
4.7 out of 5 stars 2,528
4.6 out of 5 stars 484
4.8 out of 5 stars 754
4.8 out of 5 stars 357
4.6 out of 5 stars 473
4.6 out of 5 stars 1,257
4.7 out of 5 stars 192
Price
$8.95$8.95
$9.98$9.98
$8.98$8.98
$8.95$8.95
$8.95$8.95
$8.98$8.98
$6.99$6.99
Color
Blue
Clear
Purple
Light Green
Clear
Purple
Purple
Pill Separator Material
L Shape
Wood Handle
L Shape
L Shape
L Shape
Multifunctional
L Shape
Left and Right Hands
Right Hands
Right Hands
Right Hands
Right Hands
Right Hands
Right Hands
Left Hand
Portable
✔
✔
✔
✔
✔
✔
✔
Quality
✔
✔
✔
✔
✔
✔
✔
Package Dimensions : 8.35 x 6.22 x 1.73 inches; 3.84 ounces Date First Available : March 4, 2024 Manufacturer : Medarchitect ASIN : B0CVVH2YJ7 Best Sellers Rank: #183,264 in Health & Household (See Top 100 in Health & Household) #1,270 in Personal Pill Organizers Customer Reviews: 4.7 4.7 out of 5 stars (192) var dpAcrHasRegisteredArcLinkClickAction; P.when(‘A’, ‘ready’).execute(function(A) { if (dpAcrHasRegisteredArcLinkClickAction !== true) { dpAcrHasRegisteredArcLinkClickAction = true; A.declarative( ‘acrLink-click-metrics’, ‘click’, { “allowLinkDefault”: true }, function (event) { if (window.ue) { ue.count(“acrLinkClickCount”, (ue.count(“acrLinkClickCount”) || 0) + 1); } } ); } }); P.when(‘A’, ‘cf’).execute(function(A) { A.declarative(‘acrStarsLink-click-metrics’, ‘click’, { “allowLinkDefault” : true }, function(event){ if(window.ue) { ue.count(“acrStarsLinkWithPopoverClickCount”, (ue.count(“acrStarsLinkWithPopoverClickCount”) || 0) + 1); } }); }); Dual Channel Design: Channel in lower right corner is for pouring the pills/tablets into daily pill box. Channel in top left corner is for pouring the rest pill back into original pill vial. Hands will not touch pills in whole counting process, making pill counting work more sanitary & efficient. Ergonomic in L shape Spatula: Help counting pills more comfortable, especially for elder, hand disease patient & longtime working people. Hygienic Pill Sorting – Easily count and organize your medications without direct contact, preventing spills, drops, or chasing loose pills across surfaces Food Grade & BPA Free Plastic: Non-smell, Non-toxic, robust, heavy-duty hinges with metal pins for durability, long life 【Customer Satisfaction Guarantee】If you are not 100% satisfy with the purchase for any reason, don’t hesitate to contact us to request a refund or replacement.
Price: $8.95 (as of May 31, 2026 13:47:08 UTC – Details)
Product description
Various Pill Counting Tray
Add to Cart
Add to Cart
Add to Cart
Add to Cart
Add to Cart
Add to Cart
Add to Cart
Customer Reviews
4.7 out of 5 stars 2,528
4.6 out of 5 stars 484
4.8 out of 5 stars 754
4.8 out of 5 stars 357
4.6 out of 5 stars 473
4.6 out of 5 stars 1,257
4.7 out of 5 stars 192
Price
$8.95$8.95
$9.98$9.98
$8.98$8.98
$8.95$8.95
$8.95$8.95
$8.98$8.98
$6.99$6.99
Color
Blue
Clear
Purple
Light Green
Clear
Purple
Purple
Pill Separator Material
L Shape
Wood Handle
L Shape
L Shape
L Shape
Multifunctional
L Shape
Left and Right Hands
Right Hands
Right Hands
Right Hands
Right Hands
Right Hands
Right Hands
Left Hand
Portable
✔
✔
✔
✔
✔
✔
✔
Quality
✔
✔
✔
✔
✔
✔
✔
Is Discontinued By Manufacturer : No Product Dimensions : 7.87 x 5.71 x 1.5 inches; 3.6 ounces Date First Available : December 13, 2017 Manufacturer : Medarchitect ASIN : B06W2FZYGX Best Sellers Rank: #33,219 in Health & Household (See Top 100 in Health & Household) #224 in Personal Pill Organizers Customer Reviews: 4.7 4.7 out of 5 stars (2,528) var dpAcrHasRegisteredArcLinkClickAction; P.when(‘A’, ‘ready’).execute(function(A) { if (dpAcrHasRegisteredArcLinkClickAction !== true) { dpAcrHasRegisteredArcLinkClickAction = true; A.declarative( ‘acrLink-click-metrics’, ‘click’, { “allowLinkDefault”: true }, function (event) { if (window.ue) { ue.count(“acrLinkClickCount”, (ue.count(“acrLinkClickCount”) || 0) + 1); } } ); } }); P.when(‘A’, ‘cf’).execute(function(A) { A.declarative(‘acrStarsLink-click-metrics’, ‘click’, { “allowLinkDefault” : true }, function(event){ if(window.ue) { ue.count(“acrStarsLinkWithPopoverClickCount”, (ue.count(“acrStarsLinkWithPopoverClickCount”) || 0) + 1); } }); }); ✅Dual Channel Design: Channel in lower left corner is for pouring the pills/tablets into daily pill box. Channel in top right corner is for pouring the rest pill back into original pill vial. Hands will not touch pills in whole counting process, making pill counting work more sanitary & efficient. ✅Ergonomic in L shape Spatula: Help counting pills more comfortable, especially for elder, hand disease patient & longtime working people. ✅FOOD GRADE & BPA FREE PLASTIC: Non-smell, Non-toxic, robust, heavy-duty hinges with metal pins for durability, long life. ✅Various color options to choose from: Classical Blue, Clear, Green, Light Green, Purple, White, and Black. Different color counting tray will be applied on different color pills counting. ✅【Customer Satisfaction Guarantee】If you are not 100% satisfy with the purchase for any reason, don’t hesitate to contact us to request a refund or replacement.
Catnip’s more subdued cousin catmint (Nepeta cataria) grows in average soil and produces subtly scented gray-green leaves followed by blue, pink, or white blooms.
They’ll keep coming throughout the summer if you cut it back mid-season.
This easygoing plant will grow in full sun to part shade and just about any type of well-draining soil. Average is fine!
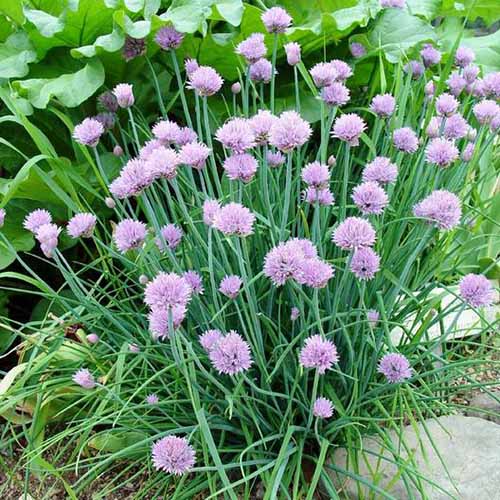
Chives (Allium schoenoprasum) are members of the onion family that includes garlic, leeks, and spring onions.
These are a secret weapon against bunnies who are treating your garden like their personal salad bowl.
Like the ornamental Alliums described above, chives make a good flower garden addition, too, since they boast beautiful light purple flowering pom-poms late in the season.
They’re also tasty perennials. This is probably the only natural, non-toxic pest deterrent that tastes great as a topping on baked potatoes or baked into cheddar biscuits.
They grow best in fertile well-draining soil and full sun, though they’ll also persevere in part shade. And they’ll usually make a comeback if you let them reseed.
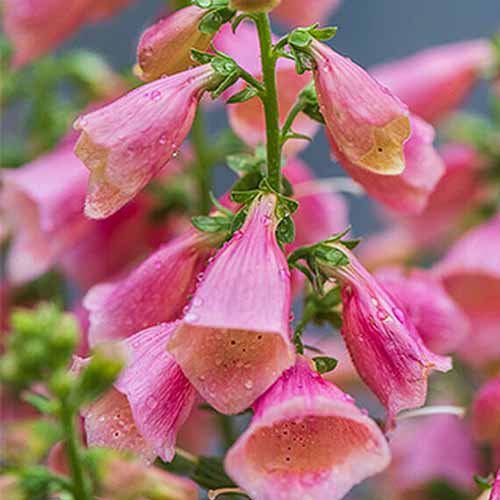
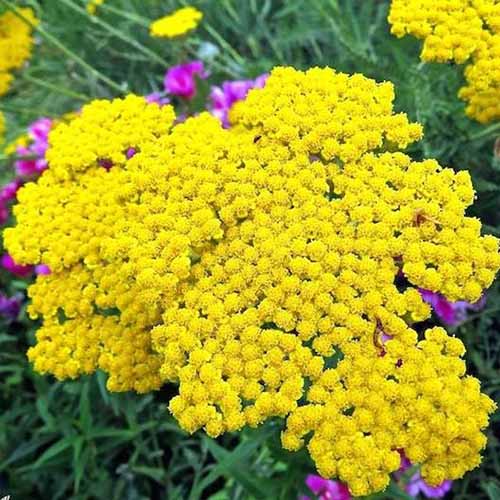
You’ll be depriving certain hopping pests of dinner, but you won’t be missing out on drama or beauty when you grow these showy 18-inch-and-up spikes of pink, rose, white, and yellow flowers.
They’ll start busting out all over in June and continue the show through late summer.
It used to be that all foxgloves (Digitalis purpurea) were biennials, so they didn’t bloom until the second year after planting. Now, some new varieties have been bred to flower in year one.
All types of foxgloves are fairly easy to grow if you have moist, well-drained soil. Remember to keep them well-watered during dry spells.
They like part sun but are also a solid choice as a perennial for the shade garden.
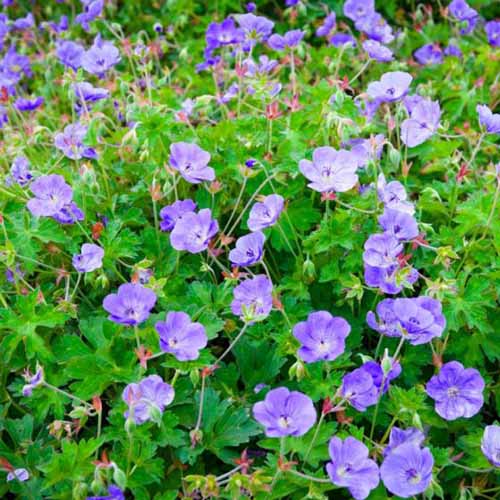
Here’s another flowering plant that deters nibblers with its scent.
Hardy geraniums, aka cranesbills (Geranium spp.), are not to be confused with those annual red geraniums that are actually a close relative, known botanically as Pelargonium.
Different varieties of hardy geraniums bloom in shades of blue, pink, purple, and white.
They produce mounds of dark green foliage and vibrant colored, five-petaled flowers. The leaves act as a deterrent with their subtle lemony scent.
They’re a great choice for native plant gardens, and areas with light shade or full morning sun.
Learn more about cultivating and propagating cranesbill geraniums in our growing guide.
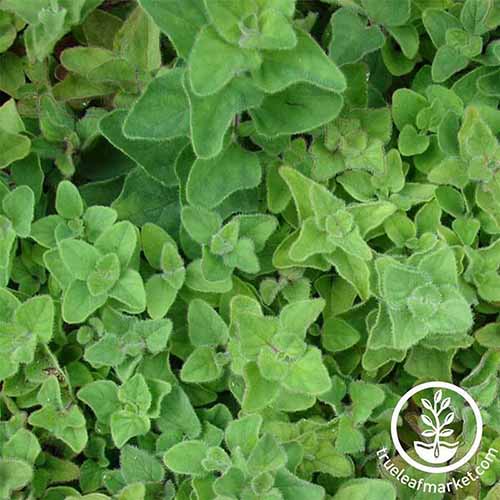
10. Oregano
The tasty herb with its tiny pink or white flowers is a culinary delight, just not to rabbits.
A perennial, oregano (Origanum vulgare) grows in average soil and tolerates drought and heat. It will need full sun to do its best. This summer favorite is hardy in Zones 5 to 10.
Plant oregano along the ground and save Thumper and Bugs’ favorites – like tender young petunias – for planting in raised beds or hanging baskets.
Our cute hopping buddies tend to leave this cheerful flowering plant alone, maybe because of its scent.
Salvia is a genus in the mint (Lamiaceae) family, so its aroma will probably be just fine for you.
It’s a handy option if you live where it’s hot or dry but still want brilliant color. In colder climes, salvia is also known for its chill tolerance.
And you’re bound to find at least one variety that suits you. Salvia can be perennial or annual, and some types are semi-woody sub-shrubs or ground covers.
If you’ve already planted your garden, you can find complementary salvia varieties in colors like red, purple, and blue that grow from one to five feet tall, depending on your selection.
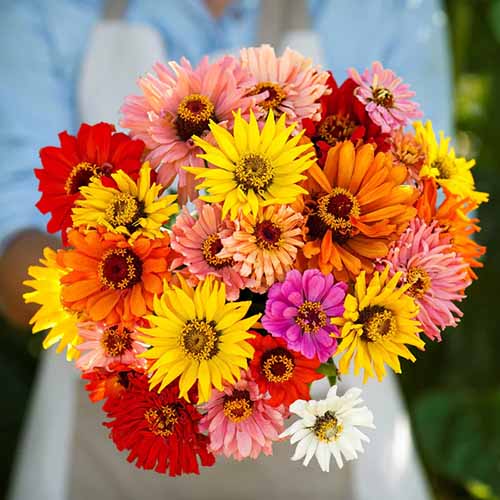
These bright, cheery annuals are easy to grow in full sun. They come in a variety of sizes, from dwarf miniatures to those that grow four or five feet tall.
And they offer plenty of color options, from a pretty pastel pink to neon green.
My favorites are cactus zinnias (Zinnia elegans), which are mammoth and arty. When they’re flowering, I like to keep a single bloom in a bud vase on my bathroom vanity.
Remember, there’s always a slight risk that rabbits will find some flowering plant in your garden to be to their taste.
For one thing, they’re constantly on the run from predators, so when they pause to eat, they’re happiest to get concentrated nutrition from those heavily fertilized bedding plants you’ve just purchased and planted.
They also like the tender sprouts of your perennials or flowering vegetables. If you’re able to keep them away with fences or other barriers while your plants are small and appealing, that’s a good strategy.
Also be extra cautious and protect young plants, woody shrubs, and even the trees that have delicious new growth, during times when wild food isn’t available for whatever reason.
Happily, a combination of all these strategies can usually make it possible to minimize or eliminate damage from these cute little creatures.
I have found that gardeners and even researchers in different areas have different ideas as to which flowering plants are rabbit-resistant. So be sure to experiment if you’re having trouble.
Let us know in the comments below if you’ve hit on a flower that seems impervious to furry little marauders with big ears, quivering whiskers, and wide eyes!
Price: $16.99 (as of May 31, 2026 01:45:40 UTC – Details)
You are looking for an awesome pharmacy technician design? Then is this funny loves pharmacy tech, medication or health care design the right one. It’s a great idea for pharmacists who love their job. Wear it proudly to work or in your free time. Get this. This funny pharmacy technician design for women and men who love their pharmacy tech or technician job. Show that you are a proud pharmacist. On the pharmacy technician motive is the quote I’m A Pharmacy Technician And I’m In It For The Money. You are looking for an awesome pharmacy technician design? Then is this funny loves pharmacy tech, medication or health care design the right one. It’s a great idea for pharmacists who love their job. Wear it proudly to work or in your free time. Get this. This funny pharmacy technician design for women and men who love their pharmacy tech or technician job. Show that you are a proud pharmacist. On the pharmacy technician motive is the quote I’m A Pharmacy Technician And I’m In It For The Money. 11-ounce ceramic mug is dishwasher and microwave-safe, lead and BPA free Features glossy finish with accent colors on interior, handle, and rim of two-tone designs


")


")


")


