Wait about a week before watering to allow any wounds to heal and prevent rot.
Pests and Disease
P. nelii rarely suffers from pests or diseases when given proper care.
Pests
Aphids occasionally attack these succulents, clustering on new growth or around flowers.
Remove the pests by spraying with water or wiping them off with a damp cloth. Insecticidal soap is effective for heavier infestations.
Mealybugs are small, white, cottony-looking insects that feed on sap. They typically cluster at the base of leaves or in the cleft between leaf pairs.
Remove them manually with a cotton swab dipped in rubbing alcohol. For heavier infestations, spray with insecticidal soap or neem oil.
Scale insects may attack split rock plants, particularly those that are stressed from overwatering. They appear as small, brown, shell-like bumps on the leaves.
Remove scale manually by scraping them off gently with your fingernail or a soft brush. For persistent infestations, use insecticidal soap or horticultural oil.
Disease
Root rot is by far the most common problem and is almost always caused by overwatering or poor drainage.
Symptoms include soft, mushy leaves that may turn translucent or yellowish.
If you catch it early while rot is confined to the roots, you may be able to save the plant. Remove it from the soil and carefully cut away all rotted roots with sterilized scissors or a knife.
Let it dry out completely in a shaded, well-ventilated area for several days to allow the cut surfaces to callus over.
Then repot in fresh, completely dry soil with excellent drainage.
Wait at least a week before watering lightly to encourage new root growth.
Some growers recommend misting the leaves occasionally during recovery, as moisture can enter through the stomates while new roots develop.
If rot has progressed into the leaves, discard the plant immediately along with its soil, and clean the pot thoroughly with a 10 percent bleach solution (one part bleach to nine parts water) before reusing.
Sterilize any tools that came in contact with the diseased specimen to prevent spreading pathogens to healthy ones.
Price: $34.99 (as of Dec 13, 2025 14:58:20 UTC – Details)
From the brand
Complete Set for Full Body Workouts – Our resistance band set includes 3 fabric resistance bands (Light, Med, Heavy), 2 comfortable handles, 2 ankle straps, a soft door anchor, and a travel backpack [Never Snaps] Our workout resistance bands for women are designed to never snap; Unlike other exercise resistance bands with handles, Alta’s stretch bands for exercise set the bar for durability Comfortable & Skin-Friendly – Our ScrunchKnit fabric sleeves not only look amazing, but they also prevent the rubber material inside the bands from rubbing your skin; perfect for those with sensitive skin On-the-Go Workouts – Stay active no matter where you are with our travel-friendly long elastic bands for exercise; Our exercise band door anchor can attach the gym bands to any hotel door Customizable Resistance – Adjust the exercise bands’ resistance from 10 to 60 lbs by stacking the bands; Use all three resistance tubes with handles for 60 lbs of resistance in your home workout
Customers say
Customers find these resistance bands to be high quality and effective for achieving fitness goals, appreciating that they can be carried like a backpack and are perfect for travel. They are easy to use and install, and customers like their colors and pretty appearance. The durability receives mixed feedback, with some finding them durable while others report them breaking easily.
Shrimp burrito bowls are one of my favorite low-effort ways to bring that big, bold, Chipotle-style flavor home without the price tag or the drive. This version uses all the shortcuts that make dinner feel doable on nights when you’re running on fumes, frozen peppers and onions, store bought fajita seasoning, seasoned beans and shrimp that’s already peeled and deveined. Everything cooks quickly, there’s no chopping at all and you end up with a bowl that’s colorful, satisfying and ready in minutes.
I know how exhausting dinner can feel at the end of a long day, which is why I lean hard into recipes that give you maximum flavor with minimal effort. I created these shrimp burrito bowls during a week when I was craving something fast casual but live nowhere near a Chipotle. I used what I already had; shrimp thawing in the fridge, frozen veggies, a packet of fajita seasoning, and was shocked by how good it turned out. It’s become one of those meals I genuinely look forward to because it feels special without any extra work.
If you love simple, flavor-packed shrimp dinners, there are a few other Cooking Burnout Club favorites you won’t want to miss. My salsa verde shrimp and rice is another shortcut-heavy recipe that uses jarred salsa verde and frozen peppers to build incredible flavor with almost no effort. For something bold and bright, the blackened shrimp bowls are topped with jarred mango salsa and paired with the most delicious homemade black beans. And if you need the fastest option of all, the air fryer shrimp tacos come together in just 10 minutes and hit every single time.
This post contains affiliate links. As an amazon associate I earn from qualifying purchases. Click here to read my policy and more about affiliate links.
Ingredient spotlight
Frozen peeled and deveined shrimp – A true cooking burnout essential. Keeping a bag of frozen shrimp in the freezer means you can make a delicious, protein packed meal without any prep. No peeling, no deveining, just defrost and cook. Shrimp thaws in under an hour in cold water, but I often pull it out the night before and let it sit in the fridge so it’s ready to go.
Charro beans – I love the Charro beans from Siete Foods because they are so flavorful on their own. In fact, they’re so bold and delicious that I like to stretch them by adding a can of drained and rinsed black beans or kidney beans while they simmer. The extra beans soak up all that amazing flavor and make the bowl even more filling. Don’t worry, if you don’t have a can of these, make my famous black beans for tacos instead, I promise they are quick and easy!
Fajita seasoning– I always keep several packets of fajita seasoning in my pantry for nights exactly like this. It instantly brings big flavor with zero effort. If you don’t have fajita seasoning, taco seasoning works great too. Want to make your own? Try my go-to taco seasoning recipe.
Fire roasted frozen bell peppers and onions – These are one of my favorite freezer shortcuts. They add so much smoky flavor and save you from chopping anything. Trader Joe’s carries a great version, but regular frozen peppers and onions work just fine if that’s what you have.
Cooking Burnout Tips
Use the Instant Pot for the rice
The Instant Pot is an essential burnout-friendly appliance in my kitchen. It cooks rice perfectly every single time without me having to babysit a pot on the stove. Being able to set it and walk away means I can multitask and get dinner on the table quickly, without the overwhelm or mental load that comes with managing multiple things at once.
Say yes to the shortcuts
Store bought seasonings, seasoned beans and freezer staples might cost a little more upfront, but they save money (and stress) in the long run. When you’re burnt out, these shortcuts are the difference between cooking at home or giving in to takeout again. Using them isn’t cheating; it’s smart, supportive and exactly what burnout cooking calls for.
No Instant Pot? No energy for rice? Totally fine.
Frozen rice or microwave-ready rice is your best friend on nights you just can’t do another step. There is no shame in grabbing the shortcut. The goal is to eat something satisfying and nourishing without draining every last bit of energy you have.
Skip the chopping entirely
Frozen bell peppers and onions pretty much guarantee I’ll get veggies on my plate. If chopping fresh ones were required, I promise you I’d skip them every time when I’m burnt out. I bet you feel the same. Frozen veggies keep things simple, fast and stress-free; exactly what we need right now.
★ Did you make this recipe? Please give it a star rating below!
Shrimp and Veggies
14ozbag frozen bell peppers and onions – fire roasted if you can find them
1poundfrozen shrimp – peeled and deveined – defrosted
1package fajita seasoning or taco seasoning – about 2 tablespoons
Start by making the rice. Rinse it well. Add rinsed rice and water to instant pot and cook 3 minutes high pressure.
1.5 cups white jasmine rice, 2 cups water
While rice is cooking, preheat large skillet over medium heat. When hot, spray with avocado oil and add frozen veggies. Cook 5-6 minutes, stirring occasionally.
14 oz bag frozen bell peppers and onions
While veggies are heating through, add Charro beans and drained and rinsed black beans to a pot with a lid. Cook over medium low heat, covered until warmed through.
1 can Siete Charro Beans, 15 oz can black beans
After the veggies are heated through and the water is starting to cook off of them, move the veggies to the outer edge of the pan and add the defrosted shrimp (be sure to drain off any liquid that comes off the shrimp when defrosting, that is not good). Cook shrimp 2 minutes. Flip shrimp and add the salt, garlic powder and fajita seasoning to the shrimp and veggies. Stir well and cook 2-3 minutes.
1 pound frozen shrimp, 1 package fajita seasoning or taco seasoning, ½ teaspoon salt, ½ teaspoon garlic powder
After the rice is done cooking, manually release the pressure (carefully). Remove the lid and add the lime juice, chopped cilantro, salt and garlic powder. Stir well.
1.5 medium limes, juiced, 3 tablespoons chopped cilantro, ½ teaspoon salt, ½ teaspoon garlic powder
Assemble the bowls – add cilantro lime rice, charro beans, fajita shrimp and veggies, guacamole, salsa and any other toppings and enjoy.
Guacamole, Salsa or pico de gallo
Don’t overcook the shrimp – Shrimp cook fast. Add them to the hot skillet and cook for about 2 minutes, flip, coat with seasoning, then stir in the veggies and cook 1–2 more minutes. The heat from the peppers and onions will continue to cook them gently. Overcooked shrimp become tough and rubbery, so pull them off the heat as soon as they’re opaque.
Use good-quality peeled and deveined shrimp – The pink Argentinian shrimp from Aldi are my favorite here, budget friendly, peeled, deveined and always cook up tender. Any peeled, deveined shrimp works, just choose something that keeps prep minimal.
Drain the defrosting liquid – When shrimp defrost, they release a lot of liquid. Make sure you drain that completely before cooking. Adding it to the skillet dilutes the seasoning and sauce and can make the dish watery (and just… not great).
No charro beans? Season your own. – If you don’t have charro beans, warm up a can of black beans with lime juice, salt, garlic powder and a pinch of cumin. It gives the beans a quick flavor boost without extra work.
Store leftovers in a well sealed container in the fridge for up to 3 days. Wait to add guacamole and salsa until after reheating.
Nutrition Information
Nutrition Facts
Amount per Serving
Where does nutrition info come from? Nutrition facts are provided as a courtesy, sourced from the USDA Food Database.
SHARE THIS POST!
If you liked this post, share it with your friends and family!
Course: dinner, Main Dish
Cuisine: Mexican
Keyword: burrito bowls with shrimp, shrimp burrito bowls
Let others know by rating and leaving a comment below!
Additions & Toppings
Keep it simple and add anything that sounds good:
Frozen fire roasted corn (toss in with the shrimp)
Cubed avocado
Cilantro
Cheese
Sour cream
Chopped romaine
Chopped tomatoes
Pickled onions
Easy, mix-and-match options to make your bowl even better.
Common questions
What if my shrimp isn’t defrosted?
If you have time, place the shrimp in a bowl of cold water and change the water every 20–30 minutes. They’ll thaw in under an hour.
If you need dinner now, make air fryer frozen shrimp instead and toss them with half the fajita seasoning in the last minute of cooking.
Can I make this with something besides shrimp?
Yes! Use cubed chicken cooked in the skillet before adding the peppers and onions, or try salmon (air fryer salmon bites coated in fajita seasoning work great). You can also double the beans and skip the protein entirely, still filling, still delicious.
Is this good for meal prep?
Shrimp isn’t my top choice for meal prep since it can overcook when reheated. That said, I did reheat leftovers in a covered glass dish in the air fryer and they were incredible. If you’re reheating at home, it works. If you’re reheating in an office… maybe choose chicken or beans instead.
Samoana Matagi was one of the four participants in a study that tested the capabilities of a new bionic hand. Here, Matagi wears the bionic hand on one arm and a common prosthetic called a body-powered hook on the other.
Dave Titensor/Utah NeuroRobotics Lab
hide caption
toggle caption
Dave Titensor/Utah NeuroRobotics Lab
Researchers have built a prosthetic hand that, with the help of artificial intelligence, can act a lot more like a natural one.
The key is to have the hand recognize when the user wants to do something, then share control of the motions needed to complete the task.
The approach, which combined AI with special sensors, helped four people missing a hand simulate drinking from a cup, says Marshall Trout, a researcher at the University of Utah and the study’s lead author.
When the sensors and AI were helping, the participants could “very reliably” grasp a cup and pretend to take a sip, Trout says. But without this shared control of the bionic hand, he says, they “crushed it or dropped it every single time.”
The success, described in the journal Nature Communications, is notable because “the ability to exert grasp force is one of the things we really struggle with in prosthetics right now,” says John Downey, an assistant professor at the University of Chicago, who was not involved in the research.
Problems like that cause many amputees to grow frustrated with their bionic hands and stop using them, he says.
A helping hand
The latest bionic hands have motors that allow them to swivel, move individual fingers, and manipulate objects. They can also detect electrical signals coming from the muscles that are used to control those actions.
But as bionic hands have become more capable, they have also become more difficult for users to control, Trout says.
“The person has to sit there and really focus on what they’re doing,” he says, “which is really not how an intact hand behaves.”
A natural hand, for example, requires very little cognitive effort to carry out routine tasks like reaching for an object or tying a shoelace. That’s because once a person puts the task in motion, most of the work is done by specialized circuits in the brain and spine that take over.
These circuits allow many tasks to be accomplished efficiently and automatically. Our conscious mind only intervenes if, say, a shoelace breaks, or an object is moved unexpectedly.
So Trout and a team of scientists set out to make a smart prosthetic that would act more like a person’s own hand.
“I just know where my coffee cup is, and my hand will just naturally squeeze and make contact with it,” he says. “That’s what we wanted to recreate with this system.”
Using AI and a suite of sensors, researchers outfitted a bionic hand so that it share control with the brain when acting on instructions.
Dave Titensor/Utah NeuroRobotics Lab
hide caption
toggle caption
Dave Titensor/Utah NeuroRobotics Lab
The team turned to AI to take on some of these subconscious functions. This meant detecting not just the signal coming from a muscle, but the intention behind it.
For example, the AI control system learned to detect the tiniest twitch in a muscle that flexes the hand.
“That’s when the machine controller kicks on, saying, ‘Oh, I’m trying to grasp something, I’m not just sitting still,'” Trout says.
To make the approach work, the scientists modified a bionic hand by adding proximity and pressure sensors. That allows the AI system to gauge the distance to an object and assess its shape.
Meanwhile, the pressure sensors on the fingertips tell the user how firmly their prosthetic hand is holding the object.
Sharing control
The idea of sharing control of a bionic hand addresses a reaction many people have when they use a prosthetic with superhuman abilities, says Jacob George, a professor at the University of Utah and director of the Utah NeuroRobotics Lab.
“You can make a robotic hand that can do tasks better than a human user,” he says. “But when you actually give that to someone, they don’t like it.”
That’s because the device feels foreign and out of their control, he says.
John Downey says that one reason we feel connected to our own hands is that they are controlled jointly by our thoughts and by reflexes in the brain stem and spinal cord.
That means the thinking part of our brain doesn’t have to worry about the details of every motion.
“All of our motor control involves reflexes that are subconscious,” Downey says, “so providing robotic imitations of those reflex loops is going to be important.”
George says the smart bionic hand solves for that issue.
“The machine is doing something and the human is doing something, and we’re combining those two together,” he says.
That’s a critical step toward creating prosthetic limbs that feel like an extension of the person’s own body.
“Ultimately, when you create an embodied robotic hand, it becomes a part of that user’s experience, it becomes a part of themselves and not just a tool,” George says.
Even the most advanced bionic hands still need some help from a human brain, Downey says.
For example, a person can use the same natural hand to gently thread a needle, then firmly lift up a child.
“The dynamic range on that is far beyond what robots typically handle,” Downey says.
That is likely to change, as bionic limbs become increasingly versatile and capable. What won’t change, scientists say, is humans’ desire to retain a sense of control over their artificial appendages.
We’ve been treated to a lot of new gardens this week. Kathy, Ami, Deborah, and Barbara all shared their gorgeous gardens for the first time. Today we are wrapping up the week with one last new garden but from a gardener who has shared his designs in the past. Bill Ziebarth has a colorful and creative garden in Duluth, Minnesota, that has been featured on the blog three times before (A Garden Full of Art and Flowers, Revisiting Bill’s Garden, and Garden Party at Bill’s), but today he is showcasing a new creation from a spot that was once underutilized.
My name is Bill Ziebarth, and I live in Duluth, Minnesota. I am now 78 years old and have been gardening at my present home for 28 years.
This time, I am submitting photos of my new potted garden. Previously, for 27 years, this was a blank slate. It is located at the end of my paver driveway and a retaining wall. The top of the retaining wall did have built-in planters. I got inspiration for this garden from paintings by Renoir and Monet, and the streets of Gringo Gulch in Puerto Vallarta, Mexico. I gathered new and vintage pots, plinths, window boxes, a vintage window, vintage table and chair, and so on. I am also including two photos of planters that will be added next year.
The first photo is the ending, so you don’t get discouraged right away.
This is the before photo.
This is the corner by my service door for the garage. A vintage Italian terra-cotta pot on a vintage plinth with SunPatiens®(Impatiens × hybrida, annual).
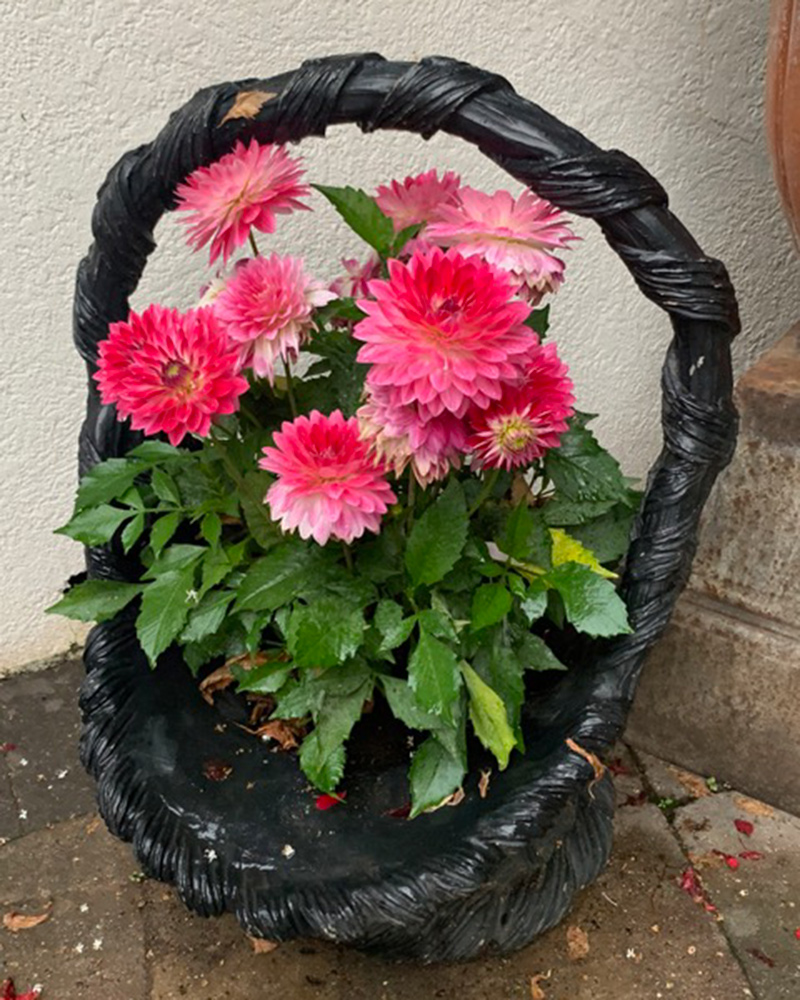
Dahlias in a vintage concrete basket
This is a vintage office window. El Jardin (Spanish for “the garden”) is hand-painted by a local artist. Geraniums are in the window box.
Three vintage window boxes that I purchased at a local “junk hunt,” planted with geraniums
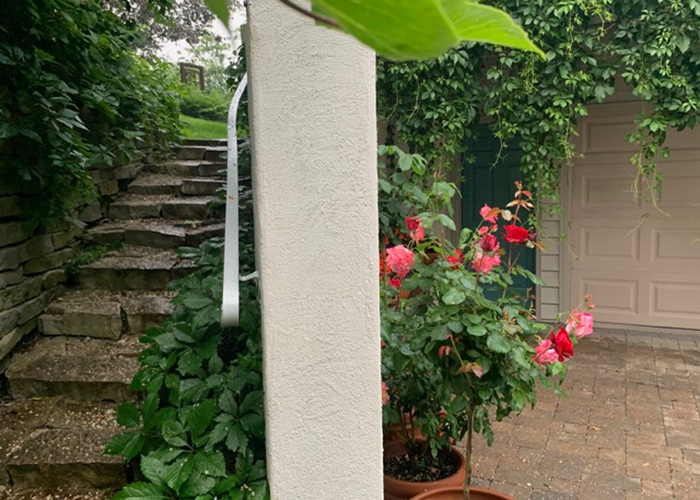
A view of the stairway to the backyard made out of Chilton limestone by yours truly, plus roses on the front
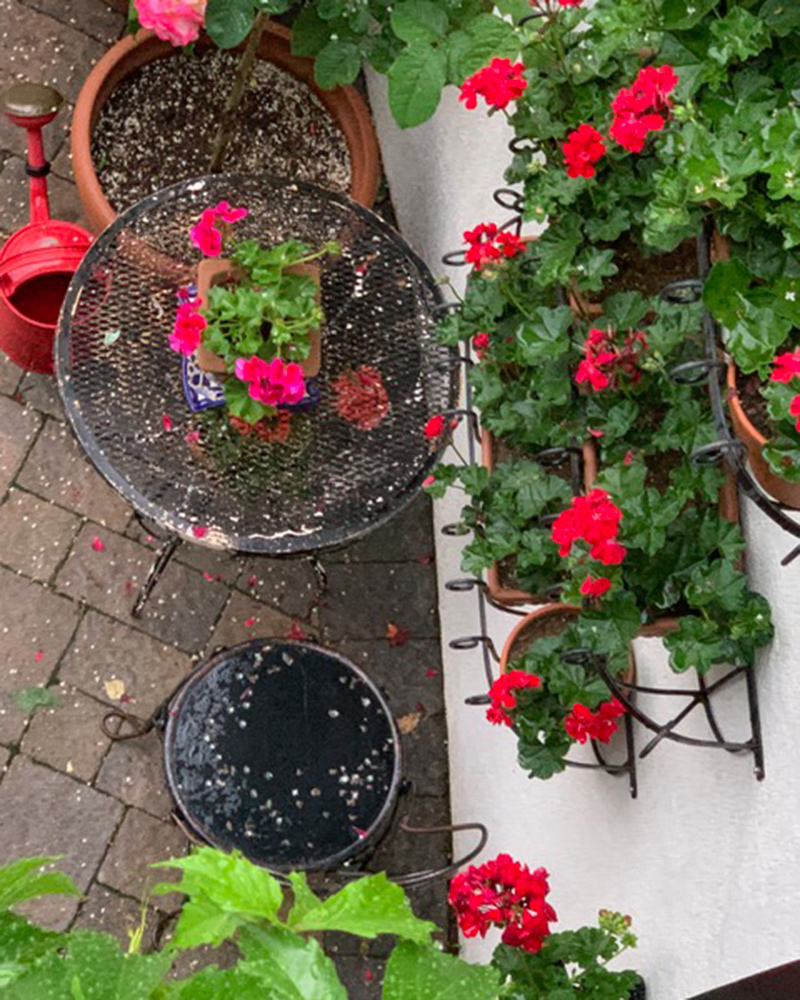
Looking down from the top of the wall on a vintage table and chair. Geraniums are in the window boxes and on the table.
The same view as the photo above, but you can see the red mandevilla vines in the built-in planters
This is a vintage concrete planter to be added next year. Nothing is ever finished. My friend and I built the stand out of angle iron. It will afford a view of the daylilies behind.
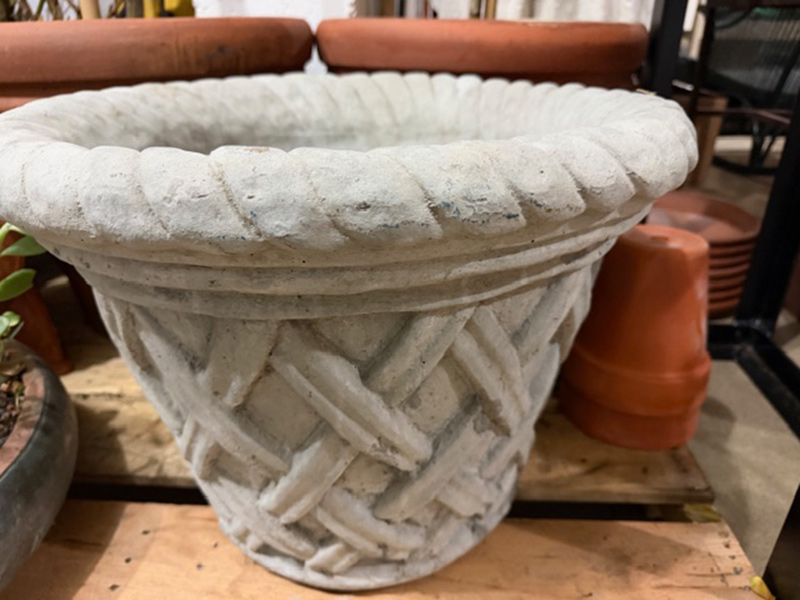
An English weave concrete planter to be used over by the garage-service-door end of the garden next year.
Thank you so much for sharing this new corner of your already outstanding landscape, Bill! Your use of art in your gardens has always been a highlight in your designs, and this new section is no different. I hope we are treated to photos showing more updates and additions in the future.
Did you make any additions to your garden this year? Big or small, we would love to see the garden projects you completed, new plants that thrived in your landscape, or garden renovations that upgraded your space. Follow the directions below to submit photos via email, or send me a DM on Instagram: @agirlherdogandtheroad.
We want to see YOUR garden!
Have photos to share? We’d love to see your garden, a particular collection of plants you love, or a wonderful garden you had the chance to visit!
To submit, send 5–10 photos to [email protected] along with some information about the plants in the pictures and where you took the photos. We’d love to hear where you are located, how long you’ve been gardening, successes you are proud of, failures you learned from, hopes for the future, favorite plants, or funny stories from your garden.
Do you receive the GPOD by email yet? Sign up here
Fine Gardening Recommended Products
Morvat Heavy Duty Brass Y-Valve
Fine Gardening receives a commission for items purchased through links on this site, including Amazon Associates and other affiliate advertising programs.
– Instantly create two tap outlets with this ultra-durable Y hose splitter. The dual-valve design features built-in shut-off valves.
– Fitted with US Standard NH 3/4″ threads for use with most water source fittings
– Screw the 2 way splitter adapter by hand or wrench with the updated hexagonal top connection. The 360° rotatable swivel connection attaches to any water source.
Planting in a Post-Wild World: Designing Plant Communities for Resilient Landscapes
Fine Gardening receives a commission for items purchased through links on this site, including Amazon Associates and other affiliate advertising programs.
Featuring gorgeous photography and advice for landscapers, Planting in a Post-Wild World by Thomas Rainer and Claudia West is dedicated to the idea of a new nature—a hybrid of both the wild and the cultivated—that can nourish in our cities and suburbs.
Price: $119.99 - $12.99 (as of Dec 13, 2025 02:44:37 UTC – Details)
Product description
【24-Hour Health Monitor】Leafora is a unique wearable fitness device that offers uninterrupted, round-the-clock monitoring of physiological data. It includes heart rate monitor, resting heart rate, heart rate variability, menstrual cycle tracking for women, stress levels, sleep quality, step tracker and daily activity tracking. This helps users gain a comprehensive understanding of their health and effectively track their personal health goals. 【120+ Sports Modes】This fitness tracker band supports more than 120+ sports modes, including rugby, football, baseball, basketball, golf, running, cycling, yoga, swimming and hiking.In this smart band addition, it also provides 3 GPS modes specifically for outdoor walking, outdoor running and cycling, helping you track your workout data accurately. 【Nighttime Sleep Monitor】Quality sleep is crucial for your daily efficiency and fitness results. To enhance your understanding of your sleep patterns, our sleep tracker watch records comprehensive sleep data from the previous night. In the app, you can view detailed insights into your sleep stages, including deep sleep, light sleep, and time spent awake, empowering you to make informed adjustments for better rest and recovery. 【Long-lasting Battery】Our smart health watches are equipped with enhanced battery capacity and performance. A full charge lasts for 45 to 60 days in regular use and 20 to 30 days in continuous operation. Whether you’re going about your daily routine or traveling, this watch guarantees you won’t need frequent recharges, allowing you to continuously enjoy health monitoring services. 【Warranty Service & Free APP】Our fitness tracker watch comes with a 1-YEAR warranty against manufacturer defects and features a highly responsive customer service team. If you are not satisfied with your purchase for any reason, we offer a refund—no questions asked. So, feel free to use our product with confidence.Additionally, we do not have any membership services; our app is completely free to use. 【1ATM Waterproof】This smart bracelet a 1ATM waterproof rating, which can withstand daily situations such as rain, sweat, and washing dishes. However, it is recommended to avoid using it in hot water or sea water to ensure optimal performance and lifespan. 【What’s Included】Leafora health tracker ×1, interchangeable wristbands ×2 (including a complimentary strap), charging cable ×1, user manual ×1, and a free app (compatible with iOS 10.0 and above, plus Android OS 5.0 and above). Just scan the QR code in the manual to download the app and start your health journey with Leafora!
Customers say
Customers find the wristband’s battery life great and appreciate how easily it integrates with Apple Health. However, the app quality and functionality receive mixed reviews, with several customers finding the app not great and one reporting it stopped working after just one week.
If you’ve been craving something cozy, creamy and a little spicy, this Cajun chicken sausage orzo is the kind of comfort food that feels incredible at the end of a long day. It’s bold, hearty and comes together in about 20 minutes using simple shortcuts like Cajun-seasoned chicken sausage, frozen bell peppers and pantry friendly orzo. The sauce simmers in the skillet while the orzo cooks separately, making the whole recipe feel easy and totally doable even when your energy is low.
I know how exhausting dinner can feel at the end of a long day, which is why I lean hard into recipes that give you maximum flavor with minimal effort. I originally created a vegetarian version of this dish, but picking up a pack of Cajun chicken sausage on a whim took it to a whole new level. It’s creamy, spicy and unbelievably satisfying; the kind of meal that got two thumbs up from my partner and reheats beautifully for meal prep. When I’m craving comfort food without a lot of work, this is the recipe I turn to.
If you love quick, flavorful meals like this, I have a few other 20-minute favorites you might want to try next. My pesto shrimp orzo is bright, cozy and works any time of year, and the orzo with kale and white beans delivers so much flavor from just a handful of simple ingredients. And if you want something even more hands-off, the Instant Pot Cajun chicken and rice cooks entirely in the Instant Pot in under 30 minutes; perfect for nights when you want dinner to take care of itself.
This post contains affiliate links. As an amazon associate I earn from qualifying purchases. Click here to read my policy and more about affiliate links.
Ingredient spotlight
Please see the recipe card for a full list of ingredients, these are just a few I think deserve a highlight or want to recommend a substitution for.
Cajun chicken sausage – I’ve found this at Whole Foods and Harris Teeter (Kroger) easily. You can swap in spicy Italian chicken sausage or turkey kielbasa if that’s what you have. It’s fully cooked, but browning it first adds great flavor.
Avocado oil – Helps toast the flour and removes the raw flour taste from the sauce. Olive oil, melted butter or ghee all work too.
Oat flour – Thickens the sauce and gives it that creamy texture. You can also use gluten free 1-to-1 flour or all-purpose flour.
Cajun seasoning – Use your favorite brand. I often have Frontier Co-op on hand, but homemade Cajun seasoning is easy if you prefer.
Orzo – This is what I had on hand, but truly any pasta works. Penne or fettuccine would be my next choices. I used Jovial to keep this gluten free.
Cooking Burnout Tips
Use frozen veggies
Frozen bell peppers are a total burnout staple. No chopping, no prep, just toss them straight into the skillet. They save time and guarantee you still get veggies in the meal.
Cut down cooking time with chicken sausage
Using pre-cooked chicken sausage means you skip the whole “cut up raw chicken and cook it through” step. A few quick slices and it’s ready to brown, saving you energy and getting dinner on the table faster.
Cook the pasta while you prep the sauce
Orzo cooks quickly and doesn’t need babysitting. Getting it started first makes the whole recipe feel faster and keeps things moving without extra effort.
Don’t chase perfection
If the sauce gets a little too thick, add a splash of broth. If it’s too thin, simmer another minute. This recipe is extremely forgiving, which is exactly what burnout cooking needs.
★ Did you make this recipe? Please give it a star rating below!
1packageCajun chicken sausage – or spicy italian chicken sausage
Bring water to a boil. When water has come to a boil, add pasta and cook according to instructions on the box.
12 oz orzo pasta
Place a large skillet over medium high heat.
Slice the sausage into coins. When the skillet is hot, spray with avocado oil and add the sausage and cook 2-3 minutes per side.
1 package Cajun chicken sausage
Once sausage has browned, add frozen bell peppers, cajun seasoning and salt. Cook for 6-7 minutes until defrosted and warmed through and most of the water has cooked off of the bell peppers. .
1 bag frozen sliced bell peppers, 1.5 tablespoon cajun seasoning, ½ teaspoon salt
Push everything to the outside rim of the skillet to make room in the center to build the sauce. Add 1 tablespoon avocado oil and ¼ cup oat flour. Stir that mixture together with a fork, then add the milk a few tablespoons at a time, mixing it in the flour mixture. You will notice it starting to thicken and create a creamy sauce.
1 tablespoon avocado oil, ¼ cup oat flour, 1 cup milk
Drain the can of diced tomatoes, add to the skillet along with the chicken broth and optional parmesan cheese.
28 oz diced tomatoes, 1 cup chicken broth, ¼ cup parmesan
When pasta is done cooking, drain it and add immediately to the skillet with the sausage and peppers. Stir well and top with more parmesan if you please.
Tips for Success
Use the biggest skillet you have. This recipe makes a lot of food. If your skillet feels too full, pour the Cajun sauce into the pot with the drained orzo instead of trying to combine everything in the pan.
Brown the sausage if you can. It’s fully cooked already, but taking a few minutes to brown the slices adds so much flavor. If you’re short on time or energy, skip it, the recipe still works.
Cook the bell peppers long enough for some of the water to evaporate. They don’t need to be totally dry, but you want most of the moisture gone so the roux forms properly in the center of the pan.
Mix the flour and milk with a fork. This helps break up any clumps and keeps the sauce smooth. When adding milk to the pan, start slow, just a few tablespoons at a time, so the sauce thickens evenly without lumps.
Nutrition Information
Nutrition Facts
Amount per Serving
Where does nutrition info come from? Nutrition facts are provided as a courtesy, sourced from the USDA Food Database.
SHARE THIS POST!
If you liked this post, share it with your friends and family!
Let others know by rating and leaving a comment below!
Additions & Toppings
Parmesan cheese – A classic here. Add some to the sauce or sprinkle it on top.
Sundried tomatoes – They add amazing flavor if you want to dress this up a bit.
Flat leaf parsley or green onion – A little freshness to balance the creamy, spicy sauce.
Red pepper flakes (optional) – For anyone who wants a little extra heat.
Common questions
What if the sauce doesn’t thicken?
Simmer it a bit longer or try my go-to fix: blend 1 cup of white beans with ¼ cup chicken broth and ¼ teaspoon salt. Stir it in, it thickens the sauce instantly without extra steps.
Can I make the sauce off the skillet?
Yes! Because this recipe uses oat flour, you can blend the avocado oil, oat flour, milk and broth together in a blender, then pour it into the skillet to thicken. I usually make it right in the pan to avoid extra dishes, but both methods work.
Can I make this with a different protein?
Yes! Any fully cooked chicken sausage works, spicy or mild. You could also make this with shrimp (cook 2-3 minutes per side) or even air fryer salmon bites (cook with 1/2 tablespoon cajun seasoning and add with the orzo at the end). You can also make this vegetarian by skipping the sausage and adding a can of white beans or chickpeas.
Is this recipe very spicy?
It has a noticeable kick from the Cajun seasoning and sausage. If you’re sensitive to heat, start with half the seasoning and add more to taste.
Does this reheat well for meal prep?
It reheats beautifully. Store in the fridge for up to 4 days and add a splash of broth or water when reheating if the sauce thickens.
I love Christmas morning… homemade cinnamon rolls, family, and giving thoughtful gifts. It’s so easy to let the commercialism of the Christmas season take over. Over the years though, I’ve found that the simple things are often the most meaningful. Store-bought gifts certainly have their place, but homemade gift ideas are usually budget-friendly and a great way to give a customized gift.
Our family focuses more on giving experiences than material gifts, but I still find DIY gifts a good option. There are so many great gift options for DIY homemade gifts. Below you’ll find lots of handmade gift ideas and suggestions for some simple gift baskets. Whether it’s under the Christmas tree or as a stocking stuffer, handmade Christmas gifts are an easy way to love on your friends and family.
Why Make DIY Christmas Gifts?
Modern society is flooded with stuff everywhere. We’ve been told that piles of toys, jewelry, and other goodies from Santa make the holidays. Thoughtful gifts, like easy DIY projects, not only save money but are a simple way to make Christmas more special.
And if you don’t have time for homemade gifts, it’s nothing to beat yourself up over. Spending quality time with loved ones is the important thing. If you’re looking for some last-minute gifts to buy, then check out my gift-giving guide for the whole family. I’ve also got a ton of great ideas for in my gift guide for her in this post.
I’ve divided some of the homemade Christmas gift ideas by type of person (grandparents, kids, men, etc.), so you can easily find something for everyone on your list. There’s a lot of crossover though, and some DIY projects in one category may be perfect for someone else on your list.
Don’t forget the gift wrapping! You can decorate plain paper gift bags. Have the kids help with some markers and stickers (if it’s for a grandparent). And if you’re really feeling crafty, make your own reusable fabric gift bags to use year after year.
DIY Christmas Decorations
While you’re making some homemade gifts, why not make your own Christmas decorations too? This DIY garland is made from natural materials like pine, cranberries, and dried oranges. Or try this tutorial for a burlap garland with ribbon and twine. I’ve also made some of these burlap wreaths to decorate our front door. For a table decoration, how about these naturally scented cinnamon pine cones?
And we can’t forget the Christmas cards! When my kids were little they’d wear matching outfits for our Christmas photo for annual Christmas cards. If you’re a crafter then some homemade Christmas cards or gift tags are also a nice touch.
Now onto the DIY Christmas gift ideas!
DIY Christmas Gift Ideas For Men
Treat your man with holiday gifts he’ll love, from food gifts to homemade body care. The perfect gift doesn’t have to be crazy expensive or complicated. Whether it’s for grandpa, dad, or your significant other, these easy DIY Christmas gifts are just the thing.
DIY Christmas Gifts for Grandparents
Many of these Christmas crafts are simple enough for the kids to make for grandma and grandpa. There are also some DIY beauty recipes that are great for mature or drier skin types.
DIY Christmas Gifts for Women
Your child’s teacher, your mom, your best friend… here are gifts that women will enjoy this holiday season. While you’re at it, don’t forget to make some extra for yourself!
DIY Christmas Gifts for Kids
It depends on your child’s age and gender, but in general, here are some fun DIY gifts for the kids. The little items also make great stocking stuffer ideas!
Gifts for a Healthy Home
Edible Christmas Gift Ideas
Instead of sugar-filled candy canes and drink mixes, gift your loved ones some homemade food items. Who wouldn’t want a cute hand-packed box of homemade truffles?
Gift Basket Ideas
Gift baskets are great for family members, co-workers, or friends. They’re simple enough to put together but look impressive. Be sure to choose a cute basket or tote for your assorted items and arrange them as desired! Browse through the categories above for options to put in your customized gift basket, or choose from the ideas below.
Have a gardener in your life? Or maybe some kids who are interested in playing in the dirt? Gift them a gardening basket with everything they need. Add in some organic seeds (maybe saved from last year’s garden!), gardener’s hand salve, and some bug repellent lotion bars.
Spa Gift Basket
Create your own spa experience with a DIY spa gift basket. There are tons of ideas above for what to put in it. I like adding some bulkier items like sugar scrubs, lotions, and foot scrubs to help fill the basket out.
Natural Baby Basket
Mom-to-be or New Mom Basket
What are some of your favorite gifts to make or that you’ve received over the years? Let us know below!
Winter is always a challenging time for my houseplants, but Boston ferns take the struggle to a whole different level.
When the air gets dry, the sunlight weakens, and indoor heating kicks in, my fern is usually the first one to complain.
Fronds get crispy, tips turn brown, and the plant starts dropping leaves everywhere like a dramatic houseguest.
But over the years, I’ve learned that winter doesn’t have to be a death sentence for Boston ferns. These plants aren’t as fragile as they seem—as long as you tweak their care routine to match the season.
Once I started paying attention to humidity, adjusting watering habits, and keeping them away from drafts and direct heat, my ferns stopped sulking through winter and actually stayed lush until spring.
The key to keeping a Boston fern happy in winter is moisture management—both in the soil and in the air—paired with gentle light, consistent temperatures, and a little extra attention.
When you make small changes like giving them more humidity, trimming crispy fronds early, or using a pebble tray, you’ll be surprised by how well your fern handles the colder months.
Below is everything I’ve learned—through trial, error, and a lot of sweeping up fallen fronds—about keeping Boston ferns alive (and beautiful!) during the winter.
Understanding Boston Fern Needs in Winter
Before getting into the how-to, it helps to understand why Boston ferns behave the way they do once winter hits.
These plants naturally grow in warm, humid, shaded forests where temperatures stay steady year-round.
They’re used to filtered light, moist air, and gentle warmth—not dry, heated homes with blasting vents and chilly drafts.
In winter:
Humidity plummets indoors: Furnaces and heaters pull moisture from the air, drying out fern fronds fast.
Light intensity drops: Shorter days and lower sun angles mean ferns get less energy to grow.
Temperature fluctuates: Warm rooms, cold windows, and nighttime drops can shock the plant.
Growth slows down: They naturally rest in winter, so they need less water and zero fertilizer.
So the goal is to recreate a softer, gentler environment that mimics the moist understory where ferns naturally thrive. Once you understand their needs, caring for them becomes much easier.
1. Adjusting Watering for Winter
I used to think my Boston fern hated me because it was always either too soggy or too dry. Winter made this worse—its soil would take forever to dry out, yet the fronds still turned brown from dryness. It felt contradictory, but once I understood the balance, everything changed.
Water Less Frequently—but Never Let It Fully Dry Out
Boston ferns hate being waterlogged, but they also hate drying completely. In the winter, their growth slows, so they need less water, but they still require steady moisture.
Here’s what works for me:
I water less often—about every 7–10 days.
I always check the soil before watering.
The top inch should be slightly dry, but below that, it should feel damp.
If the soil feels wet deeper down, I wait. If it feels powdery or pulls from the sides, I water immediately.
Use lukewarm water
Cold water can shock the roots, especially during winter. Room-temperature water keeps the plant comfortable.
Bottom-watering helps a ton
I’ve found bottom-watering incredibly useful in the winter. I set the pot in a tray of water for 10–15 minutes and let it wick up what it needs. The fern gets hydrated without drowning, and the topsoil stays fluffier and less compacted.
Avoid watering on a schedule
This is where many ferns go wrong. During winter, sticking to a rigid routine leads to soggy soil and root issues. Instead, I rely on:
The finger test (does the top inch feel dry?)
Pot weight (a dry pot feels much lighter)
Visual cues (drooping, crisping fronds, or dull leaves)
It took practice, but once I learned to read the signals, watering became much simpler.
2. Managing Humidity (The Most Important Winter Step)
If I had to pick just one winter-care tip for Boston ferns, it would be this: give them humidity—lots of it.
Indoor winter humidity can fall as low as 10–20%, while Boston ferns prefer 50–70%. That’s a massive difference, and it’s the reason most ferns start dropping leaves in January.
Here are several humidity-boosting tricks I use (and all of them help):
Use a humidifier
This is the ultimate solution. When the air gets painfully dry, I turn on a small cool-mist humidifier near my fern. It keeps the air moist and the fronds soft.
Set up a pebble tray
A pebble tray is a simple winter lifesaver:
Fill a shallow tray with stones.
Add water until it sits just below the top of the pebbles.
Set your fern’s pot on top.
As the water evaporates, it raises humidity around the plant.
Group plants together
Plants create a mini humidity bubble. I cluster my humidity-loving plants—like ferns, calatheas, and fittonias—so they can help each other thrive.
Avoid misting in winter
Misting seems like a good idea, but in winter it often causes more harm than good. Cold droplets can shock leaves and increase the risk of fungal issues if the room isn’t warm enough.
I’ve found that misting helps in summer, but in winter I stick to humidifiers and trays instead.
3. Choosing the Right Lighting for Winter
Boston ferns don’t need bright light, but they do need steady, filtered brightness. Winter sunlight is weak, so finding good spots becomes trickier.
Move your fern closer to a window
My fern always perks up when I move it to:
East-facing windows (ideal soft light)
North-facing windows (low, consistent light)
A few feet from a bright south-facing window (if light is filtered).
Avoid direct sun—especially in winter—because it can scorch the thinning foliage.
Rotate the plant weekly
I used to forget this, and half my fern would turn pale while the other half flourished. Rotating ensures all sides get enough light.
Use grow lights if your home is dim
I’ve experimented with small clip-on grow lights during very dark winters. A few hours a day keeps the fern happy without overwhelming it.
Choose a gentle, full-spectrum grow light and place it at least 12–18 inches above the plant.
4. Temperature Tips for Winter Survival
Boston ferns love stability. Winter brings drafts, heater blasts, and cold windows—all of which ferns hate.
Here’s how I keep the temperature just right:
Keep them away from heat sources
Heating vents and radiators are the biggest fern killers in my house. The dry, blowing air turns fronds crispy almost overnight.
Avoid cold drafts
Don’t place the plant:
Against cold windows
Next to drafty doors
In hallways with frequent temperature swings
Aim for temperatures between 60–75°F
Anything below 55°F causes stress and leaf drop.
Keep night temperatures steady
Sudden drops at night—especially in apartments—confuse the plant. Curtains or plant covers can help block cold air from windows.
5. Winter Pruning and Grooming
Winter is the time when Boston ferns develop crispy tips, brown fronds, and patchy spots. This is normal, and grooming keeps the plant looking fresh and encourages new growth.
Remove dead or brown fronds
I do a light trim every few weeks:
Snip dead fronds at the base.
Trim brown tips carefully (cutting diagonally looks most natural).
Remove yellowing or thinning stems.
This stops the plant from wasting energy on dying foliage.
Wipe dust from the leaves
Indoor dust gathers fast in winter, especially near heaters. A gentle brush or soft cloth keeps the fronds clean and improves air and light exposure.
Never do heavy pruning in winter
Save major shaping for spring, when the plant is ready to grow again.
6. Winter Soil Care and Repotting Tips
Boston ferns are notorious for having dense root systems that fill pots quickly. But winter is not a good time to repot them unless absolutely necessary.
Skip repotting until spring
Repotting stresses the plant, and winter is already stressful enough.
Refresh the topsoil instead
If the soil looks old or compacted, I gently remove the top inch and replace it with fresh, high-quality potting mix. It gives the fern a small nutrient boost without disturbing the roots.
Use the right soil
If you must repot (for example, if roots are rotting or the pot is damaged), choose a lightweight mix containing:
Peat or coco coir
Perlite
Pine bark or other organic matter
Boston ferns like fluffy, moisture-retentive but well-draining soil.
7. Should You Fertilize Boston Ferns in Winter?
Short answer: No.
Boston ferns rest during the winter, so fertilizing them only stresses the roots and can cause salt buildup in the soil.
I stop fertilizing completely from late October through February.
If you want to support growth:
Wait until early spring.
Start with a diluted, balanced houseplant fertilizer.
Feed lightly every 4–6 weeks.
Your fern will appreciate the break during winter.
8. Where to Keep Boston Ferns During the Winter?
Over time, I’ve found that certain rooms are better suited for winter fern care than others.
Best rooms
Bathrooms: with natural light Steam from showers gives the perfect humidity boost.
Kitchens: Lots of warm, moist air from cooking.
Bedrooms: Often cooler and more stable in temperature.
Worst rooms
Rooms with fireplaces or wood stoves These make the air extremely dry.
Drafty entryways Constant cold air is the enemy.
Very sunny south-facing rooms The winter sun can scorch delicate fronds.
Common Winter Problems (and How to Fix Them)
Boston ferns are expressive plants. If something isn’t right, they’ll tell you.
Here’s what I see most often—and how I fix it:
1. Brown, crispy fronds
Cause: Dry air Fix: Add humidity, prune brown tips, move away from heat sources.
2. Sudden leaf drop
Cause: Cold drafts or inconsistent watering Fix: Stabilize temperature and adjust watering routine.
Cause: Low light Fix: Move closer to a window or add gentle grow lights.
5. Moldy soil
Cause: Too much moisture + low airflow Fix: Improve ventilation, water less, remove the top layer of soil.
How I Keep My Boston Fern Alive All Winter (My Simple Routine)
Here’s the routine that finally stopped my fern from falling apart every winter:
Move it to a spot with bright but indirect light.
Keep it far from heaters and cold windows.
Run a humidifier for a few hours most evenings.
Use a pebble tray under the pot.
Water lightly every 7–10 days, checking soil first.
Trim dead fronds as needed.
Avoid fertilizer completely.
Lightly dust the leaves every few weeks.
These small changes added up and transformed winter from a battle to something manageable. My fern now makes it through winter without turning into a crunchy mess—something I never thought possible when I first started growing them.
Conclusion
Caring for a Boston fern in the winter can feel intimidating, but once you understand what the plant needs—humidity, consistent moisture, gentle light, and steady temperatures—it becomes much more manageable. Most ferns struggle not because winter is harsh, but because our homes become the exact opposite of what they prefer.
With a few thoughtful adjustments, your Boston fern can stay green, full, and beautiful until spring returns. And honestly? Seeing those vibrant fronds thriving in the middle of January always makes my home feel a little warmer.
If you ever find yourself sweeping up dropped fronds or questioning whether your fern hates you, trust me—you’re not alone. But once you get the winter routine down, Boston ferns become incredibly rewarding plants to grow.
Khaja Moinuddin, a computer science graduate, finds joy in gardening and homesteading. Join him on this blog as he shares his experiences in homesteading, gardening, and composting
Price: $17.99 (as of Dec 12, 2025 14:36:16 UTC – Details)
From the brand
Qultivo, No Finish Line
Sweat writes our legacy. Pain forges strength. Rise. Fight. Conquer. This isn’t sport. It’s war on weakness.
Sweat Now, Shine Later
We don’t just sweat. We build. Grit in our veins. Glory in our sights. Join the grind. #KeepMoving
VERSATILE RESISTANCE BANDS WITH HANDLES: Our exercise bands resistance bands set offers a complete home gym solution, featuring 5 color-coded workout bands with varying resistance levels for targeted muscle training on arms, legs, and glutes BUILD YOUR PERFECT HOME GYM: This all-in-one fitness equipment includes 5 durable exercise bands, 2 non-slip cushioned handles, a door anchor, and a carry pouch, enabling a wide range of strength training exercises anywhere SUPERIOR DURABILITY FOR DAILY USE: Crafted from high-quality natural latex, these resistance bands for working out boast exceptional tear resistance and elasticity, ensuring they withstand intense daily workout sessions ADJUSTABLE RESISTANCE UP TO 150 LBS: Each of the five workout bands provides a different resistance level; use them individually or stack multiple exercise bands resistance combinations to customize your training intensity PORTABLE WORKOUT EQUIPMENT: Lightweight and compact, these bands for working out come with a convenient travel case, making it easy to maintain your fitness routine at home, in the gym, or while traveling


")


")


