

Price: $16.95
(as of Apr 23, 2026 11:51:56 UTC – Details)
The TRX Training Strength Band Set, created by US Navy SEALs, embodies the ethos that fitness is achievable for anyone, anywhere. These dynamic full-body resistance bands are the ultimate accessories to elevate your workouts, providing a versatile range of resistance levels to suit all fitness goals. Available in resistance levels of 5–15 lbs., 15–30 lbs., 25–50 lbs., 35–70 lbs., 45–110 lbs., and 60–150 lbs., the TRX Strength Bands cater to everyone from beginners to seasoned athletes. Choose from a 4-pack with bands ranging from 5–70 lbs. or a 6-pack with bands from 5–150 lbs.
Each TRX Strength Band is made from high-quality, durable latex designed to withstand intense training sessions while maintaining elasticity over time. The bands’ compact size makes them easy to store and transport, allowing you to perform resistance training anywhere, from the gym to your living room or even outdoors. Use these bands on their own or pair them with TRX Bandit handles (sold separately) for enhanced grip and control. These bands are excellent for a variety of exercises, including squats, presses, pulls, and stretching routines for a full-body training session anytime and anywhere.
Move for the things that matter. TRX strength-training equipment is used by beginners, pro athletes, celebrity trainers, runners, yogis, cyclists, cross-trainers, service members, physical therapists, and combat athletes. With the TRX Training Club fitness app, you’ll have unlimited access to a virtual gym that includes live-streaming classes 7 days a week and hundreds of on-demand workouts, and you can even be matched with a personal trainer for a 1:1 training session. You can filter workouts by body part, workout type, duration, trainer, and fitness level. Whether you need yoga, HIIT, cardio, or strength-training equipment, we have what you need, when you need it. Join our loyal worldwide community and transform your entire body today.
WHAT’S IN THE BOX: Add an extra challenge to your resistance training with a TRX long resistance band in a full-body size. This band has a 5- to 15-pound resistance amount. We offer multiple weights to choose from, so you can perfect your ideal resistant-band workout routine.
QUALITY WORKOUT EQUIPMENT: Each TRX Strength Band has a full-length design that is meant for full-body training on the go. Our stretchy workout band allows a full range of motion and makes your muscles use maximum effort for every move, every time.
EXERCISE & RECOVERY BAND: This TRX exercise band adds intensity and tension to your workouts to help you perform better. You can also use this stretch band postworkout to aid with stretching and rehabilitation and help keep your body in great physical shape.
FOR ALL FITNESS LEVELS: No matter your fitness level, you can always use exercise tools. Our exercise accessories are great for use at the gym or home. Whether you’re a seasoned pro, a beginner, or in between the two, we have the gear to make fit happen.
YOUR TRIAL TO THE TRX TRAINING CLUB APP: Experience unlimited access to 500+ on-demand workouts: weight training, cardio, cross-training, sport athleticism, resistance and mobility training, and prehab and rehab. Find 100s of workouts for every goal! All workouts guided by world-class certified TRX trainers.
TRX Training Strength Band Set, Full-Body Resistance Bands for Home and Gym Use, Resistance Bands for Working Out

How Well Will You Age? Take Our Quiz to Find Out.

Every day we’re faced with a zillion small choices: Go to sleep early, or watch one more episode of that Netflix drama. Call an old friend to catch up, or cruise social media. Of course, no single action will guarantee a long, healthy life or doom you to an early grave. But those little daily decisions do add up, and over the long term they can make a difference when it comes to both your longevity and your health span, the amount of life spent in relatively good health.
Scroll through this theoretical “day in the life” and select the option that best fits your typical day. Not every situation will apply perfectly, but think about which choice you’d be most likely to make. This isn’t a formal scientific assessment. The goal here isn’t to assign you a “good” or “bad” score, but to help you understand the central factors that shape the way we age and how long we live.
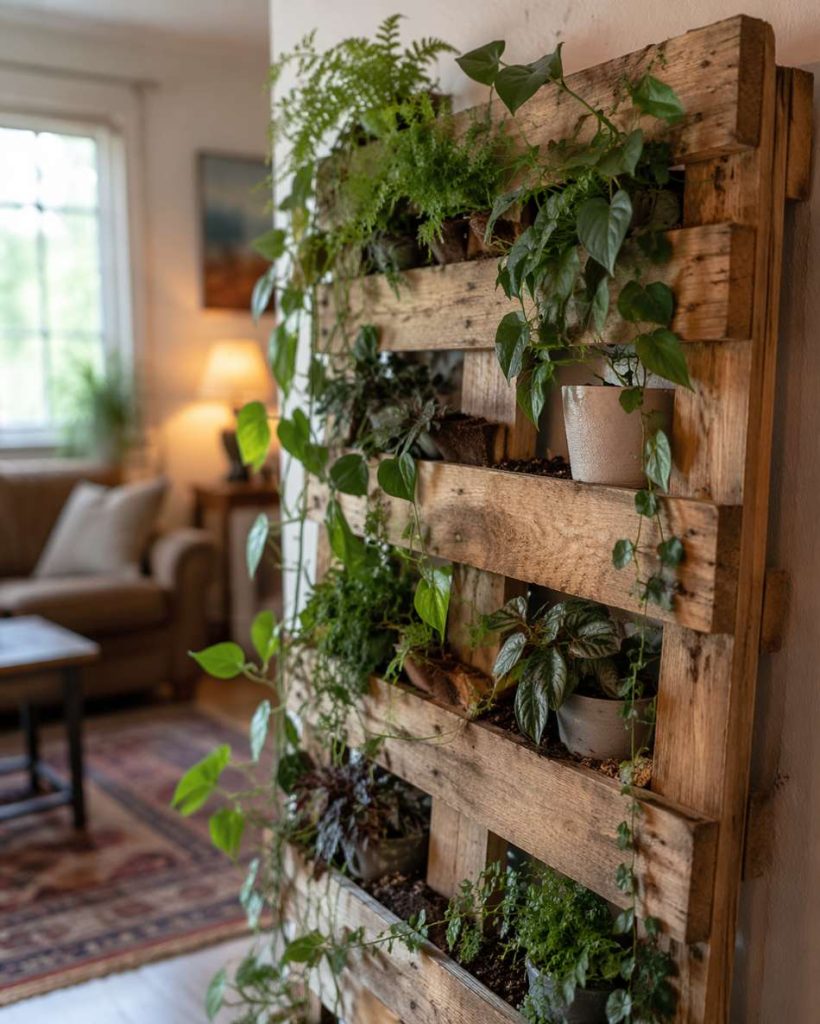
19 DIY Pallet Garden Ideas for Your Backyard

For me, gardening is about reusing and recycling. It’s inspiring to see the creativity in turning an old wooden pallet into a vertical garden, a mini herb wall, or stylish planters.
Apart from being budget-friendly, it’s a bit crafty, which makes the whole process more satisfying.
No matter how much space you have—whether it’s a backyard or a balcony—you can use tossed pallets, paint them if needed, and turn them into planters for your favorite edible or ornamental plants.
But, it’s important to note that not all pallets are safe for gardening.
Look for ones stamped “HT” (heat-treated), which means they’re safe to use. Avoid pallets marked “MB” or anything that looks heavily treated, since those can contain chemicals you don’t want near your plants (or your veggies).
Basic Tools
- Sandpaper – Smooths rough pallet surfaces and prevents splinters
- Hammer – For securing nails and tightening loose boards
- Nails or Screws – To fix or reinforce the pallet structure
- Landscape Fabric – Holds soil in place while allowing drainage
- Staple Gun (or small nails) – To attach the fabric securely
- Good-Quality Potting Soil – Provides nutrients and proper drainage for plants
DIY Pallet Garden: Simple Guide
Creating your own pallet garden is one of those projects that looks impressive but is actually pretty simple once you get started.
- First, find a good-quality heat-treated pallet and give it a quick clean. Sand down any rough spots so it’s smooth to handle, then decide how you want to use it—standing upright for a vertical garden or laid flat for a more traditional planter.
- Next, attach landscape fabric to the back and sides using a staple gun or small nails. This helps hold the soil in place while still allowing for drainage.
- Fill each section with a good-quality potting mix, pressing it in gently so it stays compact.
- Once that’s done, you can start planting—herbs, flowers, or even small veggies all work great here.
After planting, give everything a light watering and let the pallet sit flat for a few days so the roots can settle in.
Once the plants are established, you can carefully lift it upright if you’re going for that vertical look.
Place it somewhere with the right amount of sunlight, keep up with regular watering, and you’ve got yourself a low-cost, space-saving garden that actually looks pretty stylish too.
19 Pallet Garden Ideas for Your Garden
Depending on the available space, you can be creative in designing your own pallet garden.
Below listed are a few interesting ideas. Grow through them and pick one that fits your needs.
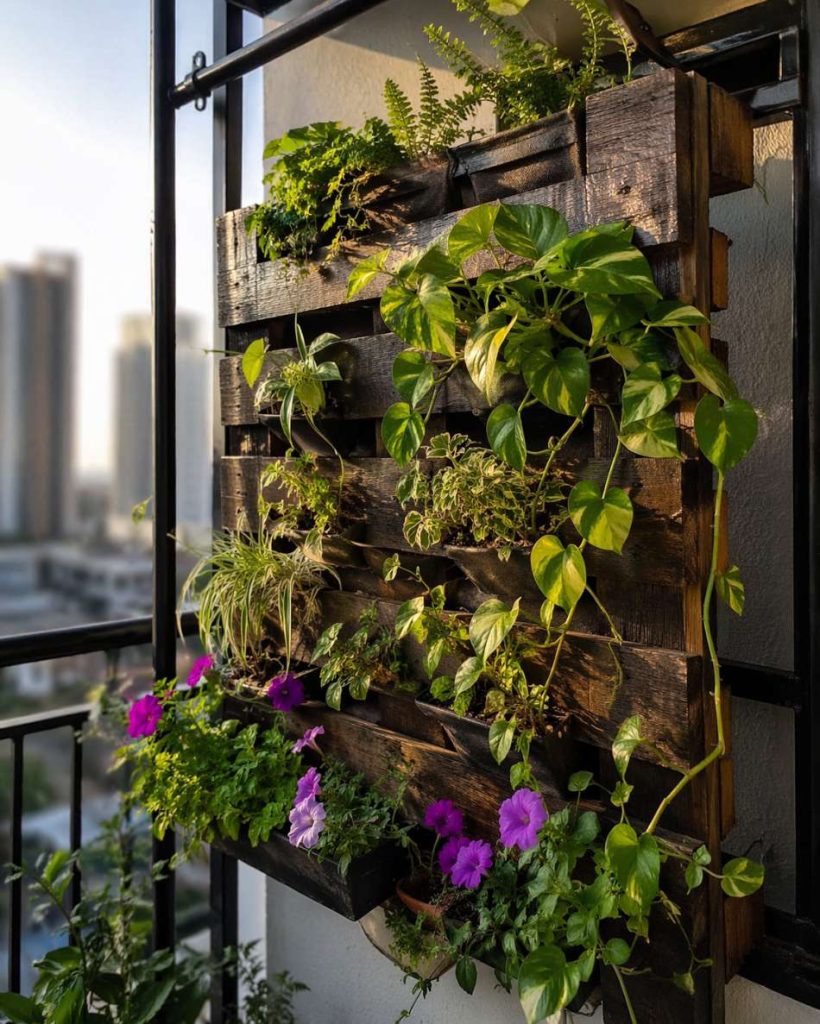
1. Vertical Pallet Garden
A vertical pallet garden is perfect when you’re short on space but still want that lush, green look.
By standing the pallet upright, you instantly create multiple planting pockets—great for herbs, leafy greens, or even small flowering plants. It works especially well on balconies, patios, or against a sunny wall where every inch counts.
To get started, line the back and inner sections with landscape fabric, fill with soil, and plant each row carefully. Let it rest flat for a few days so the roots settle, then lift it upright. Once in place, it becomes a living wall that’s not just space-saving, but also a real eye-catcher.
2. Pallet Herb Garden

If you love having fresh flavors within arm’s reach, a pallet herb garden just makes sense. It’s compact, practical, and fits right into a kitchen balcony or near a sunny window.
Think basil, mint, coriander, and thyme—all growing neatly in their own little sections, ready whenever you need them.
You can keep it simple by laying the pallet flat or go vertical for a cleaner look. Add small labels for each herb (it’s surprisingly helpful), and make sure it gets a few hours of sunlight daily.
With regular watering and a quick trim now and then, it turns into a low-effort, high-reward setup.
3. Pallet Flower Wall
If you’re looking to add a pop of color without taking up ground space, a pallet flower wall does the trick beautifully.
It turns a plain fence or empty wall into something lively, filled with blooms like petunias, pansies, or marigolds. It’s less about growing food and more about creating a cheerful, decorative corner.
Mount the pallet securely against a wall and arrange flowers with a mix of colors and textures for that full, layered look.
Watering might need a bit more attention since vertical setups dry out faster, but once it fills in, it becomes a bright, living backdrop that instantly lifts the space.
4. Pallet Succulent Garden
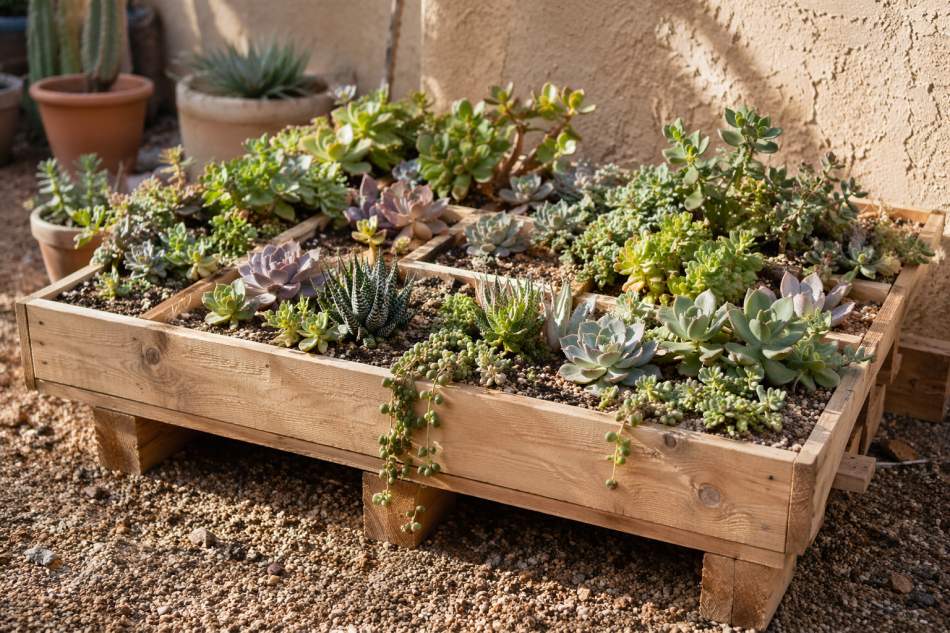
A pallet succulent garden is about as low-maintenance as it gets. Succulents love well-drained spaces, which makes pallets a surprisingly good fit. Plus, their different shapes and tones—greens, purples, and dusty blues—create a really modern, textured look.
Use a light, sandy potting mix and avoid overwatering, since succulents prefer things on the drier side. You can arrange them in patterns or keep it random for a more natural feel. Either way, it’s a great option if you want something stylish that doesn’t need constant attention.
5. Pallet Vegetable Planter
If you’re aiming to grow your own food, a pallet vegetable planter is a great place to start. It keeps things organized, especially for small veggies like lettuce, spinach, radishes, or even green onions. Each section acts like its own mini bed, which makes planting and harvesting feel a lot more manageable.
Lay the pallet flat for better root space and fill it with nutrient-rich soil. Make sure it gets plenty of sunlight, since most vegetables need it to thrive. With regular watering and a bit of care, you’ll have a neat, productive setup that fits even in a compact space.
6. Hanging Pallet Garden
A hanging pallet garden adds a whole different dimension—literally. Instead of taking up floor space, it uses vertical air space, making it perfect for balconies or small patios. It has a slightly rustic, floating look that feels both casual and creative.
You can hang it using sturdy hooks or chains, then plant lightweight options like herbs, trailing plants, or small flowers. Just be mindful of the weight and water drainage. Once set up, it becomes a unique focal point that draws the eye upward.
7. Pallet Raised Garden Bed
For something a bit more traditional, a pallet raised garden bed gives you that classic garden feel without much cost. It’s ideal if you want a defined planting area for veggies, flowers, or even mixed plants, while keeping things neat and easy to manage.
Break down a pallet (or use a few) to form a box-like structure, then fill it with good soil. Raised beds offer better drainage and are easier on your back since there’s less bending involved. It’s simple, sturdy, and works well in both small and larger outdoor spaces.
8. Pallet Strawberry Planter
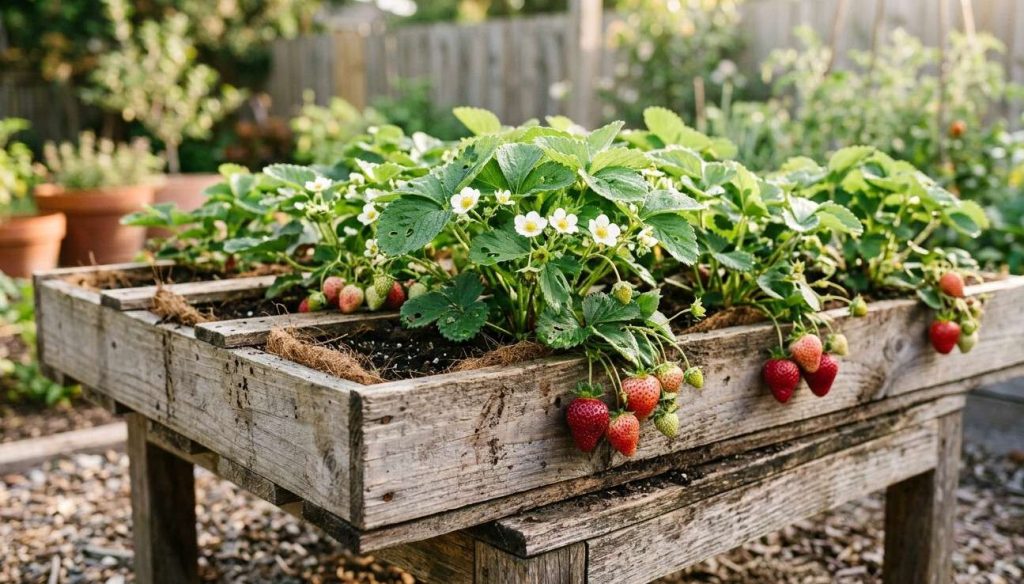
A pallet strawberry planter is one of those ideas that’s both practical and a little fun. The slatted design naturally creates pockets that are just right for strawberry plants, keeping the fruits off the ground and away from pests. Plus, it makes harvesting a lot easier—no more hunting through leaves.
Set the pallet at a slight angle or keep it vertical, and plant each pocket with a strawberry start. Make sure it gets plenty of sunlight and consistent watering. As the plants grow and start to trail, you’ll get a neat, cascading look with pops of red that are hard to miss.
9. Pallet Garden Bench with Planters
This one blends function with a bit of creativity. A pallet garden bench with built-in planters gives you a place to sit and enjoy your garden while literally being surrounded by it. It’s a great weekend DIY if you want something a little more custom.
You can use pallets to build a simple bench frame and leave space on the sides or back for planting sections. Add flowers or herbs to soften the look and make it feel more inviting. It’s not just a garden feature—it becomes a cozy spot you’ll actually want to spend time in.
10. Pallet Trellis Garden
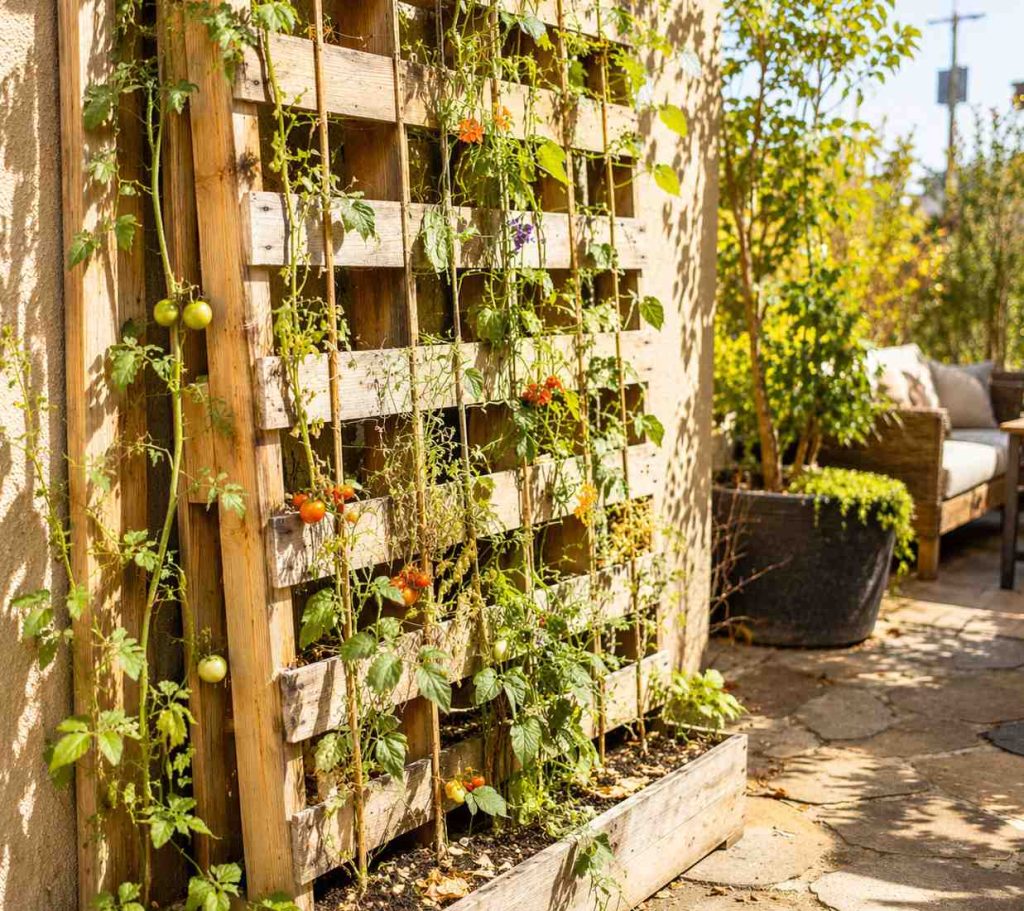
If you’re growing climbers, a pallet trellis garden is a smart and space-saving solution. Plants like beans, peas, or even flowering vines love something to climb on, and a pallet gives them a sturdy structure to latch onto.
Stand the pallet upright and secure it firmly into the ground or against a wall. Plant your climbers at the base and guide them as they start to grow. Over time, the pallet gets covered in greenery, turning into a living wall that feels both natural and productive.
11. Pallet Fence Planters
Got a plain fence that feels a bit dull? A few pallets can completely change that. Pallet fence planters let you turn vertical surfaces into growing space, adding color and life without taking up your floor area. It’s a simple way to make boundaries feel less… boring.
Just secure sections of pallet onto the fence and fill the gaps with soil and plants. Flowers, herbs, or even small trailing plants work really well here. With a bit of arrangement, your fence goes from plain to full of character.
12. Pallet Potting Station
If you enjoy gardening regularly, having a dedicated potting spot makes things so much easier. A pallet potting station gives you a handy workspace where you can repot plants, store tools, and keep everything in one place.
Stack or modify a couple of pallets to create a table-like setup, and add hooks or shelves for tools and pots. It doesn’t have to be perfect—just functional. Once you have it, you’ll wonder how you managed without it.
13. Tiered Pallet Garden
A tiered pallet garden is great when you want to grow a variety of plants but still keep things organized. The layered design gives each plant its own level, so nothing gets overcrowded or hidden.
You can stack or angle pallets to create a step-like structure, then plant each tier with something different—herbs on one level, flowers on another. It adds depth to your garden and makes everything easier to see and maintain.
14. Pallet Indoor Garden
Who says pallets are just for outdoors? A pallet indoor garden lets you bring a bit of greenery inside, especially if you’ve got a bright window or a sunny corner. It’s a nice way to keep plants close without cluttering tables or shelves.
Keep the setup neat by using smaller plants like herbs, pothos, or ferns, and make sure to line it properly to avoid mess. With the right light and a little care, it turns into a fresh, living decor piece that brightens up the room.
15. Pallet Garden Pathway Planters
This idea is all about guiding the eye—and your steps. Pallet garden pathway planters line your walkway with greenery, making even a simple path feel more inviting and thoughtfully designed.
Break pallets into smaller sections and place them along the edges of your pathway, filling them with low-growing flowers or foliage. It doesn’t have to be perfectly symmetrical; a slightly relaxed layout often looks more natural and charming.
16. Pallet Compost Bin

A pallet compost bin is one of the most practical ways to reuse old wood. It gives you a dedicated space to turn kitchen scraps and garden waste into rich, usable compost for your plants.
Arrange a few pallets into a box or enclosure, leaving enough gaps for airflow. Toss in your organic waste, turn it occasionally, and let nature do the work. It’s simple, effective, and a great step toward more sustainable gardening.
17. Pallet Green Wall Divider
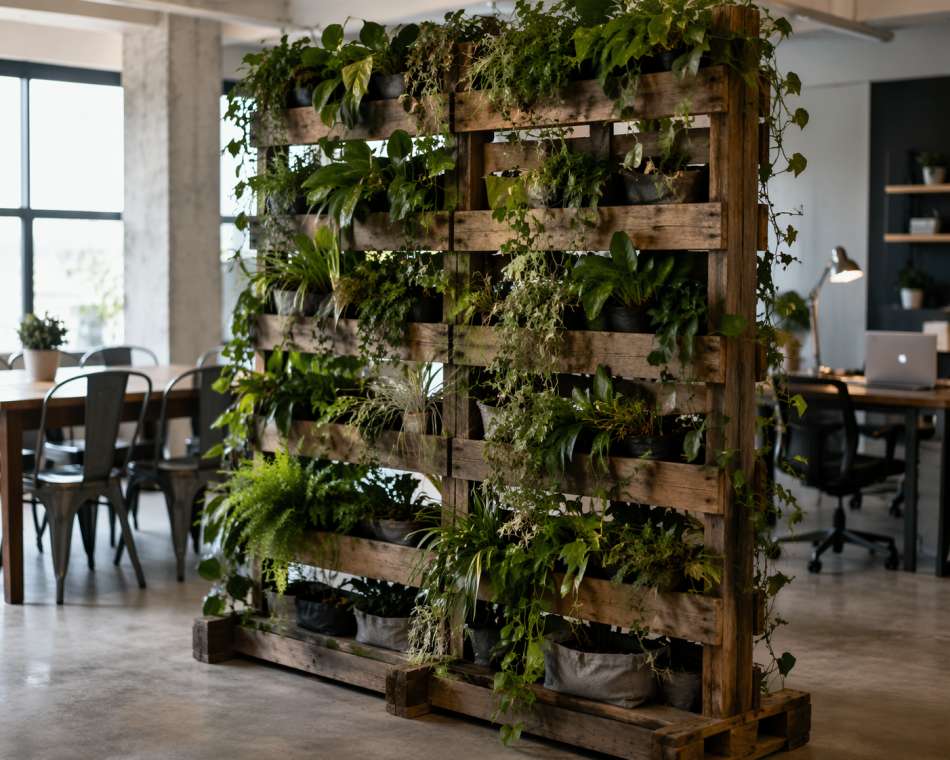
If you want to create a little separation in your space without building anything permanent, a pallet green wall divider works beautifully. It acts like a living partition—great for splitting up a patio, balcony, or even a garden corner while still keeping things airy and green.
Stand the pallet upright and plant both sides with a mix of foliage or trailing plants. As it fills out, it creates a soft, natural barrier that feels more relaxed than a solid wall. It’s functional, but still very much part of the garden.
Also Read: How to Build Chicken Coop Out of Pallets?
18. Painted Decorative Pallet Garden
This one’s all about adding personality. A painted decorative pallet garden lets you play with colors, patterns, or even a bit of rustic distressing to match your space. It’s less about what you grow and more about how it looks overall.
Give the pallet a coat of paint—anything from soft pastels to bold, bright shades—then add a few simple plants to complement it. Even a basic setup feels more intentional with a bit of color, making it a standout feature in your garden.
19. Mini Pallet Garden for Kids
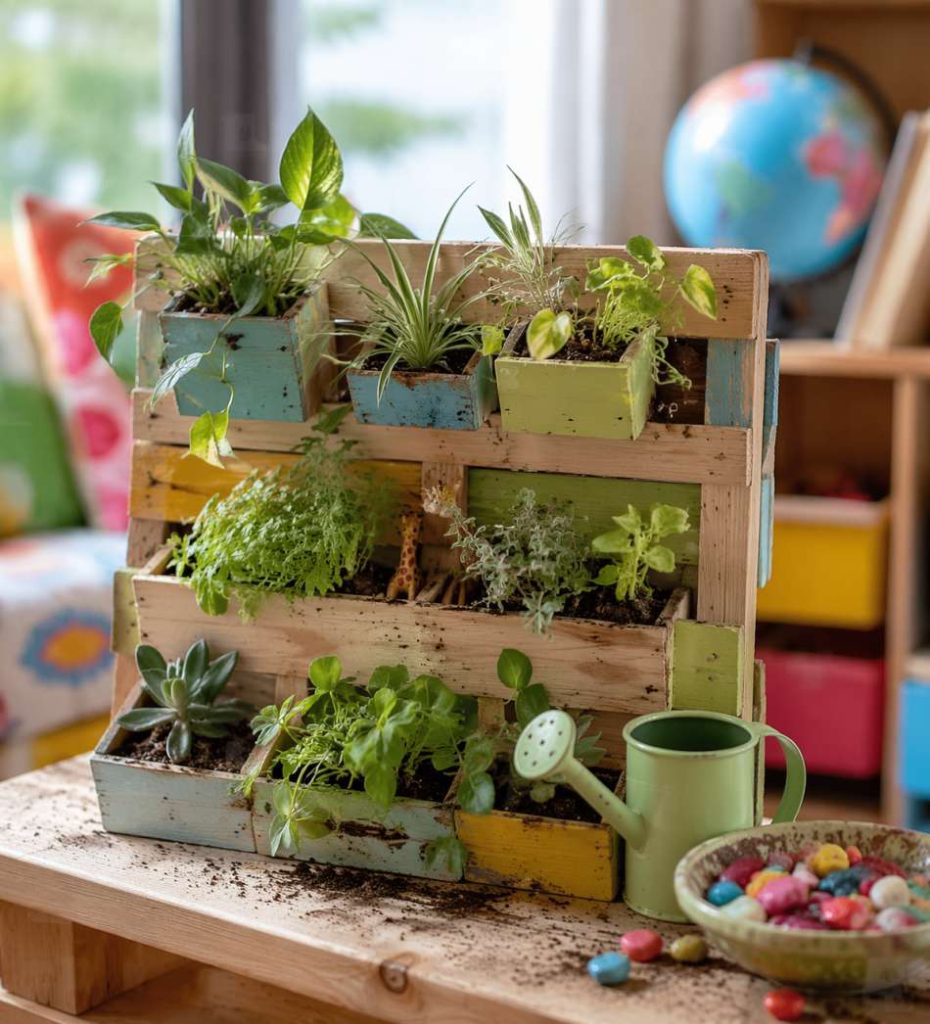
A mini pallet garden for kids is a fun way to get them involved without overwhelming them. It’s small, easy to manage, and gives them their own little space to grow something—whether it’s herbs, flowers, or quick-growing veggies.
Keep the setup simple and place it somewhere accessible. Let them help with planting and watering, even if it gets a bit messy. It’s less about perfection and more about the experience—and watching something grow makes it all the more exciting for them.
Common Mistakes to Avoid
Pallet gardening is pretty forgiving, but a few small missteps can make a big difference in how your setup turns out.
- One of the most common mistakes is using the wrong kind of pallet. Always double-check for the “HT” stamp and avoid anything chemically treated—especially if you’re growing herbs or veggies. It’s an easy detail to miss, but really important.
- Another thing people often overlook is proper prep.
- Skipping sanding might save time upfront, but those rough edges can cause splinters and make handling a pain.
- Not lining the pallet properly is another one—without landscape fabric, soil can fall out, and things get messy fast.
- At the same time, sealing it too tightly without thinking about drainage can lead to soggy roots.
And finally, don’t underestimate placement and plant choice. Cramming in too many plants or putting sun-loving ones in a shady spot (or the other way around) can hold everything back.
Start simple, give your plants enough space, and pay attention to light and watering needs—it’ll save you a lot of trial and error later.
Conclusion
Pallet gardening is one of those ideas that proves you don’t need a big budget or a big space to grow something beautiful.
With a bit of creativity and some basic prep, even a simple wooden pallet can turn into a productive and eye-catching garden.
Whether you’re growing herbs on a balcony, adding color to a fence, or building a small veggie setup, there’s a pallet project that fits your space and style.
Start small, experiment as you go, and don’t worry about getting everything perfect—the charm of pallet gardening is in its simplicity and hands-on feel.

Khaja Moinuddin, a computer science graduate, finds joy in gardening and homesteading. Join him on this blog as he shares his experiences in homesteading, gardening, and composting
Neart Fabric Resistance Bands Set of 5 – Premium Exercise Bands for Legs & Glutes, Non-Slip Workout Bands for Home, Fitness Equipment, Resistance Bands for Legs and Physical Therapy Bands

Price: $39.99 - $29.99
(as of Apr 22, 2026 23:51:16 UTC – Details)
From the brand


Premium Fabric Design for Lower Body Training: These fabric resistance bands are designed to support glutes, hips, thighs, and core, offering reliable performance as high-quality fitness bands for strength and mobility workouts.
Balanced Resistance for Every Fitness Level: This complete resistance band set is suitable for beginners and advanced users, working effectively as resistance bands for women and controlled exercise bands resistance during lower-body routines.
Comfortable, Durable & Secure During Workouts: Unlike elastic bands for exercise, these workout resistance bands stay firmly in place and feel comfortable on the skin, making them dependable bands for working out.
Portable & Easy to Use Anywhere: These lightweight work out bands are easy to store and carry, making them practical workout bands for legs whether you train at home, the gym, or while traveling.
Complete Kit for Strength, Stretch & Recovery: Includes 5 loop resistance bands, a carry bag, and workout guide—ideal for stretching bands and recovery-focused training sessions.
")
Fabric Resistance Bands,5 Non-Slip Fabric Workout Bands,Booty Bands for Women & Men, Elastic Exercise Bands for Legs, Glutes, Hips & Thighs, Home Fitness & Gym

Price: $19.95 - $17.95
(as of Apr 22, 2026 11:50:04 UTC – Details)
Build strong, toned legs and glutes from anywhere. This premium fabric resistance bands set includes 4 levels of booty bands designed for full lower-body training. Whether you’re at home, outdoors, or in the gym, these elastic exercise bands help you activate muscles more effectively and achieve visible results faster.
✔ 4 Resistance Levels
Light, Medium, Heavy, and Extra Heavy bands allow progressive training for all fitness levels.
✔ Non-Slip Fabric Material
Soft woven fabric with inner latex keeps bands in place — no rolling, no slipping, no pinching.
✔ Full Lower Body Training
Targets glutes, hips, thighs, hamstrings, calves, and core. Ideal for squats, lunges, hip thrusts, kickbacks, Pilates, yoga, and rehab.
✔ Includes Workout Bands Guide
Step-by-step exercise instructions help you perform each movement correctly and safely.
✔ Compact & Travel-Friendly
Store your bands in the included carry bag and train anywhere — perfect for home, travel, or gym use.
Achieve your fitness goals faster with this complete resistance bands set — perfect for women, men, beginners, and professionals!
【5-Level Fabric Booty Bands – From Light to Heavy】 This resistance bands set includes 5 fabric workout bands with progressive tension levels, suitable for beginners to advanced athletes. Perfect for warm-ups, leg day, HIIT training, and glute activation.
【Non-Slip, Durable & Comfortable Fabric Design】 Made with premium woven cotton + latex blend, these bands stay non-slip, won’t roll up or pinch skin, and maintain elasticity even after thousands of stretches. Designed for intense lower body workouts.
【Sculpts Legs, Hips & Glutes Effectively】 Target your glutes, thighs, hamstrings, hips, and core with higher efficiency. Ideal for squats, lunges, hip thrusts, kickbacks, Pilates, yoga, and physical therapy.
【Portable Set with Workout Guide Included】 Comes with a workout bands guide featuring step-by-step exercises for beginners and pros. Lightweight and portable — take them to the gym, office, or while traveling.
【Suitable for Women & Men – All Fitness Levels】 This elastic resistance bands set supports all training goals: shaping, toning, postpartum recovery, physical therapy, and strength building. A versatile home workout accessory for women, men, teens, and seniors.
39 Common Weeds That You Can Eat or Use for Medicine

5. Chickweed
Chickweed (Stellaria media) is an invasive weed (it’s right there in the name!) that came to North America from Europe.
Fortunately, it also has edible leaves, stems, and flowers, so you can put it to good use.
As an added bonus, it can be evergreen and survives the winter under dense conifer cover where few other plants can thrive, which means you have a winter source of nutrients.

Chickweed has a sweet, grassy flavor that makes a nice addition to salads or a sandwich. Use the leaves of this weed instead of basil to make pesto.
Dried, it makes a tasty tea. Of all the plants on this list, it’s one of the best-tasting, so don’t pass it up.
Medicinally, it can be used to make a poultice, as a diuretic, and as an emollient. The tea is useful for treating a dry cough.
Chickweed is an annual that crawls along the ground, with small, oval leaves, a round stem, and small white flowers. It’s common in garden beds, especially rose beds.
Don’t confuse it with scarlet pimpernel (Anagallis arvensis), which is toxic, and has square stems and red flowers.
Look for the line of hairs on just one side of the stem. The side where these appear changes between each node That’s a definitive way to tell chickweed apart from any lookalike.
6. Chicory
More and more these days, chicory (Cichorium intybus) is being cultivated once again as a veggie and a coffee substitute rather than being pulled as an unpleasant weed.
It’s easily identified by its bright blue-purple inflorescences on stalks that grow up to three feet tall. Look for it on roadsides and in disturbed areas.
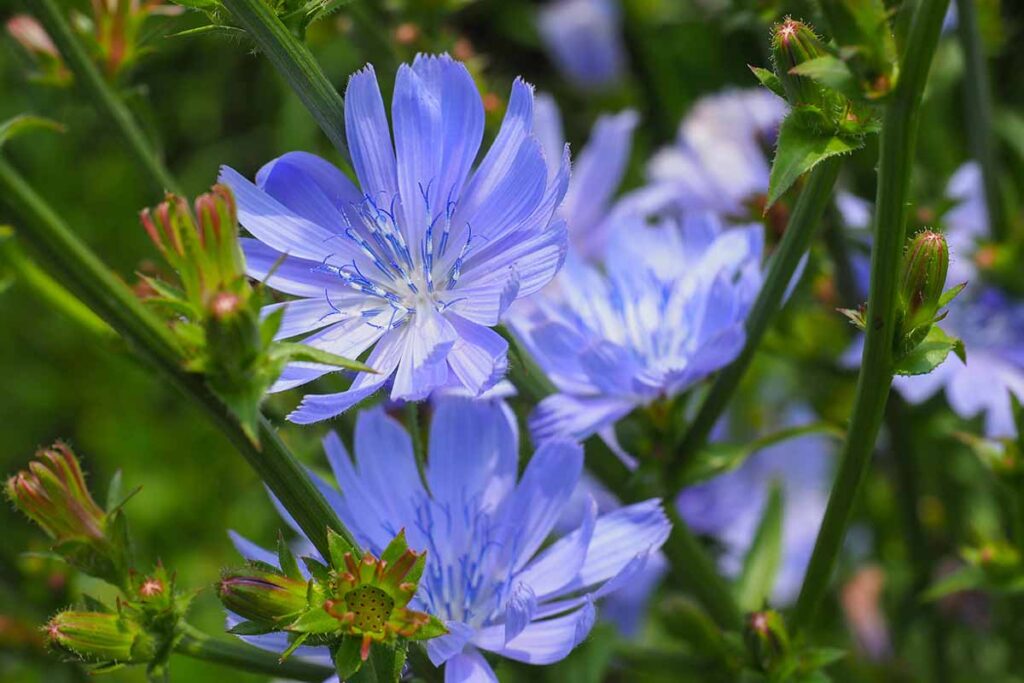
The roots, leaves, and flowers are all edible, but the root is what most people use.
If you roast the root in the oven until it’s dark brown and hard, you can grind it and brew it like coffee. The leaves have a spicy flavor, while the flowers are a bit more subtle.
Most people prefer the flavor of dandelion greens over the more bitter ones of chicory, but I find it’s a matter of proportion.
Just like endive can be a fabulous addition to a bowl full of lettuce greens, some chopped chicory leaves are also a pleasant addition.
If the leaves aren’t your thing, harvest the crown of the plant, remove the root and the green parts of the leaves, and eat the crown whole or chopped.
Medicinally, it’s considered an inferior substitute for dandelion, with the same diuretic, laxative, and liver-stimulating qualities.
I always feel lucky to have chicory in my yard. Not only is it edible, but I think the flowers are simply stunning.
The vibrant blue-purple hue stands out, and each blossom only appears for a day before it is spent.
Learn more about cultivating chicory here.
7. Claytonia
Claytonia includes several species of plants that go by various names, such as miner’s lettuce, spring beauty, pink purslane, and candy flower.
The latter common name is no misnomer. The blossoms are so incredibly floral and sweet that you might think you’re eating candy.
These plants are related to purslane, and miner’s lettuce (Claytonia perfoliata) is perhaps the easiest to identify. It has little cup-shaped leaves that are speared by the stem of the plant.
Candy flower (C. sibirica) has small white, pink and white striped, or pink flowers atop fleshy stems.
Our guide to growing miner’s lettuce (Claytonia perfoliata) has more information.
8. Cleavers
Cleavers (Galium aparine) earned their name because the leaves cleave to clothing, pet fur, and just about anything else they can get their tiny hooks into.
This species prefers moist areas, but it’s not too picky and you can find it in drier areas, as well.
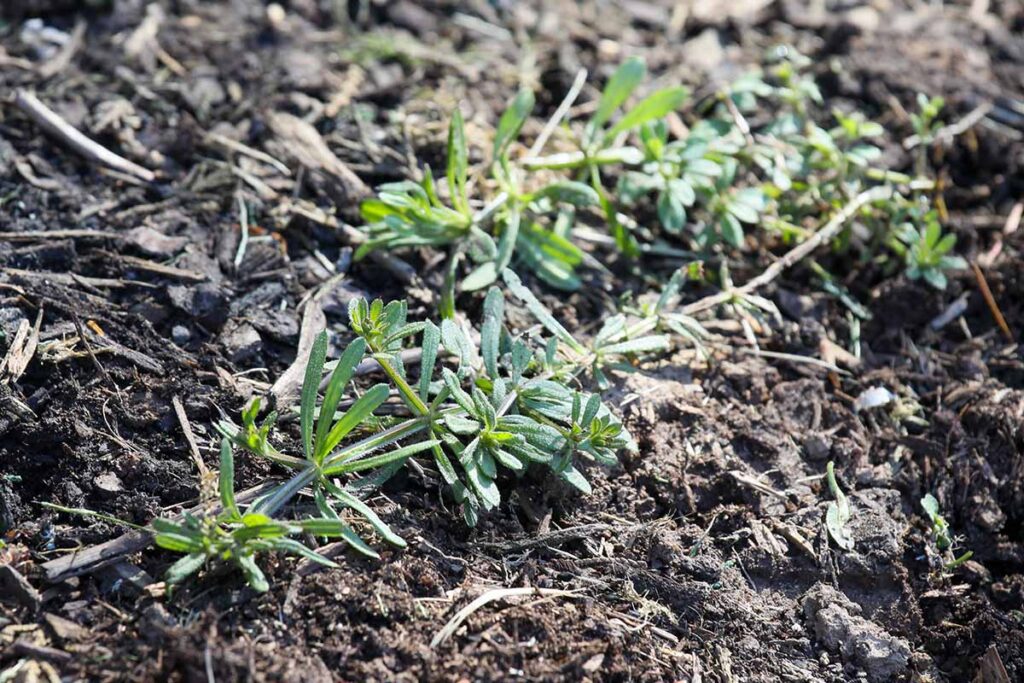
The shoots and leaves are edible, but keep in mind that there are annual and perennial forms of this plant, and the perennials have leaves that are covered in jagged hooks.
These hooks will become stuck in your throat, making them difficult to swallow unless you boil them first. Young leaves or ones from annual forms don’t have the hooks.
This plant looks somewhat like sweet woodruff, with five lanceolate leaves emerging from a central stalk, and small white flowers.
This plant is used medicinally as a diuretic and topically as a salve.
9. Clover
Clover is cultivated in some areas of Europe and North America as fodder, but in others, it is an annoying weed.

Red clover (Trifolium pratense) is particularly worth pulling from your garden because it’s high in protein, calcium, and B-complex vitamins, and vitamins A and C.
Eat the leaves and flowers.
A tea made from the leaves can be used to soothe coughs and throat irritation.
10. Creeping Charlie
Ground ivy, or creeping Charlie (Glechoma hederacea), has kidney-shaped, toothed leaves and purple flowers from March to June, depending on where you live.
It’s extremely common in lawns and other garden areas that receive regular moisture.

While it’s toxic to horses in large amounts, the leaves are safe for human consumption.
The dried, crushed leaves are used medicinally to treat coughs, bronchitis, and other lung issues.
11. Dandelion
We all know and love the good old dandelion (Taraxacum spp.).
With its oblong, heavily toothed leaves and bright yellow inflorescence, it’s a common weed in lawns, fields, gardens, and roadsides.

The roots, flowers, and leaves are all edible. The young leaves are grassy and mellow, while the older leaves take on a bitter flavor.
They’re edible raw or cooked, and the flowers are best eaten raw.
You can make dandelion wine, syrup, and coffee, or even harvest the tightly-packed flower buds to make dandelion capers. And dandelions have more beta-carotene than carrots!
You can even find newer cultivars of dandelions that are intended to be cultivated and eaten or grown as ornamentals.
It’s about time dandelions made a comeback, because they have been an important part of human culture for as long as we have kept records.
If you missed harvesting the young leaves, you can place a piece of cardboard over the plant for a few weeks to blanch it and reduce the bitterness.
If you plan to harvest the roots, at which point the leaves are usually older and bitter, consider drying the leaves to use as a parsley-like herb.
It’s also valuable medicinally for digestive issues and treating skin injuries.
Learn more about dandelions here.
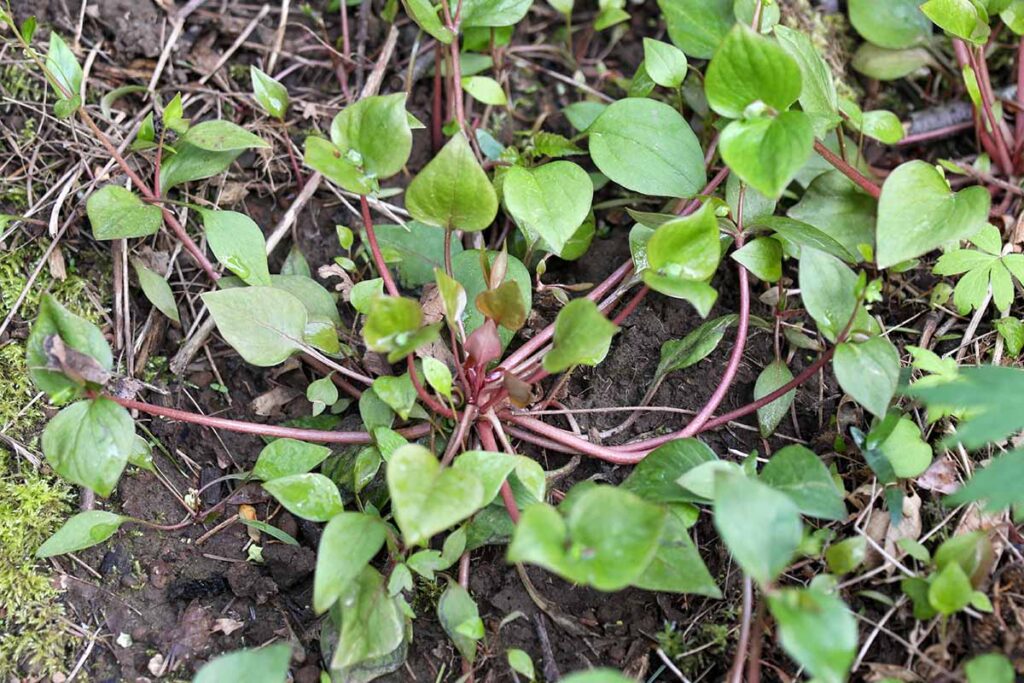
12. Dead Nettle
Dead nettle (Lamium purpureum) is in the mint family, but these plants look more like stinging nettles.
When you rub the leaves between your fingers, however, you can understand the mint relation because of the pungent aroma that’s released.
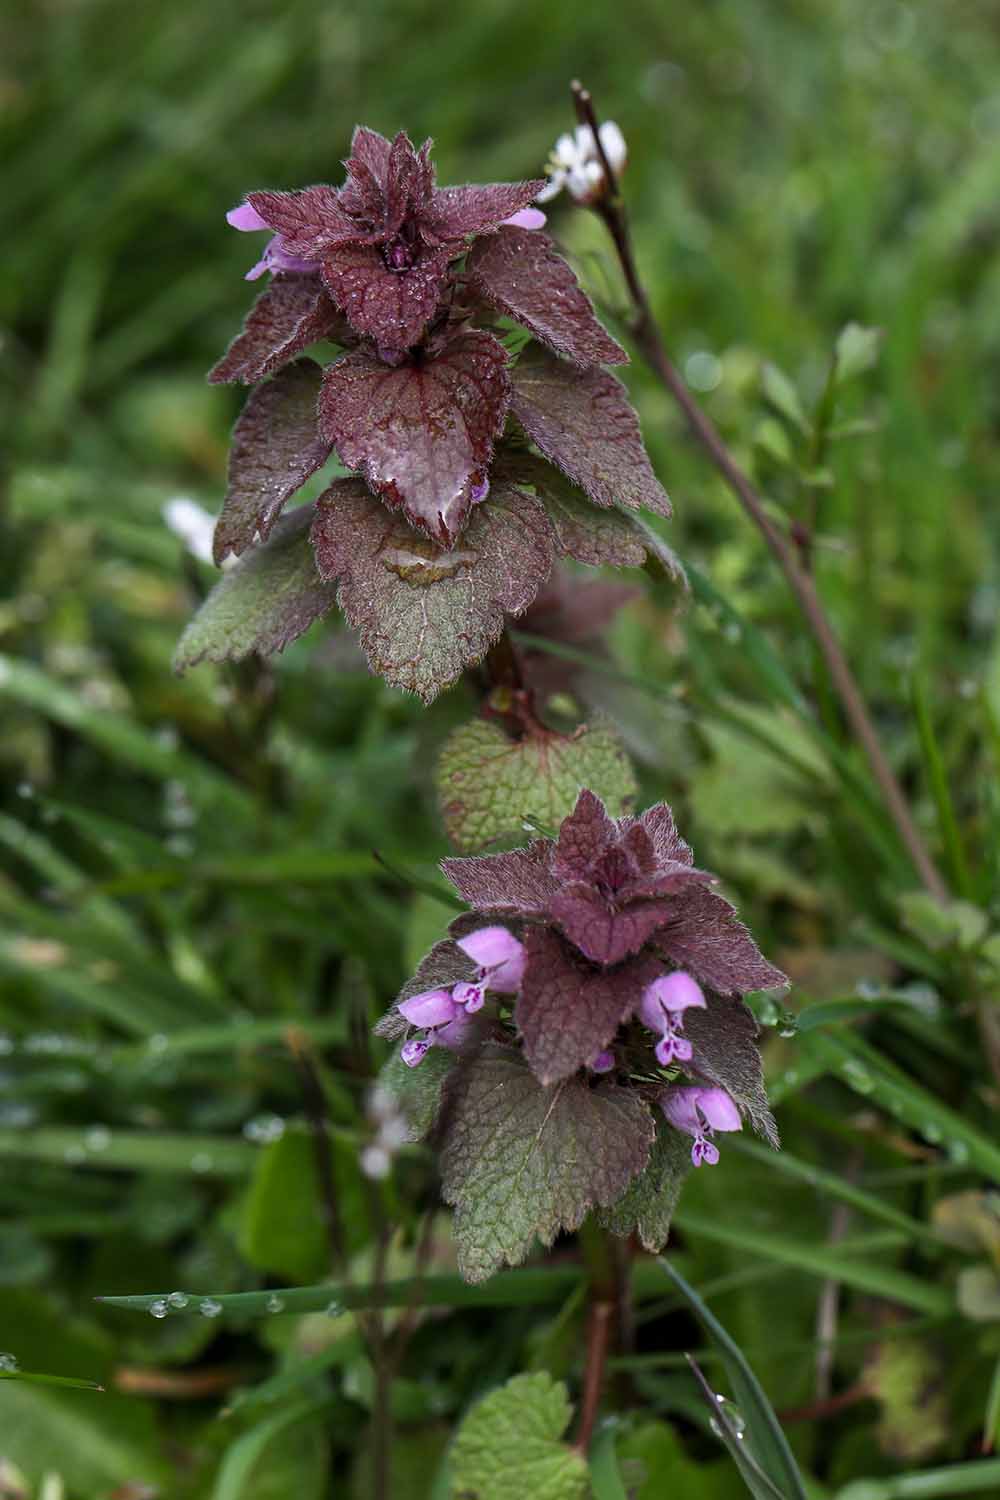
You can find this weed almost everywhere – in lawns, disturbed areas, gardens, and just about anywhere else that they’re given the opportunity to grow.
They pop up early in the year and stick around during the winter in mild regions, where they send up purple flowers.
500 Double-Sided Professional Terminology flashcards for Nursing and Medical Students – Includes Easy to use Color-Coded Study Tool with Sorting Ring and Access to Complementary Resource Library

Price: $34.99
(as of Apr 21, 2026 23:49:10 UTC – Details)
Equip yourself with the ultimate study tool tailored specifically for nursing and medical students. Our set of 500 double-sided medical terminology flash cards covers an extensive range of topics, including pharmacology, med-surg, anatomy, and more. Each card is carefully color-coded to facilitate learning, allowing you to categorize and memorize terms effectively. Crafted from premium 280 gsm art paper with a glossy oil finish, these flash cards are built to last. The included 1.5” sorting ring keeps your cards organized, while the sturdy lift-off lid box with rounded corners on dividers ensures they remain in perfect condition. We’ve also added three bonus sorting cards to help you track your progress—whether you’re just starting out, nearly there, or have mastered the material. But we don’t stop at just the cards. Access our free resource library for even more study materials, and challenge yourself with 30 “Test Your Knowledge” multiple-choice cards to reinforce what you’ve learned. Whether you’re preparing for the NCLEX, PTCB, or other certification exams, these flash cards will become an indispensable part of your nursing school survival kit.
COMPREHENSIVE LEARNING TOOL: 500 double-sided flash cards designed for nursing and medical students. These color-coded cards make it easier to master medical terminology, pharmacology, med-surg, and more.
HIGH-QUALITY DESIGN: Each card is crafted from 280 gsm art paper with a glossy oil finish, ensuring durability and longevity. The set includes a 1.5” sorting ring for organized learning and easy handling.
ORGANIZED & ACCESSIBLE: The flash cards are stored in a sturdy lift-off lid box with rounded corners on dividers, making sorting a breeze. Three bonus sorting cards—“Work in Progress,” “Almost There,” and “Mastered It!”—help plan study sessions effectively.
ENHANCED LEARNING RESOURCES: Gain access to a free resource library filled with additional study materials. Plus, test your knowledge with 30 multiple-choice question cards designed to reinforce learning.
PERFECT FOR EXAM PREPARATION: Ideal for NCLEX, PTCB, and other exams, these flash cards are a must-have in any nursing school survival kit. The clear, easy-to-read font and thoughtfully designed reference guides streamline your study process.
Adobo Seasoning Recipe

I regularly make homemade mayo and I’ll often make different flavors, like sriracha or mayo with adobo seasoning. I use so much adobo seasoning that I started making it in bulk at home. It’s delicious on everything from meats to veggies to dips.
What is Adobo Seasoning?
Adobo seasoning is a mixture of garlic, oregano, pepper and other spices. It’s traditionally used in Latin American, Caribbean, and Filipino cooking to flavor everything from meats to veggies and soups. Adobo usually doesn’t have really heavy, pungent flavors so it’s versatile to use.
In my kitchen, it’s a general all-purpose seasoning that I add to meats, soups, seafood, eggs, roasted vegetables, and many other dishes.
The word adobo stems from the Spanish word “adobar” meaning “to marinate.” There are many variations of this seasoning, including liquid sauce versions that often include vinegar. The base ingredients are garlic, black pepper, turmeric, and oregano, though other spices can be added (I add several others to my variation).
How to Use Adobo Seasoning
This combination of spices adds depth to dishes without overpowering them, and is versatile enough to use on practically everything. You can mix it in while cooking, or use it as a dry rub on meats. It also makes a delicious marinade when mixed with oil, orange juice, lime juice, or vinegar. Just add enough liquid to make a paste and rub it on beef, poultry, fish, etc.
Here are some other ways I use Adobo seasoning:
- In marinades for meats or chicken
- As an all-purpose seasoning on seafood
- On grilled meats and vegetables
- In soups of all kinds
- In omelets, quiches, or other egg dishes
- In guacamole
- Stirred into homemade mayo for a flavor twist
Tips For Making Adobo Seasoning
Adobo seasoning blends include salt so they’re an all in one seasoning when cooking. If you prefer you can leave the salt out or reduce the amount. This makes it easier to control the amount of salt added when cooking, especially if you’re using this with other salty flavors.
The recipe calls for black or white pepper. They each have a unique flavor, but either will work in adobo seasoning. I prefer to use a blend of both when making this.
Adobo Seasoning Recipe
Our family loves this adobo seasoning on meats, seafood, guacamole, soups, roasted vegetables, and practically any other dish. I always have some on hand and use it nearly every day!
-
Add all ingredients to a small glass jar or bowl.
-
Stir or shake well until fully combined.
-
Store in an airtight container away from heat and sunlight.
Nutrition Facts
Adobo Seasoning Recipe
Amount Per Serving (1 TBSP)
Calories 22
Calories from Fat 4
% Daily Value*
Fat 0.4g1%
Saturated Fat 0.1g1%
Polyunsaturated Fat 0.1g
Monounsaturated Fat 0.1g
Sodium 880mg38%
Potassium 107mg3%
Carbohydrates 5g2%
Fiber 1g4%
Sugar 0.3g0%
Protein 1g2%
Vitamin A 385IU8%
Vitamin C 1mg1%
Calcium 31mg3%
Iron 1mg6%
* Percent Daily Values are based on a 2000 calorie diet.
If you prefer, you can omit the salt from this recipe and just add it as desired while cooking.
Shelf Life and Storage
Like any spice, this tastes best when stored in a cool, dark place away from direct light and heat. Right above the stove is not the best place! When stored properly it will stay fresh for about 6 months. Feel free to double the batch if your family loves it as much as we do!
Other Homemade Spices to Try
Like this recipe? I recommend ordering herbs and spices in bulk and making your own spice blends at home. It’s a great way to avoid unwanted additives found in many commercial spice blends, and an easy way to save money. I order most of my herbs and spices in bulk online and make many of my own blends, including:
What’s your favorite type of seasoning? Do you ever make your own? Leave a comment and let us know!
Rhonda’s Spring Garden in Pennsylvania

Hi GPODers!
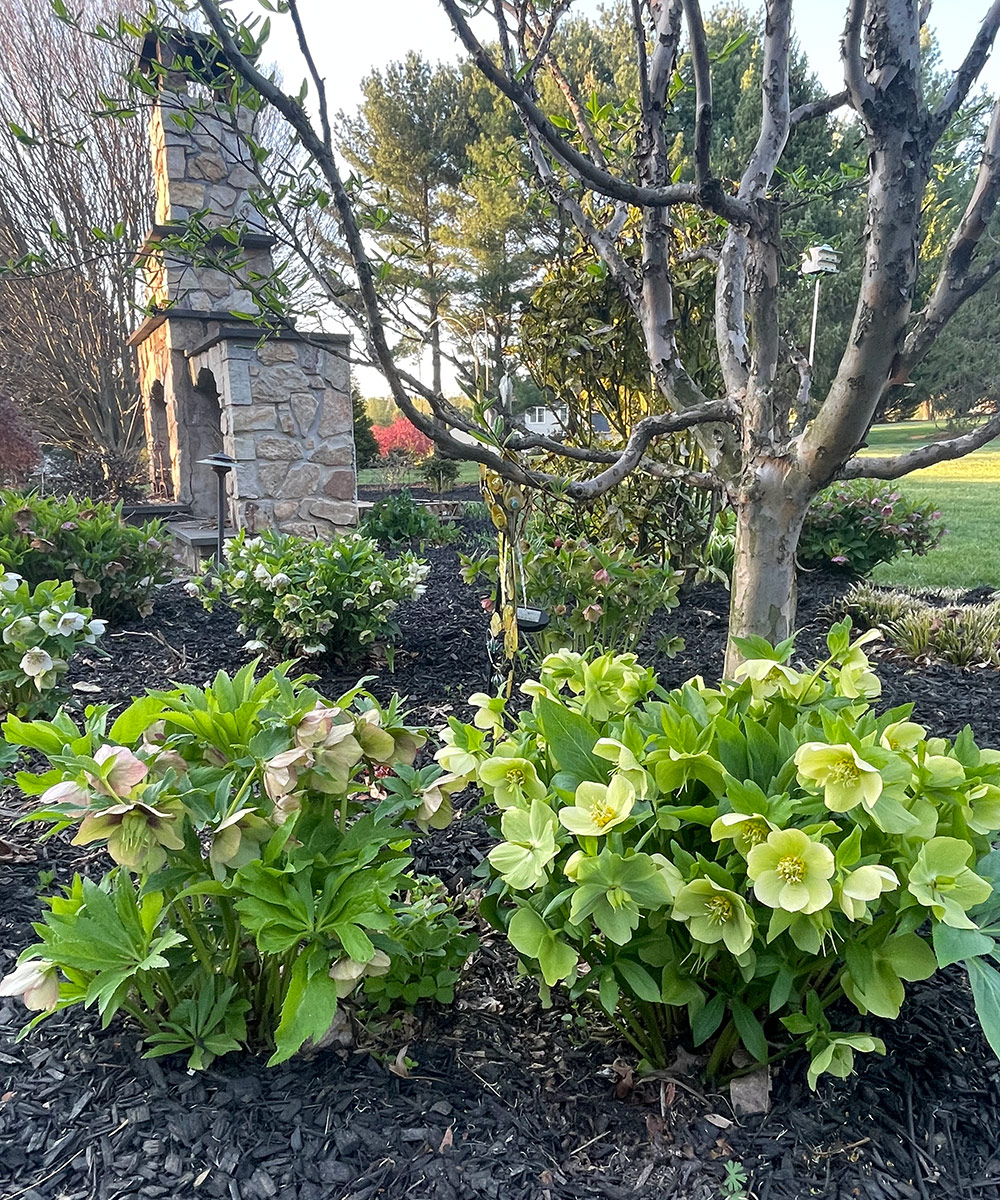
Sometimes it’s hard to enjoy your garden when all you see is the laundry list of chores to get done. This is true throughout the growing season but might be the most applicable in spring—clearing debris that accumulated through winter, pruning during the optimal window, putting new plants in the ground before it gets too warm. But once the majority of your must-dos are done, the beauty finally emerges in its full glory. I only imagine that’s what Rhonda Molin felt when she snapped these photos after weeding and mulching. With a bit of tidying done, these stunning blooms took on a whole new life. Rhonda is a frequent contributor who has shared her lovely garden in West Grove, Pennsylvania (Zone 7a but sometimes still 6b!), several times (Rhonda’s Late-Summer Garden in Pennsylvania, A Guest in Rhonda’s Garden, Spring Blooms in Rhonda’s Pennsylvania Garden, Rhonda’s Hellebore Roundup, Fall in Rhonda’s Garden, and more), and it’s still a pleasure when each new update rolls in.
We just finished mulching and weeding. We have been here 35 years, but the layout of the garden was done in 2011.
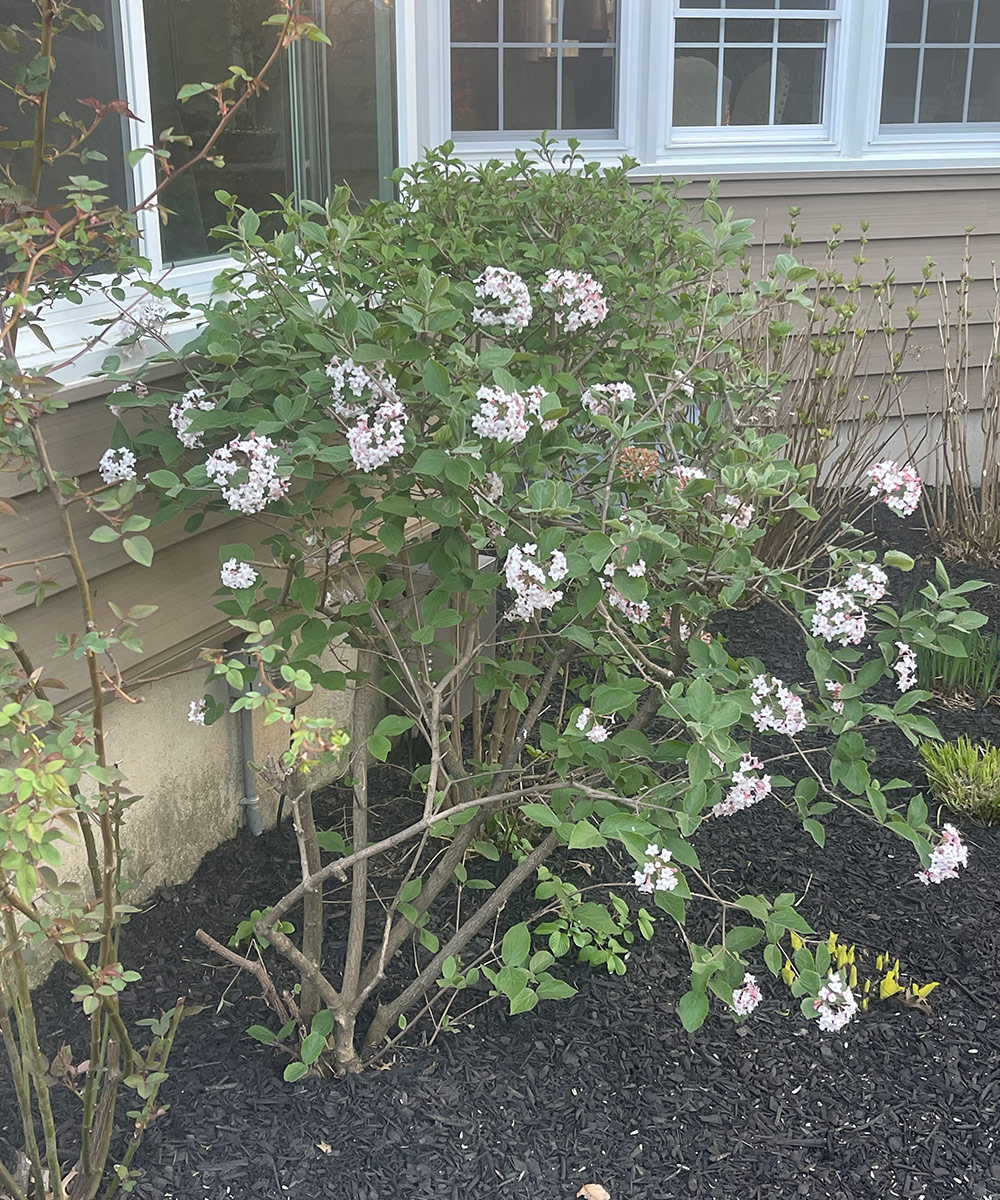
Koreanspice viburnum (Viburnum carlesii, Zones 4–7)
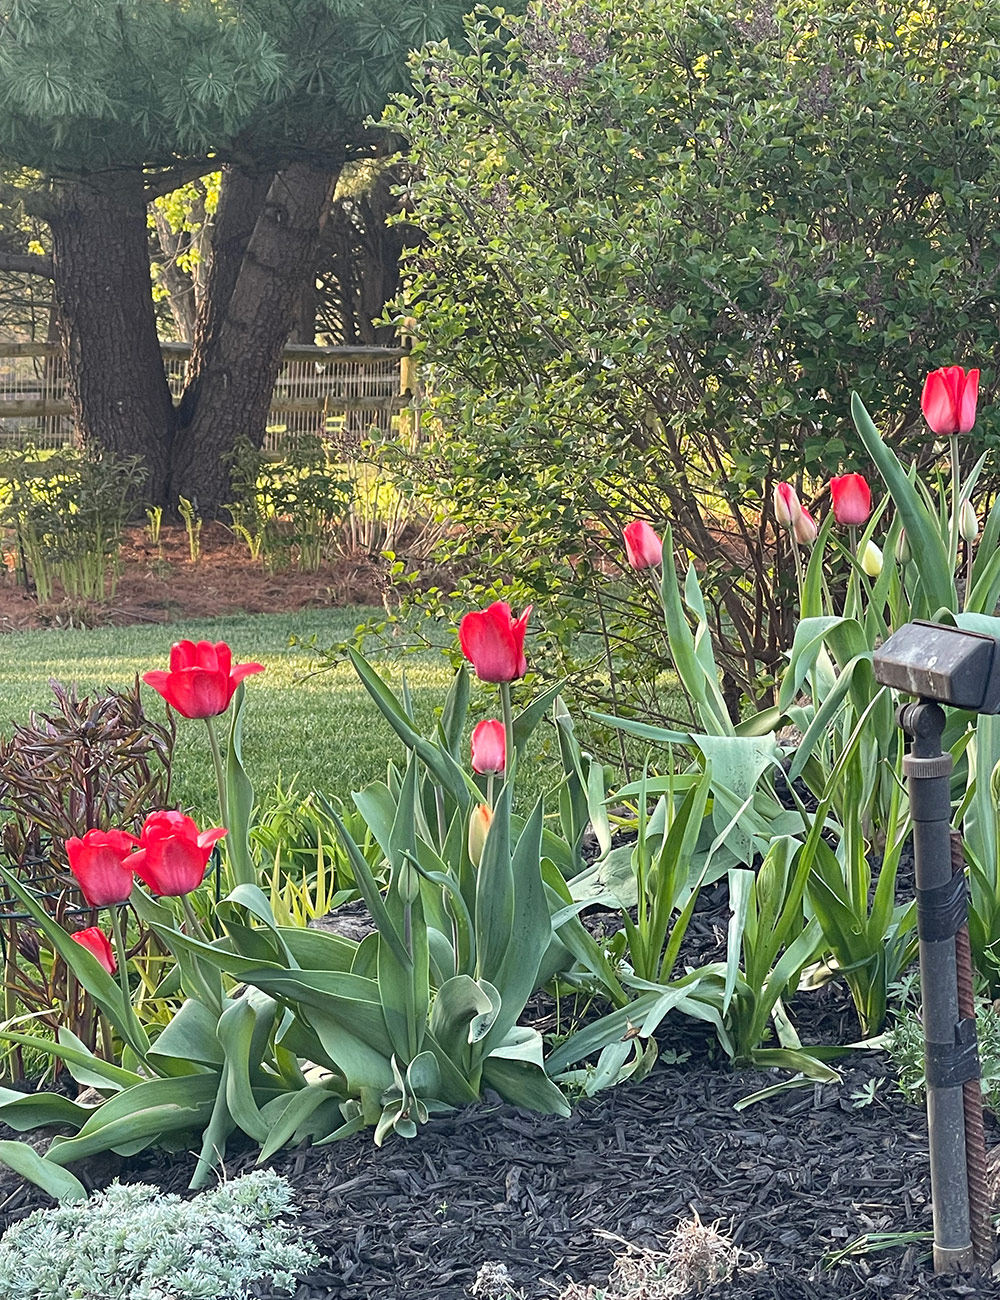 Darwin tulips—gotta keep the deer scram handy!
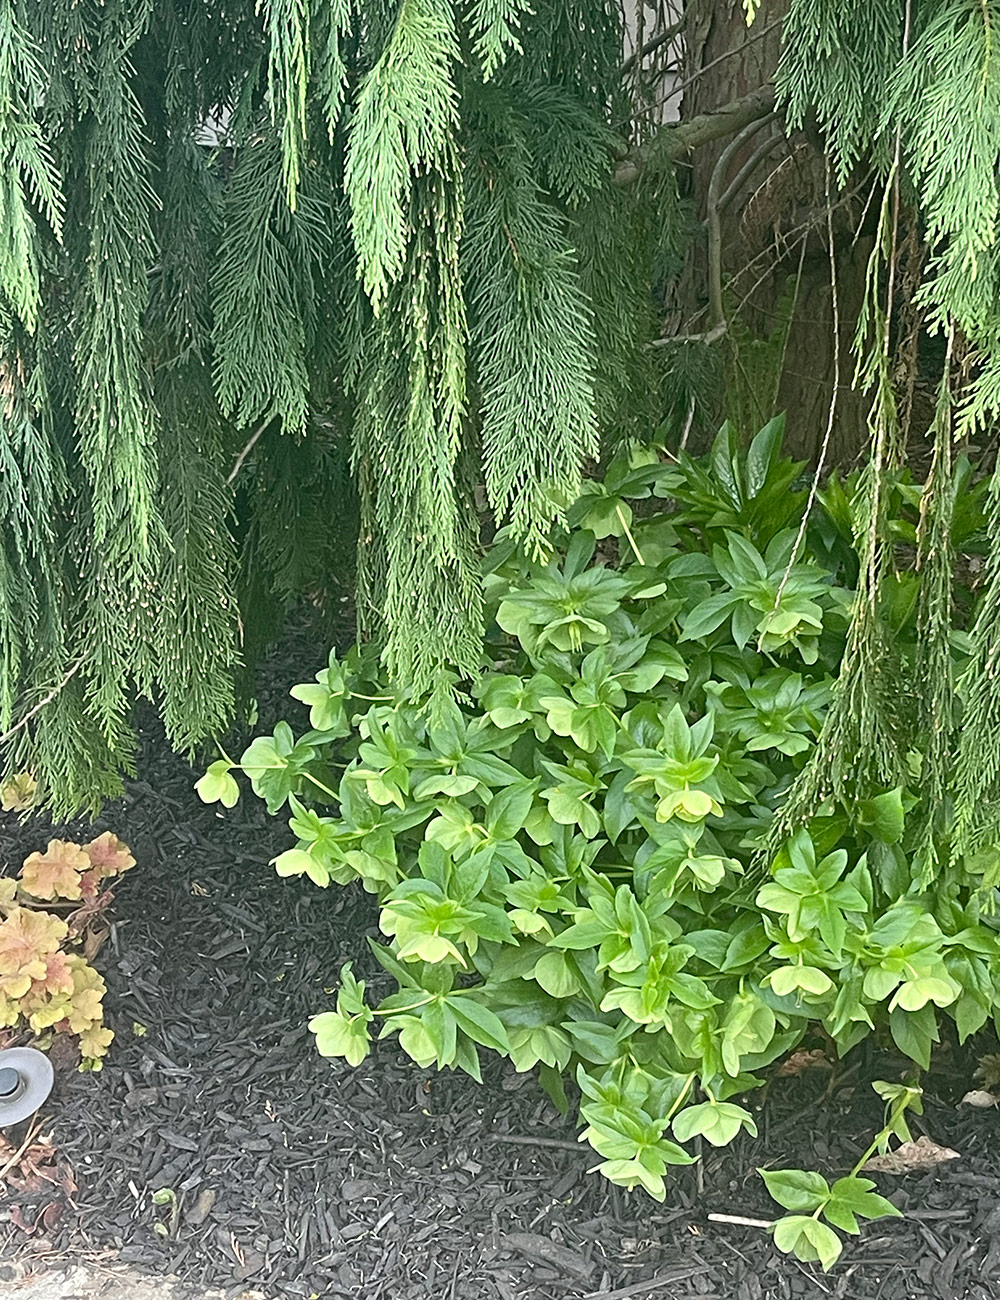 Hellebores under the Alaskan cedar (Chamaecyparis nootkatensis, Zones 4–8)
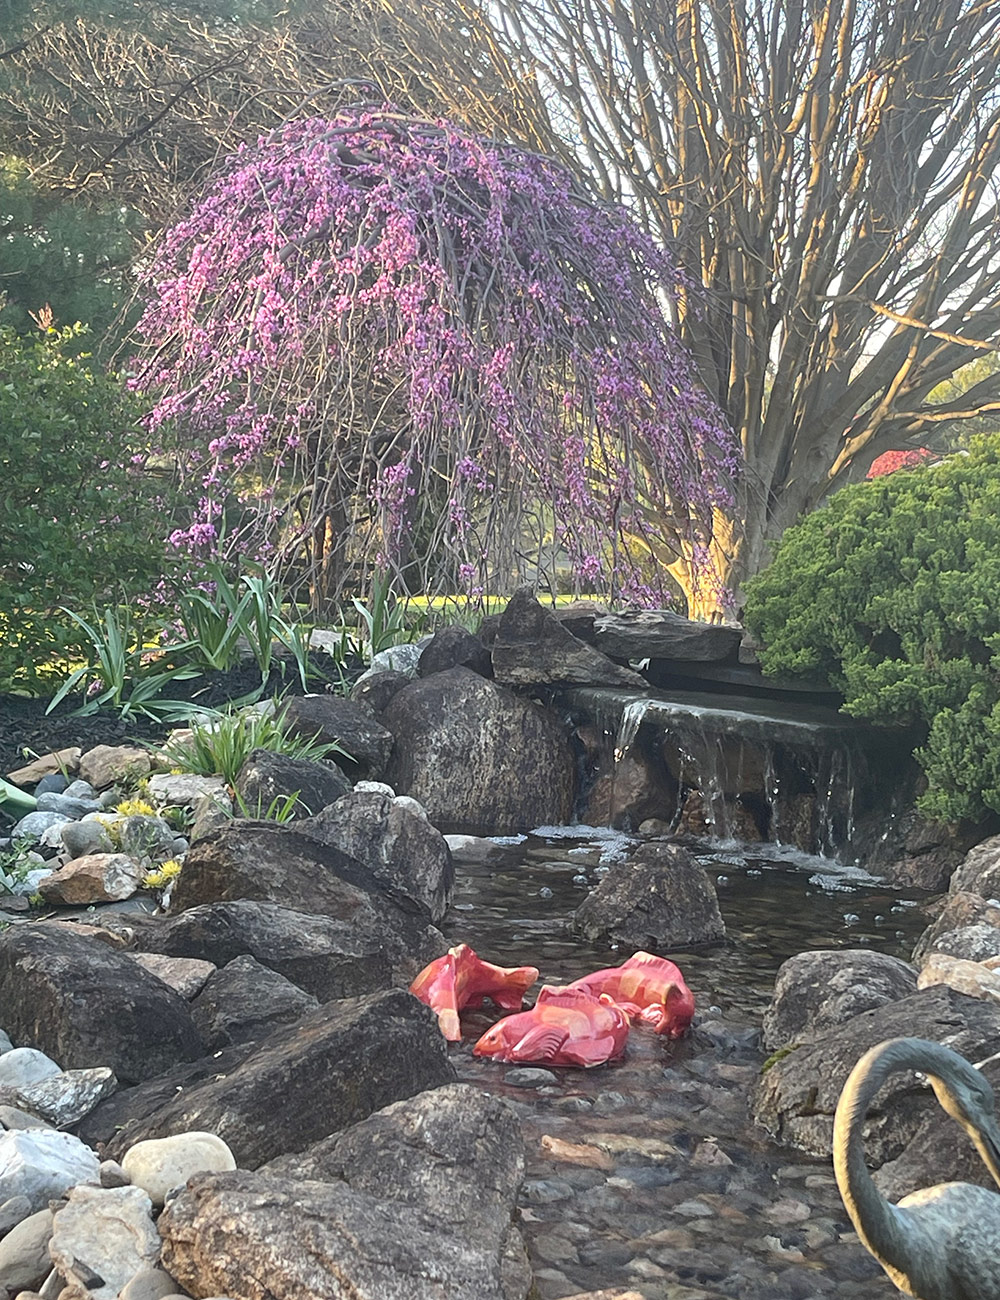 An undeniable star of Rhonda’s spring garden is her weeping redbud, which serves as a beacon for the season at the top of her gorgeous garden pond.
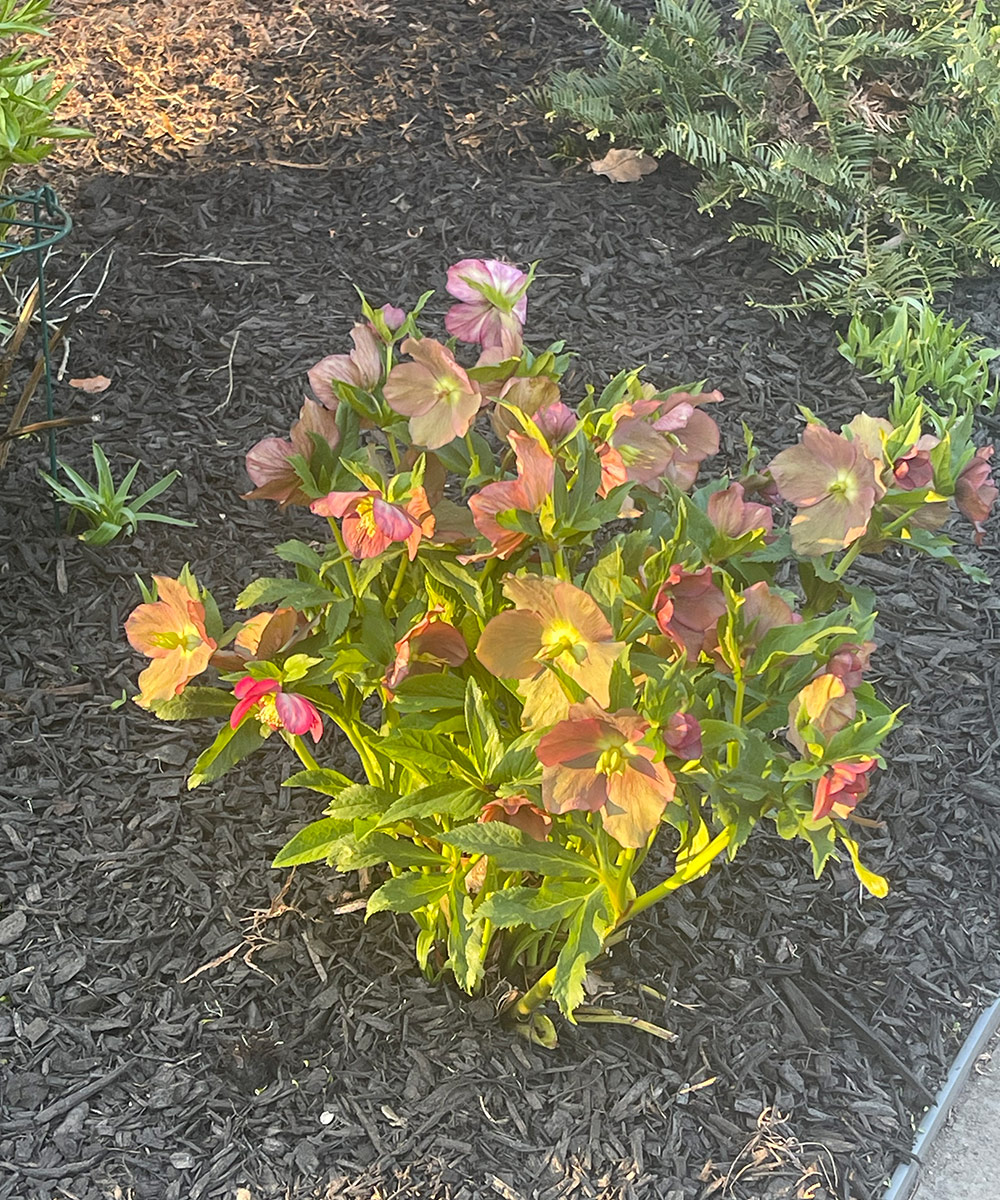
 Assortment of hellebores
 Hellebore in the evening light
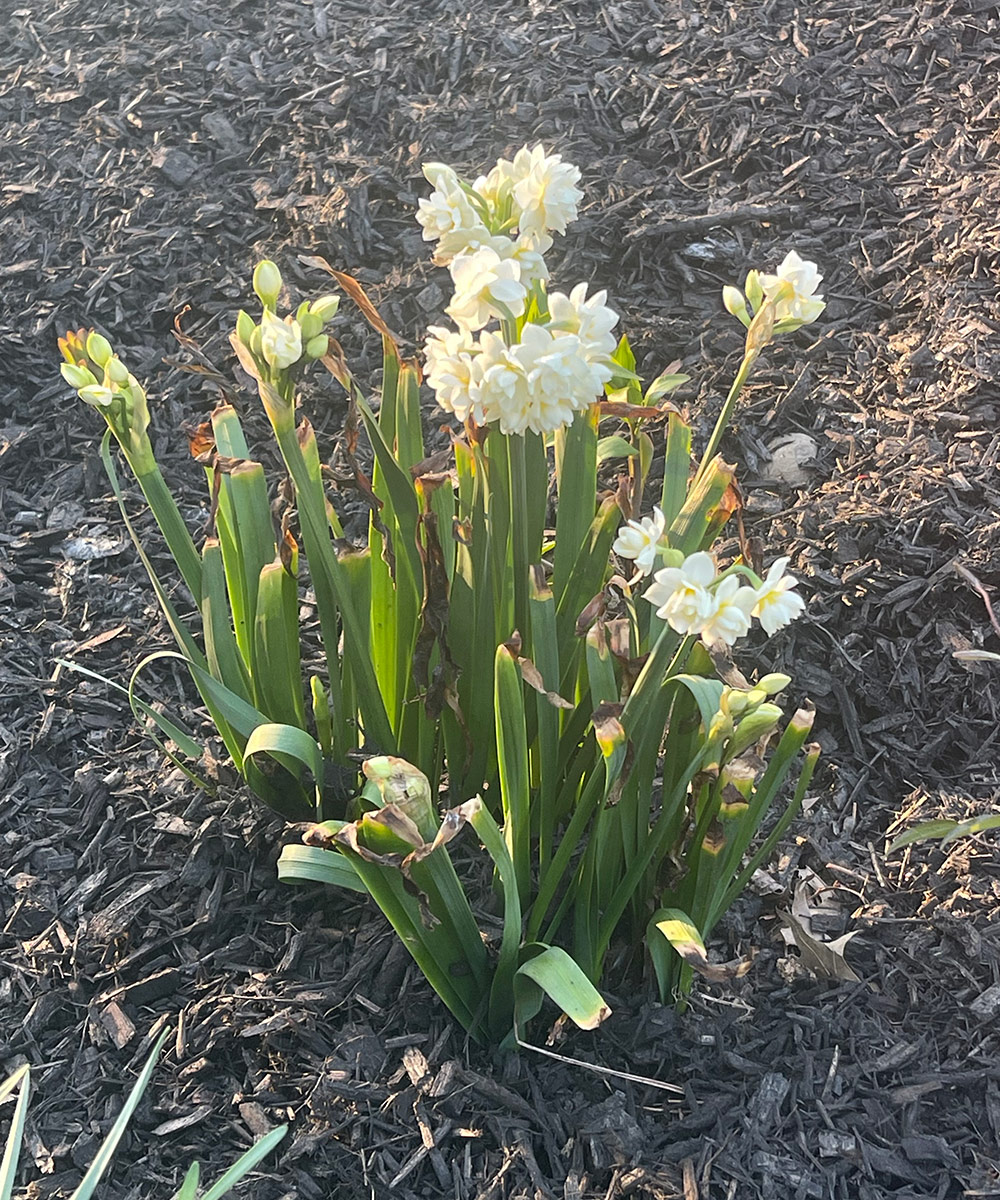 ‘Erlicheer’ daffodil (Narcissus ‘Erlicheer’, Zones 5–9). It gets nipped by frost every year. I really should move it!
Thank you so much for sharing your spring garden with us again, Rhonda! Your landscape is always a delight, and it’s great to see that your growing season is beginning on a beautiful note.
Please, keep the spring garden photos coming! As you tackle the long list of chores and more of the garden comes to life, consider sharing the spring interest you’re enjoying right now. Follow the directions below to submit your photos to Garden Photo of the Day!
We want to see YOUR garden!
Have photos to share? We’d love to see your garden, a particular collection of plants you love, or a wonderful garden you had the chance to visit!
To submit, fill out the Garden Photo of the Day Submission Form.
You can also send 5–10 photos to [email protected] along with some information about the plants in the pictures and where you took the photos. We’d love to hear where you are located, how long you’ve been gardening, successes you are proud of, failures you learned from, hopes for the future, favorite plants, or funny stories from your garden.
Do you receive the GPOD by email yet? Sign up here
Fine Gardening Recommended Products
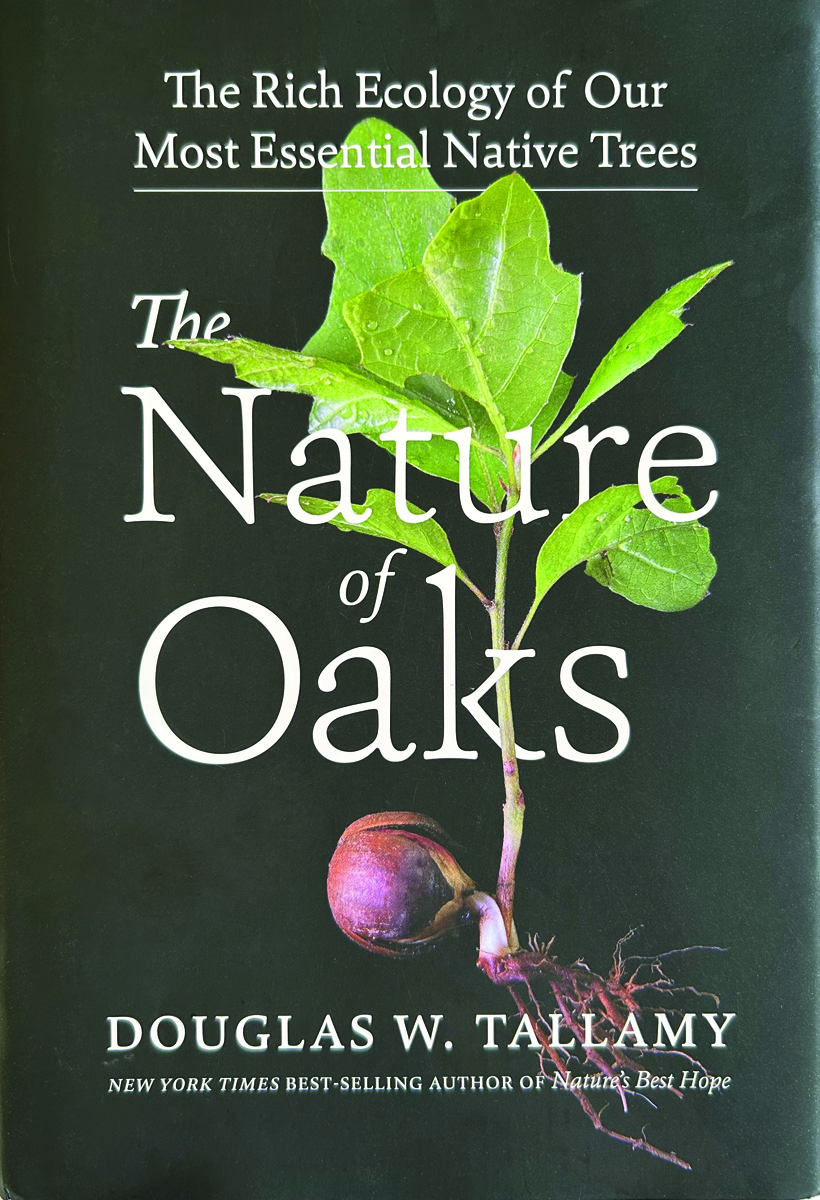
The Nature of Oaks: The Rich Ecology of Our Most Essential Native Trees
Fine Gardening receives a commission for items purchased through links on this site, including Amazon Associates and other affiliate advertising programs.
The Nature of Oaks reveals what is going on in oak trees month by month, highlighting the seasonal cycles of life, death, and renewal. From woodpeckers who collect and store hundreds of acorns for sustenance to the beauty of jewel caterpillars, Doug Tallamy illuminates and celebrates the wonders that occur right in our own backyards. He also shares practical advice about how to plant and care for an oak, along with information about the best oak species for your area.

ARS Telescoping Long Reach Pruner
Fine Gardening receives a commission for items purchased through links on this site, including Amazon Associates and other affiliate advertising programs.
Telescopes from 4 to 7′. Cut and Hold (160) Blades. Drop forged blades for unsurpassed long lasting sharpness. Lightweight, 2.3 lbs., for continued use. Perfectly balanced for easy pruning.
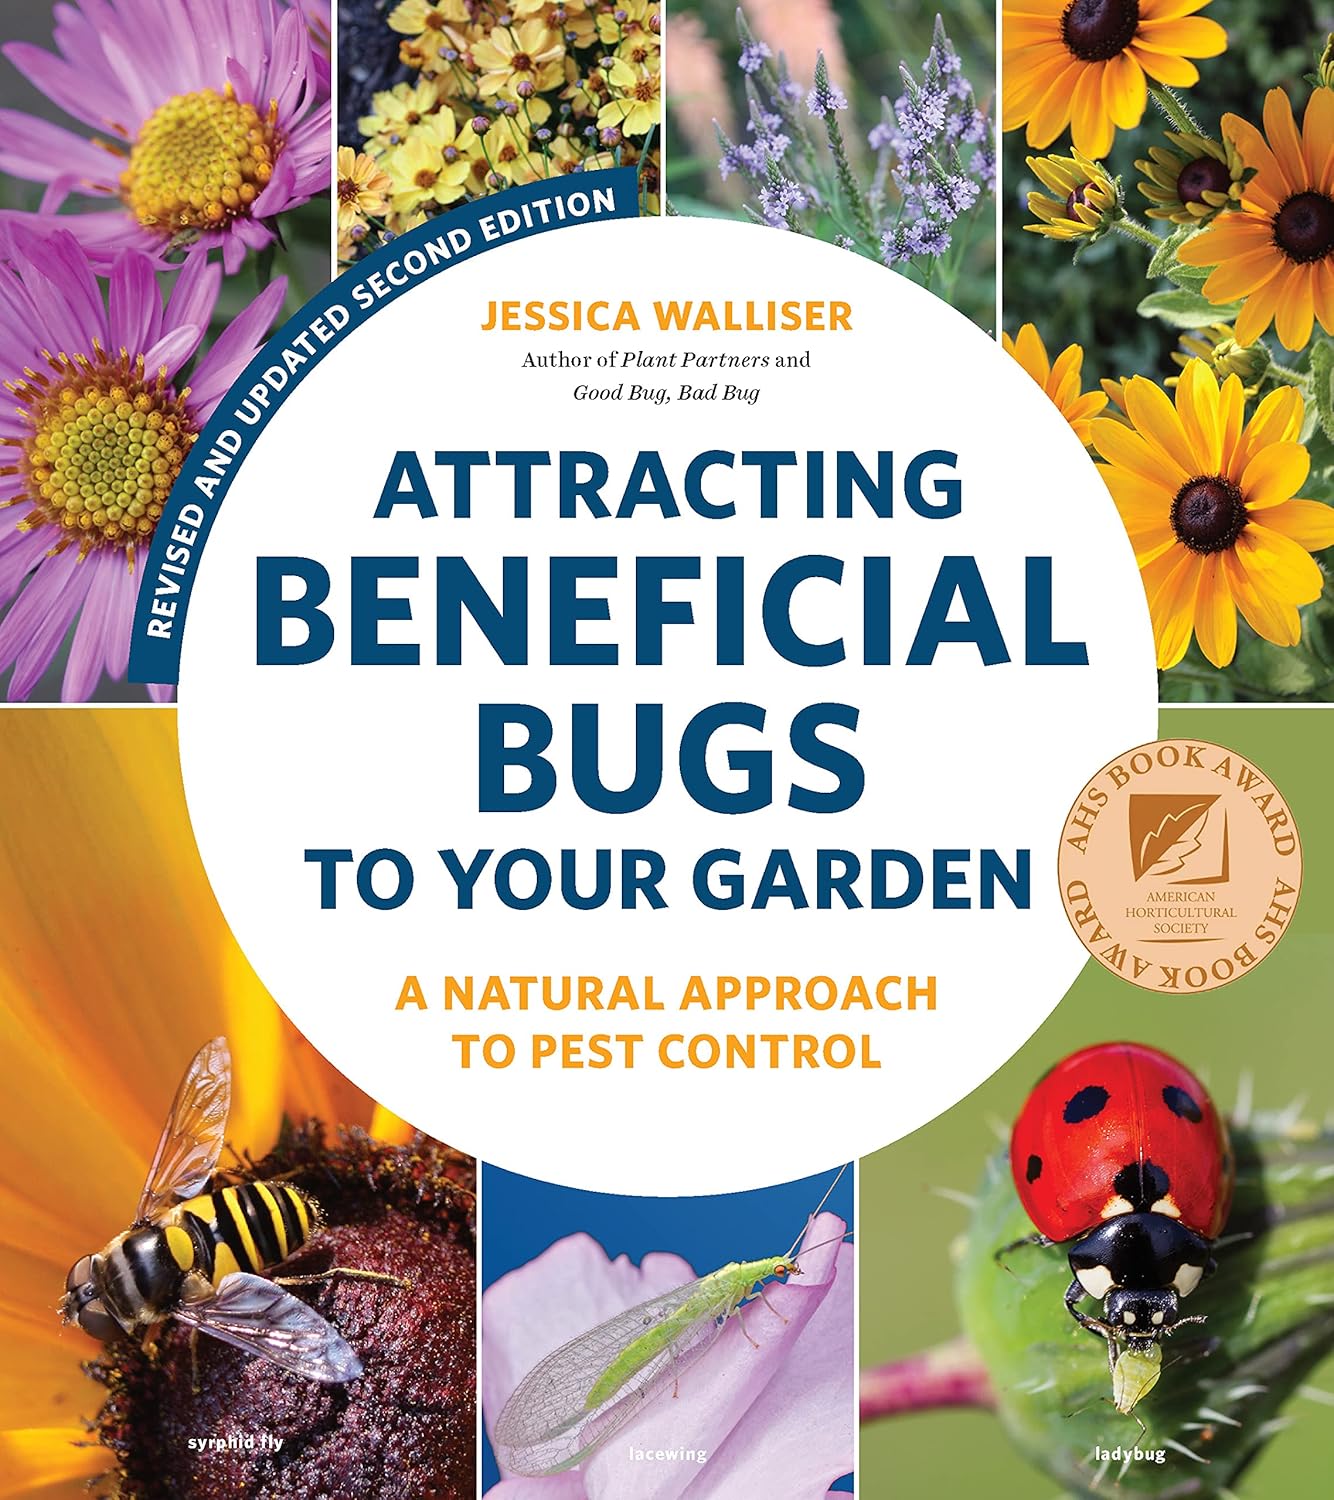
Attracting Beneficial Bugs to Your Garden, Revised and Updated Second Edition: A Natural Approach to Pest Control
Fine Gardening receives a commission for items purchased through links on this site, including Amazon Associates and other affiliate advertising programs.
This revised and updated edition of Jessica Walliser’s award-winning Attracting Beneficial Bugs to Your Garden offers a valuable and science-backed plan for bringing balance back to the garden. With this indispensable gardening reference—now updated with new research, insights, and voices—learn how to create a healthy, balanced, and diverse garden capable of supporting a hard-working crew of beneficial pest-eating insects and eliminate the need for synthetic chemical pesticides.