


As a self-sustainable gardener, I prefer to grow edible plants in my backyard. But ecological role played by ornamental plants can’t be denied.
Flowering plants are known to attract pollinators to the garden that can increase your yield. Apart from this, vibrant blossoms leave a positive impact on your mental health.
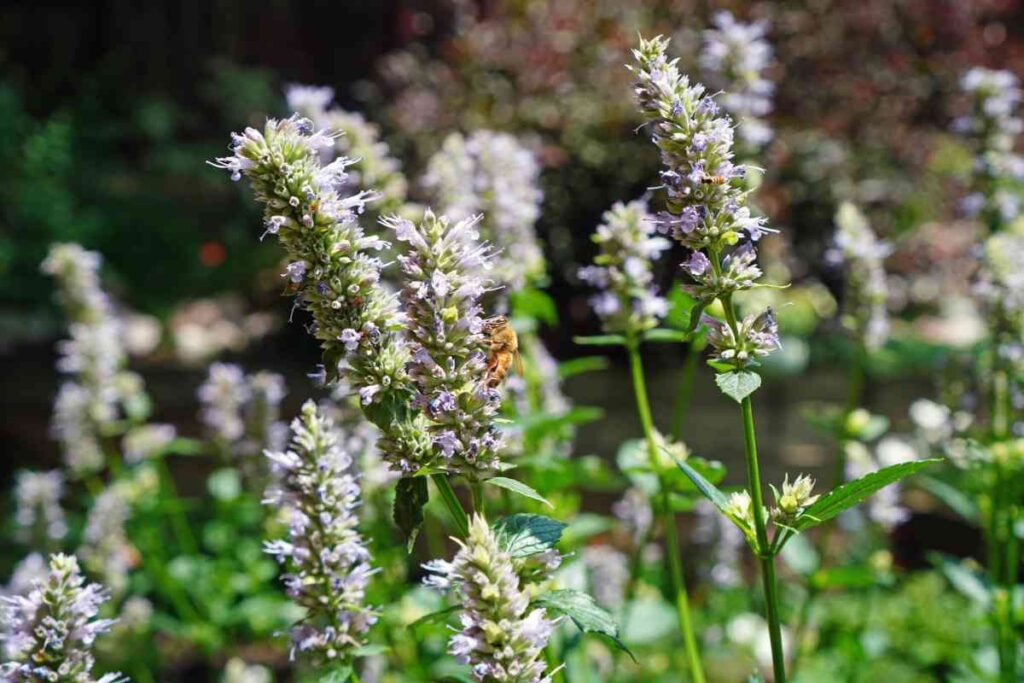
Anise hyssop is an herbaceous perennial with blue flowers, which you can grow as an ornamental or an herbal plant.
Not just the appearance Anise hyssop gives similar scent as anise and some compare it with basil.
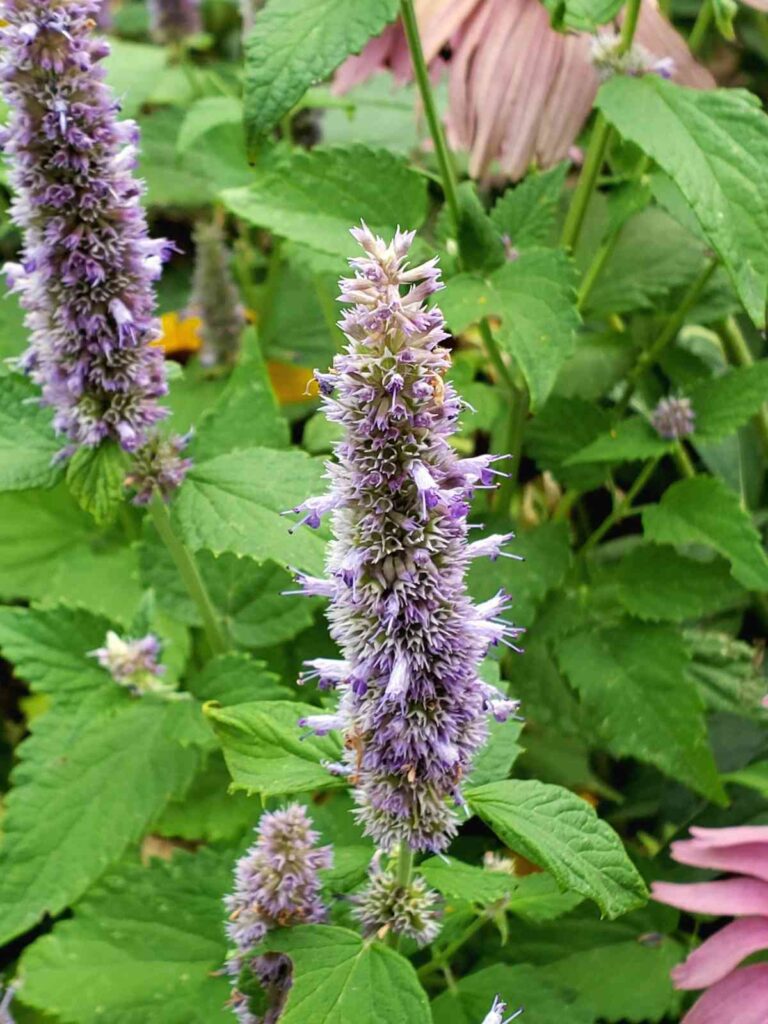
Depending on the variety you choose to grow, this plant produces blue-lavender to purple flowers that blooms from mid-summer to early fall.
Excellent thing about this herbaceous plant is it has immense benefits.
You can grow to attract pollinators, mitigate pests, as an ornamental plant, use as cut flowers or use it’s leaves to make an herbal tea.
Native to North America and hardy to USDA zones 3-8, Anise hyssop can be grown from seeds or propagated through cuttings.
I’ll shall discuss both ways of growing anise hyssop later in this article. Before that let’s know about the growing requirements of the plant.
Growing Requirements of Anise Hyssop
Anise hyssop (Agastache foeniculum) is adaptable plant that requires minimal maintenance while providing beautiful purple-blue flower spikes from midsummer through fall.
Sunlight Requirements: Anise hyssop performs best in full sun (6+ hours of direct sunlight daily) but tolerates partial shade (4-6 hours). In partial shade, plants may become leggier and produce fewer blooms.
Soil Conditions: The plant tolerates a wide range of soil types, from sandy loam to clay loam and even rocky conditions. Good drainage is essential, as anise hyssop is susceptible to root rot in wet soils. It prefers slightly acidic, well-draining soil.
Water Requirements: Once established, anise hyssop is drought-tolerant and prefers medium-moist to dry soil conditions. Avoid overwatering or planting in areas prone to flooding, as excess moisture can cause fatal root rot. Water regularly during establishment, then allow soil to dry between waterings.
Temperature: The plant thrives in warm season temperatures between 65-85°F and cannot tolerate frost.
Spacing and Maintenance: Plant seedlings 18-24 inches apart to ensure adequate airflow. Annual compost application provides sufficient fertilization. The plant self-seeds readily and spreads via rhizomes.
Deadheading promotes continued blooming, while light pruning encourages branching. Plants rarely need staking despite reaching 2-4 feet tall.
How to Grow Anise Hyssop?
Anise hyssop (Agastache foeniculum) stands out as one of the most rewarding herbs for both novice and experienced gardeners.
This fragrant, bee-friendly perennial combines ornamental beauty with culinary versatility, making it an excellent addition to herb gardens, pollinator gardens, and mixed borders.
Its licorice-scented foliage and striking flower spikes create visual impact while attracting beneficial insects throughout the growing season.
How to Grow Anise Hyssop Seeds?
Direct Seeding: Sow seeds directly in the garden after the last frost date in spring. Scatter seeds on the soil surface without covering them, as anise hyssop seeds require light for germination.
Keep the seedbed consistently moist for 14-21 days until germination occurs. Thin seedlings to 18-24 inches apart once they reach 2-3 inches tall.
Indoor Seed Starting: Begin seeds indoors 6-8 weeks before the last expected frost. Use seed-starting trays filled with quality potting mix.
Maintain soil temperature at 65-70°F for optimal germination. Provide bright light or supplemental grow lights once seedlings emerge. Transplant outdoors after hardening off for 7-10 days.
Also Read: How to Care for Pansies in Pots?
Propagating Anise Hyssop
Anise hyssop propagation offers gardeners two reliable methods to multiply their plants and create new specimens for expanded plantings or sharing with fellow gardeners.
Division Method
Plant Selection and Timing
Choose well-established anise hyssop plants that are at least 2-3 years old with robust root systems and multiple growing crowns.
Spring division (early April to May) is ideal as plants have the entire growing season to establish, while fall division should occur 6-8 weeks before the first hard frost to allow adequate root development.
Division Process
Begin by watering the parent plant thoroughly 24 hours before division to ensure tissues are well-hydrated. Use a sharp spade to cut straight down through the center of the plant while still in the ground, creating sections 4-6 inches wide.
Each division must contain both healthy roots and visible growing shoots or buds. Lift sections carefully, preserving as much root mass as possible. Trim any damaged or broken roots with clean, sharp pruning shears.
Post-Division Care
Plant divisions immediately at the same soil depth as the original plant. Space new divisions 18-24 inches apart in well-prepared soil.
Water thoroughly after planting and maintain consistent moisture for 3-4 weeks until new growth appears, indicating successful establishment.
Also Read: How to Fertilize Zinnias?
Propagating through Stem Cutting
Cutting Selection: In early summer, select healthy, semi-mature stems that are neither too soft nor completely woody.
Avoid flowering stems, as they root less successfully. Take 4-6 inch cuttings in early morning when plants are fully hydrated.
Preparation and Rooting: Remove all leaves from the bottom half of each cutting, leaving 4-6 leaves at the top.
Dip the cut end in rooting hormone powder or gel to accelerate root development.
Plant in a well-draining mix of equal parts peat moss and perlite, maintaining consistent moisture and humidity until roots form in 3-4 weeks.
How to Grow Anise Hyssop in Pots?
Anise hyssop adapts exceptionally well to container cultivation, making it perfect for patios, balconies, and small gardens.
Use pots at least 12 inches wide and deep with drainage holes to accommodate the plant’s root system and prevent waterlogging. For optimal growth, choose containers 16-18 inches wide for mature plants or multiple specimens.
Fill containers with high-quality potting mix blended with compost for nutrition and perlite for drainage. Avoid garden soil, which compacts in containers.
Place containers in full sun locations receiving 6+ hours of direct sunlight daily, though partial shade is tolerated.
- Container plants require more frequent watering than garden specimens due to faster soil drying. Check moisture daily by inserting your finger 2 inches deep.
- Water thoroughly until excess drains from holes, then allow soil to dry slightly between waterings. Never let plants sit in waterlogged soil.
- Apply diluted liquid fertilizer monthly during growing season. Deadhead spent flowers to encourage continuous blooming.
- In winter, reduce watering and move containers to protected locations in harsh climates. Repot every 2-3 years with fresh growing medium.
Must Read: How to Grow and Care Columbine Plant?
How to Care for Anise Hyssop?
Anise hyssop is remarkably low-maintenance once established, making it an ideal choice for both novice and experienced gardeners. This hardy perennial thrives with minimal intervention while providing continuous blooms and aromatic foliage throughout the growing season.
Watering Requirements
Water newly planted anise hyssop regularly for 4-6 weeks until established, then allow soil to dry between waterings. Check moisture 2-3 inches deep before watering. Overwatering causes root rot, the most common mistake.
Container plants need more frequent watering than garden plants but never allow standing water. During hot weather, containers may need daily watering while established garden plants survive on rainfall. Reduce winter watering significantly.
Soil and Drainage
Anise hyssop tolerates various soil types but requires excellent drainage. It prefers lean, well-draining soil and performs better in poor to average conditions than overly rich soils. Amend heavy clay with compost, perlite, or coarse sand.
Test drainage by digging a 12-inch hole and filling with water—if water remains after 24 hours, improvements are needed. Add 2-3 inches of organic mulch to maintain consistent moisture while preventing water pooling around the crown.
Fertilization and Feeding
Anise hyssop thrives in lean conditions and requires minimal fertilization. Overfertilizing can actually reduce the plant’s essential oil content and make it more susceptible to diseases and pests.
For garden plants, apply a thin layer of compost in early spring, which provides gentle, slow-release nutrition.
Container plants may benefit from occasional feeding with diluted liquid seaweed fertilizer or compost tea during the growing season, applied monthly at half-strength.
Avoid high-nitrogen fertilizers, which promote excessive foliage growth at the expense of flowers and fragrance.
Pruning and Deadheading
Regular pruning maintains plant health and encourages blooming. Cut dormant stems to ground level in early spring. Pinch growing tips at 8-10 inches for bushier growth.
Deadhead spent flowers for continuous blooms, or leave some for seeds and bird food. Cut back to 4-6 inches after first frost, or leave standing for winter interest. Remove damaged growth as needed.
Pest and Disease Management
Anise hyssop is naturally resistant to most pests and diseases when grown in proper conditions. The plant actually repels many garden pests, including flea beetles and cabbage moths, making it valuable as a companion plant.
Potential pest issues include spider mites, aphids, and whiteflies, though these are uncommon on healthy plants. Leafhoppers may occasionally cause white or yellow mottling on leaves, but natural predators usually control their populations without intervention.
Disease problems are primarily moisture-related and include root rot, powdery mildew, and fungal leaf spots. These issues are best prevented through proper cultural practices: ensuring excellent drainage, providing good air circulation, avoiding overhead watering, and not overcrowding plants.
Also Read: How to Grow Celosia – Ultimate Planting Guide
How Tall Does Anise Hyssop Grow?
Anise hyssop typically reaches a mature height of 2-4 feet (60-120 cm), with some varieties growing as tall as 5 feet under optimal conditions.
The plant develops an upright, clumping growth habit with square stems characteristic of the mint family, and most varieties maintain their sturdy form without requiring staking despite their height.
The specific height can vary based on growing conditions, with plants in rich, moist soil often reaching the upper end of this range.
The plant’s spread is generally more modest, ranging from 1-3 feet wide (30-90 cm), though it will gradually expand over time through rhizomes and self-seeding.
For container growing, anise hyssop can be kept more compact through regular pinching and pruning, typically maintaining a height of 24-36 inches when managed this way.
The long flower spikes that top the stems add an additional 4-6 inches to the plant’s overall height during the blooming period from midsummer through fall.
Also Read: How to Grow Blanket Flower?
Conclusion
Anise hyssop is an exceptional low-maintenance perennial offering beauty, fragrance, and ecological benefits. This hardy herb thrives in gardens or containers with well-draining soil and minimal watering.
Reaching 2-4 feet tall with purple-blue spikes and licorice-scented foliage, it attracts pollinators while providing continuous blooms and reliable self-seeding performance.

Khaja Moinuddin, a computer science graduate, finds joy in gardening and homesteading. Join him on this blog as he shares his experiences in homesteading, gardening, and composting


")


