67.8 F
Klamath Falls
Friday, July 31, 2026
Home Blog Page 73

How to Manage Winter Damage in Evergreen Shrubs

0

Evergreens provide structure, privacy, and color long after deciduous plants have dropped their leaves, but they can be vulnerable to winter stress.

Unlike deciduous plants, evergreen foliage continues to lose moisture throughout the cold months. When soil is frozen, roots can’t replace that water.

Combined with cold temperatures, drying winds, heavy snow, freeze–thaw cycles, and deicing salt, winter conditions can leave shrubs browned, scorched, or structurally damaged by spring.

A horizontal image of a garden filled with evergreens covered in a light dusting of frost.A horizontal image of a garden filled with evergreens covered in a light dusting of frost.

We link to vendors to help you find relevant products. If you buy from one of our links, we may earn a commission.

Winter injury often appears as bronzed or dried foliage, crisp leaf margins, split bark, bent or splayed branches, or sections that fail to leaf out when temperatures rise in spring.

Some damage is cosmetic. More severe stress can weaken shrubs and increase susceptibility to pests and disease during the growing season.

Understanding what caused the damage helps you decide how to respond and how to prevent it next time.

Here’s what I’ll cover:

Managing Winter Damage in Evergreen Shrubs

Since winters tend to be harsh and chaotic – especially here in the Midwest – don’t be surprised if your evergreens experience more than one of the following types of damage simultaneously.

Cold Temperature Injury

Cold injury occurs when temperatures drop below what a particular evergreen can tolerate.

Shrubs grown outside their recommended hardiness range are especially vulnerable.

A common boxwood, for instance, won’t fare well if you place it in USDA Hardiness Zone 3.

A close up horizontal image of damaged foliage of a spruce pictured in light sunshine on a soft focus background.A close up horizontal image of damaged foliage of a spruce pictured in light sunshine on a soft focus background.

When plant tissues freeze, the water inside cells expands, rupturing cell walls.

Floral and vegetative buds are often more susceptible than mature foliage, which is why new growth may suffer first.

Damage typically appears as blackened, wilted, or watersoaked tissue.

New shoots may turn limp and discolored, and evergreen branches often show bronzing or reddish-brown foliage a week or two after exposure.

Severe injury can cause dieback of entire stems.

Belowground roots aren’t immune to cold injury, either.

Although soil cools more slowly than air, roots are generally less cold-hardy than aboveground growth.

Shallow root systems, lack of mulch, and sudden extreme cold can lead to root injury or death.

Sometimes, it’s not even the exact degree of the chill that matters, but rather, the timing.

Gradual temperature declines in fall allow evergreens to acclimate to winter conditions.

Sudden early freezes can damage shrubs before they have had a chance to acclimate, while late spring frosts may injure plants that have already resumed active growth.

A horizontal image of a thuja hedge that has sustained extensive winter damage.A horizontal image of a thuja hedge that has sustained extensive winter damage.

Repeated freeze-thaw cycles during winter further stress plant tissues.

When it comes to managing cold temperature injury, an ounce of prevention is worth a pound of cure.

Select evergreen shrubs that are suitably hardy for your region and transplant them either before bud break in early spring or prior to the onset of cold temperatures in late summer or fall.

Apply three to four inches of mulch over the root zone to moderate soil temperatures and conserve moisture.

If your shrubs are only marginally hardy for your area, be mindful of the microclimates formed in your garden.

Conditions such as heavy shade, harsh winds, and low elevations can lower the temperature beyond what a hardiness zone map indicates, and may put your specimens at risk.

Alternatively, utilizing protected areas such as courtyards or planting near walls can help shield your shrubs from harsh exposures.

A horizontal image of a line of yellow thuja growing along a fence line, covered in a light dusting of snow.A horizontal image of a line of yellow thuja growing along a fence line, covered in a light dusting of snow.

Avoid late-season fertilization, which encourages tender new growth, and delay spring pruning until after the risk of hard frost has passed.

But suppose all that prep doesn’t go according to plan and your plantings are in jeopardy. Now what?

Container plants can be moved indoors or into a greenhouse when temperatures drop, while in-ground plantings can be covered with frost cloth or thermal plant blankets.

If you suspect injury, wait until spring growth resumes before assessing damage.

Gently scrape the bark of affected branches, green tissue beneath indicates living wood, while brown tissue suggests dieback.

In spring, prune dead branches back to the first healthy bud or lateral branch using clean tools. In many cases, shrubs will gradually fill in over one to two growing seasons.

If an entire plant fails to show signs of life by late spring, replacement may be the best option.

Replant with a species or cultivar better suited to your hardiness zone or position the new specimen in a more protected microclimate.

Winter Burn

Winter burn is a form of desiccation injury caused by moisture loss during winter.

Sunlight and wind strip away the plant’s moisture, while frozen soil hinders the uptake of water by the roots.

Poorly-developed, shallow root systems and low temperatures – especially following a warm and sunny day – can further exacerbate moisture problems.

Symptoms typically appear as browning, bronzing, or bleaching. In conifers, discoloration usually begins at the tips of needles or scales.

Broadleaf evergreens often show damage first along leaf margins.

A horizontal image of an evergreen shrub that has turned brown with winter damage, outside a residence.A horizontal image of an evergreen shrub that has turned brown with winter damage, outside a residence.

Broadleaf species tend to be more susceptible than conifers. Their larger leaves lose moisture more readily and show injury more visibly.

A holly leaf, for example, is a much larger target for wind and sunlight than a slender pine needle.

As damage progresses, foliage may dry out and drop. In severe cases, entire branches may die back.

Although most shrubs recover with time, repeated or extreme winter burn can weaken plants and reduce overall vigor.

Wait until spring growth begins before removing damaged tissue. Once new growth appears, prune dead stems and branches back to healthy wood.

Use sanitized tools, and rely on a visual inspection or a bark scrape test to determine whether tissue is alive.

Some winter burn risk factors are out of our hands, such as a warm autumn delaying the onset of dormancy. But many forms of winter burn prevention are well within our control.

Site selection plays a major role in preventing winter burn. Choose hardy species suited to your climate and plant them in locations protected from prevailing winds and intense winter sun.

Maintain consistent soil moisture through fall until the ground freezes. A three- to four-inch layer of mulch helps insulate roots and reduce moisture loss.

Avoid late-season fertilization or premature pruning, both of which can stimulate tender growth vulnerable to dehydration.

In exposed areas, temporary windbreaks made of burlap or canvas can reduce moisture loss. Position screens on the side facing prevailing winter winds and secure them firmly with stakes.

Similar to those with cold temperature injury, any shrubs winter burned beyond repair should be removed after you’ve taken the time to give any still hanging on a chance to bounce back.

Replace them with tougher plantings, if you so desire, or choose future planting areas that are more protected.

Snow and Ice Breakage

Heavy snow and ice can place significant weight on evergreen branches.

As accumulation increases, stems may bend, split, or break under pressure. Even if branches don’t snap, prolonged bending can distort the plant’s natural shape and weaken its structure.

A close up horizontal image of evergreen branches covered in a dusting of snow in wintertime.A close up horizontal image of evergreen branches covered in a dusting of snow in wintertime.

Ice is difficult to remove safely while temperatures remain below freezing, but fresh snowfall can be gently brushed off before it compacts.

Use an upward sweeping motion with a broom or lightweight snow shovel to lift snow away from branches rather than pushing down, which can cause breakage.

During extended snowfall, snow may need to be cleared periodically to prevent excessive buildup.

For taller shrubs, use a long-handled broom or lightweight tool to reach upper branches.

As always, do not climb ladders to perform yard work in unsafe conditions.

A horizontal image of an evergreen hedge with a dusting of snow in the winter.A horizontal image of an evergreen hedge with a dusting of snow in the winter.

Proper structural pruning during spring or summer can reduce the risk of winter breakage.

Remove weak, crowded, or poorly attached branches so the shrub is better able to withstand heavy precipitation.

In regions prone to significant snowfall, loosely tying upright evergreens with soft twine before winter can help prevent splaying.

After winter, prune broken or hanging branches back to healthy wood. Clean cuts promote proper healing and reduce the risk of disease.

If structural damage is extensive, you may need to consult a certified arborist.

Herbivore Feeding Damage

Winter is often a lean time for many plant-munching mammals.

Once their preferred plants become scarce, herbivores such as deer and rabbits can turn to your evergreen shrubs for sustenance.

A close up horizontal image of a deer in the winter garden.A close up horizontal image of a deer in the winter garden.

Repeated winter browsing can distort a shrub’s natural form. Heavy feeding that removes terminal buds or large sections of foliage may permanently alter its shape.

Physical barriers are the most reliable form of protection.

A line of deer fencing around your property and individual rabbit fencing around specimens you want to protect can provide the ultimate one-two punch of security.

Liquid repellents may also help deter feeding. Apply to dry foliage when temperatures are above freezing, and reapply according to label instructions, especially after heavy precipitation.

Liquid Fence sells gallon-sized containers of liquid deer and rabbit repellent that are available on Amazon.

Liquid Fence Animal Repellent

Wait until mid- to late spring to assess the full extent of damage. If browsed stems fail to produce new growth, prune them back to the first healthy, living node.

Most established shrubs will recover over time, though repeated winter browsing may require additional protection in future seasons.

Salt Injury

Deicing salts applied to sidewalks, driveways, and roadways can injure nearby evergreen shrubs.

When sodium chloride accumulates in the soil, it interferes with water uptake and disrupts the balance of essential nutrients.

A horizontal image of a person's feet walking down a sidewalk that has had salt applied in winter.A horizontal image of a person's feet walking down a sidewalk that has had salt applied in winter.

High salt concentrations can damage roots directly, leading to spring and summer symptoms such as leaf browning, tip burn, stunted growth, and dieback.

Salt spray presents an additional risk. When slush or runoff contacts foliage, it can burn needles, leaves, twigs, and young stems.

Apply deicing products sparingly and take care to limit where they land. Direct runoff away from planting beds when possible.

Instead of using standard sodium chloride, you could improve traction with coarse sand or de-icing products that are safer for plants, such as calcium chloride or calcium magnesium acetate.

Physical barriers may also help protect shrubs growing near streets or heavily treated surfaces.

Burlap screens, plywood panels, or similar materials can shield foliage from salt spray during winter.

If salt exposure is suspected, deep watering in early spring can help leach accumulated salts from the root zone. Ensure soil drains well so flushed salts do not linger.

Prune damaged stems once new growth begins and the extent of injury is clear.

If you’re looking for less salt-susceptible plantings, check out our roundup of salt-tolerant evergreen shrubs!

Improper Holiday Lighting

Granted, this is the least concerning threat on the list.

Holiday lighting can cause minor but preventable damage to evergreen shrubs.

A horizontal image of a line of evergreen shrubs decorated with small yellow holiday lights outside a residence.A horizontal image of a line of evergreen shrubs decorated with small yellow holiday lights outside a residence.

Lights intended for indoor use may generate excess heat or lack proper insulation against moisture.

When wrapped around living branches, they can scorch foliage or damage bark. Electrical faults, such as frayed wires or loose connections, also increase the risk of fire.

Always use lighting rated for outdoor use, along with extension cords and power sources designed to withstand winter conditions.

When installing lights, avoid wrapping them tightly around branches.

Constricting stems can interfere with growth and cause abrasion damage. Lightweight strands are best, particularly on young shrubs with flexible or delicate growth.

After the last spring frost, prune any branches that show signs of scorch, dieback, or mechanical injury.

Winter Is Coming…

Whether winter is just around the corner or several seasons away, it pays to “be prepared,” as the Boy Scouts are fond of saying.

A horizontal image of a garden scene with a variety of different evergreen plantings.A horizontal image of a garden scene with a variety of different evergreen plantings.

With the tips offered here, you can help your evergreen shrubs to make it through the toughest season of the year, sans injury.

Winter injury, that is. A force majeure such as a lightning strike or shrub-shearing sleepwalk could still occur, I suppose…

Have remarks or questions to share? The comments section awaits.

To protect other plants in the garden from the damages of wintry weather, you’re sure to find these guides quite insightful:


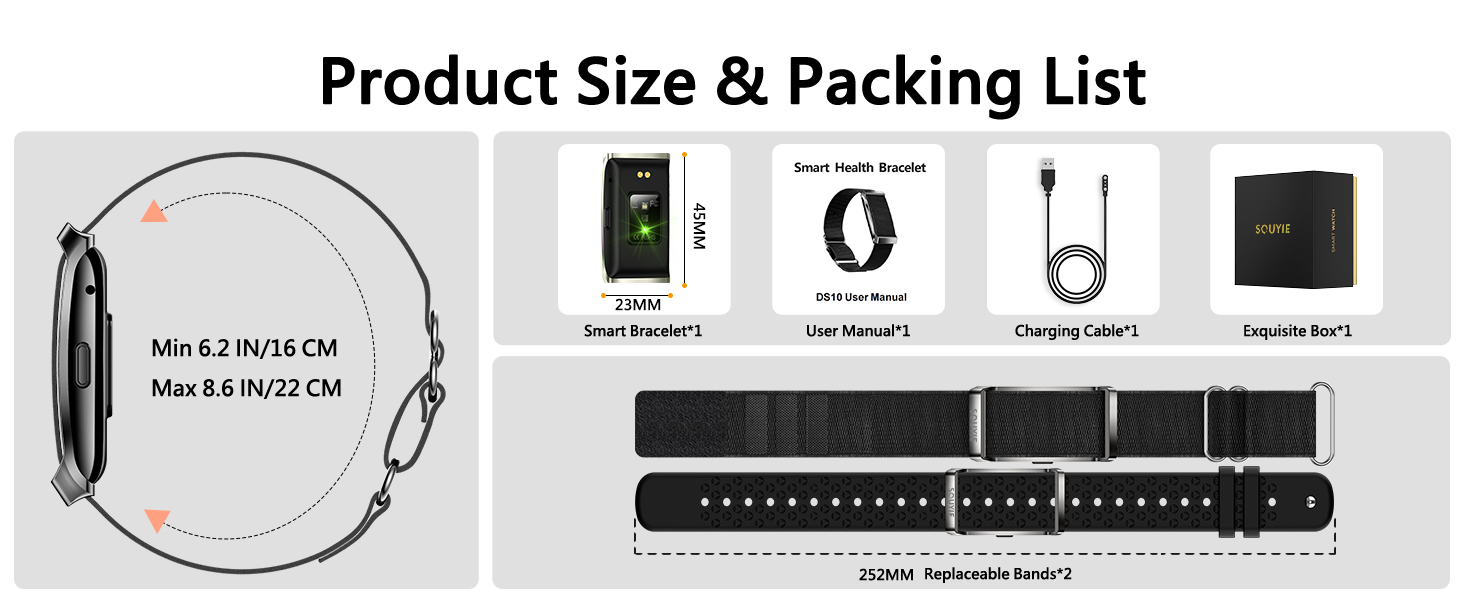
Smart Bracelet for Men Women, Health Activity Fitness Trackers, 24H Sleep Tracker, 24/7 Continuous Heart Rate/Blood Pressure/HRV/Stress Monitor, 170+ Sports Modes Smart Wristband with Free APP 2 Bands

0


Price: $159.99 - $139.99
(as of Feb 20, 2026 08:30:39 UTC – Details)

Product description

The video showcases the product in use.The video guides you through product setup.The video compares multiple products.The video shows the product being unpacked. SOUYIE Smart Bracelet Merchant Video

fitness tracker fitness tracker watch
1 Free APP

2 Double Straps

whoop fitness tracker activity & fitness trackers fitbit fitness tracker for women
1 24H Health Tracker

2 All-Day Sleep Tracking

3 Female Cycle Tracking

fitness tracker watch for women fitness trackers for women
1 24/7 Activity Tracking

2 1ATM Waterproof

fitness watch amazfit fitness tracker health tracker
1 Smart Alerts

2 Long Battery Life

3 Multifunctional

health watch

step tracker

How to connect the smart bracelet to my phone?

1. Press and hold the bracelet button for 3 seconds. The bracelet will vibrate and the green light will flash, indicating successful power-on;

2. Open the app-Devices-“Add”-find “DS10” and tap it.

You can watch the video at the link to learn more.

How long does it last after being fully charged?

20-30 days. You don’t need to charge it frequently.

Does the “QWatch Pro” app have extra paid content?

No subscription is required – our app is completely free, and all features are available for free for life.

Is this smart bracelet waterproof?

This smart bracelet is 1ATM water resistant, meaning it can easily handle rain, hand washing, and even cold showers without needing to be removed.

It is not recommended to wear it during activities involving high-temperature steam, such as saunas.

What if I have other questions about the smart bracelet?

You can reach out to us at any time, we are committed to providing you with satisfactory service.

【24/7 Continuous Health Tracking】Experience 24/7 continuous health tracking with SOUYIE fitness tracker. Advanced sensors and AI algorithms continuously monitor real-time heart rate, blood pressure, blood oxygen, heart rate variability, and stress levels day and night. Get comprehensive health insights through detailed trends and analysis reports on the companion app to understand your health status, prevent risks, and improve your health level—all on your wrist. (Note: The measurement results are for reference only and should not be used for any medical purposes or as a basis for diagnosis)
【All-Day Activity Tracking & 170+ Sports Modes】Maximize every workout with 170+ sports modes and 24/7 activity tracking. SOUYIE fitness tracker accurately monitors steps, distance, and calories burned all day to accelerate your goal achievement. Train smarter in 170+ activities including running, yoga, basketball, and skipping—plus 3 dedicated GPS modes (walking/running/cycling) for real-time route mapping. View real-time workout tracks on the app to analyze performance and optimize progress.
【Day and Night Sleep Tracking】Experience 24/7 sleep tracking with our newly upgraded health watch. Monitor your nighttime sleep and daytime naps for a comprehensive rest analysis. Get professional insights into your sleep stages (light, deep, REM), sleep duration, and awake time. Understand your unique sleeping patterns with detailed reports. Optimize your sleep, enhance recovery, and wake up refreshed—make smarter adjustments for truly restful nights.
【Instant Vibration Reminder】Stay seamlessly connected with intelligent vibration reminders. SOUYIE smart bracelet provides call, SMS, and app notification reminders (Whatsapp/Skype/Facebook) via Bluetooth sync. Gentle, private vibrations ensure only you feel alerts—no disruptive sounds. Never miss important messages in meetings, workouts, or quiet moments. Maintain focus without phone-checking while avoiding social awkwardness.
【18.4g Lightweight Body & Double Straps】Redefine lightness and comfort with the SOUYIE 18.4g smart bracelet. The stylish metal case is durable and exudes an elegant sheen, and comes with two straps (silicone and nylon) for a versatile look. The minimalist screenless design and ergonomically curved body bring an excellent all-day comfort experience whether you are exercising, sleeping or working.
【Long Battery Life & 1ATM Waterproof】Solve your daily charging worries with the SOUYIE ultra-long 20-30 day battery life fitness tracker—designed for low power consumption and minimalist convenience. Built-in 1 ATM water resistance makes it easy to handle workouts, hand washing and active lifestyles. Enjoy uninterrupted, all-day health tracking without having to worry about frequent charging. Whether you’re sweating in the gym or caught in the rain, wear it worry-free as your always-ready health companion (It is not recommended to wear the watch when taking a hot bath, swimming, diving, or taking a sauna).
【Free APP】Enjoy truly free fitness tracking with SOUYIE 100% subscription-free app—no hidden fees, no service charges, ever. Our intuitive companion app provides full feature access: sync health metrics, analyze sleep patterns, and customize goals without paywalls. Seamlessly compatible with smartphones (Android 5.0+/iOS 10.0+), it features an ad-free dashboard, effortless Bluetooth pairing, and free lifetime updates. Focus on your health journey, not payments—experience premium insights with zero financial commitment.
【Worry-free after-sales, quality assurance】Enjoy 30-day free return, 1-year warranty and 24/7 customer support. If you have any questions, please contact us through “Find Order-Contact Seller”, we will serve you wholeheartedly!

Sweet Potato Muffins

0

Overhead view of a basket filled with freshly baked Sweet Potato Muffins.These sweet potato muffins are easy to make, lightly sweetened, and perfect for breakfast or snacks. A kid-approved, make-ahead recipe everyone will love.

Fitness Resistance Band for Stretching and Yoga 2pcs,Numbered Resistance Bands for Glutes,Number Resistance Band,Women’s Glutes Back Legs Training – for Pilates Dance Home Workouts.

0


Price: $9.79
(as of Feb 19, 2026 20:27:16 UTC – Details)


fitness resistance band for stretching and yoga
【8 ADJUSTABLE SECTIONS NUMBER RESISTANCE BAND】Featuring 8 adjustable sections, this number resistance band is your ideal companion for stretching and yoga sessions. Effortlessly switch between different resistance levels to match your workout intensity and help you master more challenging poses.
【NUMBER RESISTANCE BAND DESIGNED EXCLUSIVELY FOR STRETCHING AND YOGA PRACTICES】This resistance band is purpose-built for stretching and yoga sessions. It is ideal for both total beginners learning their first poses and advanced yogis refining their flows, and you can use it anywhere you want to practice.
【FITS ALL SKILL LEVELS, PERFECT FOR ALL TRAINING SPACES】Whether you are just starting your fitness journey or you are a seasoned workout veteran, our number resistance band fits you perfectly. It works flawlessly in home gyms,even small apartment corners, bringing professional training experience to every space.
【PORTABLE, LIGHTWEIGHT FITNESS NUMBER RESISTANCE BAND】Our portable, lightweight fitness number resistance band is your ideal on-the-go workout partner. Easily slip it into your backpack or suitcase, and enjoy stretching and strength training wherever your day takes you.
【STRONG AND DURABLE ELASTIC NUMBER RESISTANCE BAND】Our strong and durable elastic numbered resistance band is made to last. It can withstand the rigors of daily workouts, from light stretching to intense strength training, making it ideal for long-term use.

Oil Pulling With Coconut Oil Chews

0

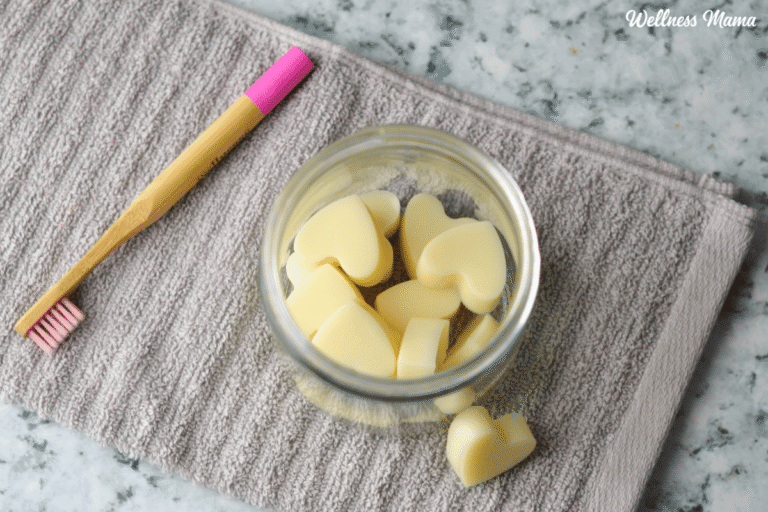
I’m a big fan of oil pulling. I’ve shared before how I started this age-old practice and why I started oil pulling with coconut oil instead. I decided to give my oral routine an upgrade with these coconut oil pulling chews with essential oils!

Coconut Oil Pulling Benefits

Not familiar with oil pulling? It’s simply swishing oil (usually sesame or coconut oil) in your mouth, then spitting it out in the trash. There’s some research, and plenty of anecdotal evidence, that shows it can reduce plaque. Coconut oil is also naturally a mild antibacterial and can help keep oral bacteria in check. 

Coconut oil pulling for teeth is an old practice, but more people are starting to pick it back up. How long you swish the coconut oil depends on your tolerance, but 5-20 minutes is a good goal. So how often do you do coconut oil pulling? I aim for once a day, or at least several times a week. 

What kind of coconut oil you use also plays a role. I recommend using organic, virgin (or unrefined) coconut oil. MCT oil will also work. 

Oil Pulling With Coconut Oil For Teeth 

The idea is that the oil can reach and help remove harmful substances in the mouth, like bacteria and plaque. Unlike alcohol-based mouthwashes and toothpaste, oil may be able to get to hard to reach parts of the gum. And the naturally antibacterial properties of oils like coconut may help break down bacteria.

Many report their teeth and gums feel much cleaner when regularly using oil pulling. Others notice bad breath goes away. Personally, I saw less gum swelling and plaque on my teeth. My dentist even commented how clean and plaque-free my teeth were after I added oil pulling to my oral health routine.

While oil pulling isn’t a miracle cure, there’s a good chance it promotes healthier teeth and gums. Especially if used in combination with other good oral health practices. If you want to read more, I’ve written about coconut oil pulling in more detail here. 

Coconut Oil Pulling With Essential Oils

These coconut oil pulling chews were inspired one day when I made homemade chocolate in little molds. I realized I could make my routine simpler by making bite-size oil pulling chews. 

Adding essential oils like peppermint, clove, and tea tree improve the taste and the health benefits. My favorites so far are mint and clove. Just make sure that the oils you choose are safe for oral use and don’t interact with any of your meds or health conditions. 

Here are some essential oils that work well with oil pulling:

I keep these chews in the fridge so they maintain their shape. Keeping them cool also helps with the texture at the beginning. For my kids who have trouble with the texture of coconut oil, keeping these in the fridge so they can “chew” them first helps a lot.

Coconut Oil Pulling Chews

These pre-made chews make oil pulling easy. Customize the flavors and add health benefits with your favorite essential oils!

Prep Time5 minutes

Cooling Time30 minutes

Yield: 12 chews

Author: Katie Wells

  • Melt the coconut oil until just barely liquid.

  • Remove from heat and add the essential oils.

  • Pour into silicone candy molds and put in the fridge or freezer to harden.

  • Once hardened, remove from the molds and store in a jar.

  • Use one chew per day as needed for oil pulling.

  • Want a pre-made essential oil blend? I love this Balanced Mouth Blend from Wellnesse.
  • The molds I used held about 2 teaspoons each. If your molds are a little smaller or larger than mine then you’ll get a different yield. 

Other Healthy Mouth Recipes

I’ve always been fascinated by oral health. I was even able to use a combination of diet, supplements and oral health products to reverse a cavity. Since then I’ve made these methods a priority for our whole family. These are some of the other recipes and methods we use:

 Ever tried coconut oil pulling? How did it work for you? Leave a comment and let us know!

Finding Garden Advice in the Offseason

0

During the peak season, gardening advice inevitably comes at you from everywhere and everyone—whether you’re looking for it or not. When all I can focus on is staying on top of weeding, watering, and harvesting, I’m inundated with influencers on my social media feeds offering countless tips, tricks, and recommendations. As I’m hunched over my beds, sweating into the soil and wondering why I always plant so many needy tomato plants, I often have a well-intentioned friend or family member giving their opinions and suggestions.

However, when the weather turns and most of the garden goes to bed for the winter, when my time frees up and the excitement for planning and prepping surges, the advice dries up. There is always something new and shiny to check out on social media, but this time is mostly dominated by seed-starting and houseplant-care videos. If you’re looking for more inspiration for the upcoming growing season and, even more importantly, to connect with fellow gardeners about questions and concerns, we’re excited to announce a new member benefit: free monthly gardening webinars.

If you’re thinking, Hey, didn’t you guys do that before?—you’re absolutely right. Back in 2020, when the usual string of in-person gardening events were abruptly canceled, we began a series of virtual gardening events to fill that gap. Yet, as with many pandemic-era crazes, the slow shift back into real-world gatherings saw the end of these webinars as we put our attention on other initiatives such as e-learning courses.

After a bit of downtime, we’re thrilled to bring these interactive sessions back with a whole new batch of inspiring and informative topics and experts from across North America. Maybe you have already attended one of the webinars we have hosted since last fall—The Secrets to Spring Bulbs with Joseph Tychonievich, All About Growing Conifers with Mark Dwyer, Mastering Soil Health with Kirsten Kurtz, The Winter Gardening Roundtable with Andy Pulte and Jason Reeves, or Growing Heirloom Vegetables with Fionuala Campion—or perhaps you watched one of the recordings on our YouTube channel.

conifer webinar thumbnail

These hour-long sessions are the perfect place to ask your gardening questions and get specific, detailed answers straight from an expert in that field or from your region. They are also always recorded, so you can return to a certain snippet or catch a webinar you missed at a time convenient to you. Moving forward, these recordings will not be available on YouTube and will be an exclusive benefit of All Access membership here on finegardening.com.


If you’re interested in the garden tour of the Netherlands we’re hosting this September, be sure to register for the upcoming tour Q&A webinar with Annie Guilfoyle: Special Netherlands Garden Tour Q&A Webinar

And keep an eye out for our garden-design webinar with Susan Calhoun, which will open for registration soon!

My Mommy is a Pharmacy Technician!: Kid’s picture book that teaches about real medical careers as an allied healthcare professional (The Antling Club: … Professionals (Careers for Kids Ages 2-6))

0


Price: $11.99
(as of Feb 19, 2026 08:24:40 UTC – Details)

A heartwarming children’s picture book about teamwork, precision, and the helpers behind every prescription. Perfect for toddlers, preschoolers, and kindergarteners.

This delightful story celebrates Mommy, a pharmacy technician who works with pharmacists and healthcare teams to make sure every prescription is filled safely and correctly. Told through the eyes of a proud child, it shows how Mommy counts tablets, measures liquids, prints labels, and keeps the pharmacy running smoothly. Children will see how careful work, focus, and teamwork help patients feel better every day.

My Mommy is a Pharmacy Technician! is a beautifully illustrated rhyming book that introduces young readers to the important work of pharmacy technicians. It teaches that healthcare happens not only in hospitals, but also in pharmacies, clinics, and communities where people care and help.

This book is part of The Antling Club: My Mommy/Daddy is a(n)… Allied Healthcare Professionals Series, inspiring curiosity about real healthcare careers and the people who make healing possible. Each book highlights a specific career as an allied healthcare professional, shining a light on the helpers who heal with hands, hearts, and science. Titles in this series include My Mommy is a Dental Hygienist!, My Daddy is a Pharmacist!, My Mommy is a Speech-Language Pathologist!, My Daddy is a Radiologic Technologist!, My Mommy is an Occupation Therapist!, and many more!

Why parents and kids love this book:
📚 Perfect for ages 2–6 (toddlers, preschoolers, and kindergarteners)
💊 Shows how medicine is prepared and checked safely
🏥 Encourages curiosity about the medical field and healthcare
🎁 A thoughtful gift for pharmacy technicians, medical and healthcare families, Mother’s day, baby showers, or birthdays
🌙 Wonderful for storytime, classrooms, and exceptional for bedtime snuggles!

“Maybe one day I’ll be a pharmacy technician too! I’ll prepare each medicine with care, just like you!”
Explore more series from The Antling Club, such as Doctors (Careers for Kids Ages 2-6) and Nurses (Careers for Kids Ages 2-6) featuring titles like My Daddy is a Surgeon!, My Mommy is a Nurse Practitioner!, My Daddy is an Anesthesiologist!, My Mommy is a Labor and Delivery Nurse!, and many more!


From the Publisher

Allied Healthcare ProfessionalsAllied Healthcare Professionals

allied healthcare professionals library career books for kidsallied healthcare professionals library career books for kids

The Antling Club creates rhyming picture books about careers in medicine and healthcareThe Antling Club creates rhyming picture books about careers in medicine and healthcare

medical professional series and careersmedical professional series and careers

The Heartling Publishing Family creates rhyming picture book careers for childrenThe Heartling Publishing Family creates rhyming picture book careers for children

ASIN ‏ : ‎ B0FVVWM5BR
Publisher ‏ : ‎ Independently published
Publication date ‏ : ‎ October 11, 2025
Language ‏ : ‎ English
Print length ‏ : ‎ 27 pages
ISBN-13 ‏ : ‎ 979-8269459943
Item Weight ‏ : ‎ 3.68 ounces
Dimensions ‏ : ‎ 8.5 x 0.07 x 8.5 inches
Part of series ‏ : ‎ The Antling Club: Allied Healthcare Professionals (Careers for Kids Ages 2-6)
Best Sellers Rank: #1,435,964 in Books (See Top 100 in Books) #614 in Pharmacies #3,044 in Children’s Parents Books #5,001 in Allied Health Professions (Books)

Air Fryer Blackened Salmon Tacos (15-Minute Dinner)

0

These blackened salmon tacos are smoky, slightly spicy, and seriously craveable. Air fryer salmon gets coated in bold blackening seasoning, paired with a quick blackened ranch slaw, and tucked into warm tortillas for a dinner that’s ready in about 15 minutes. With just 8 simple ingredients, this is one of those easy weeknight meals that feels exciting without requiring extra effort. Even the leftovers are just as good the next day.

Tacos are a Cooking Burnout Club staple for me. When my energy is low and I don’t want to overthink dinner, tacos almost always win. I started making these as a new way to enjoy salmon, and after making the air fryer blackened salmon at least ten times last summer, this quickly became my favorite way to use it. If a recipe isn’t quick, easy, and actually worth the effort, I don’t keep making it. This one made the cut.

Two blackened salmon tacos on a white plate. Two blackened salmon tacos on a white plate.

If tacos are your weeknight fallback like they are for me, you might also love a few of my other quick options. Chipotle salmon tacos, BBQ salmon tacos, and air fryer chicken tacos are all ready in under 15 minutes and follow the same Cooking Burnout Club philosophy: big flavor, minimal prep, and dinner handled without a lot of thinking.

This post contains affiliate links. As an amazon associate I earn from qualifying purchases. Click here to read my policy and more about affiliate links.

Ingredient Spotlight

This is not a full list of ingredients, you can find that in the recipe card below. This is just a 

  • Blackening seasoning – You can use store-bought or make your own. If you want to mix it yourself, check out my air fryer blackened salmon for the seasoning blend I use. Either way works here, so go with what’s easiest.
  • Ranch dressing – Use your favorite ranch. Store-bought or homemade both work, but I typically use store-bought since tacos are usually happening on nights when I’m short on time or already feeling overwhelmed.

Tips for success

  • Watch the salmon thickness – Salmon cooks quickly. If your fillets are thin, start checking for doneness around 7–8 minutes.
  • Use bagged slaw – I almost always use bagged coleslaw for this because chopping cabbage is not cooking burnout friendly. Broccoli slaw or shredded lettuce work well too.
Hand folding a blackened salmon taco, lifting it from the plate.Hand folding a blackened salmon taco, lifting it from the plate.

★ Did you make this recipe? Please give it a star rating below!

  • 1.25 pounds salmon
  • avocado oil spray or olive oil spray
  • ½ teaspoon salt
  • 1 tablespoon blackening seasoning
  • 12 oz. bag cole slaw mix
  • ½ cup ranch dressing
  • ½ teaspoon blackening seasoning
  • ½ teaspoon salt
  • 8 tortillasI used almond flour tortillas
  • Coat salmon in avocado oil, add 1/2 teaspoon salt and 1 tablespoon blackening seasoning to cover the fish.

    1.25 pounds salmon, avocado oil spray or olive oil spray, ½ teaspoon salt, 1 tablespoon blackening seasoning

  • Cook in air fryer at 400F for 9 minutes (or bake in a 425F oven for 12-13 minutes).

  • While salmon is cooking, combine the 1/2 cup ranch dressing with 1/2 teaspoon blackening seasoning and 1/2 teaspoon salt.

    ½ cup ranch dressing, ½ teaspoon blackening seasoning, ½ teaspoon salt

  • Add coleslaw mix to a large bowl and pour the ranch dressing over the top. Stir well with tongs.

    12 oz. bag cole slaw mix

  • Serve tacos with slaw, flaked salmon and more ranch dressing (optional).

    8 tortillas

Recipe tips:

  • Warm the tortillas – Warm tortillas before assembling so they’re more flexible and less likely to tear. I like to put them in the air fryer for 1 minute at 400F. 
  • Let the salmon rest – I like to let the salmon rest 2-3 minutes before flaking to let the juices redistribute. 
  • Flake the salmon gently – Break it into larger pieces instead of shredding it too finely so the tacos keep some texture.
  • Leftovers keep well in the fridge for 2–3 days and are great cold over salads or reheated for quick tacos the next day.

Nutrition Information

Nutrition Facts

Amount per Serving

Where does nutrition info come from? Nutrition facts are provided as a courtesy, sourced from the USDA Food Database.

Course: dinner

Cuisine: American

Keyword: air fryer blackened salmon tacos, blackened salmon tacos, blackenend salmon tacos in air fryer

Let others know by rating and leaving a comment below!

What Microgreens are Good for Chickens and How to Grow them?

0

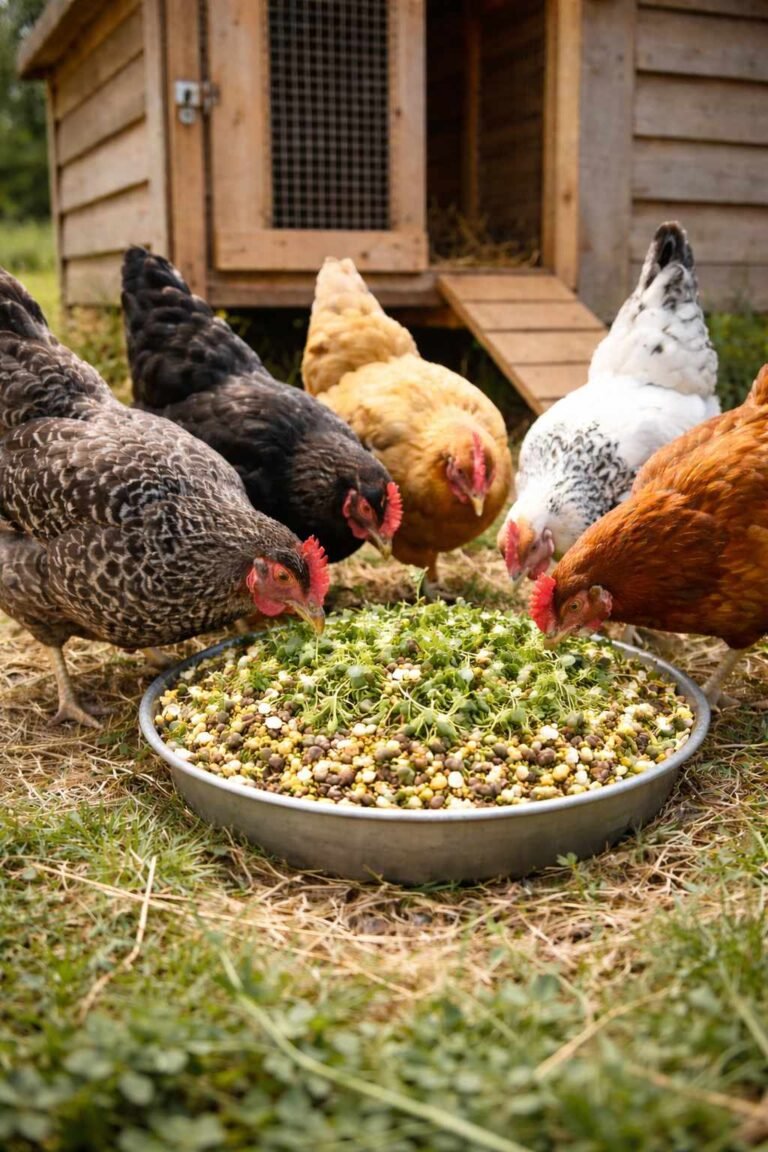
Microgreens are small but they are packed with abundant nutrients like protein, minerals and vitamins that improve the overall health of your feathered flocks.

Start mixing small amounts of microgreens in chicken feed gradually to prevent digestive upset.

Anecdotal reports claim that microgreens for chickens help to improve egg quality, strengthen the immune system and improve feather growth.

However, you should ensure that microgreens aren’t exposed to pesticides or mold.

In this write-up, I’ll share in detail about benefits and how you can effectively grow microgreens at home.

Nutrients in Microgreens for Chickens

Microgreens are young vegetable greens harvested just after their first true leaves appear. Though tiny, they are packed with concentrated nutrients.

Because they’re picked early, they often contain higher levels of vitamins, minerals, and antioxidants than mature plants. Fed in moderation, they can give your chickens a healthy nutritional boost.

Protein Content for Growth and Molting

Many microgreens, especially sunflower and pea shoots, provide plant-based protein that supports muscle growth and feather regrowth during molting.

Adding small amounts can help hens recover faster and maintain strong plumage, while chicks benefit from the extra amino acids for healthy development.

Improves Egg Quality and Yolk Color

Microgreens can help improve the overall quality of eggs laid by hens. The natural vitamins and minerals support healthier egg formation.

Greens rich in Vitamin A and other nutrients may deepen yolk color naturally. Many poultry keepers notice brighter, richer-looking yolks when fresh greens are included in the diet.

Calcium and trace minerals in microgreens can also support stronger eggshells. While not a replacement for layer feed, they add an extra nutritional boost.

Check this: Why Did My Chickens Stop Laying Eggs?

Supports Stronger Immunity

Microgreens contain antioxidants that help protect chickens from everyday stress. This includes heat, seasonal changes, and minor environmental challenges.

Vitamins like A, C, and E play an important role in strengthening the immune system. A well-supported immune system helps hens stay active and productive.

Regular small portions of fresh greens may help reduce the risk of common health issues. Healthy birds are more likely to lay consistently and maintain good energy levels.

Aids in Natural Foraging Behavior

Chickens naturally enjoy pecking and scratching for food. Offering trays of microgreens encourages this instinctive behavior.

Foraging keeps chickens mentally stimulated and physically active. This is especially helpful for birds kept in smaller or enclosed spaces.

Providing fresh greens can also reduce boredom and unwanted pecking habits. It adds variety to their routine while supporting natural behavior.

Also Read: How to Grow Microgreens Indoors?

Rich Source of Essential Vitamins

Microgreens provide several key vitamins that support overall flock health:

  • Vitamin A supports vision, immune health, and vibrant egg yolk color.
  • Vitamin C helps reduce stress, especially during heat waves or seasonal changes.
  • Vitamin E acts as an antioxidant and supports reproductive health.
  • Vitamin K contributes to proper blood clotting and bone strength.

These vitamins work together to maintain healthy hens that lay consistently and remain active.

Important Minerals for Strong Bones and Eggshells

Microgreens naturally contain minerals such as calcium, iron, magnesium, potassium, and phosphorus.

  • Calcium is essential for strong eggshell formation.
  • Iron helps maintain healthy blood and oxygen transport.
  • Magnesium and phosphorus support bone development.
  • Potassium assists in muscle and nerve function.

While commercial feed provides the primary mineral supply, microgreens can enhance and diversify nutrient intake.

Additional nutritional Value

Microgreens like broccoli, radish, and mustard are rich in antioxidants that help protect chickens from stress caused by heat, overcrowding, or illness. Regular intake may support stronger immunity and better overall vitality.

Fresh microgreens also contain natural enzymes that aid digestion and improve nutrient absorption. When introduced gradually, they can promote healthier gut function and better feed efficiency.

Potential Risks of Microgreens

Though it is safe to feed your chickens microgreens, it is essential to avoid moldy, contaminated, or chemically treated greens.

Microgreens grow in moist conditions and can develop mold quickly if overwatered or poorly ventilated. Always discard trays with fuzzy growth or a musty smell, as mold can cause serious health issues.

Use only untreated, food-grade seeds. Seeds coated with pesticides or fungicides are harmful to poultry. Growing your own microgreens with clean water and proper hygiene helps ensure safety.

Microgreens should be offered in moderation as a supplement, not a replacement for balanced feed. Introduce new varieties slowly and monitor your flock to prevent digestive upset.

How to Grow Microgreens for Chickens?

Chickens need a balanced mix of protein, vitamins, minerals, and essential amino acids for healthy growth and steady egg production. Proper nutrition supports strong bones, strong feathers, good immunity, and consistent laying.

As mentioned earlier, microgreens can supply many of these nutrients naturally. Growing them at home gives you fresh, chemical-free greens and ensures your flock gets safe and high-quality supplements.

1. Choose the Right Seeds

Always select untreated, food-grade seeds meant for sprouting or microgreen growing. Safe and popular options for chickens include sunflower, pea shoots, wheatgrass, barley, broccoli, and radish.

Do not use seeds meant for ornamental gardening if they are coated with chemicals. Treated seeds can be harmful to poultry, even in small amounts.

2. Gather Simple Supplies

You do not need expensive equipment to grow microgreens. A shallow tray, potting soil or coconut coir, clean water, and a spray bottle are enough.

Using trays with small drainage holes helps prevent water from sitting at the bottom. Good drainage lowers the risk of mold growth.

3. Prepare the Growing Tray

Fill the tray with about 1–2 inches of moist soil or coir. The growing medium should be damp but not dripping wet.

Level the surface gently so the seeds can spread evenly. This helps ensure uniform growth.

4. Sow the Seeds Properly

Spread the seeds evenly across the surface without overcrowding. A dense layer is fine, but seeds should not be piled on top of each other.

Press them lightly into the soil and mist gently with water. There is no need to bury them deep, as microgreens grow well on the surface.

5. Provide the Right Growing Conditions

Place the tray in a warm area with indirect sunlight. A bright windowsill works well.

Mist lightly once or twice a day to keep the surface moist. Avoid overwatering, as too much moisture can cause mold. Proper air circulation is very important.

6. Watch for Growth

Seeds usually sprout within 2–3 days. After that, you will see small green leaves growing quickly.

Most microgreens are ready to harvest in 7–10 days when they reach about 2–4 inches tall. Harvesting at this stage ensures maximum nutrients.

7. Harvest and Feed Fresh

Use clean scissors to cut the greens just above the soil line. Rinse lightly if needed and feed them fresh to your chickens.

Fresh microgreens contain the highest nutrient levels. Avoid feeding wilted or spoiled greens.

8. Introduce Gradually and Feed in Moderation

Start by offering small handfuls mixed into regular feed. This allows your flock to adjust without digestive upset.

Microgreens should act as a supplement, not a complete feed replacement. When offered in moderation, they provide a healthy, natural boost to your chickens’ diet.

How Often to Feed Microgreens for Chickens?

Microgreens should be fed as a supplement, not as a main feed. Chickens still need a balanced commercial feed to meet their daily nutritional requirements.

You can offer microgreens 2–4 times per week in small portions. A small handful per bird is usually enough to provide benefits without overfeeding.

If you are introducing microgreens for the first time, start slowly. Mix a small amount into their regular feed and observe your flock for any digestive changes.

During molting or stressful seasons, you may slightly increase the amount. However, always keep microgreens as an addition, not a replacement for their complete diet.

Also Read: 70 Things Chickens Can Eat

How Long Do Microgreens Take to Grow?

Microgreens grow very quickly compared to regular vegetables. Most varieties are ready to harvest within 7 to 10 days after planting.

Some fast-growing types like radish or mustard may be ready in as little as 6–7 days. Others, such as sunflower or pea shoots, may take 10–14 days to reach the ideal height.

They are usually harvested when they are about 2–4 inches tall and have developed their first true leaves. Harvesting at this stage ensures the best flavor and highest nutrient content.

With proper moisture, warmth, and light, you can grow fresh microgreens for your chickens almost every week.

7 Best Microgreens for Chickens

Choosing the right microgreens can make a big difference in your flock’s health, growth, and egg production.

1. Sunflower Microgreens

Sunflower microgreens are rich in plant-based protein and healthy fats. They support muscle growth and strong feather development.

They are also easy to grow and produce thick, juicy shoots. Chickens usually love their crunchy texture.

2. Pea Shoots

Pea shoots contain good levels of protein and essential vitamins. They help support healthy growth and recovery during molting.

They grow quickly and produce tender green leaves. Most chickens eagerly peck at fresh pea shoots.

3. Wheatgrass

Wheatgrass is packed with vitamins A, C, and E along with chlorophyll. It supports immunity and overall vitality.

It grows thick and lush within days. Chickens enjoy grazing on it like natural pasture grass.

4. Barley Microgreens

Barley microgreens provide fiber, enzymes, and important minerals. They can help support healthy digestion.

They are commonly used as fodder and grow well in trays. This makes them a practical choice for backyard flocks.

5. Broccoli Microgreens

Broccoli microgreens are rich in antioxidants and vitamins. They help strengthen the immune system naturally.

They have a mild flavor and soft texture. Feeding them occasionally adds variety to your flock’s diet.

6. Radish Microgreens

Radish microgreens grow very fast and are rich in vitamins and antioxidants. They can support overall health and energy.

They have a slightly spicy taste, so feed in moderation. Most chickens enjoy them as a fresh treat.

7. Mustard Microgreens

Mustard microgreens contain antioxidants and beneficial plant compounds. They may help support immune health.

Because of their strong flavor, offer them in small amounts. They are best used as an occasional supplement.

Also Read: 27 Herbs to Feed Chickens to Keep them Healthy

Conclusion

Microgreens are a simple and natural way to boost your chickens’ nutrition. Though small in size, they provide protein, vitamins, minerals, and antioxidants that support growth, immunity, and egg quality.

Feed microgreens in moderation by mixing small handfuls into their regular feed 2–4 times a week. Always introduce new varieties slowly to prevent digestive upset and observe how your flock responds.

Remember, microgreens should act as a supplement, not a replacement for balanced poultry feed. When grown safely and offered properly, they can become a healthy and affordable addition to your chickens’ diet.

Information Technology in Pharmacy: An Integrated Approach (Health Informatics)

0


Price: $84.99
(as of Feb 18, 2026 20:23:59 UTC – Details)

This extensively revised new edition reviews the use of information technology within pharmacy practice and details the various developments in the field of digital systems for pharmacy and medicines. Many of these developments are related to increased digital maturity and advancing benefits research with existing technologies, for example electronic health records, electronic prescribing and pharmacy automation. Other areas of technology have also opened up, enabled by the adoption of web-based systems, increased use of clinical and data standards (SNOMED dm+d and FHIR) and innovative hardware and devices. Recently-developed digital technologies in pharmacy include mobile phone apps for pharmacy communications, increased health record access, and integrated pharmacy services support. The use of remote technologies was increased by the COVID pandemic. The development of integrated and connected digital systems has enabled the prospect of data-driven care with medicines and has also highlighted ethical issues relating to these systems, including issues concerning privacy, impact on professional roles and systemic bias. Future prospects for pharmacy and medicines digital technology now include artificial intelligence systems, a wider range of smart devices and wearables and support for pharmacogenomic medicine.

IT in Pharmacy: An Integrated Approach describes and discusses the major areas of pharmacy IT innovation from a systems and professional perspective. It considers how the areas of pharmacy IT link together and can be used to enable and develop pharmacy professional practice. The book examines pharmacy IT from an international perspective, taking into account all parts of the world where IT systems are used in global pharmacy practice, and hence will be essential for all pharmacists and healthcare informatics professionals with an interest in pharmacy digital applications.

Publisher ‏ : ‎ Springer
Publication date ‏ : ‎ January 14, 2026
Edition ‏ : ‎ Second Edition 2026
Language ‏ : ‎ English
Print length ‏ : ‎ 347 pages
ISBN-10 ‏ : ‎ 144717612X
ISBN-13 ‏ : ‎ 978-1447176121
Item Weight ‏ : ‎ 1.5 pounds
Dimensions ‏ : ‎ 6.3 x 0.94 x 9.49 inches
Best Sellers Rank: #1,217,655 in Books (See Top 100 in Books) #35 in Medical Practice Management #121 in Hospital Administration & Care #171 in Pharmacy (Books)