
")

Once I started my natural health journey, I realized that I enjoy foods that stretch my palate a little (or sometimes a lot). Who wants plain chicken breast and steamed broccoli when you can have volcano chicken? This fried chicken recipe has an Asian inspired flair and is perfect for busy nights. It pulls together in less than 30 minutes and even my kids can make it in the air fryer!
Some sources say that the original volcano chicken was a Thai dish that involved covering a whole chicken in whiskey and lighting it on fire. While we certainly won’t be doing that today, I can just about guarantee this crispy chicken recipe tastes much better!
The modern day version of volcano chicken is a spicy chicken with a sweet and savory sauce. It’s often paired with rice or stir fry to make a meal. It’s typically deep fried in hot oil (vegetable oil) and covered in a sauce that includes ingredients like brown sugar, sriracha, or even buffalo sauce.
I use a homemade sweet chili sauce in this recipe that includes ingredients like rice vinegar, garlic powder, red pepper flakes, and honey. It’s like a spicy, sweet hot sauce with an Asian twist! And although the recipe calls for chicken breast, deboned and skinless chicken thighs would also work.
This Volcano Chicken is a game-changer when it comes to quick, flavorful meals. The crispy chicken paired with the sweet and spicy sauce is the perfect combination, and it comes together in under 30 minutes! Plus, it’s versatile since you can serve it however you like, whether it’s over rice, salad, or potatoes.
I’ll also sometimes make this recipe ahead when I’m meal prepping. You can cook the chicken ahead of time, then reheat and toss it with the sauce when you’re ready to eat. The crispy chicken and tangy sauce are so delicious, my kids definitely requested adding this to our regular dinner rotation.
It’s always nice when delicious recipes are also easy and healthy!
This sweet, savory, and spicy chicken is even better than takeout. My kids love this one!
Whisk the eggs until well combined in a shallow bowl. In another shallow bowl or plate, mix together the flour, onion powder, salt, and black pepper.
Coat the chicken pieces in the flour mixture, then dip them in the egg mixture, and then coat them in the flour mixture again. The double coating ensures the chicken gets a crispy, crunchy texture when cooked. Set each piece aside on a plate and repeat for the rest of the chicken.
Preheat your air fryer to 375°F. Lay the chicken pieces in the air fryer basket in a single layer—don’t overcrowd them! You may need to cook the chicken in batches if your fryer is small. Cook for about 15 minutes, shaking the basket halfway through for even cooking. The chicken should be golden brown and crispy when done.
While the chicken is cooking, make the sauce by stirring together the sweet chili sauce, maple syrup (or honey), soy sauce, orange juice, orange zest, and minced garlic in a small bowl. Taste and adjust the sweetness or spice level to your liking.
Once the chicken is cooked, transfer it to a large bowl and pour the Volcano sauce over the crispy chicken pieces. Toss everything together, ensuring each piece is coated.
Nutrition Facts
Quick Volcano Chicken Recipe
Amount Per Serving (1 serving)
Calories 395
Calories from Fat 63
% Daily Value*
Fat 7g11%
Saturated Fat 2g13%
Trans Fat 0.03g
Polyunsaturated Fat 1g
Monounsaturated Fat 2g
Cholesterol 191mg64%
Sodium 1383mg60%
Potassium 768mg22%
Carbohydrates 39g13%
Fiber 1g4%
Sugar 23g26%
Protein 42g84%
Vitamin A 210IU4%
Vitamin C 12mg15%
Calcium 54mg5%
Iron 2mg11%
* Percent Daily Values are based on a 2000 calorie diet.
Looking for some more Asian inspired recipes to try? Here are some of our favorites!
What are some of your favorite take-out dishes to make at home? Leave a comment and let us know!

Hens can be brutal to new comers, so you add new chickens to your flocks matters to keep them happy and stress free.
Integrating them at night may sound weird, but it worked in most cases. Am not sure if it works for you.
Another effective way is to allot a temporary chicken coop for new chickens are best way to avoid pecking.
There are few ways to easily introduce new chickens to your old ones. I’ll share them in detail here.
Important: Never throw small chickens to full sized chickens. You should wait for few weeks, until they can hold on their own.
To prevent stress, bullying and injury, it is essential to integrating new chickens into an existing flock gradually.
A step-by-step approach—starting with visual separation, followed by supervised interaction—allows the birds to get used to each other safely and establishes a natural pecking order with minimal conflict.

When introducing new chickens to your flock, begin by letting them see each other without making direct contact. Use a wire fence or a separate run placed next to the main coop so both groups can observe and get familiar with one another safely.
This visual exposure helps reduce fear and aggression, as the existing flock gradually accepts the presence of newcomers. It also allows you to monitor any signs of hostility or stress before moving to physical interaction.
During this phase, provide separate free-ranging spaces for both groups. This ensures they can enjoy outdoor time without the risk of confrontation, while still continuing to build familiarity from a distance.

Sometimes, a few dominant hens get a little too territorial when new chickens show up. If you notice any of your older flock chasing, pecking, or cornering the newcomers, it’s best to step in early. Letting this kind of behavior go unchecked can lead to serious injuries or lasting fear in the new birds.
A simple trick is to temporarily remove the aggressive hen or hens from the main flock. Locking them in a crate or a separate space for a day or two shifts the flock dynamics just enough to knock them down a peg in the pecking order. It also gives the new chickens time to settle in without constant harassment.
When you reintroduce the aggressive hens, they’re less likely to come back with the same attitude. This method helps balance out the flock hierarchy and encourages more peaceful behavior all around.
Keep an eye out during this phase—it’s normal for some pecking to happen, but if it turns into relentless bullying, don’t hesitate to step in again. A bit of temporary separation can make the long-term integration smoother for everyone.
Also Read: How to Clip Flight Feathers on Chickens?
Evening is a calm time for chickens, and that makes it the perfect window for introducing new birds. Once the original flock has settled on the roosts for the night, quietly place the new chickens onto the roost bars alongside them.
Chickens are generally less alert and less aggressive in the dark, so they’re more likely to accept the newcomers without drama.
Come morning, the entire flock will wake up together, and the new birds won’t seem quite as foreign.
You may still see a bit of pecking as they establish hierarchy, but starting the day together helps reduce shock and tension. Just be sure to stick around and monitor their behavior closely that first day.

One big reason new chickens get picked on is competition for food and water. Dominant birds may guard feeders or push new ones away, making integration even harder.
To avoid this, set up multiple feeding and watering stations around the run and coop so everyone has easy access.
Spacing out resources helps reduce conflict and gives new chickens a fair shot at eating and drinking without being bullied. It also eases overall tension in the flock by removing a major source of stress—food competition. Keep this setup until the flock starts mingling peacefully.
Introducing chickens at night isn’t a magic solution—but it often makes the process gentler and more successful. When combined with proper quarantine, visual introductions, and ongoing observation, it can help your flock grow with less drama and more harmony.
1. Chickens are calm and disoriented at night
Once the sun sets, chickens naturally go into a rest mode. Their eyesight is poor in the dark, and they become quite docile and less reactive. When chickens are asleep or drowsy, they’re far less likely to act aggressively.
This makes night the perfect time to sneak new birds onto the roost. Most chickens won’t even notice the newcomers until morning, and by then, the shock of “strangers in the coop” is usually lower.
2. It resets the pecking order subtly
Introducing new birds while everyone’s sleeping helps minimize immediate pecking and squabbles. In chicken society, pecking order is everything.
By placing new chickens on the roost while the flock is off guard, you’re nudging the social structure into a reset. Instead of seeing the newcomers as invaders, the existing flock is more likely to treat them as fellow members who have always been there—at least in part.
3. Reduces stress for new birds
Moving to a new coop is stressful enough for new chickens. If they’re met with pecks, squawks, and full-blown attacks right away, it can create trauma, weaken their immune systems, and even affect egg-laying.
Introducing them at night gives them a quiet, conflict-free entry and a chance to wake up in a calmer environment, surrounded by their new flock mates without instant hostility.
Step 1: Prepare the Coop

Before you even think about adding new chickens, make sure your coop has enough space. Overcrowding is a major cause of aggression in flocks. Ensure there’s enough roosting space for everyone—about 8 to 10 inches per bird is a good rule of thumb.
Clean the coop, add fresh bedding, and check for any sharp edges or tight spaces where birds could get trapped if startled.
Must Read: What Should Be Inside a Chicken Coop?
Step 2: Isolate and Quarantine First
Never introduce new chickens directly without a quarantine period. Keep them separate for at least 2 weeks—ideally 3 to 4—to watch for signs of illness, parasites, or infections.
This isolation also gives you time to observe their behavior and make sure they’re healthy and ready to integrate.
Step 3: Allow Visual Introduction
Before the nighttime merging, let your chickens get used to each other from a distance. Use a wire fence, dog crate, or separate run close to the main coop so the old and new flocks can see, smell, and hear each other during the day. Do this for several days or even a week. It helps reduce fear and shock on both sides.
Step 4: Wait Until Dark and the Flock Is Roosting
Once your original flock is settled on the roosts after sunset, usually 30–60 minutes after dusk, quietly and gently bring in the new chickens. Use a soft light like a red bulb or headlamp to avoid startling everyone. Pick up the new birds calmly and place them directly onto the roost bars alongside the others.
Handle them gently but firmly to avoid flapping and panic. If your roosts are narrow, make sure the birds have enough space and aren’t crowding each other too much. If necessary, you can place some of the new birds on a lower roost to give everyone breathing room.
Step 5: Observe Closely the Next Morning
Wake up early and watch the flock closely when they come down from the roost. A little pecking or chest bumping is normal as they reestablish their social order, but watch out for signs of serious aggression—constant chasing, pecking at the head, or cornering.
If one or more hens are being especially mean, consider separating them temporarily (as in isolating the bullies).
You can also distract the flock with treats scattered around the run or place multiple feeders and waterers to prevent resource guarding.
Check this: How to Deworm Chickens Naturally?

Khaja Moinuddin, a computer science graduate, finds joy in gardening and homesteading. Join him on this blog as he shares his experiences in homesteading, gardening, and composting

Kraft Heinz says 90% of its food items already use natural food colorings. Products that still use synthetic dyes are in its beverage and dessert categories like Crystal Light and Jell-O.
Photography by Jeremy Villasis./Moment RF/Getty Images
hide caption
toggle caption
Photography by Jeremy Villasis./Moment RF/Getty Images
Kraft Heinz says it will be removing all artificial food dyes from products sold in the U.S. starting in 2027, and it will stop making new products with these dyes, effective immediately.
In a statement, Kraft Heinz said nearly 90% of its U.S. products are already free of synthetic dyes. It says it has invested in removing the dyes in remaining products or replacing them with natural colors. A company spokesperson tells NPR that many of the products that still contain artificial dyes are in the beverage and dessert category. These include some products sold under brands such as Crystal Light, Kool-Aid, Jell-O and Jet-Puffed.

“The vast majority of our products use natural or no colors, and we’ve been on a journey to reduce our use of FD&C colors across the remainder of our portfolio,” Pedro Navio, North America president at Kraft Heinz, said in a statement, adding, “Our iconic Heinz Tomato Ketchup has never had artificial dyes.”
About a decade ago, the company removed the artificial dyes used to give its Kraft Mac & Cheese its iconic yellow-orange hue; that color now comes from spices like paprika and turmeric.
The company’s announcement comes nearly two months after federal health officials said they would work with the food industry to voluntarily phase out the use of petroleum-based food dyes by the end of next year.
“We are going to get rid of the dyes and then one by one, we’re going to get rid of every ingredient and additive in food that we can legally address,” Health Secretary Robert F. Kennedy Jr. said at the time.
Some studies have linked these dyes to negative effects on children’s behavior and mental health.

The Consumer Brands Association, which represents U.S. packaged food manufacturers, has defended the industry’s current ingredients. In a statement back in April, Melissa Hockstad, the group’s CEO, said “the ingredients used in America’s food supply have been rigorously studied … and have been demonstrated to be safe.”
Some food manufacturers have already been working to phase out synthetic dyes. The Food and Drug Administration recently approved three new all-natural dyes for manufacturers to use instead. But switching isn’t necessarily easy.
As NPR has reported, extracting large volumes of color from natural sources is far more complex than mixing chemical dyes. Some colors, such as blues, can be difficult to get in large quantities from natural sources, which can raise the costs of reformulating products. And the resulting colors may not be as vivid as those achieved with synthetic dyes.

Whether you’re working with rooted cuttings or nursery transplants, plant jostaberry in spring in colder regions once the soil is workable.
In milder climates, autumn transplanting is also an option.

Before planting, soak the roots in water for a few hours to keep them hydrated.
Then dig a hole twice as wide and slightly deeper than the root ball – about one to two inches deeper is ideal. Place the plant in the hole, backfill with soil, firm it in, and water thoroughly.
After planting, prune the top growth back to about 10 inches to encourage bushy new shoots.
Finish by applying two to four inches of mulch around the base, using compost, pine needles, or wood chips.
Just keep the mulch a few inches away from the crown to avoid trapping moisture against the stems.
Jostaberries are notably resistant to many common diseases that affect other Ribes species, such as powdery mildew, leaf spot, and white pine blister rust.
Depending where you live though, birds may be a problem.
Birds are naturally attracted to the sweet, ripe jostaberries and can significantly reduce your harvest if not managed properly.
To protect your crop, you can use netting or other methods as discussed in our guide to protecting blueberries from birds.
Insect pests may show up occasionally, the main culprits being aphids, currant worms, and cane borers.
Aphids can be despatched with a strong spray of water from the hose, or failing that, an application of neem oil or insecticidal soap.
The larvae of the imported currant worm can defoliate plants rapidly. Early detection is crucial. Handpick the larvae or use a biological control like Bacillus thuringiensis (Bt) to manage outbreaks.
As the name suggests, cane borers bore into stems, causing wilting. Prune and destroy affected canes to prevent the spread.
You’re very unlikely to encounter any diseases when growing jostaberries. If you grow your plants in soggy water or have a habit of overwatering, they may succumb to root rot.
But this is easily prevented by planting in appropriate, well-draining soil.
I always wince when I see the price of currants at the farmer’s market – if you can even find them. Jostaberries? Forget it.
But when a single shrub can produce ten to twenty pounds of fruit in a season, it makes a lot of sense to grow your own.

Most jostaberries begin bearing fruit between their first and third year, depending on the age of the plant when it was planted and the specific cultivar.

Hi GPODers!
Today we’re getting an update from Kristen Rembold and her husband, Chris, as their garden in Virginia is in the midst of transition. Kristen has shared their exuberant space twice in the past, in early spring (Spring in Kristen’s Garden in Virginia) and during its summer peak (Summer in Kristen’s Garden), and today we’re seeing it during the period between. On the last day of May, Kristen captured their garden as spring stars made way for the summer stalwarts that will perform through the increasing heat of June and July.
Hello! I enthusiastically took some pictures this morning as our spring garden transitions into summer. Here, the roses, clematis, and irises are mainly over, and the hydrangeas, lavender, coneflowers, and salvias are coming on. Everything is lush again after the recent rains.
Kristen
Chinese witch hazel (Hamamelis mollis, Zones 5–8), Japanese maples, asters, catmint, lavender in two beds along the front of the house
 Peeking up through catmint and emerging salvia; the baptisia is done blooming now.
 A view from the edge of the edible garden, where the veggies are flourishing
 Looking down across the lawn into our little arboretum area
 Behind the house
 This is our pool garden.
 This little area in front of the outdoor shower is abloom with adenophora and catmint. The daylilies and calamint (Calamintha nepeta, Zones 5–7) will come along later.
 Looking back down from the pool toward the house and porch garden
 Front garden
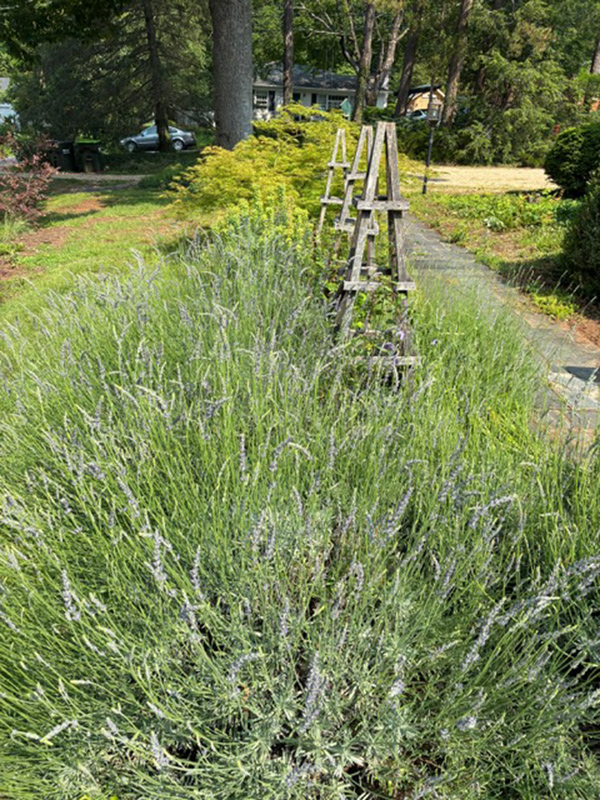 Lavender coming into bloom; I sited it on the hottest, driest spot we have.
 The out-of-the way place most gardeners have where they start seeds, propagate from cuttings (greenwood cuttings in this case), and raise up transplants until they’re bigger—the story isn’t complete without this! Otherwise, how could we have afforded so many plants?
Thank you so much for this fabulous update on your garden, Kristen! Every corner of your property has something of interest and even at transition, all the different garden spaces you and Chris have created are lively and lush.
How is your garden looking as the gardening season really starts heating up? Are summer flowers already blooming, or is spring still holding on? We’d love to see more garden spaces during this time of transition. Follow the directions below to submit photos via email, or send me a DM on Instagram: @agirlherdogandtheroad.
Have photos to share? We’d love to see your garden, a particular collection of plants you love, or a wonderful garden you had the chance to visit!
To submit, send 5–10 photos to [email protected] along with some information about the plants in the pictures and where you took the photos. We’d love to hear where you are located, how long you’ve been gardening, successes you are proud of, failures you learned from, hopes for the future, favorite plants, or funny stories from your garden.
Have a mobile phone? Tag your photos on Facebook, Instagram or Twitter with #FineGardening!
Do you receive the GPOD by email yet? Sign up here
Fine Gardening Recommended Products

Planting in a Post-Wild World: Designing Plant Communities for Resilient Landscapes
Fine Gardening receives a commission for items purchased through links on this site, including Amazon Associates and other affiliate advertising programs.
Featuring gorgeous photography and advice for landscapers, Planting in a Post-Wild World by Thomas Rainer and Claudia West is dedicated to the idea of a new nature—a hybrid of both the wild and the cultivated—that can nourish in our cities and suburbs.

Buffalo-Style Gardens: Create a Quirky, One-of-a-Kind Private Garden with Eye-Catching Designs
Fine Gardening receives a commission for items purchased through links on this site, including Amazon Associates and other affiliate advertising programs.
Buffalo-Style Gardens is a one-of-a-kind, offbeat garden design book that showcases the wildly inventive gardens and gardeners of Buffalo – and offers readers “the best of the best” ideas to use in their own small-space gardens.

ARS Telescoping Long Reach Pruner
Fine Gardening receives a commission for items purchased through links on this site, including Amazon Associates and other affiliate advertising programs.
Telescopes from 4 to 7′. Cut and Hold (160) Blades. Drop forged blades for unsurpassed long lasting sharpness. Lightweight, 2.3 lbs., for continued use. Perfectly balanced for easy pruning.

Tea Church is a stay-at-home mom with five kids. She says SNAP is a big part of what keeps her family afloat each month.
Jay Fram/For NPR
hide caption
toggle caption
Jay Fram/For NPR
Millions of people who use the Supplemental Nutrition Assistance Program (SNAP) are facing changes, not only to what kinds of food they can buy, but how much money they receive, what they have to do to be eligible for the program, or if they qualify for benefits at all.
The Trump administration last week allowed more states to stop people from using benefits to buy sugary food and drinks. And the budget reconciliation bill currently includes deep cuts to the program. Some say they cannot imagine how they will keep themselves and their families fed if these new proposals are approved.

“ It would start changing the calculation from ‘how do I make this stretch to meet my needs?’ to ‘how much food do I need to eat in order to survive?'” says Rook Smith, a graduating college student in Oregon who receives a little over $300 a month in benefits.
Smith does not receive family support and pays for college through a combination of loans and work — current SNAP rules require students to work 20 hours a week to receive benefits. One study estimated that nearly a quarter of undergraduate college students are food insecure.
“ Without it I would’ve had to make major changes, if not just drop out of college entirely,” Smith says.
Analysis from the nonpartisan Congressional Budget Office suggests the cuts would reduce SNAP by nearly $300 billion — the largest cut in the program’s history. More than 40 million people in the U.S. receive food assistance; some food policy experts warn 1 in 4 could be affected. They caution that many recipients would see their benefits reduced substantially or eliminated completely. Some states — unable to make up for the federal cuts — may choose to abandon the program altogether.
“It’s hard to overstate how devastating that would be to low income families” says Katie Bergh, a policy analyst at the Center on Budget and Policy Priorities. “ I think it has flown under the radar a little bit that the Congressional Budget Office — Congress’s nonpartisan, official scorekeeper — has confirmed that some states could end their SNAP programs as a result of this provision.”

Tea Church quit her job to take care of her kids. She says a proposed work requirement for parents with kids older than 7 would be hard for her family.
Jay Fram/For NPR
hide caption
toggle caption
Jay Fram/For NPR
The budget reconciliation bill passed by the House would impose new work requirements in order to qualify for SNAP. Among other changes, parents of children ages 7 and older would be required to work 20 hours a week to maintain eligibility.
“There’s no way,” says Tea Church, a single mom who lives in the rural town of The Dalles, Ore., about an hour outside Portland. Church has five children ranging in age from 10 to 18. “If the requirement was 20 hours a week, that would drastically, negatively impact our family.”
One of Church’s sons, whom she adopted after fostering, needs special care. “Chronologically he is 11,” says Church. “Socially and emotionally, he’s more like 6.”
Under current SNAP rules, some people qualify for an exemption from existing work requirements if they are caring for someone with a disability; it’s unclear if Church’s family would meet the requirements under the new rules.
She says finding child care for after-school and summer in her rural Oregon town is difficult and would be nearly impossible for a child with high needs.
“ It’s not that I don’t want to work or that I’m unable,” says Church, who quit a full-time job at a community college to care for her children. “ Working a regular job with a regular schedule isn’t an option for us.”
Her family’s current benefit is close to $450 a month, though it is increasing in the summer by $125 while her kids are home from school. SNAP she says, “is a huge part of what keeps us afloat every month.”

Another flashpoint in the Trump administration’s rules around SNAP: sugar.
Last week, Secretary of Agriculture Brooke Rollins announced that three more states — Utah, Idaho and Arkansas — would be eligible for waivers that would allow them to ban the purchase of sugary foods and drinks with SNAP benefits.
“Disallowing taxpayer funded benefits to purchase unhealthy items like soda, candy and other junk food” is part of an effort to improve the American diet, Rollins said at a press conference.
Six states now have such policies; more than a dozen are pursuing them, primarily led by Republican state legislators.
Secretary of Health and Human Services Robert F. Kennedy Jr. said he would extend the ban to include ultra-processed food, though he acknowledged implementing such a policy would take time. Kennedy says these changes are part of a larger effort to mitigate chronic diseases such as obesity, diabetes and heart disease.
“If somebody wants to drink a soda pop, we have no problem with that, we believe that we have freedom of choice in this country,” Kennedy said at the same press conference. “It’s about nutrition and there’s no nutrition in these products. We shouldn’t be paying for them with taxpayer money.”
Critics — including food experts and SNAP recipients — say fighting disease is not as simple as creating a banned foods list.
On a recent shopping trip, Tea Church took several of her kids along with her. Her 11-year-old son, Solomon, pointed to the back of a cereal box and considered the balance of sugar and protein.
“Six grams and protein 9,” he said. “I think the protein should be more.”
Tea — who worked with a nutrition expert and lost over 100 pounds recently — says nutrition is important in their family, but she also values choice and the ability to give her kids an occasional treat.
“Being able to give them something that doesn’t negatively impact our budget is amazing,” she says.
For her teenagers, soda and energy drinks occupy a unique role. “It’s a kind of social currency for them,” she says.
Her 17-year-old daughter, Olivia, confirms this dynamic.
“ I feel like when you walk into first period in the morning, everyone has like a Red Bull, an energy drink — it’s a social construct for sure,” says Olivia.
Some of her peers come to school with Starbucks drinks that cost nearly $7 — a luxury she cannot afford. But having a Red Bull, she says, makes her feel more normal.
“I would never be able to be a part of that social pyramid if we didn’t have the SNAP benefits that would pay for those.”
Some food policy experts stress there are meaningful ways to incentivize healthy eating, but proven strategies generally involve expanding benefits rather than just restricting them.

“ We do not have quality data that says that if you restrict access to candy and soda in SNAP, you are going to see improved diet quality, improved nutrition, reduced chronic disease,” says Joelle Johnson with the Center for Science in the Public Interest. “That data does not exist.”
Johnson cites successful pilot programs that encourage people to buy more fruits and vegetables through expanded access to these foods.
“ Just because somebody participates in SNAP doesn’t mean that they don’t deserve the same food choices that somebody who doesn’t participate in SNAP has,” says Johnson.
Some research suggests people who use SNAP drink about the same amount of soda as those who do not receive the subsidy.
Standing in the grocery store parking lot after her shopping, Church says she feels like the changes the administration is proposing don’t take into account the fundamental purpose of the program.
“That’s why these programs were created,” she says, “to be able to care for members of our community.”

Setting up your first chicken coop in the backyard can stir up a mix of emotions. Excitement of building on your and a bit of nervousness as a beginner.
It is definitely rewarding when it comes to housing your flock. But, there’s more to consider than just hammering a few boards together.
To ensure the well-being, safety, and productivity of your chickens, it’s important to understand exactly what should go inside the coop.
Important factors that need to be considered while building chicken coop, include good ventilation, roosting bars, nesting boxes, chicken bedding and solid flooring.

Before diving into the must-have features, it’s crucial to understand that a chicken coop isn’t just a shelter—it’s your flock’s home, protection, and comfort zone.
A strong, well-structured coop not only keeps predators out but also shields chickens from harsh weather.
And choosing the right location—somewhere dry, well-drained, and partially shaded—can make all the difference in maintaining a healthy and low-maintenance environment.
Good ventilation is one of the most important yet often overlooked parts of a chicken coop. Chickens produce a surprising amount of moisture through breathing and droppings, and without airflow, this moisture builds up quickly. Proper ventilation allows fresh air to circulate while pushing out humidity, ammonia fumes, and stale air.
Especially in hot or humid climates, ventilation helps keep chickens cool and prevents respiratory problems. Even during winter, a well-ventilated coop reduces condensation that can lead to frostbite and mold growth, all without creating uncomfortable drafts.
Without good ventilation, ammonia from droppings can accumulate, making the coop smell strong and unhealthy. High humidity can also cause respiratory issues, mold, and even illnesses that spread easily in a damp, poorly ventilated environment.
Best Practices for Good Ventilation:
Chickens don’t sleep on the ground—they like to perch up high, where they feel safe and secure. That’s where roosting bars come in. These simple wooden bars give your flock a place to rest at night, mimicking their natural instinct to sleep off the ground like they would in trees.
It’s not just about comfort—roosting also helps keep your chicken’s cleaner and healthier. Sleeping on the floor exposes them to droppings and moisture, which can lead to disease or parasites.
Best Practices for Roosting Bars:
If you want clean uncracked eggs, then nesting boxes are a must. These cosy little spaces give hens a quiet, private place to lay their eggs, which helps reduce stress and keeps the eggs in one spot instead of all over the coop.
A good rule of thumb is one nesting box for every 3–4 hens. Keep the boxes lined with soft bedding like straw or pine shavings, and make sure they’re slightly lower than the roosting bars so the hens don’t try to sleep in them.
Best Practices for Nesting Boxes:
Also Read: How to Clip Flight Feathers on Chickens?
You might not think much about what goes on the coop floor, but bedding plays a huge role in keeping things clean, dry, and odor-free. It absorbs moisture from droppings and spilled water, and it helps control smells and bacteria.
Popular choices include straw, pine shavings, or even shredded leaves. Some folks go for the deep litter method, where you let bedding build up and compost in place—it’s low-maintenance and can be great for insulation. Whatever method you use, just make sure to clean or refresh the bedding regularly to keep the coop healthy.
Best Practices for Bedding:
While it might be tempting to skip thinking about the floor, trust me—it matters. A solid floor keeps predators like rats and snakes from burrowing in, and it makes daily cleaning a lot easier.
You’ve got options here. Wooden floors are common, especially if the coop is raised. Dirt floors can work too, but only with proper predator-proofing and regular maintenance. Some people even use linoleum over plywood for easy cleaning. Just make sure the floor is level, durable, and safe from dampness and pests.
Best Practices for Flooring:
Along with essential needs, there are few things that shouldn’t go inside the coop. Though the listed things are crucial, but they may attract predators or result in mold growth.
1. Water
It might seem convenient to keep water inside the coop, but it’s usually not a good idea. Waterers tip easily, leak, or get pooped in, turning your cozy coop into a damp, smelly mess.
Moisture inside a coop increases the risk of mold, ammonia buildup, and frostbite in cold weather. It’s much better to place water outside in the run or in a sheltered area where it stays clean and doesn’t soak the bedding.
2. Feed
Similar to water, chicken feed inside the coop often leads to messes. Chickens scratch, scatter, and spill their feed everywhere, and leftover crumbs attract rodents and insects overnight.
Plus, feed dust adds to the poor air quality if ventilation isn’t strong. Feeding in the run keeps things cleaner and gives the birds a little something to look forward to during the day.
3. Dust Baths
Chickens absolutely need dust baths—but not inside the coop. A proper dust bath area takes up space, gets messy quickly, and kicks up fine dust that’s bad for their lungs (and yours).
It’s best to create a dedicated dust bath zone in the run or outdoor area with dry dirt, ash, or sand. That way, your coop stays cleaner, and your birds can still enjoy their spa time without turning their sleeping space into a dusty sandbox.
Before you grab your tools and start hammering away, it’s crucial to pause and plan a few key things.
A well-thought-out chicken coop isn’t just easier to build—it saves you stress, money, and trouble down the road.
Here are three important factors to think through before you set up your coop:
1. Predator Proofing

No matter where you live—country, suburb, or even city—predators will find your chickens if you’re not prepared. Raccoons, snakes, dogs, and even hawks are always looking for an easy meal.
So before you build, think about security. A coop needs solid locks (not just latches), strong hardware cloth (never chicken wire!), and a secure floor or buried apron to stop anything from digging underneath.
It’s easier to build it predator-proof from the start than to fix it after something breaks in.
2. Location
The spot you choose can make or break your setup. Pick a flat, well-drained area that gets morning sun and some afternoon shade.
Avoid low-lying spots where water collects during rain. Ideally, your coop should also be close enough to your home for easy access—especially when you’re heading out in bad weather to collect eggs or do a quick check-in. Bonus points if it’s near a water source or compost bin.
3. Brooder (if you’re starting with chicks)
If you’re beginning with baby chicks instead of mature hens, you’ll need a brooder—a warm, safe place for them to grow before moving into the coop. Don’t rush them into the main coop too soon; chicks need extra heat, clean bedding, and protection from drafts.
Plan your brooder setup in advance, and make sure it’s completely separate from your outdoor coop until the chicks are at least 6 to 8 weeks old and fully feathered.
Must Read: 7 Ways to Break a Broody Chicken
Creating the right setup inside your chicken coop isn’t just about ticking boxes—it’s about giving your flock a safe, healthy, and comfortable home.
With proper ventilation, sturdy roosting bars, cozy nesting boxes, clean bedding, and solid flooring, you’re laying the foundation for happy hens and fresh eggs.
Add a few optional extras like enrichment toys or a first aid shelf, and avoid common mistakes like keeping water or feed inside the coop, and your setup will be even better.
Khaja Moinuddin, a computer science graduate, finds joy in gardening and homesteading. Join him on this blog as he shares his experiences in homesteading, gardening, and composting

After a month or so, they should be well established and you don’t need to add water unless the soil dries out.
However, if it’s the flowers you’re after, the soil shouldn’t be allowed to dry out completely.

Some gardeners opt to let the soil dry out as a method of controlling the spread since no flowers means no seed-filled burrs.
If the plant is spreading into an area where you don’t want it, let the plants dry out as much as possible.
There’s no need to feed your agrimony. It’s fine without any added nutrients.
Most species of Agrimonia look similar and can be grown in the same way, but it helps to know a bit about each one.
Swamp or small-flowered agrimony (A. parviflora), sometimes called harvestlice, is considered a noxious weed in many areas.
With its tiny, less showy flowers and invasive tendencies, it’s best avoided.
Common agrimony (A. eupatoria) is the species typically called church steeples for its tall stems of flowers.

It’s the species most commonly cultivated in home gardens. That’s partially because the flower stalks are dense and showy, and they appear from June through September.
You can find packets of 10 seeds available from Earthbeat Seeds.
Tall or hooked agrimony (A. gryposepala) grows wild in disturbed areas and, as the name suggests, can grow over five feet tall.
The undersides of the leaves and stems have faint hairs. This species is native to North American woodlands and was an important plant used medicinally by indigenous people.
Fragrant agrimony (A. procera, syn. A. odorata) stands out not just for its size, reaching about three feet tall before flowering, but for its strong, pleasant scent.

It’s the only species in the genus with a noticeable fragrance, produced by glands on the undersides of the leaves.
Visually, it resembles common agrimony and often grows in the same habitats.
The easiest way to distinguish it is by scent, though the leaves are also more finely serrated if you take a closer look.
The leaves of A. pubescens aka downy agrimony are hairy on the undersides, inspiring its common name.

Welcome to Well Rooted Wellness, your transformative journey towards holistic wellness and personal growth. We are an online learning platform that believes in the power of interconnectedness between the mind, body, and environment. Our mission is to empower individuals like you to lead fulfilling lives by nurturing these essential connections.
Contact us: contact@yoursite.com
© Copyright - wrwofficial.com - 2025
