The most popular choices for the home gardener are hybrids typically classified as G. × hortulanus.
These are divided into three main groups, all with an extensive range of flower colors.
Grandiflora hybrids, G. grandiflora, produce large, funnel-shaped and ruffled blooms four to six inches wide on tall spikes three to six feet tall with up to 30 flowers per scape.
Nanus hybrids are miniature varieties with small, trumpet-like blooms three inches wide on scapes that grow up to two feet tall.
Primulinus hybrids, G. dalenii, have loose, hooded flowers two to three inches wide on scapes up to three feet tall and often feature contrasting throat blotches.
Dwarf varieties typically grow in the range of 12 to 36 inches tall and make a handsome, upright choice for containers.
Nanus types are popular miniature varieties with soft, pastel colors on scapes that grow up to 24 inches tall.
They also have better cold hardiness than standard varieties and are suitable for cultivation in Zones 5 to 10.
Here are some varieties to consider:
Charming Lady
‘Charming Lady’ is a nanus type with beautiful, bubblegum pink blooms.
If you opt to grow dwarf varieties that top out in the range of 12 to 36 inches tall, pots with a minimum of 12 inches in diameter and height are suitable.
Standard varieties grow much taller, and these need taller pots for a couple of reasons.
The first is that shallow pots make it too easy to overwater the corms, which can lead to root rot and bulb collapse.
Another reason is that taller pots are needed to balance the impressive height, which can look top-heavy in small vessels.
For a visually pleasing look, aim to use containers that are roughly one-and-a-half to two-and-a-half times shorter than the mature plants.
For example, if your plants grow five to six feet tall, choose a pot that’s in the range of 18 to 30 inches in height.
This size helps to anchor the overall appearance and provides a satisfying, harmonious sightline.
Containers can be made of any type of material such as ceramic, fiberglass, hypertufa, terra cotta, or wood.
However, if you plan to overwinter bulbs in their pots, ensure the material can withstand the low temperatures your region experiences.
A fast, furious, embodied and empowering birth – sharing River’s birth story in its entirety!
Let me start off with a little back story for context. On Friday, December 27th, at 30 weeks pregnant, I found out I had gestational diabetes. I was shocked, confused, angry, sad, in denial, scared…As someone who has worked really hard to find peace with food, I was upset about having to be more rigid with what I was eating.
ESPECIALLY because Steve and I had our baby moon to the Bahamas planned that following week. A baby moon spent pricking my fingers 4x/day, stressing over blood sugar levels, and skipping the virgin pina coladas?! I didn’t skip the coladas but I also stressed way too much about food and my sugars and it put a big damper on our getaway. Needless to say, I want a redo someday on the carefree Bahamas vacay.
Once we got back home and into our routine, I was able to manage my post meal sugars well but my fasting sugars always hovered around 93-100 (they wanted them below 95). We took a wait-and-see approach for needing to start nighttime insulin.
I really didn’t want to start insulin because then I would’ve been induced at 39 weeks and I’d have to switch my care from my certified nurse midwife who I had a relationship with to an OB who I never met before. This was the practice’s standard protocol.
As we approached 37/38 weeks, my fasting sugars started to creep up a little more. I’d have 3 days of slightly elevated fasting levels and then 4 days of normal levels. My endocrinologist and later a MFM doctor told me I was very borderline for starting insulin and my endocrinologist didn’t really seem to know what to recommend “well, what did MFM say?” “She said to refer to you!” Gotta love too many cooks in the healthcare kitchen.
At 38 weeks and 4 days I was STRESSIN. I had my midwife appointment the next day and I didn’t have a clear picture of what was going to happen (I mean when it comes to childbirth do we really ever? no). But I wanted to know was I going to get induced in 3 days? Would I start on insulin for a few days before getting induced?
My anxiety started to get the best of me – I wanted to make “THE RIGHT” decision that would be the least risk to me and my baby. Between the gestational diabetes and testing positive for Group B Strep, I was worried that something was going to go wrong.
So I sent long winded messages to my endocrinologist and MFM doctor (who I previously met with because of a growth ultrasound that was concerning) trying to get more information so I could make an informed decision. I was also aggravated that my care couldn’t be more coordinated. Why cant ya’ll collaborate on my case and tell me your team recommendation?
38 weeks and 4 days was a Thursday. My last day of seeing my private practice clients and my second to last day of work. I had planned to do a bunch of admin / tying up loose ends work on Friday. And then the hope was I would have a week off before baby came. I scheduled some self care for that weekend and upcoming week.
JOKE’S ON ME.
I swear it’s as if River knew I was stressing and was like girl I got you. Let me make this decision for you.
That night I went to bed like any other night, uncomfortable with pubic symphysis pain, but nothing felt different (side note: Steve claims he had a sense that I was going to go into labor that night when I went up to bed).
At 3:40 AM, I woke up and felt a little crampy. I was like hmmm this feels a little different and also vaguely familiar (to 4 years ago when I woke up at 2am feeling crampy the night I went into labor with Luca). So I stood up to use the bathroom (as one does in the middle of the night when they are 38 weeks preggo).
And when I stood up, water leaked out. I’m like oh shit. But this time it wasn’t an obvious gush of water (like I had with Luca) but it was more than a trickle. And as someone with good bladder control, I’m like that didn’t feel like me peeing myself lol.
So I went to the bathroom, actually peed, checked my undies and I was like hmmm that looks clear but a little too shiny to be pee.
I walked out of the bedroom calling for Steve (he was in Luca’s room because we have a toddler that doesn’t like to sleep through the night alone). “Can you come here?” He knew. He said he knew as soon as he saw I turned on the light in our bedroom lol.
Now if you’ve never heard or read Luca’s birth story, you have to know this. Luca came unexpectedly fast. My entire labor was 4.5 hours start to finish. And they say your second comes even faster. Logistically, this time around was more complicated too. We needed someone to stay with Luca and we moved to the burbs last fall so we were about 30 minutes from friends and 30 minutes from the hospital (with little to no traffic).
Because of my fast labor with Luca, I was told to pretty much go right to the hospital at a first sign of labor. I told Steve to call our friends Lauren and Brent who were the first on our “on call” list of generous friends who volunteered to help out with Luca if I went “early”. Meanwhile, I called my midwife practice.
The midwife who called me back clearly didn’t read my chart before she called. She asked questions about my water breaking. “Usually it’s a gush”. I know, I know. But I told her it wasn’t a trickle and I was pretty certain it wasn’t pee. She told me I could put on a pad and if it was my water breaking, I would see more coming out onto the pad. She said I could wait an hour and see if I start having regular contractions (I was only having mild cramping at that time).
I told her that I had a really fast labor with my first and she paused and she’s like “oh, oh okay. I’m just reading your chart and yes I see that now. There’s a note that says tell her to come to the hospital when she calls” (LOL). She’s like “okay actually I think you should just come right in then.”
As we waited for our friend to arrive to our house while Luca slept, we gathered our (packed, thankfully) hospital bags and last minute things like my bed pillow. I changed out of my PJs and into comfy clothes. Steve and I shared words about how we “weren’t ready” and had work to do that day. I told him I had to transfer my website management to a different agency today.
I started getting contractions and opened up a contraction timer app to see if they were happening regularly, and sure enough they were, every ~ 3 minutes. Yes, within ~10 minutes I went from mild cramping to regular contractions every 3 minutes. Told ya I labor fast.
Our friend, Brent, made it to us in record time – 20 minutes! Thank goodness for going into labor in the middle of the night and there being no cars on the road.
We told him what time Luca might wake up, told him to make himself at home, he wished us good luck, and we were on our way.
As soon as we got into the car, I texted my Mom and Dad (who were also on call) at 4:12AM and said “Heading into the hospital. Think it’s happening. Will keep you posted.” Also while in the car, I busted out my business credit card and purchased the plan for my new website management agency (because my other agency was scheduled to exit the site that day). Nothing like a little last minute work while speeding to the hospital to give birth!
We arrive at Newton Wellesley Hospital, also in record time, thanks to Steve speeding and it being 4 in the morning. We park in the ER parking lot because the entrance to Labor & Delivery (L&D) ward is locked after hours. It feels a little like deja vu honestly. We arrived to the same lot around the same time in the middle of the night as my first labor.
We get out of the car, Steve grabs our bags, and we walk toward the ER entrance, stopping a couple times on the way for me to work through contractions.
The staff member at the entrance just stares at us as we walk in. Steve says “labor and delivery?” And he points down the hall and gives us directions on how to get to the L&D ward. I’m like that’s weird I remember being wheeled in a wheelchair to L&D last time. But we start walking down the hall, me crouching over in pain, until a woman calls after us. “Excuse me, are you IN labor?”
UH YAH.
“Sorry, come this way, we need to check you into triage.”
They check me in. We do some admin paperwork. They page L&D. Check my vitals. Then the L&D nurse comes to get me with a wheelchair (THERE SHE IS – the wheelchair, not the RN). Actually I don’t even know if she’s a nurse or who she is because I’m pretty sure she doesn’t introduce herself or maybe she does and I’m starting to be in my labor third dimension. But I honestly thought she was an aid until she started poking my veins in antenatal.
They wheel me to the antenatal room and they’re asking me medical questions and about my birth plan and trying to put an IV in in-between contractions. They stick me with the needle. Blow my vein. Oh I’m sorry we’re going to have to do that again. Contraction. Stick me again. Blow another vein. I’m so sorry. This went on two more times before they finally called in a senior nurse to give me an IV. The nurses in recovery saw my bruised arms and said “honey, what happened to you?!” But seriously, blown veins make some gnarly looking bruises.
At this point I know I’m in labor for real so I tell Steve to text my parents at 5:23AM. “It’s happening Kara requests booking the flight”.
Now the midwife on call, Nicole (goes by Nicki), comes into the room. She’s really bubbly and friendly and positive but not in an annoying way, in a reassuring way. I also can’t stop staring at her sweet sleeve tats. The nurses are asking again about my birth plan (I never gave my midwife my birth plan because she told us we would review it at my 38 week visit – which was scheduled in like 6 hours). They ask me if I want an epidural (which my birth plan says don’t ask me if I want one – I will tell you if I want one). I must have been asked at least 3 separate times if I wanted an epidural.
Nicki, who must have seen my birth plan for Luca in my chart, said “she wants to start with nitrous (oxide gas) first. She had a ‘natural’ birth, no epidural, with her first.” By this time my contractions are pretty intense. The midwife is going to do a cervical check but she’s coaching me through the contractions right now. “Relax your shoulders, relax your jaw…” “You’re doing great, mama.”
Checks my cervix. “You’re 7 centimeters dilated. Fully effaced. You definitely came in at the right time.” She also said she could feel my water bag but wasn’t sure what was going on – that maybe it was partially blocked and that’s why I didn’t experience that full gush.
Nicki tells me we’re ready to go to the L&D room and she’ll see me in there. She tells the nurses she’ll put in the order for antibiotics for my group B strep.
Steve is now trying to coach me through contractions. “Relax,” he keeps saying. Relax. Poor Steve. He’s only trying to replicate what he heard Nicki saying minutes before. But this general statement to “relax” repeated again and again sends me over. I’m like “You gotta stop telling me to relax.” Like I understand the intention but I’m not at the spa babe, I’m in the worst pain of my LIFE. Relaxing? Not in the cards for me right now.
As they push my hospital bed into the L&D room, I start to feel like I could cry. Because I know this is the room where I will meet my son so so soon. It feels oddly nostalgic too – I’ve been here before. This is where the magic happened.
Magic is going to happen again here.
They try to get the nitrous machine. They hook me up to the monitors. Contractions are so painful now. I begin to doubt myself. How much longer is this going to be until I’m fully dilated? I don’t know if I can make it (without an epidural). They wheel the nitrous machine in and hook it up. Then the most piercing annoying loud alarm starts going off on the machine. And I’m trying to relax between contractions. “What is that noise?! Can someone make it stop?!”
The nurse tells another nurse to get the machine out of the room. And to find a different one.
I ask Steve to put on my labor playlist. I need music to help ground me after that alarm shook me.
They bring back another machine. They try to coach me on how to use it. Breathe in and breathe out with your contractions. I breathe in but it’s hard to take a long, full breath. Even harder to breathe out into this mask because my exhale is basically a loud moan / growl / scream? at this point. It’s not helping the pain. I give up on it after a couple attempts.
“Can someone dim the lights?” The nurses look to Nicki, now in the room, for her approval. She nods her head yes.
“I don’t see the order in here,” the nurse says (she’s referring to the antibiotic order). “I put it in.” “It’s not in here.” Nicki leaves to go put in the order again. I was supposed to get this antibiotic asap so it had time to get into my system before I delivered.
When Nicki comes back in, I tell her I think I’m ready to start pushing. My contractions feel different. Way more intense. I feel like I want to bear down. I remember this feeling with Luca. When I was in transition.
She nonchalantly says “I can do another cervical check if you want.” Um YES. She asks if I’m okay if she does it after the next contraction is over. I’m like GIRL LET’S GO.
Around 5:50AM, she checks my cervix. “Yup, you’re fully dilated. Do you feel like you want to start pushing?” Most definitely.
I start bearing down with contractions. I am lying on my left side. The nurse is to the left of me with her medical charting stand so Steve is to my right. Because of this I’m squeezing the heck out of the bed rail, not Steve’s hand this time (lucky Steve’s hand). But he’s coaching me through every contraction. And by coaching I just mean encouraging me I guess? Saying things like “you’re doing great hunny, you got this.”
It feels chaotic around me. The nurses seemed very green and everyone seemed like they were rushing around and confused about this antibiotic order. No one was helping me or asking if I needed anything.
I had to ask myself.
“Can I get some water?”
“Can I get a cold towel for my forehead?” (I be sweatin’)
“Can I get another cold towel for my neck?”
“Can you put on my playlist?”
“Can you dim the lights?”
With Luca, the L&D nurses were way more on top of it. Offering all those things without me asking. Applying counter pressure on my back with contractions.
This time, there was just frantic energy around me. But I was like only half there. I was aware of the chaos around me but also in my own little world too.
“You need to relax your hand,” the nurse says. Then she starts tampering with the IV in my arm. Apparently when squeezing the bed rail, I messed with it and the antibiotic couldn’t be administered. The chaos, I found out later from Steve, was them not being able to figure out why they kept getting an error message for pushing the antibiotic.
One of the nurses asked me if she could lift my upper leg – yes that’s fine. And she started to coach me through pushing. When to breathe in and when to bear down and when to breathe out.
With each contraction, Nicki would say “so intense” “you’re doing awesome.” I appreciated the comment of “so intense”. It was simple but felt like a validation. Yes this is intense. I see you doing the intense thing.
A gush of water. There’s the rest of that bag.
I started to feel a burning sensation but it wasn’t a searing burn like I experienced with Luca crowning. It was a less intense burn.
Nicki said “I see hair!” “Do you want to feel his head?” I reached down and touched the top of his soft head. A internal sigh of relief. A confirmation that we were close to the finish line.
“Okay he’s going to be here with this last push. I need you to give me one more really strong push.”
ARGHHHHHHHHHH I yelled. I pushed hard. I opened. I felt River emerge. But really it kind of feels like an alien is emerging.
At 6:09 AM, I took a breath. River took a breath (he cried).
The cry that floods you with relief. He’s here. He’s okay.
The midwife hands him to me and he lays on my chest. I cry. Sobs of happiness. Sobs of relief.
I did it. I fucking did it.
In that moment, all the hardships of my pregnancy – the intense anxiety, the pain, the nausea, the vomiting, the gestational diabetes, the depression, it all felt worth it. THIS. It was for HIM. And he’s here. On my chest. He is perfection.
I that moment, I fell in love all over again.
I kept saying to River, “You’re here! You’re finally here.” “We did it.”
For nine months my mental health was shit. And now, pure joy and happiness and purpose. The shift in my energy was palpable. Later that day Steve said “it’s nice to see you smile again.” Not that I hadn’t smiled in nine months lol but this smile was different. I couldn’t stop smiling. I was so happy.
Nicki congratulated me on the birth – she was in awe of my fast labor (2.5 hours from start to finish!) and kept saying wow your body really knows how to labor. “You’re a rockstar.” “That was incredible.”
I felt strong. I felt capable. I felt so much gratitude for my body. I also felt in awe of my body and what she was capable of.
With Luca’s birth, I felt scared. I felt disconnected. I felt traumatized afterward.
This labor was even faster and more furious and yet, I felt more empowered and embodied. I felt like a badass. I just had another unmedicated birth where I got to feel everything and be in my body (not that there is anything wrong with a medicated labor).
I rode that high for the rest of my hospital stay.
My umbilical cord was still pulsating for a bit so they delayed cord clamping until it was done and then Steve helped cut the cord. Nicki told me I didn’t have any tearing this time (I had three tears with Luca). “Seriously?!”, I said. “That’s amazing.” She said Luca helped pave the way for River.
They gave me a shot of Pitocin to help stop the bleeding.
One of the nurses asked me if I wanted to see my placenta. Normally I’m not into this sort of thing. Blood skeeves me out. But I had just finished reading a chapter all about the placenta in Like a Mother: A Feminist’s Journey through the Science and Culture of Pregnancy by Angela Garbes so was intrigued to see it. It was huge. She showed me the side that faced me and the side that faced baby. She showed me what they refer to as ‘the tree of life”, a branch of blood vessels on the fetal side of the placenta.
Birthing bodies are incredible.
I’m so grateful that River’s birth unfolded the way it did. That labor started in the middle of the night so we could get the care we needed and to the hospital quickly and safely (if this happened during rush hour traffic, I would’ve had him in the car!). That my body and River made the decision for when labor would start and that it happened spontaneously.
I’m grateful for my birth with Luca so that I felt more mentally prepared for a fast and furious labor this time. Grateful for my body, for my physical and mental strength, for Steve and my midwife. Grateful for our friends and family who were on call to help us.
I’m grateful to have had an empowering and embodied birthing experience.
On February 28th, at 6:09AM, River Avery was born. And my heart forever expanded.
For more pregnancy-related content check out my posts below:
Who doesn’t love ice cream on a hot summer day? Even if you’re avoiding dairy, there’s no reason to miss out! I first learned to make homemade ice cream when we were avoiding dairy for my son years ago. Even though I’ve added some dairy back into my diet, this dairy-free mint chocolate chip ice cream recipe is still a family favorite.
This mint chocolate ice cream gets its creaminess from coconut milk and avocado. Since making ice cream is on our summer bucket list, I’m glad to have an ice cream recipe full of nutrients and healthy fats for the kids to enjoy.
I Scream, You Scream, We All Scream For… Avocado Ice Cream?
Instead of whipping cream or heavy cream, this mint chip ice cream gets its creaminess from avocadoes.
Avocados have such a mild taste and creamy texture that they’re perfect for desserts. I’ve used them before in cucumber lime veggie smoothies and real food shamrock shakes. Whenever I find a good deal on avocados, I know it’s time to stock up and make chocolate mint ice cream (and maybe some avocado brownies too).
Another reason avocados work so well for mint chocolate chip ice cream is the light green color they naturally add. It’s not bright like the green food coloring found in store bought versions though (which is probably a good thing!).
Homemade Mint Chocolate Chip Ice Cream With Coconut Milk
To make the ice cream, I simply puree everything except the chocolate chips together in a blender and then pour it into the ice cream maker. I add the chocolate chips once it starts to thicken. If you don’t have an ice cream maker you can freeze it without one, just stir it occasionally until it thickens.
You can use either semi-sweet chocolate chips or dark chocolate for this. You can even use a chopped chocolate bar. The little bits of chocolate add a nice crunchy texture the the smooth ice cream. I always opt for a darker chocolate since it has more health benefits and less additives.
This homemade version skips the granulated sugar and instead uses a touch of raw honey to sweeten. You can even make your own mint extract with fresh mint to add to this.
Here’s how to make your own (healthy!) mint chocolate chip ice cream the whole family will love!
Homemade Mint Chocolate Chip Ice Cream Recipe
Make dairy-free mint chocolate chip ice cream at home with coconut milk, avocado, and honey.
Place all the ingredients except the chocolate chips in a blender and puree until smooth.
Pour the mixture into an ice cream maker and churn until thickened.
Add the chocolate chips and churn 2 minutes more.
The ice cream will be a very soft texture at this point. You can either serve immediately as soft-serve or pour into a freezer safe bowl and freeze until ready to use.
Allow to thaw at room temperature for 10-15 minutes before serving.
Enjoy!
Nutrition Facts
Homemade Mint Chocolate Chip Ice Cream Recipe
Amount Per Serving (0.5 cups)
Calories 305 Calories from Fat 189
% Daily Value*
Fat 21g32%
Saturated Fat 13g81%
Cholesterol 3mg1%
Sodium 27mg1%
Potassium 356mg10%
Carbohydrates 29g10%
Fiber 4g17%
Sugar 23g26%
Protein 3g6%
Vitamin A 110IU2%
Vitamin C 5.5mg7%
Calcium 34mg3%
Iron 2.1mg12%
* Percent Daily Values are based on a 2000 calorie diet.
Taste after step 1 and add more peppermint extract if desired.
If you do not have an ice cream maker, add the chocolate chips and put into a freezer safe bowl and into the freezer. Stir every 30 minutes until thickened.
More Homemade Ice Cream Recipes
If you’re in the mood for some more ice cream, homemade versions beat the ones from the grocery store hands down. You might even like them more than your favorite ice cream from the local ice cream shop! Here are a few recipes to try.
What are your favorite ice cream flavors? Tell me about it below!
At the end of last year we were introduced to Karen Safford’s stunning garden in Bend, Ore., (check that post out here: Karen’s Oregon Garden Through the Seasons). Karen’s gardens are relatively new—she moved to her property less than 5 years ago—but she has already thoughtfully and beautifully mixed many ornamentals and natives to accommodate the dry conditions and tough terrain of the high desert. Last time we got a great overview of her diverse plantings through the seasons; today we get to see some other areas in the garden in their spring glory.
Hi! I submitted part of my garden through the seasons last year. I’m sending some photos of other areas of my garden as early spring flowers wind down here in the high desert of Oregon. All of my plants are low water and on a drip system. I have a mix of ornamentals and native plants. My intention is to water my ornamental beds twice a week and my native beds once every couple of weeks, dependent on how hot the summer ends up being. I’m trying to make as many pollinators and birds as happy as possible, so I’ve got a lot of natives mixed in. We are now technically Zone 6a, but everything I’ve learned is that because of our freeze-thaw cycle, which can last all summer long, we should really plant for much colder— Zone 4 or 5.
As I mentioned last time, I live in the high desert and have a lot of lava rock in my yard. All of the rock in the pictures is from my yard— nothing was outsourced other than flagstone. This is one of my wetter beds. I have Jack Frost brunnera(Brunnera macrophylla ‘Jack Frost’, Zones 3–7), hosta, Johnson Blue geranium (Geranium ‘Johnson’s Blue’, Zones 4–8), lambs’ ear, and creeping Veronica cascading down the rocks.
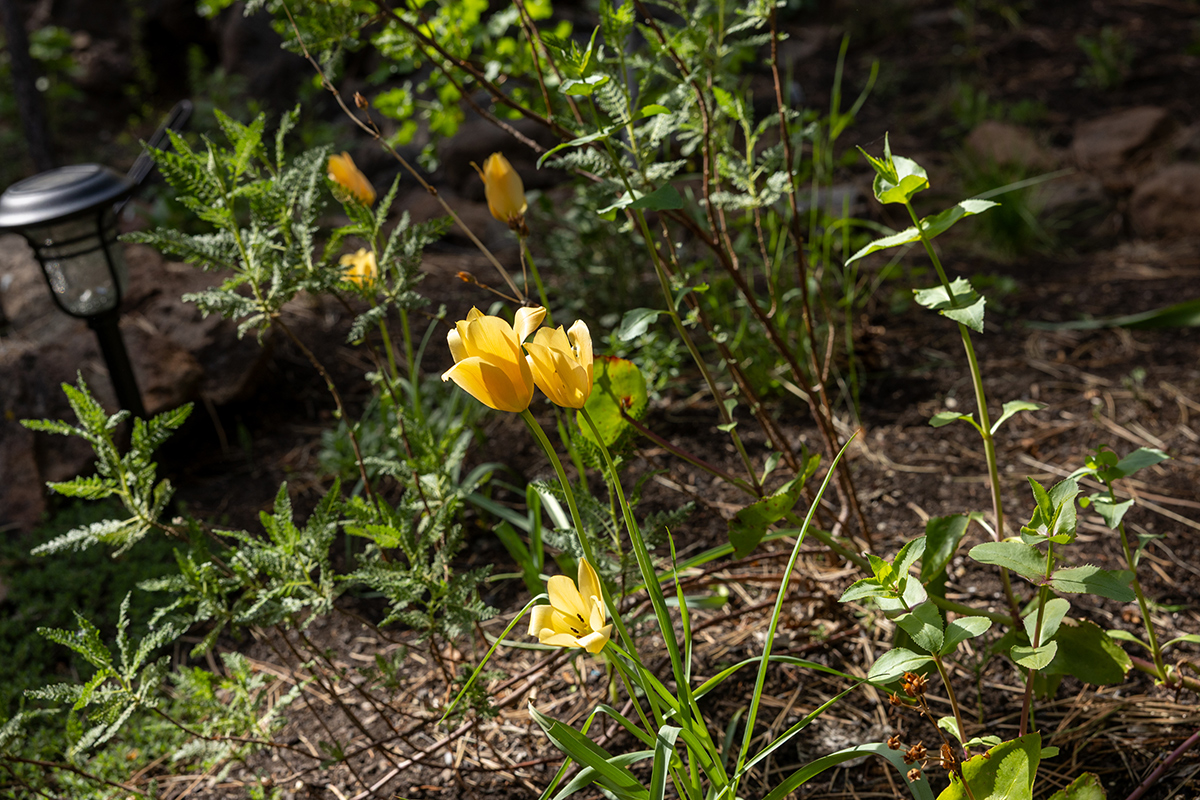
Wild flower tulips(Tulipa sylvestris, Zones 4–8)mixed in with my fern bush(Chamaebatiaria millefolium, Zones 4–9)and desert penstemon(Penstemon pseudospectabilis, Zones 5–9)
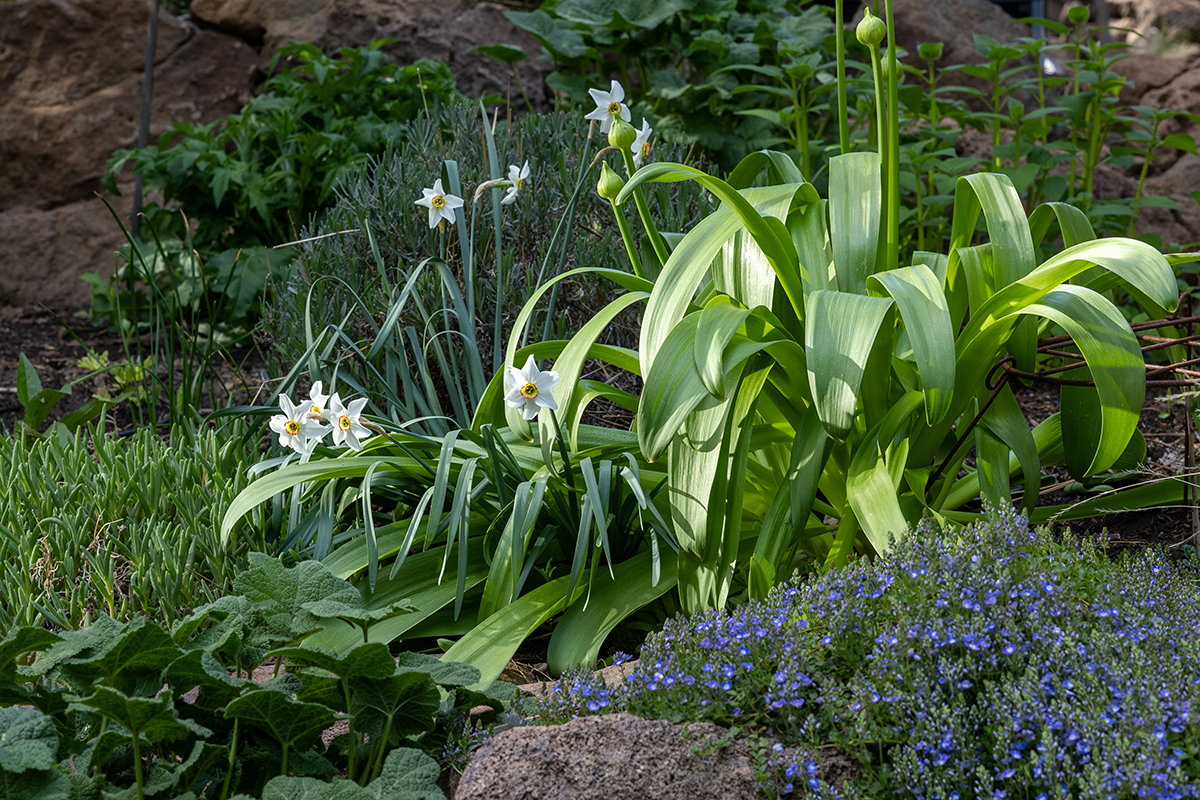
Ice plant (Delospermaspp. and cvs., Zones 6–10), poet’s daffodil(Narcissus poeticus, Zones 3–8), Globemaster allium(Allium ‘Globemaster’, Zones 5–8), hollyhock, and creeping Veronica; globe thistle(Echinops spp. and cvs., Zones 3–8),and phenomenal lavender in the background
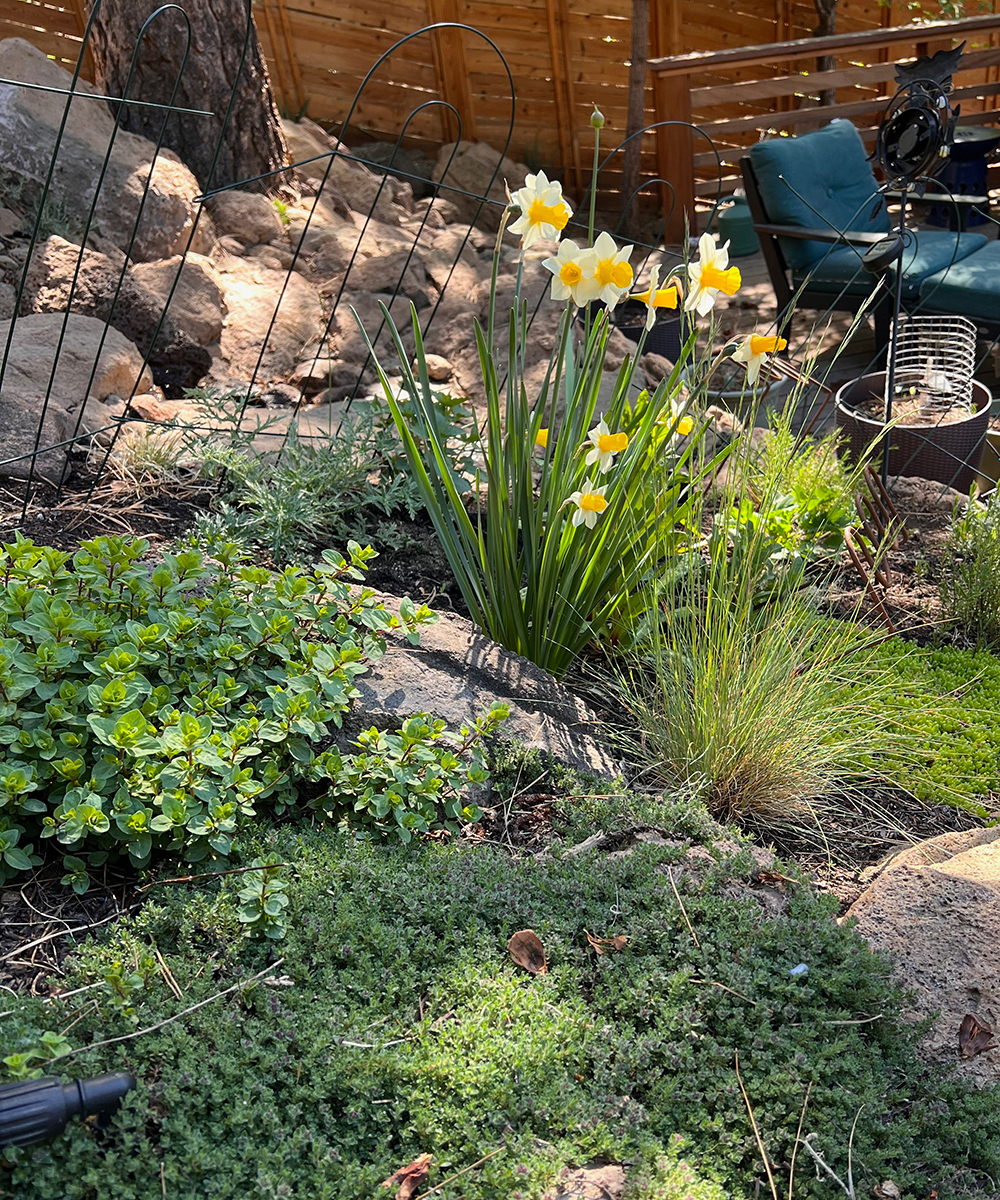
Near our water feature (the fencing is to keep the dogs from tearing through the fountain and wiping out my plants): Creeping thyme(Thymusspp. and cvs., Zones 4–9), hopflower oregano(Origanum libanoticum, Zones 5–9), globe thistle(Echinops ritro, Zones 3–8), Golden Echo daffodil(Narcissus ‘Golden Echo’, Zones 5–8), blue fescue(Festuca glauca, Zones 4–9), and yellow ice plant
This is the area I featured last year. Everything is filling in and looks lovely in the evening light.
Down one of my garden paths—this divides my rock garden to the left with my native beds to the right, with my dog Winston on the path.
Final photo—our water feature—this was made with rocks from our lot. There is a vacation rental behind our house and this helps dampen any noise; it’s like having a giant white-noise machine. It often has birds or dogs taking baths in it. It is flanked by native penstemons, a native juniper plant, yarrow, lavender, serviceberry, gray creeping germander (Teucrium aroanium, Zones 5–10), Blonde Ambition blue grama grass(Bouteloua gracilis ‘Blonde Ambition’, Zones 4–9), Blue Boa agastache(Agastache ‘Blue Boa’, Zones 5–9), stonecrops, and ice plants. I’m hoping this is the year that this garden really takes off.
Thank you so much for another fabulous tour of your garden, Karen! Your unique landscape presents plenty of challenges, but it also allows you to create a fascinating garden full of natural interest.
We’ve seen an incredible mix of spring gardens so far this season, but there is always room for more. If you’ve been considering sharing some photos with the blog, here’s your sign to send them in. Follow the directions below to submit photos via email, or send me a DM on Instagram: @agirlherdogandtheroad.
We want to see YOUR garden!
Have photos to share? We’d love to see your garden, a particular collection of plants you love, or a wonderful garden you had the chance to visit!
To submit, send 5–10 photos to [email protected] along with some information about the plants in the pictures and where you took the photos. We’d love to hear where you are located, how long you’ve been gardening, successes you are proud of, failures you learned from, hopes for the future, favorite plants, or funny stories from your garden.
Do you receive the GPOD by email yet? Sign up here
Fine Gardening Recommended Products
The Regenerative Landscaper: Design and Build Landscapes That Repair the Environment
Fine Gardening receives a commission for items purchased through links on this site, including Amazon Associates and other affiliate advertising programs.
2024 Nautilus Award Gold Medal Winner! This awe-inspiring guide weaves together permaculture design, food resiliency, climate adaptation, community organizing, and indigenous wisdom that you can implement in your own backyard.
Berry & Bird Rabbiting Spade, Trenching Shovel
Fine Gardening receives a commission for items purchased through links on this site, including Amazon Associates and other affiliate advertising programs.
Ideal Tool for All Gardeners Use: Our heavy duty trenching shovel is designed by a professional gardening tool designer. Lifetime Durability: This heavy duty drain spade is made of high-quality stainless steel, it is very strong and durable, even if it is used for high-strength work, it will not bend. Ergonomic Wood Handle: The handle of this planting spade is made of ash hardwood harvested from FSC-certified forests and has an ergonomically streamlined design, making it very suitable for everyone’s hands. Multi-Use: This digging shovel is generally used for digging trenches, digging holes, transplanting, edging, moving compost, cutting thick turf and furrowing. The sharp blade allows you to cut, scoop, dig, lift and dice in hard soil.
Corona E-Grip Trowel
Fine Gardening receives a commission for items purchased through links on this site, including Amazon Associates and other affiliate advertising programs.
Handle Material: Aluminum. Handle Length: 14-1/2 in. Overall Length: 14.5 in. Head Material: Aluminum. Handle Color: Red.
The CDC is removing recommendations that children and pregnant people get the COVID vaccine.
Jane Tyska/Digital First Media/Media News Group/Getty Images
hide caption
toggle caption
Jane Tyska/Digital First Media/Media News Group/Getty Images
The federal government has removed COVID-19 vaccines from the list of shots recommended for healthy pregnant women and children, federal health officials announced Tuesday.
“I couldn’t be more pleased to announce that as of today the COVID vaccine for healthy children and healthy pregnant women has been removed from the CDC recommended immunization schedule,” Health and Human Services Secretary Robert F. Kennedy Jr. announced in a video posted on X. “We’re now one step closer to realizing President Trump’s promise to make America healthy again.”
The decision will make it much harder for parents to get their children vaccinated and for pregnant people to get the shots because insurance companies will likely no longer pay for them.
“Last year the Biden administration urged healthy children to get yet another COVID shot despite the lack of any clinical data to support the repeat booster strategy in children,” Kennedy said.
In announcing the decision, Kennedy was flanked by Food and Drug Administration Commissioner Dr. Martin Makary and National Institutes of Health Director Dr. Jay Bhattacharya.
“It’s common sense and it’s good science,” Bhattacharya said.
“There’s no evidence healthy kids need it today and most countries have stopped recommending it for children,” Makary added.
The decision was apparently made without the usual input from independent outside advisers. Although independent advisers have been reconsidering the COVID vaccine recommendations, the Center for Disease Control and Prevention’s Advisory Committee on Immunization Practices isn’t scheduled to meet until later this month to make a recommendation.
In response to questions on this issue, Department of Health and Human Services press secretary Vianca N. Rodriguez Feliciano shared the following statement: “HHS and the CDC remain committed to gold standard science and to ensuring the health and well-being of all Americans—especially our nation’s children.”
Since the vaccines became available, the government has been recommending the shots for nearly everyone, including children and pregnant people. Although children don’t tend to get seriously ill from COVID, some do, especially very young children, and pregnant women remain at high risk for serious complications from the virus.
Vaccinating pregnant women also protects newborn babies, who can’t get vaccinated themselves but are at very high risk for serious complications from the virus.
“It’s really concerning,” Dr. Sean O’Leary, who chairs the American Academy of Pediatrics’ Committee on Infectious Diseases, told NPR. “I think it’s going to be confusing not only for parents but also for public health professionals and medical professionals as well. This takes away choice.”
Dr. Steven J. Fleischman, president of the American College of Obstetricians and Gynecologists said his organization is “extremely disappointed” by the removal of the recommendation for COVID shots during pregnancy.
“As ob-gyns who treat patients every day, we have seen firsthand how dangerous COVID infection can be during pregnancy and for newborns who depend on maternal antibodies from the vaccine for protection,” he said in a statement. “The science has not changed. It is very clear that COVID infection during pregnancy can be catastrophic and lead to major disability.”
The announcement comes a week after the administration made changes that could dramatically restrict the availability of the next round of COVID boosters. The government will now require additional testing for the vaccines to be approved for use by anyone other than people who are at high risk from COVID because they are age 65 or older or have risk factors for other health problems.
Weeds are nightmare for gardeners! They rob resources like water, sunlight and nutrients from your plants.
Apart from occupying your valuable gardening space, weeds harbor pest’s growth that can stunt plant growth.
Off-course, you can use herbicides, but there are more natural ways to get rid of weeds.
Growing ground cover plants will not just suppress weed growth; it prevents soil erosion and transforms your landscape.
These low-maintenance plants are considered best way to add aromatic and vibrant colors to your leftover garden space.
Creeping Jenny, Ice Plant, Sweet Woodruff, Coral Bells, Wild Ginger, Bugleweed, Hardy Geraniums, and Irish Moss are few prominent ground cover plants that can prevent weed growth.
Benefits of Ground Cover Plants
Ground cover plants are low-growing, spreading plants that fill in gaps in your garden and carpet the soil with attractive foliage, flowers, or both. Unlike traditional lawn grass, these plants offer a diverse array of colors, textures, and heights, creating a dynamic and functional layer in the landscape.
One of the primary benefits of ground covers is their ability to suppress weed growth. By forming a dense mat over the soil, these plants outcompete weeds for essential resources like sunlight, water, and nutrients—making it hard for unwanted invaders to take root.
Ground cover plants also help in preventing soil erosion. Their sprawling roots hold the soil firmly in place, especially on slopes or areas prone to runoff. This stabilizes the landscape and improves long-term soil health.
Another major perk is their low-maintenance nature. Most ground covers require minimal watering, trimming, or fertilizing once established. Many are drought-tolerant and can thrive in areas where grass struggles to grow.
Beyond practicality, ground covers are also decorative. From the golden hues of Creeping Jenny to the soft greens of Irish Moss, they bring life and color to empty patches, walkways, and shady corners—turning dull spaces into lush green beds.
25 Best Ground Cover Plants
If you’re tired of weeding and looking for a beautiful yet functional solution, ground cover plants might be your garden’s new best friend. These plants don’t just add charm—they work hard too. Whether you’re filling in awkward spaces, covering slopes, or replacing high-maintenance lawns, there’s a ground cover plant suited for every purpose and condition.
In this guide, we’ll explore 25 of the best ground cover plants—ranging from sun-lovers to shade dwellers, and evergreens to seasonal bloomers. No matter your gardening zone or landscape design, there’s a ground cover here to beautify your yard while keeping weeds at bay.
1. Nepeta
Nepeta is a fast-spreading perennial that acts as a natural weed barrier thanks to its dense, low-lying foliage.
As it matures, it forms a thick, fragrant mat of silver-green leaves and soft lavender-blue flowers that choke out weeds by shading the soil and limiting available space for invasive plants to grow.
Its strong scent also helps deter certain pests, making it doubly beneficial in the garden.
Nepeta thrives in full sun but tolerates partial shade. It prefers well-draining soil and is highly drought-tolerant once established, making it a fantastic option for dry or rocky areas where grass struggles to grow.
Plant it in the spring or early fall, and space clumps about 18–24 inches apart to allow room for spreading.
It’s hardy in USDA Zones 3–9 and requires minimal maintenance—occasional pruning keeps it tidy and encourages re-blooming.
2. Creeping Thyme
Creeping Thyme is a fragrant, mat-forming herb that works wonders in weed suppression. Its dense, evergreen foliage quickly spreads over open soil, creating a living mulch that blocks light and space needed by weeds to thrive.
When it blooms, it produces a carpet of tiny purple or pink flowers that attract pollinators and add a burst of color to pathways and borders.
This plant prefers full sun and well-drained soil, thriving even in poor, rocky conditions. It’s highly drought-tolerant and thrives with minimal care once established.
Creeping Thyme is hardy in USDA Zones 4–9 and makes an excellent ground cover between stepping stones or as a lawn alternative. Plant it in spring, spacing 12–18 inches apart, and enjoy its soft texture and pleasant aroma.
3. Sweet Woodruff
Sweet Woodruff forms a lush carpet of whorled green leaves topped with tiny white star-like flowers in spring.
It naturally deters weeds with its thick coverage, especially in shaded areas where other plants may struggle. Its fresh, hay-like scent adds a pleasant fragrance, and it’s often used as a natural moth repellent.
It grows best in partial to full shade and prefers moist, well-draining soil rich in organic matter. Sweet Woodruff is perfect for woodland gardens or under trees and is hardy in USDA Zones 4–8.
Once planted, it spreads steadily, requiring little maintenance beyond occasional thinning if it becomes too aggressive.
4. Dead Nettle (Lamium)
Dead Nettle is an excellent ground cover for shady spots, producing attractive foliage with silver or variegated patterns that outcompete weeds by forming a dense, light-blocking mat.
Its small purple, pink, or white flowers bloom throughout the growing season, providing visual interest and pollinator value.
It grows well in partial to full shade and thrives in moist, well-draining soil. Dead Nettle is suitable for USDA Zones 3–8 and works well in woodland gardens, under shrubs, or in difficult corners. It requires little more than occasional trimming to keep it neat and prevent excessive spreading.
5. Sedum
Sedum is a low-growing succulent that forms tight clusters of fleshy leaves, ideal for suppressing weeds in dry, sunny spaces.
Its water-storing capabilities and shallow root system allow it to thrive in tough conditions while keeping soil cool and shaded, making it difficult for weeds to germinate.
It grows best in full sun and sandy or rocky, well-drained soil. Sedum is highly drought-resistant and requires almost no maintenance. Hardy in USDA Zones 3–9, it’s great for rock gardens, slopes, and borders. Many varieties also bloom with star-shaped flowers in summer, adding bonus beauty.
6. Lamb’s Ears
Lamb’s Ears earns its name from its soft, fuzzy, silvery leaves that form a thick, velvety blanket over the soil. This dense matting blocks sunlight and space that weeds need to grow, making it a decorative and effective weed deterrent.
Its silvery foliage adds contrast in the garden, and occasional purple flower spikes add vertical interest.
Lamb’s Ears thrives in full sun and well-drained soil, tolerating drought and heat once established. It prefers drier conditions and doesn’t do well in high humidity or wet soils. Hardy in USDA Zones 4–9, it makes an excellent edging plant or filler in sunny garden beds.
7. Creeping Phlox
Creeping Phlox forms a vibrant carpet of flowers in spring, ranging from pink and purple to white and blue.
Its dense, needle-like foliage covers the ground year-round, crowding out weeds with its vigorous spreading habit. When in bloom, it’s not only a weed deterrent but a show-stopping floral ground cover.
It grows best in full sun and well-draining soil, tolerating sandy or rocky conditions. Creeping Phlox is drought-tolerant and thrives with minimal maintenance. Ideal for slopes, rock gardens, or front borders, it’s hardy in USDA Zones 3–9 and should be planted in early spring or fall.
Epimedium is a shade-loving ground cover that forms clumping, heart-shaped leaves which expand into a weed-smothering layer.
It’s especially useful under trees or in dry shade, where it naturally prevents weed growth with its dense foliage and early-season flowers in delicate hues of yellow, pink, or purple.
It prefers partial to full shade and tolerates dry, poor soils once established. Epimedium is hardy in USDA Zones 5–9 and has a slow but steady spreading habit. It requires very little maintenance and can be cut back in late winter to encourage fresh new growth in spring.
9. Mondo Grass
Mondo Grass, though grass-like in appearance, is a hardy perennial that spreads slowly by underground rhizomes. Its tufts of dark green, strappy leaves grow close together, creating a thick mat that suffocates weeds and fills in bare garden patches with a tidy, low-maintenance look.
It tolerates full sun to full shade but grows best in partial shade with moist, well-drained soil. Mondo Grass is hardy in USDA Zones 6–10 and is often used for edging pathways, planting under trees, or creating evergreen ground cover in tricky spots.
10. Amethyst in Snow
Amethyst in Snow offers more than just weed control—it provides striking contrast with white petals and deep amethyst centers. Its spreading clumps create a dense root system that inhibits weed growth, especially in borders and open spaces where its bold blooms can shine.
It prefers full sun and well-drained soil and is drought-tolerant once established. Hardy in USDA Zones 3–8, this perennial wildflower-style ground cover adds color, pollinator appeal, and weed control all in one. Plant in spring or fall and allow 12–18 inches between plants for spreading.
11. Oregano
Oregano isn’t just a kitchen staple—it’s also a fantastic ground cover that suppresses weeds with its low, spreading habit and fragrant leaves. Its quick-growing foliage forms a thick blanket over soil, outcompeting weeds while offering the added benefit of culinary use.
It thrives in full sun and well-drained soil and is quite drought-tolerant once established. Oregano is hardy in USDA Zones 5–10 and makes an excellent choice for herb gardens, borders, and between stepping stones. Cut it back occasionally to encourage dense growth and prevent flowering if you prefer more leaf production.
12. Lavender
Lavender offers beauty, fragrance, and function. With its silvery-green leaves and spikes of purple blooms, it creates a visually appealing ground cover that repels pests and smothers weeds with its dense, woody stems. Plus, its natural oils deter deer and rabbits.
Lavender thrives in full sun and dry, well-drained soil. It prefers a more alkaline pH and should not be overwatered.
Hardy in USDA Zones 5–9, lavender is perfect for borders, slopes, and dry landscapes. Space plants about 12–18 inches apart and prune after flowering to keep the shape compact.
Irish Moss creates a lush, soft carpet of bright green that spreads low and dense, eliminating weed growth by denying light and space. It forms a smooth, cushion-like cover that’s perfect for filling cracks, edging paths, or adding softness around stones.
It prefers partial shade to full sun in cooler climates and moist, well-drained soil. Irish Moss is hardy in USDA Zones 4–8 and needs regular moisture, especially during dry spells. It’s ideal for cool, damp spots where other ground covers might fail.
14. Ajuga (Bugleweed)
Ajuga is a vigorous ground cover that forms dense mats of glossy leaves in shades of green, bronze, or purple. In spring, it sends up short spikes of blue, purple, or pink flowers that pollinators love. Its aggressive spread smothers weeds effectively.
It prefers part shade but can tolerate full sun with enough moisture. Ajuga grows best in moist, well-drained soil and is hardy in USDA Zones 3–10. Plant it where its quick spread won’t interfere with other delicate plants, such as under trees or along shady paths.
This sunny ground cover gets its name from its brilliant yellow spring blooms. Basket-of-Gold forms low, dense mounds of gray-green foliage that spread quickly, shading the soil and leaving no room for weeds to emerge.
It loves full sun and dry, well-drained soil, making it ideal for rock gardens, slopes, or borders. Hardy in USDA Zones 3–7, it’s drought-tolerant and thrives in poor soils. Prune after flowering to keep it neat and encourage more blooms the next year.
16. Sweet Alyssum
Sweet Alyssum is a charming, fragrant ground cover that forms a delicate but weed-blocking mat of white, pink, or purple flowers. Though low-growing, its density and fast growth keep weeds at bay, and it continuously blooms in cooler weather.
It prefers full sun to part shade and well-drained soil, thriving in cooler seasons or coastal areas. Often treated as an annual in cooler zones, it’s hardy as a perennial in USDA Zones 9–11. It reseeds easily and is a favorite for borders, hanging baskets, and between pavers.
17. Chamomile
Chamomile’s ferny, apple-scented foliage and small daisy-like flowers create a soft, spreading mat that naturally discourages weeds. As it grows, it forms a living mulch that shades the soil and releases compounds that may suppress weed seeds.
It prefers full sun and light, well-drained soil. German chamomile is typically grown as an annual, while Roman chamomile is a low-growing perennial hardy in USDA Zones 4–9. It works well in herb gardens or as a ground cover along garden paths.
Thrift forms neat, grassy clumps that bloom with globe-shaped pink or purple flowers in spring. It grows in tight rosettes that expand gradually, filling in gaps and making it tough for weeds to take hold.
This plant thrives in full sun and sandy, well-drained soils—especially coastal or rocky areas. Thrift is hardy in USDA Zones 4–8 and works wonderfully in borders, rock gardens, or along pathways. Once established, it’s both drought- and salt-tolerant.
19. Dianthus
Dianthus brings both color and weed suppression to your garden with its low, mounding growth habit and fragrant blooms. Its evergreen foliage forms dense mats that minimize weed invasion, and its pink, white, or red flowers bloom through spring and summer.
It prefers full sun and well-drained soil, thriving in USDA Zones 3–9. Deadheading spent blooms encourages continued flowering. Ideal for borders and edges, Dianthus is also deer-resistant and tolerant of heat once established.
20. Wall Germander
Wall Germander is a compact, woody perennial with small aromatic leaves and lavender-pink summer flowers. Its tight-growing habit creates a structured, low hedge that prevents weeds from establishing beneath or between its foliage.
It prefers full sun and dry, well-drained soil, especially in Mediterranean-style or xeriscape gardens. Hardy in USDA Zones 5–9, it’s drought-tolerant and attracts bees while resisting deer and rabbits. Trim regularly to maintain shape and encourage dense growth.
21. Aronia (Groundcover Chokeberry)
Dwarf Aronia varieties make excellent ground covers with glossy green leaves, spring flowers, and brilliant red fall foliage. Their dense, shrubby spread prevents weeds while adding multi-season beauty to the landscape.
They grow well in full sun to part shade and adapt to various soils, though they prefer moist, well-drained conditions. Hardy in USDA Zones 3–8, Aronia is also prized for its edible berries and resistance to pests and diseases.
22. Creeping Jenny
Creeping Jenny spreads quickly with vibrant chartreuse or golden-green leaves that cascade over edges and blanket the ground. It out competes weeds by forming a low, dense mat, especially in moist or shaded areas.
It grows in sun to part shade and prefers moist, rich soil but can adapt to various conditions. Hardy in USDA Zones 3–9, it’s excellent for containers, borders, or wet areas. Monitor its spread, as it can become aggressive if not managed.
23. Lily of the Valley
Lily of the Valley spreads via underground rhizomes to form dense colonies of lush green leaves and sweet-scented white bell flowers. It naturally prevents weeds by forming a thick carpet, particularly in shady areas.
It prefers partial to full shade and moist, well-draining soil. Hardy in USDA Zones 3–9, it’s ideal under trees or in woodland gardens. Be mindful—it can spread rapidly and is toxic if ingested, so plant with care around pets or children.
24. Ferns
Many fern species, such as Lady Fern and Ostrich Fern, form spreading clumps that provide excellent ground coverage in shaded areas. Their leafy fronds block sunlight and help retain soil moisture while deterring weed growth underneath.
Ferns generally thrive in full to partial shade with moist, humus-rich, well-draining soil. Most are hardy in USDA Zones 3–8, depending on the species. They’re perfect for woodland edges, under trees, and shaded borders where other plants won’t grow.
25. Microbiota Decussata
Siberian Cypress is a low-growing, evergreen conifer that creates a spreading mat of feathery green foliage that turns bronze in winter. It provides year-round weed suppression in colder climates, where few other ground covers thrive.
It prefers full sun to partial shade and moist, well-drained soil. Hardy in USDA Zones 2–7, it’s ideal for slopes, rock gardens, or under tall shrubs. Once established, it needs little care and offers year-round texture and color.
Conclusion
Weeds don’t stand a chance when your garden is armed with the right ground cover plants.
These hardworking, low-maintenance spreaders not only crowd out unwanted invaders by blocking light and space—they also protect your soil, reduce erosion, and add texture, fragrance, and color to your landscape.
Whether you’re dealing with a dry slope, a shady nook, or a sunny border, there’s a ground cover plant suited to the job.
By choosing the right varieties for your conditions, you can build a healthier, more resilient garden that naturally stays weed-free—all without relying on chemicals or constant pulling.
Let nature do the heavy lifting, one spreading stem at a time.
Khaja Moinuddin, a computer science graduate, finds joy in gardening and homesteading. Join him on this blog as he shares his experiences in homesteading, gardening, and composting
One of the biggest struggle areas many of us have is undoubtedly around our bellies. Belly fat often seems to be the quickest to burgeon and slowest to go away.
Unfortunately, studies show belly fat increases the risk of things like type 2 diabetes and heart disease. It also can be uncomfortable and make finding clothes that fit challenging.
Thankfully, there is good news for those of us who want to target this problematic area — and the solution may lie in boosting your soluble fiber intake.
What is Soluble Fiber?
Soluble fiber is a carbohydrate that can slow down how fast your stomach releases digested food into your gut when it mixes with water. It’s a bit different than its counterpart, insoluble fiber, which helps our bodies form stools.
What are the Benefits of Eating It?
Several studies explore the benefits of increasing how much soluble fiber you consume. In one 2012 study, researchers found that participants who increased their soluble fiber intake by 10 grams had a 3.7% lower risk of gaining belly fat.
Another 2012 study found that higher insoluble fiber consumption meant lower belly fat and inflammation. Still, another 2009 study concluded that participants who reduced their fiber intake had a higher risk of gaining belly fat.
People who eat soluble fiber also have a higher number and diversity of good bacteria living in their guts. These bacteria assist with vital physiological processes like creating vitamins and processing waste. A 2016 study found a link between gut bacteria variety and lower belly fat, and several others found the same link with better health outcomes in life.
What’s more, soluble fiber is a potent appetite suppressant. That may help you reduce the number of calories you eat, which in turn can help with weight loss.
What Foods are Good Sources of Soluble Fiber?
The U.S. Dept. of Agriculture recommends men consume 30-38 grams of fiber per day, and that women should aim for 21-25 grams daily.
Experts recommend people who don’t currently eat high levels of soluble fiber increase their daily intake gradually to avoid unpleasant side effects like bloating, diarrhea, and stomach aches.
Foods with high levels of soluble fiber include:
Apricots
Oranges
Apples
Pears
Oatmeal
Legumes
Brussels sprouts
Broccoli
Sweet potatoes
Flaxseeds
Hazelnuts
Sunflower seeds
Barley
Carrots
Beans
Peas
Avocados
Turnips
Figs
Can You Take Supplements to Boost Soluble Your Fiber Intake?
While it’s best to get soluble fiber by eating the foods that have them, it is possible to use supplements, too.
Soluble fiber supplements come in various types, with the most popular being:
Inulin
Psyllium husk
Glucomannan
Some studies have looked at how each of these supplements impacted belly fat and found 👍
Inulin: A 2015 study found that people at risk for type 2 diabetes who took inulin rather than cellulose (insoluble fiber) lost significantly more belly fat and weight.
Psyllium husk: A 2012 study found a belly fat reduction in teenage boys who took this supplement.
Glucomannan: A 2012 study found that men taking this supplement saw a reduction in belly fat.
—
Ultimately, incorporating more insoluble fiber into your diet can go a long way toward helping you reach your goals and may reduce your belly fat. Consider talking to your doctor or a nutritionist to create a plan for gradually adding foods rich in insoluble fiber into your meal plan.
Caitlin is the Diet-to-Go community manager and an avid runner. She is passionate about engaging with others online and maintaining a healthy, active lifestyle. She believes moderation is key, and people will have the most weight loss success if they engage in common-sense healthy eating and fitness.
My remineralizing toothpaste recipe has always been a big hit, but there were a few problems. It has to be stored in a jar. And thanks to the coconut oil it can get really hard, especially in colder weather. This squeezable homemade toothpaste version solves those problems and gives you a smoother consistency!
You can use distilled water (which does significantly shorten the shelf life) or you can use MCT oil instead. And since it’s in a tube, it’s easier to share than a jar. Don’t feel like making your own? Check out these remineralizing toothpastes from Wellnesse. They come in flavors like mint, cinnamon, and strawberry for the kids.
Squeezable Homemade Toothpaste
Here’s a closer look at the ingredients and how they benefit your teeth.
Calcium – Our teeth are largely made of calcium, so brushing with it helps us maintain healthy levels. Though diet is also really important!
Xylitol – This naturally sweet sugar alcohol shows lots of promise for dental health. Studies show it can help reduce plaque and bad bacteria in the mouth. It’s also known to decrease the amount of cavities and can help remineralize cavities.
Coconut oil – Helps reduce bad bacteria in the mouth that are linked with causing tooth decay and gum disease. It may also help with fresher breath.
Baking soda – Gently scrubs teeth clean and helps whiten. It can also reduce plaque and supports a healthy mouth pH. Too much can cause gum irritation, which is why I like including it along with other ingredients.
Bentonite clay – Optional, but has lots of minerals to support enamel. It also helps detox the mouth by adsorbing heavy metals.
Trace minerals – Helps further strengthen enamel by providing it with more of the minerals it needs.
Adding Essential Oils
These add a pleasant taste as well as antibacterial and anti-fungal properties. Be sure to only use high quality essential oils that are safe to put in the mouth. These include cinnamon, clove, myrrh, peppermint, spearmint, sweet orange, fennel, and tea tree. Some oils are more irritating than others (like cinnamon and clove) so you don’t need as much if using these.
Here’s how to make your own squeezable toothpaste!
Squeezable Homemade Toothpaste Recipe
This homemade toothpaste works well in a tube for easy squeezing, sharing, and traveling.
Author: Katie Wells
Mix all of the ingredients except clay in a mini-food processor and mix well to incorporate.
Once smooth, slowly add in the bentonite clay and mix by hand with a non-metal utensil (bentonite clay should not come in contact with metal). If you don’t have a food processor, you can use an immersion blender or even a whisk/fork in a bowl. Do not use an air-tight blender like a magic bullet as this creates too much pressure
Store in a small glass jar or a squeezable tube.
Use as you would regular toothpaste.
Because of the coconut oil, this toothpaste will be thicker when cooler and thinner when it’s warm. However it should be a squeezable consistency at normal room temp (70-75 degrees). If it’s too runny or too thick, try adding more liquid or calcium.
Adjust the essential oils to taste.
More Oral Care Recipes
If you’re a fan of making your own oral care products, then I’ve got plenty of recipes to try!
Homemade Toothpaste FAQs
Q. What’s the best type of calcium/calcium magnesium to use?
I tried many types of calcium and calcium magnesium powders and got feedback from dozens of readers. The consensus is that calcium carbonate is the best option. Certain types of calcium and magnesium powders can cause issues…like explosive reactions.
Q. Is this okay for sensitive teeth/fillings/veneers/children/etc?
Always check with a dentist before changing a dental routine especially if you have any dental conditions. My kids and I have both used this, including on my teeth that have some non-amalgam fillings (before I knew about remineralization). Since all ingredients are generally considered safe for consumption, I feel comfortable using it, but check with your dentist if you have any doubts.
Q. What are some common reactions in the first few weeks (heightened sensitivity for some)?
I didn’t have any reactions, but it seems some people experience sensitivity for the first few weeks using homemade toothpaste. Especially if they’ve been using commercial products for a long time or have had recent fluoride treatments as the clay can bind and pull out toxins. This seems to be less of an issue with calcium powder and seems to resolve itself within a few weeks. However, check with a holistic dentist if you have specific concerns with your situation.
Q. Xylitol vs. stevia, which is better?
This is largely a matter of opinion. There are studies showing xylitol is very beneficial for oral health, but it is highly toxic for dogs. Be very careful to keep it out of reach of any pets! I use this birch derived, non-GMO xylitol.
Q. Vodka vs. Water?
This recipe works just fine with water, but many people have successfully used vodka in its place to extend the shelf life. MCT oil is an even better option that does not introduce any water into the toothpaste. Microbes can start to grow within days in water based products.
Q. Why NO Glycerin?
There’s some evidence glycerin may inhibit mineral absorption on enamel. While the research is definitely not conclusive on the subject, I feel safer avoiding it just in case. On a personal level, I’ve seen relatives’ teeth turn brown after using glycerin-based toothpaste and return to normal after switching to different brands.
Q. Other than yourself and your family, has anyone else used this for a while?
I’ve received dozens of emails from people who have used this toothpaste or my regular remineralizing toothpaste with good results.
Tina offered these changes:
I started adding a bit of hydrogen peroxide to mine. That made it squeezable. I do not use the bentonite clay. Instead I use baking soda. I also add a few drops of grapefruit seed extract to mine. There is still the fact that coconut oil is more firm in cooler temps.
Melinda adds:
This recipe really does make my teeth look and feel fantastic. I love it! May have to get a squeezable tube and see how that goes.
Q. I had bleeding gums the first few times I used this, is this normal?
I didn’t experience this personally, but have heard from many readers who did. It’s likely from the baking soda, which has a high pH and can irritate the gums in some cases. Some reported experiencing irritated gums for a few days or up to a few weeks which eventually resolved itself. You can always reduce or omit the baking soda if that’s the case.
Q. What type of container is best for this?
I use GoToobs which are made with FDA approved silicone. They’re great for re-using, traveling, and squeezing without worrying about plastic leaching into the toothpaste. I’ve had one of these and for over a year and it’s still going strong. I also use them for my oil cleansing blend when traveling since they don’t leak.
Ever made your own toothpaste or oral health products? How did it go? Share below!
Cilantro, also known as coriander, produces an abundance of umbrella shaped inflorescences covered in tiny blooms that attract pollinators and other beneficial insects.
In fact, its ability to attract beneficial bugs is what makes it one of the most powerful companion plants in the organic vegetable garden!
There are truly countless cilantro companion plant combinations you can make in the garden.
We link to vendors to help you find relevant products. If you buy from one of our links, we may earn a commission.
But growing cilantro as a companion plant takes some forethought and planning, since this is a cool season herb that blooms when temperatures begin to warm up.
In this article you’ll learn about some of the best cilantro companion plant combinations that you can use in your own garden.
You’ll learn how these partnerships work in detail, but let’s start off with a quick view of our list:
11 of the Best Companion Plants for Cilantro
Companion planting allows gardeners to create stunning visual effects in the vegetable patch but primarily contributes to healthier plants and greater yields in an organic food growing system.
There are numerous benefits that come from this gardening approach, and you’ll learn about many of them in this article.
As mentioned, the main benefit of using cilantro as a companion plant is its ability to attract beneficial insects with its flowers – making it protective for crops such as arugula!
The hoverflies drawn to cilantro’s nectar rich flowers act as natural enemies to armyworms, which are common arugula pests.
Why not try wild arugula, a heat and cold resistant salad green packed with pungent flavor!
Cilantro and beans make great companion plants, not just because of the pest protection offered by the herb.
In addition to providing services as an insectary plant in companion planting, in one study coriander was shown to also increase the macronutrient content of beans such as favas.
One of my favorite varieties of pole beansis ‘Northeaster,’ a Romano type that produces delicious, seven- to eight-inch long, flat, green pods in just 56 days.
In this article we’re looking primarily at combinations where cilantro is the helper – but in the case of carrots the tables have turned.
Growing carrots with coriander at a one to one ratio actually increases the yield of the herb. It’s also an efficient use of garden space, as the carrots are maturing underground.
There are so many wonderful types of carrots out there that it can be hard to choose just one.
‘Red Cored Chantenay’ is a chantenay carrot cultivar that has short, thick roots, making it perfect for all types of soils, and even the raised beds used in square foot gardens.
Studies show that interplanting eggplant with cilantro or dill can help control Colorado potato beetle populations, as both herbs attract the pest’s natural predators.
Ladybugs are one of these beneficial insects that enjoy cilantro pollen.
They also enjoy feasting on Colorado potato beetle eggs, helping to reduce the risk of these pests attacking not only your eggplant, but also potatoes, tomatoes, peppers, and ground cherries!
‘Ping Tung Long’ is an heirloom eggplant variety that bears an abundant crop of thin fruits reaching over a foot long. They are ready to harvest after 70 days from transplanting.
Coriander plants also lend a hand in protecting hot peppers from pests.
One study found that when growing these two plants together, the hot peppers sustained less damage from thrips, caterpillars, and fruit flies.
Sow the cilantro early in spring, and transplant your hot peppers after the last average frost so that the coriander blooms just as the peppers are becoming established.
When your hot peppers are nearing harvest, it will be time to resow some fall cilantro seeds, giving you the homegrown makings of many flavor packed meals. Just add avocado!
‘Ring-O-Fire’ is an early-maturing type of cayenne pepper with fruits that register 30,000 on the Scoville scale, making them hotter than jalapenos, but nowhere near as hot as ghost peppers!
Did you ever consider that in addition to ladybugs and lacewings, spiders could be beneficial to your garden?
Plant some coriander with your lettuce crops, and these helpful arachnids will flourish, providing yet another means of controlling insect pests.
Just make sure to plant low-growing plants like lettuce to the south side of the taller herb, so that the shorter crop doesn’t end up in the shade when the cilantro flowers.
There are many different types of lettuce – but if you’re looking for one that will remain edible going into summer, choose a heat tolerant variety such as ‘Jericho.’
One of the benefits of growing radishes and cilantro together is that this combination allows gardeners to benefit from something called a multi-storied or multi-tier cropping system, making more efficient use of a plot of land.
Pretend that your garden plot is an apartment building.
In this analogy, the radishes live in the basement and ground floor, while cilantro quickly grows taller to dwell on the second and higher floors!
And since smaller radish varieties have a short growing season, you’ll harvest the radishes early in the season, leaving cilantro more room to grow as it bolts and produces beneficial insect-attracting flowers.
One of the classics is ‘French Breakfast,’ a French heirloom originally known as ‘Radis Demi-long Rose a Bout Blanc’ – a mouthful whether you are fluent in that language or not!
You can see why it was given a name change.
‘French Breakfast’ radishes are ready to harvest in just 26 days – and no, you don’t really have to eat them for breakfast!
One of the most common tomato pests is the whitefly, a small insect related to aphids that causes damage to plants and transmits viruses.
Guess who eats whitefly larvae? Ladybugs, hoverflies, and lacewing larvae!
By growing tomatoes with cilantro companion plants, you’ll attract lacewings and help keep away whitefly infestations, increasing yields from your beefsteak, ‘Cherokee Purple,’ and ‘Hawaiian Pineapple’ crops.
If you’re in the mood for a recommendation, ‘Matt’s Wild Cherry’ is one of my favorite cherry tomato cultivars.
Intensely tangy, these small fruits can be thrown whole into summer salads.
Consider combining turmeric and cilantro, along with onion, for higher yields of turmeric rhizomes!
If you live in a warm location, equivalent to USDA Hardiness Zones 8 to 11, you can grow turmeric outdoors year round.
Turmeric plants are grown from rhizomes rather than seeds.
You can grow your own from a supermarket rhizome as long as it isn’t treated to inhibit sprouting – or skip the sprouting part and get started with a plant!
These cilantro plant partnerships should get you on a good start on using this popular herb to the benefit of your garden.
But keep in mind that these combinations are just the tip of the companion planting iceberg – there are so many more to try out!
Are there any other cilantro companion plant pairings you’ve tried and loved? Or are there any combos you would like feedback on before you try them out? Let us know in the comments section below!


")


