")
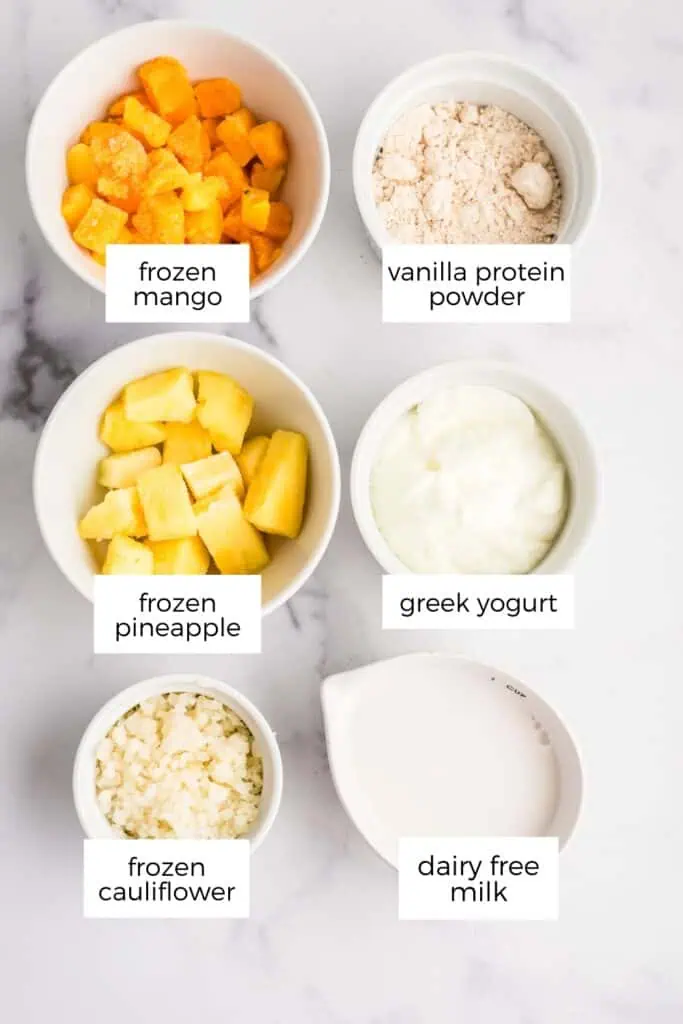
For me, nothing hits the spot on a hot summer morning like a refreshing, protein-packed smoothie, and this Mango Pineapple Smoothie is exactly that. I created this recipe when I needed something light, energizing, and filling—without any unnecessary added sugars or bananas. The combination of sweet mango, juicy pineapple, and creamy protein makes every sip feel like a tropical vacation in a glass!
Back when I owned a gym and trained hundreds of women, one of the biggest struggles I heard was getting enough protein throughout the day. That’s why I love smoothies—they’re an easy, delicious way to boost protein intake without extra effort. Plus, this one is completely flexible—make it dairy free or vegan to suit your needs.

If you love tropical flavors, try my Peach Mango Strawberry Smoothie for a fruity blend, the Avocado Date Smoothie for a creamy, naturally sweet option, or the Mango Chocolate Smoothie for a fun twist. I also have over 50 high-protein smoothies on my site, all designed to be quick, nourishing, and satisfying. Whether you need a fast breakfast, a post-workout refuel, or a healthy afternoon pick-me-up, this pineapple mango smoothie is an easy and delicious choice!


★ Did you make this recipe? Please give it a star rating below!
Nutrition Facts
Amount per Serving
Where does nutrition info come from? Nutrition facts are provided as a courtesy, sourced from the USDA Food Database.
Yes! Just skip the protein powder and add 1 tablespoon honey or maple syrup for sweetness.
Yes, replace the yogurt with an extra 1/2 cup of dairy free milk or water.
I recommend vegan protein powder, whey protein or almond protein powder. Check out all my favorite protein powders for smoothies.

Smoothies are best fresh. You can store them into a double walled insulated cup in the fridge (for up to 24 hours), the texture may change, so re-blend with ice before serving if possible.
Pro Tip: For easy mornings, check out my smoothie meal prep tips.
No problem. Simply add 1 cup of ice cubes to keep the smoothie thick, creamy and refreshing.

Use less liquid, add more frozen fruit or add 1 tablespoon of chia seeds or ground flax.
If you are like me and hate wasting food, you are probably looking for ways to preserve any leftover smoothies. My favorite way is to pour leftovers into a popsicle mold for a frozen treat or freeze in an ice cube tray to blend into future smoothies.

Years ago I thought I didn’t like balsamic vinegar and would always opt for other salad dressing options. After finally giving it a chance, I discovered not only did I like it, but it’s downright delicious! This balsamic glaze is more concentrated than a vinaigrette and even simpler to make. We love it on veggies, meat, and even fresh fruit
First, let’s start with defining what (real) balsamic vinegar even is. Aged balsamic vinegar is made in Italy from grape must and aged for at least 12 years in wooden barrels. The resulting vinegar has a naturally sweet flavor… and it’s incredibly expensive. The Italians are very strict with their food qualifications! That’s why many grocery store brands add caramel coloring and sweeteners to regular wine vinegar for balsamic look-alikes.
There is another classification of balsamic called balsamic vinegar of Modena that’s easier to find. Just look for something that doesn’t have added colors, sweeteners, or flavors, and has been barrel aged for at least several years. The best balsamic glaze is made with good quality vinegar.
Making the balsamic glaze really couldn’t be any easier! Unlike a vinaigrette which is a blend of vinegar, oil, and spices, a glaze is just a reduction. Some recipes call for brown sugar or white sugar, but I like to use honey in mine. Maple syrup also works well. Or keep it even simpler and skip the sweetener entirely!
The glaze is naturally gluten-free, dairy-free, grain-free, and adds a tangy boost to lots of different foods. Just be sure to keep an eye on it as it cooks to prevent burning. There’s nothing sadder than a burnt balsamic glaze. And be sure to check out a list of ways to use your new balsamic glaze below the recipe.
This balsamic glaze makes a great drizzle over salads, roasted veggies, meats, or even fresh fruit!
Pour the aged balsamic vinegar into a small saucepan over medium heat. Add honey or maple syrup if using.
Bring to a gentle boil, then reduce the heat to low and let it simmer for 10–15 minutes, stirring occasionally.
It’s ready when the mixture has reduced by about half and coats the back of a spoon. Don’t over-reduce—it will continue to thicken as it cools.
Use immediately or cool to room temperature and transfer to an airtight container. Refrigerate for up to 1 month.
Nutrition Facts
Simple Balsamic Glaze Recipe
Amount Per Serving (1 tsp)
Calories 11
% Daily Value*
Sodium 2mg0%
Potassium 11mg0%
Carbohydrates 2g1%
Fiber 0.002g0%
Sugar 2g2%
Protein 0.1g0%
Vitamin C 0.004mg0%
Calcium 3mg0%
Iron 0.1mg1%
* Percent Daily Values are based on a 2000 calorie diet.
The glaze will naturally thicken as it cools. If it becomes too thick, simply reheat it with a little water to reach the desired consistency.
The vinegar’s natural acidity helps preserve the balsamic reduction, but if you notice off smells, mold, or separation, it’s time to discard it.
Looking for some new recipes to try or ways to use your homemade glaze? Some popular options include traditional Italian burrata cheese on bruschetta bread. We don’t eat a lot of bread around here, so I’ve collected some other options below as well.
Try balsamic glaze drizzled on:
Have you ever used balsamic glaze before? What are your favorite ways to use it? Leave a comment and let us know!

Excess heat, less nutritional intake, and other health-related stress can reduce frequency of laying in chickens.
Providing a balanced diet, cool water, and a stress-free environment can help restore healthy egg production.
Summer is often seen as prime egg-laying season for backyard chickens—longer daylight hours and warm temperatures should encourage peak productivity
So when your hens suddenly stop laying in the middle of a sunny July, it’s confusing and frustrating.
If your coop has gone quiet, you’re not alone. There are several reasons chickens stop laying eggs in summer, ranging from heat stress to dietary imbalances and even natural biological cycles.
Let’s break down the possible causes and what you can do to get those eggs rolling again.

It’s the middle of summer, the days are long, and your hens should be laying at their best. So what gives?
While it might seem like a mystery, there are several common reasons chickens take a break from laying during the hottest months.
From heat stress to nutrition issues and natural cycles, let’s uncover why your flock may be on a summer egg strike.
Chickens are surprisingly sensitive to heat. When summer temperatures soar, your hens may stop laying eggs altogether. Heat stress affects their overall health and disrupts the hormonal balance needed for egg production.
Signs of heat stress include panting, holding wings away from their bodies, reduced movement, and a pale comb. When the body focuses on staying cool, non-essential functions like egg production take a backseat.
What you can do:
Although molting typically occurs in fall, stress-induced or irregular molting can happen in summer—especially after a heatwave or predator scare. During molt, hens lose old feathers and grow new ones, which requires a lot of protein and energy, pausing egg production temporarily.
What to look for:
How to help:
A well-balanced diet is essential for egg production. If your chickens are filling up on treats or kitchen scraps instead of layer feed, they might not be getting enough calcium, protein, or other nutrients. Summer forage can also be lower in nutrition if the vegetation dries out.
Nutritional red flags:
Solutions:
Also Read: 70 Things Chickens Can Eat
Chickens can drink up to double their usual water intake in hot weather. If they don’t have access to clean, fresh water at all times, even for a few hours, it can disrupt laying. Dehydration affects kidney function and the reproductive system.
Tips to stay hydrated:
External parasites like mites and lice, or internal worms, become more active in summer. These pests drain your hens’ energy and nutrients, leading to stress and decreased egg production. If laying stops and your chickens seem lethargic, it may be time to investigate further.
Watch for:
Action plan:
Some hens go broody in the summer and stop laying because they’re trying to hatch eggs—even if there are no eggs to sit on. During this phase, they’ll puff up, sit in nesting boxes all day, and may peck or squawk when approached.
How to handle it:
Chickens rely heavily on light to regulate their laying cycles. Even though summer days are long, disruptions to their natural light exposure—such as being locked in the coop too long, excessive artificial light at night, or frequent disturbances—can confuse their bodies and pause egg production.
Prevent this by:
If your hens have recently been spooked by a predator (even if no attack occurred), or if you’ve changed their coop or routine, they may go off-lay. Stressful events affect their sense of security and can shut down egg production until they feel safe again.
What to do:
Finally, if your hens are older—typically past 2-3 years—their laying naturally slows down. In hot summer weather, the combination of age and seasonal stress may halt eggs entirely until cooler months arrive.
Consider:

The egg-laying cycle begins when a hen reaches maturity, usually around 18–22 weeks old. At this point, her reproductive system starts producing eggs regularly, often one every 24–26 hours.
Each egg starts as a yolk in the ovary, which travels down the oviduct while layers of albumen (egg white), membranes, and shell form. This process takes about a day per egg.
Laying is influenced by daylight—hens need about 14–16 hours of light daily to maintain steady production. In summer, natural sunlight supports this rhythm, while winter may slow it down.
After a period of laying, hens may pause for rest, molt, or due to age, stress, or health factors. These breaks are normal and allow the body to recover.
Over time, egg production naturally declines as hens age, with most laying fewer eggs after 2–3 years, though some may continue sporadically for years.
Summer should be a productive season for egg-laying hens, thanks to longer daylight hours and ample foraging opportunities. But when temperatures soar, your flock may lay fewer eggs or stop laying altogether.
Thankfully, with the right care and adjustments, you can help your chickens stay comfortable, healthy, and productive even during the hottest months.
Here’s a detailed guide on how to improve egg production in chickens during summer.
High temperatures can significantly reduce or halt egg production, as hens divert energy toward cooling down rather than laying.
How to Help:
Dehydration is one of the fastest ways to disrupt egg production. Chickens drink more in the summer, and warm water can be unappealing.
Tips for Summer Hydration:
In summer, hens may eat less due to the heat, which can lead to nutritional deficiencies affecting egg production.
Feeding Guidelines:
Chickens are sensitive creatures. Stress from predators, changes in routine, or excessive noise can disrupt laying.
How to Minimize Stress:
Illness, worms, mites, or lice can stress hens and lower their productivity. Summer is prime time for parasite outbreaks.
Preventive Care:
Also Read: How to Help My Chickens Grow Feathers Back?
If hens don’t feel comfortable in the nesting boxes, they may lay elsewhere—or not at all.
Make Nesting Areas Appealing:
Even in summer, some hens naturally slow down due to molting or age. While this is normal, you can support them during this time.
Support Measures:
If your chickens stop laying eggs in summer, it’s usually a response to environmental stress rather than a serious health issue.
Excessive heat, dehydration, poor nutrition, molting, or even emotional stress can all contribute to a decline in egg production.
Fortunately, most of these issues are manageable with a few adjustments in care. By providing shade, fresh water, a balanced diet, and a calm, clean environment, you can support your hens through the heat and help them return to regular laying.
Stay observant, responsive, and patient—your flock will reward you when conditions improve.

Khaja Moinuddin, a computer science graduate, finds joy in gardening and homesteading. Join him on this blog as he shares his experiences in homesteading, gardening, and composting
")
Pizza Beans – if you love pizza, you are going to love this recipe! It is just like hitting the easy button. It tastes like pizza, is made with 7 simple ingredients in one pot, in about 15 minutes. Oh and kids (and picky adults) will love it. Whether you are looking for a simple dinner recipe or an easy afterschool snack, these cheesy marinara beans are the perfect solution.

If you are looking for more simple bean recipes, you should try my 3 Ingredient Black Bean Dip or Greek White Bean Salad next!
This site is all about helping you create simple, nourishing recipes in 20 minutes using 8 ingredients (or less). If you want to cook more at home but you’re short on time and overwhelmed by long lists of ingredients, you are in the right place! As a health and nutrition coach, I love helping you cook nourishing meals at home. If you are visiting Bites of Wellness for the first time, welcome! Find out more about me and the website.
In case you are wondering, what the heck are pizza beans, essentially they are white beans with marinara and cheese that are eaten on crusty bread or crackers – everything you love about pizza, but with beans!
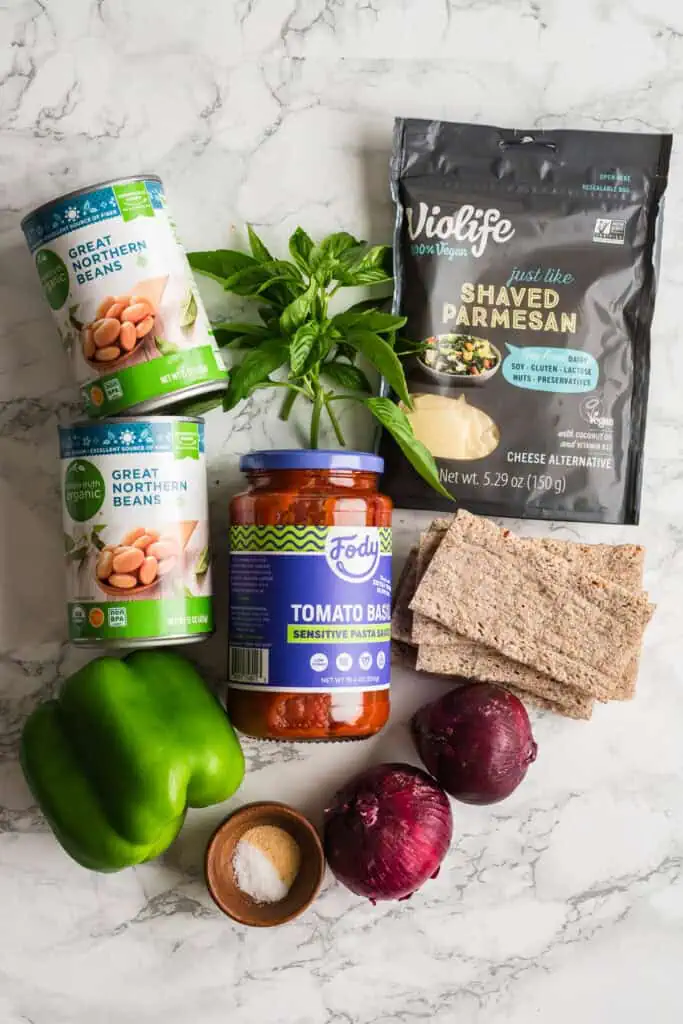
The reason this recipe is so quick and easy is because we are using a jarred marinara sauce. If you want to make your own, check out my go to homemade spaghetti sauce recipe. It’s ready in just 2 minutes, you will need:
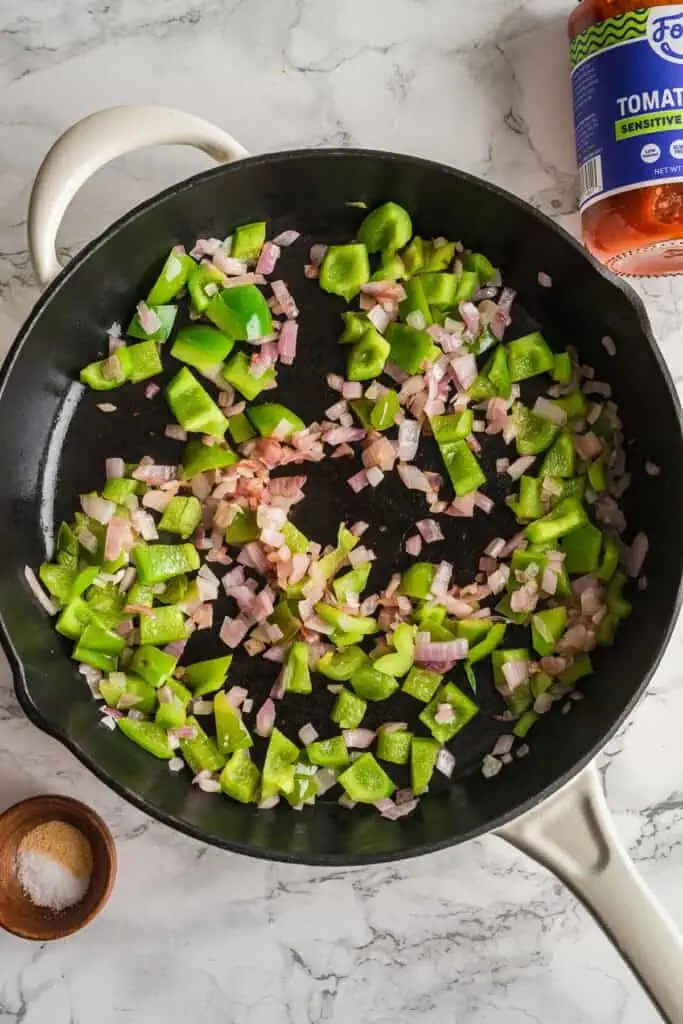
Chop and cook the veggies: Add veggies to preheated skillet (over medium low heat) and cook 4-5 minutes until soft.

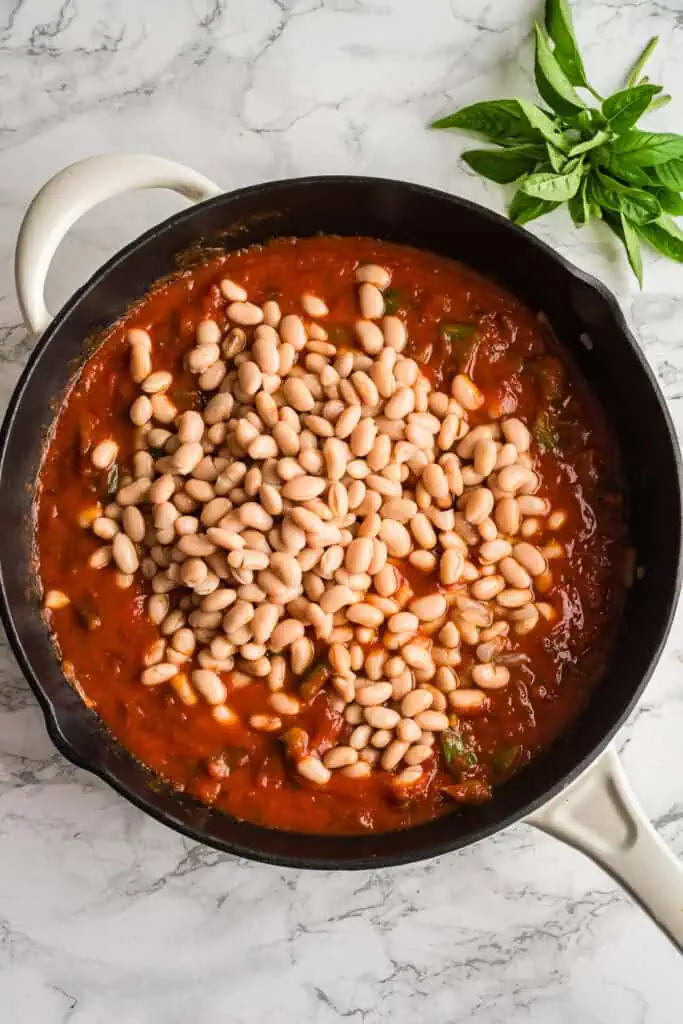
Make the pizza beans: Add marinara, spices and beans to the pan. Cook 5-6 minutes to slightly reduce the sauce and get the beans well flavored. After 5-6 minutes stir in half the parmesan cheese and fresh basil.


Add toppings and serve: Take off the heat and add the rest of the cheese and fresh basil. Serve on toasted crusty bread or your favorite flatbread crackers (or homemade crackers).


I like to serve the cheesy marinara beans with a simple salad, Greek Salad or a light soup (like this frozen veggie soup).
You can also serve these with air fryer roasted zucchini or sundried tomato broccoli.
If you can’t find a parmesan cheese you love, you can use your favorite mozzarella (regular or dairy free) or replace the parmesan cheese with cashew cream

Keep the beans separate from any bread or crackers until you are ready to enjoy. Store the beans in the fridge in an airtight container for up to 4 days. Reheat in the microwave, on the stove or in the oven until bubbly.
I love serving the leftovers on crusty bread with a fried egg on top the next morning for breakfast.
★ Did you make this recipe? Please give it a star rating below!
Preheat a large skillet over medium low heat. Preheat the oven to 350F if you are planning on toasting your bread in the oven, otherwise use a toaster or crackers for serving.
Chop the bell pepper and red onion.
When hot, spray the skillet with oil (I used avocado oil) add the bell peppers and onions. Cook for 4-5 minutes until peppers start to soften.
Stir in half the cheese and half the fresh basil. Continue to stir until cheese is melted.
Take off the heat and add the rest of the cheese and fresh basil right before serving.
Serve with toasted bread or crackers.
Other additions
Nutrition Facts
Amount per Serving
Where does nutrition info come from? Nutrition facts are provided as a courtesy, sourced from the USDA Food Database.

President Trump, joined by National Institutes of Health Director Jay Bhattacharya and Health and Human Services Secretary Robert F. Kennedy Jr., talks about an executive order aimed at reducing the cost of prescription drugs.
Andrew Harnik/Getty Images
hide caption
toggle caption
Andrew Harnik/Getty Images
President Trump is taking aim at U.S. drug prices with an executive order geared toward forcing drug companies to match the lower prices paid in other developed countries.
If drugmakers don’t do it voluntarily, the administration is threatening to directly tie drug prices paid by government programs like Medicare to those paid in other countries.
“Whoever is paying the lowest price, that’s the price that we’re going to get,” Trump said in an announcement at the White House, explaining what he called “most favored nation” pricing.
He said drugmakers would have to cut their U.S. prices to the level paid by other developed countries—or face consequences. “If necessary, we’ll investigate the drug companies, and we’ll, in particular, investigate the countries that are doing this,” he said. He also said that the U.S. market would be opened to imports from other countries.
Patients in the U.S. generally pay more for drugs than patients in other countries, largely because other countries have government health care systems that set prices they are willing to pay. The U.S., by and large, doesn’t set prices, so drug companies have more freedom to see what prices the market here will bear.
“We’ve been subsidizing other countries throughout the world” by paying higher prices, Trump said at the White House Monday, joined by leaders of federal health agencies.
The new executive order has multiple parts. It directs the U.S. Trade Representative and Department of Commerce to take action against “unreasonable and discriminatory policies” that lower drug prices abroad, though it’s not clear what authority the White House has in this regard. It also directs Health and Human Services Secretary Robert F. Kennedy Jr. to facilitate direct–to-consumer sales that bypass health insurance at lower prices.
The order says that within 30 days the administration will give price targets to drugmakers “to bring prices for American patients in line with comparably developed nations.” The order lays out actions the administration would take if drugmakers don’t comply voluntarily, such as rulemaking to impose the prices. It’s unclear in the short term what legal authority the administration would have to enforce the order.
Trump said he doesn’t think the move would hurt drug companies’ ability to make money because they will put pressure on other countries to make up the difference by raising their prices. “Europe’s going to have to pay a little bit more,” Trump said. “The rest of the world is going to have to pay a little bit more, and America is going to pay a lot less.”
Trump teased the latest “most favored nation” price policy on Truth Social Sunday night, prompting the trade group Pharmaceutical Research and Manufacturers of America, or PhRMA, to come out against the executive order, calling it a “bad deal for American patients.”
After the executive order was announced, PhRMA president and CEO Steve Ubl said in a statement: “To lower costs for Americans, we need to address the real reasons U.S. prices are higher: foreign countries not paying their fair share and middlemen driving up prices for U.S. patients.” He added, “The Administration is right to use trade negotiations to force foreign governments to pay their fair share for medicines. U.S. patients should not foot the bill for global innovation.”
Trump originally signed an executive order on most favored nation pricing in late 2020 during his first term that would have tied Medicare Part B drug prices to those in other countries. But the executive order faced court challenges and was ultimately dropped by the Biden administration. On the campaign trail last year, Trump said he would reinstate the most favored nation executive order from 2020, but a video about it disappeared from Trump’s 2024 campaign website.

Medicare began negotiating drug prices for the first time during the Biden administration in 2024, under new authority granted by the Inflation Reduction Act. The new lower Medicare prices for the first 10 drugs won’t go into effect until January 2026, but the discounts range from 79% for diabetes drug Januvia to 38% for blood cancer drug Imbruvica. Now, the Trump administration is negotiating the second batch of drug prices for 15 medicines in accordance with the law.
During the White House announcement, Dr. Mehmet Oz, who leads the Centers for Medicare and Medicaid Services under Trump, pointed out that even the lower negotiated Medicare prices are higher than what people pay in Europe for the same products. “Half the time we’re paying three times more than is paid in other countries. It doesn’t make any sense for the system.”
Oz says the new executive order will bring those prices down even further.

We all admire the colorful cascade of leaves from deciduous trees in the fall, but when needles start dropping from your favorite pine or spruce, it’s hard not to worry.
A little needle loss is natural for all conifers. But if it’s happening at the wrong time of year, or in large amounts, it could be a sign that something is wrong.

It could be caused by something minor like a dry summer or it could be a sign of a deadly fungal disease.
So how can you tell if the needle drop is a normal part of your plant’s lifecycle, or a red flag? That’s what we’re going to explore in this guide.
Here’s what we’ll cover:
This first cause might seem a little obvious, but I want to go over it because it’s not commonly known that some conifers are deciduous.
They’re uncommon in the garden, but they do exist.
Many of us imagine that all conifers are evergreens, but there are some species that are deciduous.
These will drop all of their needles in the fall and grow new ones in the spring.

Larches (Larix spp.) are the most famous deciduous conifers, with their needles turning brilliant yellow in the fall.
Dawn redwoods (Metasequoia glyptostroboides), bald cypress (Taxodium spp.), and golden larches (Psuedolarix amabilis) also do the same.
If one of these trees is shedding needles in the spring or summer, it’s not part of the natural lifecycle and will require investigation. But if it’s autumn, just enjoy the show!
Many different diseases can cause needles to change color and drop.
Dothistroma needle blight (Dothistroma septosporum) causes dark green bands and yellow or tan spots, while brown spot needle blight (Mycosphaerella dearnessii) causes circular brown or yellow spots.

After the needles become symptomatic, they’ll drop. Both of these fungal diseases are found in most pine species.
Junipers are subject to twig blight, caused by fungi in the Phomopsis and Kabatina genera.
Infection can cause entire twigs and stems to turn brown or yellow, often accompanied by black fungal spots.
The symptomatic foliage may persist or fall from the tree.
Needle cast caused by Rhizosphaera kalkhoffii or Stigmina lautii causes discoloration and drop in spruce trees.
In Douglas firs, needle cast caused by Rhabdocline species and Swiss needle cast (Phaeocryptopus gaeumannii) causes browning or yellowing and falling foliage.
Lophodermium lacerum affects grand fir (Abies grandis) and balsam fir (A. balsamea).
If the needle death is appearing on the exterior of the tree or you see shedding during a time of year that’s not normal, it’s worth taking a sample to your local university extension office to confirm whether or not it’s caused by a disease.
You can then treat accordingly.
If the weather has been dry for a long time, especially during hot temperatures, it’s entirely possible your tree is experiencing drought stress.
Often, the first sign is yellowing of the needle tips. The new growing tips might die, as well.

During periods of drought, conifers may also drop needles as a way of conserving moisture, reducing the amount of foliage that requires moisture.
Sometimes the needles will turn yellow, but often they’ll just dry out without changing color at all.
If you’ve ever swept up needles after your living Christmas tree was past its prime, that’s what they look like.
A few weeks of drought usually isn’t enough to cause stress in established, healthy specimens but extended drought, especially over several years, can cause problems.
Of course, the solution here is to make sure your conifer is receiving the right amount of water, which varies according to the species.
A juniper might be fine while a redwood might be in serious trouble in the same environment.
Being familiar with the needs of the species you are growing means you can irrigate accordingly.
Some conifers are sensitive to extreme heat. Well, any plant is susceptible to stress during prolonged periods of exceptional heat, but some species suffer in seasonal heatwaves.

Douglas fir (Pseudotsuga menziesii), silver fir (Abies alba), Norway spruce (Picea abies), and Atlas cedar (Cedrus atlantica) should all be protected from prolonged heat and you should avoid growing these species in hot, humid climates.
The Pacific Northwest, also known as conifer heaven, has recently had several years of extreme heat in the summer with record-breaking temperatures. The local firs, pines, and cedars have taken a real beating.
The university extension offices were flooded with samples and images of landscape trees looking decidedly worse for wear. But even if you aren’t experiencing shocking heatwaves, higher than average temperatures can cause your conifers to suffer.
Heat stress typically shows up as brown needles on the exterior parts of the plant. The younger growth is more susceptible to damage and it generally turns brown and falls off first. Continued stress will cause older foliage to do the same.
There isn’t much you can do unless your conifer is growing in a container and you can move it somewhere cool during a heatwave.
Otherwise, just keep the soil moist and if the tree is small or you’re growing a shrub, consider propping an umbrella or shade cloth over it during the heat of the day.
Anything that causes injury to a tree can result in dropping foliage. The two major concerns are root damage and herbicide injury.
Root damage can come in the form of rot, which can be caused by a disease or by drowning roots with too much water, but it can also be something as simple as compacting the soil by driving over the roots or chopping some up with the lawn mower.
Herbicide damage, on the other hand, is harder to identify. You don’t have to spray the plant directly, either. Drift on the wind when you or a neighbor is spraying nearby can cause damage.

Herbicides are made to kill plants, and while some species are resistant, others might not be.
The tolerance varies depending on the type of herbicide and the species it is used on. Dormant trees are usually tolerant to glyphosate, though it will harm any living tree.
Spruces and firs are sensitive to simazine, all conifers are sensitive to picloram, and spruces are sensitive to phenoxy-type herbicides.
One clue to whether needle drop is a result of herbicide damage is if all the plants in the area show some type of damage – even if they are different species.
There are few diseases that will affect roses, conifers, Japanese maples, echinacea, and lettuce, so if you had all of these growing in the same area and all of them were looking bad, the first thing I’d consider is herbicide damage.
There are lots of insects that feed on conifers and almost all of them can cause needle drop depending on the severity of the infestation.
Spider mites are a super common pest. They love the same hot, dry conditions that many pines and junipers thrive in and they’ll feed on the plant using their sapsucking mouthparts.

As they feed, the needles turn yellow or red and fall like raindrops. Scale insects do similar damage.
Borers are the other major pest to watch for. Bark beetles, pine moths, clearwing moths, pine weevils, and more will chew on the plant material and cause needle discoloration and drop.
The species of pest depends on the species of conifer and there are many different types, so it’s a matter of understanding the particular ones that attack your particular plant.
All evergreens drop some needles over the course of their lives. The needles don’t have an indefinite lifespan and at some point they will age and die, dropping to the ground.
The lifespan of the needles depends on the species, but most live for a few years before they need to be replaced.
I can tell you that the first time my Japanese white pine started shedding its needles, I went into full panic mode.

Luckily, before I started pulling out my hair, an arborist friend told me that all was well and it was totally normal.
Conifers with scale-like leaves also drop their foliage as it dies off. More than one gardener has had their own mini panic when their western cedar or arborvitae started turning brown.
A small percentage of leaves turning brown or yellow and falling is totally normal. The trick is to understand the shedding process of your particular species.
Arborvitae shed in the fall, when some of the inner branches turn brown. They tend to hang out for a few months before shedding.
In Japanese pines, come late summer, inner needles turn yellow and fall. Yews drop in spring.
White pines are known for terrifying their owners since they tend to shed a bunch all at once in the fall, where most spruces tend to shed just a few here and there gradually year-round.
Junipers shed in the late summer and may or may not turn brown before they do.
Western red cedars shed late summer, but it can take a few years after the foliage turns brown before they drop.
As a broad overview, arborvitae, Australian, Scots, and white pines persist for about three years. Red pines last four years. Junipers stick around for a decade or so.
Spruce needles last anywhere from four to 10 years.
My advice is to familiarize yourself with the lifecycle of your particular conifer. You will also know that it’s not the normal seasonal drop if the color change is happening on the tips of the branches.
The tips are where the younger needles emerge and these shouldn’t be shedding before the older ones.
Needle drop isn’t always a cause for concern, it’s often a perfectly natural part of the conifer’s lifecycle.
But when foliage starts falling at the wrong time of year or in unusually large amounts, it’s time to take a closer look.

By learning how your specific species behaves, you can quickly tell the difference between normal seasonal shedding and a symptom of stress or disease.
Whether it’s caused by drought, pests, or an unexpected heatwave, early action can mean the difference between recovery and decline.
What symptoms are you seeing? Are you having trouble figuring out the cause? Let us know in the comments section below and we can try to help you out. Pictures help a lot!
And for more information about how to grow conifers in your landscape, check out these guides next:

by Caitlin H,
Jun 17, 2024

You might think you can no longer have many of your favorite treats on a low-carb diet.
These heavenly, delish desserts prove that’s simply not true! All you need to do is swap familiar ingredients with keto-friendly replacements — and voila! You’ll have every confection you desire without going outside the keto diet line.
Here are 10 favorites you can make in 20 minutes or less.

Servings: 6
Net Carbs: 2.5g
Cheesecake lovers, this one’s for you. A delicious blend of four simple ingredients is all you need to create this scrumptious key lime-flavored Keto Key Lime Fluff.
Recipe courtesy Sugar Free Londoner

Servings: 15
Net Carbs: 3g
These Peanut Butter Fudge bites epitomize creamy, rich, and decadent treats. They’re perfect for peanut butter lovers and any keto follower who just wants to pop in a quick treat to satisfy their sweet tooth.
Recipe courtesy All Day I Dream About Food

Servings: 6
Net Carbs: 4g
Feeling fancy? Whip up these no-bake Cookies and Cream Keto Fat Bombs in a jiffy for delicious treats that look as elegant as they taste.

Servings: 25
Net Carbs: 1.6g
For a chocolatey treat that melts in your mouth, try these easy-to-make Keto Brownies. They use almond flour instead of regular flour to ensure they’re low-carb and keto-friendly. Thankfully, the ingredient swap doesn’t skimp on taste, ensuring these are a dessert everyone will love!
Recipe courtesy Chocolate Covered Katie

Servings: 4
Net Carbs: 2g
There’s nothing quite like a fruity, velvety orange creamsicle on a warm summer day. Enter: Orange Creamsicle Jello Whips, a fun-to-make, sugar-free refreshment perfect for enjoying on a patio at sunset.
Recipe courtesy Resolution Eats

Servings: 1
Net Carbs: 4g
With a mug, a few keto-friendly ingredients, and 5 minutes is all you need to create a mouth-watering cinnamon roll snack perfect for a morning meal or after-dinner dessert. Trust us, you’ll repeatedly return to this Keto Cinnamon Roll Mug Cake.
Recipe courtesy The Diet Chefs

Servings: 2
Net Carbs: 7g
Mousse often appears in keto dessert round-ups, and for good reason! It’s a rich, decadent pleasure that takes almost no time to make. This particular Easy Keto Chocolate Mousse recipe is so easy that it’s hard to find a reason NOT to make it.
Recipe courtesy Stylish Cravings

Servings: 10
Net Carbs: 1g
Browned butter is one of the most delicious things you can enjoy, and this recipe makes good use of it. You can quickly whip up these crunchy, mellow Brown Butter Pralines on the stove and then refrigerate or freeze them to enjoy all week long.
Recipe courtesy Low Carb with Jennifer

Servings: 16
Net Carbs: 2g
A buttery base and sugar-free caramel topping make these Keto White Chocolate Caramel Blondies a crowd-pleaser for bringing to a neighborhood barbecue, family gathering, or friendly party. Once they bite into these decadent desserts, they’ll have difficulty believing they’re low-carb.

Servings: 16
Net Carbs: 2.6g
You can have your cookies and eat them too with this easy 15-minute Edible Cookie Dough recipe, which you can enjoy by the spoonful.
Recipe courtesy I Can’t Believe It’s Low-Carb
————————————————————————————

Author: Caitlin H
Diet-to-Go Community Manager
Caitlin is the Diet-to-Go community manager and an avid runner. She is passionate about engaging with others online and maintaining a healthy, active lifestyle. She believes moderation is key, and people will have the most weight loss success if they engage in common-sense healthy eating and fitness.

Tacos are my partner Dave’s absolute favorite meal, so I’m always experimenting with new ways to make them. He loves buffalo wings but hates how messy they can be, so stuffing buffalo chicken into a tortilla with some ranch dressing is his idea of a perfect meal. These buffalo chicken tacos are a regular in our house because they’re quick (ready in just 15 minutes), only require 6 ingredients when you use bottled buffalo sauce, and are delicious. Honestly, I don’t mind when he requests them at least once a week!
I know that finding a meal that’s both satisfying and high in protein but doesn’t take much time to prepare can be a challenge. When I worked as a health coach, this was one of the biggest struggles I heard from the women I worked with. That’s why I created this recipe – to help busy women get a nutritious, flavorful meal on the table in no time.

If you’re a taco fan like my family, be sure to check out some of my other favorites like BBQ Salmon Tacos or Broccoli Black Bean Tacos (a great option for your meatless meals).
Use pre-prepped shredded chicken or rotisserie chicken instead of cooking chicken fresh in this recipe.
Prep Tips:
Cooking Tips:
Pro Tips:

★ Did you make this recipe? Please give it a star rating below!
Cut the chicken into small cubes (about 1/2 inch pieces).
Add chicken to bowl, top with 2 tablespoons buffalo sauce and stir well to coat.
Cook chicken in preheated pan over medium heat. Add chicken to skillet, ensuring it’s in a single layer. Let cook 5 minutes without touching. After 5 minutes, move it around in the pan continuing to cook 3-5 minutes until cooked through (check temperature to 165F).
Add the rest of the buffalo sauce (about 6 tablespoons) to the chicken. Stir well.
Heat tortillas (I like to put them in the toaster oven for 1-2 minutes) to make them more pliable.
Chop the tomatoes and shred the lettuce.
Serve the tacos by putting down lettuce, tomatoes, buffalo chicken in each tortilla and topping with ranch dressing.
Nutrition Facts
Amount per Serving
Where does nutrition info come from? Nutrition facts are provided as a courtesy, sourced from the USDA Food Database.
Here is my go-to homemade 5 ingredient buffalo sauce that uses pantry ingredients and only takes a minute to make!
I bet you have what you need to make ranch dressing in your pantry right now! Try my cashew ranch dressing (dairy free) or if you have avocado on hand, this avocado ranch dressing.
Store leftovers in the fridge for up to 4 days. Be sure to store buffalo chicken separately from tortillas and fresh toppings. Add ranch just before serving.
Reheat options (be sure to remove the lettuce and tomato before reheating):
Repurpose leftovers (since sometimes making the same meal on repeat can get a little boring)

Welcome to Well Rooted Wellness, your transformative journey towards holistic wellness and personal growth. We are an online learning platform that believes in the power of interconnectedness between the mind, body, and environment. Our mission is to empower individuals like you to lead fulfilling lives by nurturing these essential connections.
Contact us: contact@yoursite.com
© Copyright - wrwofficial.com - 2025