41.7 F
Klamath Falls
Saturday, March 14, 2026
Home Blog Page 131

Root Vegetable Barley Soup | The Full Helping

If you’re looking for a nourishing, hearty soup to keep you warm through the colder months, then this root vegetable barley soup has you covered. It’s made with carrots, parsnips, and celery root, all of which are simmered in a savory, tomato-based broth. Barley adds a nice texture, as well as fiber, magnesium, and iron, to the wholesome mix.

There’s a good chance that, at some point in time, you’ve had a bowl of mushroom barley soup. If you have, then you know that barley’s plump, chewy texture is so pleasant in a warm and brothy bowl.

I’ve got a different version of barley soup to share with you today. It’s a little more unusual, but no less delicious, than the version made with mushrooms.

Root vegetable barley soup is the epitome of all things grounding and fortifying for winter and fall.

In theory, the combination of nutty barley and root vegetables might be almost too earthy. Yet a bright, tomato-based broth, which has just the right amount of acidity, keeps this soup lively and lifted.

I first made the soup as part of a “cook the pantry” effort. I was (and still am) trying to make my way through more than a pound of barley.

The soup is more than a convenient recipe for using up leftover barley, though. It’s really tasty and special, and I know that it’ll be a favorite this season and in seasons to come.

The many benefits of barley

I have to admit that I don’t cook with barley often enough, hence the surplus that I just mentioned having at home.

But I should. Each time I put cooked barley into a salad or make a quick and easy barley “risotto,” I’m reminded of how much I love its round grains, with their springy texture.

In addition to being tasty and versatile, barley is also nutrient-dense. Like most whole grains, it’s rich in fiber. And the fiber in barley happens to be soluble fiber, which is typically regulating and therapeutic for those with IBS or sensitive digestive systems.

Barley, like many whole forms of wheat, also has a decent amount of protein: about five or six grams per cooked cup.

Barley is an excellent source of magnesium, an electrolyte that plays numerous important roles in health and well-being. Magnesium aids in maintaining hydration status and bone health, and it’s also important for the nervous system.

Finally, barley is a good plant-based source of iron.

I’ve written about this mineral in the past; it’s especially important for vegans and vegetarians to pay attention to their iron intake, as red meat is one of the most concentrated food sources.

Beans, lentils, and dark leafy greens are really good sources of plant-based iron. Consuming iron-rich foods with Vitamin C can be helpful with iron status, too.

A number of whole grains also provide iron, and barley is one of them. A cup of cooked barley contains over 10% of the recommended daily allowance of iron for an adult female.

Whole grain barley has been placed into a round white bowl.Whole grain barley has been placed into a round white bowl.

Pearl vs hulled barley

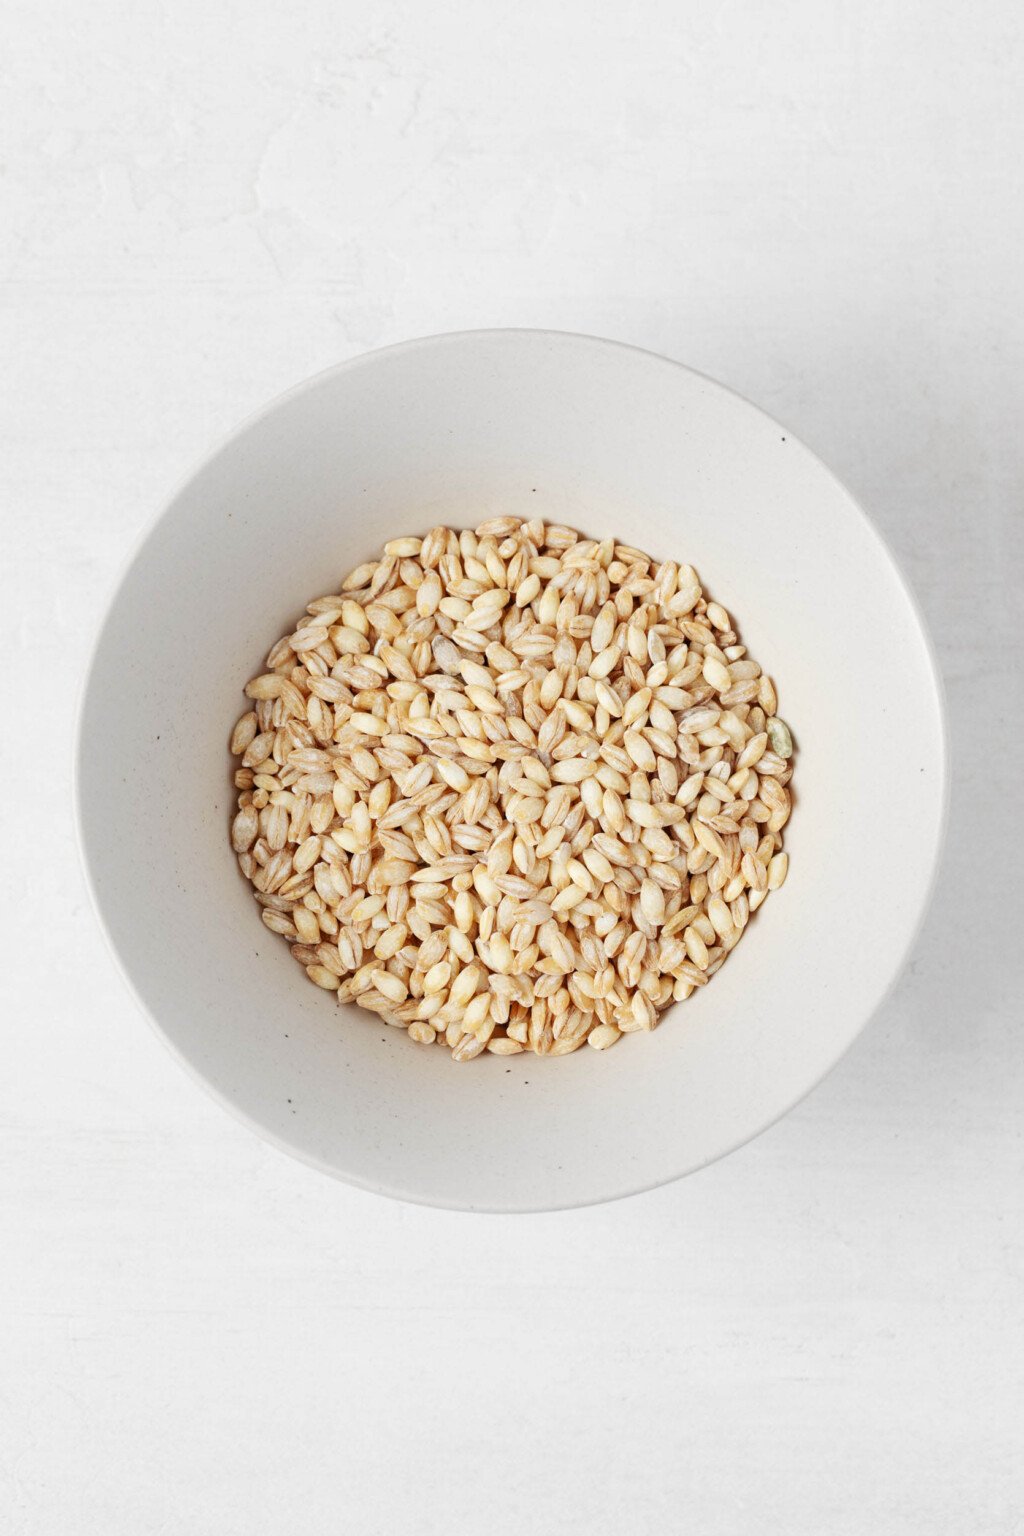
Most barley is sold in one of two forms: pearl or hulled.

In the case of hulled barley, only the outer husk has been removed from the original grain. In order to make pearl barley, both the husk and the bran of the grain are removed.

As a result, pearl barley cooks more quickly—in about twenty-five minutes, rather than forty-five—and I think it has a more pleasant texture than hulled.

Theoretically, the downside of choosing pearl barley is that it has a little less fiber, and possibly less micronutrient content, than hulled. This is because the bran of the grain is inherently nutritious.

In practice, the difference between these two forms of the grain isn’t all that significant.

In fact, depending on which brand you buy, pearl and hulled barley varieties might have equal amounts of fiber. Even if there’s a small difference, barley in all of its forms is still a relatively high-fiber food.

As a registered dietitian, I feel strongly about keeping the big picture in mind. I know that fifteen minutes of extra cooking time can be meaningful to a busy or tired home cook. Choose the variety of grain that’s best for you!

Is barley gluten-free?

No, barley is a gluten-containing grain.

If you need to modify the soup to suit a gluten-free or wheat-free diet, then I recommend substituting the barley with short grain brown rice and simmering it for at least forty minutes.

What are root vegetables, exactly?

This may seem like a ridiculous question for a cookbook author to ask.

But a few years ago, I incorrectly titled what I now know to be an “autumn vegetable bake” as a “root vegetable bake,” which forced me to brush up on the topic.

Here are some popular root vegetables:

  • Carrot
  • Rutabaga
  • Celeriac (celery root)
  • Turnip
  • Parsnip
  • Sweet potato
  • Yam
  • Daikon radish
  • Cassava
  • Yuca
  • Radish

Onions and garlic belong in the category of “modified stem” plants, but they’re often categorized with “true root” vegetables, too.

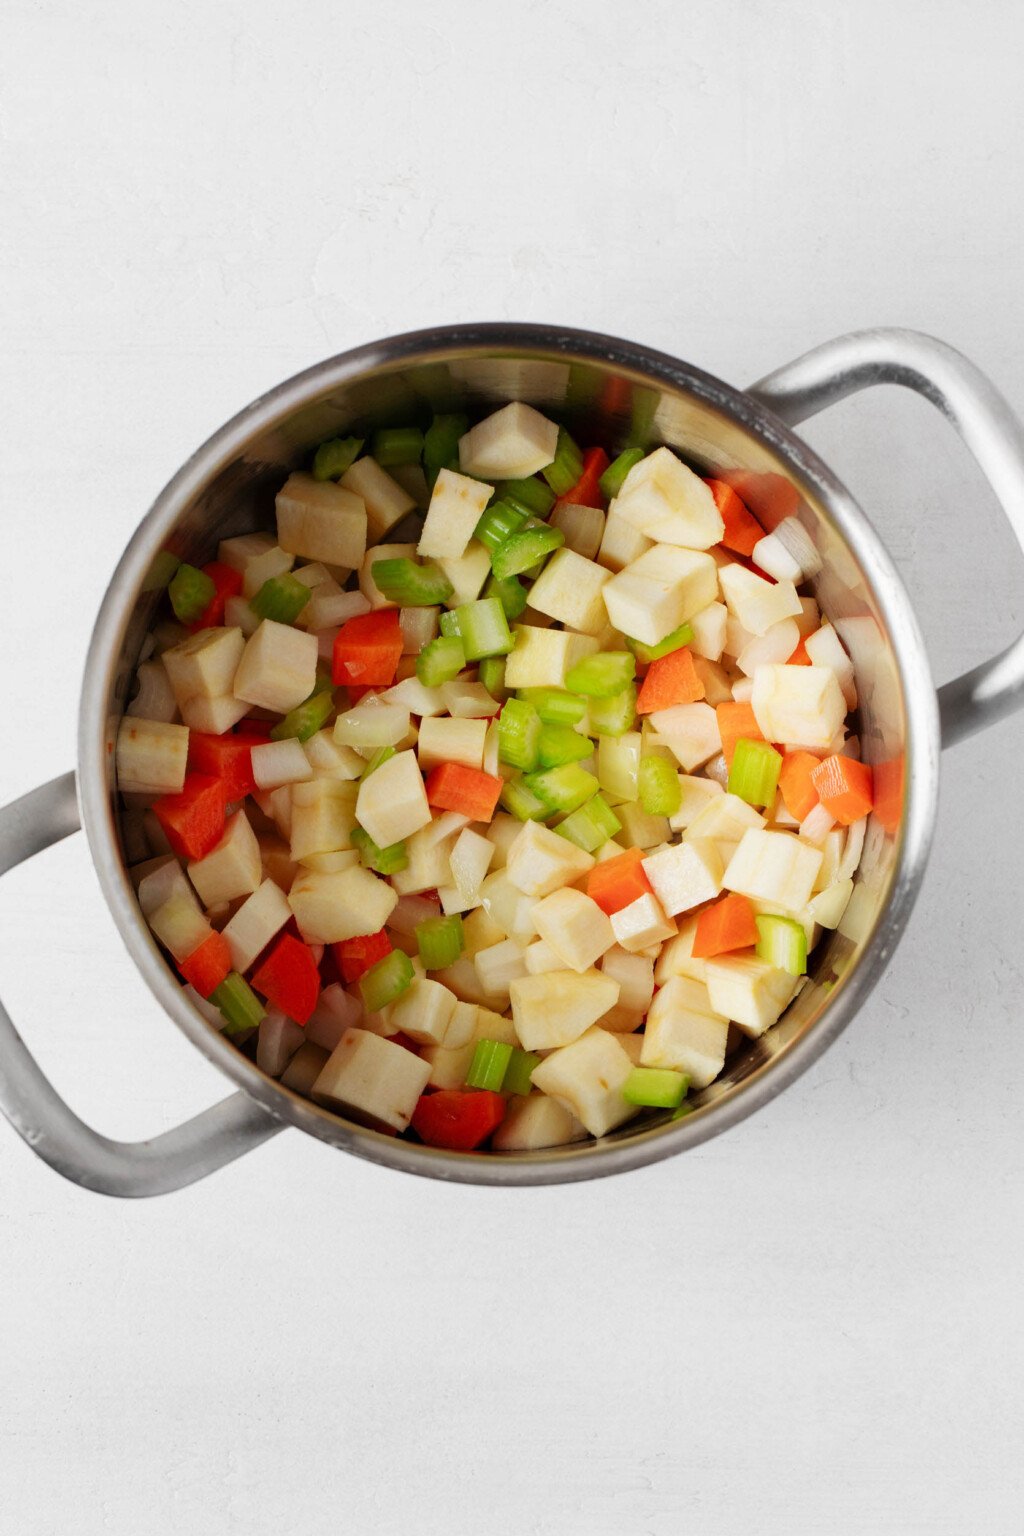
For my root vegetable barley soup, I use carrots, parsnips, and celeriac, as well as onions and garlic.

If you can’t find these veggies or don’t care for them, you can make reasonable substitutions within the root vegetable family.

And, though it’s not a root vegetable, butternut squash would be a nice alternative to the celeriac, carrot, or parsnip.

What I love about using root in the barley soup is that they add a little sweetness, along with savory notes. This soup has more flavor complexity than you might immediately guess.

How to make root vegetable barley soup

This is one of those one-pot recipes that makes preparing soup or stew such a treat.

Step 1: Sauté the vegetables

You’ll start the soup by sautéing all of its vegetables—not just the onion, celery, and carrot, but the parsnip and celeriac as well—in olive oil.

An overhead image of a large soup pot, filled with diced vegetables. An overhead image of a large soup pot, filled with diced vegetables.
To prepare the soup, begin by sautéing all of its vegetables in olive oil till they’re becoming tender.

Once the onions are translucent and the carrots have become tender, you can add the garlic, sauté everything a little more, and move on.

Step 2: Add almost everything else to the pot and simmer away

Next, add nearly all of the remaining ingredients—the barley, tomatoes, broth, and some thyme—to the pot.

A large soup pot is filled with a red, tomato-based broth and numerous root vegetables.A large soup pot is filled with a red, tomato-based broth and numerous root vegetables.
The barley and vegetables should simmer for 30-45 minutes, depending on which type of barley you use.

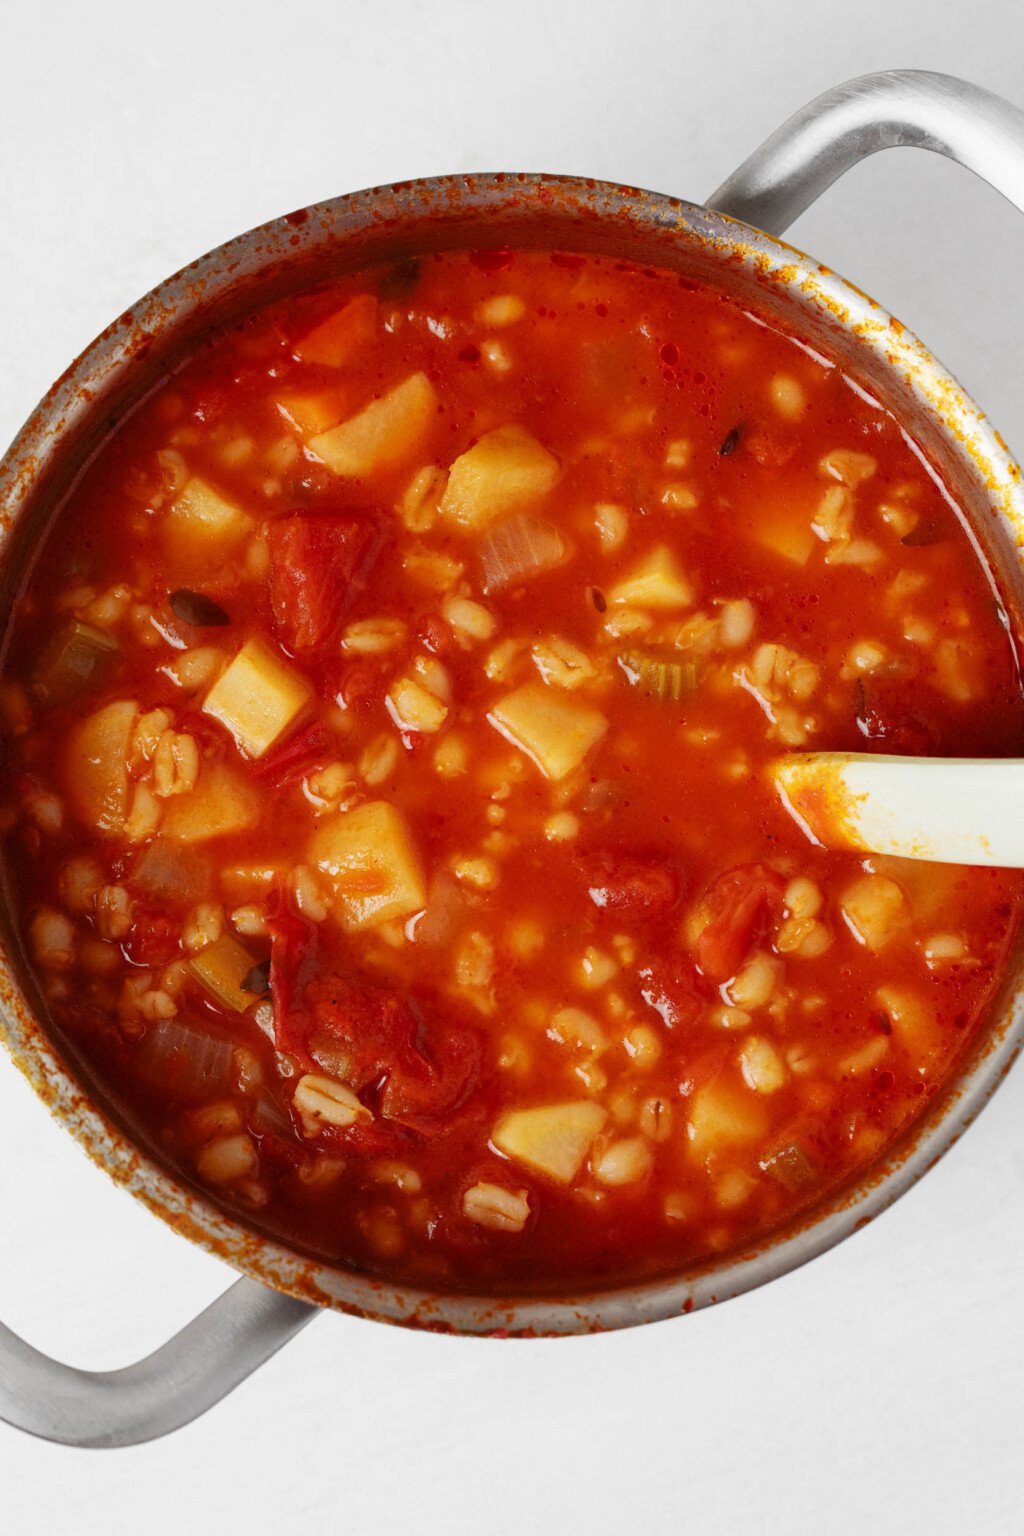
Bring the mixture to a boil, then turn the heat to low. Cover and simmer everything for thirty minutes if using pearl barley, forty to forty-five if using hulled.

Once the barley is tender, yet still has some chew, the soup is ready.

Step 3: Season and serve

Finally, taste the soup.

Depending on what brand of broth and crushed tomatoes you’ve used, the soup may need some extra salt, and it may not.

Add as much freshly ground black pepper as you like.

And finally, I like to stir just a small splash of white balsamic vinegar into the soup, in order to amplify sweetness and acidity.

A bowl of root vegetable barley soup, made with a brothy tomato base, is served in a round white bowl. The bowl rests on a white surface.A bowl of root vegetable barley soup, made with a brothy tomato base, is served in a round white bowl. The bowl rests on a white surface.

At this point, you can go ahead and serve the root vegetable barley soup. A finishing drizzle of olive oil or a few leaves of fresh thyme (or parsley) are a nice touch for your bowl.

I like to have the soup with a simple salad, like my butter lettuce side salad or Brussels sprout kale salad.

However, a heartier, autumnal salad, like my winter panzanella, kale salad with cranberries, lentils, and coconut “bacon,” or perfect winter chopped salad, would also be nice alongside.

Toast triangles, croutons, and crackers are all nice for some added crunch, too.

Meal prep and storage

This couldn’t be a better dish for meal prep and make-ahead cooking. Once prepared, the soup can be stored in an airtight container in the fridge for up to six days or frozen for up to eight weeks.

A bowl of root vegetable barley soup, made with a brothy tomato base, is served in a round white bowl. The bowl rests on a white surface.A bowl of root vegetable barley soup, made with a brothy tomato base, is served in a round white bowl. The bowl rests on a white surface.
A bowl of root vegetable barley soup, made with a brothy tomato base, is served in a round white bowl. The bowl rests on a white surface.

Prep Time: 20 minutes

Cook Time: 45 minutes

Total Time: 1 hour 5 minutes

Yields: 6 servings

  • 2 tablespoons olive oil (plus extra for serving, if desired)
  • 1 large yellow onion, diced
  • 2 stalks celery, trimmed and diced
  • 2 large or 3 small carrots, trimmed, scrubbed or peeled, and diced
  • 2 large or 3 small parsnips, trimmed, scrubbed or peeled, and diced
  • 1 turnip or celery root, peeled and diced
  • 2 cloves garlic, minced
  • 1 cup dry pearl barley (180g; substitute farro or short-grain brown rice)
  • 3 cups crushed tomatoes (1 28-ounce / 850g can)
  • 7-8 cups vegetable broth (1.65-1.9L)
  • 2 teaspoons fresh thyme leaves or 1 teaspoon dried thyme
  • Salt
  • Freshly ground black pepper
  • White balsamic vinegar (optional, to taste)
  • Heat the olive oil in a large, heavy-bottomed pan over medium heat. Add the chopped vegetables. Sauté the vegetables for ten minutes, or until the onions are translucent and the carrots are becoming tender. Stir in the garlic and sauté for another minute.

  • Add the barley, crushed tomatoes, broth, and thyme to the pot. Bring the mixture to a boil, then turn the heat to low. Cover the pot and simmer for 30 minutes.

  • Stir the white balsamic vinegar into the soup. Taste and add salt and freshly ground pepper as needed; the amount of salt necessary will depend on the broth that you’ve used. Serve the soup with an additional drizzle of olive oil or a few leaves of fresh herbs, if you like. Enjoy.

Soup can be stored in an airtight container in the fridge for up to six days and frozen for up to eight weeks.

With all of the holiday commotion of November and December, it’s so nice to prepare a dish that’s simple, homey, and humble, yet an absolute delight to eat.

This vegetable barley soup is a perfect example. I hope you’ll find some comfort in it soon.

xo

Measles math: What to know about 1,001 measles cases across the country : Shots

0

A measles advisory is shown tacked to a bulletin board outside Gaines County Courthouse on April 09, 2025 in Seminole, Texas.

Brandon Bell/Getty Images North America


hide caption

toggle caption

Brandon Bell/Getty Images North America

The Centers for Disease Control and Prevention reports there have been 1,001 confirmed measles cases in the U.S. this year. It’s the second-highest case count in 25 years, topped only by 2019, when more than 1,200 measles cases were detected. The best way to contain measles is two doses of the MMR vaccine (measles, mumps and rubella).

Here are numbers to help you understand how measles is spreading now.

1,001 cases:

The CDC keeps track of confirmed cases and is updating its count on a weekly basis. On May 2, it reported 935 cases. On Friday, it reported cases have ticked past the thousand mark, to 1,001.

31 jurisdictions:

Measles cases have been reported in 31 jurisdictions, up from 30 on May 1. Cases have been reported in more than half of U.S. states this year, but not all of those states have full-fledged outbreaks.

14 outbreaks:

An outbreak is defined as 3 or more related cases. So while the total number of cases is important, the number of outbreaks shows where the virus is spreading. The number of outbreaks went from 12 last week to 14 this week.

By far the largest outbreak is centered in west Texas, where measles has been spreading since January. Reported cases in that outbreak totaled 683 last week and 709 this week.

3 deaths

Two unvaccinated, otherwise healthy children in Texas have died of the disease. One adult in New Mexico was diagnosed with measles posthumously.

18 people

In a population where no one is vaccinated, a single person sick with measles could go on to infect up to 18 others on average. By comparison, when 82% of a population is vaccinated, a sick person would infect about 2 to 3 other unvaccinated people on average.

95% vaccination rate

To prevent outbreaks from spreading within a community, there needs to be a vaccination rate of 95%, according to the CDC. Below that threshold, a community’s herd immunity can begin to erode. In Gaines County, Texas, the epicenter of the outbreak in that state and where measles is still spreading, the kindergarten vaccination rate against measles is just under 82%.

Herd immunity means that enough members of a community are immune to a contagious disease that it is unlikely to keep spreading because there aren’t enough people vulnerable to infection. Herd immunity protects people with weakened immune systems and children who have not yet completed their two-shot series of the measles vaccine.

12 months

It’s an open question how long measles will keep spreading in the U.S. The Texas outbreak, the biggest one, began in January. If any single outbreak continues to result in ongoing transmission for more than 12 months, the U.S. will lose its measles “elimination” status. That’s a technical term in public health for contagions that have been well-controlled for 12 months or more. The U.S. has had that status for about 25 years.

GPOD on the Road: Kielian in the Netherlands

Happy Friday, GPODers!!

For the past several weeks we’ve been enjoying spring gardens all across North America, but today we’re joining Kielian DeWitt on her recent trip to one of the most iconic locations for spring flowers: the Netherlands.

Kielian has shared her stunning garden in Montana many times in the past (Seasons in a Montana Garden, More Months from Kielian’s Garden, Kielian’s Garden in Montana, Kielian’s Montana Garden in Autumn, and More from Kielian’s Garden to name a few), and last year she treated us to an incredible assortment of photos from the annual Bitterroot Secret Garden Tour™ she helps facilitate as president of the board. If you missed that series, be sure to check it out: A Nurseryman’s Expansive Garden; Meticulously Maintained Urban Garden; An Eco-friendly, Native Plant Garden; The Alice in Wonderland Garden; and Rural Garden on a Montana Ranch. In her latest submission she is sharing two very different sites she visited in the Netherlands—the first is the world’s largest floriculture marketplace, and the second is a very famous botanical garden.

Hello from Holland!

Royal FloraHolland is the largest international marketplace for flowers and plants. It is a cooperative of 3,800 flower and plant growers that allows buyers to purchase cut flowers and plants through a digital marketplace auction system. Over 5,300 suppliers offer 23,000 different flowers and plants for auction. During a typical day, 46 million flowers are sold at a €22 million daily turnover. Roses are the number one seller throughout Europe, with tulips coming in second and phalaenopsis orchids coming in third.

After bids are made and accepted, electric carts carry the sold flowers to lanes labeled for the different buyers. Within one day, the flowers are shipped to and received by each European country.
There is a film at the end of the photographs showing the hectic but organized chaos of a typical working day.

The first half of today’s post is like our own version of the How It’s Made television series I used to watch on the Discovery Channel in the early 200os. When we get lost in our gardens, it can be easy to forget that plants are still a big business that requires connecting buyers and sellers.

rows of potted plants in a warehouseThough the operation is very modern and high-tech now, Royal FloraHolland started from humble beginnings. The birth of the flower auction can be traced back to 1910, when discussions were sparked at two local pubs in the town of Aalsmeer, where this auction house is located. Now the current facility is one of the largest buildings in Europe, occupying an area equivalent to 200 football fields. While it looks like a lot of plants in these photos, it’s only a small fraction!

stacks of foliage plants in a warehouseWhile the Netherlands is undeniably known for its flowers, plants of all sorts are bought and sold through Royal FloraHolland. More than 30,000 species of flowers and plants are traded, and between 1,200 to 1,500 new botanical varieties join the catalog every year.

Above is the video that Kielian mentioned in her introduction. This transport line that allows plants and flowers to move throughout the warehouse is 18 kilometers (11.18 miles) long. It’s like a giant plant highway!

Next up is just a small selection of the photos shared from Keukenhof Park in Lisse, Netherlands. I will be sharing a full post of this iconic garden on Monday, but I wanted to end our Friday with some of these outrageously colorful flowers.

garden full of colorful spring flowersFor many gardeners and plant aficionados, Keukenhof is well-known and high on their bucket lists. But this is only a preview of Kielian’s photos, so I won’t get into too many specifics about this iconic spring location just yet; I’ll let the incredible photos speak for themselves.

orange, purple, and yellow spring bulbs planted in massYou might have already seen this garden without realizing it. If you’ve ever seen those photos of massive rows of spring bulbs with Dutch windmills in the distance, there is a good chance it was this garden.

mixed spring bulb plantingBut massing is far from the only design technique employed, and various colors get mixed and match to perfection.

close up of bright red tulipsThere are so many different kinds of bulbs to enjoy at Keukenhof, but sometimes the classics are just as exciting as the rare varieties. Red tulips are always delightful, and ‘Queensday’ (Tulipa ‘Queensday’, Zones 3–8) is a particularly beautiful cultivar.

white and pink spring flowers in a large containerLastly, a pot of mostly white is still an exciting sight when it’s filled with a wonderful mixture of textures and forms. The unbelievable number of different bulbs that can be found at Keukenhof will give you a whole new perspective on spring bloomers.

And this is only a taste of what Kielian captured at Keukenhof, so keep an eye on your inbox Monday to learn more about this iconic spring display and see more fabulous photos.

While you wait for the continuation of Kielian’s submission, consider sharing your own adventures in spring gardens this weekend. Whether it’s photos of your own spring plantings or a public garden or park that had a gorgeous display, we’d love to see it on Garden Photo of the Day! Follow the directions below to submit photos via email, or send me a DM on Instagram: @agirlherdogandtheroad.


We want to see YOUR garden!

Have photos to share? We’d love to see your garden, a particular collection of plants you love, or a wonderful garden you had the chance to visit!

To submit, send 5–10 photos to [email protected] along with some information about the plants in the pictures and where you took the photos. We’d love to hear where you are located, how long you’ve been gardening, successes you are proud of, failures you learned from, hopes for the future, favorite plants, or funny stories from your garden.

Have a mobile phone? Tag your photos on Facebook, Instagram or Twitter with #FineGardening!

Do you receive the GPOD by email yet? Sign up here

Diet-to-Go is the Catalyst For Improved Diabetes and Wellness

by Caitlin H,

Jun 24, 2024

Sliced Turkey

Name: Richard Frank

Age: 74

Occupation: PR firm owner + entrepreneur

Meal Plan: Balance-D

Favorite Meal: Sliced Turkey

Start Date: Jan. 3, 2023

Starting Weight: 210 lbs.

Height: 6 feet

Pounds Lost: 15

When Richard’s two children sat down with him on New Year’s Day to outline several life changes he needed to make to start caring for himself better, he took it to heart.

Richard, a longtime public relations firm owner and entrepreneur, had spent his days at a care facility helping look after his late wife, Linda. Linda had a rare neurological condition called progressive supranuclear palsy (PSP), which causes problems with balance, movement, vision, speech, and swallowing.

“I was there every day and running my business,” Richard said, adding that he often worked from 8 p.m. to 3 a.m. so he could spend time with Linda. “I was not eating well. I was running myself ragged and not taking any time for myself.”

His kids—49-year-old Tracy and 45-year-old Wes—emphasized several life changes: fitness, working less, family and social time, and eating healthier. Eating healthier was especially important to Richard. As a person with diabetes, he said he needed to better control his blood sugar levels, which often spiked due to poor food choices.

“My key focus was to get my diabetes under control,” Richard said. “I take insulin twice a day — even so, my blood sugar levels were erratic. I thought I could better control my numbers by getting into a stable meal program.”

Richard signed up for Diet-to-Go two days later, on Jan. 3rd. Within five weeks, he lost 15 pounds and saw a rapid stabilization in his blood sugar levels.

“For me, just the process of having a box show up on my doorstep with meals for the week was sufficient guidance,” Richard said. “I got accustomed to that style of meal, that style of eating, that quantity of food.”

At the time, Richard and his friend of 25 years, Matt, had just started a business selling high-performance home entertainment systems. Richard said Matt cared for his 90-year-old mother while working hard to meet the demands of starting a business.

“Starting a company is busy, busy, busy, and to do all the things I’ve asked him, it’s been hard for him to take care of himself,” Richard said.

Matt’s weight grew to 460 pounds, and Richard decided to have his Diet-to-Go meals sent to Matt’s home in Phoenix instead.

In five months, Matt dropped 80 pounds.

“It was much better quality food than he was preparing, much healthier for him and his mom,” Richard said, adding that the weight loss increased Matt’s confidence to present their company’s product to prospective buyers. “It was a boon to his life.”

Richard said it was also a blessing to his own life, serving as the catalyst he needed to make significant changes, including working with a personal trainer twice a week, prioritizing sleep, and spending quality time with his family.

“Diet-to-Go got me into the habit of eating more balanced meals, eating smaller meals,” he said. “It was enough to give me the nutrition and energy to get everything going.”

Shortly after transferring his meal plan to Matt, Richard had knee surgery. During that time, he focused on completing physical therapy. Later, in 2023, he joined an eight-week wellness program that took a balanced approach to health. It included chiropractic and massage appointments, fitness, heart rate monitoring, and nutrition counseling.

“I started following good habits with Diet-to-Go, but, even so, felt I could be doing better,” Richard said. “[The wellness program] engaged me more with food preparation.”

Richard substituted unhealthy carbs like pasta and rice with vegetables and lean proteins.

“I’m a busy guy,” he said. “I trust in the ingredients I choose, and I trust in my portion control. I don’t check ounces, quantities, or grams. I don’t micromanage it; I just watch it carefully.”

Richard said Diet-to-Go and the wellness program helped set him up for success, even through Linda’s passing in the summer of 2023.

“Specifically, about Diet-to-Go, the factor that helped me the most was that it showed up at my door — the ease of customer access,” he said. “Concerning my longer journey, it was fueled by my success with those first five weeks of Diet-to-Go.”

Richard said he now feels confident in his understanding of nutrition and portion size and enjoys making meals for himself and his girlfriend.

“Last night, I made a dinner of braised sea scallops on spaghetti squash…and a side salad with low-calorie Greek goddess dressing,” he said. “It was a really good meal. I’m having fun experimenting and learning as I go.”

Richard advises others to take it one step at a time.

“Every day is different. You’ll have some days when you’re good and some you’re not. That’s okay, give yourself grace,” he said. “Keep trying to make each week better than the week before, and you’ll get there.”


————————————————————————————


Author: Caitlin H

Diet-to-Go Community Manager

Caitlin is the Diet-to-Go community manager and an avid runner. She is passionate about engaging with others online and maintaining a healthy, active lifestyle. She believes moderation is key, and people will have the most weight loss success if they engage in common-sense healthy eating and fitness.


Gnocchi Marinara (10 Minute Meal)


Gnocchi marinara is a simple, one pan meal that cooks in just 10 minutes. This gnocchi with marinara sauce is flavorful and filling without complicated ingredients. This recipe is quick and easy and made with 6 simple pantry ingredients and minimal prep. Gnocchi with white beans is the recipe to make when you don’t have a lot of time for dinner.

If you love this gnocchi in sauce recipe, you have to try these beans with marinara (serve with toast or crackers) or this creamy tomato pasta without cream.

Wood spoon lifting gnocchi from the skillet of gnocchi with tomato sauce.Wood spoon lifting gnocchi from the skillet of gnocchi with tomato sauce.
This post contains affiliate links. As an amazon associate I earn from qualifying purchases. Click here to read my policy and more about affiliate links.

Gnocchi alla marinara spotlight

  • Easy to make
  • Use store-bought, shelf stable gnocchi
  • One pot meal
  • Packed with flavor
  • Hearty & filling (thanks to the white beans)
  • Gluten free and dairy free (using gluten free gnocchi and vegan parmesan)
Ingredients to make tomato gnocchi.Ingredients to make tomato gnocchi.

Ingredients

  • Shelf stable gnocchi – I used chickpea gnocchi to make this gluten free and as a way to add more protein and fiber However, this recipe will work with any shelf-stable gnocchi.
  • Marinara – use your favorite store bought or homemade marinara
  • Baby spinach – this adds color and more veggies to the dish
  • White beans – unlike a traditional gnocchi with tomato sauce, this recipe adds white beans as a way to make this recipe more filling.
  • Parmesan cheese – use regular, vegetarian or dairy free to make this recipe vegan.
  • Fresh basil – this adds more flavor to the end dish

Cooking gnocchi in sauce

Add gnocchi and marinara in a large skillet (with a tight fitting lid). Turn heat to medium high.

Once the tomato sauce is bubbling, stir the skillet well then cover and cook for 2 minutes (this will help fully cook the gnocchi quickly).

After 2 minutes, take off the lid, stir well then add the baby spinach, and half the parmesan cheese. Stir well. Add ½ – ¾ cup of water to help thin out the sauce.

When sauce has reached your desired consistency and spinach is wilted, turn off the heat and add the rest of the parmesan and chopped fresh basil. Serve hot.

Gnocchi in marinara sauce in a large cast iron skillet.Gnocchi in marinara sauce in a large cast iron skillet.

Top tips

  • Stir gnocchi often to ensure they don’t stick to the bottom of the pot when cooking
  • The starch from the gnocchi will thicken the sauce, so you will need to add water or the sauce will be too thick.
  • You don’t have to pre-cook the gnocchi, it cooks quickly in the sauce.

Other additions

  • Spicy: Add crushed red pepper flakes
  • More fresh herbs: Add flat leaf parsley, oregano
  • Make it cheesy: mozzarella cheese
Forkful of gnocchi with tomato sauce over the bowl.Forkful of gnocchi with tomato sauce over the bowl.

Common questions

What is gnocchi?

Gnocchi is a type of pasta that look similar to a dumpling but is typically made with potatoes and flour.

I used these chickpea flour gnocchi, they are gluten free and packed with protein and fiber, making this dish more filling

What to serve along with gnocchi and white beans

Simple green salad with creamy balsamic dressing

Greek Salad with Kalamata Olive Dressing

Air Fryer Chicken Meatballs or Italian Chicken Chunks

Don’t have marinara on hand?

Make your own pasta sauce with 5 simple ingredients

Creamy tomato gnocchi in a skillet with a wood spoon resting in the skillet.Creamy tomato gnocchi in a skillet with a wood spoon resting in the skillet.

Storing leftovers

  • Fridge: Store in a well sealed container in the fridge for up to 3 days.
  • Freezer: Store in a freezer tight container for up to 3 months. I like to store in ½ cup portions using Soupercubes, then transferring to a Stasher bag.

If you gnocchi, you should try

Air Fryer Cauliflower Gnocchi

Tomato Gnocchi Soup

Homemade Pumpkin Gnocchi

★ Did you make this recipe? Please give it a star rating below!

  • 16 oz shelf-stable gnocchi I used Delallo Chickpea Gnocchi
  • 16 oz marinara
  • 2 cup chopped baby spinach
  • 1/2 cup parmesan cheese
  • 3 tablespoons fresh basil, chopped
  • 3/4 cup water start with 1/2 cup
  • 15.5 oz can white beansgreat northern white, cannellini beans
  • Add gnocchi and marinara sauce to a skillet with a tight fitting lid. Turn the heat on medium and allow the sauce to start to bubble. Stir regularly (this typically takes 3-4 minutes).

  • Once the marinara sauce is bubbling, place the lid on the pot and cook 2 minutes.

  • After 2 minutes, remove the lid, stir the pot and add the drained and rinsed white beans, chopped spinach and 1/4 cup of the parmesan cheese. Stir well. Add 1/2 cup of water to the pot. Stir well. Add up to 1/4 cup more water as the gnocchi continues to cook, until the sauce reaches your desired consistency.

  • Once the spinach is wilted, turn off the heat, chop the basil and serve by topping with remaining parmesan cheese and fresh basil.

Tips:
  • Stir gnocchi often so they don’t stick to the bottom of the pot
  • The starch from the gnocchi will thicken the sauce, so you will need to add water or the sauce will be too thick.
  • You don’t have to pre-cook the gnocchi, it cooks quickly in the sauce.

Nutrition Information

Nutrition Facts

Amount per Serving

Where does nutrition info come from? Nutrition facts are provided as a courtesy, sourced from the USDA Food Database.

Let others know by rating and leaving a comment below!

Trump Has Called for More Babies but Dismissed Fertility Experts

0

Every year, tens of thousands of young women opt to freeze their eggs, an expensive and sometimes painful procedure. As more Americans postpone childbearing, the numbers are growing.

But there are many unknowns: What is the optimal donor age for freezing? What are the success rates? And critically: How long do frozen eggs last?

The answers to those questions may be harder to find. In its drastic downsizing of the Centers for Disease Control and Prevention, the Trump administration abolished a federal research team that gathered and analyzed data from fertility clinics with the purpose of improving outcomes.

The dismissal of the six-person operation “is a real critical loss,” said Aaron Levine, a professor at the Jimmy and Rosalynn Carter School of Public Policy at Georgia Tech, who has collaborated with the C.D.C. team on research projects.

“They had the most comprehensive data on fertility clinics, and their core value was truth in advertising for patients.”

Barbara Collura, chief executive of Resolve: The National Infertility Association, said the loss of the C.D.C. team would be a setback to both infertile couples and women contemplating the freezing and banking of eggs.

The termination arrives as politicians have become increasingly concerned with falling fertility rates in the United States. President Trump has declared himself the “fertility president” and issued an executive order expanding access to in vitro fertilization.

“It doesn’t square with the White House leaning all in on I.V.F.,” Ms. Collura said.

One in seven women, married or unmarried, experiences infertility, she said: “So I just look at those statistics and it’s disappointing, if not mind-blowing, that our nation’s public health agency has decided we’re not going to talk about it or do work on it.”

Asked why the team had been eliminated, a Health and Human Services spokeswoman said the administration is “in the planning stages” of moving maternal health programs to the new Administration for a Healthy America. She did not provide other details.

The scientists on the team, the National Assisted Reproductive Technology Surveillance System, were trying to solve a number of riddles surrounding I.V.F. Planned research included a study looking at the birthrates involving eggs and embryos that had been frozen and banked for several years.

“We don’t have great data on the success rates of egg freezing when women do it for their own personal use, just because it’s relatively new and difficult to track,” said Dr. Levine.

The unknowns weigh on women who want to have children. Simeonne Bookal, who works with Ms. Collura at Resolve, froze her eggs in 2018. She knew she wanted to have children, but was waiting to find the right partner.

Earlier this year, Ms. Bookal became engaged; the wedding will be held next spring. She is now 38, and said the banked eggs had provided her with a “security blanket.”

Though she still can’t be completely confident she will be able to get pregnant and have children, “I would be way more stressed if I hadn’t frozen my eggs.”

Precise success rates for the procedure are elusive, because many of the studies published so far are based on theoretical models that rely on data from patients with infertility, or women who are donating their eggs. They are different in many ways from women who are preserving their own eggs for future use.

Other studies are small, reporting on outcomes involving fewer than 1,000 women who have returned to thaw their eggs and undergo I.V.F., said Dr. Sarah Druckenmiller Cascante, clinical assistant professor of obstetrics and gynecology at NYU Langone and the author of a recent review paper on the subject.

“The data is limited, and it’s important to be honest with patients about that,” she said.

“I don’t like to think of it as an insurance policy that is guaranteed to pay out, resulting in a baby, but rather as increasing your odds of having a biological child later in life, especially if you do it when you’re young and get a good number of eggs.”

The C.D.C. team maintained a database, the National ART Surveillance System, which was created by Congress in 1992 and calculated success rates for each reporting fertility clinic. It needs constant updating, and its future is now in doubt.

The Society for Assisted Reproductive Technology has a similar database available to researchers. But it is slightly less comprehensive than the C.D.C.’s, as it only includes information from its member clinics, about 85 percent of the nation’s fertility clinics.

That database is not attended by a dedicated research team, said Sean Tipton, chief advocacy and policy officer at the American Society for Reproductive Medicine.

Questions about the risks and benefits of egg freezing have taken on an added urgency as the number of women banking their eggs for future use has grown dramatically.

The procedure was no longer deemed experimental as of 2012. In 2014, only 6,090 patients banked their eggs for fertility preservation; by 2022, the number had climbed to 28,207. The figure was 39,269 in 2023, the last year for which data is available.

How to Get Desert Rose to Bloom?

Adenium obesum, also referred as Desert rose is a succulent flowering plant renowned for its thick, sculptural trunk and vivid, trumpet-shaped blooms.

When in flower, it brings a bold, tropical feel to gardens and indoor spaces alike. However, getting it to bloom consistently can be a challenge, especially if it’s not receiving the right conditions.

You don’t have to worry; with the right care, a little patience, and some attention to its needs, you can encourage your desert rose to burst into beautiful bloom.

It thrives in warmth, full sunlight, and well-draining soil—and benefits from a bit of seasonal adjustment.

Before heading towards tips on blooming desert rose, let’s first know blooming period of adenium.

To make your desert rose to bloom, provide 6 hours of direct sunlight regularly with well-draining soil. Allow the soil to dry out completely between waterings, especially during cooler months.

Enrich the plant with a balanced, low-nitrogen fertilizer every 4–6 weeks in spring and summer. In winter, reduce watering and stop fertilizing to allow the plant to rest.

With the right care, your desert rose will reward you with vibrant, beautiful blooms year after year.

How Long Does it Take for a Desert Rose to Bloom?

A desert rose typically takes about 7 to 12 months to bloom from seed, but this can vary depending on growing conditions.

If you’re starting with a mature plant or a cutting, you might see flowers sooner—sometimes within a few months—especially if it’s kept warm and gets plenty of sunlight.

Also Read: 18 Houseplants with Red and Green Leaves

That said, desert roses don’t bloom on a strict schedule. They usually flower in late spring and summer, but with the right environment, they can bloom more than once a year.

Just make sure it has well-draining soil, bright light, and a bit of a dry rest period in winter to help trigger those blooms when the weather warms up.

How to Get a Desert Rose to Bloom?

adeniumadenium

Sometimes, a desert rose just needs the right nudge to put on its spectacular floral display. While these plants are tough and adapted to dry, sunny climates, they won’t bloom just because they look healthy.

Getting those blooms to show up takes a bit of know-how—and timing. Think of it like setting the stage for a performance: the conditions have to be just right.

Let’s go over what actually makes a desert rose burst into bloom, from sunlight and soil to feeding and rest.

Enough Sunlight

Desert roses thrive in full sun. If yours is stuck in a dim spot, it’s no wonder the blooms are missing. These plants evolved in the blazing heat of Africa and the Arabian Peninsula—they don’t just tolerate sunlight, they need it.

Outdoors, a south-facing spot that gets sun all day is ideal. If you’re growing it indoors, place it near the brightest window you’ve got, preferably one that faces south or west. If natural light is limited, a good grow light can make up the difference.

Also Read: How to Grow Adenium from Cuttings?

Avoid Overwatering

Too much water is one of the quickest ways to stop a desert rose from blooming. It stores moisture in its thick trunk and roots, so it doesn’t like sitting in damp soil. Overwatering leads to lazy roots and fewer flowers—or worse, root rot.

Let the soil dry out completely between waterings. During the active growing season (spring to early fall), water deeply but infrequently. In winter, cut back even more, sometimes going weeks without watering at all.

Use Well-Drained Potting Soil Mix

Heavy soil that holds onto moisture can smother the roots and stall blooming. Desert roses do best in gritty, fast-draining soil that mimics their natural environment.

A quality cactus or succulent mix works well, but you can also make your own blend with coarse sand, perlite, and a bit of regular potting soil. The key is to keep things airy and well-drained so the roots stay healthy and ready to support flowering.

Apply Balanced Fertilizer

When it comes to fertilizer, desert roses appreciate a little boost during spring and summer. But don’t go overboard—too much nitrogen encourages lush leaves, not flowers.

Use a balanced or low-nitrogen fertilizer (something like 10-30-10) every 4 to 6 weeks while the plant is actively growing. Liquid or slow-release options both work, just follow the label and avoid fertilizing in fall or winter when the plant goes into rest mode.

Allow them to Reset During Winter

Desert roses benefit from a dormant phase in cooler months. It’s nature’s way of letting the plant rest and reset, which often triggers blooming when spring returns.

In winter, reduce watering significantly, stop fertilizing altogether, and keep it in a cooler (but frost-free) spot if possible—somewhere around 60°F is fine. This quiet period helps the plant conserve energy and prepare for a strong blooming season ahead.

Prune to Encourage New Growth

A well-timed pruning session can spark fresh growth and more blooms. Desert roses tend to flower on new branches, so trimming leggy or weak stems in early spring can give you better results.

Use clean, sharp pruners and aim to cut just above a leaf node. Don’t go overboard—shaping the plant while encouraging branching is the goal. Bonus: pruning also helps maintain that classic bonsai-like form desert roses are loved for.

Keep It Warm and Protected

These plants hate the cold. Anything below 50°F can stress them out and delay blooming. If you live in a cooler climate, be ready to bring your desert rose indoors when nighttime temps start to drop.

While indoors, avoid drafty spots or cold windowsills. They prefer warmth and steady conditions—too much fluctuation can throw off their rhythm.

Check this: 19 Plants that Have Heart Shaped Leaves

Why Your Desert Rose Plant is Not Blooming?

Before you can encourage a desert rose to bloom, it’s important to understand why it might not be flowering in the first place.

A plant that refuses to bloom is often sending signals that something isn’t quite right in its environment or care routine.

If your desert rose isn’t blooming, don’t worry—it’s not always a sign of a serious problem. Often, the plant is simply reacting to its environment. Desert roses are particular about their care, and a few small missteps can keep them from flowering, even if they look healthy overall.

One of the most common issues is lack of sunlight. These plants are true sun-lovers and need at least six hours of direct sun each day to build up the energy to bloom. Without it, they may grow plenty of leaves but hold back on flowers. If yours is indoors, a bright window might not be enough—consider using a grow light to give it a boost.

Watering is another area where things often go wrong. Desert roses are succulents and don’t like wet feet. Overwatering can lead to root rot or encourage leafy growth at the expense of blooms. Let the soil dry out completely between waterings and make sure the pot drains well.

Soil quality also plays a big role. If the mix is too heavy or holds onto moisture, the roots can become suffocated, which affects blooming. A gritty, well-draining soil—like a cactus mix with added sand or perlite—will help keep the roots healthy and support flower production.

Age and seasonal care matter too. Young plants may not bloom for their first year, and recently repotted ones often need time to settle. On top of that, desert roses benefit from a cool, dry rest in winter. Reducing water and stopping fertilizer during this time encourages them to bloom strongly when spring rolls around.

Also Read: 10 Big Leaf Houseplants for Your Indoor Jungle

Conclusion

Getting a desert rose to bloom isn’t complicated—but it does require the right mix of light, water, warmth, and timing. Think of it as a plant that thrives on rhythm: sun by day, dry feet, rest in winter, and a little encouragement in the form of food and pruning.

Once you dial in those basics, you’ll be rewarded with vibrant, trumpet-shaped blooms that make all the effort worth it. So don’t give up on your desert rose—sometimes, it just needs a little push in the right direction.

20 Minute Buffalo Chicken Flatbread Pizza

Dinner ready in 20 minutes! These buffalo chicken flatbread pizzas are so easy to make for a weeknight dinner when you’re in a pinch for time. The flatbreads are topped with ranch dressing, shredded rotisserie chicken mixed with Buffalo sauce, bell pepper, cheese, and green onion. Perfect for a game day appetizer or quick weeknight meal!

Why this is going to be your new favorite flatbread!

Dinner on your table in 20 minutes. Need I say more??

Okay, I will. I’m all about creating delicious, filling meals that can be made when you’re in a pinch for time.

And as a mom to a toddler and business owner, that feels like all the time for me. So easy flatbread meals like this pizza that can be easily whipped together on a weeknight are a savior.

Plus, I love anything buffalo flavored. Proof includes my Buffalo Cauliflower Dip, Buffalo Cauliflower Pizza, and Buffalo Cauliflower Wings.

Did you know I’m originally from Buffalo, NY, home of the buffalo chicken wings?! So I hold myself to very high standards on all Buffalo flavored recipes :).

And Frank’s hot sauce is my unwavering go-to for Buffalo sauce (ask anyone from Buffalo, NY and they’ll tell you the same thing). It’s totally worth looking for it if you’ve never cooked with it before. It will make this flatbread recipe 10x more delicious!

I love this quick pizza recipe for a weeknight meal but I also really enjoy it for a game day appetizer or meal. You can easily make this during halftime so you don’t have to miss any of the game.

As a registered dietitian, I’m all about repurposing leftovers to save on food waste and this is a great recipe to make if you have leftover chicken that you’re looking to transform into a new meal! But if you don’t have any leftover chicken, I love using rotisserie chicken because it’s one less step!

Crispy, crunchy, cheesy, spicy, this chicken flatbread has all the components you’d want. And be sure to drizzle some extra ranch on top for good measure!

Ingredients You’ll Need

ingredients for buffalo chicken flatbread laid on marble surface with black text overlay for eachingredients for buffalo chicken flatbread laid on marble surface with black text overlay for each

Notes on Ingredients:

flatbread: I used a long flatbread as the base – it was about 15 ounces for two flatbreads but you could also use naan bread, pita, or premade pizza crust as the base.

rotisserie chicken: precooked chicken is a big time saver! Simply shred and you’re good to go! You could also use leftover chicken or cook some fresh.

Frank’s hot sauce: this is hands down my favorite buffalo sauce and the one I always use but you could use any Buffalo flavored hot sauce that you like

onion powder: gives the chicken a zesty, sharp flavor boost

garlic powder: gives the chicken a garlicky flavor boost

salt: enhances and helps meld all the flavors for the chicken

bell pepper: adds a pop of color, satisfying crunch, and veggie to the dish

ranch dressing: serves as the sauce base for the pizza, adding some tangy flavor, and used for a finishing drizzle

mozzarella cheese: adds a creamy, richness to the pizza

crumbled blue cheese: adds a sharp, tangy flavor to the pizza. If you’re not a fan of blue cheese, simply omit!

green onion: adds a fresh mild onion taste with subtle hints of garlic

How to make Buffalo Chicken Flatbread

  1. Preheat oven. Preheat to 450 degrees if using a pizza stone and 425 degrees F if using a baking sheet.
  2. Prepare chicken. Mix together chicken, hot sauce, garlic powder, onion powder, and salt until combined.
  3. Prepare flatbread. Brush flatbread with ranch dressing. Evenly distribute buffalo chicken and green peppers over flatbreads.
  4. Get cheesy. Sprinkle mozzarella cheese and crumbled blue over top along with green onions.
  5. Bake baby. If using a pizza stone, bake at 450 degrees until golden-brown and cheese is bubbly, about 5-10 minutes. If using a baking sheet, bake at 425 degrees for about 5-8 minutes. Check flatbread manufacturer’s instructions for recommended baking times.
  6. Cool ranch. Let flatbreads cool for 2-3 minutes before serving. Drizzle with ranch dressing!

Expert Tips!

  1. You can use any type of flatbread for this recipe – I used a 15 ounce package of two long flatbreads for this recipe but you could also use naan bread, pita bread, or premade pizza crust! If you use naan bread or pita, which is smaller, you’ll be making more than two flatbreads.
  2. This is a great recipe to repurpose leftover chicken! Simply shred and you’re on your way.
  3. If you like extra heat, drizzle extra Frank’s hot sauce over the pizza once it’s baked.

Storage and Preparation

This chicken flatbread can be stored in the refrigerator in an airtight container for up to 3-4 days.

This recipe can also be stored in the freezer in an airtight bag or container for up to three months. Defrost overnight in the refrigerator before reheating.

To reheat, set oven temperature to 425 degrees F and heat for about 5 minutes or until cheese is melted or place in the microwave for 30-60 seconds.

Recipes That Pair Well

Beet Salad with Feta

Summer Peach Corn Salad

Vegan Asparagus Soup

Easy Instant Pot Vegetarian Chili

buffalo chicken flatbread with three slices cut on wood cutting board next to small bowl with ranch dressingbuffalo chicken flatbread with three slices cut on wood cutting board next to small bowl with ranch dressing

For more pizza inspiration, check out my recipes below!

Butternut Squash and Brussels Sprouts Naan Pizza

Roasted Vegetable Pizza

Spring Pizza

White Clam and Kale Pizza

If you like this recipe, please be sure to comment and give it a 5 star rating below. If you make it, share it on Instagram and tag me @karalydonrd and I’ll re-share it with my followers! If you want to save this recipe for later, be sure to pin it on Pinterest!

Don’t ever miss a recipe! Sign up to receive my monthly newsletter with a round-up of recipes from the previous month and get my FREE guide when you sign upRediscover the Joy in Eating: 5 Simple Steps to Stop Stressing Over Food + Enjoy Every Bite


Print

clock clock iconcutlery cutlery iconflag flag iconfolder folder iconinstagram instagram iconpinterest pinterest iconfacebook facebook iconprint print iconsquares squares iconheart heart iconheart solid heart solid icon

Description

Dinner ready in 20 minutes! These buffalo chicken flatbread pizzas are so easy to make for a weeknight dinner when you’re in a pinch for time. The flatbreads are topped with ranch dressing, shredded rotisserie chicken mixed with Buffalo sauce, bell pepper, cheese, and green onion. Perfect for a game day appetizer or quick weeknight meal!


  • 1.5 cups shredded rotisserie chicken
  • 1/2 cup Frank’s hot sauce (or other Buffalo sauce)
  • 1/4 teaspoon garlic powder
  • 1/4 teaspoon onion powder
  • 1/4 teaspoon salt
  • 2 flatbreads (15 ounce package)
  • 1/4 cup ranch dressing, plus extra for garnish
  • 1 green bell pepper, diced (about 1 cup)
  • 1 1/2 cups shredded mozzarella cheese
  • 1/4 cup crumbled blue cheese
  • 1/4 cup sliced green onion


  1. If using a pizza stone, place inside oven and preheat to 450 degrees F. If using a baking sheet, preheat to 425 degrees F.
  2. In a small mixing bowl, mix together chicken, Frank’s hot sauce, garlic powder, onion powder, and salt until combined.
  3. Brush flatbreads with ranch dressing.
  4. Evenly distribute Buffalo chicken and bell pepper over the flatbreads.
  5. Sprinkle mozzarella cheese, blue cheese and green onion on top.
  6. If using a pizza stone, place flatbread onto pizza peel (or back of a baking sheet) and slide flatbread onto the stone. Bake at 450 degrees F until cheeses are bubbly and crust is golden-brown, about 5-10 minutes (check flatbread manufacturer’s instructions as baking times may vary). Repeat for the next flatbread.
  7. If using a baking sheet, bake at 425 degrees F until cheeses are bubbly and crust is golden-brown, about 5-8 minutes (check flatbread manufacturer’s instructions as baking times may vary).
  8. Let flatbreads cool for 2-3 minutes before serving. Drizzle extra ranch dressing over top.

Notes

  1. You can also use naan bread as the flatbread or premade pizza crust.
  2. If you’re a fan of spice, drizzle extra Frank’s hot sauce over the pizza once it’s finished cooking.

  • Prep Time: 10 minutes
  • Cook Time: 10 minutes
  • Category: Dinner
  • Method: Baked
  • Cuisine: American

Easy Vegan Pumpkin Pie Bars

If you love pumpkin pie and want a low-stress dessert recipe, then these vegan pumpkin pie bars with graham cracker crust are for you! They feature a spiced pumpkin pie filling, which is made with vegan cream cheese, and an easy, press-in graham cracker crust. The bars are baked in a square pan and cut into after chilling. They’re creamy and delicious, with perfectly crisp and crumbly bottoms.

Pumpkin pie is my favorite pie, and I’ve accordingly made many vegan versions of the recipe over the years.

Finally, a few years back, I published a classic vegan pumpkin pie recipe that was a culmination of my efforts. It’s perfect.

Sometimes, however, one craves a shortcut version of a classic dessert. And that’s exactly what these vegan pumpkin pie bars are.

As Thanksgiving rolls around this year, I find myself especially in need of a holiday meal plan that’s gentle and forgiving. I tested the bars a few weeks ago, sensing that it would be a long month.

My hope was for a dessert that would speak to my eternal love of pumpkin pie without requiring much work from me, and I got just that.

Classic pie vs. pumpkin pie bars: is there really a difference?

The difference between pumpkin pie bars and a classic pumpkin pie really boils down to crust.

Specifically, traditional pumpkin pie usually features a classic pie crust, or pâte Brisée.

Pumpkin pie bars, on the other hand, can have a few different types of crust. The recipe that I’m sharing in this post features a press-in, graham cracker crust.

Other pumpkin pie bar recipes feature a shortbread crust. I’ve even seen recipes in this category that call for no crust at all, but that’s where I draw the line: at that point, we’re talking about baked pudding!

Anyway, recipe distinctions can be a little arbitrary, and the pie vs. pie bar delineation is no exception. But the idea here is that you won’t have to make, chill, and roll pastry prior to making your pumpkin pie filling.

Instead, you’ll blitz up some graham crackers, mix them with melted butter and sugar, and press them into a square baking pan.

Which graham crackers are vegan?

A few graham crackers on the market are vegan, whereas others have honey, egg, or dairy ingredients.

I typically keep it simple and use Nabisco Original Grahams, which are vegan, for baking. They’re my go-to not only for these pumpkin pie bars, but also my classic vegan cheesecake and no-bake vegan chocolate mousse pie.

Other vegan graham cracker brands include Partake Classic Grahams, Kellogg’s Original Graham’s Crackers, and Kroger® Original Graham Crackers.

A faster pumpkin pie filling

Usually, I make vegan pumpkin pie with cashew cream, which should come as no surprise. Soaked and blended cashews are my secret weapon when it comes to creamy consistencies in cooking and baking.

At any given moment, I’m likely to have a cup or two of cashew cream (not to mention cashew cheese, and cashew mayo) sitting in my freezer.

If you don’t have such a stash, however, having cashew cream on hand for baking requires a little forethought.

For my pumpkin pie bars, I take an even easier route, which is to use vegan cream cheese for creamy texture.

Store-bought vegan cream cheese is is fast, it’s low stress, and adaptable to various food allergies. For instance, use Tofutti if you’re allergic to almonds or cashews, or Kite Hill if you’re allergic to soy.

I’ve tested the recipe so far with Tofutti, Kite Hill, and Miyoko’s cream cheese, with good results each time.

For what it’s worth, for bagels and all of the breakfast things, I have a homemade vegan cream cheese recipe with tofu that I love. But I find that store-bought vegan cream cheese is better for baking.

How to make vegan pumpkin pie bars with graham cracker crust

I love a dessert recipe that’s as easy as it is rewarding.

There are a number of steps required here, and the bars should be chilled overnight or for at least four hours: plan your baking accordingly! However, none of those steps are difficult.

Step 1: Create a parchment paper sling for your baking dish

The first step in this recipe may is to prep your baking pan. It can be hard to remove bars from a square baking pan unless you use a a parchment paper sling.

King Arthur’s tutorial on this process is really helpful.

The sling will allow you to lift the whole baked good out of the pan, then slice it into individual squares on a flat surface.

It’s much less messy than trying to cut the big square into smaller squares first, then gingerly remove them, one at a time.

If you don’t have parchment at home, then you can take your chances with nonstick cooking spray. Cut the squares after chilling and remove them from the pan, one by one.

But let the buyer beware: I think using a sling is easier and cleaner!

Step 2: Prepare the graham cracker crust

This all comes together with some pulsing in the food processor. The ingredients are graham cracker sheets, vegan butter, and brown sugar, and it can be any vegan butter you like.

A crumbly graham cracker mixture is pictured in a square baking pan.A crumbly graham cracker mixture is pictured in a square baking pan.
Before pressing, the graham cracker crust will be crumbly and loose. Use the bottom of a measuring spoon or mason jar to press it down as instructed.

After processing the mixture, press it down firmly in your lined 8-inch / 20cm square baking dish. I use the bottom of a measuring cup or mason jar to do this.

Step 3: Blend the filling

The pumpkin pie bar filling comes together easily in a blender. This is a recipe in which appliances do most of the work!

You’ll be blending up:

  • Canned pumpkin purée
  • Vegan cream cheese
  • Arrowroot or cornstarch (either is fine)
  • Brown sugar
  • Cane sugar
  • Pumpkin pie spice
  • Vanilla extract
A blender is pictured with pumpkin, cream cheese, and brown sugar in its container.A blender is pictured with pumpkin, cream cheese, and brown sugar in its container.
Blending the filling for the pumpkin pie bars is quick and easy.

You should only need a minute or two to blend. Once the mixture is smooth, pour it into your prepared square baking pan.

Step 4: Bake

At this point, the bars need 50 minutes in a 350°F / 175°C oven.

After baking the top of the bars will be set, but they may still wiggle a bit, similar to cheesecake. They’ll have a darker color.

Step 5: Chill

If you try to slice the pumpkin pie bars before chilling them, they’ll be too soft. Some time in the fridge is necessary for them to set.

After the bars cool at room temperature for about an hour, cover them and transfer them to the fridge for chilling.

Ideally, you should chill them overnight, but four hours is enough time if you want to make them same day.

A perfectly square vegan pumpkin pie bar is pictured on a round, white plate. A perfectly square vegan pumpkin pie bar is pictured on a round, white plate.
After chilling, it will be easy to remove the bars from their pan and cut them into neat squares.

Step 6: Enjoy

After chilling, you can go ahead and remove the pumpkin pie bars from the square baking pan, using your sling. Cut them into nine squares, and serve them as you’re ready.

A dollop of vegan whipped cream (I use a homemade tofu whipped cream or cashew whipped cream) is nice, but totally optional.

Make ahead and storage

Once baked, the bars can be stored in the fridge for up to five days. You can also freeze them for up to 8 weeks.

I happen to have a half batch in my own freezer at this very moment. I’ll be defrosting some on Wednesday, for Thursday’s holiday.

A square shaped, vegan pumpkin dessert is pictured on a round, white plate. A square shaped, vegan pumpkin dessert is pictured on a round, white plate.
An overhead image of a square of freshly baked vegan pumpkin pie bars.

Easy Vegan Pumpkin Pie Bars with Graham Cracker Crust

Author – Gena Hamshaw

Prep Time: 15 minutes

Cook Time: 50 minutes

Chilling time 4 hours

Total Time: 5 hours 5 minutes

Yields: 9 servings

Graham cracker crust

  • 8 sheets vegan graham crackers (120g)
  • 1/4 cup brown sugar (50g)
  • 5 tablespoons vegan butter, melted (70g)

Pumpkin pie filling

  • 15 ounces canned pumpkin purée (430 g / 1 3/4 cups)
  • 8 ounces vegan cream cheese (225g)
  • 2 tablespoons arrowroot or cornstarch
  • 1/2 cup light or dark brown sugar (100g)
  • 1/2 cup cane sugar (100g)
  • 1 1/2 teaspoons pumpkin pie spice (substitute 1/2 teaspoon ground cinnamon, 1/2 teaspoon ground ginger, 1/8 teaspoon ground nutmeg or allspice, and 1/8 teaspoon ground cloves)
  • 1 teaspoon vanilla extract

Prepare the graham cracker crust

  • Preheat your oven to 350°F / 175°C. Line an 8-inch / 20-cm square baking pan with a parchment paper sling.
  • To prepare the graham cracker crust: place the graham crackers and sugar into a food processor fitted with the S blade. Process for about 20 seconds, or until the crackers are turning into crumbs. Drizzle in the melted butter and continue processing for about a minute. The crust is ready when a small amount will stick together when you squeeze it in the palm of your hand.

  • Remove the blade from the processor and pour the crumbs into your parchment-lined pan. Use the back of a measuring cup or a regular cup to smooth it out over the bottom and to the sides. It’s important to use some pressure here! Pack the mixture down till it’s smooth and firm.

Prepare the pumpkin pie filling

  • Transfer all of the filling ingredients to a blender. Blend till smooth. Pour this mixture into the prepared pan with the graham cracker crust; the filling mixture will be thick. Use an invert spatula to spread it evenly into the square, making sure that it reaches all edges.

Chill and serve

  • Allow the pan to cool at room temperature for an hour, uncovered. Cover the pan lightly with a cloth cover, foil, or Saran wrap, then transfer it to the fridge overnight to set, or for at least 4 hours.

  • Gently remove the squares from the pan by lifting the parchment sling out of its container and immediately to a large cutting board. Cut the finished baked good into 9 squares. Top each with a small portion of vegan whipped cream, if desired, and serve.

I welcome any opportunity to take a recipe that I love and make it simpler, so long as the spirit of the dish remains.

These vegan pumpkin pie bars are a great example. And there’s no reason at all why you should feel obligated to serve them for a holiday gathering or special occasion.

The bars are a really fun “anytime dessert” for autumn, not to mention an excellent sweet snack. I hope you love them!

xo

3 Common Ones, Plus Their Solutions

0

“I work with coaches and other people who know too much.”

Kate Solovieva is a former professor of psychology, a PN master coach, and PN’s director of community engagement.

And the above quote has become one of her taglines.

Though Coach Kate has coached thousands of “regular” clients, her specialty is coaching other coaches.

Through her work as an instructor with PN’s Level 2 Master Health Coaching Certification, a facilitator for PN’s private online coaching communities, and a coach in her own private practice, she gets a front-row view of all the questions and challenges both new and seasoned coaches have.

Coach Kate knows what other coaches are up to.

She’s seen the victories and the blunders of thousands of coaches, and today, she’ll share three common mistakes she sees them making.

If there’s anything Coach Kate wants, it’s to see her peers achieve wild success, so her hope with this article is to help coaches:

  • Stop feeling paralyzed by insecurity and doubt—and start growing their business
  • Learn to see their clients more objectively, so they can best serve their needs and goals
  • Clearly identify their responsibilities as a coach (hint: they’re’ not what many coaches think they are)
  • Harness their natural passion and investment in a client’s success—without burning themselves out

We’ll cover three common coaching mistakes, plus the solutions to overcome them. Let’s get into it.

Coaching mistake #1: Focusing on coaching instead of selling

Coach Kate describes a coaching business as a three-legged stool.

  • There’s the coaching leg (which is your skills and knowledge as a coach),
  • A selling leg (which is your ability to market and attract a flow of clients), and
  • An administrative leg (which includes how clients book appointments, make payments, and other organizing tools and systems).

“The vast majority of folks who get into coaching start with the coaching leg,” says Kate.

“They want to become the best coach they can be, which is amazing. However, to become the best coach you can be, information and theory only get you so far.”

As Kate says, “You cannot become the best coach you can be in a vacuum, talking to yourself in your office.”

Which is why she suggests challenging the desire many coaches have to wait until their knowledge is “complete.”

Instead, she suggests, just start selling.

Why?

Coaches who start selling sooner also get to start coaching sooner.

Over time, they’ll have an advantage over the coaches who want to be “the BEST coach they can be” by getting 12 certifications before selling their services.

Meanwhile, the coach who “doesn’t really know what they’re doing” but has started practicing anyway will begin building their business and their coaching experience—and likely improve their odds of overall success.

Solution: Remember to show up as a COACH, not an EXPERT

There’s a natural inclination among aspiring coaches who want to do a good job to get those 12 certifications before they start coaching.

“Sometimes we hold on to this hope that we’ll get to a point where we feel confident enough at fielding any question that ever comes our way,” Kate says.

Because as every coach knows, when you start telling people what you do, they’ll have questions. And often, they’ll have questions you can’t answer, and that can feel uncomfortable… mortifying even.

(You’re supposed to be the expert, right??)

According to Coach Kate, the above belief—that you’re supposed to be an authority with all the answers—is based on an erroneous assumption.

“When I show up to a coaching conversation, my role is not ‘the expert,’” she says.

Yes, coaches have to show up to client interactions with a baseline of nutrition knowledge. (For example, if a client asks you about good sources of protein, you should be able to list some.)

But coaches don’t have to show up with a prepared lecture, or encyclopedic knowledge of nutrition minutia or biochemistry. (You don’t have to feel bad if you can’t recall the ratio of omega 3 to omega 6 in flax oil, or all the steps in the Krebs cycle that produces ATP.)

Even when you know the answer, Kate suggests that not answering right away can actually be more productive.

“If a client asks you about seed oils, you can simply say, ‘That’s a great question. I can get you some information on that if you’d like, but I’m curious, why do you ask?’”

While the expert might respond with a summary of the latest research on seed oil processing and its health effects, the coach will strive to learn more about why the question is meaningful to the client.

For example, after inquiring further, you may learn that your client heard about seed oils from their friend Susan, who changed the fat sources in her diet and lost ten pounds. And the client is curious to see if they might also lose ten pounds if they eliminate seed oils.

With this kind of response, you learn more about what the client is really after (a weight loss solution), which ultimately helps direct you to more effective strategies (which probably have nothing to do with seed oils).

▶ Takeaway nugget:

Coaches should have a firm understanding of fitness and nutrition principles.

However, clients often don’t need more information; they need coaching.

When a client asks you a question, consider whether the answer will help them take action.

If it will, offer them what you know. (If you don’t know the answer, you can simply say, “I’m happy to find more information about that for you.”)

If it won’t, consider turning their question into a coaching opportunity. Ask, “Can you tell me why you’re curious about that?” Their answers will likely lead you to a more productive conversation.

Coaching mistake #2: Assuming your clients are exactly like you

Now, maybe it sounds obvious that clients aren’t just clones of us.

That said, especially when we feel all warm and vibe-y with our clients, it can be easy to forget in the moment.

For example, maybe you’re someone who…

  • Tracks macros, and feels it’s relatively simple and effective. So you assume this approach will work on most clients (even though many will find it triggering and overwhelmingly complicated).
  • Coaches virtually, so your clients are all over the world. You might recommend meeting certain protein targets, without considering that in some communities, protein dense foods might either be hard to access, prohibitively expensive, or both.
  • Prioritizes fitness. And for the life of you, you can’t understand why your client would skip a lunch workout because she doesn’t want to mess up her hair and makeup in the middle of a work day.

If you’re a coach, you probably went into this line of work because you value nutrition, exercise, and overall health. And often, we assume our clients hold these same values. But the truth is, that’s not always the case.

Says Kate:

“There’s nothing inherently superior about valuing your health. If you do, yes, you’ll probably experience better health and live longer. But not everyone shares those values. That’s a tough one to swallow.”

Of course, without seeing your clients for the unique people they are—with their own individual preferences, values, and goals—you may find yourself suggesting behaviors that aren’t possible for them, or striving for goals that aren’t meaningful to them.

Over time, this becomes frustrating for your clients and you: They feel like you don’t “get” them, and you feel like a “bad” coach.

Solution: Get a clear picture of the client’s baseline—and determine what actions they’re ready, willing, and able to take

The opposite of assuming (often unconsciously) that clients are like you is, well, assuming nothing.

As best as you can, check your biases and assumptions at the door, and approach each client session with an open, curious mind.

Ask questions, such as:

“What inspired you—or pushed you—to come in today?”

And:

“Why is that goal meaningful to you?”

And:

“What skills do you have today that might help you achieve your goal? What skills do you feel you might be missing?”

Listen.

Withholding assumptions can be particularly difficult when clients share some obvious similarities with you. (Perhaps they’re also a single mom, or they’re also training for a triathlon, or they’re also a cancer survivor.)

But even when clients share similar experiences or goals, their biology, social context, personal history, and many other factors can make their “similar” experiences, in fact, totally different.

Coach Kate says in these cases, you can show that you relate to them, while also inviting them to describe their own experience. She suggests using the following question:

“I know what [insert shared experience] has been like for me, but what has [insert shared experience] been like for you?”

Once you have a clear picture of a client’s values, priorities, and reasons for change, you can assess which actions they’re ready, willing, and able to take. (Again, don’t make assumptions here. Just because you find meal prep quick and easy, doesn’t mean your client will.)

If you want to go through this exercise with your client on paper, use our Ready, Willing, and Able Worksheet.

▶ Takeaway nugget:

Remember that clients:

  • Aren’t always motivated by the same things as you (for example, they might care more about their next lab test results than how they look in a swimsuit)
  • Don’t always enjoy—or hate—the same things (just because you love long sessions of steady state cardio, doesn’t mean they will… or vice versa)
  • Don’t always share your values (as mentioned above, not all clients value health above all else; they may instead value pleasure, spontaneity, or something else)

Get to know your unique client, their specific goals, and what actions they can realistically execute (and maybe even get excited about).

Coaching mistake #3: Getting too attached to client results

This is, actually, very natural.

“There’s a reason we go into coaching. It’s because we care and we want to help clients. We want to see them succeed,” says Coach Kate.

But caring can be a double-edged sword.

“With our clients, we carefully decide on the habits and behaviors that need to occur… And then they walk off and either do the thing or don’t do the thing. That’s brutal.”

No matter how sound and foolproof your advice is, how well-thought out your plan, how much you care, ultimately, you have no control over whether a client executes it, and gets results.

Naturally, as a coach, you might feel frustrated, even heartbroken when clients don’t do what they say they’ll do, or when they’re not seeing the outcomes they were hoping to see.

However, according to Kate, this isn’t something coaches should try to avoid completely. It’s part of the job, and it’s often a sign that your work has meaning to you. (It’s a good thing.)

“However, I think there’s a point there where we can start caring more than the client themselves,” she says.

And that’s precisely where to draw to the line.

At PN, we often say that “care units” are the currency of coaching.

Care units are how much time, energy, attention, authenticity, and true “heart” you can bring to helping, serving, and caring about your clients.

Your client also has a certain amount of care units.

How much time, energy, attention, authenticity, and “heart” can they bring to their own change and growth projects?

(Most of the time, not that much. Which is totally normal.)

Our advice: Care one care unit less than your client does.

How do you do that? One approach…

Solution: Clearly separate client and coach responsibilities

So, how do we maintain an appropriate level of emotional investment—but also help clients stay on track?

“This is where I really like to get really clear on what my role is as a coach,” Coach Kate says.

“Because if you are very, very clear on what your role is as a coach, then you can sort of go through the list, and check in with yourself: ‘Did I show up? Did I follow up? Did I coach this person to the best of my ability?’”

For example, as a coach, it’s reasonable to be responsible for:

  • Providing guidelines for how to reach out (to ask questions or book appointments) as well as setting expectations for your response times
  • Weekly check-ins with clients via email, text, or phone, to assess progress or troubleshoot obstacles
  • “Life-proofing” a program as much as possible, by proactively discussing obstacles that could arise in the future, and brainstorming realistic, flexible solutions

Meanwhile, the client is responsible for:

  • Whether or not they respond to your check-ins
  • Whether or not they actually DO the agreed upon fitness, nutrition, or lifestyle practices that are likely to get them to their goal
  • How much they reveal during coaching sessions (for example, whether or not they tell you if they’re struggling with stress eating, or some other issue that makes it hard to stick to the plan)

Ideally, clearly delineating these responsibilities should happen early in the coaching relationship. Some coaches prefer to have an open discussion, while others have actual contracts that outline coach deliverables and client expectations.

This early communication can also be a way of vetting coach-client “fit.”

“When I’m having that initial conversation with a prospective client, I can ask, ‘What does accountability look like to you?’ If the client replies, ‘Well, I want you to text me every morning and night, and I want you to make sure I’ve done my workout, and also ship groceries to my house,’ then I will be the one to say, ‘I don’t think this is a good fit.’”

Coach Kate says this kind of early clarity can also prevent coach-client friction in the future.

Clear boundaries and expectations at the outset means clients are less likely to be disappointed if they assumed their coach was going to “take on” more, and coaches are less likely to burn out from shouldering more than they should.

It even protects the coach-client relationship in extreme (though not uncommon) situations such as when a client “ghosts” before a paid contract is over.

“When somebody doesn’t reply to me, I don’t take it personally. It’s not their job to reply, but it is my job to check in,” Coach Kate says.

“If I don’t hear back, I just check in on Monday, and then again on Monday. And again, and again, and again—trying all the contact methods they’ve provided me—until their coaching contract is over. If we get to that point, they’ll get an email from me saying, ‘Hey, I hope everything’s okay. My door is always open. I hope you’re doing well.’”

▶ Takeaway nugget:

Make a list—either for your own reference, or to include in a contract that new clients have to sign—of the accountabilities you have as a coach.

(Hint: These are usually specific actions, like “Text, email, or phone once a week to check in” or “Host monthly virtual lectures on various nutrition topics for group clients.”)

Make sure to have a conversation about expectations and responsibilities with all clients, ideally before beginning to work together, or at least in the first session.

Bonus mistake: Forgetting to give yourself a pat on the back

It’s maybe not the most “coach-y” way to write an article: Point out a list of your mistakes, then hand you solutions to deal with them.

But if you’ve made the above “mistakes,” we want you to hear it from us:

We’re proud of you.

If you’ve gotten sidetracked by the above, it’s likely because you really care. And that’s never going to be a mistake; it’s a strength.

That said, although these “mistakes” are completely normal, and most coaches make them, they can limit your potential as a coach, and as a business.

And we want to see you succeed.

(If you liked this article and want to learn more, listen to the full episode of the Coaches Compass podcast, where the interview with Coach Kate Solovieva was originally conducted.)

If you’re a coach, or you want to be…


You can help people build sustainable nutrition and lifestyle habits that will significantly improve their physical and mental health—while you make a great living doing what you love. We’ll show you how.


If you’d like to learn more, consider the PN Level 1 Nutrition Coaching Certification. (You can enroll now at a big discount.)