Price: $7.99 (as of Jun 25, 2026 03:10:43 UTC – Details)
Product description
PHARMACIST & HEALTHCARE THANK YOU CARDS – Show your appreciation for dedicated pharmacists, pharmacy technicians, doctors, and nurses with a thoughtful and meaningful thank you card. Featuring heartfelt messages, professional appreciation themes, and warm gratitude, this card is perfect for recognizing the hard work, care, and commitment of healthcare heroes who make a difference every day. A simple yet powerful way to say thank you and show respect. GIFT IDEA FOR PHARMACISTS, TECHNICIANS & MEDICAL STAFF – A meaningful card for pharmacist students, licensed pharmacists, pharmacy techs, doctors, nurses, and healthcare professionals. Ideal for Pharmacist Week, Doctor’s Day, Nurse Week, graduation, or appreciation events. Sized at 5.3 x 8 inches, it offers plenty of space to write a personalized message, making your gratitude more special and memorable. Search us with: pharmacy thank you card; pharmacist card; pharmacist appreciation card; pharmacist week card; pharmacist week gifts card; gifts for pharmacists; pharmacist gifts; pharmacist gifts for men; gift for pharmacist student; gift for pharmacist men; gifts for pharmacy technicians; pharmacy technician card; happy pharmacy technician day card; doctor card; doctors day card; doctors day cards; doctor day card; doctor appreciation card; doctor appreciation cards; dr day card; nurse card; nurse cards; nurses day cards; nurses week cards; nurse week cards; nurse graduation card HIGH QUALITY CARDSTOCK & PRINT – Printed on thick, premium cardstock with vibrant and professional designs, this greeting card provides a smooth writing surface and long-lasting durability. The clean layout and meaningful message create a keepsake healthcare professionals will appreciate. Each card includes a matching envelope for a polished presentation. For best writing results, use a gel pen or marker to keep your message neat and smudge-free. FIT FOR ALL OCCASIONS – Perfect for Pharmacist Week, Doctor’s Day, Nurse Week, graduation, appreciation ceremonies, or any moment you want to express gratitude to healthcare workers. Ideal for coworkers, students, patients, or friends looking to recognize medical professionals with a heartfelt and respectful message.
Price: $7.99 (as of Jun 24, 2026 15:09:33 UTC – Details)
Product description
PHARMACIST & HEALTHCARE THANK YOU CARDS – Show your appreciation for dedicated pharmacists, pharmacy technicians, doctors, and nurses with a thoughtful and meaningful thank you card. Featuring heartfelt messages, professional appreciation themes, and warm gratitude, this card is perfect for recognizing the hard work, care, and commitment of healthcare heroes who make a difference every day. A simple yet powerful way to say thank you and show respect. GIFT IDEA FOR PHARMACISTS, TECHNICIANS & MEDICAL STAFF – A meaningful card for pharmacist students, licensed pharmacists, pharmacy techs, doctors, nurses, and healthcare professionals. Ideal for Pharmacist Week, Doctor’s Day, Nurse Week, graduation, or appreciation events. Sized at 5.3 x 8 inches, it offers plenty of space to write a personalized message, making your gratitude more special and memorable. Search us with: pharmacy thank you card; pharmacist card; pharmacist appreciation card; pharmacist week card; pharmacist week gifts card; gifts for pharmacists; pharmacist gifts; pharmacist gifts for men; gift for pharmacist student; gift for pharmacist men; gifts for pharmacy technicians; pharmacy technician card; happy pharmacy technician day card; doctor card; doctors day card; doctors day cards; doctor day card; doctor appreciation card; doctor appreciation cards; dr day card; nurse card; nurse cards; nurses day cards; nurses week cards; nurse week cards; nurse graduation card HIGH QUALITY CARDSTOCK & PRINT – Printed on thick, premium cardstock with vibrant and professional designs, this greeting card provides a smooth writing surface and long-lasting durability. The clean layout and meaningful message create a keepsake healthcare professionals will appreciate. Each card includes a matching envelope for a polished presentation. For best writing results, use a gel pen or marker to keep your message neat and smudge-free. FIT FOR ALL OCCASIONS – Perfect for Pharmacist Week, Doctor’s Day, Nurse Week, graduation, appreciation ceremonies, or any moment you want to express gratitude to healthcare workers. Ideal for coworkers, students, patients, or friends looking to recognize medical professionals with a heartfelt and respectful message.
There’s something just so nostalgic about biting into a gooey Rice Krispie treat. And while I remember them from my childhood, they’re not something that I’ve had in many years. Until now that is. This homemade, healthy Rice Krispie treat recipe is a new favorite in our house.
The Rice Krispie treats from the store are usually a little hard and not so fresh tasting. You’ll find ingredients like corn syrup, GMO soybean oil, artificial flavors, and acetylated monoglycerides… whatever that is. And many of the homemade Rice Krispies treats, while they taste good, aren’t much healthier.
An Upgraded Rice Krispies Treat Recipe
One of the questions I get all the time is how to use my homemade marshmallows recipe to make Rice Krispie treats. And honestly that’s not something I’d ever tried. For years my family avoided grains as I was in a healing phase. Now that grains are back in my diet on occasion, that means I’ve been experimenting with more grain-based recipes.
Of course, this doesn’t mean I’m eating glyphosate covered, artificially fortified white flour all the time. It’s about balance, but I still choose healthier options when I can. So for this recipe that means the name brand (or store brand) rice crispy cereal is out. Instead I used sprouted brown rice cereal.
Yes, it’s still cereal and not as nutritious as a grass-fed steak, but I’m ok with it for the occasional treat. Sprouted grains are easier for our body to digest. This cereal is organic, non-GMO, and sweetened with just a touch of coconut sugar. I’ve linked to the kind I used in the recipe below, but you can also use organic rice cereal from your local store if that’s all they have.
Homemade Marshmallows
My marshmallow recipe base is sweetened with honey instead of sugar. They feature gut healthy, grass-fed gelatin and real marshmallow root for more gut soothing benefits. I’ve experimented over the years with variations like elderberry, matcha, and even hibiscus rose marshmallows.
The marshmallow portion of the Rice Krispie treats recipe is very similar, but you don’t have to press them into a pan and let them set first. After whipping up the marshmallow mixture, simply add it to melted butter and stir in the cereal.
Homemade Rice Krispie Treat Variations
The kids and I love this recipe as is. In fact, the first time I made a batch the kids devoured them within minutes! However, you can also add some ingredients if you want a different flavor.
Try sprinkling some flaky sea salt on the top for a salty, sweet treat. Or drizzle the top with melted dark chocolate (and then sprinkle with salt!). Sometimes I’ll gently press mini chocolate chips onto the top before they’ve really hardened. Work quickly with this one though or you’ll just end up with melted chocolate all over your hand! I haven’t tried it here, but some people like adding ¼ cup of creamy peanut butter when stirring in the marshmallows to the butter.
For another depth of flavor, try browning the butter first before adding the marshmallows. It gives it a caramel-like taste! I give more details on how to brown butter in this pistachio chocolate chunk cookie recipe.
Here’s how to make healthier, naturally sweetened rice treats with homemade marshmallow!
This healthier, naturally sweetened version of rice krispie treats is a kid (and parent!) favorite.
Homemade Marshmallow Base
Line a 9×13-inch baking dish with parchment paper and set aside.
Pour ½ cup of the cold water into the bowl of a stand mixer. Sprinkle the gelatin evenly over the water and let it sit while you prepare the honey syrup.
In a small saucepan, combine the remaining ½ cup of water, honey, and sea salt.
Bring the mixture to a gentle boil over medium heat. Simmer for 7-8 minutes, until slightly thickened.
Turn the mixer on low speed. Carefully and slowrly pour the hot honey syrup into the gelatin mixture.
Gradually increase the mixer speed to high. Whip for 8-10 minutes, until thick, glossy, fluffy, and marshmallow-like. Add the vanilla extract during the last minute of mixing.
While the marshmallow is whipping, melt the butter in a large pot over low heat.
Add the whipped marshmallow mixture to the melted butter and stir until combined.
Fold in the crispy rice cereal until evenly coated.
Transfer the mixture to the prepared baking dish. Using lightly buttered hands or a piece of parchment paper, gently press into an even layer.
Sprinkle with flaky sea salt if desired. Let cool for about 30 minutes before slicing into squares and serving.
* Percent Daily Values are based on a 2000 calorie diet.
The optional flaky sea salt turns this into an amazing salty sweet treat.
Try drizzling the top with some melted dark chocolate for a more decadent dessert.
How to Store Homemade Rice Krispie Treats
Homemade Rice Krispie treats store best at room temperature. Keep them in an airtight container and enjoy within 4-5 days. However, if your house is like mine, they won’t last long!
What are your favorite Rice Krispie treat flavors? Ever made them before? Leave a comment and share below!
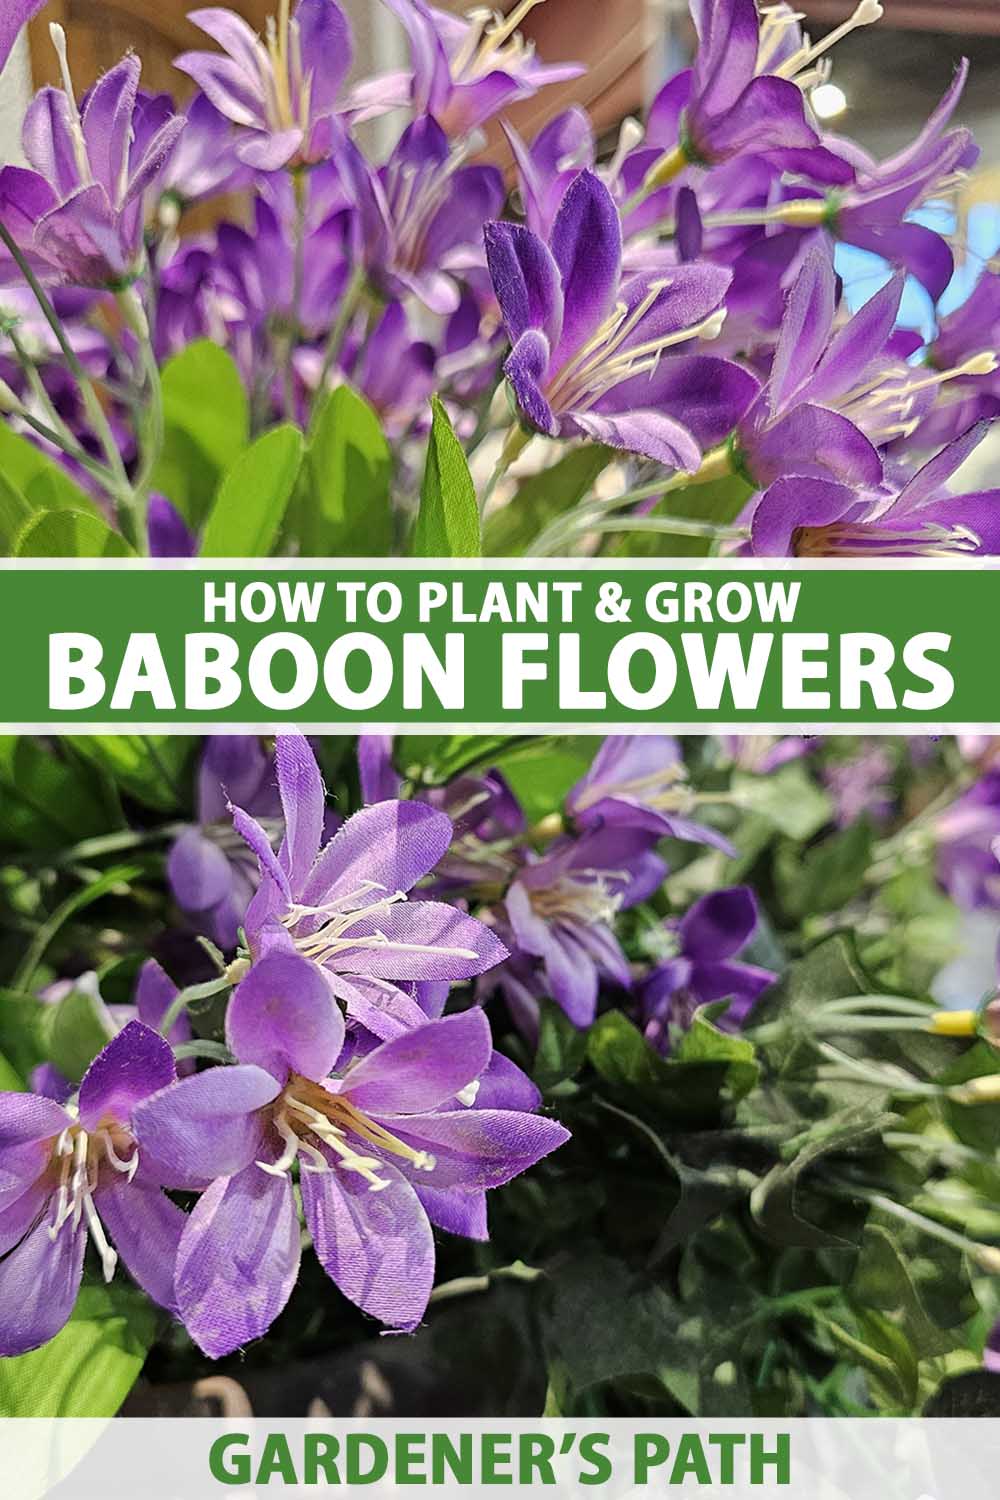
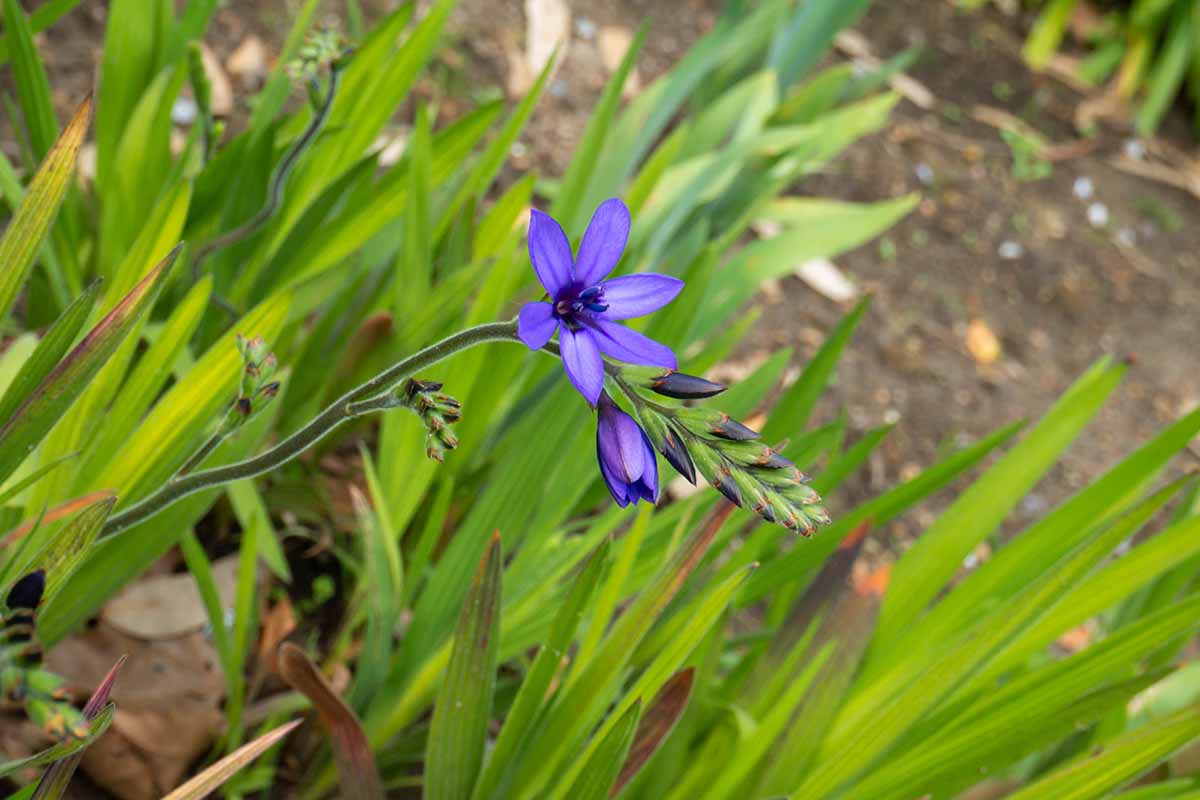
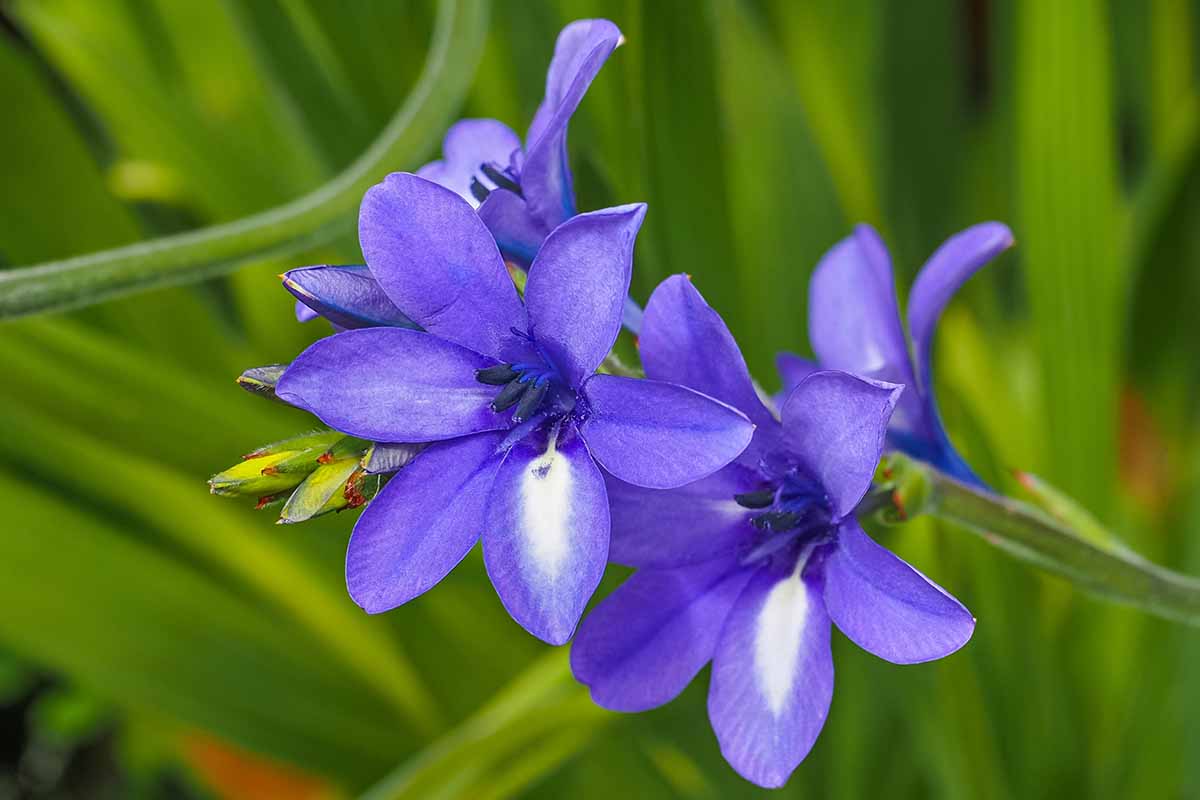
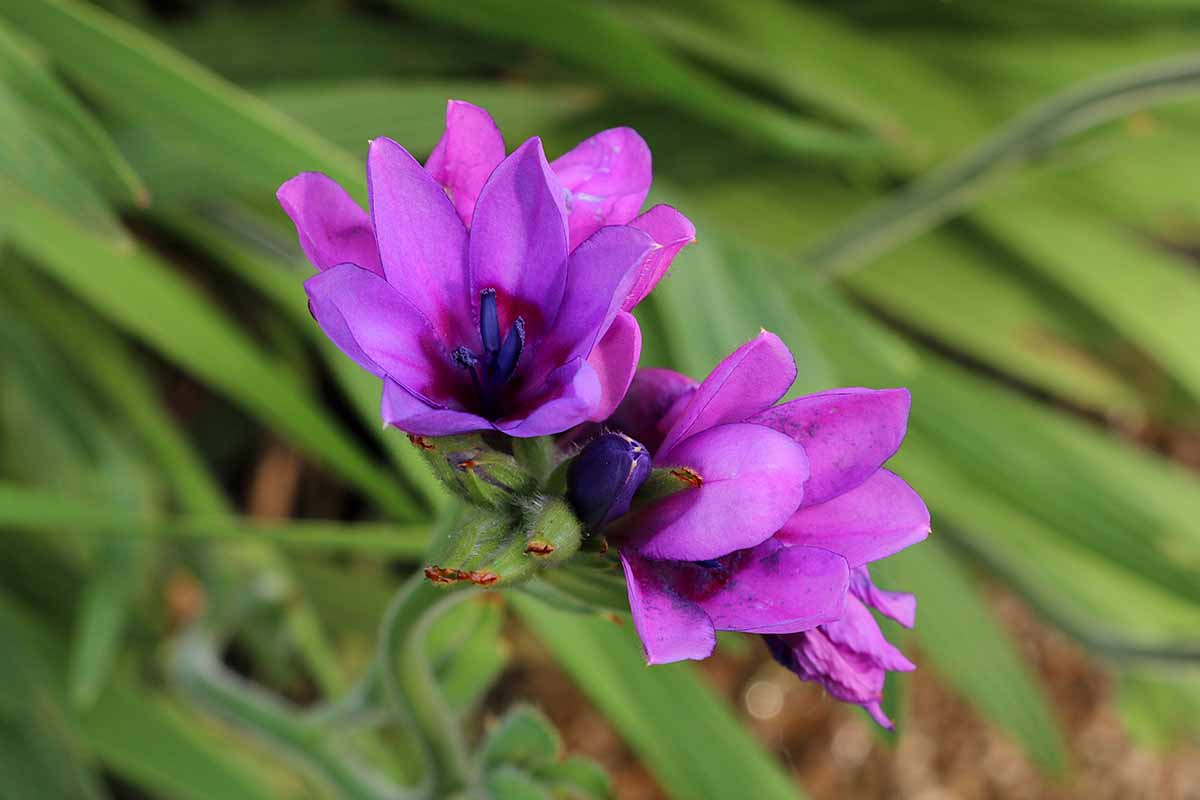
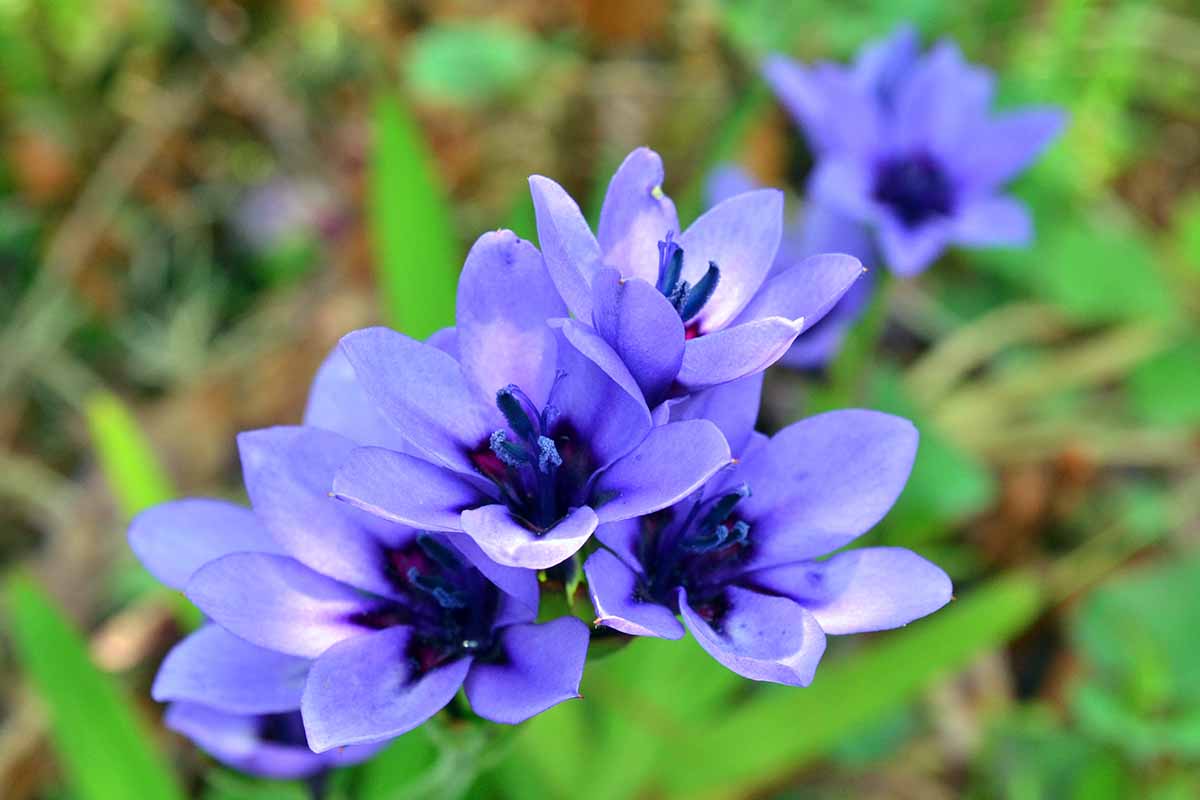
Baboon flowers (Babiana nervosa)are cormous perennials native to South Africa, cultivated for their spikes of fragrant, funnel-shaped flowers that bloom in spring.
The blue, purple, or yellow flowers typically feature contrasting light or dark markings near the center with dark blue anthers.
Each flowering stem produces about six two-inch-wide flowers that have a delightful, lemon-like scent.
The upright, lance-shaped leaves are pleated, with prominent veins and they form clumps four to eight inches tall, spreading up to two feet wide.
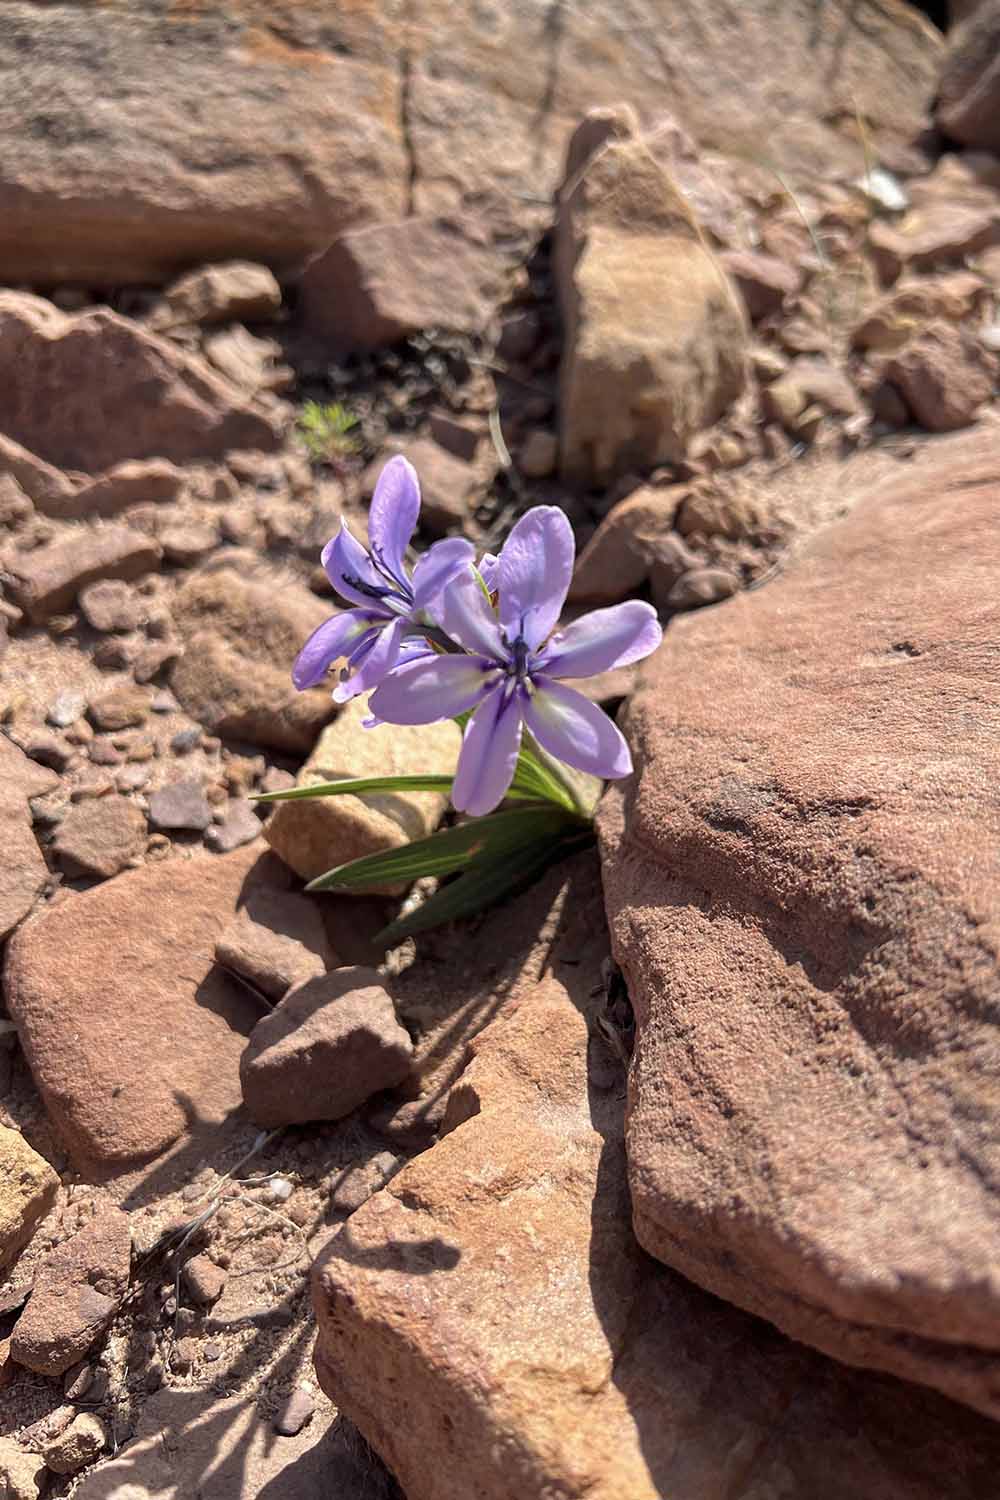
Native to the Western Cape, babiana grows through the cool, wet winter season and goes dormant during the hot, dry summer.
Hardy outdoors in USDA Hardiness Zones 9 and 10, baboon flowers also do well in containers that can be brought indoors for the growing season.
Are you ready to add baboon flowers to your landscape? Here’s what I’ll cover:
There are about 90 species in the Babiana genus, a member of the iris family, Iridaceae.
Nearly all of them are native to southern Africa, with the greatest concentration in the Western and Northern Cape regions of South Africa.
The genus name comes from the Afrikaans word bobbejaan, meaning baboon, a reference to the baboons that dig up and eat the corms.
The Afrikaans common names, bobbejaantjie and bobbejaanuintjie are diminutives of that same word.
You’ll also see it listed as blue freesia in some nursery catalogues as the flowers resemble those of true freesias.
The plant has been classified as B. stricta for well over a century, but botanists now treat that name as a synonym of B. nervosa.
You’ll still find it labeled Babiana stricta in catalogs and at garden centers. The species epithet nervosa means “veined,” for the leaves.
Quick Look
Common name(s): Baboon flower, blue freesia, bobbejaantjie
Time to maturity: 2-3 years from seed, 1 year from corms
Mature size: 4-8 inches tall by 24 inches wide
Best uses:Containers, cottage gardens, borders, pollinator plantings, rockeries
Taxonomy
Order: Asparagales
Family: Iridaceae
Genus:Babiana
Species:Nervosa (syn. stricta)
Baboon flowers grow from small corms that are dormant through summer and resume growth in fall. Each corm produces a fan of pleated leaves held upright and one or more flower spikes.
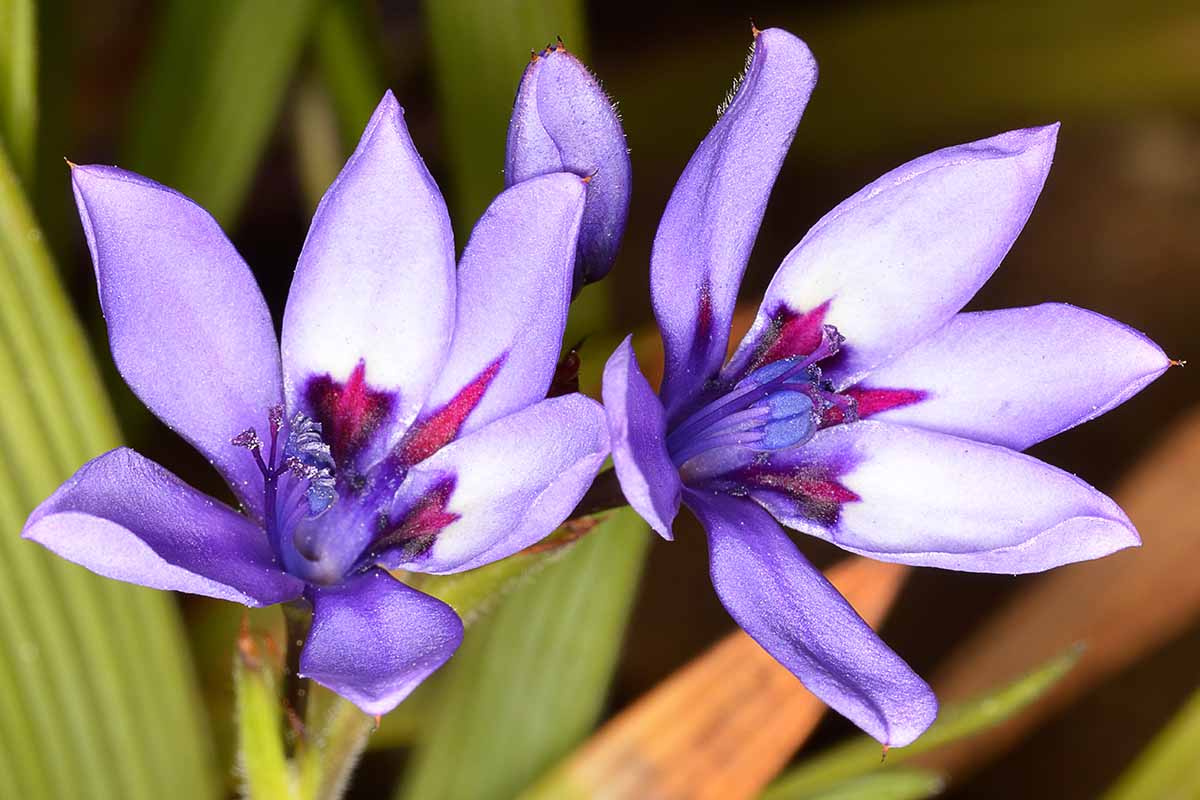
The flowers open along the upper part of the spike, six or so to a stem. Each funnel-shaped flower has six tepals and a sweet, citrusy fragrance.
The plant’s growth cycle is adapted to a Mediterranean-type climate with moist, mild winters and bone-dry summers.
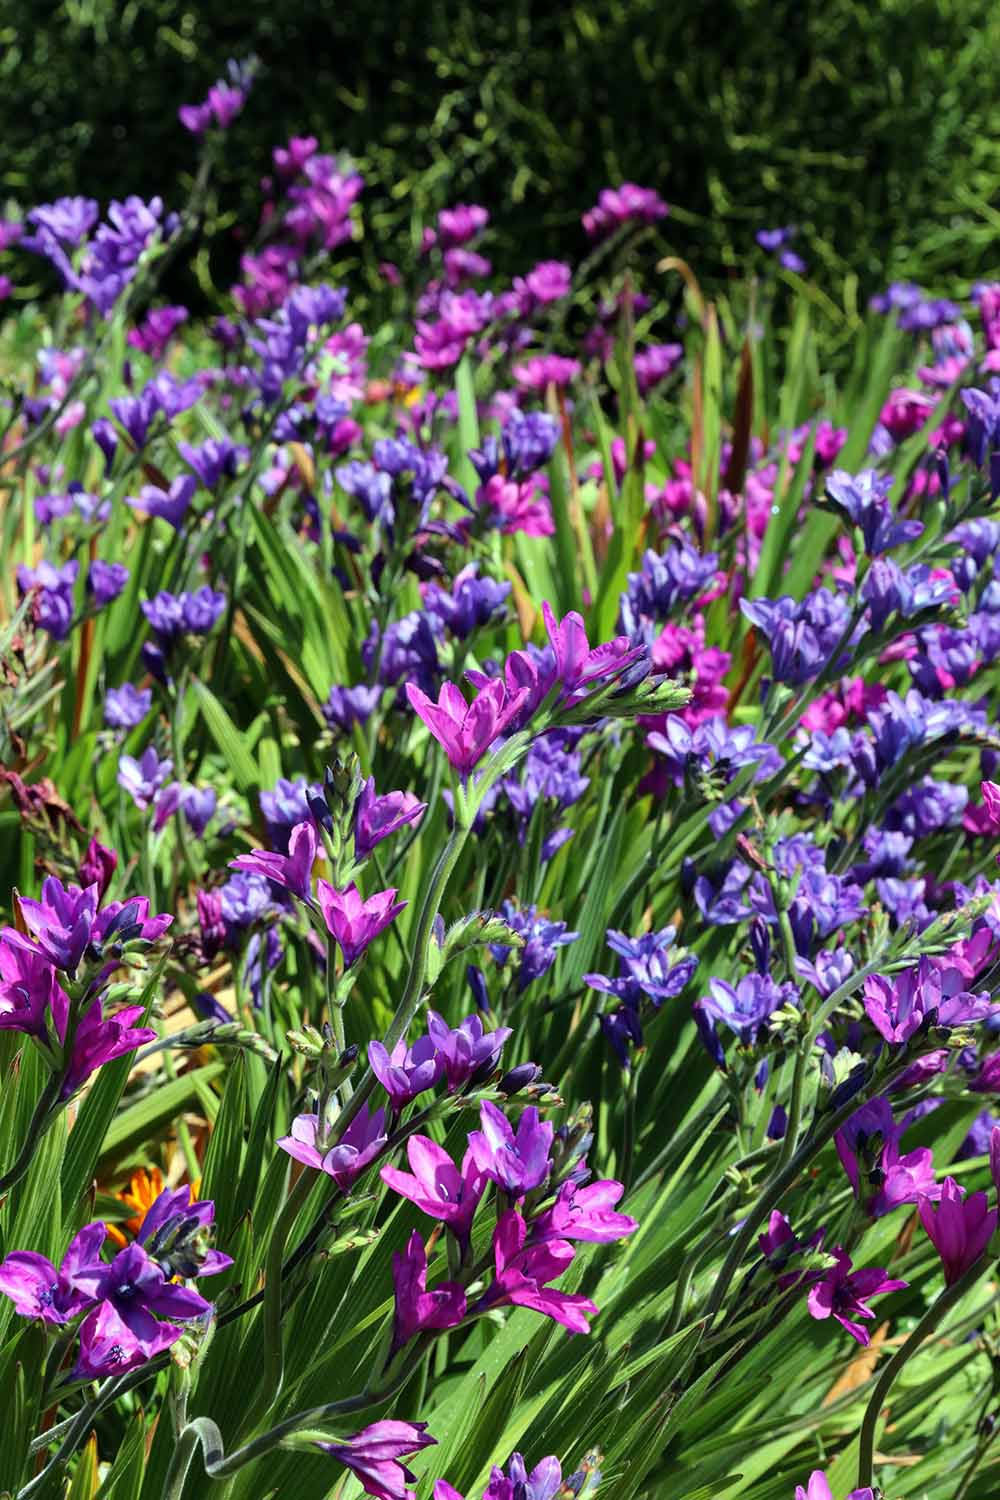
In the garden, they are well-suited to sunny rockeries, front-off-border placements, and cottage-style plantings.
They also thrive in containers, providing early-season color in mild climates.
How to Grow
Baboon flowers are easy to grow when provided with the right conditions.
Babiana can be grown in-ground year-round in regions where they are hardy and in containers elsewhere.
Since the active growth period is during the cool months, in Zones outside their hardiness range they can be grown in containers in a bright, frost-free spot or in a greenhouse.
Unlike many summer-flowering bulbs, these should not be lifted and stored over the winter months.
Plant the corms in fall, setting them three to four inches deep and two to four inches apart, with the pointed growing tip facing upwards.
Light
Choose a spot in full sun for the most prolific flowering. Baboon flowers tolerate part shade but perform best in full sun.
In the Northern Hemisphere, a south- or west-facing aspect provides the warmth and light these South African natives need.
Soil
Baboon flowers are not fussy about soil type, growing happily in lean soil provided it drains well. During the dormant summer months, waterlogged soil will rot the corms.
Ideally, the soil will be organically-rich, loose, and well-draining. If you’re dealing with heavy clay, grow in a raised bed or container instead.
Shoot for a pH of between 6.0 and 7.0, though you don’t need to change anything if your earth is outside that range.
In containers, use a well-draining potting mix – amend with grit if you want to improve drainage.
Water
Keep the soil evenly moist through fall, winter, and spring, while the plant is in leaf and during flowering. Add water whenever the surface of the soil begins to dry out.
After flowering, when the leaves start to turn yellow in early summer stop any supplemental watering as the corms go dormant.
Wet soil over summer dormancy will cause the corms to rot.
A layer of mulch can help retain moisture during the growing season if you live in a very dry region.
Fertilizer
Provided your soil isn’t very depleted, you can skip fertilizing baboon flowers. If you want, a side-dress of compost as the shoots start to appear is enough.
When grown in containers, from the second year onwards, provide a balanced liquid fertilizer diluted to half strength every three to four weeks during the growing season.
Stop fertilizing after the blooms have faded.
Container Growing
If you’re growing your baboon flowers in a container, choose a pot that’s at least six inches deep and make sure it has adequate drainage holes.
The material doesn’t matter, as long as there is adequate drainage.
Space your corms two to four inches apart and plant them three to four inches deep.
In regions outside of their hardiness range, move the container under cover before the first fall frost and keep it in a bright, frost-free spot and maintain even moisture.
Taper off watering after the flowers fade and the foliage starts to wane.
Where to Buy
Corms are typically sold in fall through bulb specialists, online retailers, and larger garden centers.
There are a couple of named cultivars worth seeking out.
‘Purple Star’ features deep purple blooms and ‘Tubergen’s Blue’ produces lavender-colored flowers with a dark blotch in the center.
There are a number of Babiana hybrids as well, though these are usually simply listed as baboon flowers.
Mixed-color collections sold simply as baboon flower or blue freesia are also common.
Maintenance
In-ground plantings in mild climates need little attention beyond watering during the growing season in the absence of rain.
Let the foliage die back naturally after flowering rather than cutting it back – the leaves help to feed the corm for next season’s growth.
Once the leaves have withered, the dead foliage can be cut back to tidy the garden.
If you live in a region with very wet summer weather, you can lift and store the corms to prevent them from rotting in the ground. Do this after the foliage has died back and replant in early fall.
Over the course of a few growing seasons, healthy plants produce offsets which form large clumps. To prevent overcrowding, divide and replant as discussed below.
Propagation
Baboon flowers are propagated from cormlets, the small offsets that form around the base of mature corms, or from seed. Offsets are faster and will produce clones of the parent plant.
To divide, lift dormant corms after the foliage has died back and gently pull away the cormlets clustered around each one.
Store them in a dry location for the rest of the summer and replant in early fall. The largest offsets may flower their first season, smaller ones in a year or two.
To grow from seed, sow in fall in a gritty, well-draining potting mix. You can expect the seeds to germinate within about six weeks, but it’ll be two to three years before the new plants are mature enough to flower.
Pests and Disease
Unless you live in baboon territory, Babiana are not really troubled by pests, but thrips and spider mites may feed on the foliage, especially in warm, dry conditions.
A strong jet of water or application of insecticidal soap should deal with light infestations.
Corm rot and soft rot can be a problem when the soil stays wet during summer dormancy.
Southern blight, a fungal disease that rots the corm, can also be an issue during wet summer weather.
If your region experiences a lot of rain during the summer months, consider lifting the corms and storing them in a dry spot before replanting in fall.
This Baboon’s Got Blooms
The citrus-scented blooms are pretty enough for front of border placements or patio pots as well as providing forage for bees and other pollinators.
Easy-care, these South African natives provide spring color in mild climates with little fuss from the gardener. Plus, who doesn’t love a plant called “baboon flower”?
Are you growing baboon flowers in your landscape? Tell us how they’re doing and share your top tips in the comments section below.
Price: $4.99 - $7.99 (as of Jun 24, 2026 03:08:50 UTC – Details)
Product description
PHARMACIST & HEALTHCARE THANK YOU CARDS – Show your appreciation for dedicated pharmacists, pharmacy technicians, doctors, and nurses with a thoughtful and meaningful thank you card. Featuring heartfelt messages, professional appreciation themes, and warm gratitude, this card is perfect for recognizing the hard work, care, and commitment of healthcare heroes who make a difference every day. A simple yet powerful way to say thank you and show respect. GIFT IDEA FOR PHARMACISTS, TECHNICIANS & MEDICAL STAFF – A meaningful card for pharmacist students, licensed pharmacists, pharmacy techs, doctors, nurses, and healthcare professionals. Ideal for Pharmacist Week, Doctor’s Day, Nurse Week, graduation, or appreciation events. Sized at 5.3 x 8 inches, it offers plenty of space to write a personalized message, making your gratitude more special and memorable. Search us with: pharmacy thank you card; pharmacist card; pharmacist appreciation card; pharmacist week card; pharmacist week gifts card; gifts for pharmacists; pharmacist gifts; pharmacist gifts for men; gift for pharmacist student; gift for pharmacist men; gifts for pharmacy technicians; pharmacy technician card; happy pharmacy technician day card; doctor card; doctors day card; doctors day cards; doctor day card; doctor appreciation card; doctor appreciation cards; dr day card; nurse card; nurse cards; nurses day cards; nurses week cards; nurse week cards; nurse graduation card HIGH QUALITY CARDSTOCK & PRINT – Printed on thick, premium cardstock with vibrant and professional designs, this greeting card provides a smooth writing surface and long-lasting durability. The clean layout and meaningful message create a keepsake healthcare professionals will appreciate. Each card includes a matching envelope for a polished presentation. For best writing results, use a gel pen or marker to keep your message neat and smudge-free. FIT FOR ALL OCCASIONS – Perfect for Pharmacist Week, Doctor’s Day, Nurse Week, graduation, appreciation ceremonies, or any moment you want to express gratitude to healthcare workers. Ideal for coworkers, students, patients, or friends looking to recognize medical professionals with a heartfelt and respectful message.
new video loaded: Why Milder Symptoms Could Make This Ebola Outbreak More Dangerous
Early signs indicate that the species of Ebola behind the current outbreak in the Democratic Republic of Congo may have milder symptoms than past outbreaks. Our global health reporter Apoorva Mandavilli explains why this might actually make it more dangerous.
By Apoorva Mandavilli, Alexandra Ostasiewicz, Nikolay Nikolov, Stephanie Swart, Rafaela Balster and Lauren Pruitt
I don’t think you could find more than a few Garden Photo of the Day posts in recent years that don’t have a comment from Sue Hughes (@simplesue). She always has some kind words and/or a bit of encouragement to offer every gardener that contributes. In a world where negativity usually gets the most attention, she often inspires me to spread a little more joy and light. Back in 2019 we had the pleasure of featuring the first garden Sue and her partner Marshall Goodwin designed in Pittsburgh, Pennsylvania (Zone 6b) (Check that submission out here: You Never Forget Your First Garden), but that was already after they had moved and started a new garden in the same city. Today, after 14 years of work, we finally get to see the new garden that Sue and Marshall created. I hope you can feel inspired by this gorgeous space and Sue’s kindhearted spirit, and decide to leave some positive comments for Sue and Marshall.
We are Sue Hughes & Marshall Goodwin, and we moved 14 years ago and were desperate for a garden at the new house. So we packed up what we could salvage of the little garden we created in our youth, which was on GPOD, and we started over. We moved to a small historic neighborhood called Schenley Farms, in Oakland, which is a very busy section of Pittsburgh, Pennsylvania in growing zone 6b.
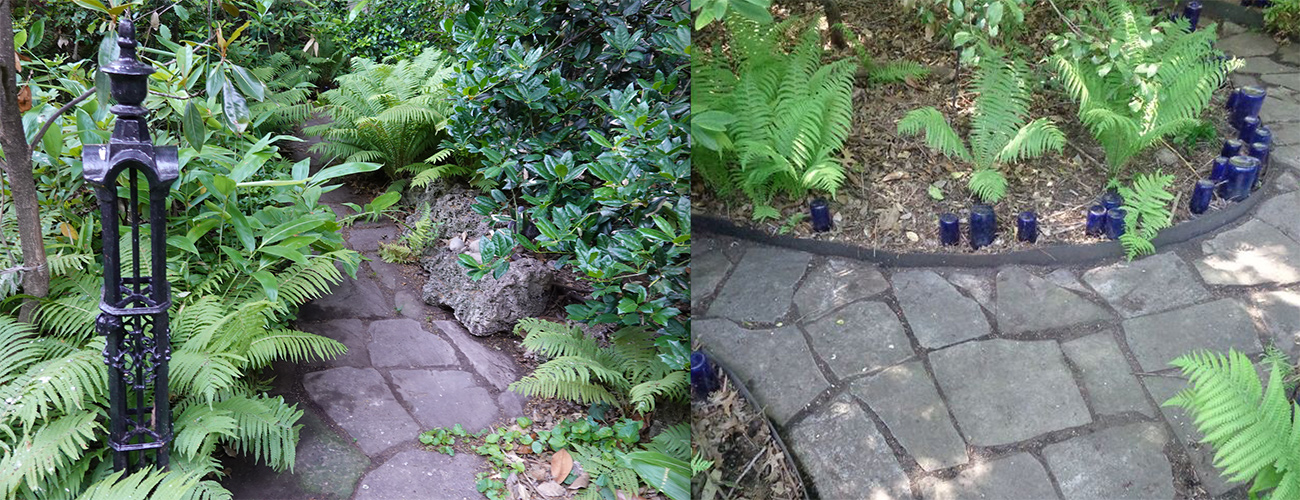
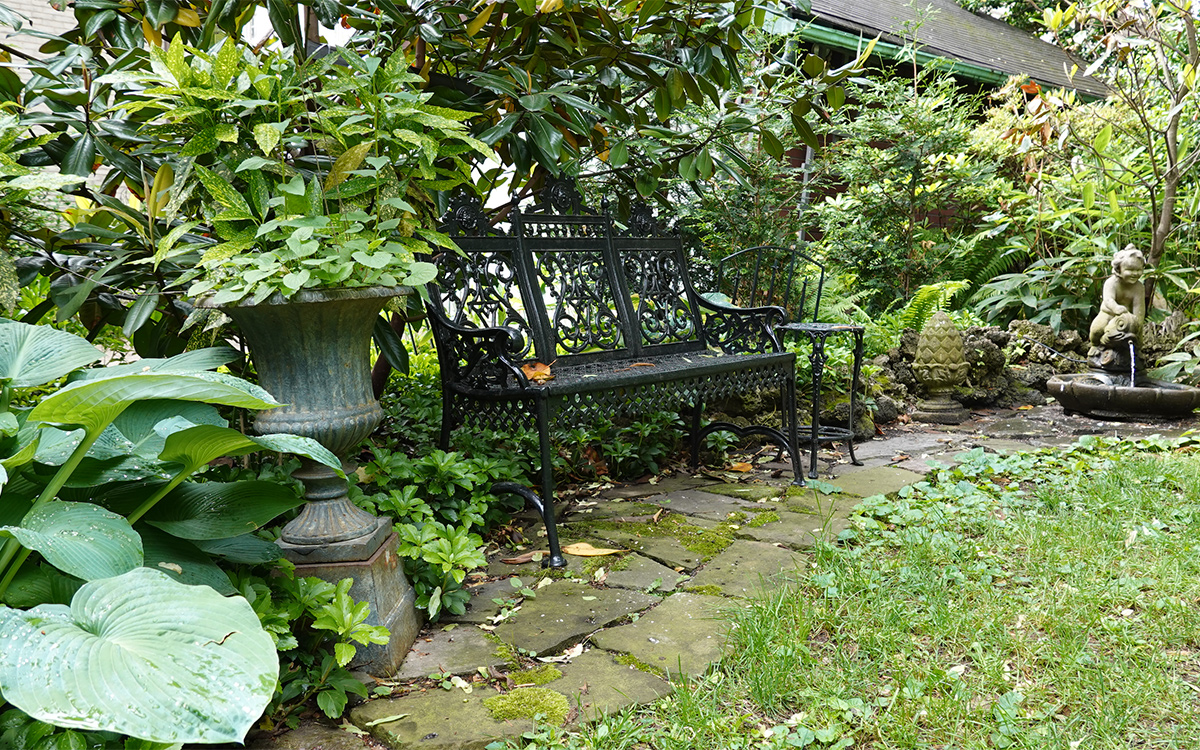
This iron garden bench, (attributed to John McLean, New York, c1880), sat in an old garden across the street since at least the early 1960s, and was given to us by the new neighbors who preferred contemporary garden design. It took a lot of work to restore it, and it inspired us to expand the stone border into a fuller and more graceful shape.
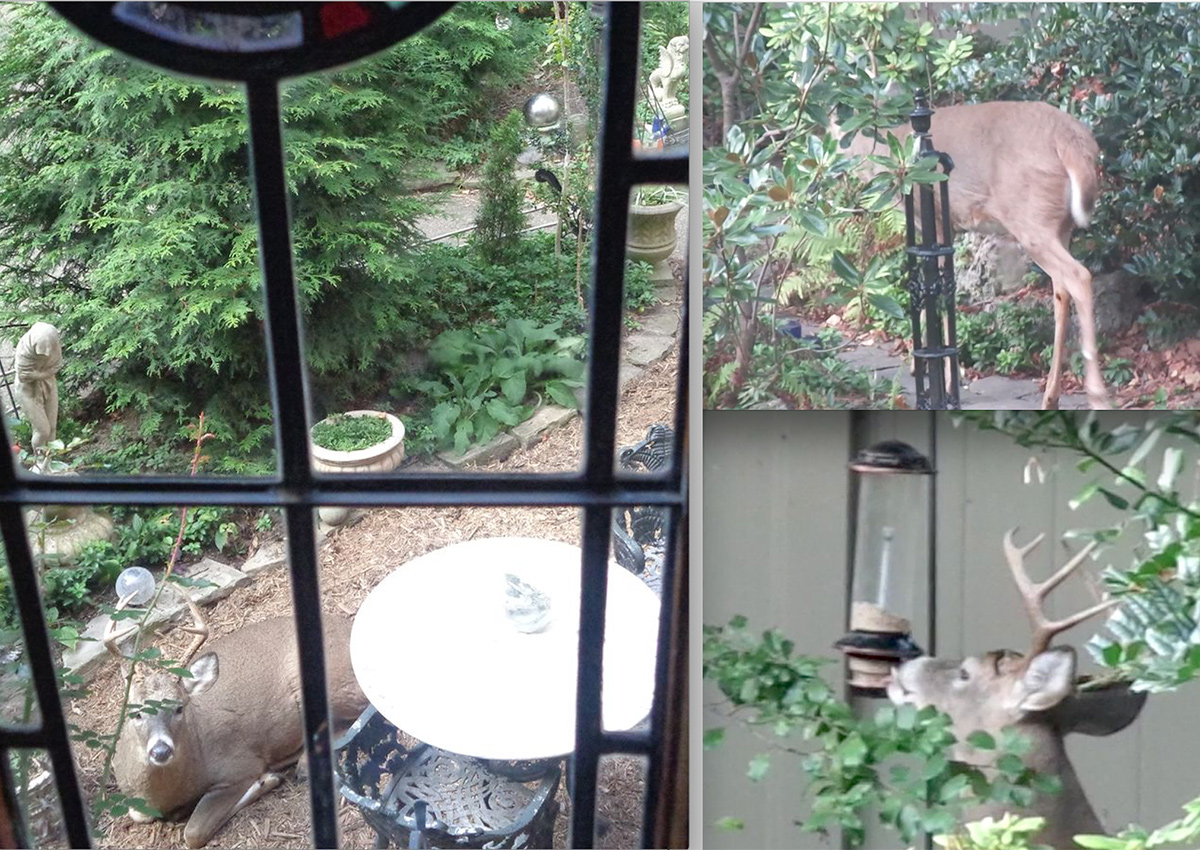
The garden path leads to the back of the garden and to the bird feeders. It’s lined with the same light catching cobalt blue bottles from our last garden. The plants in this area that survive the deer and deep shade: Ostrich ferns(Matteuccia struthiopteris, Zones 3–7), mayapples(Podophyllum peltatum, Zones 3–8), spotted laurels(Aucuba japonica, Zones 6–9), American holly(Ilex opaca, Zones 5–9), a very shade tolerant low growing bamboo(Sasa palmata, Zones 6–10), and rhododendrons.
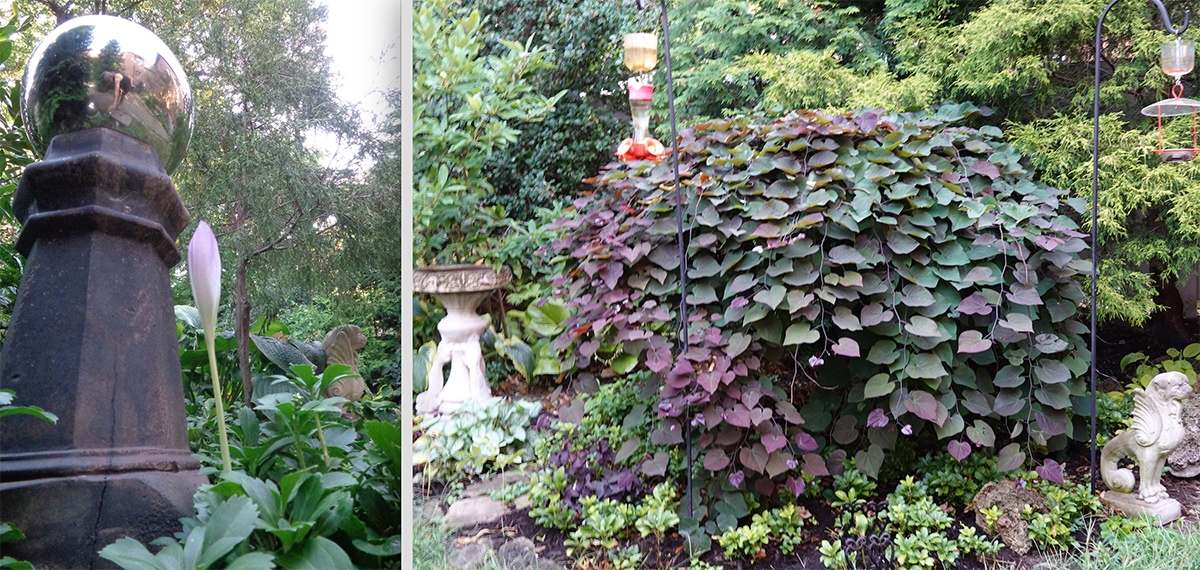
A giant autumn crocus(Colchicum giganteum, Zones 4–8) and a stainless steel gazing ball on an old chimney pot. Due to wildlife we can’t use glass gazing balls, they get knocked off and broken. We even rigged the stainless steel balls so they’re weighted and can’t be knocked off. ‘Ruby Falls’ weepingredbud(Cercis canadensis ‘Ruby Falls’, Zones 5–9)had a good year in 2025, but this year the winter was harsh, and in the spring the deer ate some of it, but it’s making a come back.
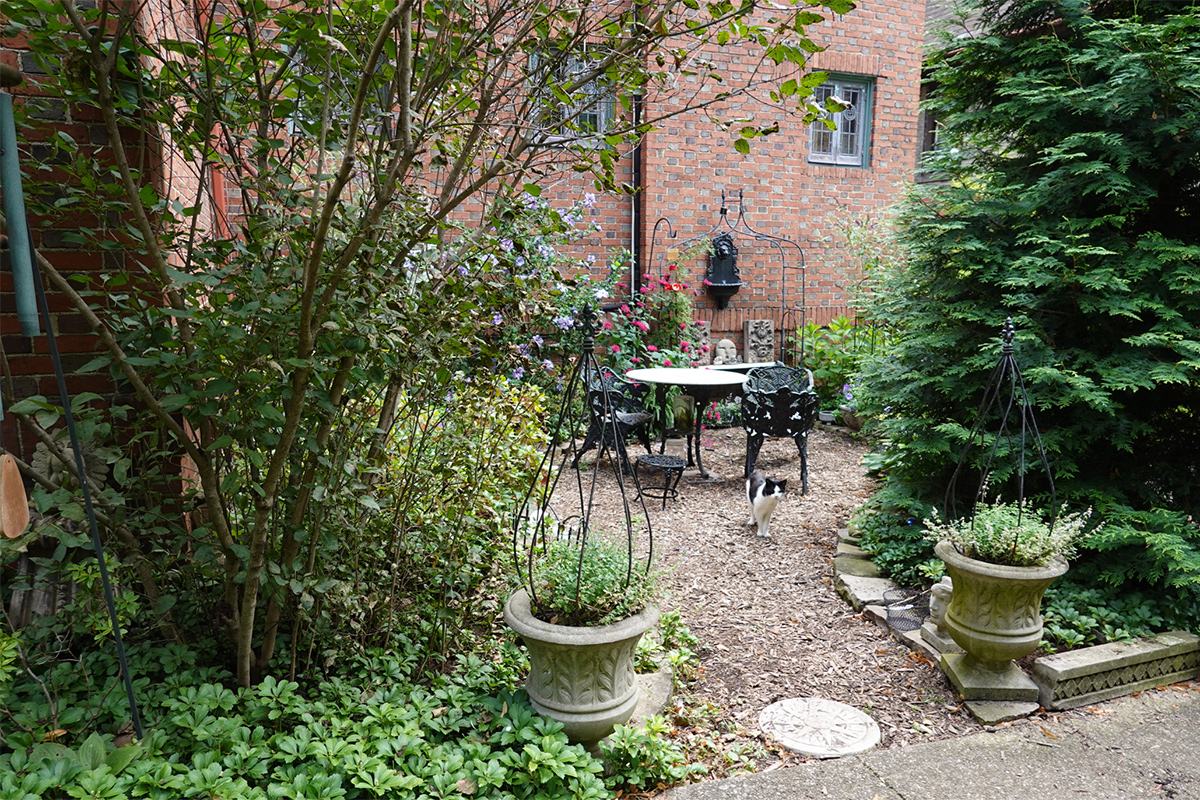
The sitting area is across from the wild woodsy side of the garden. The lilac on the left was started from a small sucker from my next-door neighbor’s beautiful old lilac. ‘Cat’s Pajamas’ catmint(Nepeta ‘Cat’s Pajamas’, Zones 3–8)in entrance pots. Pots can become too cold, to wet or too dry in winter and the nepeta survives just fine when other perennials didn’t.
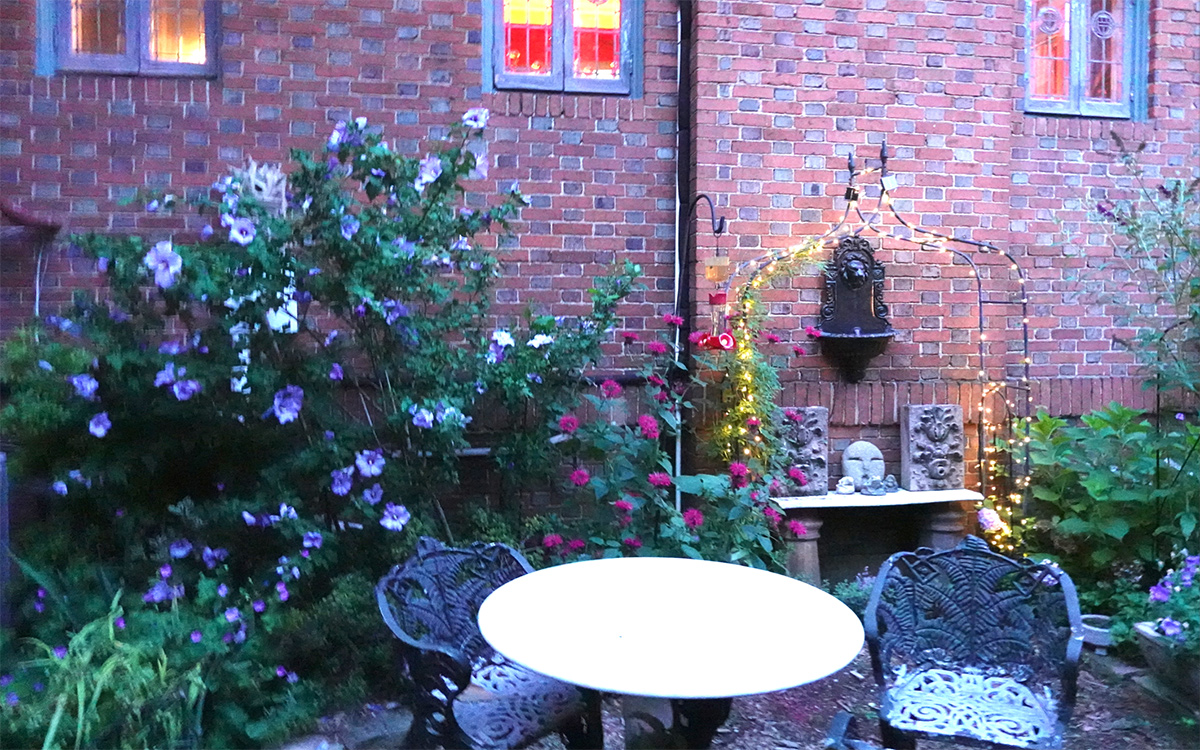
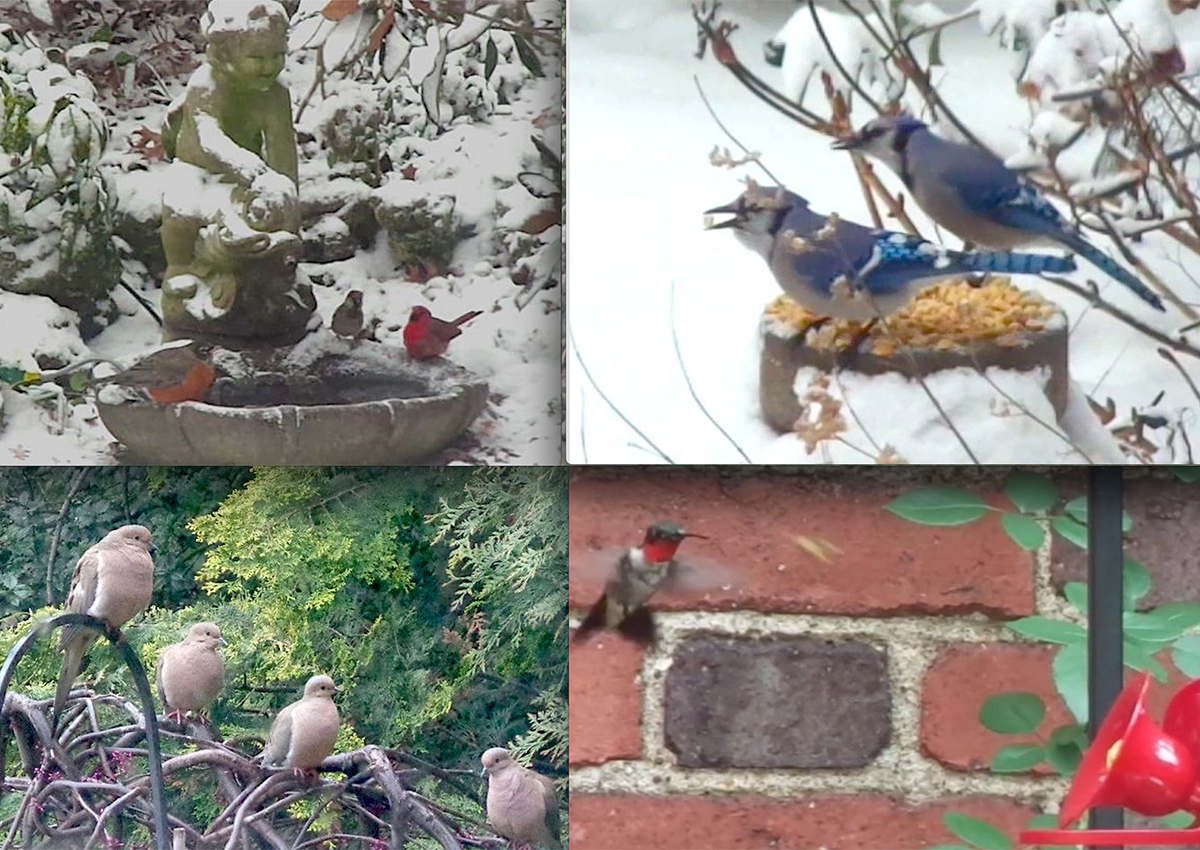
Twilight in the sitting area is a magical time of day, the heat of the day cools down, the hummingbirds come for their last sips of nectar before night fall, cardinals come for a few last seeds as the falcons that nest at the end of our street have so far never shown up that late in the day. (Check out this short video that talks about the falcons that visit Sue’s garden from their nest at the University of Pittsburgh: Our Cathedral residents got some new jewelry!)
It seems the deer didn’t appear in our neighborhood until a couple of years ago when the city unfortunately began to allow deer hunting in Schenley Park, as if they sensed danger in the park and left in search of safety and plants to eat. Also as the University of Pittsburgh continues to grow and build on a once wooded hillside, more deer were displaced.
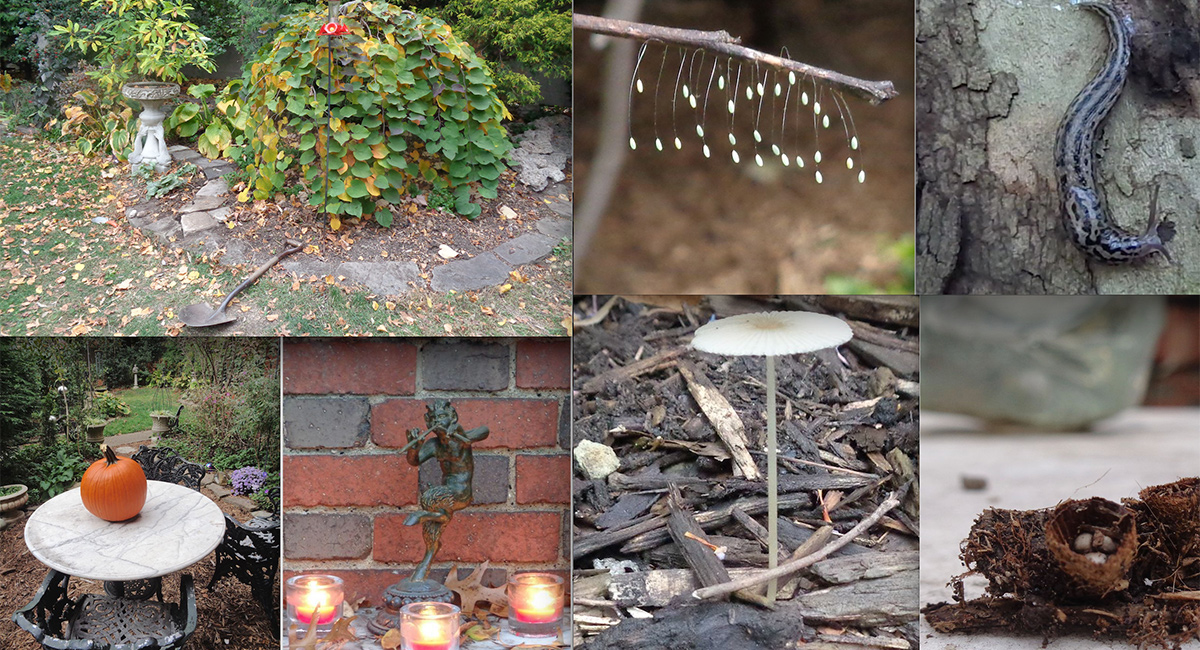
A photo collage of the garden in autumn, and tiny woodland details: The delicate eggs of the green lacewing a beneficial insect. A leopard slug (Limax maximus)that are beneficial, not destructive to the garden, they don’t eat plants and are considered detritivores and carnivores and cleanup debris and are said to actually eat the grey slug that eat garden plants.A delicate little fungus called pleated inkcap (Parasola plicatilis) and a tiny little bird’s nest fungus (Nidulariaceae).
Our little woodland garden has birds all year round coming for food and water. A birdbath heater is especially important to wildlife when winters are dry or water has frozen, and having a source of water ground level allows all wildlife access to water.
I love this tree, I rooted it from a small twig from an unknown type of Southern magnolia(Magnolia grandiflora, Zones 7–9). It grew super fast. It doesn’t lose leaves in winter and is much hardier than the two other ‘Bracken’s Brown Beauty’ magnolia(Magnolia grandiflora ‘Bracken’s Brown Beauty’, Zones 5–9)that I bought, which drop some of their leaves if it’s a harsh winter.. The bees alway seem drunk on the nectar of the huge fragrant flowers, sometimes they just roll around inside the flowers.
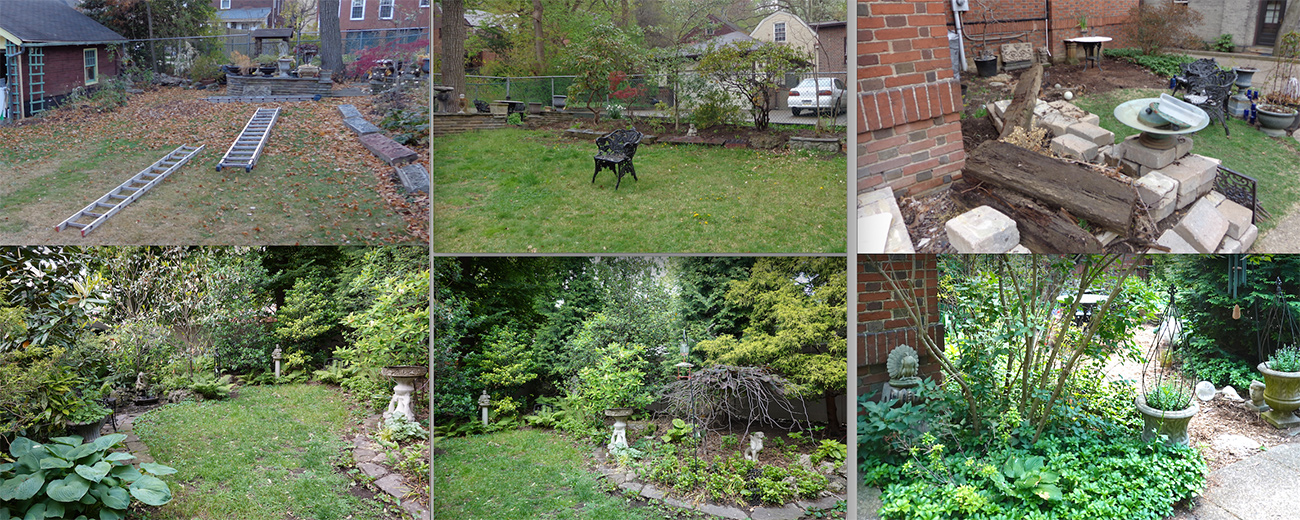
Last but not least—the before & after photos. Who would have thought there were old railroad ties buried under the ground when we began to level the hump in the sitting area, or that the boring cement block planter was almost impossible to take apart due to cement glue and filled with more gravel than soil.
Thank you so much for sharing this exciting garden update with us, Sue and Marshall! I’m happy to hear you have a glorious garden oasis again and I’m impressed with the lively landscape you have cultivated in 14 years.
What garden changes have you made in recent years? Did you move to a brand new space, like Sue and Marshall, or did you make some additions and upgrades this spring? Let us know in the comments, or consider sharing photos of your garden’s evolution with the blog. Follow the directions below to submit your photos to Garden Photo of the Day!
We want to see YOUR garden!
Have photos to share? We’d love to see your garden, a particular collection of plants you love, or a wonderful garden you had the chance to visit!
You can also send 5–10 photos to [email protected] along with some information about the plants in the pictures and where you took the photos. We’d love to hear where you are located, how long you’ve been gardening, successes you are proud of, failures you learned from, hopes for the future, favorite plants, or funny stories from your garden.
Do you receive the GPOD by email yet? Sign up here
Fine Gardening Recommended Products
ARS Telescoping Long Reach Pruner
Fine Gardening receives a commission for items purchased through links on this site, including Amazon Associates and other affiliate advertising programs.
Telescopes from 4 to 7′. Cut and Hold (160) Blades. Drop forged blades for unsurpassed long lasting sharpness. Lightweight, 2.3 lbs., for continued use. Perfectly balanced for easy pruning.
Fine Gardening receives a commission for items purchased through links on this site, including Amazon Associates and other affiliate advertising programs.
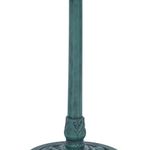
STUNNING BIRDBATH: Quality birdbath is sure to attract feathered friends and create a charismatic ambiance for your garden, patio, deck, yard, or other outdoor space. SHALLOW SHAPE: Shallow and wide bowl assures that multiple small birds can drink and bathe safely at the same time
BEAUTIFUL DESIGN: Luxurious and antique styling adds a touch of elegance to your garden or yard. DURABLE CONSTRUCTION: Polypropylene material resists rust and damage from the elements while the sturdy base prevents the birdbath from tipping over. IDEAL SIZE: Birdbath measures 20″ L x 20″W x 28″H, the perfect size for your yard, and includes a one-year manufacturer’s warranty from date of purchase.
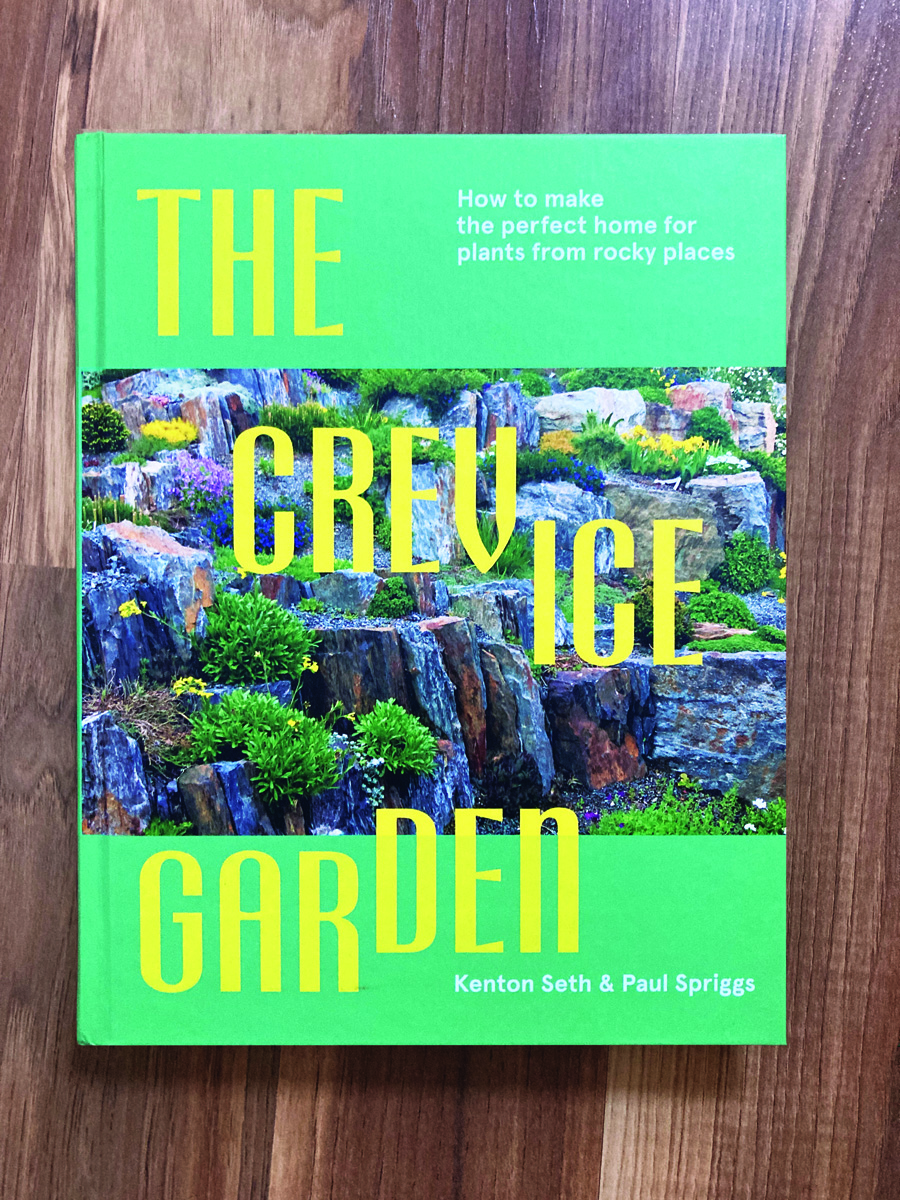
The Crevice Garden: How to make the perfect home for plants from rocky places
Fine Gardening receives a commission for items purchased through links on this site, including Amazon Associates and other affiliate advertising programs.
A crevice garden replicates the environmental conditions of mountain tops, deserts, coastlines, and other exposed or rocky places on earth. These striking garden features provide perfect conditions for the plants native to these far-off places, bringing the cultivation of these precious gems within everybody’s reach.
Price: $7.99 (as of Jun 23, 2026 15:08:04 UTC – Details)
Product description
PHARMACIST & HEALTHCARE THANK YOU CARDS – Show your appreciation for dedicated pharmacists, pharmacy technicians, doctors, and nurses with a thoughtful and meaningful thank you card. Featuring heartfelt messages, professional appreciation themes, and warm gratitude, this card is perfect for recognizing the hard work, care, and commitment of healthcare heroes who make a difference every day. A simple yet powerful way to say thank you and show respect. GIFT IDEA FOR PHARMACISTS, TECHNICIANS & MEDICAL STAFF – A meaningful card for pharmacist students, licensed pharmacists, pharmacy techs, doctors, nurses, and healthcare professionals. Ideal for Pharmacist Week, Doctor’s Day, Nurse Week, graduation, or appreciation events. Sized at 5.3 x 8 inches, it offers plenty of space to write a personalized message, making your gratitude more special and memorable. Search us with: pharmacy thank you card; pharmacist card; pharmacist appreciation card; pharmacist week card; pharmacist week gifts card; gifts for pharmacists; pharmacist gifts; pharmacist gifts for men; gift for pharmacist student; gift for pharmacist men; gifts for pharmacy technicians; pharmacy technician card; happy pharmacy technician day card; doctor card; doctors day card; doctors day cards; doctor day card; doctor appreciation card; doctor appreciation cards; dr day card; nurse card; nurse cards; nurses day cards; nurses week cards; nurse week cards; nurse graduation card HIGH QUALITY CARDSTOCK & PRINT – Printed on thick, premium cardstock with vibrant and professional designs, this greeting card provides a smooth writing surface and long-lasting durability. The clean layout and meaningful message create a keepsake healthcare professionals will appreciate. Each card includes a matching envelope for a polished presentation. For best writing results, use a gel pen or marker to keep your message neat and smudge-free. FIT FOR ALL OCCASIONS – Perfect for Pharmacist Week, Doctor’s Day, Nurse Week, graduation, appreciation ceremonies, or any moment you want to express gratitude to healthcare workers. Ideal for coworkers, students, patients, or friends looking to recognize medical professionals with a heartfelt and respectful message.


 You Are Off the Charts! Card, Funny Nurse Appreciation Card, Medical and Healthcare Worker Thank You Card with Stethoscope and RX Design")


 You’re One in a Nephron Card, Funny Nurse Appreciation Card, Cute Kidney and Rainbow Design Thank You Card for Healthcare Workers")
")
")


 I Aorta Tell You How Great You Are Card, Funny Nurse Appreciation Card, Heart and Stethoscope Design Thank You Card for Healthcare Workers")


 The Dream Team, It Would Be a Pain Not Having You Card, Funny Nurse and Medical Worker Appreciation Card, Ketamine, Propofol, and Fentanyl Design Thank You Card")