Flea beetles also enjoy feasting on rapini leaves. They are most recognizable by the damage they do – leaving tiny, round “shot holes” in the foliage.
Before you kill any other tiny garden beetles thinking they are flea beetles, however, make sure you have correctly identified them – there are some beneficial insects, such as spider mite destroyers, which can be mistaken for these pests.
Flea beetles don’t usually do enough damage to harm broccoli raab, In my own garden, I ignore the minimal damage caused by these pests.
Instead I focus on attracting natural flea beetle enemies such as braconid wasps, which love the umbel-shaped flowers of cilantro, dill, and yarrow.
Leaf miners leave distinctive maze-like marks in the foliage.
These pests are actually flies, but it isn’t the adults that create the damage, it is the larvae feeding as they burrow through the leaf tissue.
Leaf miner damage.
In addition to aesthetic damage, these burrows can interfere with photosynthesis.
As with flea beetles, parasitic wasps are important in keeping leaf miner populations down.
To encourage parasitic wasps, grow plants they like nearby. In addition to cilantro and dill, cosmos is another beneficial wasp favorite.
Remove any damaged foliage and give your plants a chance to recover before resorting to pesticides, which are harmful to beneficial insects.
Disease
There are a few common diseases that can affect your crop, but they are not very common if plants are grown in optimal conditions.
Alternaria Leaf Spot
Alternaria leaf spot is a fungal disease that causes brown lesions on the foliage with white or gray centers. These lesions are often surrounded by yellow halos.
The fungi that cause this disease flourish in hot, humid conditions.
To prevent infection, provide adequate spacing between plants and encourage good air circulation.
Also, rather than watering your crop with a sprinkler, water close to the surface of the soil instead.
Treatment of this disease is much the same in rapini as it is in its close relative, the turnip.
Damping off is caused by a soilborne pathogen that causes young seedlings to suddenly wither and die.
Cool, wet conditions and poorly draining soil put seedlings at risk for this disease. As a preventive measure, make sure the soil is well-draining, and don’t overwater.
In addition to being used in Italian and Chinese cuisine, this green is a staple in traditional Spanish and Galician cuisine as well, such as in the soup caldo Gallego.
Rapini can be cooked like any other leafy green – steamed, sauteed, added to an omelet or quiche, mixed with pasta, or used as a pizza topping.
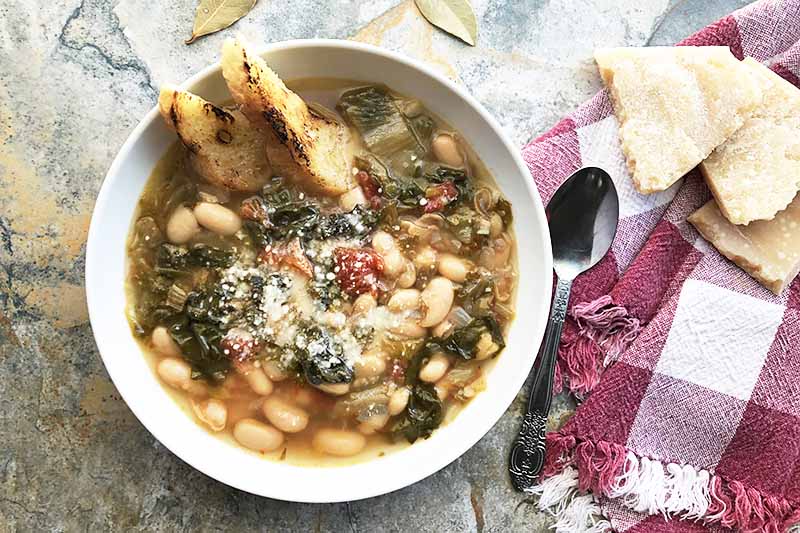
Raab also combines well with beans, such as in this recipe for cheap and easy Italian style beans and greens soup, from our sister site, Foodal.
Photo by Fanny Slater.
For a light meal or appetizer, you can also use it as a topping for toast, such as in this recipe for tartines topped with broccoli rabe, chilies, and pecorino. Find it on Foodal.
The Best Bitter Buds
You now have all of the information you need to sow, grow, harvest, and even cook up a delicious batch of homegrown broccoli rabe. So, what are you waiting for?
Are you a fan of these pungent greens? Tell us about your gardening or cooking experiences with rapini – and let us know what you call it – in the comments section below.
Price: $95.99 - $80.99 (as of Oct 24, 2025 23:48:49 UTC – Details)
Product description
1 AI Insights
2 Motion Analysis
3 Manage Stress
1. How do I connect this fitness tracker to my phone?
a. Fully charge your MUMUCREAM fitness tracker first (it will power on).
b. Enable Bluetooth on your phone and download the JCVital app.
c. In JCVital: Tap ‘Add New Device’ > Select 2208A* > Connected.
2. Is the app free? Are there other fees?
The JCVital app is completely free – no subscriptions or service fees. You only pay for the tracker itself.
3. Why can’t I register/log in?
Use either your phone number (select US code +1 first) or email.
Password: At least 6 characters.
Verification code: Enter within 30 minutes of receipt.
4. The connection drops. How do I fix it?
Keep the tracker charged and within your phone’s Bluetooth range.
Note: App data may need refreshing or a few seconds to sync – this isn’t a true “disconnection”.
5. Will the firmware update?
Yes. Update firmware manually in the app: JCVital > Device > Device Settings > Firmware Update.
Note: Click ‘Update Now’ if available. Check regularly for new versions.
All-Day Health & Activity Monitoring Fitness Trackers Our advanced fitness trackers provide 24/7 insights into your heart rate, sleep quality and stress levels. It’s your essential vital health ring for your wrist, helping you understand your body’s patterns and make informed decisions to improve your overall wellness. 44 Sports Modes & Connected GPS for Every Workout Crush your goals across 44 different sports modes, from running and cycling to yoga and swimming. For outdoor activities, simply connect to your phone’s GPS to accurately map your routes, track your pace, and measure calories burned. This is more than a simple step tracker; it’s your comprehensive workout companion. 10-Day Battery & IP68 Waterproof Design Enjoy unparalleled convenience with up to 10 days of battery life on a single charge—no constant charging needed. The IP68 rating makes it impervious to sweat, rain, and water splashes, so you can wear it rain or shine, from the gym to the pool. It’s the durable fitness ring built for an active lifestyle. Subscription-Free App with Family Data Sharing Access all your data without any hidden fees or monthly subscriptions. Our user-friendly app is free for life. Plus, a unique feature allows you to create family groups and stay connected by viewing the health steps tracker data and wellness metrics of your loved ones, all from your own phone. Smart Notifications & What You Get Stay connected without constantly checking your phone. app alerts directly on your wrist. Your purchase includes: 1x MUMUCREAM Activity Tracker, 1x Charging Cable, 1x User Manual, and Lifetime Free App Support. Download the app via the QR code and start your journey today!
Customers say
Customers appreciate the watch band’s color variety, quality, and value for money. The band is comfortable, easy to install and remove, and simple to use, with one customer noting it’s super easy to put on and secure. The fit receives mixed feedback, with some finding it great while others say it’s too big for their wrist. Durability is also mixed, with one customer reporting issues with the metal piece breaking.
After I wrote about what I keep in my purse, I had several requests for a similar post about what my kitchen looks like. While it’s changed some over the years, I’ve found what works best and some new favorites. Here’s the list I wish I’d had before having my own home. Everything from pots and pans, to water filters and other crunchy mama tools.
Natural Kitchen Items
To start off, keep in mind that unless I’m travelling we usually cook 2-3 times a day and don’t use a microwave. The kids are old enough to make family dinners and can handle their own breakfasts and lunch prep. So there are a lot of us using the kitchen at different hours of the day!
All my kitchen items are heavy duty and have multiple uses. Many of these items are pricey, but I carefully budgeted for them and many have extended warranties. And because I’m constantly experimenting with new recipes for the blog, I have some tools I wouldn’t have originally thought to purchase.
Appliances/Big Items
Besides the usual refrigerator and oven/stove, I have a variety of small appliances that I use on a regular basis.
1. Blender
I’ve had a Vitamix for many years now and it’s been used multiple times a day! We use it daily for smoothies, sauces, blending coffee with healthy fats, chopping, etc. If I could only have one of the appliances on this list, I’d keep the Vitamix. While I really think a Vitamix beats all other blenders, here are my experiences with other blenders that also pass the test.
2. Food Processor
I didn’t get this food processor early on because I didn’t think I’d use a machine that just chops and mixes. Turns out, I use it a lot. I thought it would be fun to chop everything by hand, which was true for a few years. Now when I cook for a crowd (just the family, not to mention guests) the food processor is really helpful. I also often use this for chopping items for soups, slicing cabbage for sauerkraut, pre-chopping salad items for the whole week, etc.
3. Stand Mixer
Another item that I didn’t buy for a long time because I didn’t think I’d use it much. Especially since I don’t bake that often. While my stand mixer doesn’t get as much use as the blender, I do use it for things like whipping homemade marshmallows or mixing grain-free biscuit dough.
4. Dehydrator
I went through several, cheaper plastic dehydrators before I found this one. Excalibur brand is considered the gold standard of dehydrators. It’s great for drying fruits and veggies, making beef jerky, homemade fruit leather, and more. My kids especially like fruit chips made from dehydrated apples and strawberries. We use our dehydrator the most in the summer when there’s excess produce that needs preserved.
5. Ice Cream Maker
Not something I thought I would use all the time, but surprisingly we do. We use this ice cream maker for recipes like strawberry gelato, or butter pecan ice cream. It’s also just a great way to get healthy fats and nutrients into my kids without a fight. I can even simply blend watermelon and pour it in to make a sorbet. For ice creams, I opt for coconut milk, egg yolks, and butter for good fats.
6. Slow Cooker
This is the Crock Pot I have. I actually went through several cheaper ones that wore out before I finally sprung for a high-quality one. This particular Crock Pot is also supposed to be tested to be free of lead (which is present in the crock of some slow cookers).
7. Air Fryer
I use the Wonder Oven from Our Place. It’s easy enough for my kids to use and it’s multi-functional so I can also use it as a toaster, oven, etc. I’ve used it for well over a year now and it works seamlessly with anything I put in there. The interior is stainless steel (which is hard to find in an air fryer) and they come in many different colors to coordinate with any kitchen!
8. Immersion Blender
I use my immersion blender all the time for pureeing soups in the pot, mixing pancake batter, etc. It’s so much easier than transferring hot liquids to a blender pitcher and I like that the part that touches the food is stainless steel.
9. Water Filter
Not an appliance per se but we use this water filter daily to filter our water for cooking and drinking. The 14-stage filter is the best one I’ve found that does a thorough job. If you want an option that’s not under the counter, here are my reviews on other filters we’ve tried over the years.
Cookware and Bakeware
I cook all the time, so quality cookware is really important to me. I only use cookware that’s natural/eco-friendly and also fairly easy to clean. This left only a few options, but these versatile pieces get used all the time!
1. Instant Pot
While this popular pressure cooker has been around the block for a while now, it’s still a staple in my kitchen. The Instant Pot makes soups, stews, and casseroles. It can also hardboil eggs, ferment yogurt, and makes the most tender cuts of meat you can imagine.
Food is ready in about an hour or less, and you can saute right in the pot before pressurizing, saving extra dirty pans. I even make elderberry syrup in it. Check out my full review on Instant Pot models (and why it’s a healthy way to cook).
2. Caraway
I use Caraway’s 3 qt. saucepan several times a week as well as their frying pan to make eggs, crepes, or fry up veggies. They’re easy to clean and are safe for the family without any toxic chemicals leaching into your food. I also use their bakeware when making desserts or breakfast muffins.
3. Xtrema Pure Ceramic
Xtrema’s skillets cook evenly and are really easy to clean (when used properly). The only downside is that they are breakable so I have to be careful when cleaning them. I use these especially for eggs since they don’t stick, but also for stir-fries and meats.
Xtrema also has a full line of bakeware, sauce pans, Dutch ovens, and more. I love that they’re 3rd party tested for heavy metals and toxins so I feel good about using them for my family. You can read my full review of Xtrema here.
4. Always Pan From Our Place
I love the Always Pan when I’m making scrambled eggs, stir fry, or need to steam some veggies. The pan is very easy to clean and you can either wipe it down with a wet rag or throw it into the dishwasher. Our Place also makes the Wonder Oven (mentioned above), but they have tons of healthy cookware, bakeware, utensils, and more.
5. Cast Iron Skillet
Nothing beats a good cast iron skillet, which can last forever. These are the ones I have, but you can sometimes find them at antique stores or estate sales. I use cast iron skillets for anything that has to go from stove to oven or for meats, bacon, sausage, etc. Another advantage is that trace amounts of iron are left in food to boost the body’s iron levels.
6. Le Creuset
These enameled cast iron dishes are pricey, but well worth it! I have a Dutch oven and soup pot that are coated cast iron and use these for stove or oven roasting or cooking.
7. Large Stock Pot
I have a restaurant grade 5-gallon stock pot that I use for bone broth and for pre-cooking large batches of food. Even if your family isn’t quite as big as mine, they have multiple sizes available for batch cooking.
8. Glass Baking Dishes
I use these for everyday cooking and baking. While I’ve used Pyrex for years for their durability, several of the above brands also have some nice baking dishes in various sizes (and colors!).
9. Steel Baking Pans
Since we cook in bulk whenever possible I’ll often cook enough for an army, even for a single meal. These steel baking pans come in handy. I use them for roasting veggies, cooking large amounts of food, and serving to large groups. They can also double as a roaster for large cuts of meat.
Besides the bigger items like the appliances above, I have a variety of smaller kitchen items I use all the time. I actually had a lot more of these smaller items and have weeded out single-use items, especially those that took up a lot of room. The ones that made the cut and that I still have:
1. A French Press
This stainless steel French press is great for making coffee or tea without them coming in contact with plastic like they would in many coffee makers. I also like the flavor of coffee and teas made in a French press much better. Plus, it’s much smaller to store than a full-size coffee pot.
There’s often something (or a lot of something’s) fermenting on my counter. And my fermentation crock makes it so much easier. I use it most often for sauerkraut.
3. Quality Knives
Knives are still one of the most used items in my kitchen. From chopping veggies for omelets to meat or veggies for dinner, these get used all the time. I’ve even invested in teaching the kids to use them (with the help of this awesome online course) as it’s a valuable life skill.
4. Crinkle Cutter
This cutter isn’t too sharp and makes fun shapes so kids can use them to help with meal prep. When my kids were little I kept this and a bamboo cutting board on hand so they could take turns helping cut veggies for meals. They were also able to use this for quick carrot or cucumber slices for a snack whenever they wanted.
Here are some more tools you’ll find in my kitchen:
Glass Water Bottles: For use with smoothies, drinks, etc. when not away from home.
Stainless Steel Dinnerware for Kids: My youngest kids love these fun plates and cups. And I love them because they’re non-toxic and free of plastics.
Jars
I use jars for everything so they get their own category. We use them for storage, drinking glasses, fermenting things like beet kvass or water kefir, and salsa, as well as for second ferments of kombucha. I love glass jars and have a collection of sorts in my kitchen:
Quart Size & Pint Size Mason Jars: We use these for drinking glasses, storing food in the fridge, packing salads, and foods for lunch, etc.
Mason Jar Lid Alternatives: Convert Mason jars into drinking cups for hot or cold beverages. They also have lids for pouring, sprouting lids (also great for open ferments like water kefir), ferment weights, and more that I use.
Gallon Size Jars: I use these for fermenting or storing drinks in the fridge.
Large Spigot Jar – This has a stainless steel spigot and is perfect for continuous brew kombucha.
Glass Storage Jars: I store many items in my pantry and on my counter in these jars.
Unusual Natural Kitchen Essentials
In addition to the standard kitchen items, you’ll also find the following unusual items on my kitchen counter:
There are lots of other additional kitchen items, but these are by far the ones that I use the most regularly.
What’s in your kitchen? Are there any great kitchen tools that I’m missing out on? Do you have some of these same items? Share below!
Of course we are entitled to have strong opinions about plants, but it doesn’t hurt to have our minds changed once in a while. In this episode, Danielle, Carol, and their expert guest will discuss the redeeming qualities of plants that have won them over after some initial resistance. If there are particular plants you have ruled out for one reason or another, this might be the encouragement you need to look at them in a new light.
Expert: Jason Reeves is the curator of the University of Tennessee Gardens, located at the West Tennessee AgResearch and Education Center in Jackson.
Artisan™ Yellow Ombre coneflowerPeegee hydrangea in Carol’s gardenEl Niño® desert orchid Photo courtesy of Proven Winners‘Super Hero Spry’ French marigold
Expert Jason Reeves’s Plant Picks
‘Slender Silhouette’ sweet gum (Liquidambar styraciflua ‘Slender Silhouette’, Zones 5–9)
Augusta® Lavender heliotrope (Heliotropium ‘WNHPAULAV’, Zones 7b–11)
Aromagica® Purple heliotrope (Heliotropium arborescens ‘INHELAROPU’, Zones 9–11)
Feathered Friends™ series ajuga (Ajuga reptens and cvs., Zones 4–9)
‘Flashy Flamingo’
‘Parrot Paradise’
‘Slender Silhouette’ sweet gum trees Photo courtesy of Mark DwyerAugusta® Lavender heliotrope Photo courtesy of Proven WinnersAromagica® Purple heliotrope Photo courtesy of Proven Winners‘Flashy Flamingo’ ajuga Photo courtesy of Chris Hansen‘Parrot Paradise’ ajuga Photo courtesy of Chris Hansen
All photos from the contributors unless noted otherwise.
Fine Gardening Recommended Products
A.M. Leonard Deluxe Soil Knife & Leather Sheath Combo
Fine Gardening receives a commission for items purchased through links on this site, including Amazon Associates and other affiliate advertising programs.
MULTITASKING DUAL EDGES: a deep serrated edge and a tapered slicing edge ideal for tough or delicate cuts. DURABLE 6-inch stainless steel blade withstands 300 lbs of pressure. TWINE CUTTING NOTCH, DEPTH GAUGE MARKINGS & spear point – no need to switch tools when using this garden knife. LEATHER SHEATH: heavy duty, protective, clip on sheath to keep your knife convenient and secure. LIFETIME WARRANTY.
Price: $19.99 - $11.99 (as of Oct 24, 2025 11:46:52 UTC – Details)
From the brand
Since 2017, Hshbxd is committed to creating a healthy and comfortable life for every family. Through our professional team research, we will bring you an extraordinary fitness and rehabilitation experience! All you need is a small resistance band to work with you to create a perfect figure and a healthy life.
Join exercise now
Good Quality Exercise Bands – Made of TPE material, TPE is environmentally friendly, non-toxic and safe, has a wide range of hardness, soft touch, weather resistance, fatigue resistance and temperature resistance, used TPE old products can be recycled after simple regeneration, reducing Environmental pollution, expanding the source of renewable resources. The product is latex and powder free and fragrance free. 5 Levels Of Resistance – 5 resistance bands are 59in (150cm) long and 5.9in (15cm) wide, the resistance bands is yellow band (5 lbs), red band (10 lbs), green band (15 lbs), blue strap (20 lbs), gray strap (30 lbs). Multi-Functional – It can be resistance bands, exercise bands, yoga bands,elastic exercise bands, pilates bands, exercise arm bands, physical therapy resistance bands, stretching bands, workout bands, leg shaping exercise bands, stretch bands for exercise. You can use it at home, yoga studio, gym , Pilates studio, travel, and anywhere else, it’s compact and easy to carry. Easy To Maintain Your Body – The resistance bands for working out can help you relieve problems like joint pain and prevent potential health problems, and are the preferred equipment for physical therapy. Advanced stretching bands can target muscles such as arms, buttocks, legs, and abdomen to shape your perfect ideal body. Great Holiday Present – Resistance bands are great for any age, from children to seniors, resistance bands have been proven to provide as many benefits in terms of fitness health and strength gains as weight training equipment. Plus, by knotting the resistance band you get a loop for double the resistance!
Customers say
Customers find these resistance bands to be of top quality and effective, particularly for physical therapy and at-home workouts. They appreciate the impressive range of resistance levels, nice length, and good stretchability, with one customer noting they can be cut in half for different applications. While some customers find them durable, others report them breaking on first use, though customers generally consider them good value for money.
Price: $69.99 (as of Oct 23, 2025 23:44:44 UTC – Details)
From the brand
Explore Gymreapers Gear
THE PREMIUM TRAINING BRAND
Founded in 2014, Gymreapers is the market leader in premium fitness apparel and equipment.
NOTHING IS GIVEN
Gymreapers dedication to crafting high-quality products sets it apart in the market, providing premium and reliable gear.
EVERYTHING IS EARNED
Gymreapers is a renowned industry leader specializing in the production of premium quality gear, with a commitment to excellence.
THE GOAL
Gymreapers premium quality weightlifting equipment & apparel is here to elevate your performance inside & outside the gym.
GYMREAPERS TRAINING GEAR
NEXT LEVEL RESISTANCE GUARANTEED – Whether you’re looking for a better way to stretch or simply want a new challenge to your workout regiment, the Gymreapers Resistance Bands are made for you. Our bands enable you to tone, strengthen, and tighten any muscle group no matter where you are. The portable and lightweight bands are ideal for recovery, strength building, conditioning, or as a substitute for your favorite gym machine INCREASE MOBILITY AND RESISTANCE FOR THE TOUGHEST WORKOUTS – The Gymreapers Resistance Bands can be used by anyone who wants to improve mobility, recovery, and rehabilitation. The bands are also useful as substitutes for your favorite weighted exercises such as banded squats, bench press, deadlifts, leg presses, and shrugs. Our Resistance Bands are portable so you can get any intense workout anywhere. DURABLE AND PORTABLE LATEX RESISTANCE BANDS – Just like every Gymreapers piece of equipment and apparel, our natural latex rubber stretch Resistance Bands are no exception to the quality we provide. Our Resistance Bands are made from durable latex that is lightweight and portable. Leave worry behind knowing you’re investing in bands that will look like new after many years of use. 5 COLOR CODED OPTIONS ACCORDING TO WEIGHT – Get shredded and improve your overall endurance without sacrificing quality. The Gymreapers Pull Up Bands come in several key colorways so you easily pick out the correct weight according to its color. Work out indoors or outdoors in style with bands that come in Desert Tan (20-35lbs), Ranger Green (30-60lbs), Dark Earth (40-80lbs), OD Green (50-120lbs), and Coyote Brown (60-150lbs). GYMREAPERS TRAINING GEAR – Gymreapers designs and manufactures high quality fitness equipment and apparel that merges durable products, aesthetic design, and high quality materials. We’ve developed a full line of training tools to assist you in pursuing and achieving all of your fitness goals.
Customers say
Customers find these resistance bands impressive in quality and functionality, particularly for pull-ups, and appreciate their versatility and value for money. They like the aesthetics, with one customer specifically mentioning the color, while another notes their effectiveness for adding resistance to bodyweight exercises. The durability receives mixed feedback – while some say they’re still going strong, others report them breaking right away.
A new study found the most commonly prescribed antidepressants in the U.S., called selective serotonin reuptake inhibitors, or SSRIs, tended to have fewer side effects than some older medications.
Guido Mieth/Moment RF/Getty Images
hide caption
toggle caption
Guido Mieth/Moment RF/Getty Images
Doctors have long known that antidepressants come with side effects for cardiovascular and metabolic health.
But a major analysis from a team of researchers in the U.K. has, for the first time, pulled together data from more than 150 clinical trials to compare the physical side effects of dozens of antidepressants.
The study, published in the Lancetthis week, details how each medication can affect weight, blood pressure, heart rate, cholesterol and other areas of health.
The end result is something akin to a “sports league table” for 30 different antidepressants based on their side effect profile, says lead author Dr. Toby Pillinger, a psychiatrist at King’s College London.
“It’s never been done at this scale before and no one’s ever put specific numbers to the amount of weight you’ll put on, or to the amount that your cholesterol goes up,” he says.
The findings are based on existing data, mostly from 8-week drug studies, that altogether represent more than 58,000 patients.
Other medications, particularly some of the older drugs, were shown to have more significant impacts.
For example, a person who took nortriptyline, a tricyclic antidepressant, could, on average, have an increase in heart rate that was 20 beats higher than the SSRI fluvoxamine. For other medications, the expected weight change could be 4 pounds gained, or lost.
Pillinger says the intention is not to single out certain antidepressants as better than others.
“It may be that one medication which is pretty bad for one person actually is pretty good for another one. I think that is the message, rather than naming and shaming certain drugs,” he says.
Pillinger hopes the data can help prescribers and their patients make individualized decisions about the best medication.
In fact, he and his colleagues have created a free digital tool that’s already being used by clinicians all over the world to create a “menu” of options, based on a patient’s underlying health and what side effects they’d most like to avoid.
Dr. Nina Kraguljac, a professor at the Ohio State University, who was not involved in the research, says the study was well-done — and largely reassuring.
“What surprised me about this study is that side effects are not that severe,” says Kraguljac, who is also chair of the American Psychiatric Association’s Council on Research.
However, she stresses that “side effects alone should not guide a clinical decision,” since the study’s results ultimately reflect an average, not the individual patient.
“Side effects do not happen in every patient and are not necessarily a reason to deter people from taking the medications,” she says.
The study does have some notable limitations.
Even though many people take these drugs for months or years, the data was largely from 8-week randomized controlled trials, which are the most common.
And some prominent side effects — that cause some people to stop taking antidepressants — were not evaluated, says Dr. David Hellerstein, a professor of psychiatry at Columbia University.
He points out the impact on sexual function, gastrointestinal issues and “emotional blunting” — a sense that feelings are being muted — are all common complaints that weren’t looked at.
Most of the side effects detailed in the study are already well-known, although he believes the work will still be “a useful touchstone” for patients and prescribers.
“Big picture, most of these drugs seem quite safe on a lot of physical parameters, especially the newer drugs, like the SSRIs and SNRIs (serotonin-norepinephrine reuptake inhibitors),” he says.
But for some groups of people, the side effects might be significant, he cautions, “and could affect what medicine the doctor would choose or what medicine a patient would prefer.”
And, he notes, side effects aren’t always a downside.
Hellerstein has a patient who had lost a significant amount of weight due to depression, meaning an antidepressant that also led to some extra weight would actually be “healthy.”
“I would say that is not a side effect. That is a benefit of treatment,” he says.
Festive season—yep, that magical stretch when even your porch starts calling out for a little sparkle. It’s the perfect time to show off those decorating instincts you’ve been secretly fine-tuning all year. And let’s be honest, few things feel as good as flipping on those lights and seeing your home glow against the winter night.
There’s something about stepping onto a porch wrapped in garlands and smelling faint pine in the air that just hits differently. It’s like your house is whispering, “Welcome, Christmas is here.” That first glow of twinkle lights? It’s not just décor—it’s mood, memory, and pure nostalgia rolled into one.
And here’s the best part: you don’t need a wraparound veranda to make it magical. Even the smallest stoop can become a cozy retreat with a few thoughtful touches—maybe a rustic lantern, a plaid blanket, or a potted pine dressed in fairy lights.
These little details don’t just decorate your porch; they tell your story of warmth, joy, and the quiet beauty of coming home for the holidays.
23 Outdoor Christmas Decoration Ideas
Ready to turn your yard into a winter wonderland?
From glowing evergreens to twinkling pathways, these outdoor Christmas decoration ideas will help you bring that magical holiday sparkle right to your doorstep.
Whether you love a classic red-and-gold theme or something playful and bright, each idea adds its own touch of cheer to make your home shine this festive season.
1. Light-Wrapped Evergreens
Nothing feels more like Christmas than trees glowing with twinkling lights. Wrap every branch and trunk with strands of warm-white LEDs to create a soft, golden radiance.
This simple idea turns your yard into a glowing forest, visible from blocks away. Even the smallest pine can sparkle with holiday charm when dressed in light.
Add layers by mixing bulb sizes—tiny fairy lights nestled deep inside, larger ones outlining the shape. For playful contrast, try alternating red and gold lights for a classic holiday palette.
2. Giant Ornament Displays
Supersized ornaments bring instant wow-factor to your landscape. Scatter them around driveways, near steps, or within garden beds to create a whimsical wonderland.
Their glossy or metallic finishes reflect surrounding lights beautifully, adding depth and brilliance to night-time displays. Group them in trios to keep the look balanced and intentional.
If you want something more modern, go for matte textures in bold colors like teal or champagne gold. Secure them firmly so they stay upright through wind and weather.
Guide guests to your door with a glowing tunnel of lighted arches. Wrap each arch in evergreen garland and LED strands for a magical, storybook entrance.
The soft glow creates rhythm and warmth, turning a simple pathway into a showstopping display. Guests will feel like they’re walking through a glowing winter dream.
Enhance the design by alternating warm and cool tones along the walkway. Add ribbons or dangling snowflakes to tie the arches into your home’s theme.
4. Porch Garland with Ribbons
Dress up your porch with garlands woven from pine, cedar, and fir. Wind them around railings or columns to frame your entryway with natural charm.
Weave in ornaments, pinecones, and velvet ribbons for a rich, layered finish. The result feels lush, classic, and festive without overwhelming the space.
Choose a colour theme that complements your home—red and gold for warmth or silver and blue for winter elegance. Add micro-lights for that subtle evening sparkle.
5. Hanging Snowflake Lights
Bring the magic of snowfall to your yard with dangling snowflake lights. Suspend them from tree branches or porch eaves so they sway softly in the breeze.
The movement creates a dreamy, wintry atmosphere that catches the eye even from afar. Layer snowflakes at different heights for a fuller, more dynamic look.
Use cool-white bulbs to mimic glistening snow or crystal-style designs for extra shimmer. Together, they turn your outdoor space into a glowing snow globe.
6. Rustic Wooden Signs
Add a personal, handmade touch with painted wooden signs. Messages like “Merry & Bright” or “Joy to the World” instantly warm up your porch or yard.
Use reclaimed wood for a cozy farmhouse vibe, and finish with weatherproof paint to keep them looking crisp. Pair them with pine garland or lanterns for extra charm.
These signs not only decorate but also tell a story—of family, tradition, and the joy of handmade holiday touches that last through the season.
A softly lit nativity scene adds peaceful beauty and meaning to your yard. Arrange the figures on a base of straw or faux snow for authenticity.
Position gentle spotlights below to highlight the Holy Family and cast a serene glow. The quiet illumination feels reverent and timeless, especially at night.
Include a star or angel light above the manger to complete the tableau. The subtle light and shadow evoke the spiritual heart of Christmas.
8. Wreaths on Every Window
Uniform wreaths bring order and elegance to your home’s exterior. Hanging one on each window creates a cohesive, picture-perfect façade.
Choose fresh evergreen wreaths accented with red bows or golden ribbons for a classic holiday look. Their symmetry makes even a simple home appear grand and festive.
Add tiny battery-operated lights to each wreath for nighttime charm. When they all glow in unison, your home looks like it’s wrapped in holiday cheer.
9. Snow-Covered Lanterns
Lanterns filled with faux snow and candles cast a nostalgic glow. Line them along paths or steps to welcome visitors with gentle, flickering light.
Mix lantern sizes and materials—black iron, brushed gold, or whitewashed wood—for a charming layered look. Their glow feels both cozy and magical.
Add pine sprigs or red berries inside for seasonal flair. Even after Christmas, they transition beautifully into winter décor.
10. Candy Cane Path Markers
Candy cane lights bring playful color and symmetry to your yard. Place them in pairs along walkways or driveways to lead guests with cheerful red-and-white stripes.
Their glowing pattern adds rhythm and brightness, especially under light snowfall. It’s an easy, nostalgic decoration that instantly says “Christmas.”
For extra flair, wrap garland around the bases or tie ribbons for texture. At night, their warm glow creates a candyland effect that delights everyone.
11. Christmas Planter Urns
Large planters overflowing with evergreens bring instant grandeur to porches and entryways. Use pine, fir, or cedar as a base for that classic winter fragrance.
Add height with birch logs or painted twigs, then tuck in ornaments, ribbons, or berries for color. A few twinkling lights complete the lush, layered look.
These arrangements stay fresh all winter, making them perfect for both Christmas and New Year. Simply swap accents when the season changes.
12. Twinkling Reindeer Figures
Light-up reindeer add a touch of whimsy and storytelling charm to any lawn. Arrange them in playful poses—standing tall, grazing, or pulling a sleigh.
Their glowing outlines look stunning against snow or greenery, especially when placed in groups of three or more.
Choose bronze frames with warm LEDs for a cozy glow or crisp white lights for a frosty, modern touch. Either way, they capture pure holiday magic.
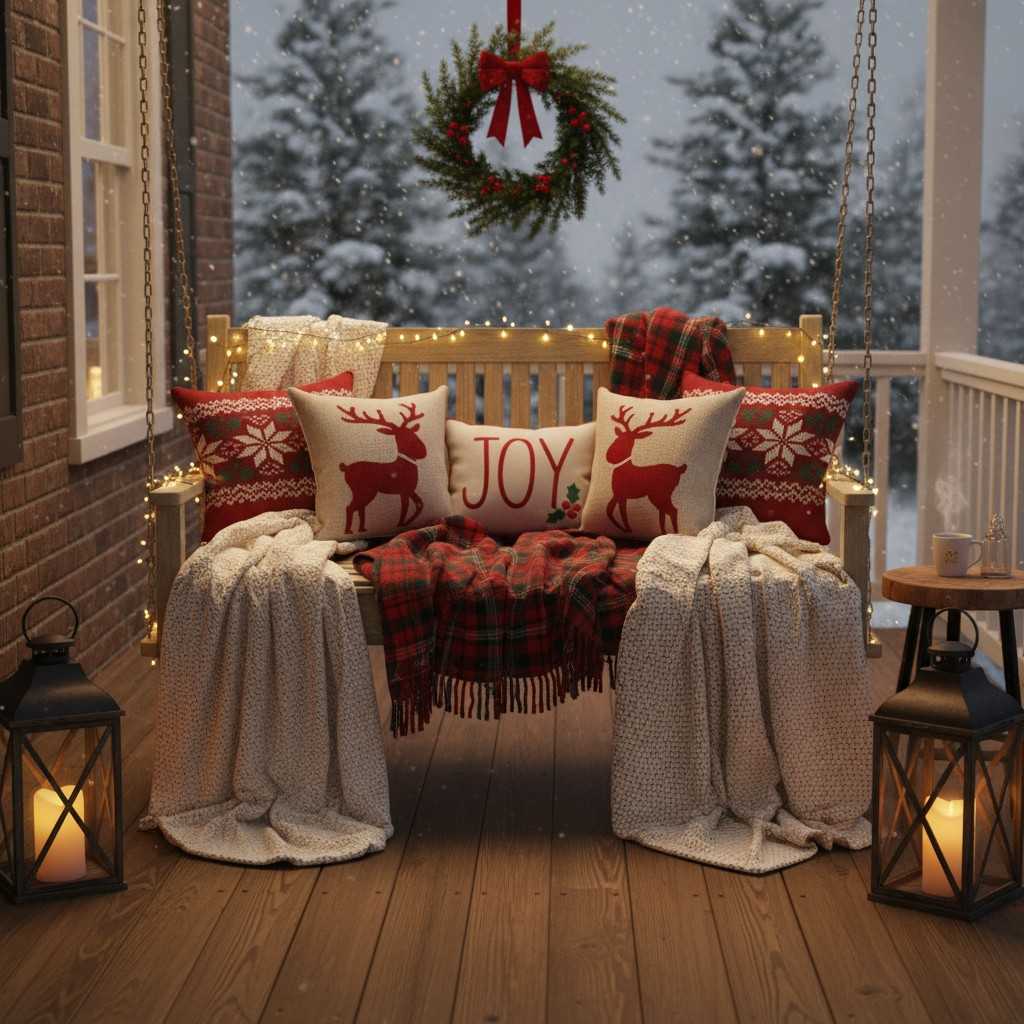
13. Holiday Porch Swing Setup
Transform your porch swing into a cozy Christmas retreat. Drape it with plaid throws, fluffy blankets, and seasonal pillows for instant warmth.
Wrap soft lights around the swing’s frame, and hang a small wreath above for a festive finishing touch. It’s the perfect backdrop for family photos.
Add a lantern or two for gentle illumination in the evening. You’ll have a picture-perfect nook for cocoa sipping and starlit conversations.
Giant wrapped boxes turn your porch or yard into Santa’s drop zone. Use waterproof wrapping paper or vinyl fabric so they withstand winter weather.
Tie bright, bold ribbons around them and label each box with playful tags like “From the North Pole.”
Cluster them under trees, beside stairs, or near the entryway. Metallic or reflective finishes help bounce surrounding lights for extra sparkle at night.
15. Light Net Over Shrubs
Light nets make decorating shrubs quick and polished. Simply drape them across bushes for an even blanket of glowing color.
They create the illusion of luminous orbs scattered across your garden—magical yet effortless.
Try mixing warm white on one side of your yard and multicolor lights on the other. It adds playful variety while keeping the look cohesive.
16. North Pole Mailbox Display
Bring a touch of childhood wonder with a “Letters to Santa” mailbox. Paint it in classic red-and-white stripes and surround it with faux snow.
Add mini gift boxes, candy canes, or elves around the base for a cheerful scene. It instantly becomes a favorite stop for kids and guests.
Place a small sign inviting letters to Santa—it adds interaction and joy. The setup blends nostalgia with pure Christmas spirit.
17. Floating Orbs in Trees
Suspending illuminated orbs from tree branches creates a floating, celestial effect. Vary their sizes and heights to make the scene dynamic.
During the day, mirrored or metallic finishes glisten in the sunlight; by night, inner LEDs glow softly like stars in your own backyard sky.
Hang them in clusters for a dreamy canopy of light. It’s a simple yet showstopping decoration that feels both modern and magical.
18. Starburst Light Installations
Starburst lights bring a burst of radiance to your yard, mimicking fireworks frozen in midair. Hang them from trees or stakes for a dynamic glow.
Cluster several at different heights to create a glowing constellation effect that feels both festive and elegant.
Their even symmetry pairs beautifully with evergreen backdrops, adding sparkle without clutter. It’s a modern touch that catches the eye instantly.
19. Christmas Window Boxes
Turn your window boxes into mini winter gardens bursting with color. Fill them with pine branches, holly, berries, and golden twigs for contrast.
Sprinkle artificial snow across the top and weave tiny fairy lights through the greenery. The glow adds life even on gray winter days.
Use a mix of textures—evergreens for fullness, berries for brightness, ornaments for shine. It’s a simple way to bring Christmas charm to every window.
20. Lighted Fence Garland
Frame your property with garland draped along the fence line. Weave in lights, ornaments, and ribbons for a full, festive look.
The soft illumination outlines your yard beautifully at night, tying together the whole outdoor décor scheme.
Alternate ornament clusters and bow placements for rhythm and variety. It’s an easy way to make even a plain fence feel like part of the celebration.
21. Poinsettia Entrance Display
Line your front steps or doorway with bold red poinsettias. Their vibrant color instantly radiates holiday cheer.
Pair them with white planters, golden ribbons, or evergreen accents to make the blooms pop under soft porch lighting.
Mix in white or pink varieties for contrast and depth. The combination feels luxurious, elegant, and unmistakably Christmas.
22. Vintage Sleigh Scene
A vintage sleigh adds nostalgia and storytelling charm to your yard. Fill it with wrapped boxes, greenery, and a sprinkle of faux snow.
Add a few plush reindeer or elves nearby for a playful, North Pole touch that delights all ages.
Position a spotlight at a low angle to create dramatic shadows and a moonlit glow. The sleigh becomes a showpiece, especially on snowy nights.
23. Ice-Like Curtain Lights
Drape icicle lights along your roofline, balcony, or porch for a dazzling finish. Their cascading glow mimics real ice catching winter sunlight.
Choose cool white or blue tones for a frosty shimmer, or warm white for a cozy golden hue.
When the snow falls, these lights create a breath-taking scene straight out of a Christmas postcard. It’s the perfect final touch for your festive home.
Conclusion
Decorating your outdoor space for Christmas isn’t just about lights and ornaments—it’s about creating warmth, wonder, and welcome for everyone who passes by. Whether you’re wrapping evergreens in twinkling lights or setting up a glowing reindeer scene, each display adds its own touch of holiday magic.
Mix grand features like lighted arches with smaller details such as lanterns or window wreaths to balance drama and coziness. Even a few thoughtful touches can transform your porch or yard into a joyful winter retreat.
So, grab your lights, ribbons, and greenery, and let your creativity shine. This season, make your home glow with the same cheer and excitement that make Christmas truly unforgettable.
Khaja Moinuddin, a computer science graduate, finds joy in gardening and homesteading. Join him on this blog as he shares his experiences in homesteading, gardening, and composting
This pumpkin skillet lasagna has all the flavor of your favorite lasagna but can be made in one pan (including the noodles) in just about 30 minutes. Swapping tomato sauce for pumpkin adds lots of fall-inspired flavor to this simple weeknight dinner dish.
Pumpkin season is in full swing and this pumpkin skillet lasagna is an easy one pot meal that is perfect for a cozy fall dinner at home. I’m so excited to be partnering with Cristel for this one since their 3.5 quart sauté pan from the Strate collection is the perfect size for this skillet lasagna.
They reached out at the perfect time since I had a hand-me-down stainless steel skillet in this size and needed an upgrade. Not only are the Cristel pieces beautiful, but the quality was 100x better with more even cooking and better heat retention. I also loved that the detachable handles of the Strate collection pieces increase the versatility and give it a smaller footprint for storage (perfect for my small city kitchen). You can use my code DEBBIE30 gets you a 30% discount on your own Cristel cookware.
Now – let’s talk about this lasagna skillet some more! It’s a fall-flavored take on my favorite vegan skillet lasagna recipe that is is just as easy to make, you’ll just sauté onion and garlic in some fresh herbs, then add canned pumpkin, broth, and lasagna noodles that have been broken into bite size pieces. After simmering, top with cheese and use the detachable long handle to transfer the skillet to the oven to broil. Then use the short handles for carrying it to the table to serve.
Why You’ll Love this Pumpkin Lasagna
In case you need more some convincing, here are some of the reasons I think you’re going to love this pumpkin skillet lasagna.
One Pot: unlike traditional lasagna, this pumpkin lasagna is truly one pot since you don’t have to boil the noodles separately. Instead, they get simmered in the broth and spices to infuse them with flavor as they soften.
Seasonal Flavors: this lasagna is infused with tons of fall flavors from pumpkin, sage, and thyme. Canned pumpkin creates a creamy sauce when combined with the vegetable broth and cheese in the pan.
Versatile: this skillet lasagna is easy to put your own spin on depending on what you have on hand in the fridge. It’s vegan friendly as written, but you can use dairy cheese if you are serving friends who aren’t plant-based. You can also swap the white beans for another protein of your choosing like crumbled tofu or veggie sausage.
Key Ingredients You’ll Need
Here’s a quick rundown of the key ingredients you’ll need for this easy vegan pumpkin lasagna recipe. Be sure to check out the recipe card for the exact measurements.
Pumpkin: you’ll need one full can of pumpkin puree for this recipe – which means you won’t have a partial can of pumpkin to try and use up later. If you have homemade pumpkin puree, you can use that too.
Cheese: you’ll use a combination of ricotta, parmesan, and mozzarella for this lasagna. I used dairy free versions of each to make it vegan — but you can make it with the regular versions of each if you prefer.
Lasagna Noodles: I tested this with both regular noodles and the no-boil noodles that are available in the store. Honestly, I thought the texture of the regular noodles was much better so pick up those. The no-boil noodles tended to fall apart.
Fresh Herbs: for the most flavor, opt for fresh sage and thyme for this recipe rather than the dried versions from your pantry. Since this recipe is pretty simple, you need to more intense flavor of the fresh herbs.
White Beans: bump up the protein and fiber content of your skillet lasagna with some canned white beans. You can substitute with butter beans too if you’d like. If you don’t have any canned beans on hand, you could substitute with crumbled tofu or veggie sausage.
How to Make Pumpkin Skillet Lasagna
I love that this fall flavored skillet lasagna comes together in one pot and makes enough to share with plenty of friends. See the recipe card for the full directions.
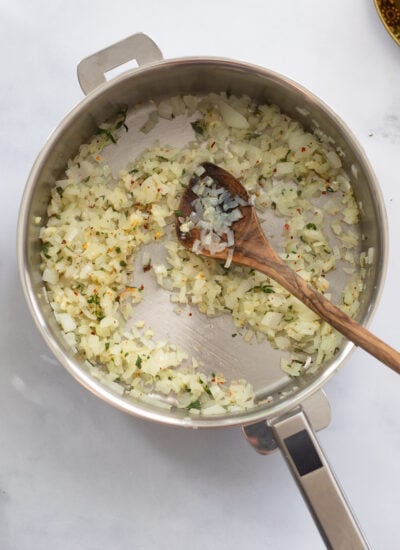
Sauté the Onions & Herbs: Add the olive oil and onion to the skillet. Saute until softened and translucent, about 3-4 minutes. Add the garlic, sage and thyme and stir to combine. Cook until fragrant, about 1 minute.
Stir in the Pumpkin &Pasta: Reduce the heat to medium, simmer covered, making sure the noodles are submerged in the liquid). Stir occasionally so that the noodles don’t stick to each other or the bottom of the skillet. Cook until the pasta is just tender and the sauce has thickened, about 13-15 minutes.
Add the Beans & Cheese: Remove from heat and stir in the white beans, ricotta cheese and 2 tablespoons of the parmesan. Top with the shredded mozzarella and remaining 2 tablespoons of parmesan cheese.
Broil & Serve: Transfer to the broiler on the second rack from the top and broil on high until the cheese is melted and slightly browned on top, 2-3 minutes. Garnish with parsley and fresh thyme and serve.
Storage
Fridge: any leftover lasagna can be stored in the fridge in an airtight container for up to 3 days.
Freezer: you can also store this pumpkin lasagna in the freezer in an airtight container for up to 3 months. Just thaw in the fridge overnight and reheat on the stovetop or microwave.
Heat a large 12-inch oven safe, nonstick skillet with a fitted lid over high heat.
Add the olive oil and onion to the skillet. Saute until softened and translucent, about 3-4 minutes. Add the garlic, sage and thyme and stir to combine. Cook until fragrant, about 1 minute.
Add the pumpkin puree, broth, and salt to the skillet, stir to combine, and bring to a simmer. Add the pasta to the skillet, stir to combine.
Reduce the heat to medium, simmer covered, making sure the noodles are submerged in the liquid). Stir occasionally so that the noodles don’t stick to each other or the bottom of the skillet. Cook until the pasta is just tender and the sauce has thickened, about 13-15 minutes.
Remove from heat and stir in the white beans, ricotta cheese and 2 tablespoons of the parmesan. Top with the shredded mozzarella and remaining 2 tablespoons of parmesan cheese.
Transfer to the broiler on the second rack from the top and broil on high until the cheese is melted and slightly browned on top, 2-3 minutes. Garnish with parsley and fresh thyme and serve.


")