When the seasons change, or when I’ve been around a lot of the sniffles, I like to make a big batch of elderberry syrup. While that’s always been a staple around our home, I also like to change up my immune boosting remedies. I’ve made all sorts of herbal concoctions over the years, but this simple ginger, turmeric, and lemon immunity shot is one I keep coming back to.
It’s warming and a little spicy, with a vibrant golden color thanks to the antioxidants. Best of all, it’s packed with nutrients that support the immune system, calm inflammation, and help the liver with detox. I sometimes sweeten it with raw honey to take the earthy edge off of the spices. If you’re feeling fancy, swap out the water for coconut water or pineapple juice for a tropical twist.
Why I Love These Ingredients
Fresh Ginger
Ginger is a staple in my kitchen for both cooking and natural remedies. I use it for everything from easing upset stomachs to calming coughs. It’s naturally warming, supports healthy circulation, and contains compounds that can help reduce inflammation. If you eat ginger you can feel it working almost immediately to warm the body.
Fresh Lemon Juice
Fresh lemon juice adds a bright flavor and a welcome dose of vitamin C. It’s great for supporting immune health and can help soothe a scratchy throat. I also find that lemon gives this drink a refreshing balance. It cuts through the spice of the ginger and the earthiness of the turmeric to brighten it up. Lemon is also a great way to detox.
Fresh Turmeric
Many recognize turmeric for its anti-inflammatory and antioxidant properties. I love using it to support joint health, digestion, and liver function. Fresh turmeric root works great for this recipe and lends an earthy, complex flavor and a bright yellow hue. Just remember, it will stain anything it touches, so be mindful when you’re making the immunity shots.
Raw Honey
The raw honey is optional, but it does help to mellow out the bite from the ginger and turmeric. Honey has natural antibacterial properties, can soothe sore throats, and adds a mellow sweetness. Local, raw honey can help combat seasonal allergies and is high in antioxidants and nutrients. It can even help reduce mucus and calm coughs as well as some over the counter cough syrups.
Optional Base Swap
While plain water works just fine, sometimes I’ll use coconut water for extra electrolytes. Pineapple juice is another great option for natural sweetness. Pineapple contains the enzyme bromelain to help better digest food and calm coughs. Other research shows bromelain can help with issues like preventing sinusitis, bronchitis, and blood clots. Both options pair beautifully with the ginger and turmeric.
Here’s how to make your own anti-inflammatory, immune boosting wellness “shots.”
Anti-inflammatory Ginger Turmeric Immunity Shots
These spicy, flavorful “shots” help keep your immune system in shape. Plus they’re anti-inflammatory and energizing.
Combine all ingredients in a blender and blend until smooth. Add more honey if desired to balance the spiciness.
Strain out the solids and compost or discard.
Enjoy your drink!
Nutrition Facts
Anti-inflammatory Ginger Turmeric Immunity Shots
Amount Per Serving (1 shot)
Calories 25 Calories from Fat 3
% Daily Value*
Fat 0.3g0%
Saturated Fat 0.1g1%
Polyunsaturated Fat 0.1g
Monounsaturated Fat 0.1g
Sodium 5mg0%
Potassium 95mg3%
Carbohydrates 6g2%
Fiber 1g4%
Sugar 3g3%
Protein 0.3g1%
Vitamin C 1mg1%
Calcium 8mg1%
Iron 1mg6%
* Percent Daily Values are based on a 2000 calorie diet.
These taste best fresh, but you can also store the drink in the fridge for several days.
Dilute with more water if desired.
A Quick Tip on Turmeric
Turmeric is wonderful, but it’s also notorious for staining countertops, wooden spoons, and anything light-colored. I’ve learned the hard way to wipe up any splashes right away.
Final Thoughts On Immunity Shots
This ginger, turmeric, and lemon immunity shot is a great way to keep your immune system strong all year long. It’s easy to make and tastes delicious. I’ve found that it’s a little too strong for younger children. However, you could try diluting in more water (or pineapple juice) and mixing more honey to mellow the flavor for little ones.
To boost the benefits even more, try stirring in a pinch of black pepper before serving! This helps your body absorb more of the curcumin from the turmeric. Play with the ingredients some and make it your own!
What are some of your favorite, easy ways to get a health boost? Leave a comment and let us know!
Few can pick up a paintbrush for the first time and recreate a Picasso in the same afternoon. Even fewer could try piano as a beginner and finish their first session with a perfect rendition of Beethoven. However, many can pot up some pretty plants and instantly create something spectacular where there once was nothing. This is not to downplay the amount of work that goes into gardening but to emphasize how a low barrier to entry makes this pastime accessible and easy to get hooked on. With a little research, trial, and error, you’re on the fast track to building beautiful beds that you’re constantly tweaking and upgrading. This is exactly the case for Jennifer Furan in Eden Prairie, Minnesota. She is a newer gardener, really getting into it after moving to her current home in 2021. In that short amount of time, she has done a lot of work to create an incredible garden with some seriously beautiful plants, as if this were a hobby she has been mastering for decades.
Hi GPODers! I’m a relatively new gardener, having moved to our current home in Eden Prairie, Minnesota in 2021. I garden in Zone 4b/5a on a suburban lot that’s about one-third of an acre. Our first task was to remove overgrown and unkempt junipers that surrounded the property at the borders, much to the neighbors’ delight. Then the tough part began: what to do with all of the suddenly empty garden beds. Year one was spent just doing my best to manage the weeds. Year two, I filled the space in with easy-care annuals, while I figured out this whole gardening thing. After hours of researching and listening to podcasts, of course, including Let’s Argue About Plants, I finally felt confident enough to start putting in perennials and shrubs. I’m sharing some pictures of my progress in the last two years.
The part-shade area of the back garden is a garden bed we share with the neighbors behind us. ‘Sun King’ aralia(Aralia cordata ‘Sun King’, Zones 4–8) has grown significantly in two years, with a ‘Euphoria Ruby’Joe Pye weed(Eutrochium purpureum ‘FLOREUPRE1’, Zones 5–9)in front of it, which is in bud for the upcoming fall weather. To the right is ‘Brilliance’ autumn fern(Dryopteris erythrosora ‘Brilliance’, Zones 4–9) with heart-leaved golden Alexanders (Zizia aptera, Zones 3–8)from a local native plant nursery. The ‘Sun King’ aralia always catches my attention as I glance out the kitchen window while washing dishes, and never fails to put a smile on my face.
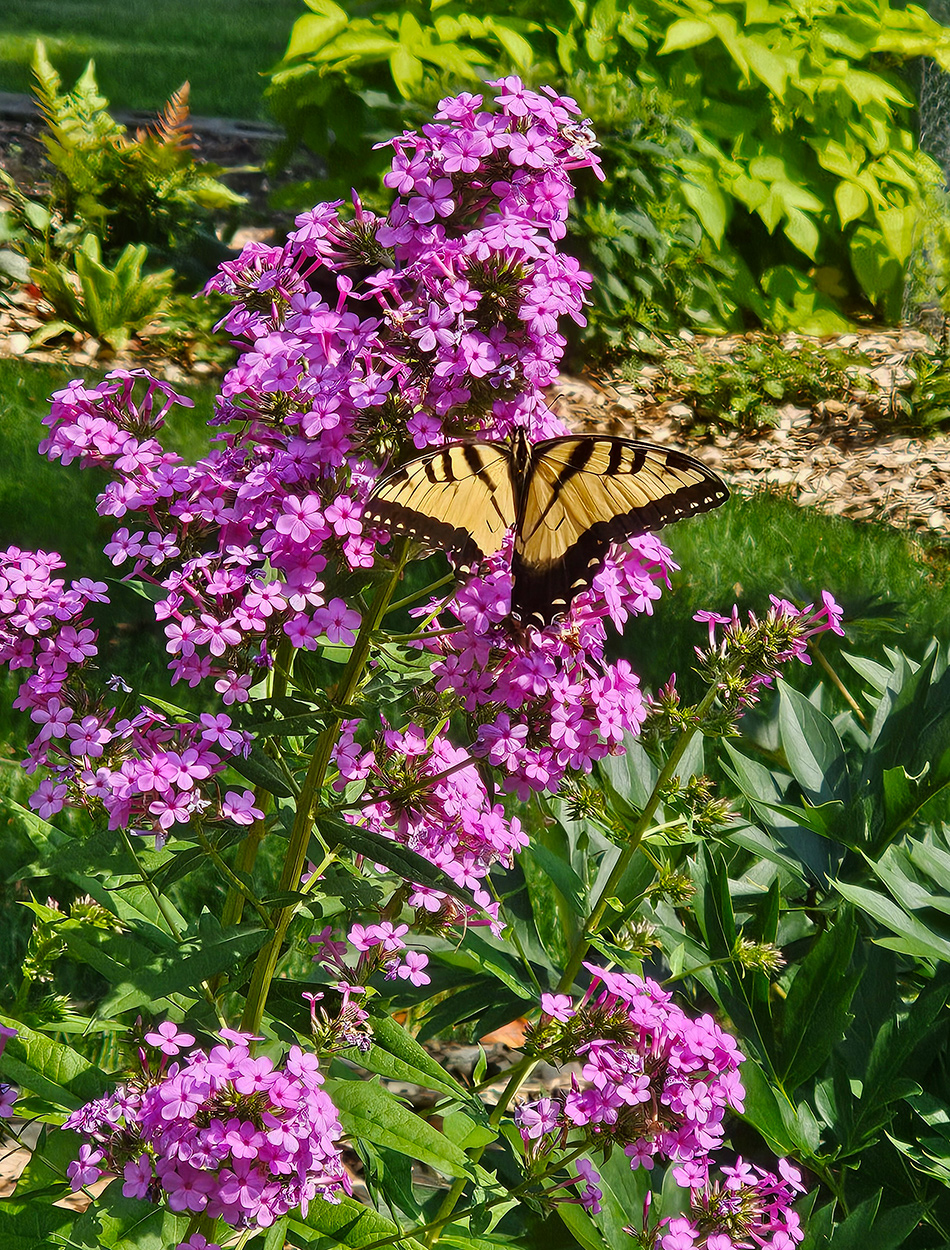
The best part of improving the garden spaces in our yard is the many visitors we are graced with each day. This swallowtail butterfly loved the ‘Jeana’ garden phlox(Phlox paniculata ‘Jeana’, Zones 4–8)that recently started blooming this season.
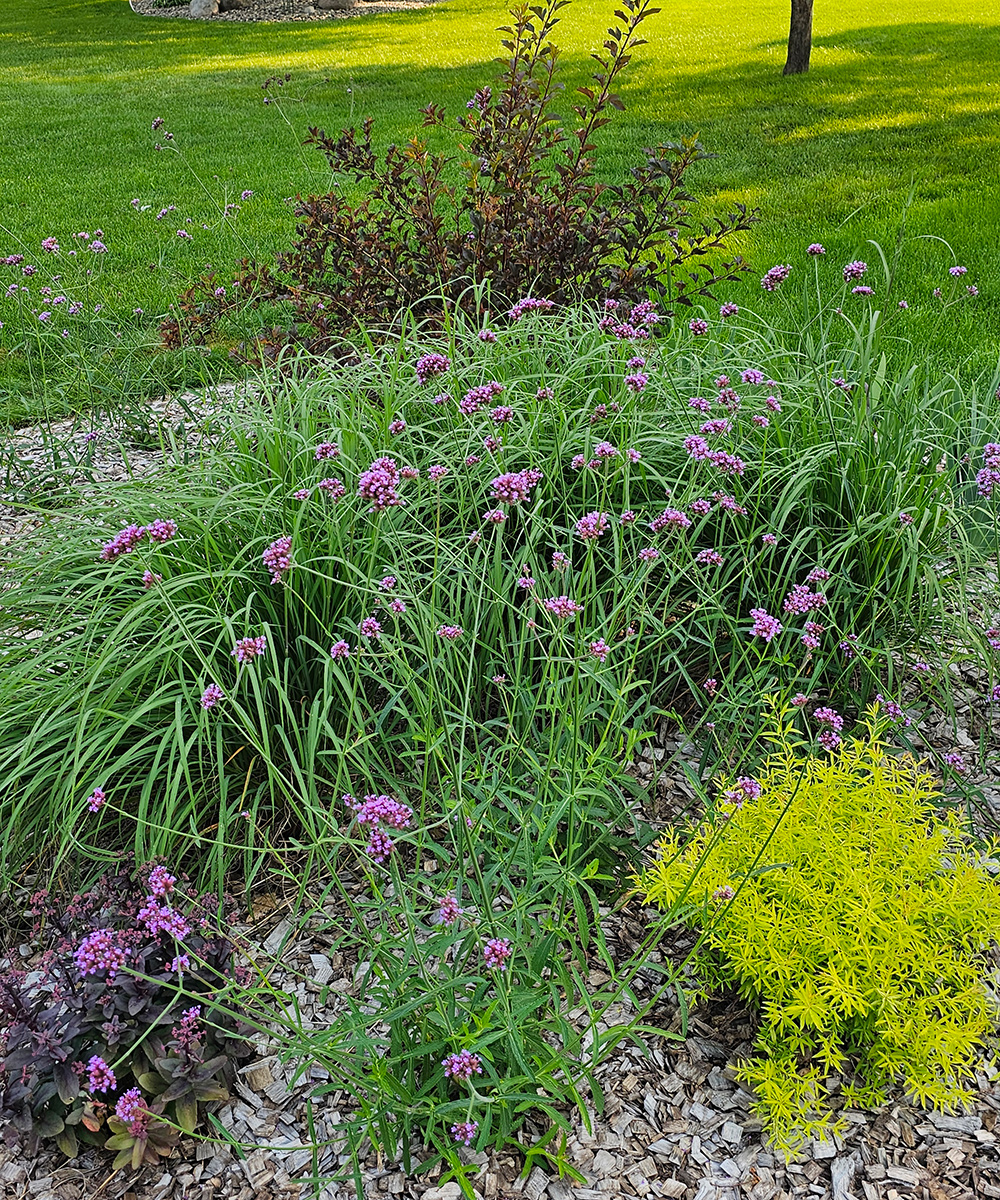
I’ve quickly found the need to spontaneously create new garden spaces because I’ve run out of places to put new plants. And while I wait for plants to bulk up, this year I added annual verbena(Verbena bonariensis, Zones 7–11 or as an annual)to help fill in the space. The monarchs and bumblebees have particularly loved this addition.
From back to front and left to right: ‘Summer Wine’ ninebark(Physocarpus opulifolius ‘Seward’, Zones 3–7), ‘Blackhawks’ big bluestem(Andropogon gerardii ‘Blackhawks’, Zones 3–9), Verbena bonariensis, Rock ’N Grow® ‘Midnight Velvet’ sedum(Sedum ‘Midnight Velvet’, Zones 3–9),and ‘Ogon’ spirea(Spiraea thunbergii ‘Ogon’, Zones 4–8).
Last spring I took on the perhaps ill-advised task of converting a 60-foot-long and 20-foot-deep area of grass along the road into a new garden space. The impetus for this was that I was tired of repairing this area each spring and trying to grow grass that never took in this full-sun space with the radiant heat from the black pavement street. I put in a mix of plants native to my area and ornamentals. It has been fun to see the pollinator activity. Gardening in the front yard resulted in a lot of questions from neighbors who didn’t necessarily understand what I was doing. In this second year, those same neighbors have transitioned to complimenting how the garden is looking.
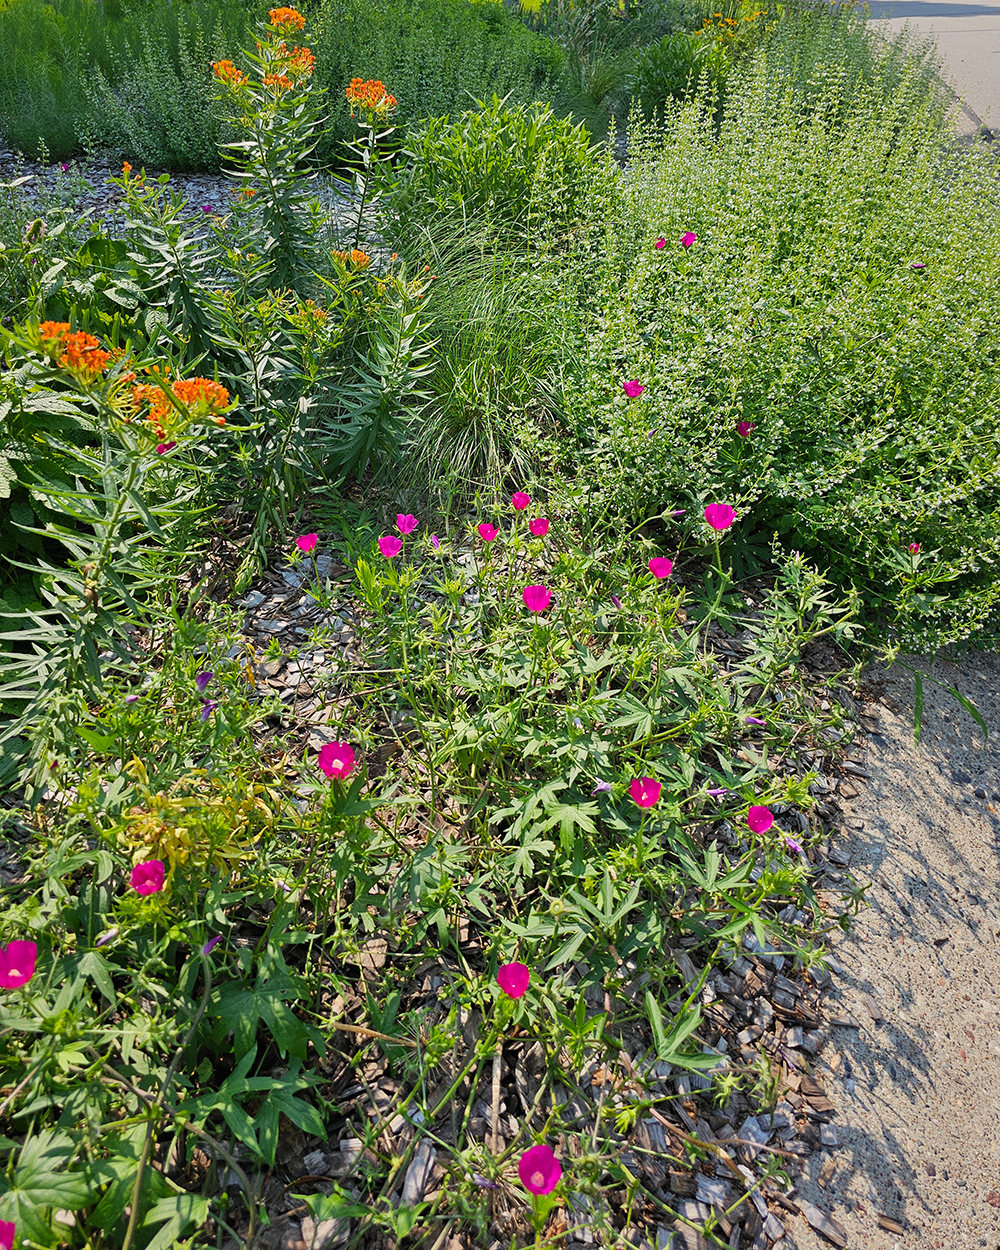
Butterfly weed (Asclepias tuberosa, Zones 3–9, left), ‘Montrose White’ calamint(Calamintha nepeta ‘Montrose White’, Zones 5–9, right), with purple poppy mallow(Callirhoe involucrata, Zones 4–8,in front)
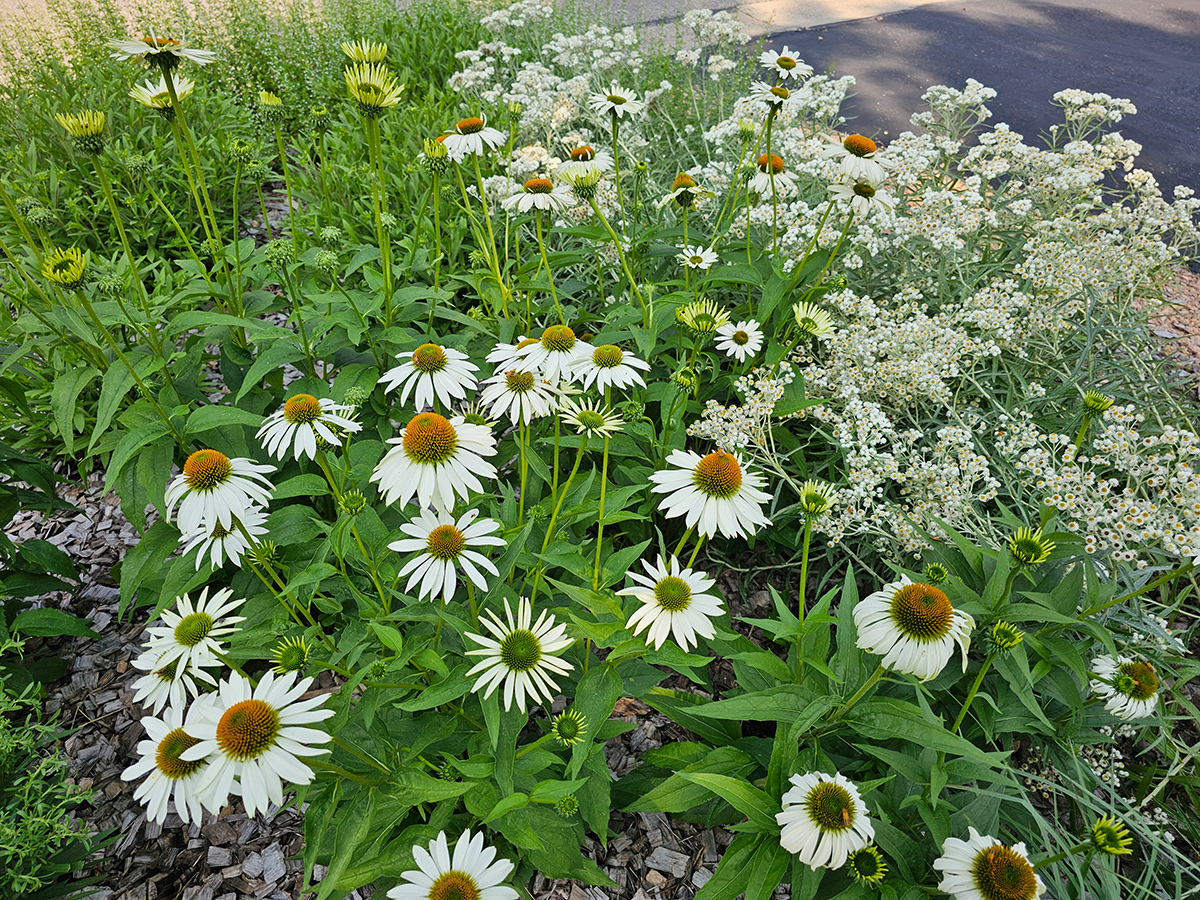
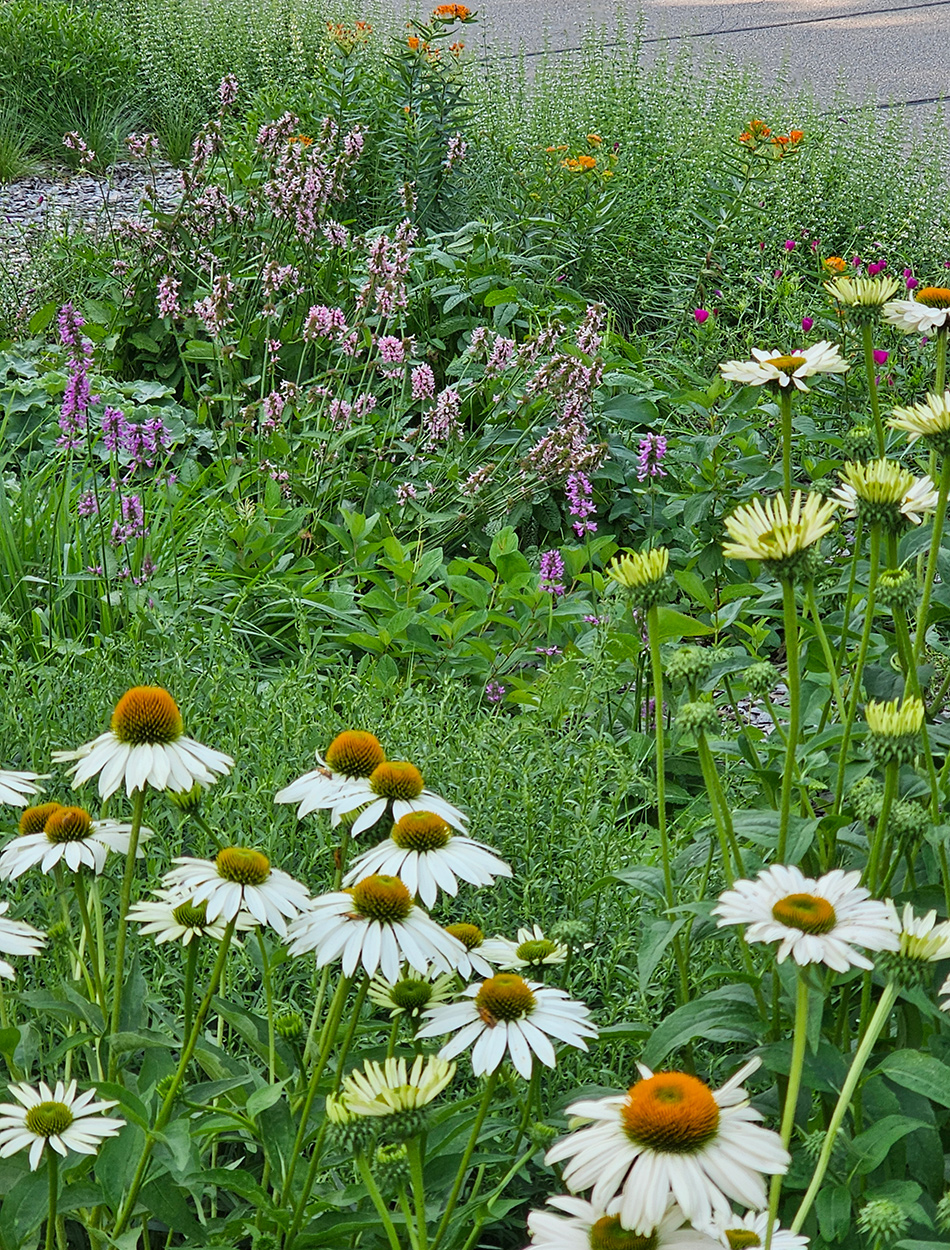
Also in this new front yard garden: ‘White Swan’ coneflower(Echinacea purpurea ‘White Swan’, Zones 3–8)with our native pearly everlasting(Anaphalis margaritacea, Zones 3–8)
Another view of this front garden: ‘White Swan’ coneflower backed up with old field goldenrod(Solidago nemoralis, Zones 3–9), New Jersey tea(Ceanothus americanus, Zones 3–8), ‘Summer Romance’ and ‘Pink Cotton’ Candy’ betony(Stachys officinalis ‘Summer Romance’ and ‘Pink Cotton’, Zones 4–8),butterfly weed, ‘Montrose White’ calamint, and purple poppy mallow
All of the gardening work has led to me wanting to find ways to relax in the shade. This is a favorite spot under a ‘Whitespire’ birch(Betula populifolia ‘Whitespire’, Zones 3–6)with a new glider bench. I’ve put together a small fountain consisting of a cement outdoor pot filled with large rocks to act as landing perches for birds and pollinators, and adding a solar water pump. It creates the perfect space to relax, especially after a long day working in the garden.
Front: ‘Lemon Zest’ Japanese forest grass(Hakonechloa macra ‘HakBri1’, Zones 5–9),hellebores, and FlowerFull smooth hydrangea (Hydrangea arborescens ‘Baiful’, Zones 3–8)
Thank you so much for sharing your impressive plantings with us, Jen! It’s clear to see the research you did before purchasing your plants; you’ve amassed some superb specimens that will undoubtably mature into an incredible garden oasis.
Just as gardening has a low barrier to entry, Garden Photo of the Day does not have any entry requirements! No matter how much experience you have, what kinds of plants you grow, or what your goals with this hobby are, we would love to highlight your garden. Follow the directions below to submit photos via email, or send me a DM on Instagram: @agirlherdogandtheroad.
We want to see YOUR garden!
Have photos to share? We’d love to see your garden, a particular collection of plants you love, or a wonderful garden you had the chance to visit!
To submit, send 5–10 photos to [email protected] along with some information about the plants in the pictures and where you took the photos. We’d love to hear where you are located, how long you’ve been gardening, successes you are proud of, failures you learned from, hopes for the future, favorite plants, or funny stories from your garden.
Do you receive the GPOD by email yet? Sign up here
Fine Gardening Recommended Products
Nelson Multi-Pattern Stationary Sprinkler
Fine Gardening receives a commission for items purchased through links on this site, including Amazon Associates and other affiliate advertising programs.
– 8 Pre-Set Watering Patterns
– Impact-resistant, plastic base
– Soft grip on multi-pattern head
SHOWA Atlas 370B Nitrile Palm Coating Gloves, Black, Medium (Pack of 12 Pairs)
Fine Gardening receives a commission for items purchased through links on this site, including Amazon Associates and other affiliate advertising programs.
Lightweight and close-fitting for excellent dexterity. Machine washable. Breathable back of hand to reduce perspiration. Designed for easy movement and continuous wear. Ideal for aerospace, assembly, automotive, construction, final fix, gardening, manufacturing, operating machinery, packaging, precision handling, tiling, warehousing.
A.M. Leonard Deluxe Soil Knife & Leather Sheath Combo
Fine Gardening receives a commission for items purchased through links on this site, including Amazon Associates and other affiliate advertising programs.
MULTITASKING DUAL EDGES: a deep serrated edge and a tapered slicing edge ideal for tough or delicate cuts. DURABLE 6-inch stainless steel blade withstands 300 lbs of pressure. TWINE CUTTING NOTCH, DEPTH GAUGE MARKINGS & spear point – no need to switch tools when using this garden knife. LEATHER SHEATH: heavy duty, protective, clip on sheath to keep your knife convenient and secure. LIFETIME WARRANTY.
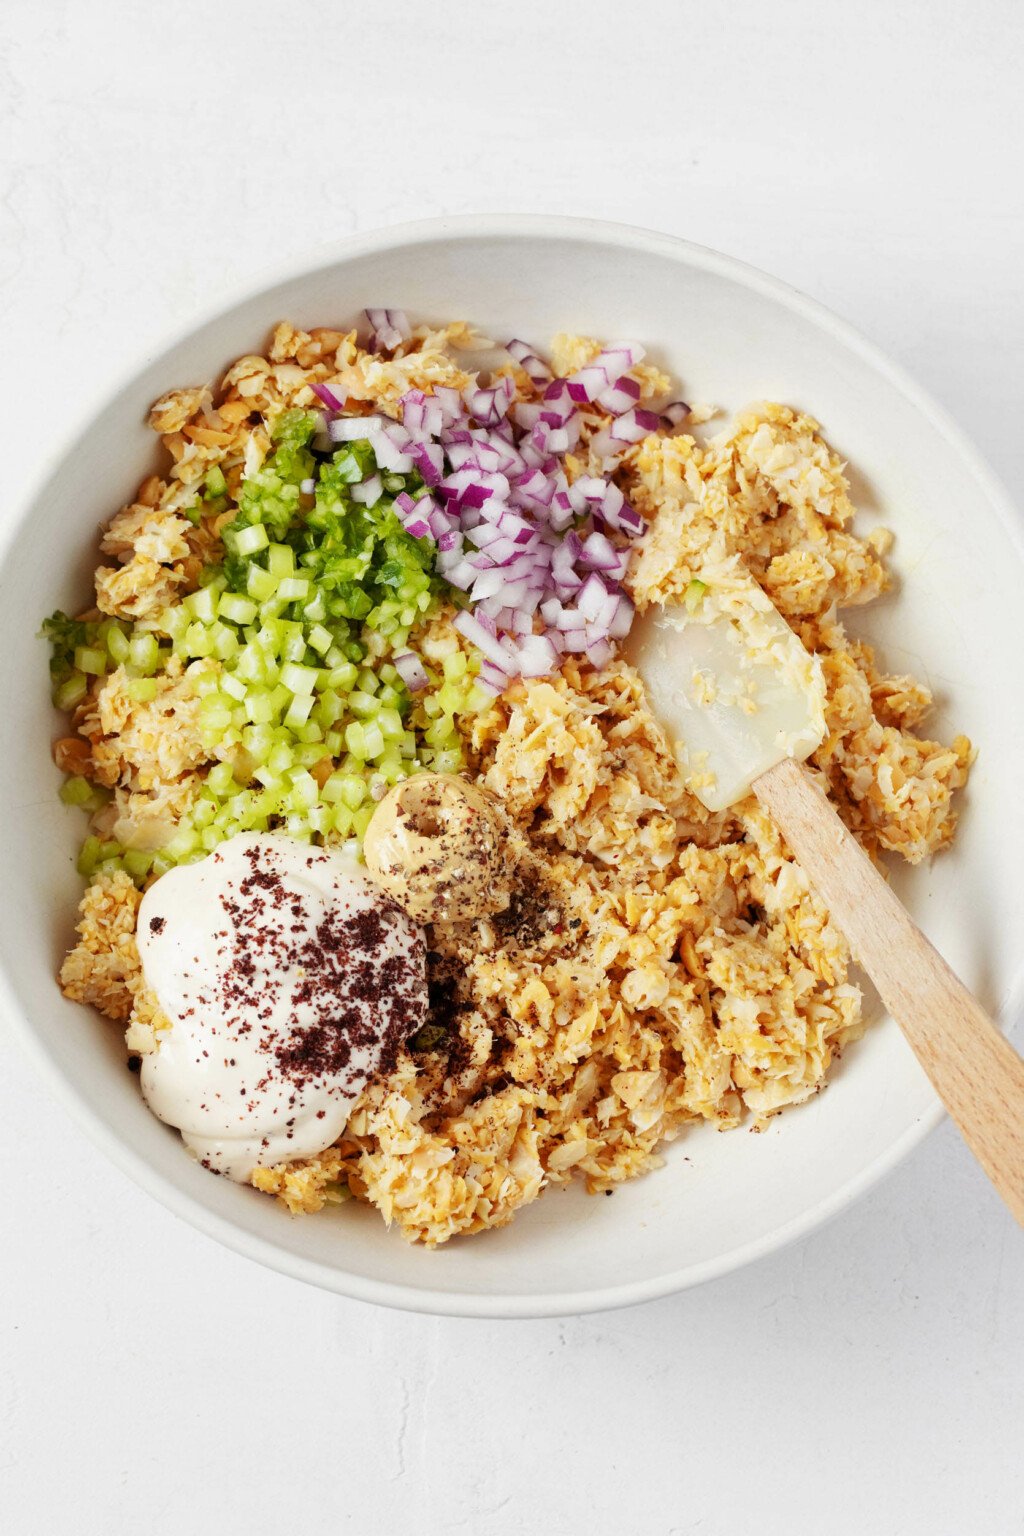
Roasted garlic tahini sauce has a rich, creamy texture and is infused with the flavor of sweet, savory roasted garlic cloves. Create delicious pasta suppers in an instant by adding the sauce to your favorite freshly cooked pasta shape. Or, keep a jar of the sauce in your fridge to use as a dip, sandwich spread, or topping for grain bowls.
This roasted garlic tahini sauce is adjacent to tahini dressing, which is a weekly staple in my home.
What distinguishes the sauce from a dressing it’s thicker, richer consistency. It’s suitable as a dip or a sandwich spread. But it’s downright ideal for mixing with freshly cooked pasta and a splash of hot pasta water.
The sauce isn’t my first experiment with tahini and pasta (or noodle) combination. Creamy tahini pesto and a curried tahini pasta salad are both favorites of mine, especially during the summer months.
This sauce, and the pasta that results from it, is reminiscent of alfredo. However, it’s a little lighter than the various cashew or cauliflower-based alfredo sauces that I’ve made over the years.
More importantly, it features the intense and irresistable flavor of roasted garlic.
The magic of roasted garlic + tahini
Roasted garlic and tahini are an ideal match.
Oven-roasting softens the aggressive, spicy kick of raw garlic cloves. The flavor of roasted garlic is very nearly sweet, which is a perfect counterpoint to the slight bitterness of tahini.
I suppose it was only a matter of time before I combined the ingredients into a sauce.
One jar, many pasta possibilities
While it’s good to have a go-to list of complete pasta recipes, it’s also so useful to have a trusty jar of sauce at the ready.
From there, you can dress up different pasta shapes and make any additions—protein or vegetable—that suit you.
A jar of marinara sauce is a household staple for me and many others, of course. But it’s good to mix things up, and it’s especially nice for those who don’t like or can’t tolerate tomato-based sauces to have a trusty alternative.
Once you’ve got a jar of roasted garlic tahini sauce in the fridge, you can take your pasta meals in many directions. Try adding roasted vegetables, such as eggplant, peppers, or cauliflower.
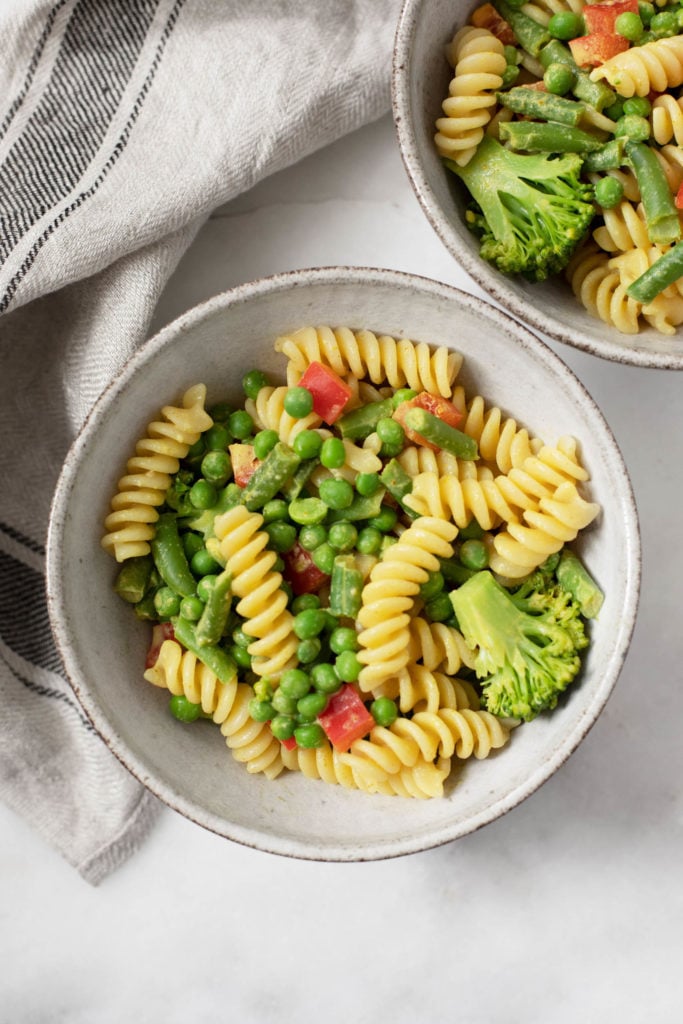
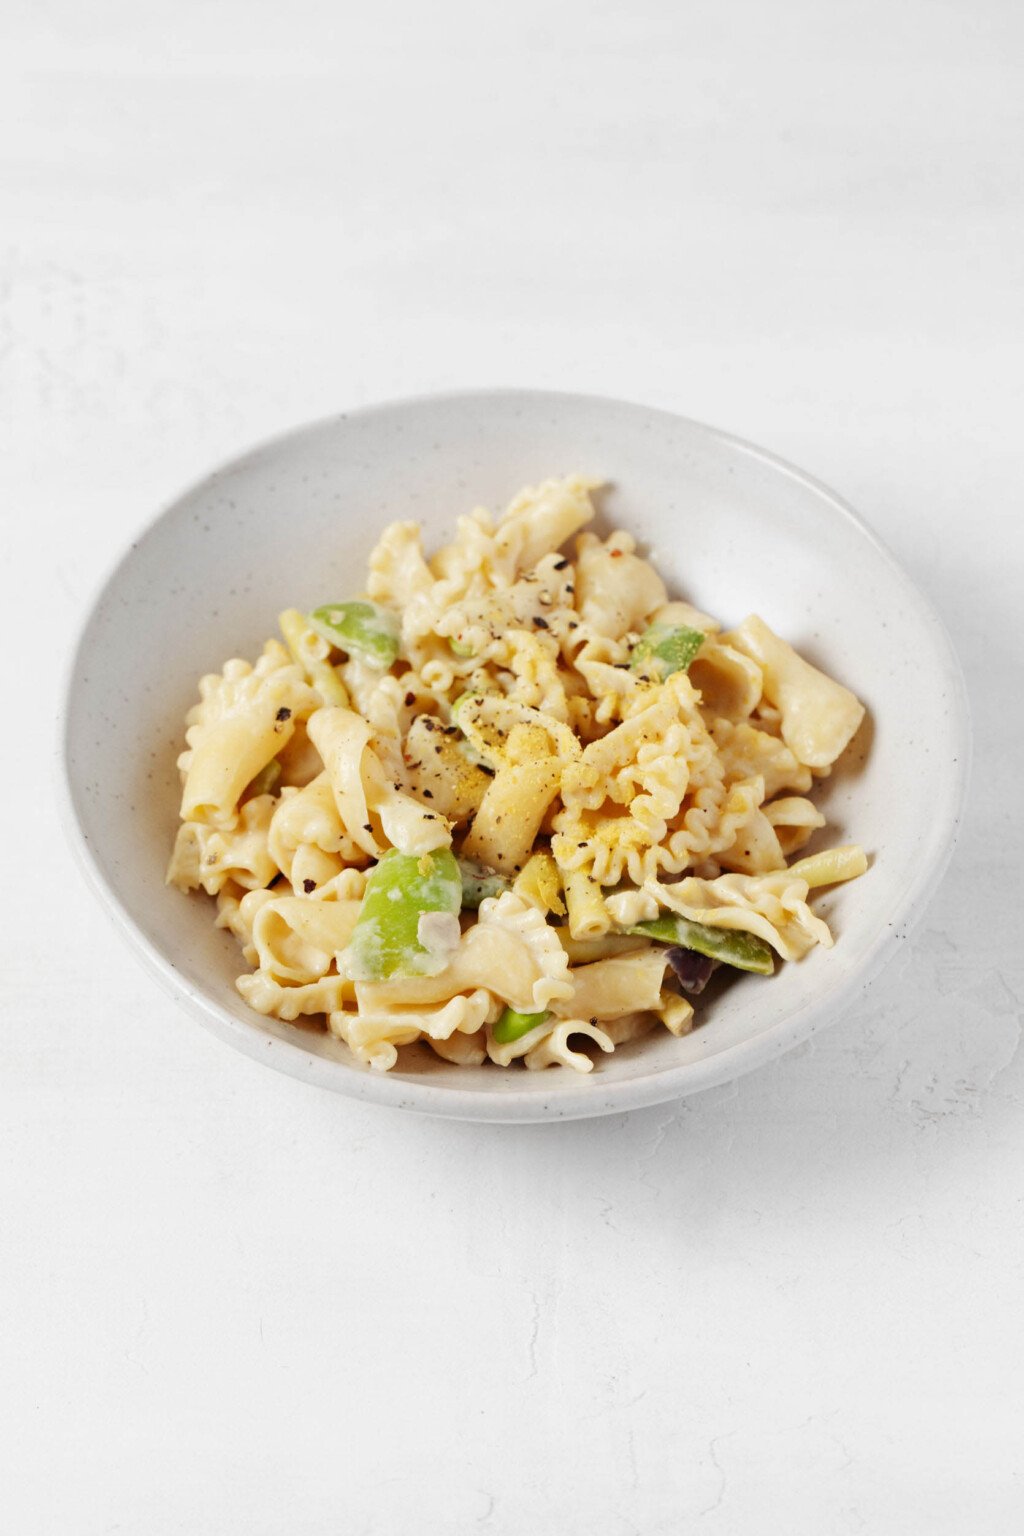
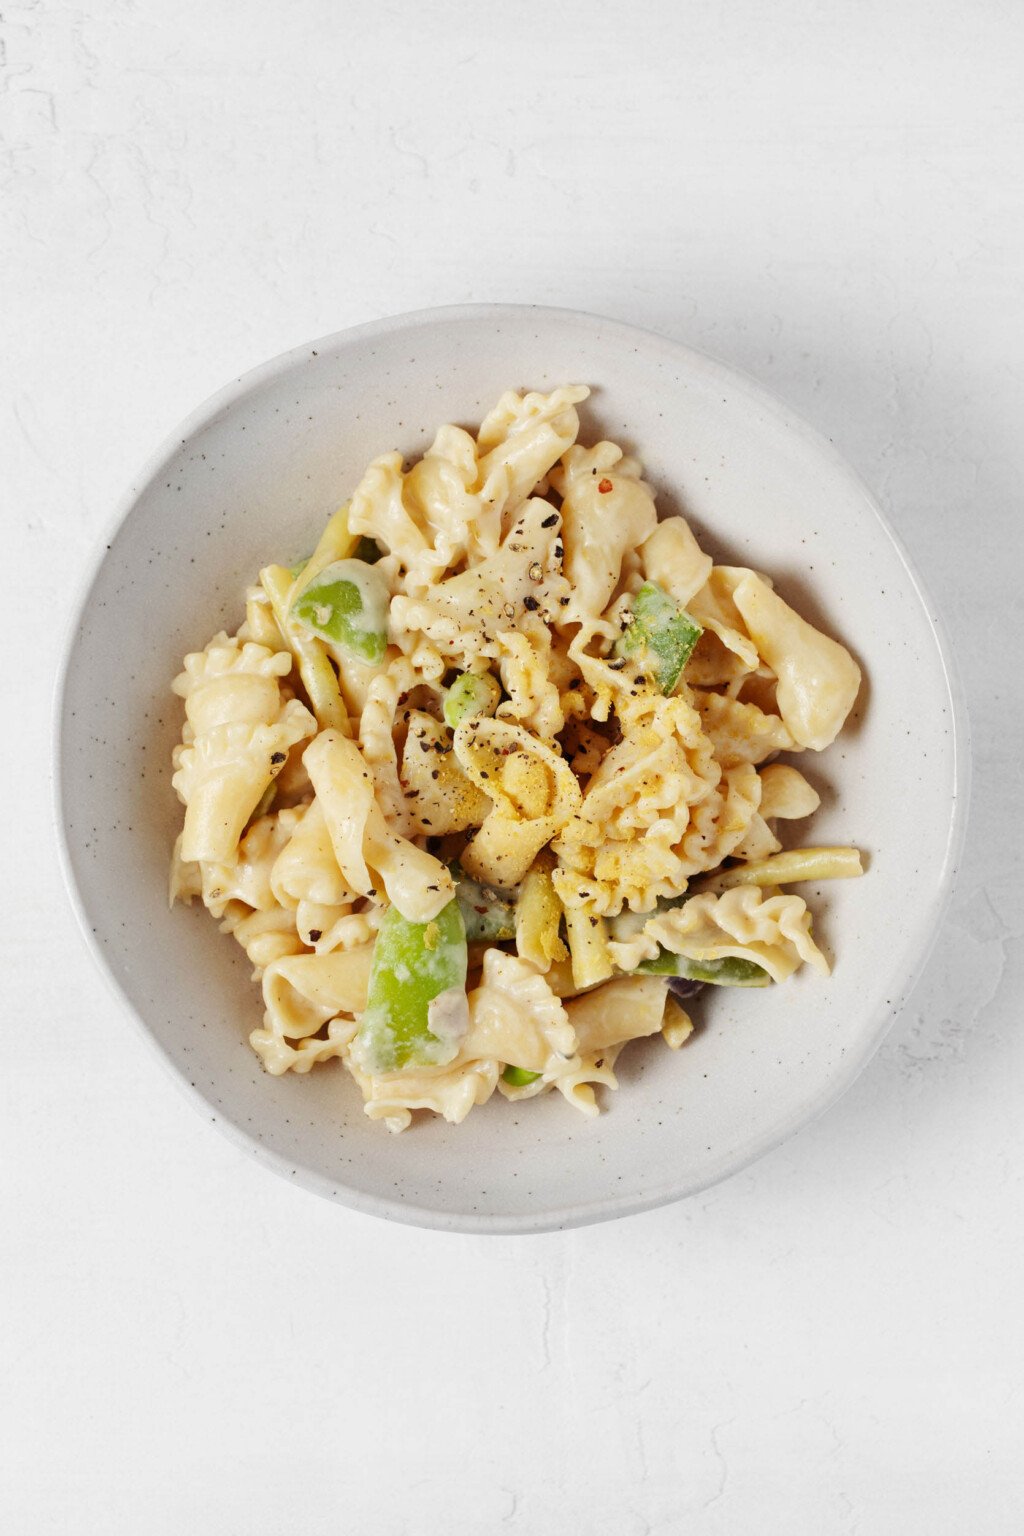
For something fresher and with more texture contrast, you can mix the roasted garlic tahini sauce and pasta with crisp, steamed veggies.
It’s so good with all manner of peas: shelled peas, snow peas, or sugar snap peas. (That combination is what you see pictured in this post!)
A simple trinity of plant-based foods—grains, greens, and beans—will set you up to create an array of beautifully balanced and complete meals. Bring the beans and grains in your pantry to life with more than 80 wholesome recipes and a world of possibilities!
Any one, two, or three of these pasta dishes could appear on your dinner table over the course of a couple weeks. As written, this recipe will create four servings, enough for about 8 ounces of pasta + add-ins.
However, doubling the batch will give you something to freeze and use later. Increasingly, multi-tasking staple sauces like this one have become absolutely essential to my meal prep.
How to make roasted garlic tahini sauce
Step one: roast the garlic
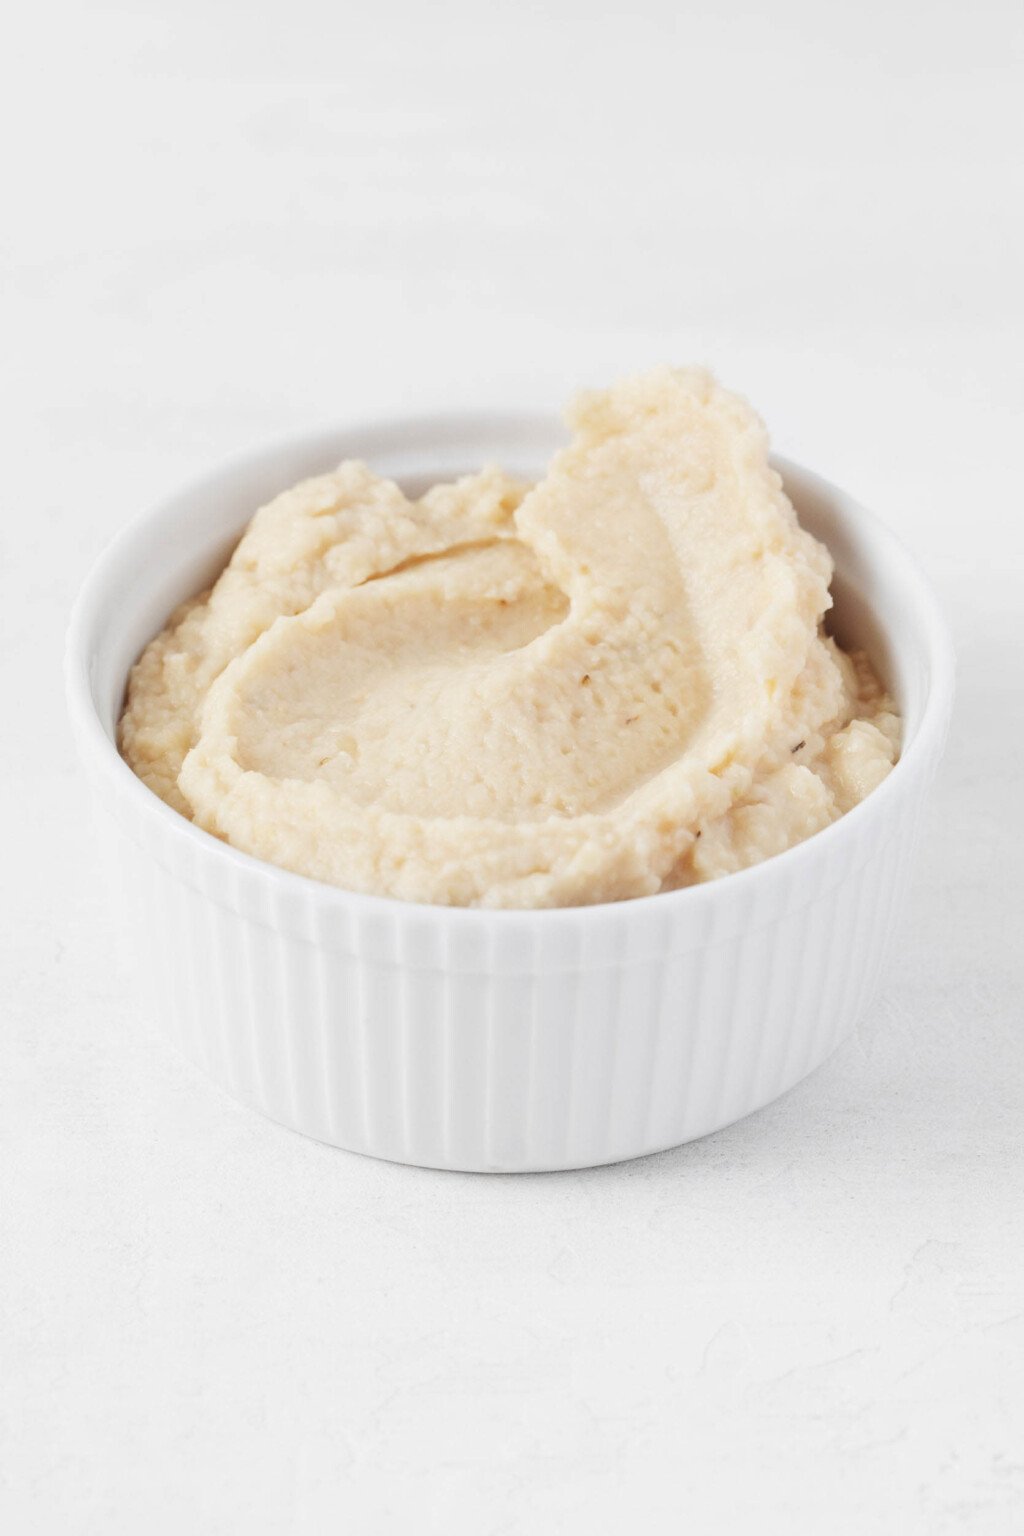
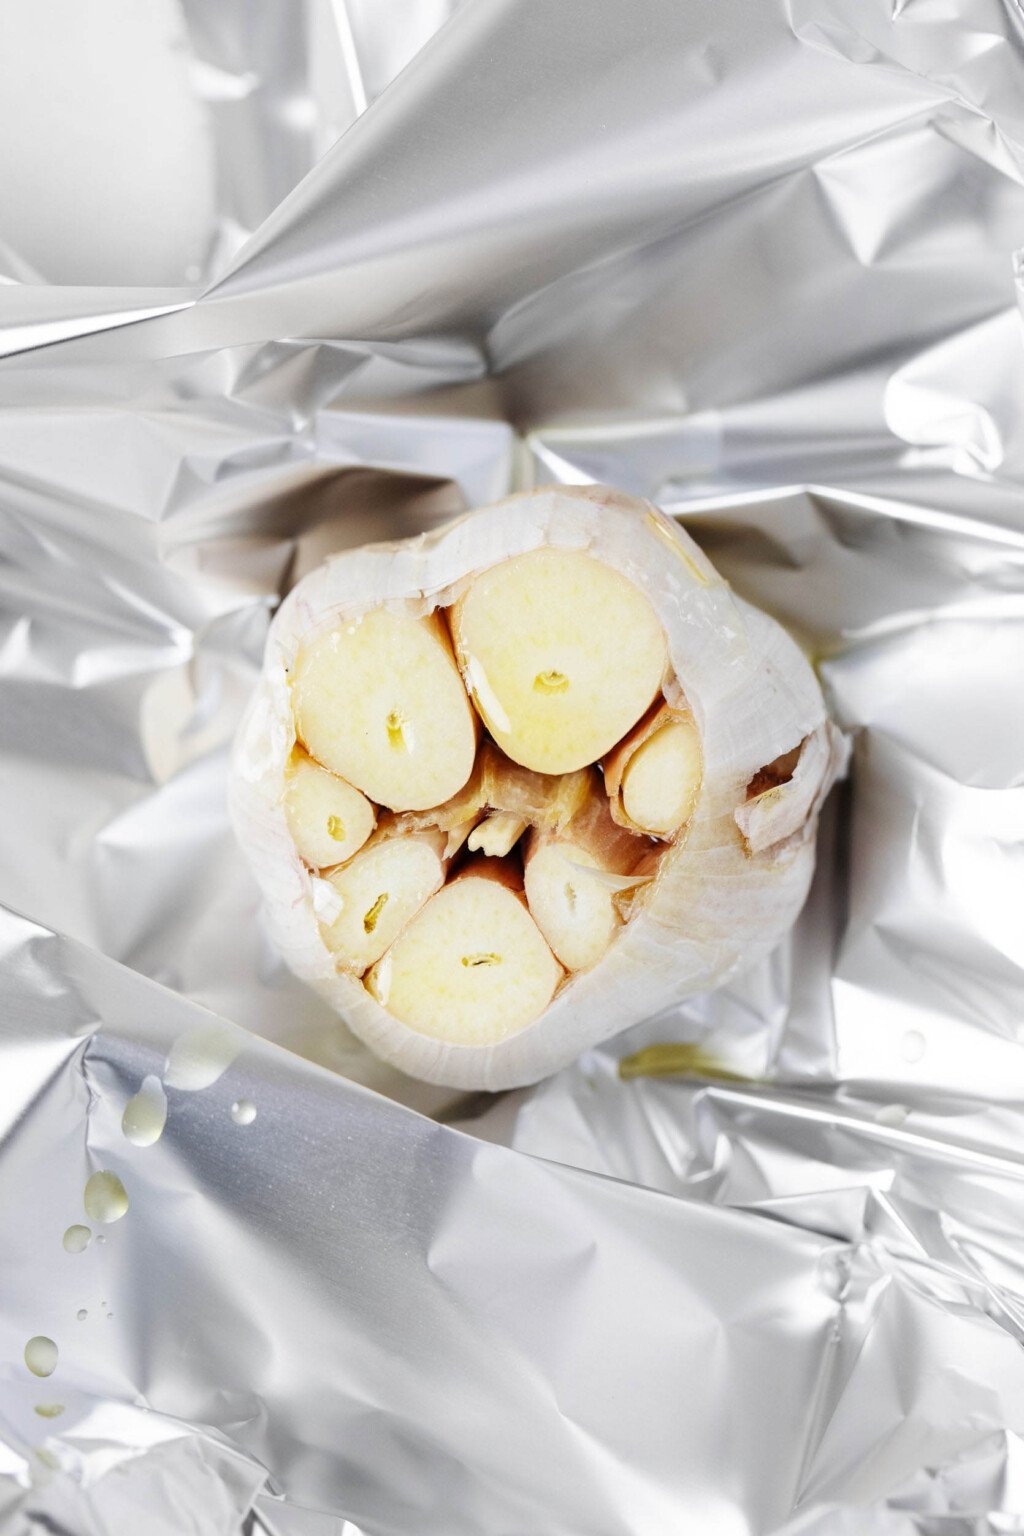
To roast garlic, I begin by slicing the top of a bulb of garlic off crosswise. I drizzle some oil over the exposed cloves, then I wrap the whole bulb in foil.
This recipe calls for two bulbs of garlic, which sounds like a lot. But the beauty of roasting garlic is that even two bulbs won’t be overpowering in flavor. Oven-roasting mellows garlic in the best possible way.
Once you’ve prepared your bulbs for roasting, pop them into the oven for about 35 minutes.
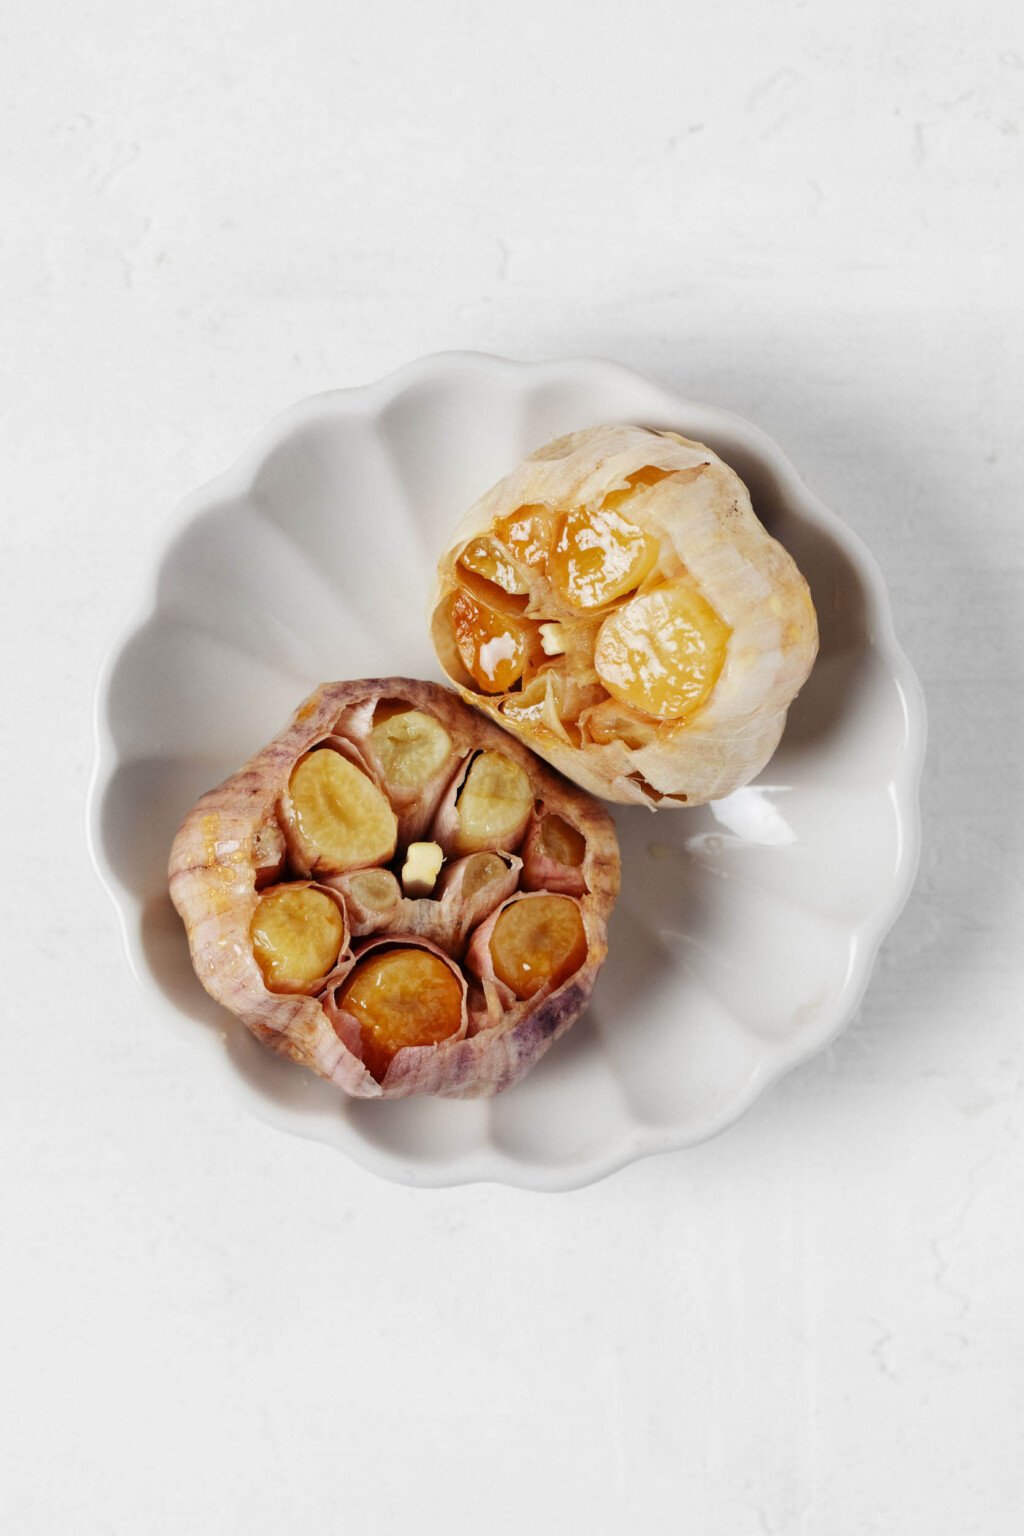
Cut the top of a bulb of garlic off and wrap it in foil for easy roasting.Once roasted, the cloves of garlic will be a deep, golden brown and very soft.
After roasting, the garlic cloves will have shrunken and turned a golden color. Once you allow them to cool a little, you ought to be able to pop them out of the bulb by squeezing it from the bottom.
Step 2: Add the garlic to the tahini sauce base
After roasting the garlic, you’ll add it to the other ingredients needed for the sauce.
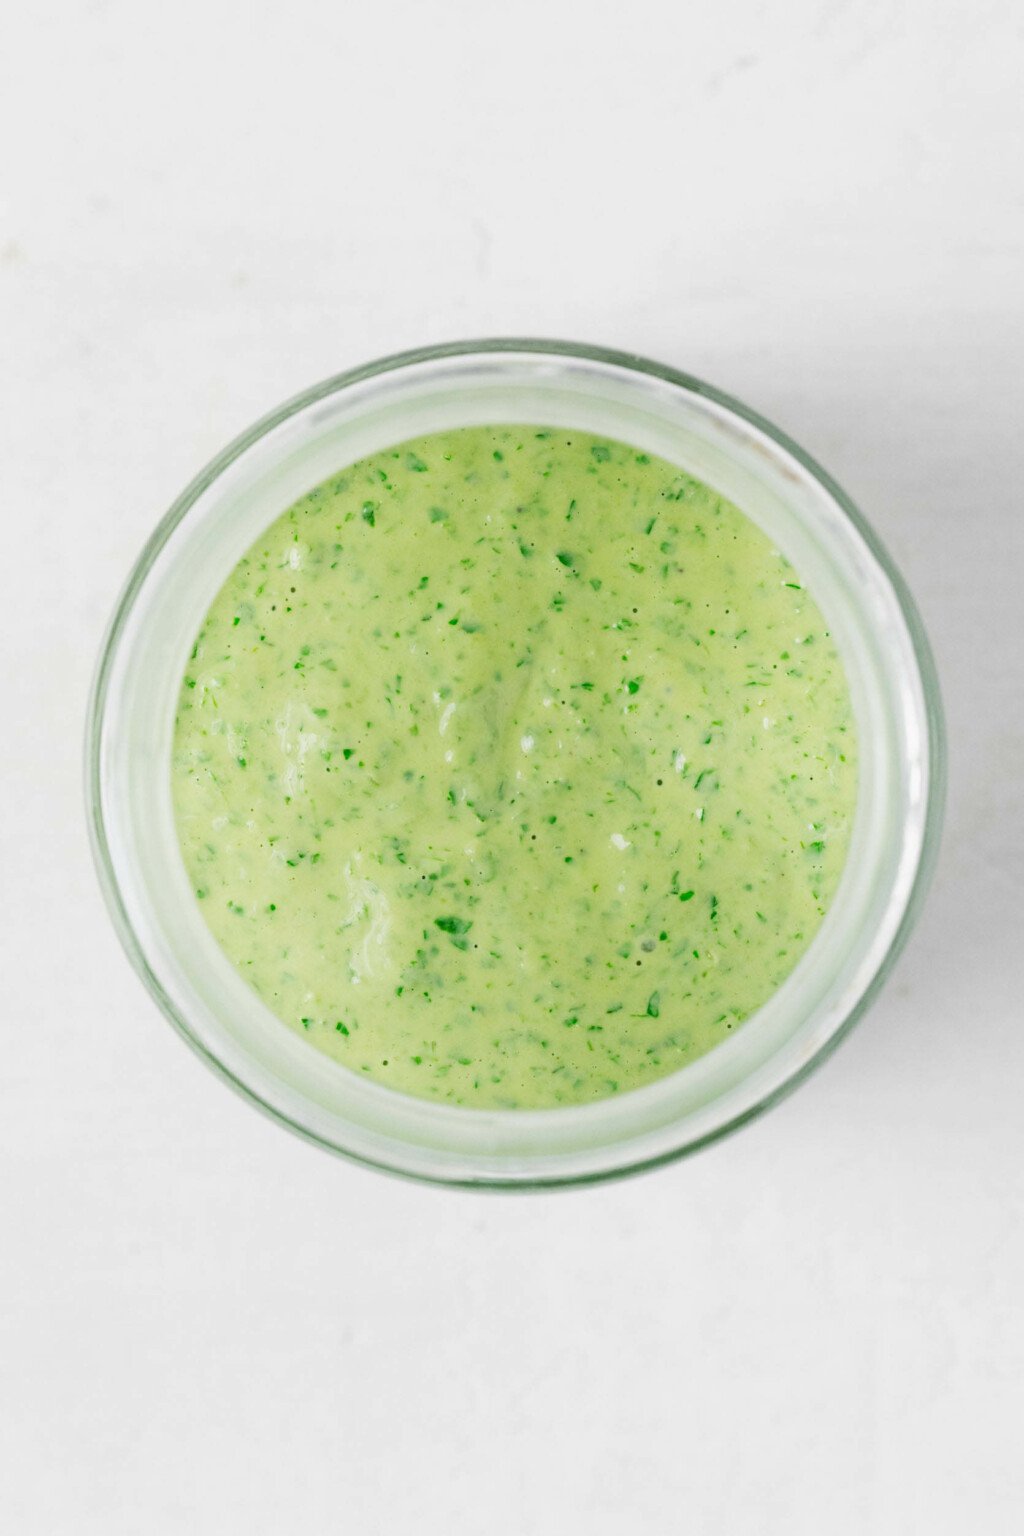
These include the usual suspects: tahini, water, lemon juice, olive oil, salt, and pepper. The olive oil helps to create an emulsified, silky texture when the sauce is added to pasta. Without it, the sauce is less smooth and luxurious.
I also add nutritional yeast to the sauce. This adds a hint of savory, cheesy flavor, which makes the sauce reminiscent of, but not identical to, alfredo.
Add all of these components to your blender or food processor. Squeeze the freshly roasted garlic cloves in after them.
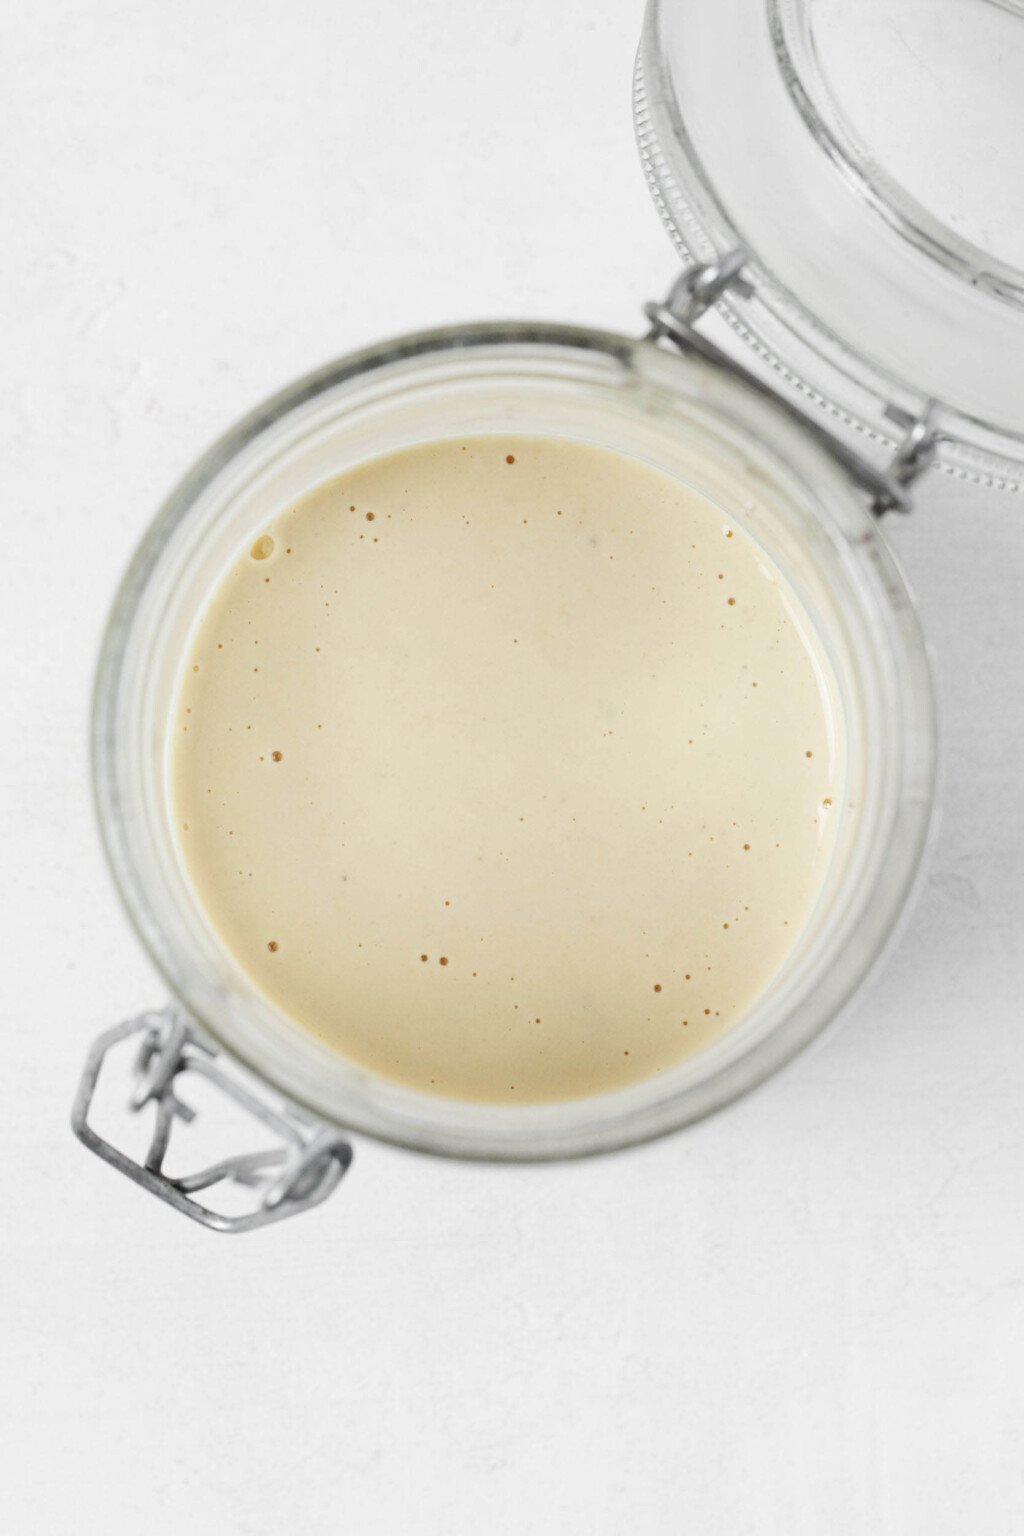
Step 3: Blend (or process)
Finally, blend or process the ingredients into a silky sauce. Transfer it to a jar and store the jar in your fridge for up to five days, or freeze it for up to six weeks.
The sauce can be stored in the fridge for up to five days or frozen for up to six weeks.
Optional step 4: Make pasta
If you’d like to make pasta with the roasted garlic tahini sauce, go ahead and bring a pot of lightly salted water to a boil.
Add eight ounces of any pasta shape to the water and cook it according to package instructions (or to your preferred texture).
When you drain the pasta, be sure to reserve about one cup / 240ml of the hot pasta water. Return the pasta, along with any other components you like (roasted or steamed vegetables, beans, toasted pine nuts, etc.) to the pot over low heat, along with the sauce.
Add a half cup / 120ml of the pasta water to the pot. Give everything a stir and heat it through. Continue adding splashes of pasta water as needed, until the pasta is creamy but has some lightness and looseness. Plate and enjoy!
The sauce can be stored or used right away to make a creamy pasta with add-ins of choice.
Alternative serving suggestions
If you like the idea of this sauce but aren’t especially excited about pasta, there are many other things you can use it for.
Keep in mind that the sauce is thick, intended originally to be thinned with pasta water. I recommend diluting it with a few tablespoons of extra water if you use it for drizzling.
8ouncespasta shape of choice(for serving, if desired)
Preheat the oven to 375°F / 190°C. Use a chef’s knife to slice off the top 3/4-inch/2 cm of each bulb of garlic in a crosswise fashion, exposing the cloves. Drizzle each head with a teaspoon of olive oil. Wrap each bulb in foil and transfer them to a baking sheet. Roast the bulbs for 30-35 minutes, or until the cloves are tender and browning. Set the bulbs aside to cool for 10 minutes.
Add the tahini, water, lemon juice (starting with 1 1/2 tablespoons—you can add more to taste once you blend up the sauce), the remaining 2 tablespoons olive oil, nutritional yeast, salt, and pepper to a blender. Invert each of the two roasted garlic bulbs over the blender and squeeze out all of the roasted cloves into the sauce mixture.
Blend the sauce for 1-2 minutes, or until thick and smooth. Transfer it to an airtight storage container. At this point, it can be stored for up to 5 days in the fridge or frozen for up to 6 weeks.
When you’re ready to use the sauce, boil your pasta shape of choice according to package instructions. Drain the pasta, reserving about 1 cup / 240ml of the hot pasta water. Return the pasta, along with any add-ins of choice (roasted vegetables, a bean, steamed greens, etc.) to the pot over low heat, along with the sauce*. Add 1/2 cup / 120ml of the pasta water. Heat and stir to incorporate the sauce into the pasta and serve.
The sauce can be stored in an airtight container in the fridge for up to five days and frozen for up to six weeks.
*If you’re making smaller portions of pasta, rather than a full 8 ounces, you’ll need about 2-3 tablespoons of the sauce per 2-3 ounce serving of pasta. **Try thinning the sauce with a couple tablespoons of water if using it as a dip or a sauce for drizzling.
If you’ve been aiming to make more homemade staples and sauces lately—and especially if you love tahini—then this recipe will serve you well. It’s easy and reliable, and I hope you’ll enjoy it!
A researcher works at the Moderna headquarters in Cambridge, Massachusetts. In May, the Trump administration pulled over $700 million committed to Moderna for developing future flu vaccines, and this week it canceled another $500 million in grants to various institutions researching mRNA vaccines.
Adam Glanzman/Bloomberg/Getty Images
hide caption
toggle caption
Adam Glanzman/Bloomberg/Getty Images
The Trump administration is canceling almost $500 million in contracts to develop mRNA vaccines to protect the U.S. against future viral threats. The move thrilled critics of the technology but horrified many public health and biosecurity experts.
The federal Biomedical Advanced Research and Development Authority (BARDA), which oversees the nation’s defenses against biological attacks, is terminating 22 contracts with university researchers and private companies to develop new uses for the mRNA technology, Health and Human Services Secretary Robert F. Kennedy Jr. announced Tuesday.
The mRNA technology was used by the first Trump administration to create the most commonly used COVID-19 vaccines, which are widely considered a medical triumph that safely and effectively saved millions of lives. But vaccine mandates during the pandemic sowed fierce antipathy toward the technology, leading to widespread public opposition.
“Let me be absolutely clear: HHS supports safe, effective vaccines for every American who wants them,” Kennedy said in a video explaining the decision. “That’s why we’re moving beyond the limitations of mRNA vaccines for respiratory viruses and investing in better solutions.”
The announcement dismayed many who study infectious disease.
“This may be the most dangerous public health judgment that I’ve seen in my 50 years in this business,” says Michael Osterholm, who runs the Center for Infectious Disease Research and Policy at the University of Minnesota. “It is baseless, and we will pay a tremendous price in terms of illnesses and deaths. I’m extremely worried about it.”
But the decision was welcomed by vaccine critics like the group Children’s Health Defense, which Kennedy himself founded.
“While we believe the mRNA vaccines should be taken off the market, the announcement is a positive move towards protecting public health,” said Mary Holland, the group’s president and CEO, in a statement.
Jennifer Nuzzo strongly disagrees. She runs the Brown University School of Public Health’s Pandemic Center and says the move could erode preparedness for future pandemics.
“This is a profoundly disappointing development,” she says. “When there’s the next pandemic, we’re going to be caught flat-footed. It absolutely leaves the country vulnerable.”
Nuzzo and others aren’t just worried about the next pandemic. Many experts say mRNA vaccines would provide a crucial deterrent and powerful defense against bioterrorists.
“I think that it endangers the national security of the United States,” says Chris Meekins, a top biodefense official in the first Trump administration. “It could put the U.S. at a strategic national security disadvantage and would be a significant threat to the national security of the United States.”
In announcing his decision, Kennedy claimed the COVID-19 vaccines were unsafe and ineffective, helped drive the evolution of the virus and could not keep up with new mutations.
“After reviewing the science and consulting top experts at NIH and FDA, HHS has determined that mRNA technology poses more risk than benefits against these respiratory viruses,” Kennedy said.
Many outside experts say Kennedy’s claims are wrong.
“His science is backwards, as it often is,” says Dr. Peter Hotez, who is the dean of Baylor College of Medicine’s National School of Tropical Medicine and who runs the Texas Children’s Hospital Center for Vaccine Development. “This is a proven technology for emerging respiratory viruses or respiratory virus pandemics. It is extremely safe and has been incredibly effective.”
mRNA vaccines work by stimulating the immune system with a key protein from a virus. Kennedy says the federal government is instead investing in an alternative technology that uses whole killed viruses and can produce “natural immunity.”
While that technology has produced effective vaccines, it’s a much older approach that can have safety issues and is not nearly as nimble in responding to new threats, experts say.
“It is irresponsible to strip funding from future technologies with great potential and shift it towards outdated old-fashioned technologies,” says Rick Bright, who ran BARDA during the first Trump administration. “We’re taking our country from 2025 back to 1940, and we all know that’s a recipe for disaster and failure.”
The mRNA technology is the only vaccine technology that can be developed quickly enough to respond swiftly to a new pathogenic threat, experts say.
“In an outbreak, when you are facing a rapidly spreading virus — whether it’s from nature or a nation-state adversary — speed is the name of the game,” Bright says.
The administration previously canceled a $766 million contract with the vaccine company Moderna to develop an mRNA vaccine to protect people against flu strains with pandemic potential.
Many fear moves like this will continue to undermine public trust in vaccines generally and mRNA technology specifically, which is also showing promise for treating diseases, most notably cancer.
“The deleterious impact is not only in the contracts that they’re canceling, but they’re trying to make the case to the public that mRNA technology doesn’t work very well and it’s unsafe,” Hotez says. “And that’s absolutely untrue.”
August is considered as the second growing season, as the soil is still warm and the plant roots has enough time to grow stronger. Above that, your plants won’t have to tolerate extreme heat.
There are several hardy perennials that you can direct sow in August and expect to bloom through fall.
Most gardeners prefer perennials as they come back every year once established, making them cost effective.
Along with climatic conditions in your region, it is important to choose the right hardy perennials that can thrive in cool weather and continue to bloom in fall.
Russian sage, Japanese Anemones, Salvia, Purple coneflower and Black-Eyed Susan are few common perennials that can be planted in August.
Importance of Deciding Flowering Perennials to Plant in August
Choosing the right perennial variety is absolutely crucial for August planting success, as it directly impacts plant establishment, winter survival, and future growth performance.
The variety determines critical factors like cold hardiness for your specific USDA zone, mature size for proper spacing, bloom time for seasonal interest, and soil requirements that must align with your garden conditions.
When selecting perennial varieties for August planting, prioritize cold-hardy options suited to your zone with proven track records of quick establishment, and look for compact or dwarf varieties that focus energy on root development rather than excessive top growth.
Choose varieties with staggered bloom times to ensure continuous color, and verify their mature spread to avoid overcrowding issues.
For August planting, established seedlings or small potted plants are strongly preferred over direct sowing since they have developed root systems that can quickly adapt to transplanting and establish before frost.
23 Perennial Flowers to Plant in August
Strategic August planting capitalizes on the seasonal transition when soil warmth promotes rapid root growth while decreasing daylight hours signal plants to focus their energy on establishing strong foundations rather than producing excessive foliage.
Below listed are such common perennials, check them out.
1. Russian Sage
Russian sage features silvery-gray foliage and tall spikes of lavender-purple flowers, creating a soft, airy effect in the garden. Its aromatic leaves shimmer in sunlight, and the blooms add movement and texture to borders and mass plantings.
This hardy perennial thrives in full sun and well-drained soil, tolerating poor, rocky, or alkaline conditions once established.
Plant in spring after frost, spacing 2–3 feet apart. Water regularly during the first year to establish roots, then reduce watering as the plant becomes drought-tolerant and low-maintenance.
2. Holly Fern
Holly ferns feature dark green, glossy fronds with holly-like leaflets and a soft texture, forming elegant, arching clumps that provide year-round structure in shaded gardens. These evergreen perennials thrive in rich, moist, well-drained soil and prefer partial to full shade.
Once established, they tolerate short droughts and adapt well to woodland settings or shady borders. Plant in spring in humus-rich soil, spacing 2–3 feet apart.
Water regularly during establishment, then maintain consistent moisture to support healthy growth and attractive frond development.
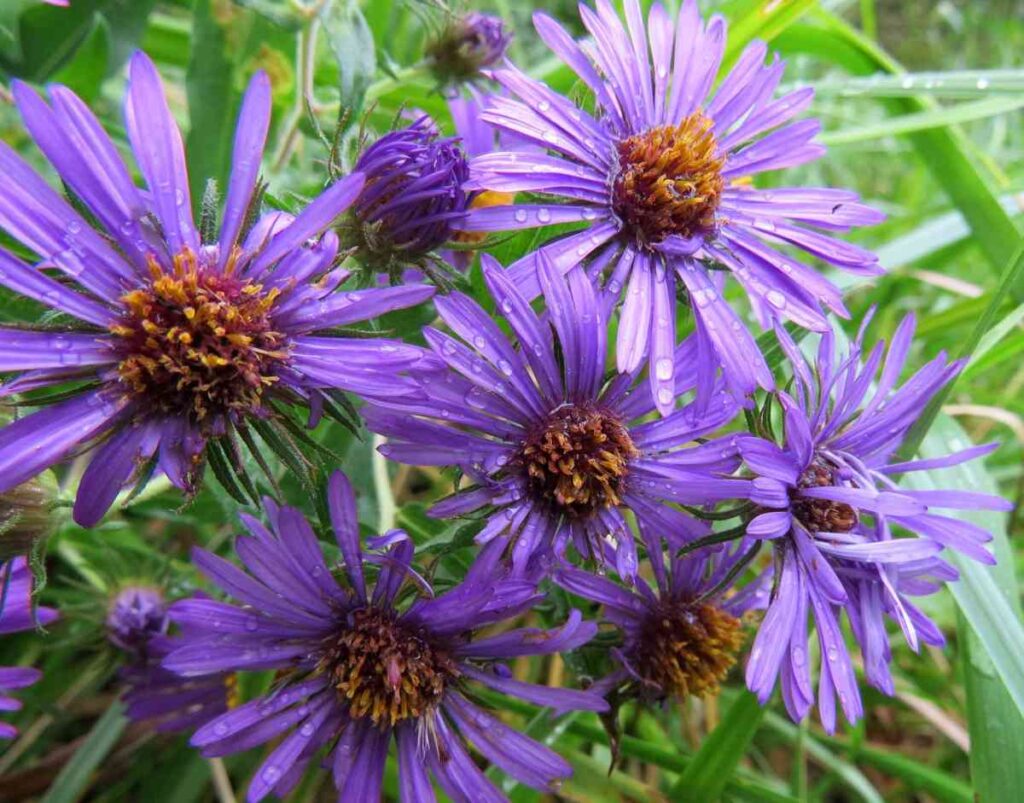
New England asters burst into bloom in late summer and fall with masses of purple-pink daisy-like flowers and golden centers. Growing 3–6 feet tall, they add bold vertical interest and attract bees and butterflies.
These hardy natives thrive in full sun and moist, well-drained soil, tolerating clay, short droughts, and tough roadside spots across zones 4–8.
Plant in spring or early fall, spacing 2–3 feet apart. Water during establishment, then pinch stems by half in early summer to encourage bushier growth and reduce flopping.
4. Bluebeard
Bluebeard produces airy clusters of cornflower-blue blooms atop fragrant, silvery-green foliage in late summer, offering color and texture when many plants fade. This compact shrub grows 2–3 feet tall, attracting butterflies and adding late-season charm to sunny borders.
Drought-tolerant and low-maintenance, it prefers full sun and well-drained, loamy soil. In colder zones (5–9), it dies back in winter and regrows like a perennial. Plant in spring or fall, space 3 feet apart, water during establishment, and cut back in early spring for fresh growth and blooms.
5. Japanese Anemone
Japanese anemones offer delicate pink or white flowers with golden centers from late summer to fall, rising on tall stems above dark green, lobed foliage.
Reaching 2–4 feet, they naturalize beautifully in partial shade. These perennials thrive in rich, moist, well-draining soil with morning sun and afternoon shade. Plant in spring, spacing 2 feet apart, and mulch to retain moisture.
Water regularly during the growing season and divide clumps every 1–2 years to control spread and maintain plant health.
6. Black-Eyed Susan
Black-eyed Susans produce golden-yellow daisy-like blooms with dark centers from summer to fall, reaching 2–3 feet tall. Their sturdy stems and coarse green foliage attract butterflies, bees, and birds like goldfinches.
Thriving in full sun to part shade, they adapt to various soils, resist deer, and tolerate drought once established. Plant in spring, spacing 11 inches apart.
Water regularly during the first season; reduce watering afterward as plants self-seed and become low-maintenance perennials with excellent heat tolerance.
Purple coneflowers feature drooping purple-pink petals and spiky bronze-orange centers, attracting pollinators and birds.
These 3–5 ft. tall natives thrive in full sun and lean, well-drained soil, tolerating drought, heat, and poor conditions (zones 3–9). Plant in spring, space 18 inches apart, water sparingly, and divide clumps every 3–4 years in fall to maintain vigor.
8. Daylilies
Daylilies produce vibrant, trumpet-shaped blooms in shades from gold to burgundy, each lasting a day but blooming for weeks. Their arching, grass-like foliage forms lush clumps that thrive in full sun or part shade.
Adaptable to various soils, they prefer well-drained, slightly acidic conditions. Plant in spring or fall, 2–3 feet apart. Water regularly during year one, then reduce as they naturalize and spread.
9. Coreopsis
Coreopsis offers bright, daisy-like flowers in yellows, oranges, and bicolors from early summer to fall. Its fine-textured foliage forms neat mounds that attract butterflies and make great cut flowers.
Thriving in full sun and well-drained, lean soils, it’s drought-tolerant and low-maintenance. Plant after frost, 12–20 inches apart. Water during establishment, then let dry conditions encourage self-seeding.
10. Hardy Chrysanthemum
Hardy chrysanthemums bloom in vibrant fall colors—yellow, rust, maroon, purple, and white—offering late-season beauty when other flowers fade. Their aromatic, gray-green foliage forms sturdy mounds that support masses of daisy-like flowers.
These perennials thrive in full sun to light shade and moist, well-drained soil. Plant in spring or early summer, spacing 18–24 inches apart.
Water regularly during establishment, fertilize in spring, and pinch stems in early summer to promote bushy growth and abundant blooms by fall.
Autumn Joy stonecrop produces pink blooms that deepen to rose-red, then bronze in fall, offering long-lasting seasonal interest.
Thick, gray-green foliage and upright stems form tidy clumps. This drought-tolerant succulent thrives in full sun and lean, well-drained soil. Plant in spring, 18–24 inches apart. Water sparingly, avoiding rich soils or overwatering to prevent rot.
12. Dahlia
Dahlias offer dazzling blooms from late summer to frost in colors from red and pink to bicolored varieties. Their upright stems and lush foliage make them a favorite for cutting gardens and pollinators.
Plant tubers in spring, 18 inches apart and 4–6 inches deep. Use rich, well-drained soil and provide consistent moisture during growth. Avoid watering until shoots appear, and feed regularly. They need full sun and frost protection in cold climates.
13. Helenium
Helenium brings warm autumn hues—gold, red, orange—to borders from mid-summer to late fall. Its daisy-like flowers attract bees and butterflies. This sun-loving perennial prefers moist, fertile soil with good drainage.
Plant in spring or fall, spacing 2–3 feet apart. Water regularly and mulch during dry spells. Staking may be needed in rainy areas to support tall, upright growth and prolific flowering.
14. Blanket Flower (Gaillardia)
Blanket flower delivers vivid red, orange, and yellow blooms from spring to fall. Its low mounding form and drought tolerance suit poor, sandy soils.
Plant in full sun, spacing 12–18 inches apart. Water during establishment, then sparingly. Overly rich or wet soils can reduce flowering and plant health.
15. Shasta Daisy
Shasta daisies bloom with classic white petals and yellow centers from summer to fall. These hardy perennials reach up to 4 feet tall and are deer-resistant.
Plant in full sun or light shade in well-drained, organic soil, spacing 1–2 feet apart. Water regularly during establishment and maintain moisture during dry spells. They make excellent cut flowers and attract butterflies to the garden.
16. Yarrow
Yarrow features flat flower clusters in white, yellow, pink, and red atop fragrant, fern-like foliage. This tough perennial thrives in full sun and lean, dry soils, tolerating drought and poor conditions.
Plant in spring, 12–18 inches apart. Water lightly to establish, then sparingly, as too much moisture or fertility causes floppiness and reduced flowering.
17. Bee Balm (Monarda)
Bee balm produces bright, spiky blooms in red, pink, purple, or white that attract hummingbirds, bees, and butterflies.
Its minty foliage also repels mosquitoes. This tall perennial prefers full sun to part shade and rich, moist, compost-enriched soil. Space 24–28 inches apart in spring.
Water regularly to maintain moisture and prevent stress. Provide good airflow to reduce mildew risk and divide every 3–4 years to keep plants vigorous and prevent center die-out.
18. Turtlehead (Chelone)
Turtlehead blooms from July to October with snapdragon-like flowers in pink, purple, or white. Glossy foliage and upright growth make it ideal for moist areas like pond edges. It thrives in rich, consistently wet soil in sun or part shade.
Space 18–24 inches apart in spring. Keep soil evenly moist and divide every few years to control spread and encourage strong flowering.
19. Sedum
Sedums range from low groundcovers to upright succulents with fleshy leaves and clustered starry blooms.
Perfect for dry, poor, or rocky soils, they love full sun and need excellent drainage. Plant in spring with minimal watering. Avoid rich soil, which can lead to weak growth or rot.
20. Heuchera (Coral Bells)
Heuchera offers colorful foliage in purple, silver, chartreuse, and more, topped by delicate flower spikes that attract pollinators.
This compact perennial thrives in partial shade but adapts to sun or shade. Plant in spring, 12–18 inches apart in well-drained, humus-rich soil.
Maintain consistent moisture without sogginess, especially in hot spells. Coral bells are excellent for edging, containers, and adding year-round interest to garden beds, with evergreen or semi-evergreen foliage depending on climate and variety.
21. Rudbeckia ‘Goldsturm’
Rudbeckia ‘Goldsturm’ blooms mid-summer to fall with golden-yellow flowers and dark centers atop compact, disease-resistant foliage. Thriving in sun and well-drained soil, it tolerates drought, clay, and heat.
Plant in spring, spacing 18–24 inches apart. Water during establishment and maintain moisture through the season. Divide every few years to prevent overcrowding and renew vigor.
22. Veronica (Speedwell)
Veronica produces vibrant flower spikes in blue, purple, or pink over neat clumps of green foliage, blooming for weeks in summer. These sun-loving perennials grow 6 inches to 4 feet tall, depending on type.
Plant in spring, 15–18 inches apart in well-drained soil. Water consistently and deadhead spent blooms to extend flowering.
They’re deer-resistant, drought-tolerant, and loved by butterflies and hummingbirds.
Ligularia adds bold texture with its large leaves and tall yellow to orange flowers in mid-to-late summer.
It thrives in full to partial shade and consistently moist, rich soil, making it perfect for boggy spots or waterside planting.
Space plants 2–3 feet apart in spring and mulch heavily to retain moisture. Protect from afternoon sun to prevent wilting, and water regularly to support lush growth. Some varieties have dramatic foliage for added ornamental value.
Planting perennials in August gives your garden a head start for next spring. Warm soil and cooler nights encourage strong root development, helping plants establish before winter.
By choosing hardy, drought-tolerant, or late-blooming varieties suited to your climate, you’ll enjoy lasting color, structure, and pollinator benefits.
With a bit of planning and care, August plantings will reward you with vigorous, resilient growth in seasons to come.
Khaja Moinuddin, a computer science graduate, finds joy in gardening and homesteading. Join him on this blog as he shares his experiences in homesteading, gardening, and composting
Our family loves these Asian chicken lettuce wraps, but I wanted to come up with something a little lighter. This version has more of a fresh, herbal flavor, instead. It’s simple, uses fresh ingredients that are plentiful in summer, and is easy to throw together.
I like to batch cook proteins at the beginning of the week, especially chicken. It really makes meal prep a breeze on busy days (which is often!). You can use either chicken breast or thigh meat for this recipe. Here’s what else you’ll find in this recipe.
Chicken Lettuce Wraps
I love fitting in as many veggies as possible whenever I’m making a meal. These chicken lettuce wraps feature veggies like red onion, cucumber, and cherry tomatoes for a nice crunch. The avocado and yogurt sauce add a nice layer of creaminess. I like using romaine or butter lettuce for these wraps because they hold together well and don’t have an overpowering flavor. Greek yogurt adds another easy protein boost and healthy fats to keep tummies full.
The fresh basil and chives in the yogurt sauce combine beautifully with the crunchy veggies. You can even make the yogurt sauce ahead of time if you want an even faster lunch. The chicken can be pre-cooked/shredded, and the veggies pre-chopped (except the avocado). This also gives the flavors a little more time to meld together. Once the chicken wraps are assembled though they taste best fresh.
Our whole family loves these chicken lettuce wraps and we’ve been devouring them for lunch! Here’s how to make them:
Chicken Lettuce Wraps
These crunchy chicken lettuce wraps are a fresh twist on the classic chicken wrap. Use precooked chicken for an even faster meal!
2cupsshredded cooked chicken(pre-cooked or prepared using one of the methods below)
In a small bowl, whisk together all of the herbed yogurt sauce ingredients until smooth. Set aside.
In a large bowl, combine shredded chicken, avocado, cucumber, onion, and cherry tomatoes. Add half of the yogurt sauce and toss gently to coat.
Lay out 8 lettuce leaves. Spoon chicken mixture evenly into each leaf. Drizzle with remaining yogurt sauce and sprinkle with 2 Tablespoons chopped walnuts for extra crunch.
Nutrition Facts
Chicken Lettuce Wraps
Amount Per Serving (2 wraps)
Calories 266 Calories from Fat 144
% Daily Value*
Fat 16g25%
Saturated Fat 3g19%
Trans Fat 0.003g
Polyunsaturated Fat 4g
Monounsaturated Fat 7g
Cholesterol 54mg18%
Sodium 377mg16%
Potassium 690mg20%
Carbohydrates 10g3%
Fiber 5g21%
Sugar 3g3%
Protein 23g46%
Vitamin A 5172IU103%
Vitamin C 15mg18%
Calcium 76mg8%
Iron 2mg11%
* Percent Daily Values are based on a 2000 calorie diet.
These wraps taste best fresh, but you can make the filling ahead of time. Place the filling and walnuts in the lettuce wraps when ready to serve.
Chicken Cooking Options
I like to premake a bunch of cooked chicken and ground beef at the beginning of the week for meal prep. It saves so much time in the kitchen on busy days! While the Instant Pot is usually my go-to, here are a few ways you can cook the chicken for this recipe (and others).
Grilled Chicken:
Prep Time: 5 minutes
Cook Time: 12-15 minutes
Instructions: Preheat grill to medium-high, 400°. Rub 2-3 chicken breasts or thighs with 1 TBSP olive oil, sea salt, black pepper, 1/2 tsp garlic powder, and 1/2 tsp smoked paprika. Grill for 6-8 minutes per side until internal temperature reaches 165°F. Let rest for 5 minutes, then shred with two forks.
Flavor Note: Adds a smoky, charred flavor that pairs well with the fresh veggies and sauce. Shred and mix into the filling as directed.
Air Fryer Chicken
Prep Time: 5 minutes
Cook Time: 10-12 minutes
Instructions: Preheat the air fryer to 380°F. Rub 2-3 chicken breasts or thighs with 1 TBSp olive oil, sea salt, black pepper, 1/2 tsp garlic powder, and 1/2 tsp smoked paprika. Air fry for 10-12 minutes, flipping halfway, until internal temperature reaches 165°F. Let rest for 5 minutes, then shred.
Flavor Note: Crispy exterior with juicy interior that’s ideal for a quick, healthy prep. Shred and mix into the filling as directed.
Rotisserie-Style (Oven-Roasted) Chicken:
Prep Time: 5 minutes
Cook Time: 20-25 minutes
Instructions: Preheat oven to 400°F. Rub 2-3 chicken breasts or thighs with 1 TBSP olive oil, sea salt, black pepper, 1/2 tsp garlic powder, and 1/2 tsp smoked paprika. Place on a baking sheet and cook for 20-30 minutes or until the internal temperature reaches 165°F. Let rest for 5 minutes, then shred.
Flavor Note: This is a great way to get juicy, tender chicken. Shred and mix into the filling as directed.
More Shredded Chicken Recipes
If you’re looking for ways to use up a big batch of cooked chicken, give these recipes a try.
What are some of your favorite easy lunch ideas? Leave a comment and let us know!
The common hepatica (Hepatica americana) is known by various names, including blue anemone, liverleaf, and mayflower. This species is native to the southeastern US.
It’s a charming wildflower that grows close to the ground in woodsy settings, where there is partial shade and rich, well-drained soil.
As an herbaceous plant, the stems, leaves, and flowers die at the end of the growing season while roots lie dormant beneath the soil throughout the winter.
This species grows up to six inches tall and blooms in early spring. Depending on the variety the flowers may be blue, pink, or white and are sometimes fragrant.
Hardy in Zones 3 to 8, common hepatica enjoys a part shade location and organically-rich, well draining soil.
5. Colorado Blue Columbine
Colorado blue columbine (Aquilegia caerulea) is native to the Colorado Rocky Mountain region that thrives in moist, well-drained soil.
This hardy herbaceous perennial does best in full sun but will tolerate partial shade. It is the Colorado state flower, and a protected species.
Colorado blue columbine may succumb to the heat of areas with hot summers after just a few years, usually because the soil isn’t moist enough.
However, it self-propagates by scattering seeds that grow into new plants, much like an annual.
Plants grow two to three feet tall and bloom in late spring. The blooms consist of central white petals flanked with blue sepals, providing a delightful, star-like display. Hardy in Zones 3 to 8.
Great blue lobelia (Lobelia siphilitica) is an herbaceous perennial native to eastern and central US.
It blooms from mid to late summer in Zones 4 to 9 with spikes of vivid blue, tubular blooms.
Plants reach two to four feet tall and thrive in organically-rich, fertile soil that is consistently moist.
A full sun location is ideal but this species will tolerate part shade, especially in hot climates.
8. Lewis Flax
Lewis or blue flax (Linum lewisii) is a short-lived perennial native to much of western North America, from Alaska and western Canada down through the western United States into northern Mexico.
Its delicate, sky-blue flowers open in the morning and often drop by afternoon, with new blooms appearing daily from late spring into midsummer.
Rams defensive end Kobie Turner takes a sniff of smelling salts during a game against the Packers at SoFi Stadium in Inglewood on Sunday.
Wally Skalij/Los Angeles Times via Getty Images
hide caption
toggle caption
Wally Skalij/Los Angeles Times via Getty Images
NFL players may soon have a harder time getting a quick jolt of alertness on the field. On Tuesday, the NFL sent a memo to clubs saying they are no longer allowed to provide the substance to players, citing safety concerns.
In the memo, which NPR has reviewed, the league pointed to a warning from the FDA released last year informing consumers that smelling salts — often marketed to increase alertness and energy — have not been proven to be safe or effective for that purpose.
In addition to general safety concerns, the NFL noted in the memo the substance can mask symptoms of a concussion. Recent estimates suggest one concussion occurs every two NFL games.
After the memo was circulated, San Francisco 49ers tight end George Kittle said in an interview with the NFL Network that smelling salts had been “made illegal in the NFL,” noting that he was “distraught” because he uses them multiple times a game. And later, some media outlets, including NPR, published articles reporting that the league had banned use of the substance, based on a story on NFL.com that also mentioned Kittle’s interview.
However, on Wednesday night, the NFL Players Association wrote in a message to players, obtained by NPR, that it wasn’t notified in advance of the policy change and that it had clarified with the NFL that the use of the substance had not been banned — only that teams were no longer allowed to distribute it. In a statement to NPR, the NFL confirmed that the memo says teams are no longer allowed to supply smelling salts.
George Kittle of the San Francisco 49ers said he regularly uses smelling salts during football games.
Michael Zagaris/Getty Images
hide caption
toggle caption
Michael Zagaris/Getty Images
What are smelling salts?
Smelling salts are made of ammonium carbonate. When dried, the substance looks like table salt and was initially called the salt of hartshorn — named for the horns of male deer from which it was commonly derived in the 17th century. A liquid form of the substance was first used as a leavening agent before baking soda and powder became widely available.
Today, smelling salts and other ammonia inhalants are used to prevent and treat fainting. The Federal Aviation Administration even requires U.S. airlines to carry them onboard.
Once the ammonia is produced, it’s packaged with water and other liquids into small, single-use capsules containing a few drops of the mixture. When the contents are crushed together, a chemical reaction releases ammonia gas and carbon dioxide.
“It’s really gross. I mean, it smells really, really bad,” Laura Boxley, a neuropsychologist at The Ohio State University Wexner Medical Center, said. “I think some people describe it as being like you’re really close up to cat urine.”
When inhaled, the ammonia gas activates receptors in the nose, which leads to a cascade of reactions that cause an increase in respiratory rate, cerebral blood flow and heart rate.
From the medicine cabinet to the field
But this physiological reaction has also been sought after by some athletes because it leads to a “subjective increase in perceived alertness and ‘psyched-up energy,'” according to a recent paper about smelling salts.
“The use of smelling salts in sports is definitely not their intended use,” Boxley said. “What’s happening with some athletes is they’re using them with much higher frequency than its intended use.”
Smelling salts are widely available and can be purchased over the counter. Athletes like Tom Brady have used them in the past.
It’s unclear when athletes first started using smelling salts, but Boxley compares their use to superstitious practices some athletes adopt.
“There’s lots of things that athletes do, from a psychological perspective, that they feel gives them an edge,” she said. “They are very famous for doing rituals like wearing a lucky shirt or wearing a certain hairdo.”
Despite the perceived effects of smelling salts, there is no strong evidence to support the theory that smelling salts enhance athletic performance. Boxley added that some athletes who use smelling salts may link success on the field with their use of the substance.
“There is no performance benefit to ammonia inhalants in a short burst of maximal effort despite elevated arousal and an associated perception of performance enhancement,” the authors of the same paper wrote.
Why sniffing for a boost could backfire
Though smelling salts are medically indicated at times, inappropriate and frequent use of the substance can lead to adverse events like shortness of breath, seizures and migraines. Even when these don’t occur, the substance can still pose risks — especially in professional athletes.
When a football player has a concussion, symptoms usually include confusion, headache and dizziness. Using smelling salts can artificially elevate arousal levels, potentially masking these telltale signs.
If a player continues to use smelling salts after a concussion, it can worsen the injury. That’s because the potent ammonia gas can trigger a sudden, automatic jolt of the head and neck.
“That certainly could complicate injury before it’s been formally evaluated,” Boxley explained.
Though smelling salts release a small amount of ammonia vapor, the long-term effects of repeated exposure are not well understood.
“Whenever you’re using a tool outside of its recommended use, you’re in kind of uncharted territory,” Boxley said, suggesting that in these situations it’s important to weigh the potential rewards against the possible risks.
“In the absence of evidence that it actually improves anything, I think it’s reasonable to prioritize somebody’s health over an unproven substance,” she said.
Our midsummer garden is a vibrant tapestry, a kaleidoscope of colors that erupts in every direction. Bright yellow cup plants stand tall, their cheerful faces attracting buzzing bees and fluttering butterflies. The sweet, heady perfume of roses mingles with the subtle scent of the lilies, creating an intoxicating aroma that fills the air. The gentle rustle of leaves in the breeze, accompanied by the chirping of birds, forms a natural soundtrack that enhances the peaceful ambiance. Every corner of the garden is overflowing with life, a testament to the abundance and joy of summer.
Thank you, Maxine Brisport
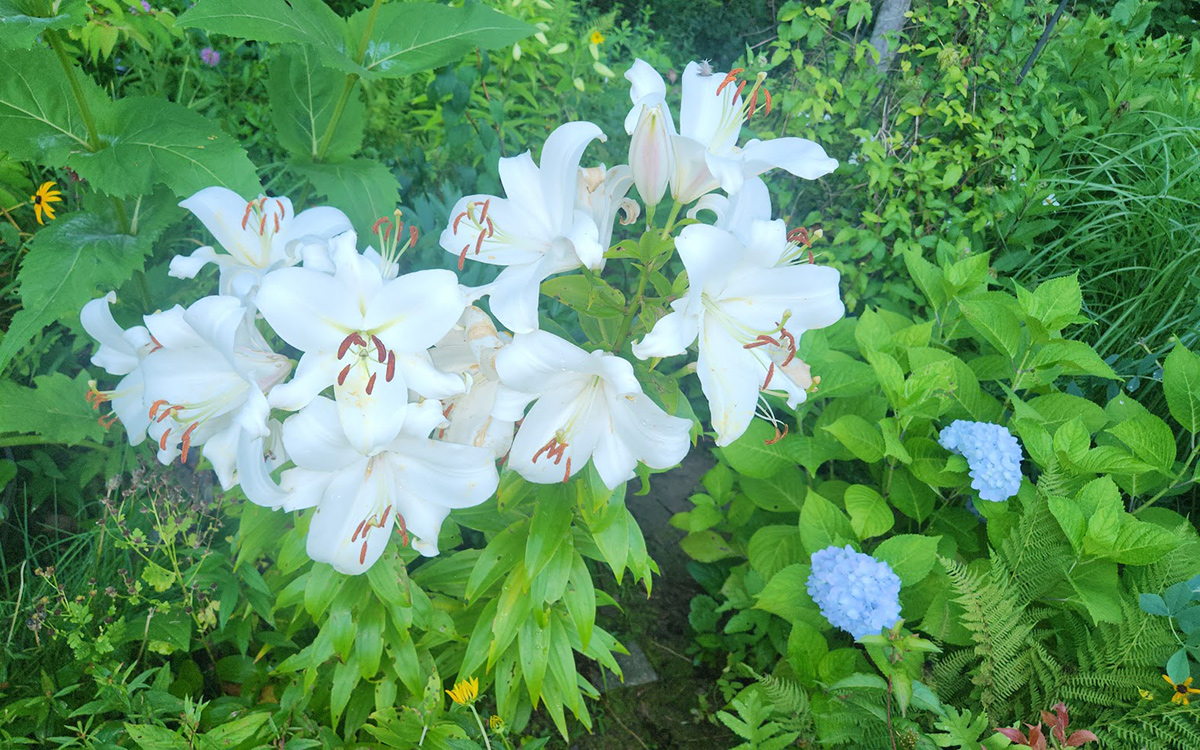
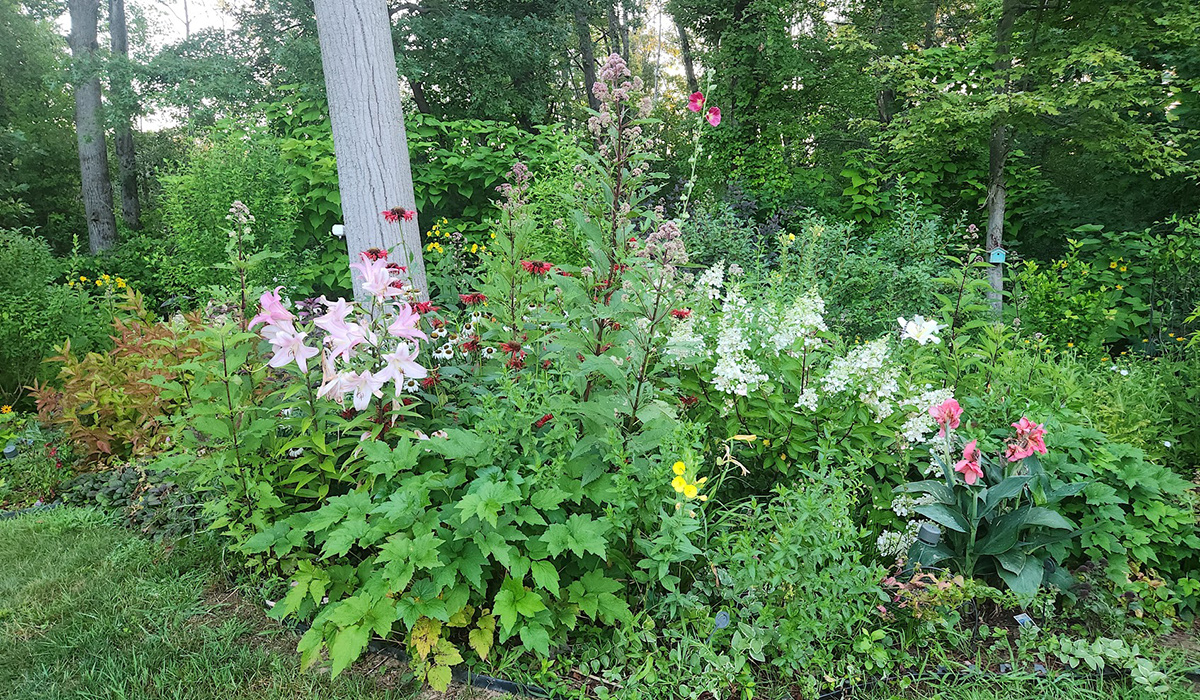
This photo epitomizes what Maxine calls a “kaleidoscope of colors.” Diverse foliage mixes and melds together, while a gorgeous array of pink, white, and yellow blooms adds layers of brightness.
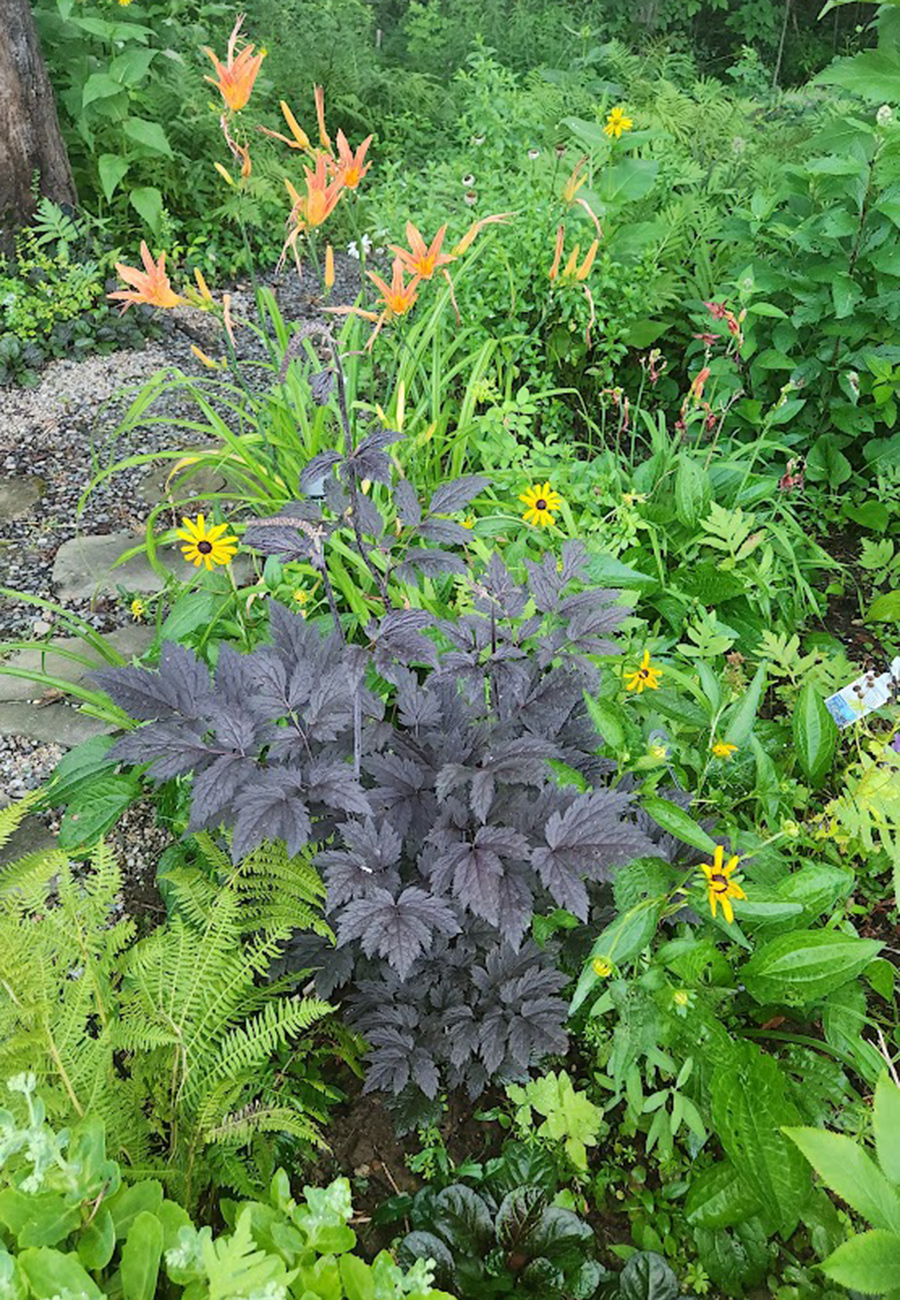
Not to be underestimated, leaves can also add some bold hues to a peak-season garden. This moody, black foliage appears to be that of a ‘Hillside Black Beauty’ black snakeroot (Cimicifuga ramosa ‘Hillside Black Beauty’, Zones 6–9). If so, later in the summer this plant will produce tall spires of fluffy white flowers.
In another part of the garden, the bright white blooms of a ‘Casa Blanca’ lily (Lilium ‘Casa Blanca’, Zones 5–8) glow with some baby blue bigleaf hydrangea blooms (Hydrangea macrophylla, Zones 6–9).
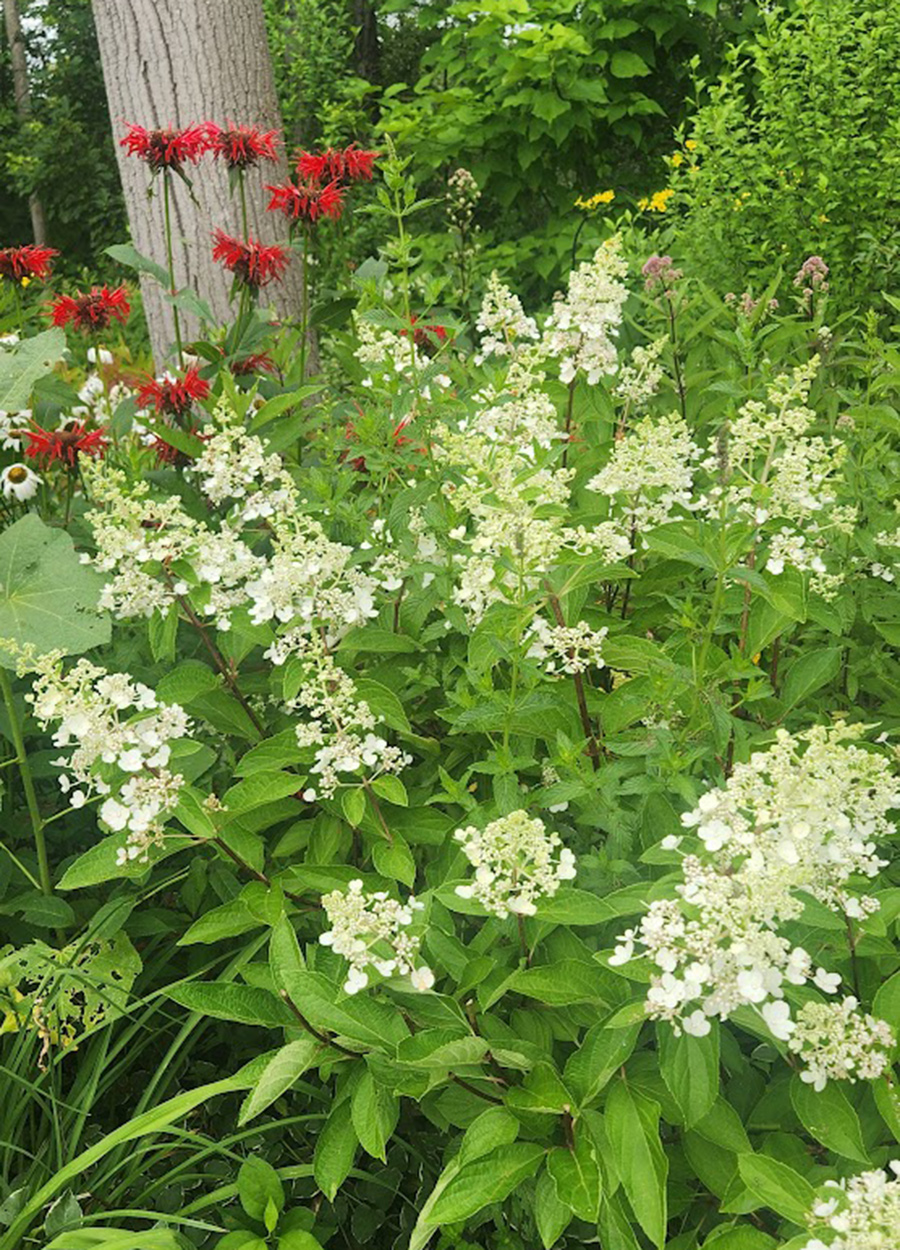
More hydrangeas, this time the panicle form (Hydrangea paniculata, Zones 3–8), created a flurry of white flowers in front of bright red bursts of bee balm.
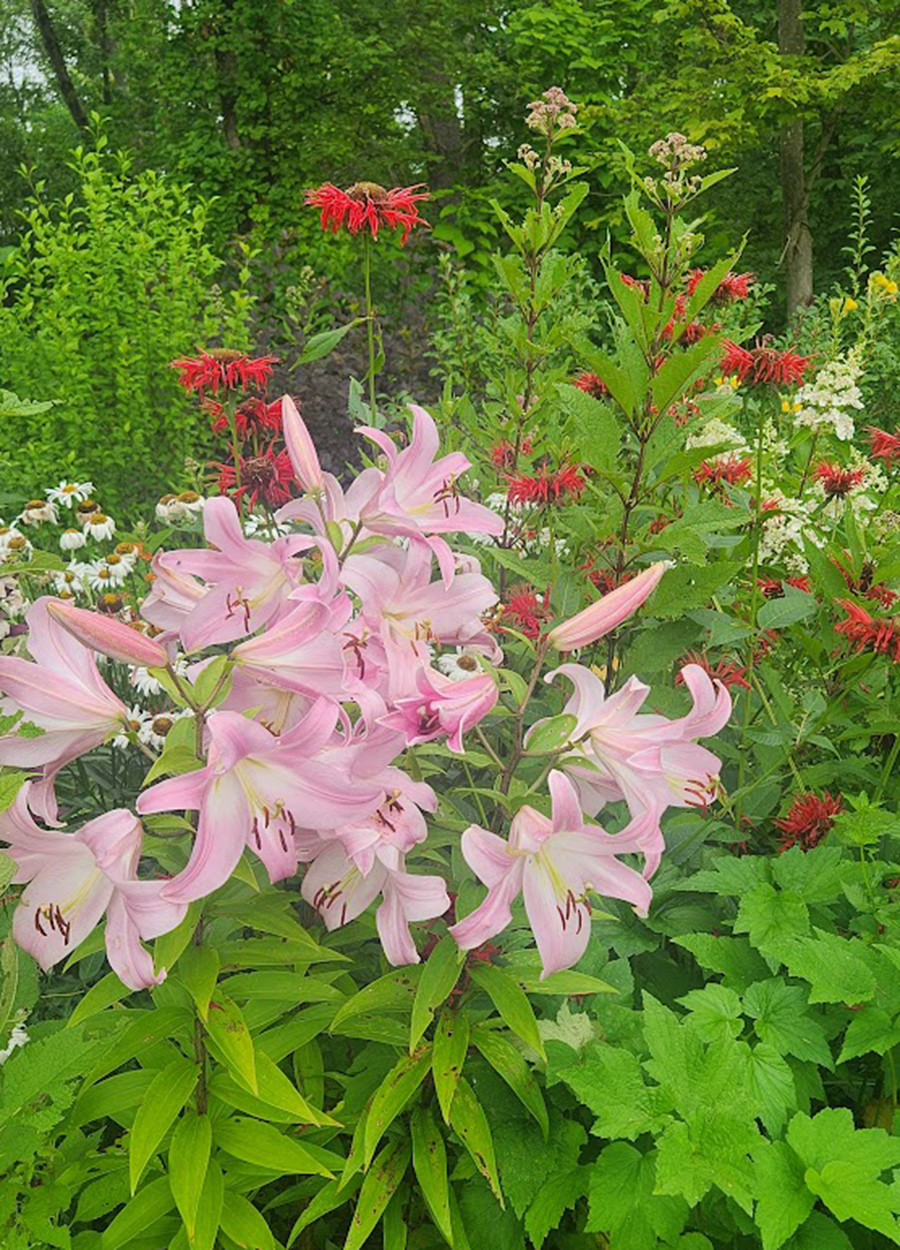
On the opposite side of the strawberry red bee balm, these light pink lilies are covered in big blossoms.
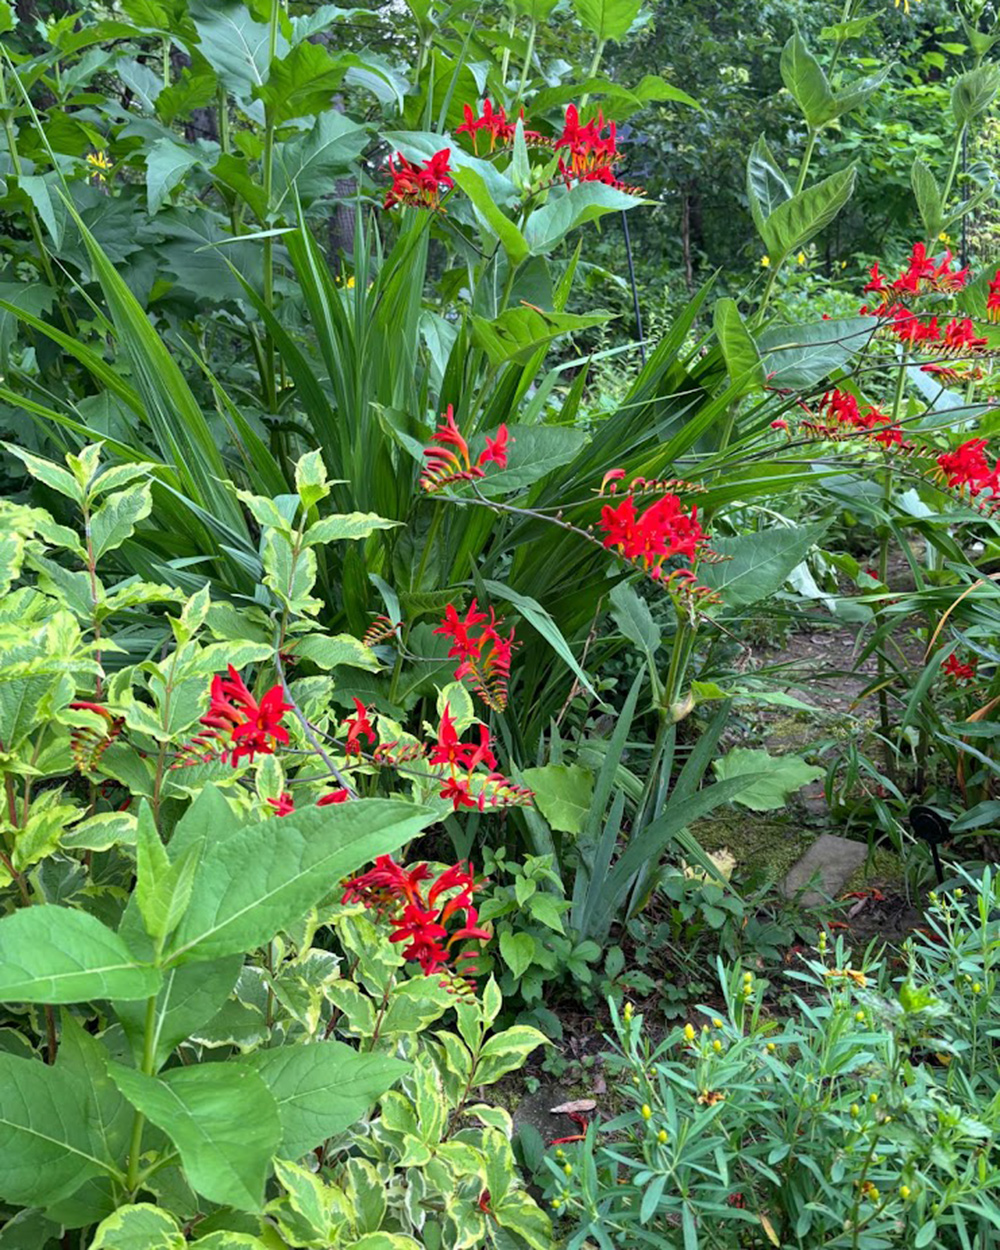
In a few months, red and green decor will signal the start of the holiday season, but right now these colors celebrate the heat of summer. Rich green foliage marries wonderfully with the bright blooms of ‘Lucifer’ crocosmia (Crocosmia ‘Lucifer’, Zones 6–9).
To keep the hot hues going, ‘Pieton’ lily (Lilium ‘Pieton’, Zones 3–8) and Shasta daisies (Leucanthemum × superbum, Zones 5–9) make for a cheerful combination in front of the golden foliage of a ‘White Gold’ bleeding heart (Lamprocapnos spectabilis ‘Tndicwg’, Zones 4–8).
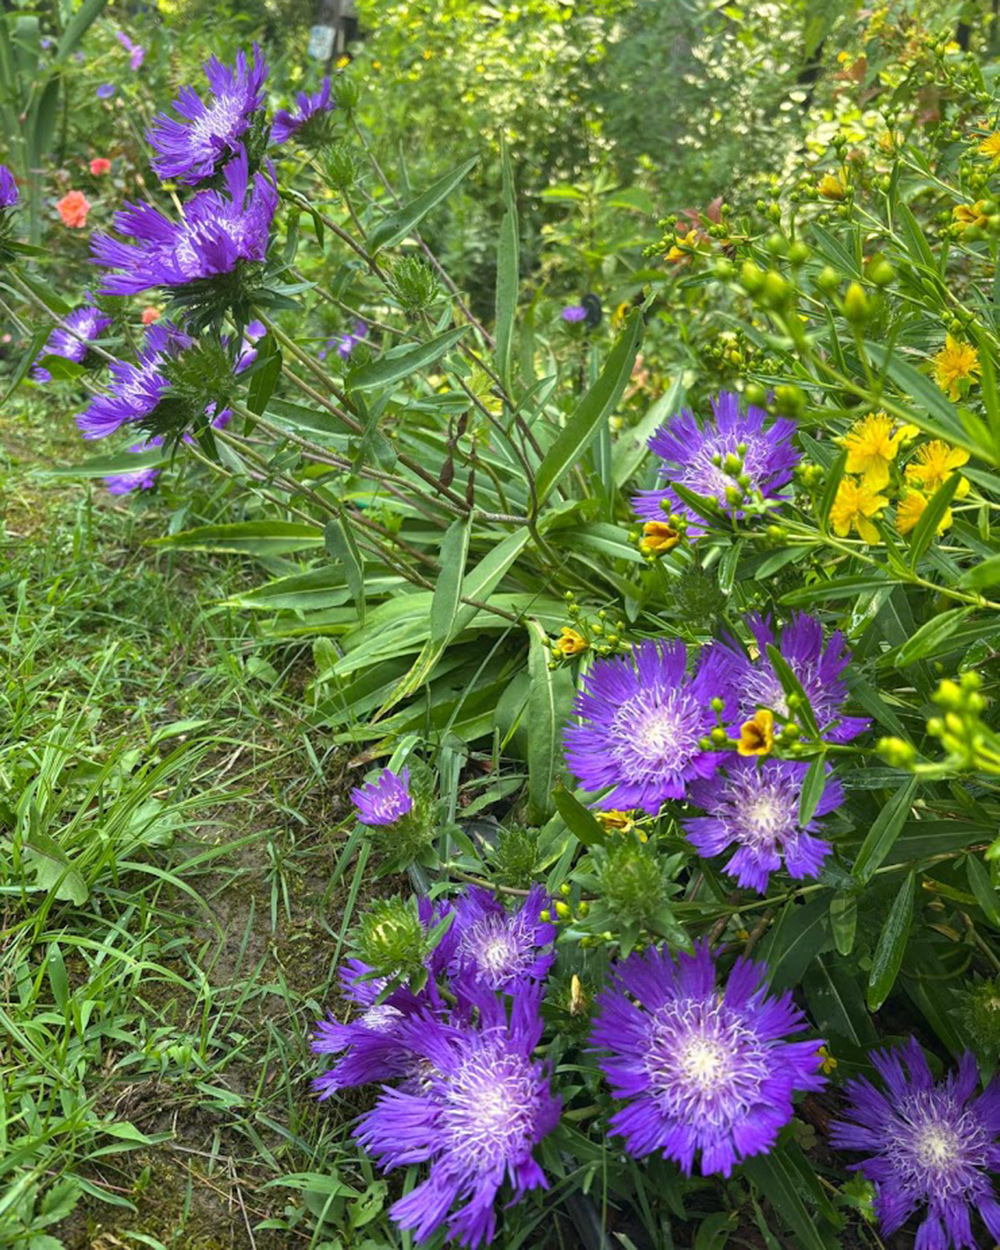
I absolutely adore that Maxine includes as many colors as possible in her garden. She hits every color in the rainbow, from the brightest reds to the vibrant purple of this Stokes’ aster (Stokesia laevis, Zones 5–9).
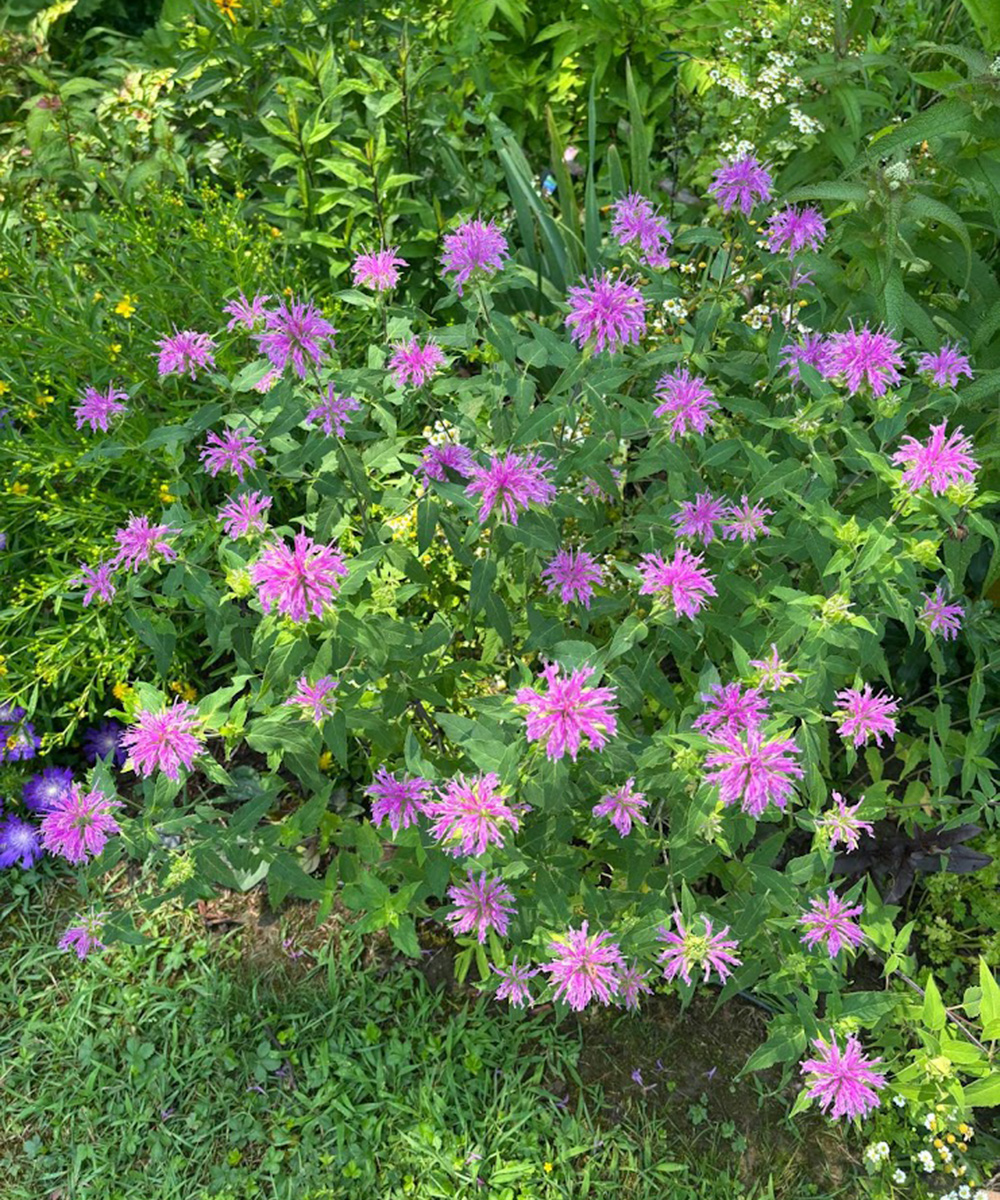
Lastly, alongside that Stokes’ aster is more bee balm to attract even more pollinators. This cultivar has produced an incredible number of blooms this year in a lovely shade of pink.
Just as she did for her early summer submission, Maxine sent a plethora of lovely scenes from her garden in midsummer. Check back in with Garden Photo of the Day tomorrow as we return to Rotterdam to see more!
We want to see YOUR garden!
Have photos to share? We’d love to see your garden, a particular collection of plants you love, or a wonderful garden you had the chance to visit!
To submit, send 5–10 photos to [email protected] along with some information about the plants in the pictures and where you took the photos. We’d love to hear where you are located, how long you’ve been gardening, successes you are proud of, failures you learned from, hopes for the future, favorite plants, or funny stories from your garden.
Do you receive the GPOD by email yet? Sign up here
Fine Gardening Recommended Products
ARS Telescoping Long Reach Pruner
Fine Gardening receives a commission for items purchased through links on this site, including Amazon Associates and other affiliate advertising programs.
Telescopes from 4 to 7′. Cut and Hold (160) Blades. Drop forged blades for unsurpassed long lasting sharpness. Lightweight, 2.3 lbs., for continued use. Perfectly balanced for easy pruning.
XLUX Soil Moisture Meter
Fine Gardening receives a commission for items purchased through links on this site, including Amazon Associates and other affiliate advertising programs.
– Large and clear dial, including ten scales, plug and read
– Simply insert the moisture meter into soil and you’ll get the test result instantly
– Single probe, less hurts to the roots, doesn’t dig up too much soil after test
SHOWA Atlas 370B Nitrile Palm Coating Gloves, Black, Medium (Pack of 12 Pairs)
Fine Gardening receives a commission for items purchased through links on this site, including Amazon Associates and other affiliate advertising programs.
Lightweight and close-fitting for excellent dexterity. Machine washable. Breathable back of hand to reduce perspiration. Designed for easy movement and continuous wear. Ideal for aerospace, assembly, automotive, construction, final fix, gardening, manufacturing, operating machinery, packaging, precision handling, tiling, warehousing.


")


