40.8 F
Klamath Falls
Saturday, March 14, 2026
Home Blog Page 100

17 Perennials that Bloom in Fall and Winter

0

As the day temperature drops and night gets colder, garden soil remains warm and it’s a sign that you still have chance to grow plants.

Perennials are plants that come back every year during the growing season. You don’t have to plant them annually.

Though most perennials prefer warmer temperatures to grow and bloom, there are few exceptions that can tolerate colder months.

In this write-up you’ll learn growing requirements of the perennial and optimal time to plant them.

While planting, plan for a mix of late-season bloomers and true winter-flowering perennials can carry the garden with blossoms, fragrance, and texture when most plants are dormant.

You don’t have to lose color when summer ends. Pick fall and winter bloomers—like hellebores, witch hazel, camellias, and cyclamen—to keep flowers, fragrance, and structure going when most plants are sleeping.

Plant about 6–8 weeks before your first hard frost. Focus on good drainage, add mulch to prevent frost heave, and group plants where they’ll get the right light and shelter. Prune at the right time, and enjoy blooms from late fall into early spring.

When to Plant Perennials to Bloom in Fall and Winter?

Fall is one of the best times to plant perennials because cooler air and warm soil reduce transplant stress and fuel strong root development before winter, setting plants up for better performance next season.

Aim to plant about 6–8 weeks before the first hard frost so roots establish while the ground is still workable; keep newly planted perennials watered if rainfall is sparse in autumn.

Early-blooming perennials often perform even better when planted in fall, and many shade perennials (such as hellebores) are ideally planted in cool weather, including fall and early spring.

17 Perennials That Bloom in Fall and Winter

While choosing perennials you must ensure the plants can thrive in shade or shorter days and should be able to tolerate colder winds.
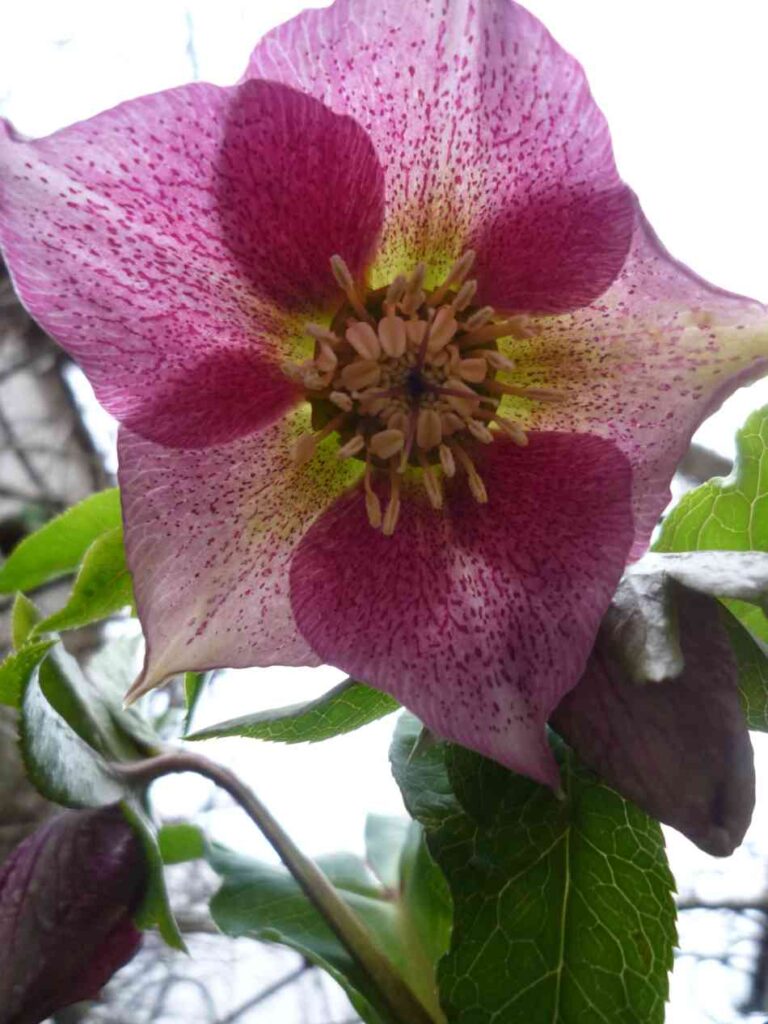
1. Hellebores

What To Do With Hellebores When Finished Flowering

Hellebores (Christmas/Lenten roses) bloom from winter to early spring with nodding flowers in white, green, pink, or deep purple. They’re hardy, mostly evergreen, and usually ignored by deer and rabbits.

Plant in partial to full shade in moist, well-drained, rich soil. Plant in cool weather (fall to spring), mulch, and water to establish. Expect blooms anytime from early winter to late spring, depending on climate. In late winter, remove old, ragged leaves so the flowers show better.
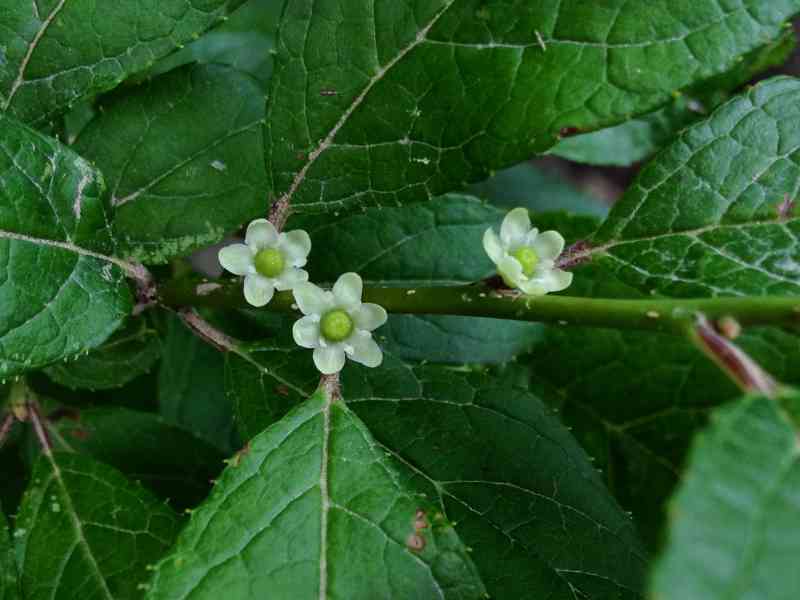
2. Witch Hazel

Witch hazel is a deciduous shrub or small tree that blooms in fall and winter with spidery yellow, orange, or red flowers, often sweetly scented on cold days. It’s low-maintenance and generally pest- and disease-resistant, adding rare midwinter color and fragrance.

Plant in full sun to partial shade in well-drained, moderately acidic soil. Give it room to spread and water during dry spells in the first year. Bloom time usually runs from late fall into winter, sometimes early spring, depending on species and climate.

3. Algerian Iris

Algerian iris (Iris unguicularis) forms neat clumps and sends up delicate, fragrant lilac flowers in late winter, brightening the garden when color is scarce. It’s low-maintenance and looks great near paths or patios where blooms can be enjoyed up close.

Grow in full sun to part shade in well-drained soil; avoid heavy, overly rich sites. Water to establish, then keep on the dry side in summer. Divide clumps when growth slows. Expect flowers in late winter into early spring, often during mild spells.

4. Camellia

Camellias are evergreen shrubs with glossy leaves and rose-like winter flowers in white, pink, or red. In mild climates, many varieties bloom from winter into spring, adding color and structure when most plants are bare.

Plant in partial shade with acidic, organic, moisture-retentive but well-drained soil. Protect from hot afternoon sun and drying winds, and mulch around the roots to keep them cool and moist. Bloom time varies by cultivar and climate, typically winter through spring; choose cold-hardy types if your winters are severe.

5. Cyclamen

Cyclamen produce butterfly-like flowers in pinks, reds, and whites above patterned leaves, blooming from fall through winter into spring. Some species suit garden beds; others shine in cool-season containers. They add welcome color under deciduous trees as leaves drop.

Plant hardy types in partial shade in well-drained, humus-rich soil. Water sparingly—tubers dislike soggy conditions—and keep summers on the dry side for good health. Bloom time varies by species and climate but typically runs from fall through early spring, with flushes during mild spells.

6. Winter Jasmine

Winter jasmine is a deciduous, arching shrub that brightens mid to late winter with cheerful yellow flowers on bare green stems, often blooming even during cold spells. It’s reliable on slopes, walls, or trellises for a cascading winter display.

Grow in full sun to part shade in average, well-drained soil. Water to establish, then it’s fairly drought-tolerant. Prune right after flowering to shape the plant and encourage new shoots that will bloom next winter. Expect flowers from winter into early spring, depending on local temperatures.

7. Winterberry Holly

Winterberry HollyWinterberry Holly

Winterberry (Ilex verticillata) has small summer flowers, but female plants shine in late fall and winter with bright red berries—provided a compatible male is nearby. The fruit offers bold seasonal color and valuable bird food, creating a “winter bloom” effect, especially striking against snow.

Plant in full sun to part shade in moist, acidic soil. Include at least one male within about 50ft for pollination. Berries set after summer bloom and often persist through winter, unless birds eat them. Choose cultivars with overlapping bloom times.

8. Hardy Viola

Many violas act as short-lived perennials in mild climates, providing cold-tolerant color into late fall and often through winter thaws, bouncing back repeatedly. They’re ideal for edging, window boxes, and containers that need winter cheer.

Grow in full sun to part shade with fertile, well-drained, consistently moist soil; deadhead to extend bloom. Expect repeated flushes from fall through winter into early spring in suitable climates.

9. Snowdrops

These bulbous perennials are among the earliest bloomers, pushing dainty white bells through frozen soil in late winter, bridging the gap to spring.

They naturalize beautifully in drifts beneath deciduous trees and shrubs where winter light reaches the ground.

Plant bulbs in fall in partial shade with well-drained, humus-rich soil; allow foliage to die back naturally after bloom to recharge bulbs. Bloom time is late winter to very early spring depending on climate.

10. Glory-of-the-Snow

Glory-of-the-snow are small bulbs that return yearly with starry blue, pink, or white flowers as winter recedes, thriving with minimal care and often spreading into cheerful carpets.

They’re durable, disease-resistant, and deer-resistant, perfect for naturalizing.

Plant in fall 2–3in deep in sun to partial shade with well-drained soil; avoid disturbance for best clump expansion. Flowering is typically very early spring, often overlapping the tail end of winter in milder climates.

11. Helleborus niger

A distinct hellebore species prized for blooming around December in mild years, Christmas rose bears pristine white flowers that can emerge in mid-winter or as soon as snow melts where winters are harsher.

It’s exceptionally cold-hardy and a mainstay for true winter bloom in shaded beds.

Grow in partial shade with moisture-retentive, free-draining soil; plant during cool weather and avoid feeding other perennials in fall while feeding hellebores as they grow actively in cool seasons.

Blooming occurs from early winter through late winter/early spring, varying by climate.

12. Black-eyed Susan

While best known as summer bloomers, many Rudbeckia selections carry flowers well into fall, extending color as nights cool, especially in prolonged mild autumns. They’re rugged, pollinator-friendly, and mix seamlessly with other late-season perennials.

Grow in full sun with average, well-drained soil; deadhead for extended bloom and leave some seedheads for birds and winter interest. Peak bloom is summer into fall, often lasting to frost in many regions.

13. Chrysanthemum

Mums are classic fall perennials, delivering dense mounds of daisies in every autumn shade and providing vital late nectar for pollinators.

Modern hardy garden mums, planted in the ground and allowed to root in summer, overwinter better and return reliably.

Plant in full sun with fertile, well-drained soil; pinch in early summer for bushier plants and plant hardy mums well before frost so they establish.

Blooming occurs in late summer through fall, often peaking in mid-to-late autumn.

14. Toad Lily

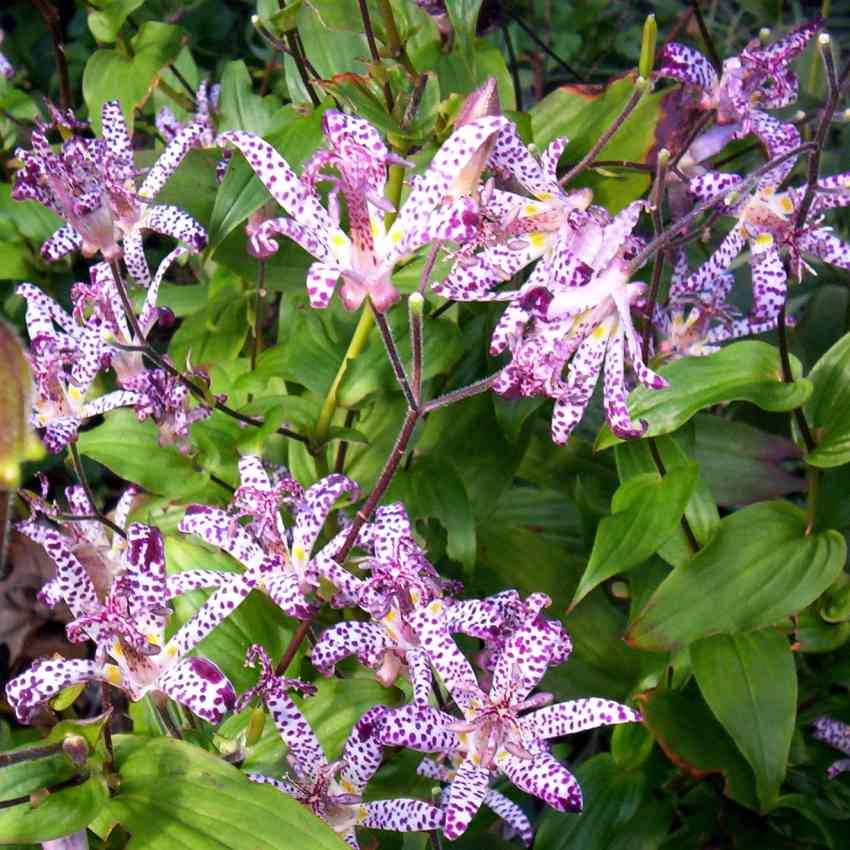
Toad lily brings orchid-like, speckled flowers to shade gardens just as many borders are winding down, with blooms appearing from late summer into fall and often lasting until frost in suitable climates.

Plants prefer consistently moist conditions and shine along woodland edges or shaded paths where their intricate flowers can be appreciated up close.

Plant in part to full shade in rich, well-drained soil that stays evenly moist; avoid dry sites and mulch to conserve moisture through late season.

Set divisions or nursery plants in spring or early fall to establish before freezing weather; expect flowering in late summer through fall, sometimes up to first frost depending on region.

15. Monkshood

MonkshoodMonkshood

Monkshood offers tall spires of saturated cobalt-blue flowers that peak in early to mid-fall, often October, providing strong color as nights cool.

Plants prefer full sun in cooler regions or dappled shade in warmer areas, with evenly moist, well-drained soil to avoid stress and flopping.

Plant in spring or early fall in moisture-retentive, well-drained soil; stake if exposed to wind, and wear gloves when handling because all parts are poisonous. Expect bloom late summer to mid-fall, with ‘Arendsii’ known for a particularly late and showy display in autumn borders.

16. Asters

Hardy asters carry the garden into fall with clouds of lavender-blue daisies that feed late pollinators and pair well with grasses and seedheads for seasonal texture.

They’re adaptable in full sun to part shade with average, well-drained soils and benefit from a midsummer pinch to reduce height and delay bloom for a longer fall show.

Plant in spring or fall in sunny, well-drained beds; water to establish, then allow average moisture, and deadhead lightly to tidy while leaving some seedheads for wildlife.

Flowering typically runs late summer through fall, often peaking as other perennials fade and persisting until frost.

17. Goldenrod

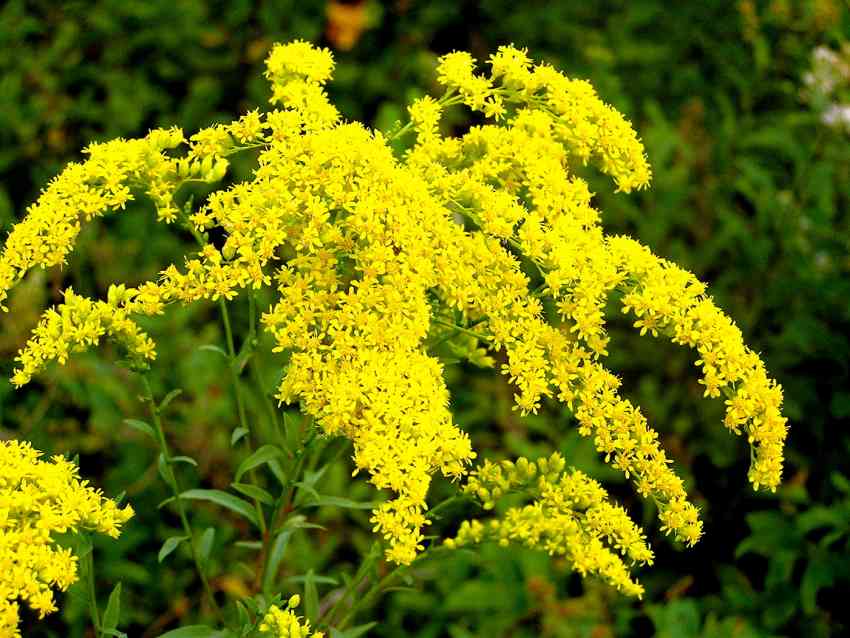
Modern goldenrod cultivars are compact, clump-forming, and explode with arching spires of golden-yellow flowers in late summer through fall, drawing diverse pollinators without causing allergies (ragweed is the usual culprit).

They tolerate varied soils and light from full sun to part shade, making them easy to weave into borders for autumn brightness.

Plant in spring or early fall in medium, well-drained soil; shear taller types by half in early June to keep plants compact and push bloom later into fall.

Expect a long fall display, with sprays holding color well into the season and combining beautifully with asters and grasses.

Planting and Establishment Tips

  • Time it right: Target 6–8 weeks before your local first hard frost so roots develop before the ground freezes.
  • Location and soil: Match sun/shade needs and ensure good drainage; most winter-flowering perennials dislike waterlogged soil.
  • Water and mulch: Water deeply at planting and during dry spells; mulch 2–3in to moderate soil temperatures and retain moisture.
  • Winter care: Some cool-season growers like hellebores benefit from planting and feeding during fall and early spring when they’re active.

Conclusion

A four-season garden is within reach by combining late-season bloomers like mums and Rudbeckia with true winter performers such as hellebores, witch hazel, winter jasmine, and early bulbs.

Planting perennials in fall leverages ideal root-building conditions and fewer pests so beds mature faster and bloom stronger when cold weather arrives.

With the right selections and timing, the garden can carry color, fragrance, and life from the first frosts through the heart of winter and into early spring

Congress looks to ease veterans’ use of health care outside of Veterans’ Affairs facilities : Shots

0

The Tibor Rubin Veteran Affairs Medical Center in Long Beach on Wednesday, July 31, 2019.

Scott Varley/MediaNews Group/Torrance Daily Breeze/Getty Images


hide caption

toggle caption

Scott Varley/MediaNews Group/Torrance Daily Breeze/Getty Images

WATERLOO, Iowa — John-Paul Sager appreciates the care he has received at Department of Veterans Affairs hospitals and clinics, but he thinks it should be easier for veterans like him to use their benefits elsewhere.

Sager, a Marine Corps and Army veteran, uses his VA coverage for non-VA treatment of back injuries stemming from his military service. But he said he sometimes must make several phone calls to obtain approval to see a local chiropractor. “It seems like it takes entirely too long,” he said.

Many veterans live hours from VA facilities, or they need health services that aren’t readily available from the VA. In such cases, the department is supposed to provide a referral and pay for private care. Some veterans’ advocates say it often hesitates to do so.

Republicans controlling Congress aim to streamline the process of obtaining what is known as community care.

Two Republican senators have introduced legislation that would make it easier for rural veterans to seek care at local hospitals and clinics. The proposals would build on VA community care programs that started under Democratic President Barack Obama and were expanded in Trump’s first term.

Critics worry that steering veterans to private care facilities drains federal money from the VA hospital and clinic system. But supporters say veterans shouldn’t be forced to travel long distances or wait months for the treatment they could obtain at local hospitals and clinics.

“My main concern is for veterans, not for the VA,” Sen. Kevin Cramer (R-N.D.) told KFF Health News. “I don’t believe we have an obligation to sustain the bureaucracy.”

John-Paul Sager, a veteran of the Marine Corps and Army, is treated for chronic back and shoulder pain by chiropractor Matt Gronewold in Waterloo, Iowa, on June 20, 2025. The Department of Veterans Affairs’ community care program pays for Sager’s treatments at Vanderloo Chiropractic Clinic in Waterloo.

John-Paul Sager, a veteran of the Marine Corps and Army, is treated for chronic back and shoulder pain by chiropractor Matt Gronewold in Waterloo, Iowa, on June 20, 2025. The Department of Veterans Affairs’ community care program pays for Sager’s treatments at Vanderloo Chiropractic Clinic in Waterloo.

Tony Leys/KFF Health News


hide caption

toggle caption

Tony Leys/KFF Health News

A 400-mile drive to a VA hospital

About 9 million veterans are enrolled in the VA health system. Last year, about 3 million of them — including 1.2 million rural veterans — used their benefits to cover care at non-VA facilities, according to data provided by the department.

Cramer sponsored a bill that would allow veterans who live within 35 miles of a rural, “critical access” hospital to use VA benefits to cover care there or at affiliated clinics without referrals from VA staff.

Cramer, who serves on the Senate Veterans’ Affairs Committee, noted his state has just one VA hospital. It’s in Fargo, on the state’s eastern border, which is more than 400 miles by car from parts of western North Dakota.

Many North Dakota veterans drive past multiple community hospitals to get to the VA hospital for treatment, he said. Meanwhile, many rural hospitals are desperate for more patients and income. “I kept thinking to myself, ‘This doesn’t make any sense at all,'” Cramer said.

Cramer said previous laws, including the VA Mission Act, made it easier for veterans to use their benefits to cover care at community hospitals and clinics.

But he said veterans still must fill out too much paperwork and obtain approval from VA staffers to use non-VA facilities.

“We can’t let the VA itself determine whether a veteran is qualified to receive local care,” he said.

U.S. Rep. Mark Takano of California, who is the top Democrat on the House Veterans’ Affairs Committee, said he sees the need for outside care for some veterans. But he contends Republicans are going overboard in shifting the department’s money to support private health care facilities.

The VA provides specialized care that responds to veterans’ needs and experiences, he argues.

“We must prevent funds from being siphoned away from veterans’ hospitals and clinics, or VA will crumble,” Takano said in a statement released by his office. “Veterans cannot afford for us to dismantle VA direct care in favor of shifting more care to the community.”

Protecting the VA

Some veterans’ advocacy groups have also expressed concerns.

Jon Retzer, deputy national legislative director for the Disabled American Veterans, said the group wants to make it easier for veterans to find care. Female veterans and veterans living in rural areas can have a particularly tough time finding appropriate, timely services at VA hospitals and clinics, he said.

But Disabled American Veterans doesn’t want to see VA facilities weakened by having too much federal money diverted to private hospitals and clinics.

Retzer said it’s true that patients sometimes wait for VA care, but so do patients at many private hospitals and clinics. Most delays stem from staff shortages, he said, which afflict many health facilities. “This is a national crisis.”

Retzer said Disabled American Veterans favors continuing to require referrals from VA physicians before veterans can seek VA-financed care elsewhere. “We want to ensure that the VA is the primary provider of that care,” he said.

Veterans Affairs Secretary Doug Collins has pledged to improve the community care program while maintaining the strength of the department’s hospitals and clinics. The department declined a KFF Health News request to interview Collins.

Marcus Lewis, CEO of First Care Health Center, which includes a hospital in Park River, North Dakota, supports Cramer’s bill. Lewis is a Navy veteran who uses the VA’s community care option to pay for treatment of a back injury stemming from his military service.

Overall, Lewis said, the community care program has become easier to use. But the application process remains complicated, and participants must repeatedly obtain VA referrals for treatment of chronic issues, he said. “It’s frustrating.”

Park River is a 1,400-person town about 50 miles south of the Canadian border. Its 14-bed hospital offers an array of services, including surgery, cancer care, and mental health treatment. But Lewis regularly sees a VA van picking up local veterans, some of whom travel 140 miles to Fargo for care they’re entitled to receive locally.

“I think a lot of folks just don’t want to fight the system,” he said. “They don’t want to go through the extra hoops, and so they’ll jump in the van, and they’ll ride along.”

Rep. Mike Bost (R-Ill.), chairman of the House Veterans’ Affairs Committee, said veterans in some areas of the country have had more trouble than others getting VA approval for care from private clinics and hospitals.

Bost helped gain the House’s approval for Trump’s request for $34.7 billion for the community care program in 2026. Although spending on the program has gone up and down in recent years, the appropriation represents an increase of about 50% from what it was in 2025 and 2022. The Senate included similar figures for next year in its version of a military spending budget that passed Aug. 1.

Bost also co-sponsored a House bill that would spell out requirements for the VA to pay for community care.

John-Paul Sager developed chronic back and shoulder pain during his military service, including his role as an Army drill sergeant at Fort Sill, Oklahoma, where he took this photo in 2014.

John-Paul Sager developed chronic back and shoulder pain during his military service, including his role as an Army drill sergeant at Fort Sill, Oklahoma, where he took this photo in 2014.

John-Paul Sager


hide caption

toggle caption

John-Paul Sager

Sager hopes the new proposals make life easier for veterans. The Gulf War veteran lives in the northeastern Iowa town of Denver. He travels about 15 miles to Waterloo to see a chiropractor, who treats him for back and shoulder pain from injuries he suffered while training Saudi troops in hand-to-hand combat.

Sager, who remains active in the Army Reserve, also visits a Waterloo outpatient clinic run by the VA, where his primary care doctor practices. He appreciates the agency’s mission, including its employment of many veterans. “You just feel like you’re being taken care of by your own,” he said.

He believes the VA can run a strong hospital and clinic system while offering alternatives for veterans who live far from those facilities or who need care the VA can’t promptly provide.

The local VA doesn’t offer chiropractic care, so it pays for Sager to visit the private clinic. But every few months, he needs to obtain fresh approval from the VA. That often requires several phone calls, he said.

Sager is one of about a dozen veterans who use the community care program to pay for visits at Vanderloo Chiropractic Clinic, office manager Linda Gill said.

Gill said the VA program pays about $34 for a typical visit, which is comparable to private insurance, but the paperwork is more burdensome. She said leaders of the chiropractic practice considered pulling out of the VA program but decided to put up with the hassles for a good cause. She wishes veterans didn’t have to jump through so many hoops to obtain convenient care.

“After what they’ve done for us? Please,” she said.

KFF Health News is a national newsroom that produces in-depth journalism about health issues and is one of the core operating programs at KFF.

How to Plant and Grow Chantenay Carrots

0

Daucus carota sativus ‘Chantenay’

Sometimes a garden presents you with an unexpected reason to rejoice.

Usually that’s a flower – an unanticipated crocus blooming in the snow, or a crape myrtle, presumed dead, sending up fresh growth.

But my personal favorite garden surprise involved vegetables, during the first season I grew ‘Chantenay’ carrots.

A close up horizontal image of Chantenay carrots growing in the garden ready for harvest.A close up horizontal image of Chantenay carrots growing in the garden ready for harvest.

We link to vendors to help you find relevant products. If you buy from one of our links, we may earn a commission.

That fall, I was racing home late for the board game night our family was hosting. I fretted that I wouldn’t even have time to get a frozen lasagna in the oven before the guests arrived.

Pulling into the driveway, I noticed a freshly dug spot in one of my container gardens. Entering the house, I heard laughter, and saw young friends happily munching.

In their hands were sunset-hued sticks of carrot, unpeeled, and unadulterated with dip or dressing. My daughter Frances had remembered my little container plot of ‘Chantenay.’

I’ve grown many more of these special gems since then. To this day, they remind me of friendship and offer unexpected rewards from seeds planted long ago.

You might like this variety, too. I’m excited to describe its many advantages, and let you in on all the best ways to grow this carrot that’s red to the core.

Keep reading, and here’s what I’ll cover:

With the botanical classification Daucus carota subsp. sativa, these conical carrots taper to a blunt point.

The original cultivar, ‘Chantenay Red Cored’ comes to us from the Chantenay region of France.

Quick Look

Common name(s): Chantenay carrots

Plant type: Biennial root vegetable

Hardiness (USDA Zone): 3-10

Native to: Eurasia

Bloom time / season: Spring and fall

Exposure: Full sun

Soil type: Sandy, loamy, well-draining

Soil pH: 6.0-6.8, slightly acidic

Time to maturity: 65-70 days

Spacing: 6 seeds per inch when planting, 2 inches after thinning

Planting depth: 1/4 inch (seeds)

Mature size: 1-2 inches wide x 8-18 inches high

Water Needs: Medium

Taxonomy

Order: Apiales

Family: Apiaceae

Genus: Daucus

Species: Carota sativus

Cultivars: Chantenay Red Core, Royal Chantenay

There is debate about when it debuted, but most experts agree it was towards the end of the 1800s. Ferry Morse began selling this variety in 1930.

Crunchy and sweet at maturity, these medium to bright orange roots have smooth, firm skin.

They offer a feast for the eyes when you cut them open, with red cores in sunset hues.

A Minneapolis outfit, Northrup King and Company, released a separate cultivar called ‘Royal Chantenay’ in 1952.

It produces slightly better yields, taller tops, and longer roots, which are five to seven inches at full size.

In its more distant past, like all the root vegetables we know as Daucus carota sativus today, ‘Chantenay’ origins extend back to Eurasia.

A close up horizontal image of a hand from the bottom of the frame holding up a bunch of freshly harvested 'Chantenay' carrots on a blue sky background.A close up horizontal image of a hand from the bottom of the frame holding up a bunch of freshly harvested 'Chantenay' carrots on a blue sky background.

This type, like the others produced in the US today, is biennial, with a two-year life cycle.

If no one pulls them up to eat, it’s likely the plants will overwinter and then use that sugar stored in the roots to bloom the following year.

You can browse more options in our guide to the best carrot cultivars. But if this one sounds appealing, let’s get it growing in your garden!

How to Sow

These root vegetables grow just four and a half to six inches long, so you have more places to plant them than you would if you were growing longer varieties like ‘Nantes’ or ‘Imperator.’

They require a soil depth of seven inches or so, not the 10 to 12 inches minimum that others demand.

A close up horizontal image of a seedling growing in the garden.A close up horizontal image of a seedling growing in the garden.

That means you could plant ‘Chantenay’ in raised beds, even those that are lined with plastic or another material, as long as they’ll have six or seven inches of soil available to set down roots.

These are also a great choice for growing in planters or even indoors.

Ideally, you should sow the seeds in sandy or loamy soil.

They can handle soil that’s a bit on the heavier side, but you’ll risk forked roots and a terrible taste, so it’s better to plant them in soil that drains well.

Also make sure to amend it with plenty of composted organic matter and get rid of any pebbles or other detritus. The roots will go all wonky if they hit resistance in the soil.

Like all carrots, they’ll need a soil pH of 6.0 to 6.8 and full sun to thrive, but they can tolerate part shade.

This is good to know if you’re tucking them into odd spots in an edible container garden or have just a little extra space below one of their good companions, like peas, peppers, or love-in-a-mist.

For the best yields, plant some in a garden spot where they’ll receive at least six hours of sunlight each day.

Only sow the seeds directly in the garden or their final container, instead of trying to start them indoors. The roots really don’t like being disturbed, so transplanting is out!

While I am usually a bit stubborn about the waste involved in sowing too many seeds and then thinning later, in the case of carrots, it’s an absolute necessity. Even ‘Royal Chantenay,’ with its standout yields, often has spotty germination.

A close up horizontal image of a pile of Chantenay carrots freshly harvested and cleaned.A close up horizontal image of a pile of Chantenay carrots freshly harvested and cleaned.

Since they take between 14 and 25 days to sprout, you lose several weeks of the growing season if you don’t sow enough and some of them fail to germinate.

I usually sow about six seeds per inch, in rows eight inches apart.

Sow seeds a quarter of an inch deep, covered with a light growing medium like commercial seed-starting mix or a couple of handfuls of loam mixed half and half with vermiculite.

After sowing, water lightly, using the gentle nozzle on the garden hose, or even a clean plastic spray bottle set to “fine mist.”

It’s important to keep that soil moist but not soggy until you see sprouts. If the growing medium becomes dry and forms a crust, the seedlings won’t be able to power through it.

When germination conditions are too soggy, the seeds might rot instead of sprouting, or they may wash away in the next rain.

Next I’ll share some more tips to guide you for the couple of months required between sowing and harvest. Spoiler alert: Thinning is essential, so expect some nagging about that.

How to Grow

After the seeds sprout and the tops grow a couple of inches, your focus will shift from just keeping the top inch or so of soil moist to making sure the plants receive ample water.

These crunchy vegetables are not at all drought tolerant!

A close up horizontal image of a pile of 'Chantenay' carrots freshly harvested in a pile on the soil surface.A close up horizontal image of a pile of 'Chantenay' carrots freshly harvested in a pile on the soil surface.

Supplement with at least an inch of water per week during the early summer in the absence of rain.

‘Chantenay’ grows best when the temperature stays between 60 and 70°F. Try to only sow seeds when your crop will have plenty of time to mature before temperatures soar above that range in your area.

Consider mulching to help retain moisture and suppress weeds. Carrots don’t grow as well when they have to compete for nutrients or sunlight, particularly in their first few weeks of life.

Even when they’re older, you risk damaging the young roots if you have to pull nearby weeds. It’s more effective to mulch and prevent them from sprouting in the first place.

A close up horizontal image of rows of 'Chantenay' carrots growing in the garden.A close up horizontal image of rows of 'Chantenay' carrots growing in the garden.

Apply just an inch or so of mulch between the plants and the rows several times throughout the growing season.

Another absolute must: Thinning. Crowded carrots will produce crooked roots. They may look cute on social media memes, but I find they tend to taste terrible.

When the tops reach two inches tall, thin them to stand an inch apart.

Use scissors or a sharp knife and cut the ones you’re removing at the soil line. You don’t want to pull them up, because you may damage or disturb the seedlings you’re trying to keep in the process.

When the greens reach three or four inches, thin again. This time your aim is two-inch spacing.

If you’re careful, you can uproot the carrots using the tops as a handle on this second go ‘round. At that age, they may have already produced tiny carrots you can eat!

They won’t be as sweet or crunchy as the mature versions, but they’re fun as sort of a preview of the delicious harvest to come.

Turn to our complete guide to growing carrots for more tips on improving the yield and flavor of ‘Chantenay’ and other varieties.

Where to Buy

These carrot seeds are readily available. You’ll want enough of them to succession sow every three weeks until the weather becomes too warm, and again in the late summer for an autumn or early winter harvest.

A close up square image of 'Chantenay Red Cored' set on a wooden surface.A close up square image of 'Chantenay Red Cored' set on a wooden surface.

‘Red Cored Chantenay’

You can find various sizes from a modest packet to a one-pound sack of ‘Red Cored Chantenay’ seeds available at Eden Brothers.

A close up square image of a pile of freshly harvested 'Royal Chantenay' carrots in a pile with tops still attached. To the bottom right of the frame is a white circular logo with text.A close up square image of a pile of freshly harvested 'Royal Chantenay' carrots in a pile with tops still attached. To the bottom right of the frame is a white circular logo with text.

‘Royal Chantenay’

Find ‘Royal Chantenay’ seeds in a variety of packet sizes available at True Leaf Market.

Pests and Disease

We’ll discuss pests first.

Pests

They may have red cores and sure, they’re sort of short, but ‘Chantenay’ are still carrots – and that means the pests that do the most damage attack at the roots.

A close up horizontal image of a gloved hand from the left of the frame holding a carrot suffering from disease.A close up horizontal image of a gloved hand from the left of the frame holding a carrot suffering from disease.

Carrot rust flies (Psila rosae), for example, are destructo-demons. They look like small green house flies, only their heads are yellow and they always have red eyes.

They aggressively attack the plants by laying eggs where the crown meets the soil. When their larvae hatch, they tunnel into the roots and turn them red.

You can tell they’ve struck if the leaves begin turning black.

Other pests that strike below the soil include wireworms and carrot weevil larvae.

You may be able to prevent trouble by covering the tops and the surrounding soil with a floating row cover, especially in the first 30 days when the plants are at their weakest.

The cover should bar rust flies, leafhoppers, and flea beetles. And unless you’re trying to encourage seed production in the second season, you can leave the row cover in place except to weed or harvest.

Read more about carrot pest identification and control.

Disease

As for diseases, leaf blight is the most common. It begins on the edges of the leaves, establishing white or yellow spots that become brown and look watery.

You should also watch out for aster yellows disease, which stunts the tops and causes hairy roots.

Pests spread aster yellows as they flit or jump from plant to plant in search of food. Leafhoppers are a prime offender, and the disease they spread can overwinter to hit next year’s veggie bed, too.

Bacterial soft rot, cercospora leaf blight, downy mildew, and powdery mildew round out the list of the most common diseases you may encounter with your crop.

Learn how to identify and control carrot diseases here.

Harvesting 

It usually takes about 65 to 70 days for the roots to be ready, but add extra time if you’re growing during chillier fall temperatures.

Look for orange showing above the soil line to determine if they’re wide enough to pull. They should be two to two and a half inches in diameter.

A close up vertical image of a hand from the top of the frame pulling up a 'Chantenay' carrot from the garden pictured in light filtered sunshine.A close up vertical image of a hand from the top of the frame pulling up a 'Chantenay' carrot from the garden pictured in light filtered sunshine.

If you can’t see the shoulders, you may have to pull one or two to be able to gauge their size.

Happily, you can eat any that are just a little immature, as a tasty preview of what you can expect.

Be sure to pull carrots the day after it rains, or create your own moist soil by irrigating 24 hours ahead of time. You may need a garden fork to loosen the soil around them, too.

Then it’s just a matter of heave ho, uprooting them one by one.

When you plant them to mature in fall and early winter, it’s also possible to store these vegetables in the ground.

The idea is to protect them from frost and pull only those you need, but also to have them all collected by the time the ground freezes.

If you live in an area where winters are mild, you may be able to keep a supply in the ground until early spring, though the tops will die off.

Do make sure to get them up before they sprout for a second season, though. Once they “bolt” and prepare to flower, the roots won’t taste good at all.

For more details on harvesting ‘Chantenay’ and other carrot cultivars, check out our guide.

Storage

While carrots “bunched” with their tops are quite appealing, leave that approach to the food stylists.

The greens may look pretty, but they’ll sap all the moisture from the roots before you have a chance to eat them.

A close up horizontal image of a pile of 'Chantenay' carrots.A close up horizontal image of a pile of 'Chantenay' carrots.

Before storing, immediately brush off any loose dirt. Then, twist or cut the tops to within an inch of the spot where they meet the root.

Store them unwashed in a cotton produce bag in the fridge. You can use zip-top plastic bags instead, but prick a few air holes in it first with the tines of a fork.

This variety is a good keeper. It will stay fresh at 32 to 40°F and 95 percent relative humidity for six to eight weeks. Ordinarily, you’ll find those conditions in your vegetable crisper.

Preserving

With its rich hues, ‘Chantenay’ is a good choice for preserving. I particularly like the way it looks sliced into thin, colorful coins to dehydrate and add to soup mixes.

Other methods include pickling, fermenting, freezing, or dehydrating.

You can also find a recipe for homemade carrot habanero butter to freeze or water bath can in our guide to growing ‘Danvers’ carrots!

Cooking Ideas

Baby food, juice, coleslaw, stew, cake, muffins – there is a seemingly endless parade of dishes this carrot variety will make more delicious.

They provide the perfect sweet-crisp complement to spicy appetizers like cheesy jalapeno black bean dip. Find the recipe on our sister site, Foodal.

A close up horizontal image of a black bean jalapeno dip served with fresh corn chips.A close up horizontal image of a black bean jalapeno dip served with fresh corn chips.
Photo by Meghan Yager.

The red core and deep orange flesh also gives you an extra incentive to use this type as an ingredient in spreads, purees, or soups.

In addition to being a bit sweeter than a lot of other varieties, the color is something special.

Shan’t Plant Again Without Chantenay

I’ve become sort of attached to ‘Chantenay,’ sentimental sort that I am.

A close up horizontal image of a row of 'Chantenay' carrots growing in the garden.A close up horizontal image of a row of 'Chantenay' carrots growing in the garden.

What about you? Do you have experience with this fairly short, red-cored cultivar? Let us know in the comments section below!

And for more information about growing carrots in your vegetable garden, check out these guides next:

Peanut Chicken Wraps Recipe

0


Peanut Chicken Wraps Recipe


Privacy & Cookies Policy

Carla’s Late June Flowers and Foliage

0

Happy Friday, GPODers!

We’re back in the endlessly enjoyable garden of Carla Zambelli Mudry in Malvern, Pennsylvania, today to catch up on the top performers from her early summer garden. In case you’ve missed it, Carla has been giving us a detailed look at the various plants that steal the show throughout the rapidly changing growing season. She started with the earliest blooms of the year (Carla’s Early Spring Flowers Part 1 and Part 2) and continued with updates right up to the end of spring and first tastes of summer (Carla’s Garden in June). Today she’s picking up where she left off with a look at the new plants that pop up at the end of June.

June is another month of daily surprises—every day, new blooms and wonderment of how lucky I am to have a garden. We had another week of crazy summer storms, and fortunately my garden came through with minimal damage . . . this time. I still have more planting to do, and I have been waging war with weeds. Today when I was taking these photos, I had a few instances of “I forgot I planted that!”

When the lilies begin to bloom, you know that summer has arrived. This dreamy variety is a spectacular mix of pink and yellow, potentially the cultivar ‘Forever Summer’ (Lilium ‘Forever Summer’, Zones 4–9).

Spigelia marilandicaCarla’s woodland garden is full of big blooms and ornamental classics, but there are also plenty of native plants in the mix. Indian pink (Spigelia marilandica, Zones 5–9) is a North American native that blooms in June, thrives in shade, and is the perfect complement to Carla’s other pink and red flowers.

large strawberry red daylilySpeaking of pink and red flowers, this ruffled daylily is a scrumptious shade of strawberry red.

bright red strawflowerWhen looking for annuals, we all want plants that will go the distance and give us the biggest bang for our buck. Strawflowers (Xerochrysum bracteatum, Zones 8–10 or as an annual) are always a no-brainer for me. Their bright blooms are an incredible addition to containers all summer long and will keep kicking into fall. However, the strawflower show doesn’t need to end there. Also known as “everlasting flower,” these blooms are very popular in the dried flower market because they retain their color after drying. Saving some of these blooms at the end of the year to dry gives you endless decor options right through winter.

shade garden with lots of foliage plantsFlowers might be the summer garden’s gems, but lush foliage is the precious metal that links all those shimmering beauties together. In Carla’s woodland garden, a mixture of fantastic foliage plants is integral to her landscape.

dark foliage with bright foliageWhile hostas are always an easy choice, Carla collects a range of diverse foliage to mix colors, textures, and forms for fascinating vignettes.

angel statue in front yard garden bedIn Carla’s last submission, she showcased some of her hydrangea and clematis collections, and as the month continued on, their colorful performance kept up.

red and green foliageEven more foliage giving Carla’s gorgeous blooms a run for their money: Flame Thrower® Eastern redbud (Cercis canadensis ‘NC2016-2’, Zones 5–9) gives a fall-like display of color from spring through summer, before transforming entirely to yellow in autumn.

hydrangea with white flowers next to dark red Japanese mapleHowever, the best displays are when flowers and foliage work together to create something spectacular. White hydrangea blooms are made brighter in contrast to the deep burgundy/purple laceleaf maple.

Thank you so much for another incredible update on your garden, Carla! The evolution your plants go through, from the earliest days of spring blooms to the first snowfall, is absolutely incredible, and the surprises along the way are just the cherry on top.

How do flowers and foliage work together in your garden? Do you have a woodland garden where foliage glows, like Carla? Or is foliage the anchor that keeps your flowers looking fresh in the bright sun? Consider sharing your garden highlights with the blog! Follow the directions below to submit photos via email, or send me a DM on Instagram: @agirlherdogandtheroad.


We want to see YOUR garden!

Have photos to share? We’d love to see your garden, a particular collection of plants you love, or a wonderful garden you had the chance to visit!

To submit, send 5–10 photos to [email protected] along with some information about the plants in the pictures and where you took the photos. We’d love to hear where you are located, how long you’ve been gardening, successes you are proud of, failures you learned from, hopes for the future, favorite plants, or funny stories from your garden.

Have a mobile phone? Tag your photos on Facebook, Instagram, or Twitter with #FineGardening!

Do you receive the GPOD by email yet? Sign up here

He built Michigan’s Medicaid work requirement system. Now he’s warning other states : Shots

0

An attendee holds a “Stop The Health Care Cuts” sign on June 6 at a Democratic town hall in Lansing, Mich. In July, Congressional Democrats failed to stop Republicans from passing a tax-and-spending bill that requires 40 states and D.C. to institute Medicaid work requirements.

Emily Elconin/Bloomberg via Getty Images


hide caption

toggle caption

Emily Elconin/Bloomberg via Getty Images

It was March 2020, and Robert Gordon was about to kick some 80,000 people off health insurance.

As the Michigan state health director, he had just spent the past year, and some $30 million in state tax dollars, trying to avoid doing that very thing.

Gordon was a Democrat, a veteran of the Obama administration, and he didn’t want people to lose the coverage they had recently gained through the Affordable Care Act.

But Gordon and his boss, Democratic governor Gretchen Whitmer, had reluctantly inherited a law passed two years earlier, when Republicans led the state. And that law mandated that Michigan institute work requirements for Medicaid on January 1, 2020.

Gordon and his team managed to determine that most enrollees were already meeting the law’s requirements, either because they were already working or had an exemption. Thousands more reported their status through the newly-built phone and online systems.

But even so, estimates suggested between 80,000 and 100,000 Michiganders were going to be booted off the rolls within the year.

“That’s the population of the city of Flint who were on track to lose their insurance,” said Gordon, who led the state health department until 2021. “We’re implementing this about as well as this thing can be implemented, and it is still going to be pretty catastrophic.”

The new tax-and-spending law signed by President Trump in July will mandate a vast expansion of Medicaid work requirements to most states.

These systems will lead to 4.8 million more people becoming uninsured by 2034, according to estimates from the Congressional Budget Office.

The law applies to 40 states and the District of Columbia, because they expanded Medicaid in recent years to cover more working-age adults.

About 18 million people will be affected once the work mandate is fully implemented nationally. Starting in 2027, they will need to prove they’re working, volunteering or getting job training at least 80 hours a month, in order to keep their coverage.

Robert Gordon, then Michigan's health director, speaks in Lansing in a Dec. 18, 2020 file photo provided by the Michigan Office of the Governor.

Robert Gordon, then Michigan’s health director, speaks in Lansing in a Dec. 18, 2020 file photo provided by the Michigan Office of the Governor.

Michigan Office of the Governor via AP/Michigan Governors Office


hide caption

toggle caption

Michigan Office of the Governor via AP/Michigan Governors Office

Republicans say this is a common-sense way to weed out “freeloaders.” Democrats argue that’s just political cover for slashing a program that saved some 27,000 lives between 2010 (when the Affordable Care Act passed) and 2022.

The number of people who lose coverage, either temporarily or permanently, could vary fairly widely by state, depending on how each state implements and maintains their reporting systems.

Michigan’s experience illustrates how challenging it can be to stop large numbers of people from inadvertently losing coverage, even when leaders try their best to prevent that.

“We were very committed to implementing a law that we didn’t agree with, in a way that reduced the number of people who lost insurance, just because the government screwed something up,” Gordon said.

A year’s worth of high-stakes work 

In 2013, then-Governor Rick Snyder, a Republican, waged a fierce battle within his own party to expand Michigan’s Medicaid program.

To Snyder, it was an opportunity to simultaneously save money and expand access: by slashing the rate of uninsured Michiganders almost in half, the state could reduce the burden of uncompensated care on the health system, and boost the economy by improving the physical health of the workforce.

But opponents saw it as an expansion of “Obamacare” that would shift massive new costs onto federal taxpayers. Work requirements became a point of compromise, and a way for Snyder to mollify some of that opposition.

Michigan Gov. Rick Snyder holding up legislation to expand Medicaid eligibility to more low-income adults. The signing ceremony took place at Oakwood Hospital in Dearborn, Mich. on Sept. 16, 2013. At the time, Michigan was the largest state led by Republicans to support Medicaid expansion, a key component of the Affordable Care Act. As a compromise with Republican state lawmakers, Snyder added a provision that the newly-eligible adults would have to meet work requirements.

Michigan Gov. Rick Snyder (R) after signing legislation to expand Medicaid eligibility to more low-income adults, on Sept. 16, 2013, at Oakwood Hospital in Dearborn, Mich. In 2018, Gov. Snyder added a provision that the newly-eligible adults would have to meet work requirements to maintain coverage.

Carlos Osorio/AP


hide caption

toggle caption

Carlos Osorio/AP

From a coverage perspective, Michigan’s expansion of Medicaid was a success. Low-income adults signed up, ballooning new enrollment beyond what even supporters had initially estimated.

By 2019, there were nearly 700,000 new Medicaid recipients in Michigan, and the state was responsible for an increasing share of their health care costs (Medicaid is paid for jointly by states and the federal government.)

Fiscal hawks were worried. “It’s now become the largest budget problem in Michigan,” said Jarrett Skorup of the Mackinac Center for Public Policy, a free-market think tank

Snyder signed the bill creating the 80-hour-a-month work requirements in 2018, but it wouldn’t go into effect until 2020, after he left office.

That left newly-elected Democratic Governor Whitmer’s administration holding the bag. She tapped Gordon, who’d held senior roles in the federal Office of Management and Budget and U.S. Department of Education during the Obama administration, to lead the sprawling state health department.

Gordon was terrified of Michigan becoming another Arkansas, which was the first state to implement work requirements, in 2018. The change led to more than 18,000 Arkansas residents losing their coverage.

People in Arkansas were disenrolled “because computers went down, because forms weren’t clear, because they just never heard about it,” Gordon said. “Maybe they got sicker, maybe they died because of this decision.”

If Michiganders lost coverage at the same rate as Arkansans, as many as 180,000 people would lose their health insurance within a year, according to one estimate.

Trying to make Medicaid work requirements … work 

In some ways, Michigan was actually better positioned than other states to implement work requirements, Gordon said. The unemployment rate was fairly low. And the state was already pretty good at collecting and tracking employment and wage data.

“If the state can figure out on its own, without having to ask you if you’re working, that’s great, because then you don’t have to do anything,” Gordon said. “You’re just exempted.”

Democratic Gov. Gretchen Whitmer, right, during an appearance at Care Free Medical, a safety-net clinic in Lansing, on Dec. 2, 2019. Whitmer encouraged uninsured Michiganders to enroll in Medicaid or other coverage through the Affordable Care Act. She was joined by U.S. Rep. Elissa Slotkin, D-Mich., and Dr. Farhan Bhatti, CEO of Care Free Medical.

Democratic Gov. Gretchen Whitmer, right, during an appearance at Care Free Medical, a safety-net clinic in Lansing, on Dec. 2, 2019. Whitmer encouraged uninsured Michiganders to enroll in Medicaid or other coverage through the Affordable Care Act. She was joined by U.S. Rep. Elissa Slotkin, D-Mich., and Dr. Farhan Bhatti, CEO of Care Free Medical.

David Eggert/AP


hide caption

toggle caption

David Eggert/AP

Michigan eventually changed the law to allow people more time to report their work activities, and to automatically determine their compliance by cross-checking data from other assistance programs, like food assistance benefits.

To see if recipients were students, or had health-related exemptions, Gordon and his team also tried to capture data from community college enrollment and medical insurance claims.

Dozens of staffers reprogrammed the state’s outdated benefits enrollment portal, created full-time call centers, set up audit and appeals processes, hired compliance review teams, and trained hundreds of local organizers to provide tech and enrollment assistance.

Forms and letters alerting hundreds of thousands of enrollees to the new policy were redesigned to be attention-grabbing and easier to understand.

The sheer amount of effort and time required meant other public health efforts had to take a back seat, Gordon said. “Your first job is going to suffer, and that is a consequence of work requirements.”

In Michigan, black infant mortality rates were some of the highest in the nation. Thousands of people were still dying from overdoses.

Yet at the state health department, “all of the oxygen in the room was dedicated – almost all, I should say – to the work requirement implementation,” said Renuka Tipirneni, MD, MSc, who studies Michigan’s Medicaid expansion at the University of Michigan.

Even after all that work, Gordon and his team had no illusions the system they’d spent $30 million creating was flawless.

“There was a real sense that everyone was doing everything they could,” he said. But they still worried that “huge numbers of people were going to fall through the cracks. Because that’s just what happens with systems like this.”

A “waste” of $30 million 

By the time the work requirements went into effect on Jan. 1, 2020, the state had been able to determine that the vast majority of the nearly 700,000 Medicaid expansion recipients already met the work requirements, or were exempt.

That left about 100,000 people whose status was unknown, and therefore still had to actively go through the reporting process. By March, around 80,000 of those had failed to report, and were on track to eventually lose coverage.

On the one hand, it was a lower rate of coverage loss than Arkansas had. But it was still “an enormous number of people” who would have lost coverage, Gordon said.

Before that could happen, a federal court issued a ruling on March 4, 2020, blocking Michigan’s policies from going forward. That same day, Gordon was scheduled to testify before a Republican-led committee about how the rollout was going.

Instead, he found himself explaining to legislators that the state’s work requirements were essentially dead in the water, and that “we had, on the demand of the people holding the hearing, spent tens of millions of dollars for no purpose.”

Given how brief Michigan’s experiment with Medicaid work requirements actually was — only about three months of the policy being in effect, and no one actually losing coverage in the end — the Mackinac Center’s Skorup doesn’t think there are a lot of takeaways here about the real-life impacts of work requirements.

“If you have an administration that is not sold on these being necessary at all, then they’re more likely to drag their feet on implementing this, which is what I think [the Whitmer administration] did,” Skorup said.

Skorup remains concerned because Medicaid costs keep rising, with 2.6 million Michiganders (one in four residents) now covered by the program. In regards to the state budget, Skorup believes that “at this point, it’s crowding out teacher pay, it’s crowding out pensions, it’s crowding out roads.”

Supporters of Medicaid expansion say the program’s growth has actually benefited Michigan, pointing to research that Medicaid expansion actually helped boost employment and school enrollment, and was a net positive for the state financially.

Court ruling came down just days before state’s first COVID cases

Just days after the court ruling stopped work requirements in Michigan, officials announced the state’s first cases of COVID-19. The 80,000 Michiganders who might have lost Medicaid were spared, so their health coverage continued as the pandemic unfolded. Gordon continued as health director until 2021, when he resigned over “differences of opinion” with Whitmer about some pandemic restrictions.

These days, Gordon is experiencing a sense of déjà vu, with new predictions showing as many as 500,000 Michiganders could lose coverage within the first year of mandated work requirements, according to state estimates.

“We would have a more honest and more efficient policy if Republicans just kick people off Medicaid,” he said.

That would be “incredibly harmful,” he said “But this thing they’re doing isn’t any less harmful. It’s just more wasteful administratively, and more confusing to everyone.”

This story comes from NPR’s health reporting partnership with Michigan Public and KFF Health News.

How to Propagate Dahlias from Cuttings?

0

Not just to beautify your garden, you can use Dahlias as cut flowers to improve aesthetics of your living space.

You can grow Dalias easily by dividing tubers, but the number of plants you can propagate through this method depends on the tubers your plant produced during previous year.

Instead, you can propagate Dahlias through cuttings to get exact replica of parent plant.

Growing from cuttings also allows you to propagate any number of plants with few tubers.

Everyone can’t buy tubers to grow dahlias, as they are expensive.

Propagating through cuttings allows a new gardener to experience the joy of growing a whole plant at a fraction of the cost of buying new tubers.

In this write-up you’ll learn two ways of stem cuttings that you can use to grow your own Dahlias. At the end, you’ll also get a brief info on how to propagate from division method.

Before that let’s understand more about the growing requirements of the plant and why it’s important to propagate through stem cuttings.

There are two methods to stem cuttings that you can use to grow your dahlias.

Choose a healthy mother plant and cut it’s stem just below a node. Remove lower leaves and dip it in rooting hormone. Insert the stem cutting in a potting soil mix and wait for 2-3 weeks to see root form.

Second way is to Start with a well-established tuber planted shallowly so its top peeks out. After stems develop, cut at the stem–tuber junction, keeping a small tuber “heel.” Plant in pre-moistened, well-drained medium; maintain high humidity, bright indirect light. Once rooted, pot on and acclimatize.

Growing Requirements of Dahlias

Dahlias prefers full sun—aim for at least 6–8 hours daily—and grow best in warm conditions with soil around 60–70F. In very hot climates, give light afternoon shade to prevent stress and reduced flowering.

Plant in well‑drained soil that’s slightly acidic to neutral (about pH 6–7) and avoid overwatering before shoots emerge to prevent rot. Once growing, water deeply to keep soil evenly moist, and use mulch 2–3 inches thick to cool shallow feeder roots and retain moisture.

Fertilize modestly with blends lower in nitrogen and higher in phosphorus and potassium to encourage blooms over foliage. Space plants for airflow, stake taller varieties early, and consider shade cloth or occasional misting during extreme heat to keep plants productive.

Choose a sunny, wind‑protected site with at least morning light for best results. In consistently hot regions, strategies like afternoon shade, mulching, and regular feeding help dahlias continue to flower through heat spells.

Benefits of Propagating Dahlias through Cuttings

Propagating dahlias from cuttings lets you multiply plants quickly from a single tuber, saving money and space. Because cuttings are clones, they keep the exact flower color, form, and habit of the parent.

Cuttings often root fast and establish earlier than divisions, leading to stronger plants and earlier blooms. It also preserves the original tuber, which can keep producing more shoots.

This method protects rare or expensive varieties by reducing the risk of losing them in storage. It’s easy to do indoors with simple tools, making it great for sharing or producing uniform plants.

How to Grow or Propagate Dahlias from Cuttings?

As mentioned most gardeners rely on purchasing new tubers each season, propagating dahlias from stem cuttings offers an economical and rewarding way to multiply your favorite varieties.

To have successful dahlia propagation your parent plant should exhibit show no signs of pest damage or disease. The mother plant should exhibit strong, robust stems with healthy foliage.

Method 1: Simple Stem Cuttings

Simple stem cutting is the most accessible and widely-used method for propagating dahlias. This technique involves taking a portion of stem that contains at least one node and encouraging it to develop its own root system.

While straightforward in concept, success depends heavily on attention to detail and proper technique throughout the process.

Essential Tools

  • Sharp, clean secateurs or pruning shears: Blade sharpness is crucial for making clean cuts that heal quickly. Dull blades can crush stem tissue, creating entry points for pathogens.
  • Isopropyl alcohol (70%): For sterilizing cutting tools between plants to prevent disease transmission.
  • Clean cloth or paper towels: For wiping tools during the sterilization process
  • Rooting hormone: Available in powder, gel, or liquid forms. Powder formulations often provide longest shelf life, while gels adhere better to stems.
  • High-quality rooting medium: Options include fine coir, perlite-vermiculite mix, seed-starting compost, or specialized cutting compost. The medium must retain moisture while providing excellent drainage.
  • Small containers: 3-4 inch pots work well, or use propagation trays with individual cells.

Step-by-Step Process

1. Timing and Plant Selection

Optimal Timing

The best time for taking dahlia cuttings is during active growth periods, typically from late spring through mid-summer. Early morning is ideal when plants are fully hydrated from overnight moisture recovery.

Selecting Cutting Material

  • Choose stems that are neither too soft (which may rot) nor too woody (which root slowly)
  • Look for stems with 3-4 nodes and healthy, vibrant foliage
  • Avoid flowering stems as they direct energy toward bloom production rather than root development
  • Select stems that are approximately pencil thickness for optimal rooting potential

2. Taking the Perfect Cutting

Cutting Technique

  • Make your cut approximately ¼ inch below a node using a single, swift motion
  • The ideal cutting length is 4-6 inches, ensuring you have at least 2-3 nodes
  • Cut at a slight angle to increase the surface area available for root development
  • Take cuttings during cooler parts of the day to minimize stress

Node Identification
Nodes appear as slight swellings on the stem where leaves emerge. These areas contain concentrated meristematic tissue—undifferentiated cells capable of developing into roots. The area just below a node contains the highest concentration of root-promoting hormones.

3. Advanced Cutting Preparation

Leaf Management Strategy

  • Remove all leaves from the lower half of the cutting to prevent rot and reduce moisture loss
  • For remaining upper leaves, cut them in half horizontally to reduce transpiration while maintaining some photosynthetic capacity
  • Make clean cuts on leaf removal to avoid tearing that could invite disease
  • Leave at least one complete node with growing tip intact at the top

Wound Treatment

  • Allow the cut surface to air dry for 10-15 minutes to form a slight callus
  • This brief drying period helps prevent rot when the cutting is inserted into moist medium
  • In humid conditions, extend this drying time slightly

4. Rooting Hormone Application

Hormone Selection and Application

  • Choose a rooting hormone appropriate for softwood cuttings (typically 0.1-0.3% IBA concentration)
  • Dip only the bottom ½ inch of the stem into powder hormone, tapping off excess
  • For gel formulations, apply a thin, even coating to the cut surface
  • Avoid over-application, which can actually inhibit rooting

Natural Alternatives

  • Willow water: Soak willow twigs in water for 24 hours to create natural rooting hormone
  • Honey solution: Mix one tablespoon honey with two cups warm water for natural antimicrobial properties
  • Cinnamon powder: Can be dusted on cuts for its antifungal properties

5. Planting Medium and Container Setup

Medium Preparation

  • Pre-moisten your chosen medium until it feels like a wrung-out sponge
  • Fill containers, leaving about ½ inch from the rim
  • Create planting holes using a pencil or dibber to avoid damaging the cutting when inserting
  • Ensure drainage holes are clear and functional

Planting Depth and Spacing

  • Insert cuttings deep enough to cover at least one complete node
  • Firm medium gently around the cutting to eliminate air pockets
  • Space multiple cuttings to allow air circulation between them
  • Plant at the same depth the cutting will eventually grow, avoiding too-deep placement

6. Creating Optimal Environmental Conditions

Humidity Management

  • Cover containers with clear plastic to maintain 80-90% humidity
  • Ensure covers don’t touch the cuttings to prevent fungal issues
  • Create ventilation holes if condensation becomes excessive
  • Mist cuttings lightly if humidity levels drop

Temperature Control

  • Maintain consistent temperatures between 65-75°F (18-24°C)
  • Bottom heat can accelerate rooting—use heating mats set to 70°F
  • Avoid temperature fluctuations which stress developing roots
  • Monitor with a min/max thermometer to track conditions

Light Requirements

  • Provide bright, indirect light equivalent to what you’d find under a tree canopy
  • Avoid direct sunlight which can overheat and stress cuttings
  • Fluorescent lights placed 12-18 inches above cuttings work well for indoor propagation
  • Maintain 12-14 hour photoperiods for optimal results

7. Monitoring and Maintenance

Daily Care Routine

  • Check moisture levels daily, watering when the surface begins to dry
  • Remove any fallen leaves or debris that could harbor disease
  • Monitor for signs of fungal problems such as gray mold or black stem rot
  • Gradually reduce humidity as roots develop by opening ventilation

Signs of Success

  • New growth at the tip typically indicates successful root development
  • Gentle resistance when lightly tugging the cutting suggests root formation
  • Fresh, healthy leaf color and firm stem texture are positive indicators
  • Root development usually begins 10-21 days after planting, varying by variety and conditions

8. Troubleshooting Common Problems

Cutting Failure Issues

  • Wilting: Usually indicates insufficient humidity or overwatering
  • Blackened stems: Often caused by fungal rot from excessive moisture or poor air circulation
  • No root development: May indicate old cutting material, incorrect temperature, or poor hormone application
  • Leaf yellowing: Normal for lower leaves, concerning if affecting all foliage

Recovery Strategies

  • For minor wilting, increase humidity and reduce light intensity temporarily
  • Remove affected plant material immediately to prevent spread of problems
  • Adjust watering frequency based on environmental conditions
  • Consider re-taking cuttings from fresh material if problems persist

Method 2: Stem-and-Tuber Cuttings

The stem-and-tuber cutting method represents an advanced dahlia propagation technique that combines traditional stem cutting principles with the enhanced rooting power of attached tuber tissue.

This method requires advance planning and strategic preparation but consistently delivers superior results compared to simple stem cuttings.

The key innovation lies in taking cuttings that include a small “heel” of tuber tissue, which provides additional stored energy, natural rooting hormones, and improved establishment rates.

While more complex than basic stem cutting, this method often achieves success rates of 80-90% and produces more vigorous plants that establish faster in their permanent locations.

Step-by-Step Guide

Step 1: Early Season Tuber Preparation

Plant dahlia tubers in early spring using shallow planting technique, leaving the top ½ to ¾ inch of tuber visible above soil level. Use well-draining potting mix in containers at least 8-10 inches deep. This strategic shallow planting encourages multiple stem development directly from the tuber crown, creating ideal cutting material for harvest in 5-6 weeks.

Step 2: Monitor Stem Development

Wait for stems to reach 4-6 inches tall with healthy green coloration and firm texture. Look for stems with good node spacing and strong attachment points to the tuber.

The optimal cutting window occurs when stems are neither too soft (which may rot) nor too woody (which root slowly). Early morning harvest provides the best plant hydration levels.

Step 3: Prepare Cutting Area

Set up a clean, well-lit workspace with all materials ready. Sterilize cutting tools with alcohol and carefully brush away soil from around stem bases to expose the tuber connection points. This exposure allows you to identify the optimal cutting line where stem meets tuber tissue.

Step 4: Take Precision Cuttings

Using a sharp knife, make cuts at a slight downward angle starting approximately ¼ inch into the tuber tissue. Include a “heel” of tuber tissue about the size of a small coin attached to each stem cutting. The cutting should include 2-3 nodes on the stem portion and maintain clean wound surfaces to prevent disease entry.

Step 5: Treat and Prepare Cuttings

Allow cut surfaces to air dry for 15-30 minutes to form protective callus tissue. Remove lower leaves from the stem while preserving more upper foliage than simple stem cuttings due to the energy reserves in tuber tissue. Optionally dust cut tuber surfaces with fungicidal powder to prevent rot development.

Step 6: Plant with Enhanced Drainage

Plant cuttings in specialized high-drainage medium with extra perlite or coarse sand. Position the tuber portion just at or slightly below soil surface while ensuring at least one stem node is buried. Use deeper containers to accommodate both developing roots and tuber tissue, maintaining natural horizontal orientation.

Step 7: Create Optimal Environment

Establish 85-90% humidity using clear covers while providing gentle air circulation to prevent stagnant conditions around tuber tissue. Maintain consistent temperatures of 68-75°F using bottom heat if available. Provide bright, indirect light equivalent to filtered sunlight conditions.

Monitor Development

Watch for multiple indicators including tuber tissue health, stem vigor, and root development from both stem nodes and tuber tissue. Expect faster development than simple stem cuttings, with root initiation often beginning 5-7 days earlier due to stored energy reserves. Remove any signs of rot immediately.

Conclusion

Stem-and-tuber cuttings offer a reliable, high-success method to propagate dahlias with speed and vigor. By including a small tuber “heel,” cuttings root faster and establish more robustly.

With a bit of early planning and careful technique, this method consistently outperforms simple stem cuttings. It’s ideal for multiplying prized varieties and building a strong, healthy dahlia collection.

15 Best Healthy + Easy Salmon Recipes

0


15 Best Healthy + Easy Salmon Recipes


Privacy & Cookies Policy

Soft Homemade Cat Treats Recipe

0

Our family prioritizes healthy, whole foods, so why not do the same for our pets? To my children, pets truly are part of the family. It was their idea to make homemade dog treats for our dog. And now they wanted to make homemade cat treats for our cats, Penelope and Tiger, too (“to be fair”).

Like the dog treats we made for Daisy, these homemade treats contain healthy ingredients cats love. They’re simple to make and store really well in the fridge. Our cats don’t even seem to mind if we don’t heat them up before giving them one. 

These treats are part of the Natural Cat Care & Holistic Alternatives we use to keep our furry friends healthy. Just remember these are treats though and not intended to be a meal replacement. 

Homemade Cat Treats: What You Need

There are so many ways you could make this recipe your own. I’d love to hear how you adapt it for your pets in the comments. Here’s what we used and why:

Coconut Oil

Coconut oil is a definite staple at our house, for both humans and pets. For cats, it’s a great source of healthy fats, especially the medium-chain fatty acids that support digestion and healthy skin. I use it in these homemade treats since coconut oil has natural antibacterial and antifungal properties. 

Cats are naturally carnivores so their systems are designed for fat-based energy. Coconut oil is a nourishing addition that mimics the natural fats they’d get from prey in the wild.

Coconut Flour

Coconut flour is one of my favorite grain-free alternatives when I’m baking for the family. So it made sense to use a little in treats for our cats too. It’s high in fiber, gentle on digestion, and helps everything hold together without using grains. Plus, it blends really well with the coconut oil and eggs, creating a soft texture our cats love.

Cooked Sweet Potatoes

While cats don’t need carbs, sweet potato adds some extra nutrients, especially vitamin A and fiber. It also gives a soft, easy-to-digest base for the treats. I’ve found that when used in moderation, it can be a nice way to add variety and a soft texture. 

Gelatin Powder

 I use gelatin in a lot of homemade recipes, from marshmallows to gummies. It turns out it’s great for pets too. Gelatin is rich in amino acids like glycine and proline, which support healthy skin, fur, and joints. I like to use a bulk grass-fed gelatin to keep it budget-friendly, but any clean gelatin will work. It also helps bind the treats and gives them a chewy texture our cats enjoy.

Tuna (or Sardines)

When in doubt, tuna is always a hit! Most cats can’t resist it. Canned fish like tuna or sardines are not only protein-rich, but they’re full of omega-3 fatty acids that support brain, skin, and coat health. In our house, sardines are a favorite. They’re small, have less mercury, and are packed with nutrients.

Egg

Eggs are a complete protein source, and full of healthy fats and fat-soluble vitamins. I use them in homemade pet treat recipes because they help everything hold together while adding a big nutritional boost. If your cat tolerates eggs well, they’re a simple and affordable way to add some extra nourishment.

I baked these on a baking sheet with natural parchment paper to avoid sticking. They store well in a glass jar in the fridge.

Homemade Cat Treats

  • Peel, cube, and cook the sweet potatoes until tender.

  • Preheat the oven to 350 degrees.

  • Mix all ingredient in a medium size bowl. Use a fork to mash everything together until evenly mixed and until all large pieces of fish and sweet potato are mashed up.

  • Add a little extra coconut flour if needed to get a dough that’s roughly the consistency of play dough.

  • Roll into 1 inch balls and mash down with a fork to form little “cookies.” I used my fingers on some to make a paw print shape.

  • Bake for 20 minutes or until lightly browned.

  • Remove from heat and let cool completely.

Nutrition Facts

Homemade Cat Treats

Amount Per Serving (1 cat treat)

Calories 49
Calories from Fat 27

% Daily Value*

Fat 3g5%

Saturated Fat 3g19%

Trans Fat 0.001g

Polyunsaturated Fat 0.1g

Monounsaturated Fat 0.2g

Cholesterol 6mg2%

Sodium 23mg1%

Potassium 47mg1%

Carbohydrates 3g1%

Fiber 1g4%

Sugar 1g1%

Protein 3g6%

Vitamin A 1611IU32%

Vitamin C 0.3mg0%

Calcium 6mg1%

Iron 0.2mg1%

* Percent Daily Values are based on a 2000 calorie diet.

Store in the refrigerator for several weeks or in the freezer for several months.

Quality Cat Food

Many of you have asked what cat food we use. I’ve tried different brands over the years and even experimented with making our own. Ultimately, I prefer to leave this in the hands of the experts. We now alternate between a variety of grain-free cat foods (wet, never dry). 

Have you ever made homemade treats for your pets? What are their favorite ingredients? Leave a comment and let us know!

How to Grow and Care for Redwood Trees

0

Sequoioideae subfamily

If you wanted to enjoy a redwood tree in the past, you probably thought you had to hop in a car or on a plane and head to the California coast, where towering Sequoia sempervirens reach skyward in ancient groves.

But redwoods of all kinds are beginning to find a home in gardens around the world. I still remember the first time I spotted one growing in someone’s yard. That looks like a redwood, I thought. But could it really be thriving here in Washington state? It was.

Admittedly, some of these trees can be a bit too large for the average yard, since they are well known as some of the tallest trees on the planet.

But not all members of the Sequoioideae subfamily need acres of space. There are species and cultivars that are surprisingly well-suited to landscape use.

A horizontal image of the view up into the canopy of a redwood tree in a forest at sunset.A horizontal image of the view up into the canopy of a redwood tree in a forest at sunset.

We link to vendors to help you find relevant products. If you buy from one of our links, we may earn a commission.

With their conical shape, reddish bark, and broad base, redwoods are instantly recognizable. When young, the bark is somewhat smooth, becoming deeply fissured with age.

That bark is part of what makes these trees so majestic and unique. I can’t walk by one without wanting to run my hands along the trunk.

Imagine having one in your garden. Let’s make it happen. Here’s how:

Redwoods are coniferous trees in the Sequoioideae subfamily. They share a generally similar appearance and growing requirements, though each species has its own unique traits.

This guide will focus on the species that are best suited to home landscapes, particularly the dawn redwood (Metasequoia glyptostroboides).

That said, if you live in the right climate, you can absolutely grow a coastal redwood (S. sempervirens), too.

A horizontal image of the view up into the canopy of Sequoia trees in a forest with the light reflecting off the evergreen foliage.A horizontal image of the view up into the canopy of Sequoia trees in a forest with the light reflecting off the evergreen foliage.

Keep in mind that the coastal species thrives in cool, humid climates. They absorb much of their moisture from the air, which is why they’re often found in foggy environments.

Without that humidity, they won’t reach their full size, though it’s still possible to grow them in less-than-ideal conditions with some extra effort.

If humidity is lacking in your region, the giant redwood (Sequoiadendron giganteum) might be a better choice.

These towering trees are native to drier areas at higher-elevations than the coastal species, though they still prefer cool temperatures.

A close up horizontal image of the bright green leaves of a Metasequoia.A close up horizontal image of the bright green leaves of a Metasequoia.

Then there’s the dawn redwood. The genus name Metasequoia means “sequoia-like,” and they do indeed resemble their close cousins.

But they’re far easier to grow than the coast or giant species, and they bring a unique twist. Unlike most conifers, this species is deciduous.

Along with larches (Larix spp.) and bald cypress (Taxodium distichum), dawn redwoods are among the few conifers that drop their needles in fall and grow new foliage in spring.

The soft, feathery needles emerge a deep green and turn a lovely bronze-red in autumn before falling.

The needles on all types are soft to the touch, which means you can plant them near a patio or walkway without fear of being stabbed by sharp needles.

Quick Look

Common name(s): Redwood

Plant type: Evergreen or deciduous conifer

Hardiness (USDA Zone): 4-10

Native to: China, United States

Bloom time / season: Year round

Exposure: Full sun to partial sun

Soil type: Loose, humus-rich, well-draining

Soil pH: 4.5-7.5, slightly acidic to slightly alkaline

Time to maturity: 50+ years

Mature size: Up to 350 feet tall (depending on species)

Best uses: Specimen

Taxonomy

Order: Cupressales

Family: Cupressaceae

Subfamily: Sequoioideae

Genus: Metasequoia, Sequoia, Sequoiadendron

Species: Metasequoia glyptostroboides, Sequoia sempervirens, Sequoiadendron giganteum

These trees thrive in moist soil and are extremely large. In the wild, they’re endangered and face threats from poachers, fire, and habitat loss.

Coastal redwoods are the tallest trees on Earth, growing over 350 feet high. Giant redwoods aren’t far behind, reaching over 300 feet tall.

Dawn redwoods are more modest, typically topping out around 160 feet in the wild, and often maturing to about half that size in cultivation. Dwarf and compact cultivars make them even more accessible for smaller spaces.

Dawn redwoods are hardy in Zones 4 to 8, giants in Zones 6 to 9, and coast in Zones 7 to 10. While both coastal and giant species are native to North America, dawn redwoods hail from China.

A horizontal image of a mature dawn redwood tree growing in a botanical garden.A horizontal image of a mature dawn redwood tree growing in a botanical garden.
Dawn redwood.

Fossil evidence shows that dawn redwoods were once widespread across the Northern Hemisphere, but they were believed to be extinct until 1941. That year, a forester named T. Kan discovered a living specimen near Modaoqi, China.

Soon after, a team of botanists and redwood enthusiasts journeyed to the region and found thousands of dawn redwoods growing in low-lying rice fields.

These trees were being used for timber and fodder, and the landscape had likely once supported far more before agricultural development.

Specimens were collected, and in 1947 the Arnold Arboretum of Harvard University sponsored an expedition to gather seeds.

Many of the dawn redwoods grown today descend from those original collections, which were shared widely with institutions and gardeners around the world. Some of the earliest specimens still thrive at the Missouri Botanical Garden, in front of the Lehmann Building.

Thanks to this distribution effort, this species is now widely available and easy to grow. Here’s how:

How to Grow

Redwoods tolerate some pretty challenging conditions, like road salt, pollution, and occasional flooding.

What they don’t handle well is extreme heat, prolonged drought, or excessive humidity. Let’s break down what they need to thrive:

Climate

Coast types prefer mild conditions with temperatures typically ranging between 35 and 95°F. They can handle temperatures just outside this range, but prolonged cold or heat may take its toll.

A horizontal image of giant Sequoia trees with snow on the ground during winter.A horizontal image of giant Sequoia trees with snow on the ground during winter.

Giants are a bit more cold-tolerant, surviving winter lows of about 15°F.

Dawn redwoods are the hardiest, they can thrive in regions with frigid winters, tolerating temperatures as low as -30°F and they’ll remain happy up to around 85°F.

Occasional heat spikes beyond that are fine, especially once established.

Light

Young specimens benefit from partial sun, especially in hot climates.

A horizontal image of the sun's rays coming through the trees in a Sequoia forest.A horizontal image of the sun's rays coming through the trees in a Sequoia forest.

Dawn redwoods in particular may suffer from scorched foliage if planted in full sun in regions with intense summer heat.

Some afternoon shade can help protect young trees until they grow tall enough to rise above neighboring vegetation.

In cooler regions, full sun is ideal, especially for dawn redwoods, which will reward you with more vivid bronze-red fall color if they receive ample sunlight.

Those grown in partial shade may show more muted foliage in autumn.

Soil

All redwood species prefer slightly acidic, humus-rich soil with good drainage. A bit of sand in the mix is welcome, but heavy clay or compacted soils are not.

Dawn redwoods are the most flexible, capable of tolerating a pH down to 4.5 and even neutral conditions. Coast and giant types prefer a pH in the range of 5.5 to 7.5.

For all three, keeping the roots cool is essential. When trees are young, mulch well with shredded bark or composted leaves to insulate the soil and retain moisture.

As they mature, their own canopy will help shade the root zone.

Avoid planting in compacted, poorly draining, or alkaline soils.

Water

No matter the species, you want to keep the soil moist at all times. It’s not the end of the world if the soil dries out temporarily, but extended drought is a problem.

A horizontal image of redwood trees in a forest encased by fog.A horizontal image of redwood trees in a forest encased by fog.

Keep the soil consistently moist, especially when trees are young. Water deeply when the top few inches of soil begin to dry out.

These trees can also tolerate occasional flooding and excess moisture, so they’re pretty adaptable.

Coast types are happy with up to 122 inches of annual rain and lots of humidity, with most of it occurring in the winter. Giant redwoods need less water, up to 55 inches per year, with most rainfall happening in the winter.

If natural rainfall isn’t sufficient, mimic these patterns by irrigating more frequently during the cool months and reducing water in the summer, allowing the soil to dry out slightly between waterings.

Dawn redwoods are highly adaptable. While they prefer consistently moist soil, they’ll tolerate temporary drought and even some standing water.

Fertilizing

Before applying any fertilizer, it’s always a good idea to do a soil test. It’s easy and affordable, and your local extension office can help guide you through the process.

A soil test will reveal what nutrients are already present and help you avoid overfertilizing or applying unnecessary amendments. You’ll also receive tailored recommendations based on your regional soil conditions.

In general, healthy specimens don’t need regular feeding unless the soil is depleted. Let your test results guide you to make informed decisions that support long-term tree health.

Where to Buy

You can sometimes find these trees at a local nursery, especially if they do well in your region. Dawn redwoods are the most commonly available, and they’re also widely sold online.

A square image of a large dawn redwood growing in a central island of a road pictured in bright sunshine on a blue sky background.A square image of a large dawn redwood growing in a central island of a road pictured in bright sunshine on a blue sky background.

Dawn Redwood

For example you can find the species available at Fast Growing Trees.

But if you want to dip your toe in some of the exceptional cultivars out there, here are a few we recommend:

Amber Glow

Amber Glow™ takes the majestic form of the dawn redwood and scales it down to a more manageable size.

Reaching just 40 feet tall and 20 feet wide, it fits beautifully into most home landscapes.

A square image of two 'Amber Glow' trees with fall coloration growing in a park like setting.A square image of two 'Amber Glow' trees with fall coloration growing in a park like setting.

Amber Glow

The summer foliage is tinged with yellow and turns a gentle golden orange hue in the fall. Hardy in Zones 5 to 9.

You can find Amber Glow™ available at Fast Growing Trees.

Miss Grace

‘Miss Grace’ has an elegant, weeping habit that brings graceful movement to the garden.

Left unstaked, it forms a low, broad pyramid, growing up to 10 feet tall and three feet wide. With support, it can be trained into a more upright, cascading form.

A vertical image of a small sapling of a 'Miss Grace' Metasequoia growing in a pot set outdoors.A vertical image of a small sapling of a 'Miss Grace' Metasequoia growing in a pot set outdoors.

The gray-green summer foliage gives way to a rich, deep orange in autumn.

This cultivar was discovered as a witches’-broom in New York and developed by Buchholz & Buchholz Nursery in Gaston, Oregon.

It was the first weeping dawn redwood introduced to the market and is hardy in Zones 5 to 9. It even tolerates wet soil conditions.

North Light

If space is limited, consider ‘North Light.’

This compact cultivar forms a tidy, globe-shaped shrub, slowly reaching just five feet tall and wide. It tolerates a range of light conditions, from full sun to partial shade.

The foliage is variegated with creamy yellow highlights in spring and summer, transitioning to a brilliant copper-orange in fall.

A low-maintenance option for Zones 5 to 9, ‘North Light’ provides reliable, ever-changing color in a pint-sized package.

Maintenance

I think one of the reasons conifers are so popular is that they need so little maintenance and redwoods are no exception.

A close up vertical image of a small yellow Labrador retriever sitting on the ground in a redwood forest.A close up vertical image of a small yellow Labrador retriever sitting on the ground in a redwood forest.
Photo by Clare Groom.

Occasionally, a branch may die back or break during strong winds.

When that happens, simply prune it off using clean, sharp pruners, loppers, or a saw, depending on the size. You should also remove any branches that show signs of pest damage or disease.

The only other time you’ll need to break out the tools is during a tree’s early years, when you may want to shape it or encourage a specific form.

Pruning for structure is best done in early spring, just before new growth begins to emerge.

Propagation

Redwoods don’t graft reliably, but you can propagate them from seeds or cuttings. The easiest way to get started is to purchase a sapling from a nursery and transplant it into your garden.

A close up vertical image of the bright green foliage of Amber Glow redwood tree.A close up vertical image of the bright green foliage of Amber Glow redwood tree.

If you come across a particularly beautiful specimen, consider collecting a cone or taking a cutting, with permission, of course, to start one of your own.

It’s always a good idea to start a few more trees than you think you’ll need. Germination and rooting rates can vary, and any extras make excellent gifts.

From Seed

It’s entirely possible to grow redwoods from seed, and many conservation groups and commercial nurseries rely on this method to preserve genetic diversity.

A close up horizontal image of an outstretched hand holding a cone from a Sequoia conifer pictured on a soft focus background.A close up horizontal image of an outstretched hand holding a cone from a Sequoia conifer pictured on a soft focus background.

To start, harvest seeds from a mature cone and sow them in an appropriate medium. With time and care, a tiny seedling will emerge – your first step toward a towering tree.

Follow the steps in our guide to growing pines from seed and you’ll be on your way.

Whether started from seed or cuttings, redwoods – and indeed most conifers – tend to grow bushy at first. It may take a few years before a strong central leader develops.

There’s no need to prune to encourage this, although you can remove any particularly awkward or obstructive branches.

From Cuttings

Cuttings provide a faster route to a mature specimen. When you start from seed, it takes years longer for a tree to mature.

A close up horizontal image of the new spring growth of a Metasequoia pictured on a soft focus background.A close up horizontal image of the new spring growth of a Metasequoia pictured on a soft focus background.

Take semi-hardwood cuttings from the end of a branch in late spring or early summer, just as the new growth has started to harden.

Aim for a piece that’s at least six inches long. Sprouts from the base of the tree often root best.

Strip the lower two-thirds of foliage from the cutting, leaving only a few leaves at the top.

Dip the cut end in rooting hormone, then insert it into a gallon-sized container filled with potting mix. Firm the soil around the cutting to hold it upright.

Place the pot in a location with full or partial sun and keep the soil evenly moist, not soggy, and never completely dry. It should feel like a well-wrung-out sponge.

Allow the cutting to grow in the container for at least a year, until it develops strong new growth and a robust root system. When it’s ready, transplant it into the ground in early spring or late fall.

Transplanting

Whether you’ve started your redwood from seed, rooted a cutting, or purchased a young tree from a nursery, eventually it’s time to plant it in the ground.

A close up top down image of a redwood seedling growing in a pot.A close up top down image of a redwood seedling growing in a pot.

Select a site that offers plenty of space. Redwoods are not foundation plants.

I once watched a 100-foot redwood topple in a storm, planted far too close to a house, it had grown at an angle reaching for light and eventually fell during a heavy wind and ice event, crushing two cars. Don’t let that be you.

Dig a hole twice as wide and twice as deep as the root ball. This gives you room to spread the roots and ensures they aren’t compacted in the planting zone.

Remove the plant from its container and gently tease the roots outward. If the roots are spiraled or tightly packed, loosening them will help prevent future girdling or root binding that can damage or kill the tree.

Place the tree in the hole so the top of the root ball sits level with the surrounding soil. Adjust the depth if needed by adding or removing soil from the base of the hole.

Once it’s in place, backfill with soil, water thoroughly, and add more soil if needed to compensate for settling.

Pests and Disease

Planted in the right conditions and with the right care, these trees are pretty much untroubled by pests and disease.

Encountering problems is rare unless the tree is planting in the wrong soil, climate, or receives too much or too little water.

Pests

With the climate warming, these impervious trees have recently begun to experience some pest troubles. Let’s talk about those.

Scale

Rarely, scale will feed on redwoods. These flat, oval insects suck the sap out of the tree using their straw-like mouthparts. This causes yellowing needles and reduced vigor.

There are three kinds of scale that attack these trees: black araucaria (Lindingaspis rossi), juniper (Carulaspis juniperi), and redwood scale (Aonidia shastae).

Regardless of the species, learn how to deal with them in our guide to scale.

Spider Mites

Is there any plant that isn’t susceptible to attack from spider mites?

Particularly in the dry summer season, spider mites spin fine webs on the tree and use their sucking mouthparts to draw out sap.

A close up horizontal image of a red spider mite in high magnification on the bark of a tree.A close up horizontal image of a red spider mite in high magnification on the bark of a tree.

As they feed, needles turn yellow and drop and, with a large enough infestation, growth might be stunted.

Learn how to tackle spider mites here.

Bark Beetles

For a long time, redwoods were considered impervious to pests, protected by their thick bark and massive size.

But in recent years, bark beetles have begun to challenge even the oldest and most resilient trees.

If they can threaten giants that have stood for centuries, they can certainly impact your young backyard specimen.

A close up horizontal image of a western pine beetle on a piece of tree bark pictured on a soft focus background.A close up horizontal image of a western pine beetle on a piece of tree bark pictured on a soft focus background.

Bark beetles have devastated conifer forests across the western US, and redwoods are now on the menu.

The primary culprits include the western cedar bark beetle (Phloeosinus punctatus), as well as P. cupressi and P. aubei, which also attack cedar and cypress.

These beetles tunnel beneath the bark of twigs, branches, and trunks, leaving behind telltale signs: oozing sap, small exit holes, and sawdust-like frass. If you peel back the bark, you’ll see winding galleries that resemble tangled spaghetti.

While a beetle infestation alone typically isn’t enough to kill a healthy tree, it can tip the scales when combined with stressors like drought or root damage.

Unfortunately, once bark beetles invade, there’s little you can do to stop them. The best defense is prevention. Keep your tree healthy with consistent moisture, proper planting, and protection from mechanical damage.

Encouraging natural predators like woodpeckers and parasitic wasps can also help reduce beetle populations. Maintaining a diverse garden environment gives your trees the best chance of staying beetle-free.

Disease

Trees in a frequently soggy location might experience Phytophthora crown or root rot.

This disease needs moist conditions to thrive and often hitches a ride on infected plants from nurseries.

That’s why it’s always a good idea to isolate new plants for a few weeks before putting them in your garden.

Trees planted in poorly draining or consistently soggy soil may fall victim to Phytophthora crown or root rot. This fungal-like pathogen thrives in wet conditions and often spreads through infected nursery stock.

Symptoms of Phytophthora include sudden decline, dieback, or visible rot around the crown or roots. If you dig around the base and find mushy, discolored roots, your tree may be infected.

Unfortunately, there’s little you can do if the disease has progressed significantly. If caught early, however, you can try to improve drainage and treat the affected tree with a fungicide.

Products containing copper or the beneficial bacterium Bacillus subtilis are effective options.

I’ve found CEASE, a biofungicide that harnesses Bacillus subtilis, to be particularly effective against this and other common soilborne pathogens.

A close up of a jug of CEASE biofungicide isolated on a white background.A close up of a jug of CEASE biofungicide isolated on a white background.

CEASE Biofungicide

It’s available in gallon and 2.5-gallon sizes at Arbico Organics.

Bring The Majesty of a Redwood Forest to Your Space

Walking through a redwood forest is an unforgettable experience, but even a single tree in a backyard setting can be just as majestic.

A horizontal image of a gravel road winding through a forest of giant redwoods.A horizontal image of a gravel road winding through a forest of giant redwoods.

I’ve found myself stopping mid-stride to admire a redwood growing in a neighbor’s yard. These trees have a presence that’s hard to describe and impossible to ignore.

Whether you’re planting a dawn redwood for its manageable size and brilliant fall color, or making room for one of the true giants, you’re adding a piece of living history to your landscape.

Plus, once they mature, redwoods are remarkably self-sufficient. Is it the rugged red bark that draws you in? Their easygoing nature? Or the sheer grandeur of their height? Let us know in the comments section below!

And for more information about growing coniferous trees in your landscape, add these guides to your reading list next: