Many people with IBS would trade 10 to 15 years of life expectancy for an instant cure for their condition.
This is according to the results of a study of nearly 2,000 people with irritable bowel syndrome (IBS).1
In other research, people with IBS said they would take a medicine that carried a one percent risk of sudden death if it would cure their symptoms2—which can include urgent bouts of diarrhea, gas, or persistent constipation.
Some people with IBS experience bouts of abdominal pain they describe as worse than childbirth. These flare-ups can siphon concentration, interrupt sleep, and destroy work productivity.3
As a result, many people with IBS plan their lives around the availability of private, clean bathrooms. Fear of a sudden flare-up leads some to avoid restaurants, get-togethers, even exercising in public.
This pervading worry has a name—gastrointestinal-specific anxiety—and it can affect everything from social relationships to overall well-being. It’s also the main reason people with IBS report worse quality of life than people with other chronic conditions, including heart disease, diabetes, and end-stage kidney disease.4
If you or a client has IBS, there are ways to manage it.
PN Super Coach Sarah Maughan, certified through Monash University—a global leader in understanding the link between food sensitivities and IBS—has witnessed how lifestyle changes can prevent flare-ups, calm GI anxiety, and allow people with IBS to live the lives they want.
“My hope is for everyone with IBS to know they have options, whether that’s turning to a physician for medication and/or a health coach to learn about lifestyle changes and how to put them into action,” says Maughan.
In this article, we’ll hear more from Maughan. You’ll also learn:
- What IBS is, including why it happens and the different ways it can manifest
- What your poo can tell you about the health of your digestive tract
- Five evidence-based lifestyle changes that can improve IBS symptoms
- The best way to determine which foods trigger your or your client’s IBS symptoms (and which foods are usually “safe” to eat)
Plus, if you’re a health coach, you’ll learn how to support clients with IBS while safely staying within your scope of practice.
So, what is IBS?
Sometimes referred to as “spastic colon,” IBS is the most commonly diagnosed digestive disorder in the world, affecting about 14 percent percent of adults.5
Unlike Crohn’s and other inflammatory bowel diseases (IBD), IBS doesn’t alter the architecture of the gut. When healthcare professionals use diagnostic imaging, they find no infections, inflammation, damage to the bowel wall, or other evidence of disease.
Years ago, this lack of visible disease led many healthcare professionals to assume that IBS was purely psychological. More recently, however, this thinking has shifted.
Experts now view IBS as a functional neuro-gastrointestinal disorder.
That means the nerves between the GI tract and the brain don’t function optimally, causing the brain to deliver unnecessary pain signals and interfere with typical bowel function.
What are the symptoms of IBS?
IBS symptoms can come and go, with some people experiencing months or years of relief only to suffer a severe flare-up that can last hours to weeks.
In addition, not everyone with IBS experiences the same set of symptoms, which can make the condition challenging to diagnose.
The below illustration shows the range of IBS symptoms.
What causes IBS?
Researchers are still trying to understand why the gut functions differently in people with IBS. However, they do have a few theories.
According to one hypothesis, the nerve endings in the GI tract may be overly sensitive in people with IBS. This can lead to two different sets of symptoms.
▶ Hypersensitive nerves communicate pain signals to the brain, causing people with IBS to notice digestive processes that other people wouldn’t feel. Tiny gas bubbles may be severely uncomfortable for someone with IBS, for example, but not bother someone without the disorder.
▶ Overreactive nerves can trigger GI muscles to contract with too much force, leading to gas, bloating, and diarrhea. If they underreact, the same muscles don’t contract forcefully enough, which slows the passage of food through the intestine and leads to constipation.
Another theory blames disturbances on the gut microbiome, which helps to explain why some people develop IBS symptoms after first having a severe GI illness like the Norovirus.
How is IBS diagnosed?
If you or your client suspect IBS, see a credentialed health professional.
The symptoms of IBS overlap with several other gastrointestinal diseases and health conditions that can require medication, surgery, or medically-supervised lifestyle changes. These include infections, inflammatory bowel diseases, celiac disease, cancer, and food allergies, among others.
It’s especially important to see a medical professional if you or your client notice any of the following:
- Rapid, unintentional weight loss
- Rectal bleeding, blood in stools, or vomiting blood
- Bouts of diarrhea that disturb sleep
- Diarrhea with fever
- Continuous abdominal pain
- A sudden onset of GI symptoms after age 50
IBS Types
In addition to ruling out other GI conditions, a healthcare professional will also ask detailed questions about you or your client’s symptoms. This information allows them to pinpoint which IBS “type” you or your client might have:
- IBS-D, which means someone predominantly has diarrhea
- IBS-C, which is characterized by constipation
- IBS-M, which means someone has alternating periods of diarrhea and constipation
- IBS-U, which means someone’s symptoms don’t neatly fall into any of the above categories
You or your client’s IBS type will inform what your healthcare professional recommends.
A healthcare provider might suggest a short course of antibiotics and antidiarrheal medicine for IBS-D. On the other hand, for IBS-C, they might recommend a fiber supplement, non-habit-forming laxative, laxative-like medication, or other medicine that reduces the perception of pain and regulates bowel movements.
How to prepare for a medical appointment: Your pre-appointment checklist
In order to get the most out of the visit, you can help your client (or yourself) prepare for a healthcare appointment.
A healthcare professional will likely ask the following questions, so consider the responses beforehand:
- How long have you experienced these symptoms?
- Did anything change around the time your symptoms began? (Stress levels? Dietary habits? Recent travels?)
- Did you recently have food poisoning or gastroenteritis?
- How much fiber do you consume?
- How is your sleep quality? How many hours do you usually sleep at night?
- How often do you exercise?
Another way to prepare for your first appointment?
Well, you might not like it, but it’s a good idea to…
Look at your poo
Consider keeping a poo diary for a couple of weeks before your appointment.
In the diary, track the frequency of bowel movements and other symptoms. Use the Bristol Stool Chart (below) to take note of the quality of your poo. This information can help your healthcare professional assess whether you have IBS and which type.

(To learn more about the clues your poos can hide, read: 6 reasons you should care about your poop health)
How to help IBS: 5 strategies to support bowel health and function
In recent years, the U.S. Food and Drug Administration approved several new prescription medicines for IBS, along with a medical device that stimulates the cranial nerves behind the ear.
In addition, thousands of research papers have looked at the interaction between IBS and various lifestyle habits, with many promising findings.
Here are five evidence-based ways to reduce the symptoms of IBS (and bonus, many of them are great for enhancing overall health too).
IBS relief strategy #1: Add exercise
People with IBS who exercise regularly tend to experience fewer symptoms and flare-ups than people who don’t exercise.
When researchers asked people with IBS to walk moderately for an hour three times a week, study participants experienced significant relief from bloating and abdominal pain within 12 weeks.6
How exercise soothes IBS isn’t fully understood, though.
According to other research, exercise may reduce stress and improve mental health, which, in turn, may help improve communication between the gut and the brain.7 8
Another theory argues that exercise helps encourage the growth of health-promoting gut bacteria, which may help to break down food more efficiently and decrease inflammation.9
IBS relief strategy #2: Work on stress management
Anxiety, stress, and depression all activate stress hormones like norepinephrine (noradrenaline) and cortisol, which can:
- Amplify gut-based pain signals
- Alter the balance of bacteria in the gut (known as the gut microbiome)
- Increase intestinal permeability—potentially allowing harmful substances into the bloodstream10 11 12
Of course, stress doesn’t come with an on/off switch.
Simply telling yourself, “Stop getting so stressed out!” won’t likely help—and may even paradoxically lead to more stress.
That’s why Precision Nutrition-certified coaches like Maughan help clients learn to focus on what’s within their control—such as practicing self-compassion, or experimenting with nervous system regulators like yoga, breathing exercises, and gentle walking.
As the image below illustrates, clients can control how they perceive, respond to, and anticipate stressors—but not always the stressors themselves.
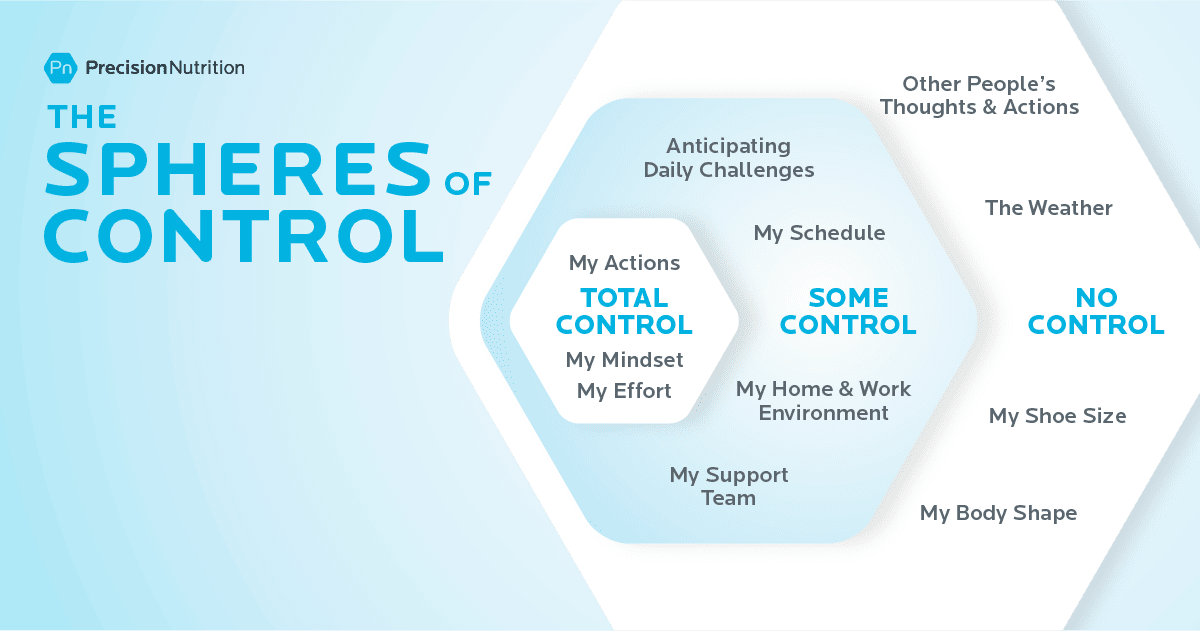
Either way, when clients focus more on what they can control and less on what they can’t, they often feel calmer and more capable.
(If you want to help a client figure out just what’s within their control—and what’s not—try out our free worksheet: Sphere of Control Worksheet)
(Assess your current stress load by taking our free quiz: Do you have a Stress Bod?)
IBS relief strategy #3: Slow your eating pace
PN coaches have long appreciated and advocated slower, more relaxed eating.
Yes, slow eating helps people fill up on fewer calories—but it also tends to help clients reduce or even eliminate GI woes like acid reflux, bloating, and pain.
For one, slower eating often translates to more chewing. In addition to mechanically mashing food into a pulp, increased chewing also allows the mouth’s digestive enzymes to pre-digest food. As a result, the stomach and intestines have to work less hard.
Plus, eating in a relaxed setting often lowers stress hormones like norepinephrine and cortisol, making it less likely that they will intensify GI pain signals.
According to Maughan, this can be especially important for young parents, as it’s not always easy to eat undistracted and peacefully when tending to little ones.
(Sounds simple, but slow eating is more challenging than people think—and a lot more impactful. Learn more: Try the slow-eating 30-day challenge.)
IBS relief strategy #4: Troubleshoot sleep problems
According to research, people with IBS experience more shallow, less restorative, and more interrupted sleep.13
Because of poor sleep quality, many people with IBS sleep more hours overall than people without IBS—yet feel less rested.
Fatigue can then set off a vicious cycle. When people don’t sleep restfully, stress hormone levels tend to be higher, which can exacerbate gut pain.14
Unrested people also tend to feel hungrier during the day. Cravings for fats and sweets also intensify, driving people to reach for the very foods more likely to trigger IBS symptoms—and wolf them down too quickly.
Stopping this cycle can be challenging.
As with stress, you can’t simply will yourself to sleep more restfully.
However, the first three strategies—exercise, stress management, and slower eating—can all help.
Some PN clients have found that consuming a smaller dinner earlier in the evening gives their bodies more time to digest before bed. Other clients tell us that a relaxing pre-bedtime routine—a few minutes of foam rolling, a guided meditation, a bath, or some journalling—tends to help.
(Find out the best practices for getting better sleep by checking out our infographic: The power of sleep)
IBS relief strategy #5: Investigate your diet
While there’s no one-size-fits-all IBS diet, experts have identified several food categories that are more likely to be problematic for many people. These include:
▶ Fermentable Oligosaccharides, Disaccharides, Monosaccharides, and Polyols (FODMAPs), which are a family of carbohydrate-rich foods that are poorly absorbed in the small intestine. Even in people without IBS, these foods tend to slow digestion and attract water. When gut bacteria ferment them, they produce gas, which can stretch the intestinal wall. For most, this slowed digestion and gas isn’t especially noticeable; In people with IBS, it can lead to intense pain. High-FODMAP foods include wheat, rye, barley, onions, garlic, beans, dairy, honey, cashews, some processed meats, and many fruits and vegetables. (More about FODMAPs in the next section.)
▶ Caffeinated beverages and foods, especially coffee, which trigger the release of stress hormones, stimulate the production of stomach acid, increase muscle contractions in the colon, and irritate the lining of the intestine.15
▶ Alcohol and spicy foods that irritate the gut.16 17
▶ High fructose corn syrup and sugar alcohols such sorbitol and mannitol, which have been linked to gas, bloating, and diarrhea in susceptible people.18 19
▶ Fatty, greasy foods, which can slow digestion and attract water, leading to loose stools, bloating, and gas.20 21
If the idea of giving up all the foods and beverages on the above list has you in a cold sweat, know this…
Not everyone with IBS is sensitive to the same foods and beverages.
“Everyone can have different triggers,” says Maughan. “That’s why it’s so important to figure out what makes your body feel good and what doesn’t.”
Some people struggle with apples but are okay with berries. Others can drink green tea but not black. One person might be able to consume five to eight ounces of beer but not 12. A gluten-free diet may work great for some but not others.
Similarly, many people find relief by avoiding certain high-FODMAP foods. However, you may only be sensitive to some FODMAPs and not others. If so, eliminating all FODMAPs would be unnecessarily restrictive and difficult to follow consistently.
For this reason, it can be helpful to try an elimination diet to see which foods and beverages are problematic—along with the quantities you can safely tolerate, says Maughan. You’ll learn more about elimination diets in the next section.
(Want someone to walk you through exactly how to do an elimination diet? Read: How and why to do an elimination diet.)
Scope of Practice: How to coach someone with IBS
In our online coaching communities, we often see people asking some version of the following question:
“My client just told me that she has IBS. Am I allowed to continue to coach this person?”
The answer: Yes, you certainly can.
As we mentioned, Maughan specializes in helping people with digestive problems. Coaching someone with IBS is no different than coaching a client with any other nutritional goal, she says.
“Because IBS is often largely associated with what someone eats, it’s within a coach’s wheelhouse—with some caveats,” says Maughan. “You can’t diagnose your client with the condition, and you should make it clear that you’re not prescribing a diet for them. In addition, you should encourage clients to seek care from a medical professional, especially if you suspect something other than IBS is going on.”
To stay within your scope of practice, follow these do’s and don’ts.
| DO |
DON’T |
| Encourage clients with digestive issues to visit a healthcare professional so they can get a definitive diagnosis. |
Tell clients, “It sounds like you might have IBS.” |
| Share information about potential lifestyle changes, including elimination diets. Help clients run experiments that allow them to gain insight about the connection between their lifestyle, diet, and their body. |
Pitch a rigid and restrictive diet as a treatment that will cure all of the client’s digestive problems. |
| Offer to work with a client’s medical team. Help the client adopt and remain consistent with the lifestyle changes their team recommends. |
Contradict medical professionals by telling clients that the medical establishment always gets IBS wrong. |
| Support clients with optional recipes and other tools that help them put what they learn about their body into practice. |
Create a prescriptive anti-IBS meal plan for a client to follow. |
| Encourage clients to experiment with a multi-disciplinary approach to managing IBS so they can discover the right combination of approaches that works for them. |
Tell clients that you have all the answers or that they don’t need to seek medical advice or therapies. |
| Ensure clients know they can choose to make any given lifestyle change—or not. |
Use force or fear to manipulate clients into following your advice. |
Elimination diets for IBS: How and when to try them
Elimination diets do what the name suggests: They exclude certain foods for a short period—usually three weeks. Then, you slowly reintroduce specific foods and monitor your symptoms for possible reactions.
Elimination diets work a lot like a science experiment that helps you identify problematic foods.
The phrase “elimination diet” may sound scary and off-putting, as if you’ll be living for months on bland food you have to slurp through a straw.
However, there are many different types of elimination diets, with some much less restrictive than others.
Here are a few versions.
Elimination diet “lite” for IBS
This is an excellent option for people who suspect they already know which foods and beverages trigger symptoms.
It goes like this: You eliminate up to four foods for several weeks. Then, slowly reintroduce them one at a time to see if your symptoms return.
Let’s say, for example, from experience, you know you feel bad whenever you eat dairy. On the lite elimination diet, you’d eliminate just dairy for three weeks. Then you’d reintroduce it to see how you feel.
Elimination Diet “medium” for IBS
If you’re unsure of how food interacts with your GI tract—but aren’t ready for a super restrictive eating plan, our Precision Nutrition elimination diet is likely the way to go.
Created by PN and approved by several registered dietitians, the plan removes many of the foods most likely to cause problems, while still including a variety of vegetables, fruits, starches, legumes, nuts, seeds, and meats, so you can continue to eat a well-balanced diet.
To learn more, download our FREE Ultimate Guide to Elimination Diets. This ebook has everything you need to be successful, including an at-a-glance chart that helps you easily follow the diet, along with recipes, meal ideas, and tip sheets.
The FODMAP diet for IBS
Over several years, researchers at Monash University in Australia have developed and extensively studied a low-FODMAP elimination diet for people with IBS.22
Unlike other types of elimination diets, the FODMAP diet is a highly specialized form of medical nutrition therapy. The FODMAP diet’s list of problematic foods (shown below) is anything but intuitive, and the reintroduction phase is more complex than other elimination diets.
As a result, if you’ve been diagnosed with IBS and suspect you have a FODMAP issue, seek the expertise of a FODMAP-certified practitioner. You can also download Monash University’s FODMAP Diet app, which will help you navigate low-FODMAP eating.
| Food Group |
Low FODMAP |
High FODMAP |
| Vegetables |
Green beans, bok choy, green bell peppers, carrots, cucumbers, lettuce, potatoes |
Artichoke, asparagus, mushrooms, onions, garlic, snowpeas, cauliflower, leeks |
| Fruits |
Cantaloupe, kiwi, mandarin, orange, pineapple, firm bananas, blueberries |
Apples, cherries, mango, nectarines, peaches, pears, plums, watermelon, ripe bananas |
| Dairy and Dairy Alternatives |
Almond milk, brie, feta, hard cheese, lactose-free milk & yogurt |
Cow’s milk and foods made from cow’s milk, soy milk |
| Protein-Rich Foods |
Eggs, tofu, tempeh, most minimally-processed meats, poultry, seafood |
Most legumes, some marinated and processed meats |
| Starches |
Foods made from oats, quinoa, rice, spelt, or corn |
Foods made from wheat, rye, and barley |
| Sweeteners |
Dark chocolate, maple syrup, rice malt, table sugar |
High-fructose corn syrup, honey, sugar alcohols, agave |
| Nuts and Seeds |
Peanuts, pumpkin seeds, almonds, macadamias, and walnuts |
Cashews, pistachios |
The power of health coaching
In isolation, more knowledge doesn’t always lead to more power.
For example, there’s a difference between knowing that dairy messes with your gut and doing something with that knowledge.
Similarly, you might know that you feel better when you eat a small dinner earlier in the evening, but you may struggle to plan your life so an early dinner happens regularly.
This is where a certified health coach can help.
“Many of my clients already have an idea of the foods that tend to cause them problems,” says Maughan, “But they’re nervous to know for sure because they fear that the knowledge will make eating more challenging.”
That’s why Maughan assures clients…
Even if you do an elimination diet and you learn your favorite food is contributing to your IBS, you don’t have to do anything with that information.
You can choose to continue to eat your favourite foods if you want, AND you can choose to avoid them when it’s really important for you not to experience IBS symptoms, she says.
“With knowledge, you have choices,” says Maughan.
References
Click here to view the information sources referenced in this article.
- Drossman, Douglas A., Carolyn Blank Morris, Susan Schneck, Yuming J. B. Hu, Nancy J. Norton, William F. Norton, Stephan R. Weinland, Christine Dalton, Jane Leserman, and Shrikant I. Bangdiwala. 2009. “International Survey of Patients with IBS: Symptom Features and Their Severity, Health Status, Treatments, and Risk Taking to Achieve Clinical Benefit‘.” Journal of Clinical Gastroenterology 43 (6): 541–50.
- Lacy, Brian E., Kelly K. Everhart, Kirsten T. Weiser, Ryan DeLee, Sebastian Strobel, Corey Siegel, and Michael D. Crowell. 2012. “IBS Patients’ Willingness to Take Risks with Medications.” The American Journal of Gastroenterology 107 (6): 804–9.
- Farndale R, Roberts L. Long-term impact of irritable bowel syndrome: a qualitative study. Prim Health Care Res Dev. 2011 Jan;12(1):52–67.
- Trindade IA, Melchior C, Törnblom H, Simrén M. Quality of life in irritable bowel syndrome: Exploring mediating factors through structural equation modelling. J Psychosom Res. 2022 Aug 1;159(110809):110809.
- Arif TB, Ali SH, Sadiq M, Bhojwani KD, Hasan F, Rahman AU, et al. S753 meta-analysis of global prevalence and gender distribution of irritable bowel syndrome (IBS) using Rome III and IV criteria. Am J Gastroenterol. 2024 Oct;119(10S):S517–S517.
- Riezzo G, Prospero L, D’Attoma B, Ignazzi A, Bianco A, Franco I, et al. The impact of a twelve-week moderate aerobic exercise program on gastrointestinal symptom profile and psychological well-being of irritable bowel syndrome patients: Preliminary data from a southern Italy cohort. J Clin Med. 2023 Aug 17;12(16):5359.
- Royes LFF. Cross-talk between gut and brain elicited by physical exercise. Biochim Biophys Acta Mol Basis Dis. 2020 Oct 1;1866(10):165877.
- Chiang H-L, Chuang Y-F, Chen Y-A, Hsu C-T, Ho C-C, Hsu H-T, et al. Physical fitness and risk of mental disorders in children and adolescents. JAMA Pediatr. 2024 Jun 1;178(6):595–607.
- Sohail MU, Yassine HM, Sohail A, Thani AAA. Impact of physical exercise on gut microbiome, inflammation, and the pathobiology of metabolic disorders. Rev Diabet Stud. 2019 Aug 4;15(1):35–48.
- Zhang L, Wang H-L, Zhang Y-F, Mao X-T, Wu T-T, Huang Z-H, et al. Stress triggers irritable bowel syndrome with diarrhea through a spermidine-mediated decline in type I interferon. Cell Metab. 2025 Jan 7;37(1):87-103.e10.
- Schaper SJ, Stengel A. Emotional stress responsivity of patients with IBS – a systematic review. J Psychosom Res. 2022 Feb 1;153(110694):110694.
- Staudacher HM, Black CJ, Teasdale SB, Mikocka-Walus A, Keefer L. Irritable bowel syndrome and mental health comorbidity – approach to multidisciplinary management. Nat Rev Gastroenterol Hepatol. 2023 Sep 2;20(9):582–96.
- Patel A, Hasak S, Cassell B, Ciorba MA, Vivio EE, Kumar M, et al. Effects of disturbed sleep on gastrointestinal and somatic pain symptoms in irritable bowel syndrome. Aliment Pharmacol Ther. 2016 Aug 30;44(3):246–58.
- Topan R, Vork L, Fitzke H, Pandya S, Keszthelyi D, Cornelis J, et al. Poor subjective sleep quality predicts symptoms in irritable bowel syndrome using the experience sampling method. Am J Gastroenterol. 2024 Jan 1;119(1):155–64.
- Koochakpoor G, Salari-Moghaddam A, Keshteli AH, Esmaillzadeh A, Adibi P. Association of coffee and caffeine intake with irritable bowel syndrome in adults. Front Nutr. 2021 Jun 15;8:632469.
- Reding KW, Cain KC, Jarrett ME, Eugenio MD, Heitkemper MM. Relationship between patterns of alcohol consumption and gastrointestinal symptoms among patients with irritable bowel syndrome. Am J Gastroenterol. 2013 Feb;108(2):270–6.
- Esmaillzadeh A, Keshteli AH, Hajishafiee M, Feizi A, Feinle-Bisset C, Adibi P. Consumption of spicy foods and the prevalence of irritable bowel syndrome. World J Gastroenterol. 2013 Oct 14;19(38):6465–71.
- Yao CK, Tan H-L, van Langenberg DR, Barrett JS, Rose R, Liels K, et al. Dietary sorbitol and mannitol: food content and distinct absorption patterns between healthy individuals and patients with irritable bowel syndrome. J Hum Nutr Diet. 2014 Apr;27 Suppl 2(s2):263–75.
- Suez J, Korem T, Zeevi D, Zilberman-Schapira G, Thaiss CA, Maza O, et al. Artificial sweeteners induce glucose intolerance by altering the gut microbiota. Nature. 2014 Oct 9;514(7521):181–6.
- Capili B, Anastasi JK, Chang M. Addressing the role of food in irritable bowel syndrome symptom management. J Nurse Pract. 2016 May;12(5):324–9.
- Simrén M, Agerforz P, Björnsson ES, Abrahamsson H. Nutrient-dependent enhancement of rectal sensitivity in irritable bowel syndrome (IBS). Neurogastroenterol Motil. 2007 Jan;19(1):20–9.
- De Giorgio R, Volta U, Gibson PR. Sensitivity to wheat, gluten and FODMAPs in IBS: facts or fiction? Gut. 2016 Jan 1;65(1):169–78.
If you’re a coach, or you want to be…
You can help people build sustainable nutrition and lifestyle habits that will significantly improve their physical and mental health—while you make a great living doing what you love. We’ll show you how.
If you’d like to learn more, consider the PN Level 1 Nutrition Coaching Certification. (You can enroll now at a big discount.)


 A close-up of those gorgeous mandevilla
 For Johanna’s climate, false heather (Cuphea hyssopifolia, Zones 9–11) is a fabulous plant that brings foliage interest and colorful blooms. The small, delicate flowers can stand up to the intense Florida sun, and it’s glossy foliage is equally as resilient.
 A trio of rustic pots also has a distinct Mediterranean feel, with some colorful tropical plants giving them a Florida garden twist. A rusty garden bench in front continues this aesthetic and makes for a great place to enjoy the garden.
 I love how Johanna has matched the themes of colorful flowers and vibrant green—some bordering yellow—foliage in her beds with similar combinations in her containers. You can see this in the trio of planters above and this desert rose (Adenium obesum, Zones 11–12) underplanted with bright chartreuse creeping sedum.
 Another signature element in Mediterranean gardens is the use of water. From a simple birdbath to elaborate and ornate fountains, the sound of flowing water and the patterns created in its reflective surface are a soothing contrast to bright, intense sunlight. This feature also incorporates plenty of stone and gravel, also common elements in a Mediterranean design.
 One last look at Johanna’s assortment of bold blooms and vibrant foliage: It’s clear that she is a pro at selecting sun-loving plants with flowers that won’t instantly scorch in the sun, and she has a wonderfully colorful garden to show for it.


 Fan Palm")


