36.1 F
Klamath Falls
Sunday, March 15, 2026
Home Blog Page 22

Barbara’s Indoor Garden in Massachusetts

0

Hi GPODers!

At the beginning of the month I gave an update on my growing houseplant collection (Houseplant Happenings) with the hope that it might inspire some of you to share your favorite indoor plants, which can be gardening lifelines during the winter months. Barbara Owen in Wellesley, Massachusetts answered the charge and sent over photos of far more than just a few of her favorites. Barbara has shared her garden with us several times over the years (Barbara’s Beginning of Spring in Massachusetts, Barbara’s Massachusetts Garden Through the Seasons, Surprises and Lessons From Barbara’s Garden and Color Themes in Barbara’s Garden), but this is our first taste of the wide variety of plants she enjoys indoors.

A while ago you asked about our indoor gardens since cold, snowy weather in the northern part of the country makes it hard to work in our outdoor gardens. Years ago, when we renovated our house, we gained some wonderful windows for my collection of plants.

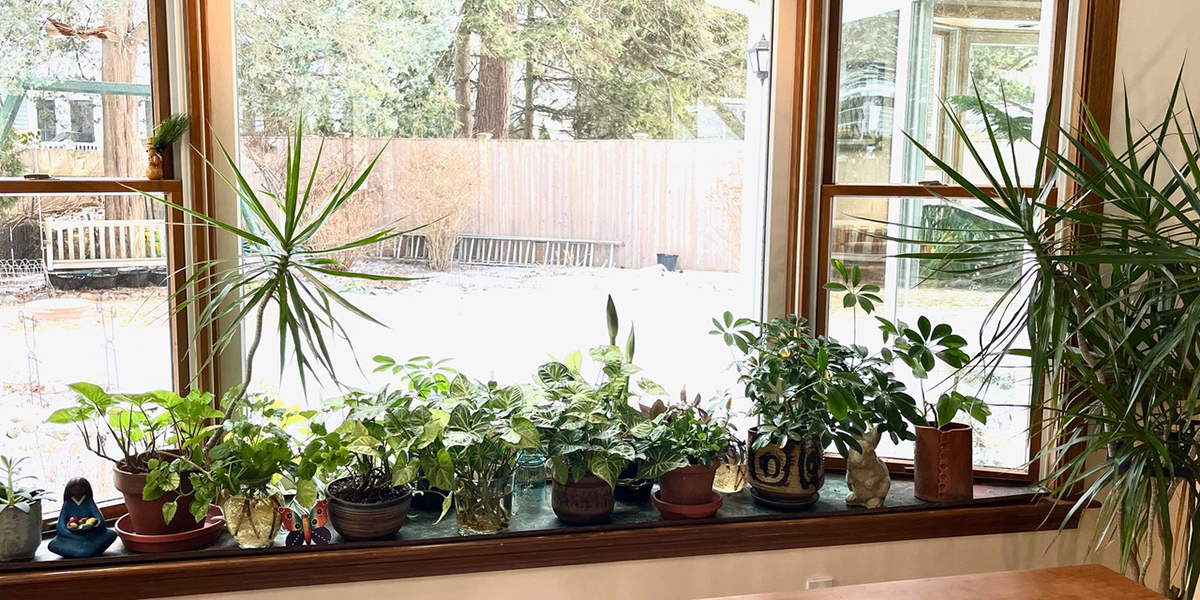
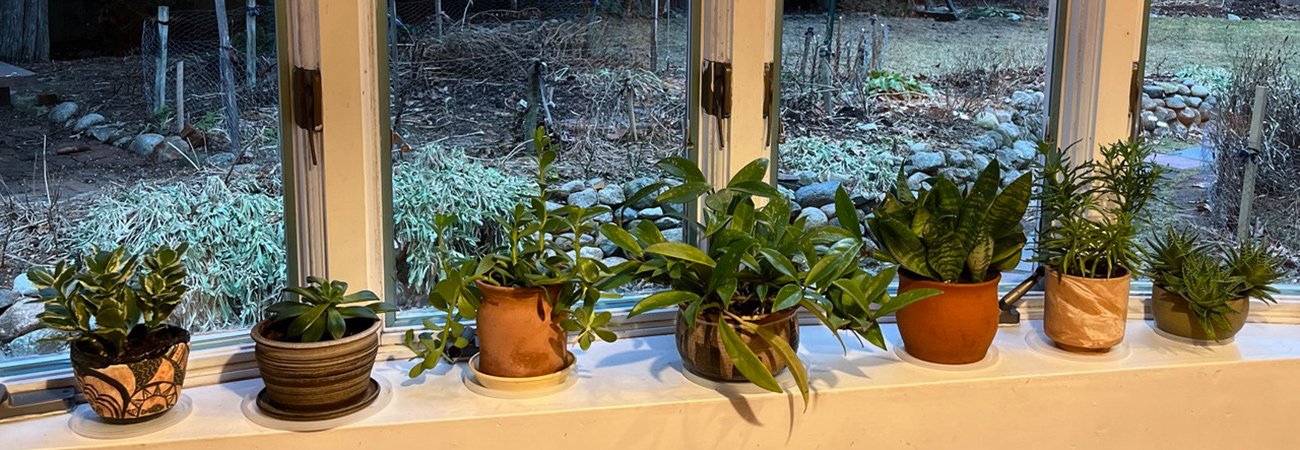
Let’s start in the eating area in the kitchen. These succulents thrive in this east facing window, cool at night and right above the heat during the day. After they spend the summer outdoors there are always too many to bring inside. 

mixed succulent container
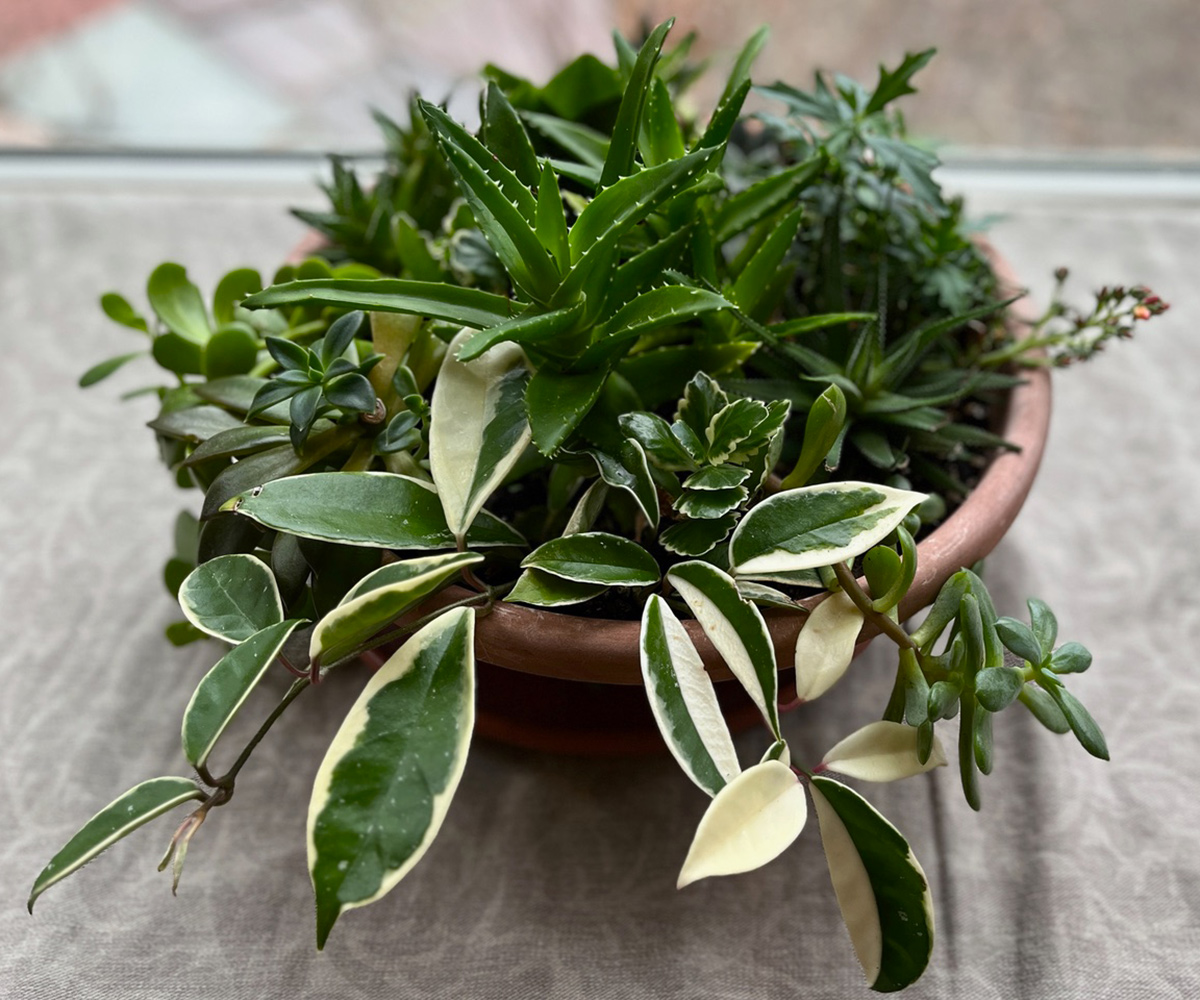
After I’ve given away what I can, those that are left become small gardens, a variety of shapes and personalities growing together in shallow pots.

container of mixed houseplantsAnother combination of fabulous green foliage!

houseplants in front of window
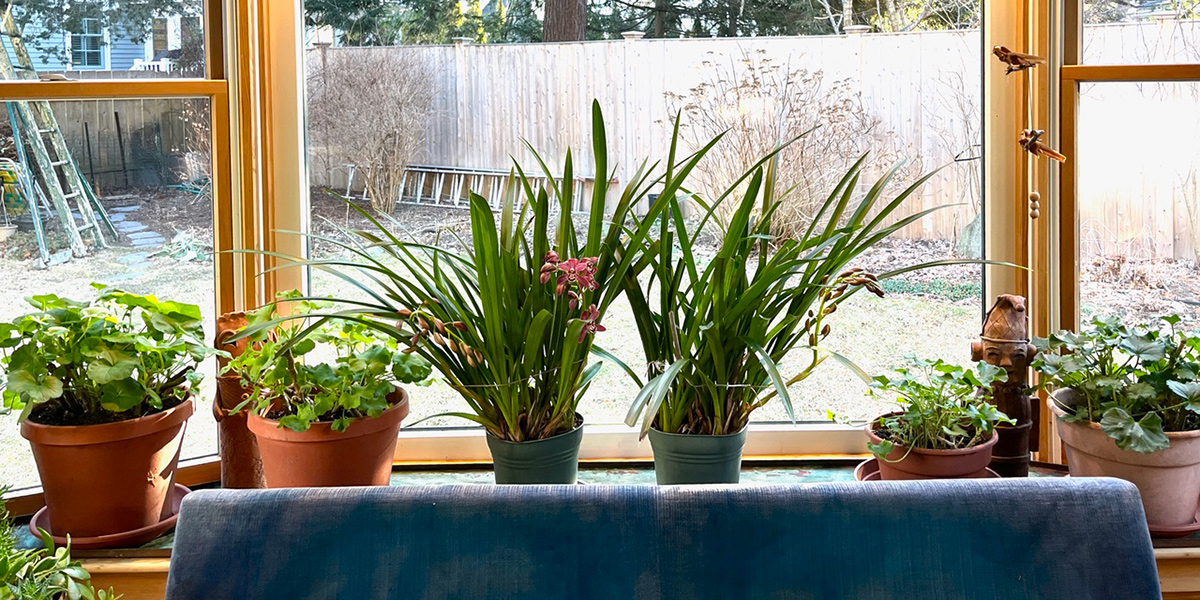
Moving to the sunroom, this window also faces east. There are windows and plants on the north and south walls as well. This is a great place for some of the summer pots of geraniums to spend the winter. Since I cut them back quite a bit last December, they aren’t yet exuberantly blooming but they will be soon.

deep pink cymbidium orchid before and after bloom
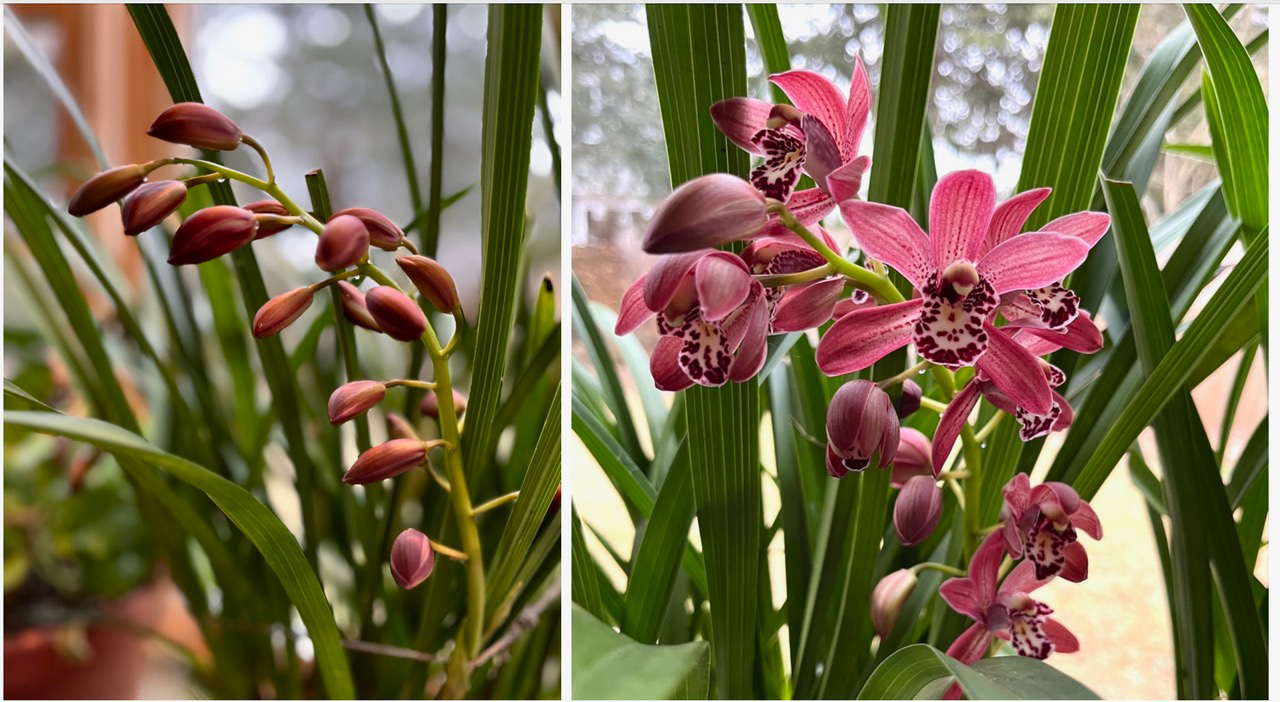
This window is also the perfect place for the orchids that someone gave to my parents many years ago. The orchids were blooming at that point but never again bloomed even with the care they got in their greenhouse. When my parents moved, the orchids came to us. In this sunny, low heat room, they have bloomed every year since.

bright orange succulent flowers
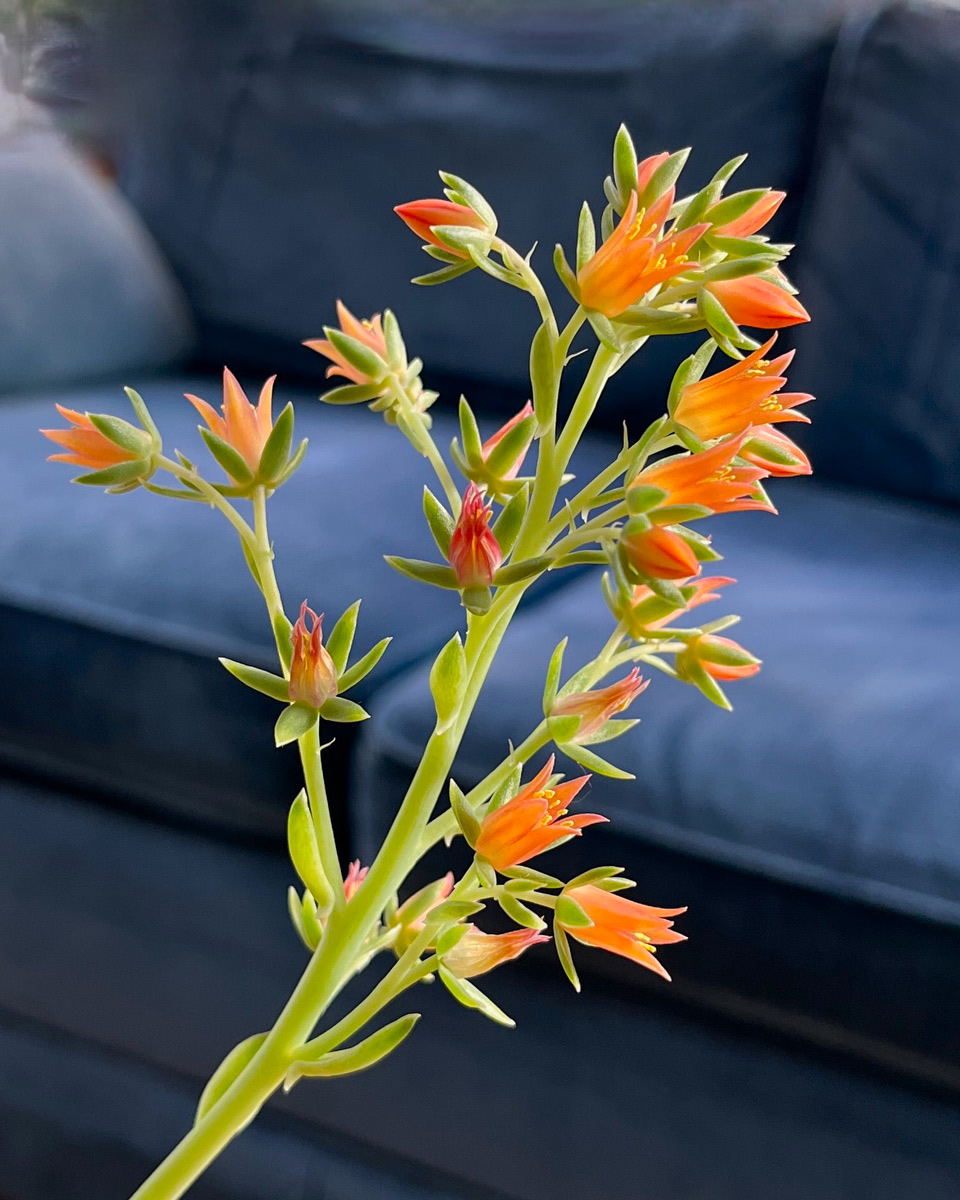
Orchids aren’t the only thing blooming on Barbara’s windowsill. Some variety of echeveria sent out this lovely cluster of bright orange blooms.

small indoor plants in front of sunny windowThe dining room window also faces east but is partly shaded in the winter by the house.

indoor plants in front of window at night
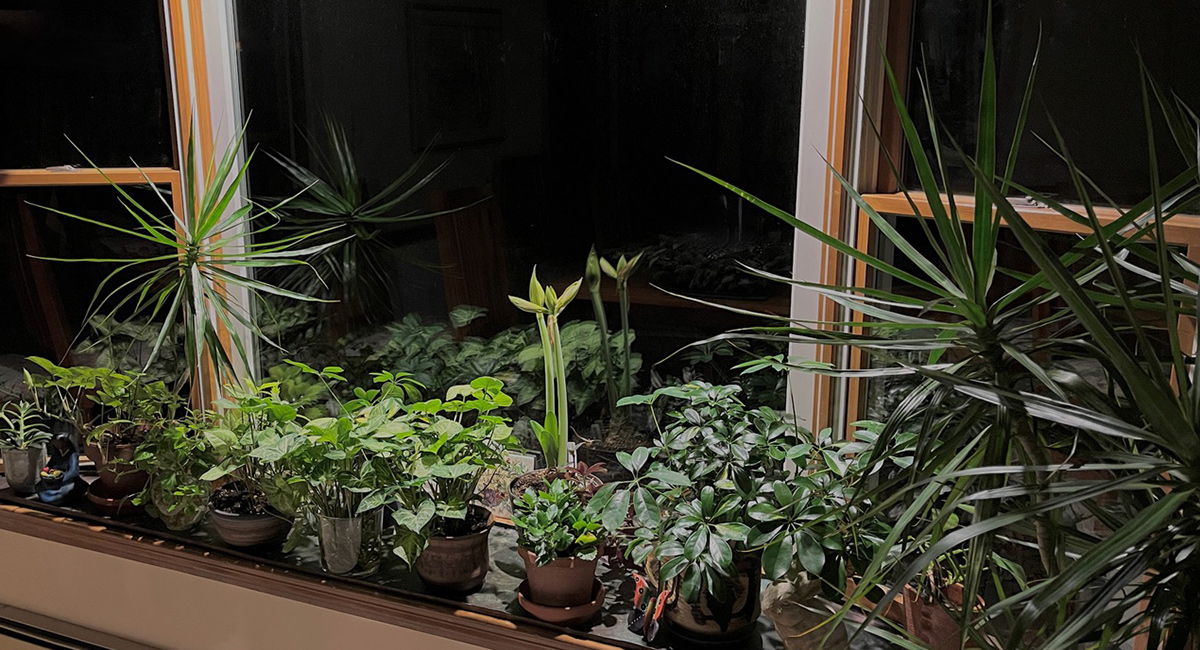
It’s the perfect place for this group of plants, many with variegated or colorful leaves, as well as an annual gift of an amaryllis.

bright red amaryllisSo while the snow falls outside, I can still “garden” inside along with dreaming and planning for next summer’s garden outside.

peach colored amaryllis
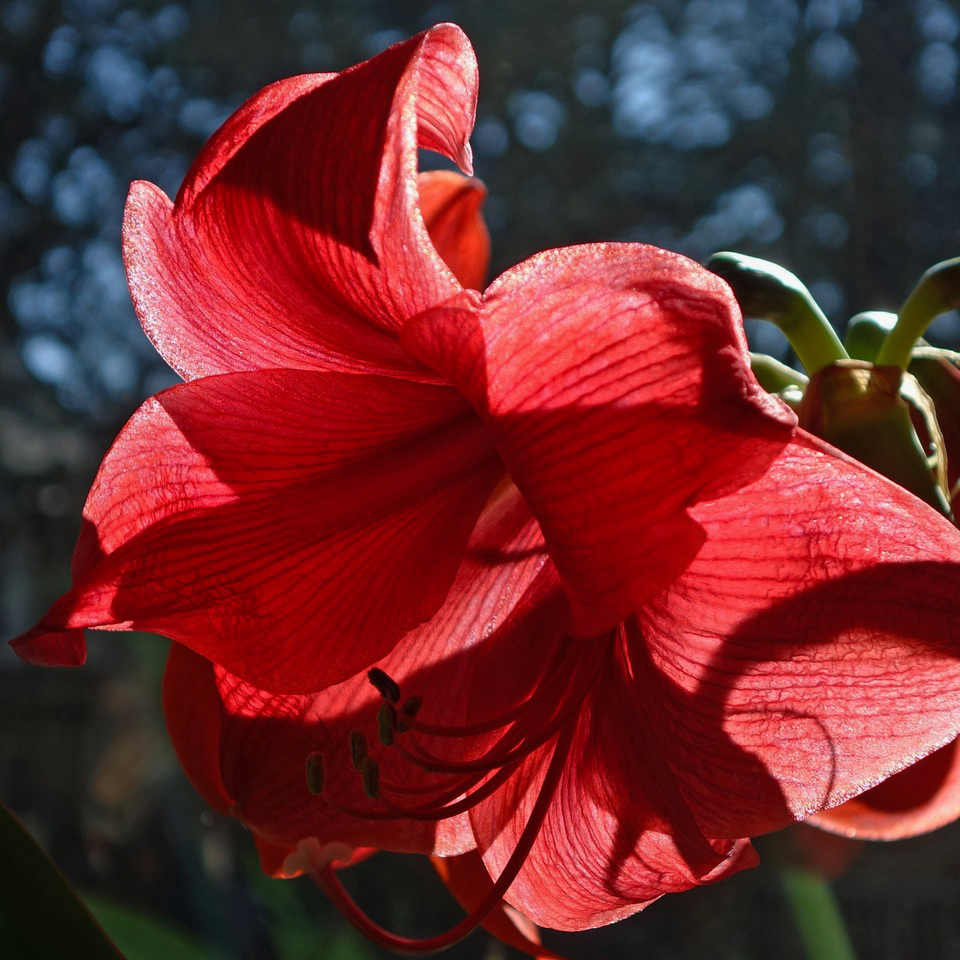
Lastly, a peach colored amaryllis—potentially the cultivar Apricot Parfait (Amaryllis ‘Apricot Parfait’, Zones 8–10 or as an indoor plant)—creates double the beauty when reflected in the window at night.

Thank you so much for giving us a tour of your indoor plant collection, Barbara! I, of course, have some serious window envy, but it was fabulous to see all of the amazing plants you’re able to grow with that extra light.

I hope more GPODers take Barbara’s lead and share some of their favorite houseplants. Whether your collection fills every windowsill or a few sunny corners of your home – we would love to see the plants that get your attention when it’s too cold or snowy to enjoy your outdoor garden. Follow the NEW directions below to submit your photos to Garden Photo of the Day!


We want to see YOUR garden!

Have photos to share? We’d love to see your garden, a particular collection of plants you love, or a wonderful garden you had the chance to visit!

To submit, fill out the Garden Photo of the Day Submission Form.

You can also send 5–10 photos to [email protected] along with some information about the plants in the pictures and where you took the photos. We’d love to hear where you are located, how long you’ve been gardening, successes you are proud of, failures you learned from, hopes for the future, favorite plants, or funny stories from your garden.

Do you receive the GPOD by email yet? Sign up here

Home Pilates Ring and Ball Set for Women with 5 Resistance Bands 13 inch Magic Circle Workout Essentials Starter Kit for Beginners, Full Body Toning Shape Your Body with 15 Min Daily Routine

0


Price: $32.99 - $29.99
(as of Jan 27, 2026 06:57:59 UTC – Details)

Product description

Regain Your Confidence In Just 15 Minutes A Day

Regain Your Confidence In Just 15 Minutes A Day

Regain Your Confidence In Just 15 Minutes A Day

Regain Your Confidence In Just 15 Minutes A Day

90 Day Transformation Challenge Feel The Difference

Unroll long stretching strap and hug Pilates ball. Wake your core gently every day for 15 min.

Grab Pilates ring and 5 resistance bands. Sculpt arms, legs and waist with slow precise moves. See The Change

Grab Pilates ring and 5 resistance bands. Sculpt arms, legs and waist with slow precise moves.

Transform Your Body Flow fast with figure-8 band, long resistance band and arm exerciser. Transform Your Body

Flow fast with figure-8 band, long resistance band and arm exerciser.

Blend every tool into powerful balanced sequences. Feel strong in 30-min daily sessions. Full Body Reset

Blend every tool into powerful balanced sequences. Feel strong in 30-min daily sessions.

90 Day Transformation Challenge

1 WEEK 1-3 2 WEEK 4-6 3 WEEK 7-9 4 WEEK 10-12

Women-First Design Gentle Yet Powerful Portable Real Value Built Tough Lasts Not Easily Deformed
1 Women-First Design

2 Gentle Yet Powerful

3 Portable Real Value

4 Built Tough Lasts

5 High-quality Materials

Sculpt Your Body in 15 Minutes a DaySculpt Your Body in 15 Minutes a Day

Core high-toughness fiberglass is break-resistant Good elasticity tested in over 10,000 compression tests Polka dots for reliable grip Versatile 5-LEVEL RESISTANCE BANDS
1 Durable Material

2 Not Easily Deformed

3 Non-Slip

4 Versatile

FULL-BODY WORKOUTFULL-BODY WORKOUT

pilates for beginnerspilates for beginners

🧩【𝐘𝐎𝐔𝐑 𝐏𝐑𝐈𝐕𝐀𝐓𝐄 𝐇𝐎𝐌𝐄 𝐒𝐓𝐔𝐃𝐈𝐎】 Forget expensive gym memberships. This all-in-one 10-piece pilates kit (including pilates ring, ball, 4 resistance bands & more) transforms any room into your personal fitness sanctuary. Target every muscle group from arms to glutes and start your body transformation instantly without bulky equipment
🦵【𝐒𝐂𝐔𝐋𝐏𝐓 𝐋𝐄𝐀𝐍𝐄𝐑 𝐋𝐈𝐍𝐄𝐒 & 𝐓𝐇𝐈𝐆𝐇𝐒】 Target stubborn inner thighs and “bat wings” efficiently. Our high-elasticity fiberglass pilates magic circle and small yoga ball work together to activate deep core muscles and correct posture. Feel your body getting tighter, stronger, and more confident with every squeeze
🍑【𝐃𝐄𝐅𝐈𝐍𝐄 𝐂𝐔𝐑𝐕𝐄𝐒 & 𝐏𝐄𝐀𝐂𝐇 𝐁𝐎𝐎𝐓𝐘】 Don’t just exercise; shape your curves. Our 5-level widened yoga bands prevent rolling and are specifically designed to activate glutes and lift hips. Easily adjust intensity to keep your progress going and watch your waistline tighten
🏠【𝐄𝐅𝐅𝐎𝐑𝐓𝐋𝐄𝐒𝐒 𝟏𝟓-𝐌𝐈𝐍 𝐑𝐎𝐔𝐓𝐈𝐍𝐄】 The hardest part of fitness is showing up, so we made it easy. With our “Grab-and-Go” backpack pilates set, you can train anywhere—even while watching TV. Stick to a simple 15-minute daily habit to boost energy and burn fat effortlessly
📚【𝐁𝐄𝐆𝐈𝐍𝐍𝐄𝐑-𝐅𝐑𝐈𝐄𝐍𝐃𝐋𝐘 𝐒𝐓𝐀𝐑𝐓𝐄𝐑 𝐊𝐈𝐓】 Confused about where to start? We’ve got you covered. Includes a simple, distraction-free Visual Workout Guide for maximum safety. No complex apps or subscriptions needed—just safe, effective movements to build your foundation from Day 1

RuenTech 6-Pack Bands Compatible with Bestinn P900/Mindrose H80 Smart Watch Band, Soft Silicone Quick Release Replacement Bands for Bestinn &Mindrose 1.47” Fitness Tracker

0


Price: $9.98
(as of Jan 26, 2026 18:55:24 UTC – Details)


NOTE: Compatible with DoSmarter ZX18 Smartwatch, not for DoSmarter Z06S and DB12 Smartwatch.
Color: Black, Red, White, Gray, Teal, Pink
There are 6 popular colors for your select. you can according to your dressing, mood, activities, and these bands for women/men is a good gift for your friends.
How to Install:
The sport bands is easy to install or remove with the pins. First, turn over and insert one side of the pin into the notch on the watch. Second, be sure to keep the band and watch at 90° angle. Third, Pressing the pull-rod inward, slide the other end of the band into place. Fourth, Sway the both of bands to make sure they are firmly. Well you can wear it.
After-sale Service : Log in your Amazon account > Choose Your orders > Find the order ID > Click Contact seller
Department ‏ : ‎ unisex-adult
Date First Available ‏ : ‎ September 14, 2022
Manufacturer ‏ : ‎ RuenTech
ASIN ‏ : ‎ B0BF8VFLQZ
Product Warranty: For warranty information about this product, please click here
Best Sellers Rank: #52,465 in Cell Phones & Accessories (See Top 100 in Cell Phones & Accessories) #5,005 in Smartwatch Bands
Customer Reviews: 4.3 4.3 out of 5 stars (69) var dpAcrHasRegisteredArcLinkClickAction; P.when(‘A’, ‘ready’).execute(function(A) { if (dpAcrHasRegisteredArcLinkClickAction !== true) { dpAcrHasRegisteredArcLinkClickAction = true; A.declarative( ‘acrLink-click-metrics’, ‘click’, { “allowLinkDefault”: true }, function (event) { if (window.ue) { ue.count(“acrLinkClickCount”, (ue.count(“acrLinkClickCount”) || 0) + 1); } } ); } }); P.when(‘A’, ‘cf’).execute(function(A) { A.declarative(‘acrStarsLink-click-metrics’, ‘click’, { “allowLinkDefault” : true }, function(event){ if(window.ue) { ue.count(“acrStarsLinkWithPopoverClickCount”, (ue.count(“acrStarsLinkWithPopoverClickCount”) || 0) + 1); } }); });

How to Build a Chicken Nesting Box?

0

If you want to avoid bad laying habits of your hen, then building a budget-friendly nesting box is the perfect option.

It gives your hens a clean, comfortable, and safe space to lay eggs—something that keeps them happy and helps you collect clean, uncracked eggs with ease.

Plus, well-placed nesting boxes can reduce stress, discourage bad laying habits, and even help maintain overall coop hygiene.

The best part is that you don’t need fancy materials or advanced carpentry skills to make one.

Building a chicken nesting box at home is surprisingly simple and can be done with basic tools and a few pieces of wood—and even repurposed items.

Whether you’re a new chicken keeper or upgrading your existing coop, a homemade nesting box is a quick, affordable project that makes a big difference.

Best Material to Make a Nesting Box for Chickens

Building material plays a vital role in regulating temperature and durability of nesting boxes.

It will directly impact hen’s comfort, egg quality and thwart bacteria.

  • Plywood Wood: Wood is the most common choice because it’s sturdy, easy to build with, and naturally insulated, helping hens stay comfortable year-round. But, if not sealed properly wood attracts mites. Occasional maintenance or repainting to stay in good shape.
  • Plastic: Plastic nesting boxes are lightweight, non-porous, and extremely easy to clean, which helps keep the coop hygienic and reduces pest issues. They’re great for humid climates since they don’t absorb water or rot.
  • Metal (Galvanized Steel or Aluminum): Metal boxes are strong, durable, and resistant to pests, but it can get too hot in summer and very cold in winter.
  • Repurposed Materials (Buckets, Crates, Drawers, Barrels): Repurposed items make creative, budget-friendly nesting boxes and are perfect for quick DIY solutions. They’re environmentally friendly and customizable with minimal tools.
  • Composite or PVC Board: Composite materials and PVC boards are weatherproof, rot-resistant, and extremely durable, offering a long-lasting, low-maintenance alternative to wood. However, it can be more expensive compared to other materials.

Check this: 70 Things Chickens Can Eat & 30 Food Items to Avoid

What Makes a Good Nesting Box Setup?

Chickens prefer dim, calm areas where they won’t be disturbed, so placing boxes away from the coop’s busiest spots helps encourage consistent laying.

Proper height and placement also matter. Nesting boxes should be off the ground—usually 12–18 inches high—to keep them clean and discourage rodents.

Just make sure they’re not higher than the roosting bars, or hens may sleep in them and cause mess.

Adding soft bedding like straw, pine shavings, or hemp keeps eggs cushioned and reduces breakage. Bedding also helps hens feel more relaxed, making them more likely to return to the same box.

Ventilation is important too. Good airflow keeps the boxes dry, prevents odor, and reduces the chance of mites. At the same time, avoid drafts directly hitting the boxes, especially in colder climates.

Also Read: How to Introduce New Chickens to a Flock?

How to Build Chicken Nesting Boxes?

You don’t need to be a carpenter to build a reliable chicken nesting box. A few pieces of wood, some screws, and the right measurements are all it takes to create a cozy spot your hens will love.

Step 1: Gather Your Materials

Start with basic supplies like plywood or solid wood boards, screws, a measuring tape, a saw, and bedding material. Make sure your wood is smooth and untreated, since hens will be in close contact with it.

Step 2: Measure and Cut the Panels

Cut your wood into six pieces for each box: a back panel, bottom panel, top panel, two sides, and a front lip. Follow the standard size of 12 x 12 x 12 inches unless you’re adjusting for large or small breeds.

Step 3: Assemble the Box Frame

Attach the sides to the bottom panel using screws, then secure the back and top pieces to form the box. A screwdriver or drill will make this step quick and sturdy. Make sure all corners are tight and flush so bedding won’t leak out.

Step 4: Add the Front Lip

Install a 3–4 inch front lip to stop bedding and eggs from rolling out. This small piece also gives hens a gentle “step” as they enter the box.

Step 5: Smooth and Finish

Sand all rough edges to prevent splinters. If you want, apply a coat of non-toxic sealant to help resist moisture and make cleaning easier—but avoid paints or chemicals inside the box.

Step 6: Mount the Boxes in the Coop

Place the nesting boxes 12–18 inches off the ground and away from busy areas of the coop. Make sure they are slightly lower than the roosting bars so hens don’t use them for sleeping.

Step 7: Add Bedding and Test Stability

Fill the box with soft bedding like straw, pine shavings, or hemp. Ensure the box is stable and doesn’t wobble when hens jump inside. Once everything is secure, your nesting boxes are ready to use.

Also Read: How Many Eggs Does a Chicken Lay Each Day?

Ideal Size and Dimensions for Chicken Nesting Boxes

The ideal nesting box size for most standard chicken breeds is 12 x 12 x 12 inches, which gives hens enough room to enter, turn around, and feel secure while laying.

Bantams can use slightly smaller boxes, while large breeds like Brahmas may need around 14 x 14 inches for comfort.

Aim for an entry opening of 8–10 inches high so hens can access the box easily without kicking out bedding, and ensure the box is deep enough to hold a few inches of straw or shavings to cushion eggs and keep them clean.

Tips to Keep Your Nesting Boxes Clean and Hygienic

Keeping nesting boxes clean starts with using the right bedding. Materials like straw, pine shavings, or hemp absorb moisture well and create a soft, sanitary surface for eggs.

Replacing bedding regularly—at least once a week—helps prevent odor, bacteria buildup, and broken eggs.

It also helps to check the boxes daily. Removing soiled bedding, feathers, or droppings keeps the area inviting for hens and reduces pests like mites. If the coop is dusty or humid, consider using a thin layer of food-grade diatomaceous earth under the bedding to deter insects naturally.

Good airflow is essential for cleanliness. Position nesting boxes in a well-ventilated but draft-free corner of the coop to keep moisture under control. Finally, deep-clean the boxes every few weeks with a mild, non-toxic cleaner to remove any hidden germs and keep your hens healthy and comfortable.

Also Read: How to Make a Cheap Chicken Coop ?

How to Encourage Hens to Use the Nesting Boxes?

Encouraging hens to use their nesting boxes starts with making the boxes feel inviting. Keep them in a quiet, dim part of the coop and add cozy bedding so the space feels safe.

Placing a few fake eggs or golf balls inside the boxes also sends a strong signal to hens that this is a good spot to lay, helping them develop the habit quickly.

Cleanliness and accessibility matter too. Make sure the boxes are easy for hens to reach and not too high off the ground.

Keep the area around the boxes free from clutter and ensure roosting bars are higher than the boxes so hens don’t sleep in them. With the right setup, most hens naturally choose the boxes over other random spots in the coop.

How Often Should You Clean Nesting Boxes?

Nesting boxes should be checked daily and cleaned as needed to keep them fresh and comfortable for your hens.

A quick daily look lets you remove any droppings, dirty bedding, or broken eggs before they attract pests or spread bacteria.

For most backyard flocks, replacing the bedding once a week is enough to maintain good hygiene and ensure hens always have a clean place to lay.

In addition to weekly upkeep, a deeper clean is recommended every few weeks. This means removing all bedding, scrubbing the box with a mild, non-toxic cleaner, and letting it dry fully before refilling.

Regular cleaning not only keeps your coop healthier but also encourages hens to consistently use the boxes, reducing the chances of hidden eggs or laying in unwanted spots.

Mistakes to Avoid When Making a Chicken Nesting Box

One of the biggest mistakes is building nesting boxes that are too large or too small.

Oversized boxes make hens feel exposed and encourage multiple birds to pile in, which leads to broken eggs.

Boxes that are too small feel cramped and may discourage hens from using them at all. Sticking to the standard 12 x 12 x 12 inches avoids these issues.

Another common mistake is using rough, untreated, or difficult-to-clean materials. Splintered wood can injure hens, while porous or unsealed surfaces hold moisture and attract mites. Always sand the wood smooth and, if possible, apply a safe, non-toxic sealant to make cleaning easier.

Placement errors are also frequent. Boxes placed too high can become sleeping spots, while boxes placed too low may draw rodents or feel unsafe to hens.

Keeping them 12–18 inches from the floor and below the roosting bars is ideal.

Lastly, forgetting to add a front lip is a simple but serious oversight—without it, eggs roll out easily, and bedding won’t stay inside.

Conclusion

Building the right nesting boxes doesn’t have to be complicated—what matters most is giving your hens a safe, comfortable place where they feel secure enough to lay.

By choosing the right materials, following proper dimensions, and keeping the boxes clean and well-placed, you create a setup that supports healthier, happier birds.

A little attention to detail goes a long way, and with a well-designed nesting box system, you’ll enjoy cleaner eggs, consistent laying, and a smoother chicken-keeping experience overall.

POWER GUIDANCE Pull Up Assist Bands – Stretch Resistance Band – Mobility Band – Powerlifting Bands – by Perfect for Body Stretching, Powerlifting, Resistance Training

0


Price: $39.99 - $33.99
(as of Jan 26, 2026 06:54:12 UTC – Details)

From the brand

Ropeless Battle Ropes

Quick fix Barbell Clamps

Barbell Squat Pad

barbell Jackbarbell Jack

Barbell Squat Pad

POWER GUIDANCE Olympic Barbell

Weighted Vest

One Piece Multipurpose: The POWER GUIDANCE Pilates Bar Kit includes 1x Pilates bar, 3x resistance bands, 2x link buckles, and can be used alone or in combination to provide 3 workouts
Adjustable Pilates Bar:The resistance band bar kit adopts a three-section connectable design, which can be selected according to your needs. It is recommended that first-time users choose two section Pilates bars
Full-body Workouts:Our Pilates bars kit work all body muscle groups from shoulders, arms, back, buttocks to legs when used in combination. Resiatance band alone can be used as an aid for lifting movements such as pull-ups. Pilates bar alone can be used exclusively to exercise the back muscles.
Ideal Choice for Home Gym:The resistance band bar kit can instead of barbells help you in squat training, it also can instead of dumbbells help you in Flat lift training. An integral part of your home gym
Portable and Easy to Install:Pilates bar help can be divided into 3 sections, stacked and carried, the length of a single section is up to 36CM. When installing, always keep the side of the hanging ring on the outside, and then tighten the connection in the middle

How to Grow Stromanthe Triostar Prayer Plants

0

In USDA Hardiness Zones 9b to 11, they can be used as evergreen perennial ground covers, while in areas with colder winters, some gardeners grow them outdoors as summer annuals.

However, keep in mind that since this species originates in a humid, tropical habitat, this variety would be more suited to outside use in Florida than in Arizona.

A close up vertical image of a Stromanthe thalia ‘Triostar’ plant growing in a pot with a curious cat in soft focus in the background.
Photo by Kristina Hicks-Hamblin.

Prayer plants are nontoxic for both kids and pets, making them safe choices for households with curious children and fur babies.

How to Grow

Stromanthe ‘Triostar’ will grace your home with gorgeous eye-catching foliage if you provide it with the care it prefers. Here’s what you need to know:

Choosing a Specimen

Make sure you get off to a good start by choosing a healthy specimen. Look for one that has no yellowing or brown leaves, and inspect for signs of pests and disease.

A close up horizontal image of a small potted Stromanthe thalia ‘Triostar’ houseplant set on a dark gray surface.A close up horizontal image of a small potted Stromanthe thalia ‘Triostar’ houseplant set on a dark gray surface.
Photo by Kristina Hicks-Hamblin.

Also, check to see that the houseplant is growing in a pot with drainage holes, and is planted in peaty soil to help with water retention.

Light

Ideally, provide your plant with medium indirect light. A little direct sun in the early morning is okay, but avoid hot sun from noon to evening.

Placing your houseplant a few feet from an eastern-facing window should provide the plant with the amount of light it needs.

A close up horizontal image of a Stromanthe 'Triostar' plant growing in a small white pot pictured on a soft focus background.A close up horizontal image of a Stromanthe 'Triostar' plant growing in a small white pot pictured on a soft focus background.

If your main source of light is a south- or west-facing window, make sure to scoot the ‘Triostar’ back several feet.

Avoid placing it directly on a windowsill and note that in low-light conditions it may lose some of its variegation.

Soil

This stromanthe prefers slightly acidic soil that is rich and peaty.

I like to make my own blend for these houseplants – I use one part coconut coir and one part De La Tank’s Houseplant Mix.

This blend provides a good balance between water retention and drainage.

A close up of the packaging of Tank's Green Stuff De La-Tanks Soil Mix isolated on a white background.A close up of the packaging of Tank's Green Stuff De La-Tanks Soil Mix isolated on a white background.

De La Tank’s Houseplant Mix

De La Tank Potting Mix is available at Arbico Organics in a variety of package sizes.

A close up square image of the packaging of Prococo Compressed Cocopeat Block Premium Coconut Husk.A close up square image of the packaging of Prococo Compressed Cocopeat Block Premium Coconut Husk.

Prococo Cocopeat Block

And if you need a source for coconut coir, you can find a 10-pound compressed block from Prococo, also available at Arbico Organics.

Temperature

‘Triostar’ can survive temperatures down to freezing (32°F), though its foliage will be killed back.

Rather than pushing it to its limits, try to keep it in the temperature range it prefers – a comfortable 65 to 80°F.

Avoid setting it in a location where it will be exposed to cold drafts or hot, blowing air.

Like all prayer plants, this one is sensitive to temperature fluctuations which can cause the leaves to turn brown.

Water

S. thalia ‘Triostar’ likes to have moist but not soggy soil, so you don’t want to let it dry out much at all.

Although many sources recommend watering ‘Triostar’ as soon as the soil is dry to the touch, when planted in a peaty growing medium, it can be hard to gauge this.

You can use a moisture meter to help guide you.

A close up vertical image of a hand from the bottom of the frame holding up a potted Stromanthe thalia ‘Triostar’ plant,A close up vertical image of a hand from the bottom of the frame holding up a potted Stromanthe thalia ‘Triostar’ plant,
Photo by Kristina Hicks-Hamblin.

If your plant has started to wilt or has stopped the daily lowering and raising of its leaves, you have waited too long between waterings.

During winter, you can decrease the frequency of watering.

Like the other prayer plants, ‘Triostar’ is sensitive to contaminants that are frequently found in tap water, so provide rainwater, distilled water, or filtered water instead.

A close up horizontal image of a hand from the left of the frame removing a houseplant from a pot after watering.A close up horizontal image of a hand from the left of the frame removing a houseplant from a pot after watering.
Photo by Kristina Hicks-Hamblin.

Water deeply, until the liquid runs out of the drainage holes to give it a good soaking.

You may also want to try a method called bottom watering.

Although you’ll want to err on the side of overwatering rather than underwatering, it is possible to damage them with too much water.

Humidity

Triostars require humidity above 50 percent. Indoor heating during winter significantly reduces humidity levels, even in humid climates.

POWER GUIDANCE Resistance Bands, Set of 5 Pull Up Bands, Pull Up Assistance Bands, Exercise Bands, Resistance Bands Set for Legs, Working Out, Muscle Training, Physical Therapy, Shape Body

0


Price: $29.99 - $25.79
(as of Jan 25, 2026 18:53:09 UTC – Details)


Five pound sizes:POWER GUIDANCE exercise bands with 5 levels of resistance, ranging from Ultralight (Yellow) / 10-18 lbs to Super Strong (Green) / 60-150 lbs. Perfect for any fitness level, these workout bands help increase flexibility, build strength, and improve physical performance.
Complimentary door buckles:Whether you’re an athlete, a yoga enthusiast, or just looking to improve your fitness, POWER GUIDANCE resistance bands have you covered. Equipped with a resistance band door anchor, you can easily do yoga training, rehabilitation and physiotherapy at home
Multifunctional Workout Bands:Train your entire body with pull up bands, suitable for exercises like pull-ups, push-ups, bench presses, squats, and more. Available in a range of resistance levels, these resistance bands offer extra resistance for maximum results no matter what your fitness goals are.
Solid and Durable:Experience the durability and stability of POWER GUIDANCE resistance bands made from high-quality rubber developed by us.Say goodbye to torn or worn out ligaments and enjoy longer-lasting training sessions.
Anywhere to Use:Comes with a storage bag,Easy to pack and carry, you can use elastic bands for a quick workout both indoors and outdoors. Enhance your strength and stamina to feel confident and look your best no matter where you go.

Taco Pasta

0

Overhead view of a white skillet filled with Taco Pasta topped with sliced jalapenos.This taco pasta is a quick, hearty stovetop skillet dinner made with ground beef, pasta, veggies, and taco seasoning. It’s a customizable, family-friendly meal that’s sure to be a hit.

INEVIFIT Resistance Band Set, 150 LBS Stackable Workout Bands for Strength Training, Yoga, Pilates, and Full Body Workout, Includes Door Anchor, Handles, Ankle Straps, Carrying Bag, and Exercise Guide

0


Price: $49.99
(as of Jan 25, 2026 06:50:41 UTC – Details)

From the brand

INEVIFIT Brand Story Ambassadors 2INEVIFIT Brand Story Ambassadors 2

INEVIFIT Brand Story - INEVIFIT ExperienceINEVIFIT Brand Story - INEVIFIT Experience

INEVIFIT Brand Story - Best rated scalesINEVIFIT Brand Story - Best rated scales

INEVIFIT Brand Story - Hydration DuoINEVIFIT Brand Story - Hydration Duo

INEVIFIT Brand Story - Your no 1 choice for fitnessINEVIFIT Brand Story - Your no 1 choice for fitness

INEVIFIT Brand Story - Product assortmentINEVIFIT Brand Story - Product assortment

150 LB ADJUSTABLE RESISTANCE: Five color-coded bands (5, 10, 15, 20, 25 lb) stack together to reach up to 150 lb. Progress from beginner to advanced without buying new gear.
FULL-BODY WORKOUT ANYWHERE: Hit arms, shoulders, chest, back, legs, and glutes at home, in a hotel, or outdoors. Use the door anchor for presses, rows, and squats, real gym moves, no membership.
BUILT TO LAST: Made from 100% natural latex with reinforced metal clips, non-slip cushioned handles, and sweat-resistant grips for comfort and control during intense sets.
COMPLETE HOME GYM KIT: Includes 5 bands, 2 handles, 2 ankle straps, 1 door anchor, 1 door hanger, 1 carry bag, and a detailed exercise guide, everything you need to start training today.
PORTABLE + GUARANTEED: Lightweight and compact for travel. Designed in Southern California and backed by US-based support and a 5-year warranty registration for total peace of mind.

Pineapple Adobo Chicken Tacos (Easy Air Fryer Recipe)

0

These pineapple adobo chicken tacos are a fast, easy way to change up taco night without making dinner complicated. The sauce blends together in minutes using pantry staples, the chicken cooks quickly in the air fryer, and the flavor hits that sweet-spicy balance that makes tacos feel fun again.

I tested this recipe a few times to get the balance right. Straight chipotle was always too spicy, so pineapple mellows the heat and makes the sauce work for the whole family. This is the version I make at home, and it’s become a go-to when I want something different but still easy.

Hand picking up a single pineapple chipotle chicken taco.Hand picking up a single pineapple chipotle chicken taco.

Even though there are a few ingredients, this is a Cooking Burnout Club staple. Most of the work happens in the blender, the slaw is quick, and you can keep it even simpler with a store-bought dressing if you want. It’s an easy way out of a taco slump without adding more effort to your night.

If quick, low effort taco dinners are your thing, you might also like my air fryer chicken tacos, chipotle salmon tacos, or buffalo chicken tacos. They’re all fast, flavor forward, and built for nights when cooking needs to be easy but still feel worth it.

Ingredients to make pineapple chipotle chicken tacos.Ingredients to make pineapple chipotle chicken tacos.
This post contains affiliate links. As an amazon associate I earn from qualifying purchases. Click here to read my policy and more about affiliate links.

Ingredient spotlight

  • Chipotle Pepper in Adobo – For this recipe, I use the pepper itself, not the extra sauce in the can. One chipotle adds smoky heat without overwhelming the tacos. If you want your tacos to be spicier, add another chipotle pepper. 
  • Canned Pineapple – Canned pineapple is perfect here. It’s already cut, easy to measure, and blends smoothly into the sauce. You can use pineapple chunks or tidbits. Fresh pineapple works too, but canned keeps this recipe fast and low effort.
  • Chicken Tenders – I usually use chicken tenders because they cook very quickly in the air fryer. If you prefer, boneless, skinless chicken thighs also work well and stay extra juicy, but they’ll need a few more minutes to cook.

Step by step instructions

Tips for success

  • The slaw gets wetter as it sits – If tacos will be sitting for any length of time, add the chicken first and the slaw on top, or wait to assemble until just before eating.
  • Shortcut option for the chicken sauce – If you don’t want to make the pineapple chipotle sauce, you can use a teriyaki sauce as the base. Blend it with a chipotle pepper and some pineapple to get a similar sweet-smoky flavor for the chicken.
  • Don’t want to make the dressing for the slaw? A sesame ginger dressing would work well here!
  • Chicken thighs work too – Boneless, skinless thighs stay juicy but will need a few extra minutes in the air fryer compared to tenders.
  • Store leftover chipotle peppers – Keep them in an airtight container in the fridge for several weeks, or freeze individual peppers in an ice cube tray so you can use one at a time.

★ Did you make this recipe? Please give it a star rating below!

  • To a blender or food process add pineapple cubes, chipotle pepper, honey, coconut aminos, rice wine vinegar, avocado oil, ginger, and salt. Blend until smooth.

    ½ cup pineapple cubes, 1 large chipotle in adobo, 1.5 tablespoons honey, 2 tablespoons coconut aminos, 1 tablespoon rice wine vinegar, 1 tablespoon avocado oil, ½ teaspoon ginger, ¼ teaspoon sea salt

  • Optional: Take a minute to remove the chicken tendon from the tender. Add the chicken to a bowl. Pour half of the sauce over the chicken. Add a pinch of salt as well. Stir well to coat the chicken well.

    1 pound chicken tenders

  • Cook 400F for 10 minutes air fryer.

For the slaw

  • Combine the rice wine vinegar, avocado oil, salt, garlic powder, ginger and chopped cilantro in the bottom of a large bowl. Stir well to combine.

    2 tablespoons rice wine vinegar, 1.5 tablespoons avocado oil, ¾ teaspoon salt, ½ teaspoon garlic powder, ½ teaspoon ginger, 1 cup pineapple chunks, 3 tablespoons cilantro, 9 ounce bagged coleslaw mix

  • Add pineapple and slaw and toss with tongs until well combined.

To assemble the tacos

  • Serve tacos by adding some pineapple slaw, chicken, pineapple chipotle sauce and additional chopped cilantro (optional).

    8 tortillas

  • Use one 20-ounce can of pineapple – It’s the perfect amount for both the sauce and the slaw.
  • Only use half the sauce on the chicken – Since the chicken isn’t simmering, coat it with about half before cooking. The rest gets spooned over at the end.
  • Watch the chicken closely – Chicken tenders cook very quickly and can dry out fast. Start checking around 8 minutes and remove any pieces that finish early.
  • Remove the tendon from chicken tenders – Taking a minute to do this helps the chicken cook more evenly and improves texture.

Nutrition Information

Nutrition Facts

Amount per Serving

Where does nutrition info come from? Nutrition facts are provided as a courtesy, sourced from the USDA Food Database.

Course: dinner

Cuisine: American, Mexican

Keyword: pineapple chipotle chicken tacos, pineapple chipotle chicken tacos with slaw, sweet and spicy chicken tacos

Let others know by rating and leaving a comment below!

Pineapple chipotle chicken tacos on a white plate.Pineapple chipotle chicken tacos on a white plate.

If you love this recipe, you should try these