The kids and I have been on a cookie testing spree lately. These brown butter chocolate chunk cookies with pistachios have made the cut. They’re sweet and savory in every bite and have layers of flavor. A fresh batch doesn’t last long around here!
Brown butter chocolate chunk cookies are thick and chewy with crispy edges and a soft center. I’ve made a few ingredient swaps to make this dessert a little healthier, but they’re still a treat we enjoy in moderation.
Brown Butter Chocolate Chunk Cookies
Salty, sweet, crunchy, chewy… you get all of the flavors and textures in one bite. Instead of brown sugar I used coconut sugar here. It has a similar flavor, but coconut sugar is a less processed option and has unique caramel undertones that really add to the cookie. I also added some collagen powder for a subtle protein boost.
Dark chocolate chunks offer a bittersweet bite in every mouthful and add some healthy polyphenol antioxidants, magnesium, and micronutrients. They’re made with sea salt which offers electrolytes and a nice contrast to the sweet cookie. And the pistachio pieces are just the icing on top. They’re also salty but give it such a unique flavor.
One of the biggest differences you’ll notice is that these use browned butter instead of regular. It offers such a richer depth of flavor, almost like caramel. Brown butter is easy enough to make, but you do want to keep a close eye on it as it cooks. You want to cook it (stirring constantly!) until you notice browned bits and it smells fragrant. Pull it off the stove at this point or you’ll have burnt butter, which does not taste as nice!
Tips For Making Salted Pistachio Chocolate Chunk Cookies
I recommend using chopped chocolate bars since it’s easier to find ones with 70% or more cocoa content. Bagged chocolate chunks also work. The taste of a good chocolate chunk cookie relies heavily on having good quality chocolate!
When you’re mixing the dough be sure not to overmix the flour, as this can overwork the gluten proteins and make for tough, hard cookies. If the dough feels too soft after mixing, chill it for 15–20 minutes before baking to prevent excess spreading. For even thicker cookies, chill the dough for 30 minutes before scooping.
Brown Butter Pistachio Chocolate Chunk Cookies
These delicious chocolate chunk cookies have an extra depth of flavor thanks to the crunchy pistachios and flavorful browned butter.
Melt the butter over medium heat, stirring constantly until it foams and turns golden brown (about 4–5 minutes), then remove from heat and let cool for 20–30 minutes.
Preheat the oven to 350°F and line a baking sheet with parchment paper.
Whisk together the cooled browned butter, coconut sugar, and maple syrup, then add the egg and vanilla and whisk until smooth.
Stir in the flour (all-purpose or 1:1 gluten-free), collagen if using, baking soda, and salt until just combined, then fold in the chopped pistachios and dark chocolate.
Scoop dough onto the prepared baking sheet (about 2 Tablespoons each), chilling for 15–20 minutes first if the dough feels soft.
Bake for 10–13 minutes until the edges are golden and the centers look slightly underdone. Sprinkle with flaky sea salt and cool on a rack before serving.
Nutrition Facts
Brown Butter Pistachio Chocolate Chunk Cookies
Amount Per Serving (1 cookie)
Calories 217 Calories from Fat 117
% Daily Value*
Fat 13g20%
Saturated Fat 7g44%
Trans Fat 0.3g
Polyunsaturated Fat 1g
Monounsaturated Fat 4g
Cholesterol 31mg10%
Sodium 394mg17%
Potassium 139mg4%
Carbohydrates 21g7%
Fiber 2g8%
Sugar 8g9%
Protein 4g8%
Vitamin A 244IU5%
Vitamin C 0.2mg0%
Calcium 20mg2%
Iron 2mg11%
* Percent Daily Values are based on a 2000 calorie diet.
For thicker cookies, chill the dough for 30 minutes before scooping.
Shelf Life and Storage
I made a double batch of these to save some for later. The dough freezes well. Scoop into balls and freeze, then bake straight from frozen, adding 1–2 minutes to bake time.
Store the cookies in an airtight container at room temperature for up to 3 days, or refrigerate for up to 1 week.
More Cookie Recipes
Looking for some more healthier cookie recipes? Here are some of our favorites!
What are your favorite cookies to make or eat? Leave a comment and let us know!
You can pick up this moisture-retentive, well-draining mix in 12-quart bags from FoxFarm via Amazon.
Avoid using garden soil in containers – it tends to compact easily, plus it can harbor unwanted pests or pathogens.
If you’re starting with a nursery plant, remove it gently from its pot and loosen the roots gently with your fingers.
Fill your container about one-third full with your potting mix, then position the plant so the crown sits at the same depth it was in the grower’s pot.
Backfill around the root ball with more soil, firming it gently to eliminate air pockets.
Water thoroughly until water runs from the drainage holes and if the soil settles, add a bit more.
If you want to start from seed, you’ll need to sow indoors six to eight weeks ahead of the last frost date.
Use small starter pots filled with seed-starting mix.
Chinese lantern seeds need light to germinate, so press them gently onto the soil surface.
Keep the soil moist and maintain temperatures between 70 and 75°F.
When seedlings develop their second set of true leaves, you can pot up into larger containers.
Container Care
Choose a location with full sun. Chinese lanterns tolerate partial shade but for the brightest color lanterns, they do better in ample sunlight.
In regions with intense summer heat, you may wish to provide a bit of afternoon shade to help keep containers from drying out too quickly.
Chinese lanterns require moderately moist soil. During establishment, ensure that the soil is evenly moist but not waterlogged. In hot weather, you may need to check your plants daily.
You can use a moisture meter or simply stick your finger into the soil. For established plants, water when the top inch feels dry.
If the top inch of soil is still moist, wait another day before checking again.
Water deeply until it runs out of the drainage holes.
Price: $99.95 - $93.12 (as of Mar 10, 2026 09:37:43 UTC – Details)
Do what you love and feel your best with Inspire 3. This little health hack on your wrist helps you stay on top of your stress, fitness and sleep—all you have to do is wear it. Track Health Metrics like skin temperature & blood oxygen, plus get daily scores that show how ready you are to work out or how well you’re managing stress. Fitbit is part of the Google family. 1) Requires a Fitbit Premium membership. Premium content recommendations are not available in all locales and may be in English only. 2) Irregular rhythm notifications are only available in select countries and with select Fitbit products; not intended for use by people under 22 years old or with other known arrhythmias. See fitbit.com/irregularrhythm for additional details. 3) Not available in all markets. The SpO2 feature is not intended to diagnose or treat any medical condition or for any other medical purpose. It is intended to help you manage your well-being and keep track of your information. 4) When phone is nearby. 5) Varies with use and other factors. 6) 6 months of Premium for New Premium users only. Must activate with device. Valid payment method required. Free trial must be activated within 60 days of device activation. Cancel before free trial ends to avoid subscription fees. Requires use of Fitbit app with compatible iPhone or Android devices. A Google account will be required. Inspire 3 is the tracker that helps you find your energy, do what you love and feel your best. All you have to do is wear it. Apple iOS 15 or higher, Android OS 9 or higher Move more: Daily Readiness Score(1), Active Zone Minutes, all-day activity tracking and 24/7 heart rate, 20+ exercise modes, automatic exercise tracking and reminders to move Stress less: always-on wellness tracking, daily Stress Management Score, mindfulness sessions, relax breathing sessions, irregular heart rhythm notifications(2), SpO2(3), menstrual health tracking, resting heart rate and high/low heart rate notifications Sleep better: automatic sleep tracking, personalized Sleep Profile(1), daily detailed Sleep Score, smart wake vibrating alarm, sleep mode Comfortably connected day and night: calls, texts & smartphone app notifications(4), color touchscreen with customizable clock faces, super lightweight and water resistant to 50 meters, up to 10 day battery life(5) Includes a 6-month Premium membership complete with personalized insights, advanced analytics and more (New & returning Premium users only. Must activate trial within 60-days of device activation. Content and features may change)
Learn how to make delicious slow cooker corned beef and cabbage. This classic dish is full of flavor and perfect for a beef-and-veggies family dinner or St. Patrick’s Day meal.
Price: $17.99 (as of Mar 09, 2026 21:36:11 UTC – Details)
Product description
With the Yogi Bands resistance loop bands, take fitness and yoga to a whole new level!
Regardless if you’re new to this world or not, our super versatile resistance loop bands make it easy for anyone to get right into it. With 5 different resistances to work with, you can continuously challenge your limits. And hey, even if it is hard, at least you’ll be looking great, working towards your goals with your Insta-worthy pastel bands!
BUILD YOUR STRONGEST BODY
Multifunctional Bands
It’s more than just fitness and yoga. Our resistance bands are perfect for flexibility, resistance training, toning and more! Use the bands to work out your legs, butt and even arms. There’s really no limit.
5 Different Resistances
Made with quality latex, Yogi Bands are designed to last for ages! Each set includes 5 increasing resistances:
Exercising at the gym, office, home, or even travelling? Take Yogi Bands with you! With the included travel pouch, our lightweight and portable resistance bands make it super easy to workout no matter where you are.
🌟 BUILD YOUR STRONGEST BODY – whether you’re sculpting your beach body, perfecting your downward facing dog or rehabbing a nagging injury, this workout bands from XNM Creations will help you get there. This bands for working out is constructed with performance latex, our elastic bands hold consistent tension throughout exercises to create enhanced strength gains. Complete with 5 Insta-worthy pink colours, these exercise bands resistance will step up your style while you step up your results. 🌟TAKE YOUR TRAINING TO THE NEXT LEVEL – Sure workout bands resistance are ideal for toning and strengthening your muscles, but it doesn’t have to stop there. Mix it up by using our versatile resistance bands for women for stretching to increase your mobility and flexibility. Use our stretch bands for exercise as assistance to master challenging exercises like chin ups, or warm up your hips before you hit the squat rack 🌟BUILT TO LAST – We know that you show up day in, day out so we wanted our resistance band to do the same. Yogi bands are constructed from tough high-grade latex and are designed with longevity in mind. You’ll get years of training out of our elastic bands for exercise and they will always return to their original size. By investing in a product as tough as you are, you can grow both your glutes, and your pocket money! 🌟TAKE YOUR WORKOUT WITH YOU – Pressed for time or travelling for work? Yogi Bands enable you to get a full upper and lower body workout when you can’t make it to the gym. Our theraband resistance bands are lightweight and portable gym accessories, which means that you can take them with you wherever you go. Just pop them into your bag and never worry about losing your progress again. Every purchase includes an attractive free carry bag for your bands. 🌟SUITABLE FOR ALL LEVELS OF FITNESS – Fitness and yoga enthusiasts of all levels have reported the benefits of adding elastic bands for exercise and training. From people who have never stepped foot on a yoga mat before to advanced athletes and elite yogis, the different workout bands resistance for women allow you to adjust the intensity of the exercise.
Even when we’ve seen a garden a few times, I’m never surprised to find that there are a selection of plants or whole areas that we still haven’t seen before—it seems like every gardener has more secret plant talents up their sleeve that they wait to reveal. Bonnie Phipps Moninger in Boulder, Colorado (Zone 4/5) has already shared her stunning backyard garden several times in the past (Check out those submissions, here: November in Colorado, The North Side of Bonnie’s Colorful Colorado Garden, Bonnie Celebrates Flowers in Colorado, The Birth of Bonnie’s Flower Garden, Part 1 and Part 2), but today she’s finally lifting the curtain on gardens she has yet to share with the blog. While front and side yards often don’t get the same level of attention and detail as the more private spaces in the back of properties, Bonnie has brought the same level of color and creativity to every inch of her landscape.
Hello, I’ve just started planning the new additions and changes to my garden for spring, and I’ve been looking at pictures of my garden from the past. You’ve seen pictures of my backyard, but not the front and side yard – so here they are, I hope you enjoy them.
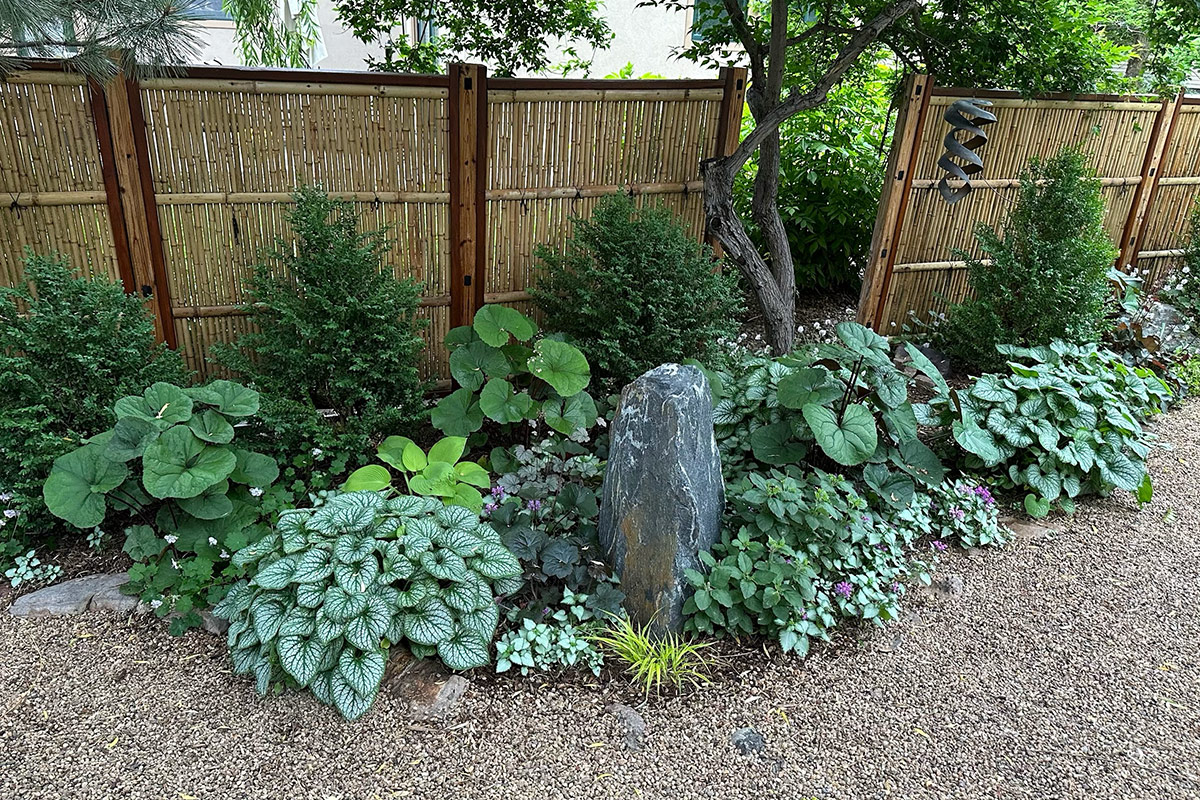
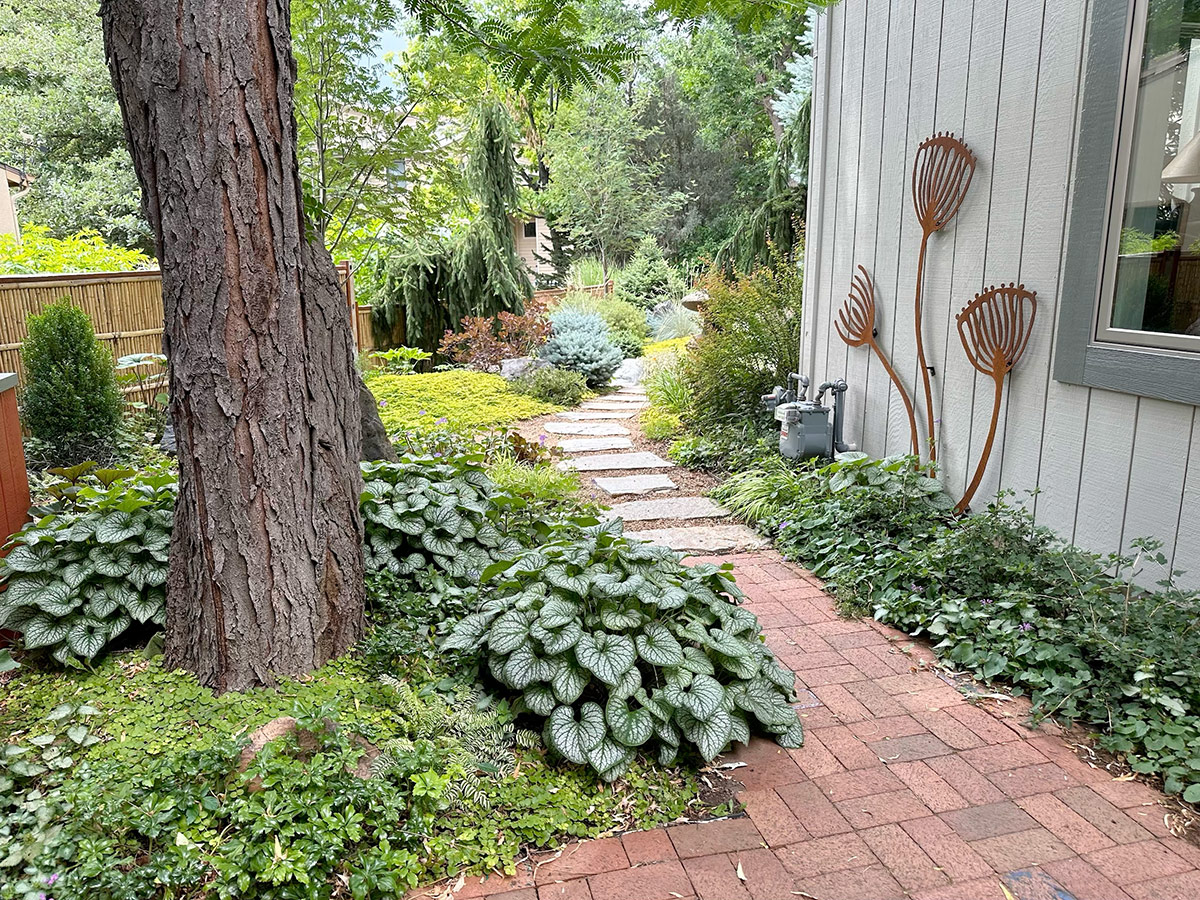
For our front garden, I worked with Nancy Loving and her landscape company back in 2017 to create a garden with a Japanese feel. I had a clear idea of what I wanted, and Nancy was great to work with. I wanted a large berm covered with golden creeping jenny (Lysimachia nummularia ‘Aurea’, Zones 3–8) ground cover with a path going through it, and not too many other plants. To me, the creeping jenny is the star of the show. It stays that vibrant yellow all season. I use it everywhere in my garden. It will take over other plants, so it’s best to put it in areas where it can expand. I also wanted Japanese statues and a lot of large-ish rocks that I hand-selected. I wanted a path that led past the blue spruce and over a dry riverbed (which they constructed), continuing along the side of the house. I didn’t have help with the side yard—that’s a work in progress, as actually, the whole garden is.
Golden creeping jenny is the star of the show and helps to dictate the rest of the color palette in Bonnie’s vibrant front garden. This is such a refreshing departure from the expanse of lawn stand of green shrubs that are all too common in many front yards.
Another angle of the front. You can see the two weeping spruce (Picea abies ‘Pendula’, Zones 2–8) in the middle of the photo. One is bending over and the other one stayed upright! You never know with those!
The path in front of the spruce leads all the way around to the back side of the garden.
The path continues and crosses the dry river bed, which is hard to see in this pic. The yellow frilly plant on the left is actually a spirea, called Mellow Yellow(Spiraea thunbergii ‘Ogon’, Zones 4–8). You can see another berm (top right) covered in creeping jenny.
Looking to the left from the path, under the blue spruce, there’s a group of hostas and brunneras I planted two years ago. They are doing well under the spruce tree! Yeah! There are also geraniums and Japanese forest grass(Hakonechloa macra, Zones 5–9).
A view looking toward the front yard from the side yard area. The second creeping jenny berm shows prominently here.
Looking toward the side yard to the right, and the patio on the upper left. The north-facing Green Mountain boxwoods(Buxus ‘Green Mountain’, Zones 4–9)seem to do well in this low-light side yard. The gravel path winds around to the back of the house to more planting areas.
A view of part of the side yard. Golden groundsel(Packera aurea, Zones 3–8), ligularias, brunnera, and Purple Dragon lamium(Lamium maculatum ‘Purple Dragon’, Zones 4–9)do well here.
A view from our south patio. Nothing wants to grow against the house in this area. I’ve tried many different plants. The light is pretty low when the tree leaves are out. I tried boxwoods, but the light in the winter was too harsh. Now I’m experimenting with these small shrubs (??) which are in their second season. I divided the brunneras (on the left) last fall—hopefully they will be okay this coming season.
This is my front entryway—I’m still working on it. I keep adding plants to see what will grow. It’s a hard spot with inconsistent light levels. It’s under a pine tree that has been limbed way up.
Thanks for viewing my garden!
And thank you for sharing your garden with us again, Bonnie! From the photos we have already seen of your lush and lively back gardens, it is no surprise that the front and sides of your property are just as vibrant and captivating.
Let the countdown to spring commence! As we inch closer and closer to spring color, lets celebrate the season by looking back on some highlights from previous years. Flip through your folders, scroll through that camera roll and find some photos that show the best spring scenes your garden has to offer, then follow the NEW directions below to submit your photos to Garden Photo of the Day!
We want to see YOUR garden!
Have photos to share? We’d love to see your garden, a particular collection of plants you love, or a wonderful garden you had the chance to visit!
You can also send 5–10 photos to [email protected] along with some information about the plants in the pictures and where you took the photos. We’d love to hear where you are located, how long you’ve been gardening, successes you are proud of, failures you learned from, hopes for the future, favorite plants, or funny stories from your garden.
Do you receive the GPOD by email yet? Sign up here
Fine Gardening Recommended Products
ARS Telescoping Long Reach Pruner
Fine Gardening receives a commission for items purchased through links on this site, including Amazon Associates and other affiliate advertising programs.
Telescopes from 4 to 7′. Cut and Hold (160) Blades. Drop forged blades for unsurpassed long lasting sharpness. Lightweight, 2.3 lbs., for continued use. Perfectly balanced for easy pruning.
SHOWA Atlas 370B Nitrile Palm Coating Gloves, Black, Medium (Pack of 12 Pairs)
Fine Gardening receives a commission for items purchased through links on this site, including Amazon Associates and other affiliate advertising programs.
Lightweight and close-fitting for excellent dexterity. Machine washable. Breathable back of hand to reduce perspiration. Designed for easy movement and continuous wear. Ideal for aerospace, assembly, automotive, construction, final fix, gardening, manufacturing, operating machinery, packaging, precision handling, tiling, warehousing.
Planting in a Post-Wild World: Designing Plant Communities for Resilient Landscapes
Fine Gardening receives a commission for items purchased through links on this site, including Amazon Associates and other affiliate advertising programs.
Featuring gorgeous photography and advice for landscapers, Planting in a Post-Wild World by Thomas Rainer and Claudia West is dedicated to the idea of a new nature—a hybrid of both the wild and the cultivated—that can nourish in our cities and suburbs.
Make the best French toast casserole for breakfast or a weekend brunch. Perfectly textured, lightly sweetened with maple syrup, and easy to prep ahead.
Price: $15.97 - $13.97 (as of Mar 09, 2026 09:34:30 UTC – Details)
KANGFITER Non-Slip Fabric Resistance Bands for Working Out, Loop Exercise Bands for Booty Leg, Butt, Glute, Stretch Workout Bands for Women & Men, Hip Elastic Bands for Home Gym Fitness, Yoga, Pilates 【HIGH-QUALITY FABRIC MATERIALS】: KANGFITER resistance bands are made of high-quality fabric materials with exquisite weaving techniques. Premium materials enhance the comfort and durability of the hip exercise band, preventing it from breaking and rolling over during use. 【NON-SLIP AND DURABLE】: Fabric and elastic latex interweave technology prevents booty bands from slipping during workouts. Inner latex increases the elasticity and durability of elastic band to avoid losing elasticity and tension after frequent stretching. 【3 RESISTANCE LEVELS】: 3 resistance levels meet the workout needs of both beginners and experienced athletes. Choose right hip band according to your own strength and exercise goals at different stages. 3 workout bands are the same length, no need to adjust the range of body movement. 【MULTIPURPOSE】: Resistance bands can exercise arms, abdomen, buttocks and legs, help you shape a healthy and perfect body, increase muscle endurance and strength. Exercise bands are suitable for many workouts and activities including P90x, CrossFit, Yoga, Insanity, Pilates, Hot Yoga, and Beach Body workouts. 【PORTABLE AND ANYWHERE FITNESS】: KANGFITER resistance band comes with a handy carrying bag, making it easy to store and take with you. Whether you’re at home, in the gym, in the office or outdoors, you can exercise and shape yourself whenever you want.
If you let cucumber vines sprawl all over the garden, things can get messy pretty fast. The vines spread across the ground, tangle with other plants, and before you know it, they’ve taken over a big chunk of your garden.
In small gardens especially, this can make the area look cluttered and harder to manage.
Instead of spreading everywhere, using cucumber trellis supports the vine to grow upwards. This keeps the plants tidy, easier to manage, and frees up valuable space so you can grow more plants in the same garden.
You don’t have to go for expensive garden structures to support your plants.
A simple DIY cucumber trellis can be made with basic materials like wood, wire, or garden netting, making it an easy and budget-friendly way to keep your cucumber plants growing neatly.
Best Material to Build Cucumber Trellis
Wood is a popular choice for building a cucumber trellis. Wooden stakes, bamboo poles, or simple wooden frames are easy to work with and provide strong support for climbing vines.
They’re also widely available and blend naturally into the garden, making them great for simple A-frame or ladder-style trellises.
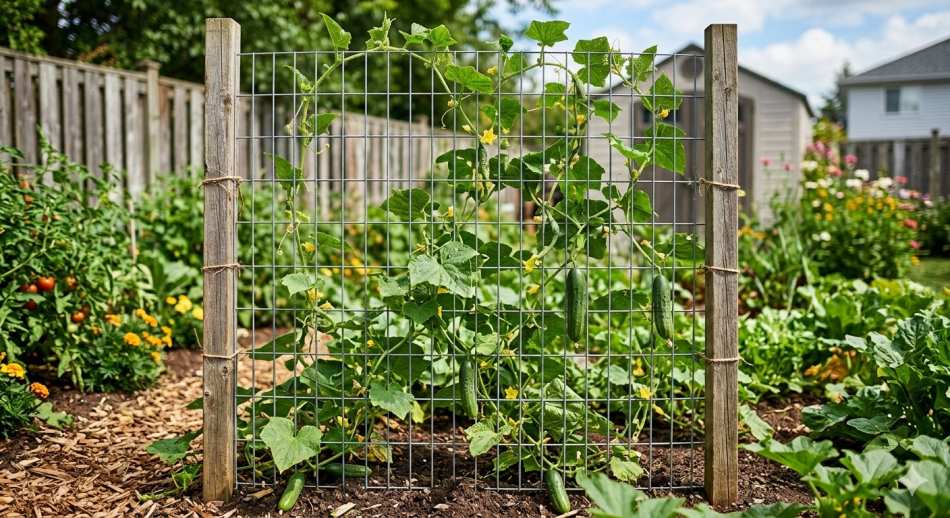
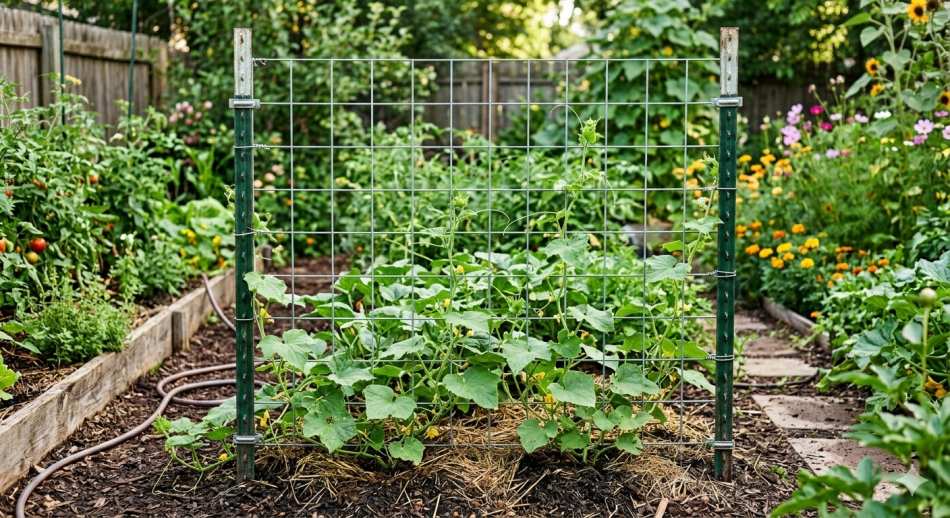
Metal wire or fencing is another reliable option. Materials like wire mesh, cattle panels, or garden fencing are sturdy and long-lasting.
The open grid design allows cucumber tendrils to easily grab and climb, while the strong structure can support the weight of vines and developing cucumbers.
You can also use garden netting or nylon trellis mesh if you want something lightweight and budget-friendly.
It’s simple to attach to stakes or a frame, and cucumber vines quickly latch onto it as they grow upward. This option works especially well in small gardens where you need a quick and flexible trellis setup.
18 Cucumber Trellis Ideas for Small Spaces
When you’re gardening in a small space, letting cucumber vines spread on the ground can quickly take up valuable room.
Using a trellis helps train the vines to grow vertically, keeping the garden neat while making the most of limited space.
1. A-Frame Cucumber Trellis
You can build this trellis using simple materials like wooden stakes, bamboo poles, or two small wooden frames.
Place the supports in an A-shape so they lean against each other and secure them at the top with screws or garden ties. Then attach wire mesh, garden netting, or fencing across the sides so cucumber vines have something to climb on.
This design works really well in small gardens because it uses vertical space without taking up much ground area. The vines grow up both sides of the frame, keeping the plants neat and off the soil.
It also makes harvesting easier and leaves more space around the bed for other vegetables.
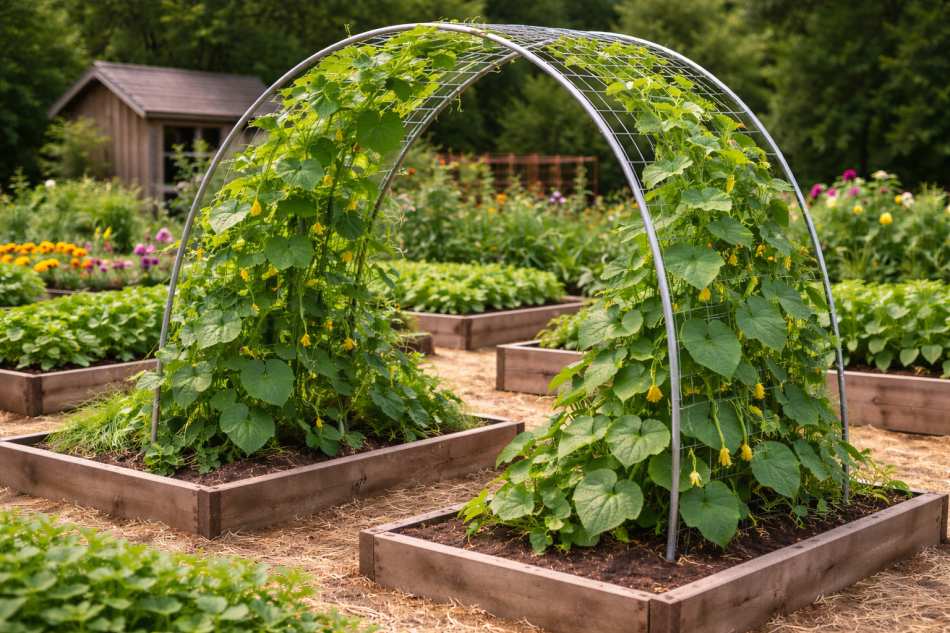
2. Arched Cucumber Trellis
An arched cucumber trellis can be made using sturdy metal panels, cattle panels, or a ready-made garden arch.
Install the arch firmly in the ground or position it between two raised beds or large planters. As the cucumber vines grow, guide them toward the arch so they naturally climb up and across the curved structure.
This type of trellis helps maximize garden space by encouraging vertical growth while also adding a decorative touch. The arch can create a charming walkway or entrance in the vegetable garden, making the space look more inviting.
Although it may cost a bit more than simple trellis designs, it is durable and strong enough to support heavier climbing crops as well.
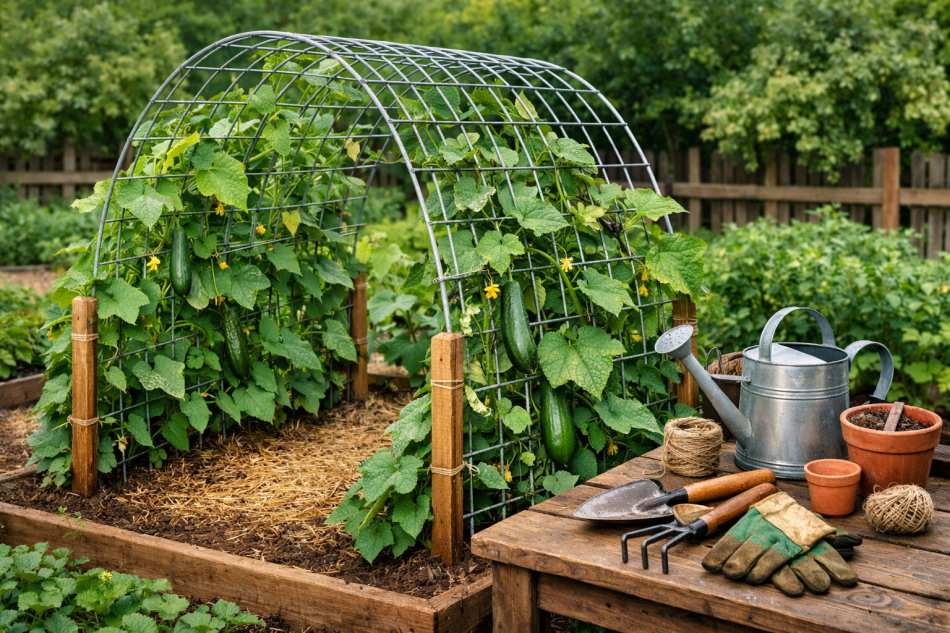
Using a cattle panel is a simple way to create a strong cucumber trellis. The metal panel can be secured upright in the soil with wooden or metal stakes, or slightly bent to form a supportive climbing structure. Its wide metal grid gives cucumber vines plenty of places to grab and climb as they grow.
This setup works well for small gardens because it encourages cucumbers to grow upward instead of spreading across the ground.
The sturdy metal frame easily supports mature vines and heavy fruits while keeping the garden area neat. It’s also very durable, so it can be reused for many growing seasons.
4. Bamboo Teepee Trellis
You can easily make this trellis using 4–6 bamboo poles. Push the poles into the soil in a circle and tie the tops together with garden twine to form a teepee shape.
You can also wrap some string around the poles to give cucumber vines more spots to grab as they climb.
This design works great for small gardens because it takes up very little ground space. The vines grow upward around the poles, keeping the plants neat and making harvesting cucumbers much easier.
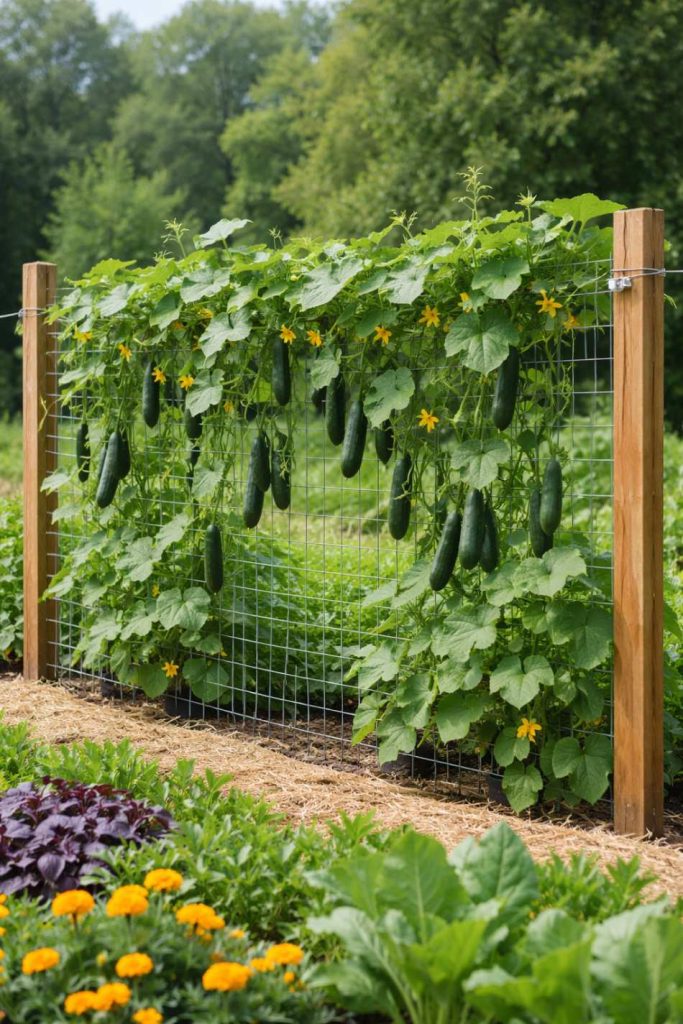
5. Wire Fence Trellis
A simple wire fence can easily be turned into a cucumber trellis. Just secure a piece of wire fencing or garden mesh between two wooden stakes or attach it to an existing fence. The open grid makes it easy for cucumber vines to grab and climb as they grow.
This option works well for small gardens because it grows cucumbers vertically along a narrow space.
It keeps vines off the ground, improves air circulation, and leaves more room in the garden for other plants.
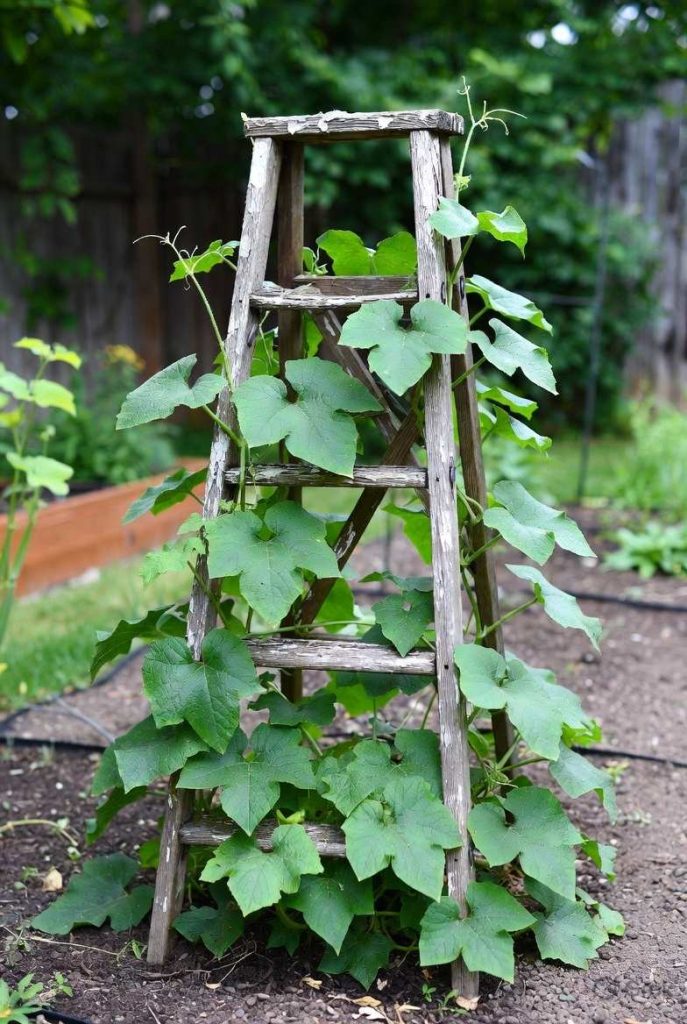
An old wooden ladder can be easily turned into a cucumber trellis. Simply place the ladder in the garden bed and secure it firmly in the soil so it stands stable. The horizontal steps act as natural supports where cucumber vines can climb and spread.
This is a great option for small gardens because it uses vertical space without needing much room on the ground. It also makes harvesting cucumbers easier since the fruits hang down between the ladder steps.
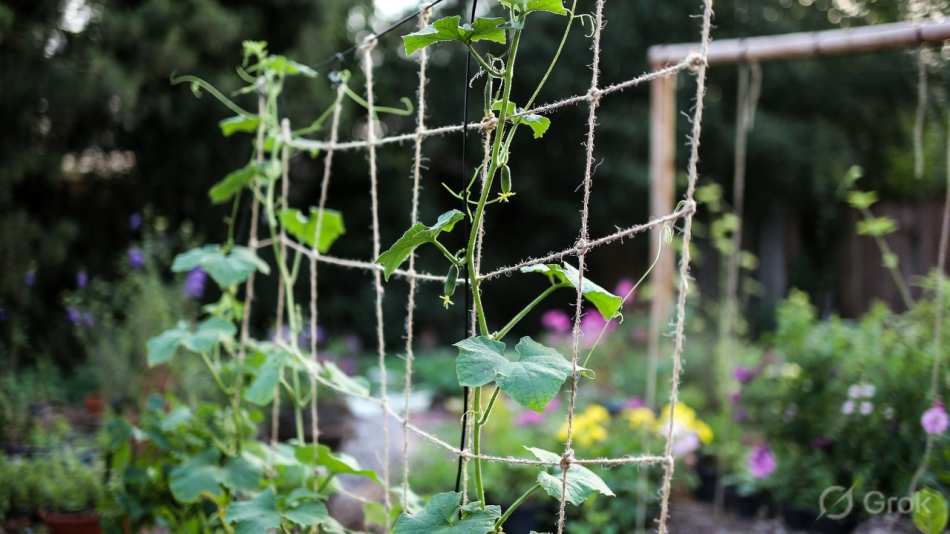
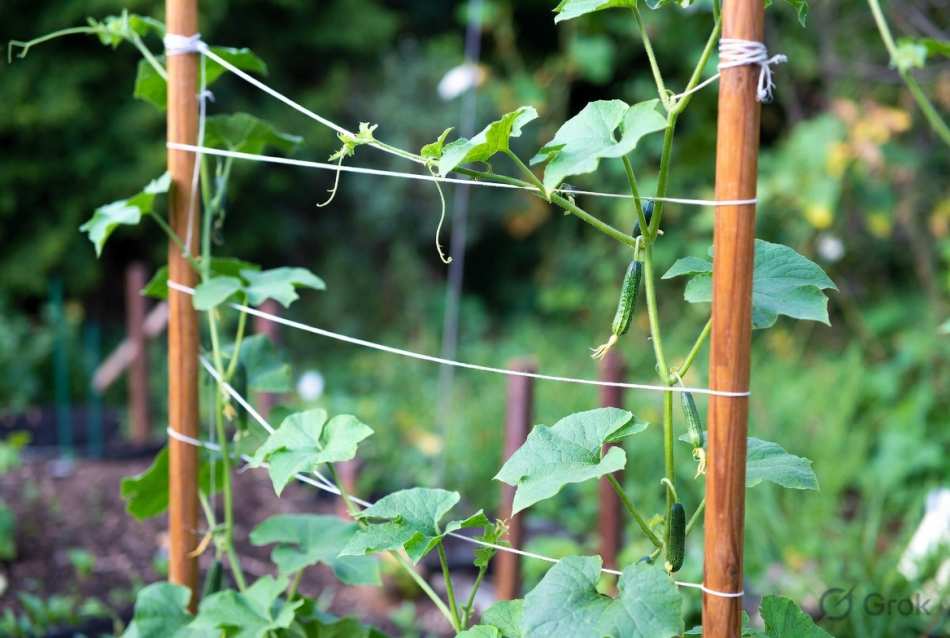
7. String Trellis
This trellis works well in small gardens because it takes up very little space while helping cucumber vines grow upward. By guiding the plants vertically, it keeps the garden neat and leaves more room for other vegetables.
To build it, tie strong garden twine or string from the base of the plant up to a horizontal support like a wooden frame, pole, or overhead beam. As the cucumber vines grow, gently wrap them around the string so they can climb easily.
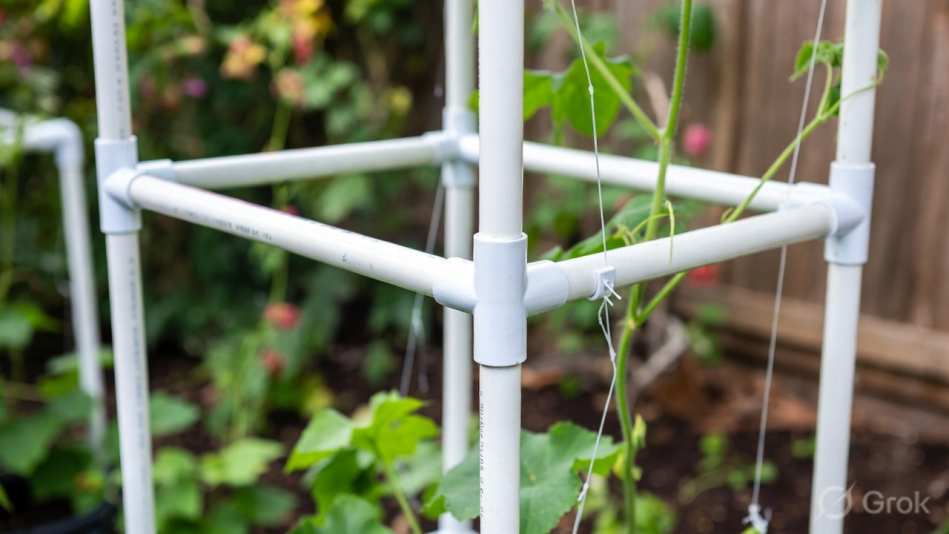
8. PVC Pipe Trellis
This trellis is helpful for small gardens because it keeps cucumber vines growing upward instead of spreading across the ground. By using vertical space, it helps keep the garden organized and leaves more room for other plants.
To build it, create a simple frame using PVC pipes and connectors.
Once the frame is in place, attach garden netting or plastic mesh across it so cucumber vines have something to climb. PVC is lightweight, affordable, and easy to assemble.
9. Metal Grid Trellis
Metal grid panels or wire mesh make a strong and reliable material for a cucumber trellis. You can secure the panel upright using wooden or metal stakes, or attach it to a garden bed frame. The grid openings give cucumber vines plenty of places to latch onto as they climb.
This setup works well in small gardens because it encourages vertical growth and keeps vines off the ground. The sturdy metal structure can easily support growing vines and cucumbers while helping keep the garden neat and easier to manage.
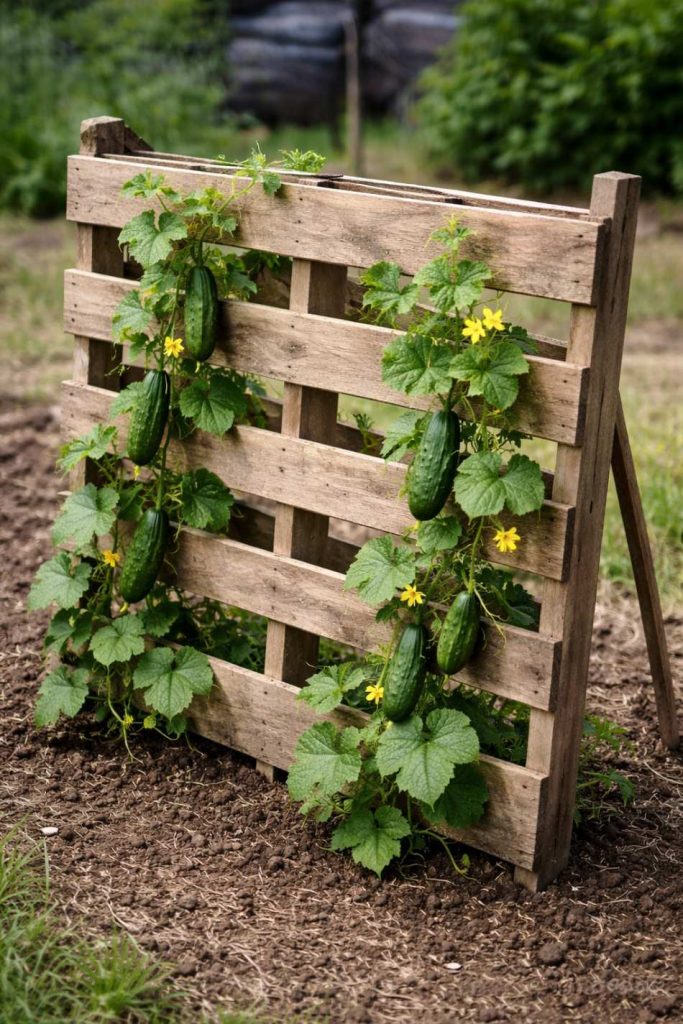
10. Wooden Pallet Trellis
A wooden pallet can easily be repurposed into a cucumber trellis. Simply stand the pallet upright in the garden and secure it firmly with stakes so it stays stable. The gaps between the wooden slats allow cucumber vines to grab and climb naturally.
This is a great option for small gardens because pallets are narrow and don’t take up much ground space. The vertical structure keeps cucumber vines off the soil and helps make better use of limited garden space.
Garden netting is a lightweight and affordable material for supporting cucumber vines. Stretch the netting between two wooden stakes or attach it to a simple frame so the plants have something to climb. As the vines grow, they easily grab onto the netting.
This setup works well in small gardens because it takes up very little space and encourages vertical growth. It keeps the vines off the ground and helps you use limited garden space more efficiently.
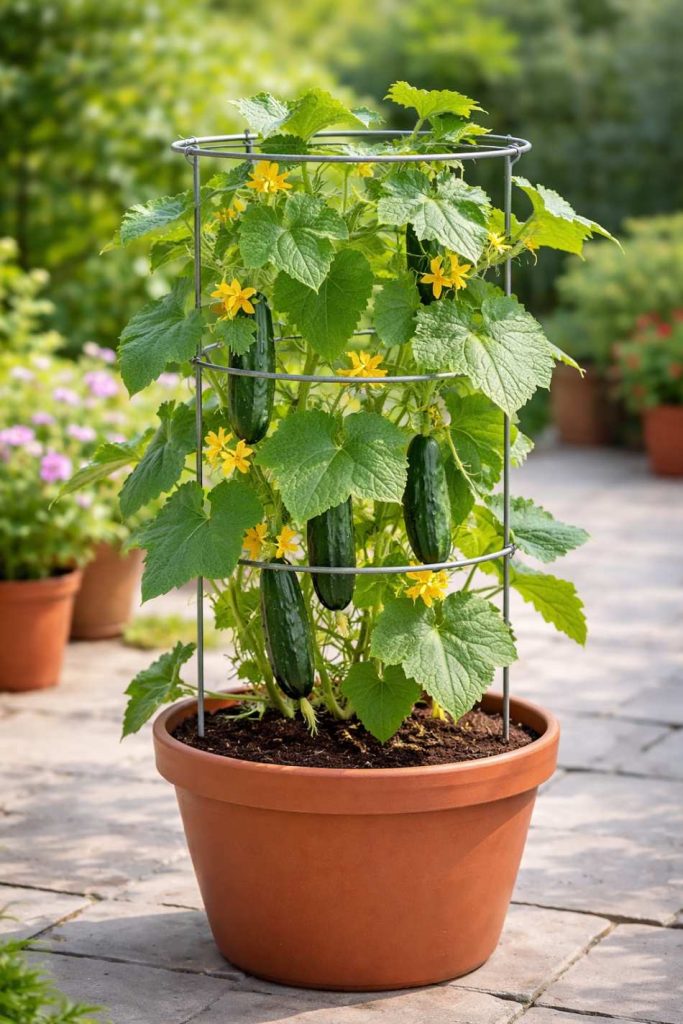
12. Tomato Cage Trellis
A tomato cage can also be used to support cucumber plants. Just place the cage over a young cucumber plant and push the legs into the soil so it stays steady. As the plant grows, guide the vines to climb around the cage.
This is a simple option for small gardens because it doesn’t take up much space. The vines grow upward around the cage, keeping the plant neat and making it easier to pick cucumbers.
13. Wooden Stakes Trellis
Wooden stakes are a simple material you can use to support cucumber plants. Push two or three stakes into the soil near the plant and tie garden twine between them. The cucumber vines will climb along the strings as they grow.
This setup works well in small gardens because it takes up very little space. It helps the vines grow upward instead of spreading on the ground, leaving more room for other plants.
14. Fence Trellis
A garden fence can easily work as a cucumber trellis. Plant your cucumbers close to the fence and guide the young vines toward it. The fence wires or slats will give the vines plenty of support as they climb.
This is a great option for small gardens because it uses a structure that is already there. The vines grow upward along the fence instead of spreading across the ground, saving valuable garden space.
15. Branch Trellis
Tree branches can make a simple and natural cucumber trellis. Collect a few sturdy branches and push them into the soil around the plant, leaning them together or crossing them to form a support. You can tie them with twine if needed to keep them stable.
This is a great option for small gardens because it uses free, natural materials and takes up very little space. The vines climb along the branches, keeping the plant off the ground and making better use of the garden area.
Poles and strong garden string can be used to create a simple cucumber trellis. Place two sturdy poles in the soil and tie several strings from the top of the poles down to the base near the plants. As the cucumbers grow, gently guide the vines to wrap around the strings.
This method works well in small gardens because it uses vertical space without taking up much room on the ground. It keeps the vines tidy and makes watering and harvesting easier.
17. T-Post Trellis
Metal T-posts are strong and easy to use for a cucumber trellis. Place two T-posts in the soil and attach wire mesh or garden fencing between them. The open grid gives cucumber vines plenty of support to climb as they grow.
This setup works well in small gardens because it is narrow and uses vertical space. The strong metal posts hold the trellis firmly, while the climbing vines stay off the ground and easier to manage.
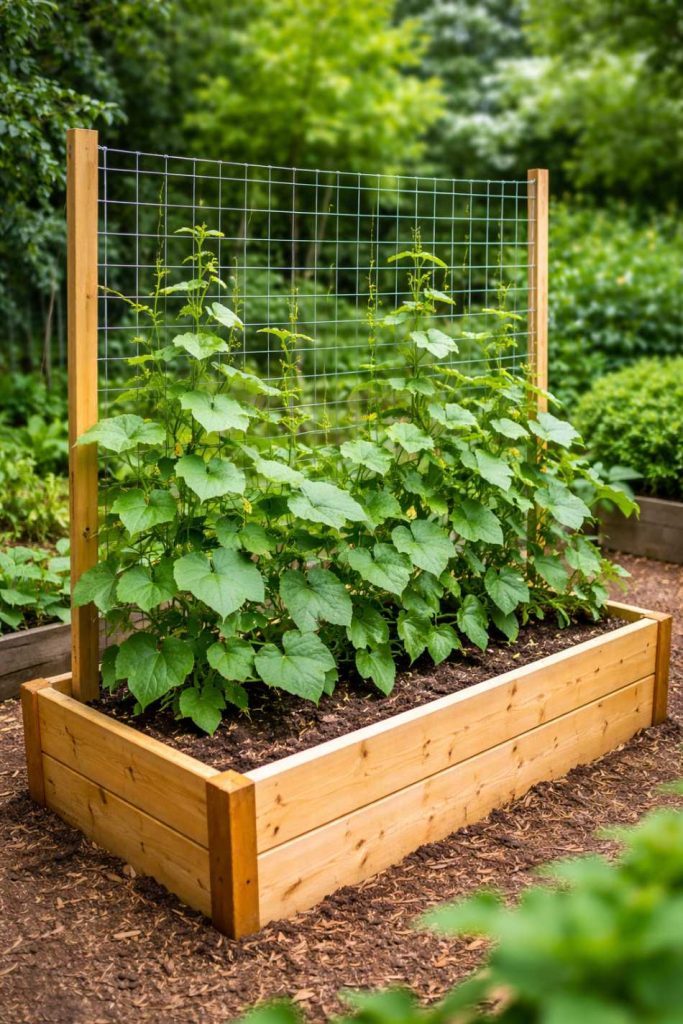
18. Raised Bed Trellis
A trellis can also be attached directly to a raised garden bed. Fix wooden stakes or a metal panel to the sides of the bed and add garden netting or wire mesh for the vines to climb. This creates a simple support right where the cucumbers are planted.
This idea is helpful for small gardens because it keeps everything contained within the raised bed. The vines grow upward instead of spreading out, which saves space and keeps the garden area neat.
Growing cucumbers in a small garden doesn’t have to feel crowded or messy. With the right trellis, you can guide the vines to grow upward and make much better use of the space you have.
Vertical growing also keeps plants healthier, improves airflow, and makes harvesting easier.
Whether you choose a simple DIY setup or a sturdy long-lasting structure, a trellis helps keep your cucumber plants organized and productive.
With these cucumber trellis ideas, even a small garden can grow plenty of fresh cucumbers without taking up too much space.
Khaja Moinuddin, a computer science graduate, finds joy in gardening and homesteading. Join him on this blog as he shares his experiences in homesteading, gardening, and composting
Price: $49.90 - $44.90 (as of Mar 08, 2026 21:33:21 UTC – Details)
From the brand
To the Top Sellers
To the Top Sellers
✅ VERSATILE STRENGTH BANDS – Our long resistance bands offer a wide range of workout possibilities. Choose from various strengths: EXTRA LIGHT, LIGHT, MEDIUM, and HEAVY. Available individually or as part of the Pullup & Dip Resistance Bands Set, which includes different band strengths. PLEASE NOTE: Only the set includes a door anchor and a convenient carrying bag. ✅ PREMIUM QUALITY & DURABILITY – Experience the durability of our heavy resistance bands. Made with thick, tear-resistant latex, these bands provide consistent resistance and are stain-free. Our pull up assistance bands are designed to withstand rigorous workouts. ✅ ENHANCE PULL-UP WORKOUTS – Use our pull-up bands for assistance during pull-up exercises. These reliable pull-up assist bands are suitable for beginners and advanced fitness enthusiasts alike, helping you improve your strength and form. ✅ COMPREHENSIVE EXERCISE OPTIONS – Resistance Bands offer endless exercise possibilities. Use them for resistance training, muscle-building, and mobility exercises. Explore the included Resistance Band Guide for a variety of over 30 resistance band exercises. ✅ CONVENIENT AND PORTABLE – Our fitness bands resistance are designed for convenient use anywhere. The compact size and included carrying bag allow for easy transportation to the gym, park, or while traveling. Enjoy the freedom to train with elastic band exercises, anytime and anywhere. Please note, the door anchor and carrying bag are included only in the Resistance Bands Set.


")


 and Exercise Guide – Single & in Value Set, Pull-Up Band Fitness Band for Calisthenics")


